


该部门做的产品是面象各大银行出售的,所以对于不同银行需要去新建一些工程,每次的创建工程都是在之前的项目中拷贝出所有的配置文件,删除没必要的业务代码,每次搭建感觉老是在做无用功,所有就有了搭建一个自己的模板生成的教授叫,在网上看了一下用yeoman来搭建比较简单,所以自己的项目的模板也用yeoman来搭建,在此记录搭建的步骤和理解。(基于window来创建的)
准备工作
首先需要电脑安装node.js,版本需要在4.0以上
node -v 来查看node的版本 npm -v查看npm的版本
全局安装yeoman
npm install -g yo
创建文件夹
- 一个文件夹以generator-xxxxx为命名,xxxxx为你取的名字
- 在这个文件下打开cmd,输入下面命令
npm init
你按照控制台的提示输入相对的信息,输入完成后会子啊该文件下生成一个package.json文件。 - * 在文件夹下创建一个app文件夹,在app目录下创建一个templates文件夹,templates文件夹下就可以创建我们需要的模板信息了*
- 在templates目录下创建index.js文件
安装插件
在这个控制执行 npm install 安装相关插件,我用的的插件如下:
“chai”: “^3.3.0”,
“chalk”: “^1.1.1”,
“deep-extend”: “^0.6.0”,
“fs-extra”: “^0.24.0”,
“inquirer-npm-name”: “^3.0.0”,
“lodash”: “^4.17.10”,
“mkdirp”: “^0.5.1”,
“mocha”: “^2.3.3”,
“yeoman-generator”: “^2.0.1”,
“yosay”: “^1.0.5”
最主要的是yeoman-generator插件,其它的是辅助,比如chalk在控制台输出不同颜色的日志
对在templates目录下创建的index.js进行编辑,也是最主要的部分。
用的yeoman-generator中的一些方法进行管理,其基本的流程如下 constructor·····>prompting·····>info·····>default·····>writing·····>conflicts·····>install·····>end;下面单独数一下用的方法- index.js的大概样式
const path = require('path');
const Generator = require('yeoman-generator');
module.exports = class extends Generator {
    constructor(args, opts) {
        super(args, opts);
    }
    prompting() { //和用户交互的时候(命令行问答之类的)调用
        、、、、、
    }
    info() {
        this.log(chalk.green(
            'I am going to build your app!'
        ));
    }
    default () {
、、、、、
    }

    writing() {
        、、、、、、、
    }

    conflicts() {
        、、、、、、
    }

    install() {
        、、、、
    }
    end() {
        、、、、、
    }
}- prompting:该方法是与用户进行交互,记录用户输入的信息
 prompting() { //和用户交互的时候(命令行问答之类的)调用
        this.appname = "template-react"
        var questions = [{
            name: 'projectAssets',
            type: 'list',
            message: '请选择模板:',
            choices: [{
                name: 'pc端',
                value: 'pc',
                checked: true
            }, {
                name: 'mobile端',
                value: 'mobile'
            }, {
                name: 'react+webpack纯洁版',
                value: 'pure'
            }]
        }, {
            type: 'input',
            name: 'projectName',
            message: '输入项目名称',
            default: this.appname
        }, {
            type: 'input',
            name: 'buildName',
            message: '打包输出文件名字',
            default: "build"
        }, {
            type: 'input',
            name: 'projectAuthor',
            message: '项目开发者',
            store: true,
            default: 'hcl'
        }, {
            type: 'input',
            name: 'projectVersion',
            message: '项目版本号',
            default: '0.0.1'
        }, {
            type: 'input',
            name: 'projectDescription',
            message: '项目描述',
            store: true,
            default: 'hcl'
        }]
        return this.prompt(questions).then(
            function(answers) {

                for (var item in answers) {
                    // 把answers里的内容绑定到外层的this,便于后面的调用
                    answers.hasOwnProperty(item) && (this[item] = answers[item]);
                }
            }.bind(this));
    }
其中this.prompt是yeoman-generator中的方法,传入一个数组对象,数组包含需要与用户交互的信息,返回用户选择或者输入的信息,返回用户选择或者输入的信息后把信息全部保存到当前的this对象中。
- writing:该方法中可以以做对于你需要的生成哪个模板的拷贝
writing() {
        let addField = "const outFileName = '" + this.buildName + "';"; //往webpack.config.json添加的字段信息
        if (this.projectAssets == "mobile") { //如果选择的是移动端的模板
            this.fs.copy(
                this.templatePath('mobile'),
                this.destinationPath(this.projectName)
            );
            //往测试的配置文件添加字段
            let testConfig = this.fs.read(this.destinationPath(this.projectName + '/webpack.test.config.js'));
            this.fs.write(this.destinationPath(this.projectName + '/webpack.test.config.js'), addField + EOL + testConfig);
            //往uat添加字段
            let uatConfig = this.fs.read(this.destinationPath(this.projectName + '/webpack.uat.config.js'));
            this.fs.write(this.destinationPath(this.projectName + '/webpack.uat.config.js'), addField + EOL + uatConfig);
            //往生产配置添加字段
            let prodConfig = this.fs.read(this.destinationPath(this.projectName + '/webpack.prod.config.js'));
            this.fs.write(this.destinationPath(this.projectName + '/webpack.prod.config.js'), addField + EOL + prodConfig);


        } else if (this.projectAssets == "pc") { //如果选择pcweb端模板
            this.fs.copy(
                this.templatePath('pc'),
                this.destinationPath(this.projectName)
            );
            //往测试的配置文件添加字段
            let testConfig = this.fs.read(this.destinationPath(this.projectName + '/webpack.test.config.js'));
            this.fs.write(this.destinationPath(this.projectName + '/webpack.test.config.js'), addField + EOL + testConfig);
            //往uat添加字段
            let uatConfig = this.fs.read(this.destinationPath(this.projectName + '/webpack.uat.config.js'));
            this.fs.write(this.destinationPath(this.projectName + '/webpack.uat.config.js'), addField + EOL + uatConfig);
            //往生产配置添加字段
            let prodConfig = this.fs.read(this.destinationPath(this.projectName + '/webpack.prod.config.js'));
            this.fs.write(this.destinationPath(this.projectName + '/webpack.prod.config.js'), addField + EOL + prodConfig);

        } else if (this.projectAssets == "pure") { //react+webpack构建的纯洁版项目
            this.fs.copy(
                this.templatePath('react-webpack'),
                this.destinationPath(this.projectName)
            );
        }

        const currPackage = this.fs.readJSON(this.destinationPath(this.projectName + '/package.json'), {});
        currPackage.name = this.projectName;
        currPackage.version = this.projectVersion;
        currPackage.author = this.projectAuthor;
        currPackage.description = this.projectDescription;
        this.fs.writeJSON(this.destinationPath(this.projectName + '/package.json'), currPackage);
    }
在该方法中对需要模板的拷贝,并且对拷贝后的模板的一些配置文件的修改,比如修改用户输入的信息到模板文件中。其中需要注意的是用到this.fs这个对象,可用的方法见 [ mem-fs-editor ]。
- install:该方法中可以执行命名安装模板需要的插件
目前没有找到方法在创建模板后直接执行npm install,需要在生成的文件夹下的命令窗口手动执行这个命令安装该模板需要的依赖。 - end:最后说一下这个方法
end() {
        this.fs.delete(".yo-rc.json") //删除无用的文件
    }
在完成后目录下会生成.yo-rc.json这个文件,无用直接给删除。
对在templates目录下创建的index.js的完整代码。
/**
* this.fs :"https://github.com/sboudrias/mem-fs-editor"
* @type {[type]}
*/
const path = require('path');
const chalk = require('chalk'); //不同颜色的info
const Generator = require('yeoman-generator');
const yosay = require('yosay'); //yeoman弹出框
const _ = require('lodash');
var EOL = require('os').EOL;
module.exports = class extends Generator {
constructor(args, opts) {
super(args, opts);
}
prompting() { //和用户交互的时候(命令行问答之类的)调用
this.appname = "template-react"
var questions = [{
name: 'projectAssets',
type: 'list',
message: '请选择模板:',
choices: [{
name: 'pc端',
value: 'pc',
checked: true
}, {
name: 'mobile端',
value: 'mobile'
}, {
name: 'react+webpack纯洁版',
value: 'pure'
}]
}, {
type: 'input',
name: 'projectName',
message: '输入项目名称',
default: this.appname
}, {
type: 'input',
name: 'buildName',
message: '打包输出文件名字',
default: "build"
}, {
type: 'input',
name: 'projectAuthor',
message: '项目开发者',
store: true,
default: 'hcl'
}, {
type: 'input',
name: 'projectVersion',
message: '项目版本号',
default: '0.0.1'
}, {
type: 'input',
name: 'projectDescription',
message: '项目描述',
store: true,
default: 'hcl'
}]
return this.prompt(questions).then(
function(answers) {
for (var item in answers) {
// 把answers里的内容绑定到外层的this,便于后面的调用
answers.hasOwnProperty(item) && (this[item] = answers[item]);
}
}.bind(this));
}
info() {
this.log(chalk.green(
'I am going to build your app!'
));
}
default () {
}
writing() {
let addField = "const outFileName = '" + this.buildName + "';"; //往webpack.config.json添加的字段信息
if (this.projectAssets == "mobile") { //如果选择的是移动端的模板
this.fs.copy(
this.templatePath('mobile'),
this.destinationPath(this.projectName)
);
//往测试的配置文件添加字段
let testConfig = this.fs.read(this.destinationPath(this.projectName + '/webpack.test.config.js'));
this.fs.write(this.destinationPath(this.projectName + '/webpack.test.config.js'), addField + EOL + testConfig);
//往uat添加字段
let uatConfig = this.fs.read(this.destinationPath(this.projectName + '/webpack.uat.config.js'));
this.fs.write(this.destinationPath(this.projectName + '/webpack.uat.config.js'), addField + EOL + uatConfig);
//往生产配置添加字段
let prodConfig = this.fs.read(this.destinationPath(this.projectName + '/webpack.prod.config.js'));
this.fs.write(this.destinationPath(this.projectName + '/webpack.prod.config.js'), addField + EOL + prodConfig);
} else if (this.projectAssets == "pc") { //如果选择pcweb端模板
this.fs.copy(
this.templatePath('pc'),
this.destinationPath(this.projectName)
);
//往测试的配置文件添加字段
let testConfig = this.fs.read(this.destinationPath(this.projectName + '/webpack.test.config.js'));
this.fs.write(this.destinationPath(this.projectName + '/webpack.test.config.js'), addField + EOL + testConfig);
//往uat添加字段
let uatConfig = this.fs.read(this.destinationPath(this.projectName + '/webpack.uat.config.js'));
this.fs.write(this.destinationPath(this.projectName + '/webpack.uat.config.js'), addField + EOL + uatConfig);
//往生产配置添加字段
let prodConfig = this.fs.read(this.destinationPath(this.projectName + '/webpack.prod.config.js'));
this.fs.write(this.destinationPath(this.projectName + '/webpack.prod.config.js'), addField + EOL + prodConfig);
} else if (this.projectAssets == "pure") { //react+webpack构建的纯洁版项目
this.fs.copy(
this.templatePath('react-webpack'),
this.destinationPath(this.projectName)
);
}
const currPackage = this.fs.readJSON(this.destinationPath(this.projectName + '/package.json'), {});
currPackage.name = this.projectName;
currPackage.version = this.projectVersion;
currPackage.author = this.projectAuthor;
currPackage.description = this.projectDescription;
this.fs.writeJSON(this.destinationPath(this.projectName + '/package.json'), currPackage);
}
conflicts() {
}
install() {
}
end() {
this.fs.delete(".yo-rc.json") //删除无用的文件
}
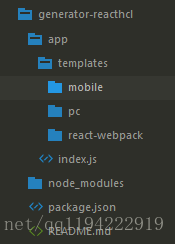
}最后看下我编写模板的完整目录结构
对项目进行测试
编写完后执行
npm link 把项目放到全局变量中
创建一个目录打开控制台执行如下命令
yo reacthcl 按照控制台提示进行输入就会生成不同模板
提交项目到npm官网
首先提交代码到github上然后执行
npm publish 命令发布到npm上面,根据提示进行注册或者是登录npm的账号进行发布
提交到npm后的使用方法
首先安装有node.js
npm install -g yo
npm install -g generator-reacthcl
在一个文件夹下执行 yo reacthcl 根据命令提示安装不同的模板
在生成的模板下执行 npm install 安装模板依赖
再执行 npm run dev 运行项目,
在浏览器中打开http://localhost:8888 就可以看到运行的项目
执行 npm run test 或者 npm run uat 或者 npm run build会生成对应的打扮文件
注意:纯的react+webpack项目没有build命令 只有mobile和pc有


 578
578


 被折叠的 条评论
为什么被折叠?
被折叠的 条评论
为什么被折叠?
 到【灌水乐园】发言


