


1、RuoYi-Cloud部署实战
1、项目
https://gitee.com/y_project/RuoYi-Cloud
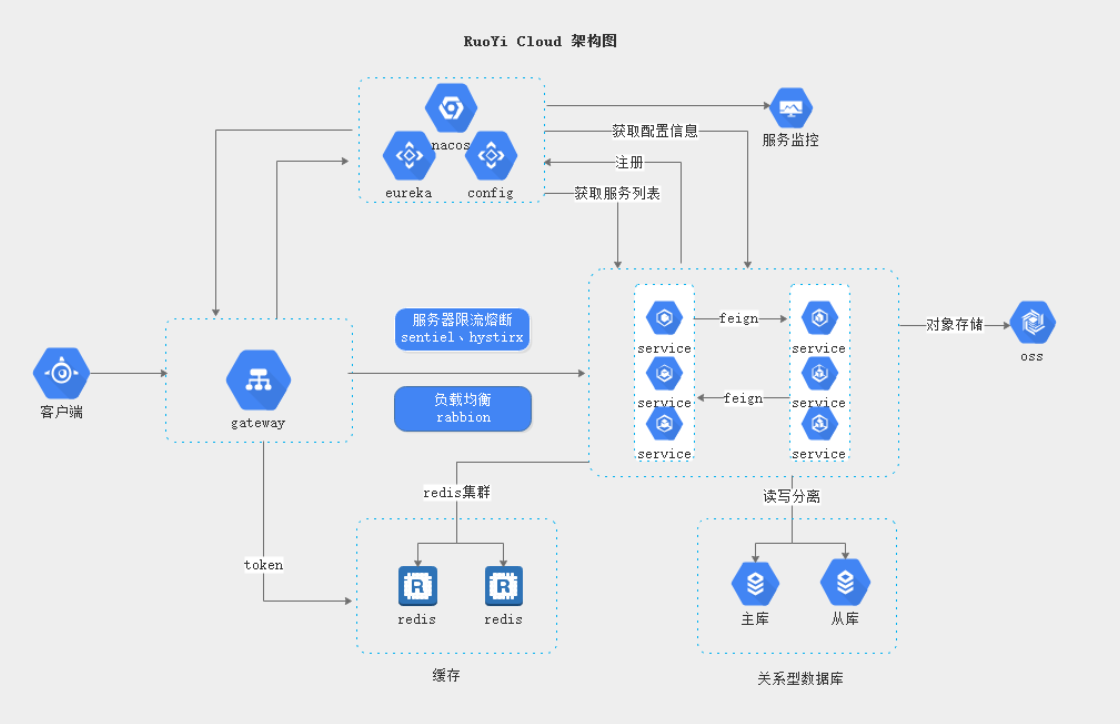
2、架构
https://gitee.com/zhangmrit/ruoyi-cloud/blob/nacos/doc/ruoyi-cloud.png
1、nacos
配置
http://nacos.io/zh-cn/docs/v2/guide/admin/deployment.html
- 去github下载即可
更改nacos的配置文件
- application.properties 放开这些。
#*************** Config Module Related Configurations ***************#
### If use MySQL as datasource:
spring.datasource.platform=mysql

### Count of DB:
db.num=1

### Connect URL of DB:
db.url.0=jdbc:mysql://127.0.0.1:3306/ry-config?characterEncoding=utf8&connectTimeout=1000&socketTimeout=3000&autoReconnect=true&useUnicode=true&useSSL=false&serverTimezone=UTC
db.user.0=root
db.password.0=123456
数据库统一改为 ry-config,使用若依的表结构创建。
-
创建 nacos 数据库,utf8字符集。不用。
-
导入配置文件目录的表文件:mysql-schema.sql。不用。
启动和访问
启动:
cmd startup.cmd -m standalone
http://localhost:8848/nacos/#/login
账号密码:nacos
2、若依表创建
1. 配置文件表
- sql 文件下的 ry_config_20220929.sql,导入到数据库。
进入Nacos配置中心,看到 ruoyi-system-dev.yml 的,数据库,redis等连接信息,要改的。
2. 数据库业务表
- ry_20220814.sql
- 查看配置文件,发现数据库为:jdbc:mysql://localhost:3306/ry-cloud
3. 调度模块表
-
发现调度模块,ruoyi-job-dev.yml的配置文件,依然是 ry-cloud
-
导入 quartz.sql
4. 分布式事务表
- ry_seata_20210128.sql
- seata框架做的 分布式事务。
3、修改若依的数据库配置连接
- ruoyi-job-dev.yml
- gen-dev.yml是代码生成器,不启动。不用管。
- ruoyi-system-dev.yml
启动前端项目
- 要先安装 node js
# 进入项目目录
cd ruoyi-ui

# 建议不要直接使用 cnpm 安装依赖,会有各种诡异的 bug。可以通过如下操作解决 npm 下载速度慢的问题
npm install --registry=https://registry.npmmirror.com

# 启动服务
npm run dev
4、Seata 和 分布式事务
Seata 是一款开源的分布式事务解决方案,致力于提供高性能和简单易用的分布式事务服务。Seata 将为用户提供了 AT、TCC、SAGA 和 XA 事务模式,为用户打造一站式的分布式解决方案
Seata基于上述架构提供了四种不同的分布式事务解决方案:
-
XA模式:强一致性分阶段事务模式,牺牲了一定的可用性,无业务侵入
-
TCC模式:最终一致的分阶段事务模式,有业务侵入
-
AT模式:最终一致的分阶段事务模式,无业务侵入,也是Seata的默认模式
-
SAGA模式:长事务模式,有业务侵入
分布式事务管理中有三个重要的角色:
TC (Transaction Coordinator)-事务协调者:维护全局和分支事务的状态,协调全局事务提交或回滚。
TM (Transaction Manager)-事务管理器:定义全局事务的范围、开始全局事务、提交或回滚全局事务。
RM(Resource Manager)-资源管理器:管理分支事务处理的资源,与TC交谈以注册分支事务和报告分支事务的状态,并驱动分支事务提交或回滚。
5、修改redis
-
ruoyi-gateway-dev.yml
-
ruoyi-auth-dev.yml
-
ruoyi-system-dev.yml
-
ruoyi-job-dev.yml
-
ruoyi-gen-dev.yml 因为不用,就不改了。
6、登录
http://localhost/login
- admin
- admin123
Istio
Istio是一个Service Mesh形态的用于服务治理的开放平台。其中“Service Mesh形态"可以理解为Istio实现了Service Mesh,它是第二代Service Mesh的典型代表
Istio 提供一种简单的方式来为已部署的服务建立网络
mesh
英
/meʃ/

n.
网,网状物;错综复杂的局面,陷阱,圈套;网眼,网孔;网状结构,互相交织的结构;(计算机)网格,格网;(计算机)网状网络(尤指 n 维点阵)

v.
啮合;吻合,匹配,适合;(使)交缠在一起;将……转化成网格,将……生成网格;以网捕捉
2、上云优化
-
1、每个微服务准备
bootstrap.properties,配置 nacos地址信息。默认使用本地 -
2、每个微服务准备Dockerfile,启动命令,指定线上nacos配置等。
-
3、每个微服务制作自己镜像。
-
中间件
有状态、数据导入 -
微服务
无状态、制作镜像 -
网络
各种访问地址 -
配置
生产配置分离、URL
数据库部署注意
-
如果在创建 有状态副本集的时候,添加存储卷。此存储卷和 副本集绑定。
- 如:输入的名字 his-mysql,
- 副本集的名字为:his-mysql-0
- 存储卷的名字:mysql-pvc-his-mysql-0
- 此时在添加 副本,有1 个变两个,存储卷会增加。
- 多个副本,存储卷 不同,会负载均衡。存储卷只能删除。
- 如:输入的名字 his-mysql,
-
所以:多个myql读取 一个存储卷没 这个问题。但 不合理。
-
如果想 每个mysql 都有自己的存储卷,还要用 其他 数据库 同步的技术。
-
另外 nfs的配置,手动删除了 存储卷,这里没设置备份
parameters:
  archiveOnDelete: "true"  ## 删除pv的时候,pv的内容是否要备份
archive
英
/ˈɑːkaɪv/
n.
存档材料,档案;档案室
v.
把……存档,把……归档
nacos 部署
http://nacos.io/zh-cn/docs/v2/guide/admin/cluster-mode-quick-start.html
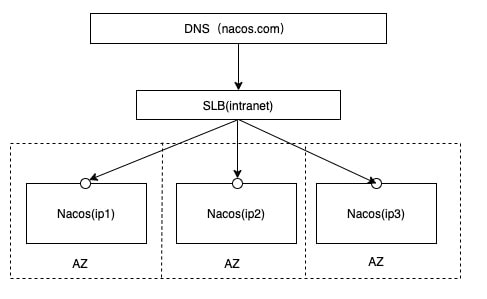
http://nacos.com:port/openAPI 域名 + SLB模式(内网SLB,不可暴露到公网,以免带来安全风险),可读性好,而且换ip方便,推荐模式
-
SLB 服务负载均衡,就是 k8s的 svc
-
配置集群配置文件
在nacos的解压目录nacos/的conf目录下,有配置文件cluster.conf,请每行配置成ip:port。(请配置3个或3个以上节点)
# ip:port。
200.8.9.16:8848 #k8s中 IP会变动,这里要写固定的域名。
200.8.9.17:8848
200.8.9.18:8848
从服务页面 处部署
- 创建有状态服务
- 名字:his-nacos,描述:注册中心和配置中心
- 容器:nacos/nacos-server:v2.0.3
- 指定端口为:8848
- 同步主机时区
ping 域名
ping his-nacos.his

#				his-nacos.his.svc.cluster.local 这是就是 his-nacos.his 的简写。
#his-nacos-v1-0.his-nacos.his.svc.cluster.local 本次:ping 到了pod0名字为:his-nacos-v1-0
PING his-nacos.his.svc.cluster.local (192.168.104.28) 56(84) bytes of data.

64 bytes from his-nacos-v1-0.his-nacos.his.svc.cluster.local (192.168.104.28): icmp_seq=1 ttl=64 time=0.020 ms

#pod名 + 总域名(服务名+项目名)+ .svc + .cluster.local
ping his-nacos-v1-1.his-nacos.his.svc.cluster.local #ping pod1
配置挂载
- 进入容器
/home/nacos/conf
application.properties  cluster.conf
创建 配置
-
名字:nacos-conf
-
键为:cluster.conf
-
值为:提前写好。
# # Copyright 1999-2021 Alibaba Group Holding Ltd. # # Licensed under the Apache License, Version 2.0 (the "License"); # you may not use this file except in compliance with the License. # You may obtain a copy of the License at # # http://www.apache.org/licenses/LICENSE-2.0 # # Unless required by applicable law or agreed to in writing, software # distributed under the License is distributed on an "AS IS" BASIS, # WITHOUT WARRANTIES OR CONDITIONS OF ANY KIND, either express or implied. # See the License for the specific language governing permissions and # limitations under the License. # #it is ip #example his-nacos-v1-0.his-nacos.his.svc.cluster.local:8848 his-nacos-v1-1.his-nacos.his.svc.cluster.local:8848 his-nacos-v1-2.his-nacos.his.svc.cluster.local:8848 -
键为:application.properties
-
值为:注意,我复制的是 nacos-server-2.2.0的配置
- 还有msyql要改好。
- 查看 mysql 的svc:DNS 为:his-mysql-node.his (老师的是内网访问,没加node)
- 测试了:端口不配置也行。最好配置。
- 查看 mysql 的svc:DNS 为:his-mysql-node.his (老师的是内网访问,没加node)
# # Copyright 1999-2021 Alibaba Group Holding Ltd. # # Licensed under the Apache License, Version 2.0 (the "License"); # you may not use this file except in compliance with the License. # You may obtain a copy of the License at # # http://www.apache.org/licenses/LICENSE-2.0 # # Unless required by applicable law or agreed to in writing, software # distributed under the License is distributed on an "AS IS" BASIS, # WITHOUT WARRANTIES OR CONDITIONS OF ANY KIND, either express or implied. # See the License for the specific language governing permissions and # limitations under the License. # #*************** Spring Boot Related Configurations ***************# ### Default web context path: server.servlet.contextPath=/nacos ### Include message field server.error.include-message=ALWAYS ### Default web server port: server.port=8848 #*************** Network Related Configurations ***************# ### If prefer hostname over ip for Nacos server addresses in cluster.conf: # nacos.inetutils.prefer-hostname-over-ip=false ### Specify local server's IP: # nacos.inetutils.ip-address= #*************** Config Module Related Configurations ***************# ### If use MySQL as datasource: spring.datasource.platform=mysql ### Count of DB: db.num=1 ### Connect URL of DB: db.url.0=jdbc:mysql://his-mysql-node.his:3306/ry-config?characterEncoding=utf8&connectTimeout=1000&socketTimeout=3000&autoReconnect=true&useUnicode=true&useSSL=false&serverTimezone=UTC db.user.0=root db.password.0=123456 ### Connection pool configuration: hikariCP db.pool.config.connectionTimeout=30000 db.pool.config.validationTimeout=10000 db.pool.config.maximumPoolSize=20 db.pool.config.minimumIdle=2 #*************** Naming Module Related Configurations ***************# ### If enable data warmup. If set to false, the server would accept request without local data preparation: # nacos.naming.data.warmup=true ### If enable the instance auto expiration, kind like of health check of instance: # nacos.naming.expireInstance=true ### Add in 2.0.0 ### The interval to clean empty service, unit: milliseconds. # nacos.naming.clean.empty-service.interval=60000 ### The expired time to clean empty service, unit: milliseconds. # nacos.naming.clean.empty-service.expired-time=60000 ### The interval to clean expired metadata, unit: milliseconds. # nacos.naming.clean.expired-metadata.interval=5000 ### The expired time to clean metadata, unit: milliseconds. # nacos.naming.clean.expired-metadata.expired-time=60000 ### The delay time before push task to execute from service changed, unit: milliseconds. # nacos.naming.push.pushTaskDelay=500 ### The timeout for push task execute, unit: milliseconds. # nacos.naming.push.pushTaskTimeout=5000 ### The delay time for retrying failed push task, unit: milliseconds. # nacos.naming.push.pushTaskRetryDelay=1000 ### Since 2.0.3 ### The expired time for inactive client, unit: milliseconds. # nacos.naming.client.expired.time=180000 #*************** CMDB Module Related Configurations ***************# ### The interval to dump external CMDB in seconds: # nacos.cmdb.dumpTaskInterval=3600 ### The interval of polling data change event in seconds: # nacos.cmdb.eventTaskInterval=10 ### The interval of loading labels in seconds: # nacos.cmdb.labelTaskInterval=300 ### If turn on data loading task: # nacos.cmdb.loadDataAtStart=false #*************** Metrics Related Configurations ***************# ### Metrics for prometheus #management.endpoints.web.exposure.include=* ### Metrics for elastic search management.metrics.export.elastic.enabled=false #management.metrics.export.elastic.host=http://localhost:9200 ### Metrics for influx management.metrics.export.influx.enabled=false #management.metrics.export.influx.db=springboot #management.metrics.export.influx.uri=http://localhost:8086 #management.metrics.export.influx.auto-create-db=true #management.metrics.export.influx.consistency=one #management.metrics.export.influx.compressed=true #*************** Access Log Related Configurations ***************# ### If turn on the access log: server.tomcat.accesslog.enabled=true ### The access log pattern: server.tomcat.accesslog.pattern=%h %l %u %t "%r" %s %b %D %{User-Agent}i %{Request-Source}i ### The directory of access log: server.tomcat.basedir=file:. #*************** Access Control Related Configurations ***************# ### If enable spring security, this option is deprecated in 1.2.0: #spring.security.enabled=false ### The ignore urls of auth nacos.security.ignore.urls=/,/error,/**/*.css,/**/*.js,/**/*.html,/**/*.map,/**/*.svg,/**/*.png,/**/*.ico,/console-ui/public/**,/v1/auth/**,/v1/console/health/**,/actuator/**,/v1/console/server/** ### The auth system to use, currently only 'nacos' and 'ldap' is supported: nacos.core.auth.system.type=nacos ### If turn on auth system: nacos.core.auth.enabled=false ### Turn on/off caching of auth information. By turning on this switch, the update of auth information would have a 15 seconds delay. nacos.core.auth.caching.enabled=true ### Since 1.4.1, Turn on/off white auth for user-agent: nacos-server, only for upgrade from old version. nacos.core.auth.enable.userAgentAuthWhite=false ### Since 1.4.1, worked when nacos.core.auth.enabled=true and nacos.core.auth.enable.userAgentAuthWhite=false. ### The two properties is the white list for auth and used by identity the request from other server. nacos.core.auth.server.identity.key=serverIdentity nacos.core.auth.server.identity.value=security ### worked when nacos.core.auth.system.type=nacos ### The token expiration in seconds: nacos.core.auth.plugin.nacos.token.expire.seconds=18000 ### The default token (Base64 String): nacos.core.auth.plugin.nacos.token.secret.key=SecretKey012345678901234567890123456789012345678901234567890123456789 ### worked when nacos.core.auth.system.type=ldap,{0} is Placeholder,replace login username #nacos.core.auth.ldap.url=ldap://localhost:389 #nacos.core.auth.ldap.basedc=dc=example,dc=org #nacos.core.auth.ldap.userDn=cn=admin,${nacos.core.auth.ldap.basedc} #nacos.core.auth.ldap.password=admin #nacos.core.auth.ldap.userdn=cn={0},dc=example,dc=org #nacos.core.auth.ldap.filter.prefix=uid #nacos.core.auth.ldap.case.sensitive=true #*************** Istio Related Configurations ***************# ### If turn on the MCP server: nacos.istio.mcp.server.enabled=false #*************** Core Related Configurations ***************# ### set the WorkerID manually # nacos.core.snowflake.worker-id= ### Member-MetaData # nacos.core.member.meta.site= # nacos.core.member.meta.adweight= # nacos.core.member.meta.weight= ### MemberLookup ### Addressing pattern category, If set, the priority is highest # nacos.core.member.lookup.type=[file,address-server] ## Set the cluster list with a configuration file or command-line argument # nacos.member.list=192.168.16.101:8847?raft_port=8807,192.168.16.101?raft_port=8808,192.168.16.101:8849?raft_port=8809 ## for AddressServerMemberLookup # Maximum number of retries to query the address server upon initialization # nacos.core.address-server.retry=5 ## Server domain name address of [address-server] mode # address.server.domain=jmenv.tbsite.net ## Server port of [address-server] mode # address.server.port=8080 ## Request address of [address-server] mode # address.server.url=/nacos/serverlist #*************** JRaft Related Configurations ***************# ### Sets the Raft cluster election timeout, default value is 5 second # nacos.core.protocol.raft.data.election_timeout_ms=5000 ### Sets the amount of time the Raft snapshot will execute periodically, default is 30 minute # nacos.core.protocol.raft.data.snapshot_interval_secs=30 ### raft internal worker threads # nacos.core.protocol.raft.data.core_thread_num=8 ### Number of threads required for raft business request processing # nacos.core.protocol.raft.data.cli_service_thread_num=4 ### raft linear read strategy. Safe linear reads are used by default, that is, the Leader tenure is confirmed by heartbeat # nacos.core.protocol.raft.data.read_index_type=ReadOnlySafe ### rpc request timeout, default 5 seconds # nacos.core.protocol.raft.data.rpc_request_timeout_ms=5000 #*************** Distro Related Configurations ***************# ### Distro data sync delay time, when sync task delayed, task will be merged for same data key. Default 1 second. # nacos.core.protocol.distro.data.sync.delayMs=1000 ### Distro data sync timeout for one sync data, default 3 seconds. # nacos.core.protocol.distro.data.sync.timeoutMs=3000 ### Distro data sync retry delay time when sync data failed or timeout, same behavior with delayMs, default 3 seconds. # nacos.core.protocol.distro.data.sync.retryDelayMs=3000 ### Distro data verify interval time, verify synced data whether expired for a interval. Default 5 seconds. # nacos.core.protocol.distro.data.verify.intervalMs=5000 ### Distro data verify timeout for one verify, default 3 seconds. # nacos.core.protocol.distro.data.verify.timeoutMs=3000 ### Distro data load retry delay when load snapshot data failed, default 30 seconds. # nacos.core.protocol.distro.data.load.retryDelayMs=30000 ### enable to support prometheus service discovery #nacos.prometheus.metrics.enabled=true - 还有msyql要改好。
重新创建服务 选配置
-
其他都一样,进行配置文件挂载
-
直接挂载,不行,会清空里面的配置文件
-
子路径挂载。
- 只读:路径填入:/home/nacos/conf/application.properties
- 子路径填入:application.properties
- 选择特定的键 和 路径
- application.properties application.properties
- /home/nacos/conf/cluster.conf 同理。
- 只读:路径填入:/home/nacos/conf/application.properties
-
在创建一个 外网访问的 服务
-
his-nacos-node,指定容器内端口为 8848
访问nacos
http://172.31.0.10:32470/nacos
账号密码:nacos
Sentinel
Sentinel 是面向分布式服务架构的 高可用流量防护组件,主要以流量为切入点,从限流、流量整形、熔断降级、系统负载保护、
- 若依也用到了 sentinel,需要手动开启
Dockerfile
FROM openjdk:8-jdk
LABEL maintainer=leifengyang


#docker run -e PARAMS="--server.port 9090"
ENV PARAMS="--server.port=8080 --spring.profiles.active=prod --spring.cloud.nacos.discovery.server-addr=his-nacos.his:8848 --spring.cloud.nacos.config.server-addr=his-nacos.his:8848 --spring.cloud.nacos.config.namespace=prod --spring.cloud.nacos.config.file-extension=yml"
RUN /bin/cp /usr/share/zoneinfo/Asia/Shanghai /etc/localtime && echo 'Asia/Shanghai' >/etc/timezone

COPY target/*.jar /app.jar
EXPOSE 8080

#
ENTRYPOINT ["/bin/sh","-c","java -Dfile.encoding=utf8 -Djava.security.egd=file:/dev/./urandom -jar app.jar ${PARAMS}"]
规则:
1、容器默认以8080端口启动
2、时间为CST
3、环境变量 PARAMS 可以动态指定配置文件中任意的值
4、nacos集群内地址为 his-nacos.his:8848
5、微服务默认启动加载 nacos中 服务名-激活的环境.yml 文件,所以线上的配置可以全部写在nacos中。
在nacos 建生产环境
-
创建命名空间 prod
-
从dev 克隆所有的配置文件到 prod
步骤整理
打包:
maven打成可
执行jar,上传给服务器
( master)
制作镜像;docker根据
Dockerfile把包打成指定的镜像
推送镜像;将镜像推送给docker hub(阿里云镜像仓库)
应用部署:
给k8s部署应用,node1节点部署应用
- 测试
java -Dfile.encoding=utf8 -jar
目录整理
- 目录整理
- ruoyi 6个。
- ruoyi-auth
- Dockerfile
- target/ruoyi-auth.jar
- ruoyi-system 用的是 modules项目下的
- 另外:ruoyi-api下有 ruoyi-api-system没用
- ruoyi-file
- ruoyi-gateway
- ruoyi-job
- ruoyi-monitor
- ruoyi-system
- ruoyi-auth
~~~
com.ruoyi
├── ruoyi-ui              // 前端框架 [80]
├── ruoyi-gateway         // 网关模块 [8080]
├── ruoyi-auth            // 认证中心 [9200]
├── ruoyi-api             // 接口模块
│       └── ruoyi-api-system                          // 系统接口
├── ruoyi-common          // 通用模块
│       └── ruoyi-common-core                         // 核心模块
│       └── ruoyi-common-datascope                    // 权限范围
│       └── ruoyi-common-datasource                   // 多数据源
│       └── ruoyi-common-log                          // 日志记录
│       └── ruoyi-common-redis                        // 缓存服务
│       └── ruoyi-common-seata                        // 分布式事务
│       └── ruoyi-common-security                     // 安全模块
│       └── ruoyi-common-swagger                      // 系统接口
├── ruoyi-modules         // 业务模块
│       └── ruoyi-system                              // 系统模块 [9201]
│       └── ruoyi-gen                                 // 代码生成 [9202]
│       └── ruoyi-job                                 // 定时任务 [9203]
│       └── ruoyi-file                                // 文件服务 [9300]
├── ruoyi-visual          // 图形化管理模块
│       └── ruoyi-visual-monitor                      // 监控中心 [9100]
├──pom.xml                // 公共依赖
~~~
构建镜像到本地docker
docker build -t ruoyi-auth:v1.0 -f Dockerfile .
docker build -t ruoyi-file:v1.0 .
docker build -t ruoyi-gateway:v1.0 .
docker build -t ruoyi-job:v1.0 .
docker build -t ruoyi-monitor:v1.0 .
docker build -t ruoyi-system:v1.0 .

 docker images | grep ruoyi
推送镜像给阿里云
●开通阿里云“容器镜像服务(个人版)”
○创建一个名称空间(lfy_ruoyi)。(存储镜像)
○推送镜像到阿里云镜像仓库
sudo docker login --username=xxx registry.cn-hangzhou.aliyuncs.com
#把本地镜像,改名,成符合阿里云名字规范的镜像。
docker tag [ImageId] registry.cn-hangzhou.aliyuncs.com/lfy_ruoyi/镜像名:[镜像版本号]
#docker tag f3046872b2f1 registry.cn-hangzhou.aliyuncs.com/bs_ruoyi/ruoyi-system:v1.0

docker push registry.cn-hangzhou.aliyuncs.com/lfy_ruoyi/镜像名:[镜像版本号]
docker push 上面的串
自动化制作镜像流程
Harbor
使用 kubeSphere 部署
- 选择服务,无状态应用
- 复制阿里的仓库:如
- registry.cn-hangzhou.aliyuncs.com/bs_ruoyi/ruoyi-monitor
- 端口统一为:8080
- 资源限制 内存最大2000Mi
- 同步主机时区
部署规则
- 应用一启动会获取到 “应用名-激活的环境标识.yml”
- 每次部署应用的时候,需要提前修改nacos线上配置,确认好每个中间件的连接地址是否正确
redis: his-redis.his 6379
mysql: his-mysql.his 3306
ruoyi所有镜像
docker pull registry.cn-hangzhou.aliyuncs.com/lfy_ruoyi/ruoyi-auth:v2
docker pull registry.cn-hangzhou.aliyuncs.com/lfy_ruoyi/ruoyi-file:v2
docker pull registry.cn-hangzhou.aliyuncs.com/lfy_ruoyi/ruoyi-gateway:v2
docker pull registry.cn-hangzhou.aliyuncs.com/lfy_ruoyi/ruoyi-job:v2
docker pull registry.cn-hangzhou.aliyuncs.com/lfy_ruoyi/ruoyi-system:v2
docker pull registry.cn-hangzhou.aliyuncs.com/lfy_ruoyi/ruoyi-visual-monitor:v2
docker pull registry.cn-hangzhou.aliyuncs.com/lfy_ruoyi/ruoyi-ui:v2
Nacos 改为 单节点
- 选择 有状态副本集,编辑配置模板,选择 容器组模板
- 选择第一个容器,点修改
- 增加环境变量
- MODE 值为:standalone
注意点都要选 TCP
- 注意:老师说 nacos ,8848端口,也改为 tcp,包括项目中所有 端口,选择 服务时 都选 TCP
- 真实会 自动选择,就算你选了 http,最后展示 和用的 还是 tcp
- 即:mysql 和 redis 等,都要选 TCP
注意点NodePort类型的DNS
- 所有的容器是 ping不通的,也不能访问。
- 一定要创建一个 非 外网暴露的 svc
- 通常 svc 访问类型,设置为 Headless,集群不为服务生成IP
部署 ruoyi-monitor
- 直接创建这个服务接口。
更改配置文件
数据库:
- ruoyi-job-dev.yml
- gen-dev.yml是代码生成器,不启动。不用管。
- ruoyi-system-dev.yml
修改redis
-
ruoyi-gateway-dev.yml
-
ruoyi-auth-dev.yml
-
ruoyi-system-dev.yml
-
ruoyi-job-dev.yml
-
ruoyi-gen-dev.yml 因为不用,就不改了。
-
参考上面的修改
-
其实 下面去掉 .his 还是可以ping通的。
  redis:
    host: his-redis.his
    port: 6379
    password:
  datasource:
    driver-class-name: com.mysql.cj.jdbc.Driver
    url: jdbc:mysql://his-mysql.his:3306
网关项目 提取nacos
- spring: 下的 配置,提取到线上。并且更改配置。
- 三个地方都要改
  cloud:
    nacos:
      discovery:
        # 服务注册地址
        server-addr: his-nacos.his:8848
      config:
        # 配置中心地址
        server-addr: his-nacos.his:8848
        # 配置文件格式
        file-extension: yml
        # 共享配置
        shared-configs:
          - application-${spring.profiles.active}.${spring.cloud.nacos.config.file-extension}
    sentinel:
      # 取消控制台懒加载
      eager: true
      transport:
        # 控制台地址
        dashboard: 127.0.0.1:8718
      # nacos配置持久化
      datasource:
        ds1:
          nacos:
            server-addr: his-nacos.his:8848
            dataId: sentinel-ruoyi-gateway
            groupId: DEFAULT_GROUP
            data-type: json
            rule-type: gw-flow
mysql 忽略大小写
- mysql的配置:
[mysqld]
lower_case_table_names=1
创建数据库时:utf8_bin跟utf8_general_ci的区别
ci是 case insensitive, 即 “大小写不敏感”, a 和 A 会在字符判断中会被当做一样的;
bin 是二进制, a 和 A 会别区别对待.例如你运行:SELECT * FROM table WHERE txt = ‘a’那么在utf8_bin中你就找不到 txt = ‘A’ 的那一行, 而 utf8_general_ci 则可以.
insensitive
英
/ɪnˈsensətɪv/
adj.
(对他人的感受)未意识到的,漠不关心的;身体无感觉的,麻木的;不敏感的,反应迟钝的
部署前端
更改并打包
- 进入前端目录
# 构建生产环境
npm run build:prod
- 更改域名 vue.config.js
target: `http://localhost:8080`, #改为ruoyi-gateway.his
nginx更改
- 复制打包好的 dist里的文件到,官方的 docker,nginx,html,dist目录下
- 更改nginx的配置文件
    server {
        listen       80;
        server_name  localhost; #改为 _,代表,所有的请求都处理。
        }

		location /prod-api/{
			proxy_set_header Host $http_host;
			proxy_set_header X-Real-IP $remote_addr;
			proxy_set_header REMOTE-HOST $remote_addr;
			proxy_set_header X-Forwarded-For $proxy_add_x_forwarded_for;
			proxy_pass http://ruoyi-gateway:8080/; #改为 ruoyi-gateway.his
		}
导入docker
yum install install -y unzip zip

docker build -t registry.cn-hangzhou.aliyuncs.com/bs_ruoyi/ruoyi-ui:v1.0 -f dockerfile .

docker push xx
创建服务,选择外网访问
- 选择 NodePort
让nacos 先启动 探针
-
可能会出现,数据库还没启动,nacos启动了,重连失败。
-
进入nacos容器, curl 127.0.0.1:8848/nacos,会请求成功。
-
进入 有状态副本集,选择:编辑配置模板,容器组模板
- 编辑:健康检查器
- 添加容器存活检查
该检查方式用于检测容器是否活着。 - 添加容器就绪检查
该检查方式用于检测容器是否准备好开始处理用户请求。
- 添加容器存活检查
- 编辑:健康检查器
-
选择 存活检查,检查 /nacos,8848端口
- 延迟20秒,超时时间3秒(3秒内要返回)。
有状态,无状态 副本集区别
无论是有状态或无状态,POD的IP都是不固定的,可用域名代替,域名= pod名.svc。
- 但deploy的POD名是随机的,所以无法取到POD的域名,
- 但sts的POD名是固定的
StatefulSet本质上是Deployment的一种变体
- 简写为sts
- sts每个Pod生成一个唯一的标识符sts_name-number,number从0开始


 6524
6524


 被折叠的 条评论
为什么被折叠?
被折叠的 条评论
为什么被折叠?
 到【灌水乐园】发言


