


Unet代码
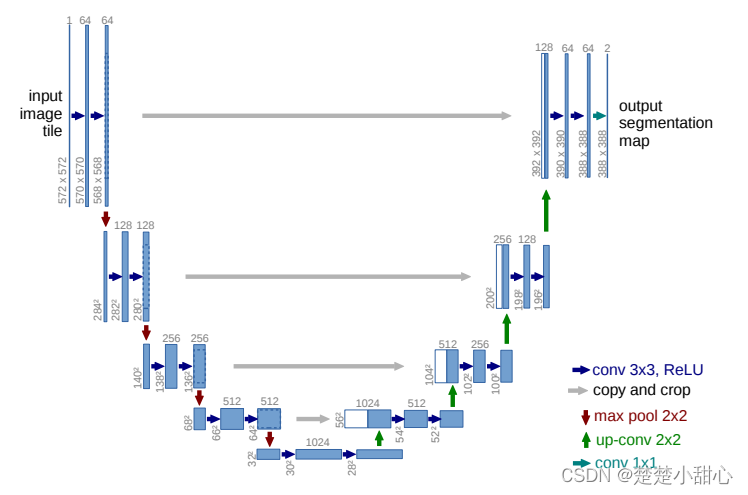
网络架构图
-
输入是572x572的,但是输出变成了388x388,这说明经过网络以后,输出的结果和原图不是完全对应的,这在计算loss和输出结果都可以得到体现.
-
蓝色箭头代表3x3的卷积操作,并且步长是1,不进行padding,因此,每个该操作以后,featuremap的大小会减2.
-
红色箭头代表2x2的最大池化操作.如果池化之前特征向量的大小是奇数,那么就会损失一些信息 。输入的大小最好满足一个条件,就是可以让每一层池化操作前的特征向量的大小是偶数,这样就不会损失一些信息,并且crop的时候不会产生误差.
-
绿色箭头代表2x2的反卷积操作.
-
灰色箭头表示复制和剪切操作.
-
输出的最后一层,使用了1x1的卷积层做了分类
-
前半部分也就是图中左边部分的作用是特征提取,后半部分也就是图中的右边部分是上采样,也叫 encoder-deconder结构
两个3X3卷积层
蓝色箭头代表3x3的卷积操作,并且步长是1,不进行padding,因此,每个该操作以后,featuremap的大小会减2.
class DoubleConvolution(nn.Module):

	def __init__(self, in_channels: int, out_channels: int):
    	super().__init__()

		self.first = nn.Conv2d(in_channels, out_channels, kernel_size=3, padding=1)
		self.act1 = nn.ReLU()
		self.second = nn.Conv2d(out_channels, out_channels, kernel_size=3, padding=1)
		self.act2 = nn.ReLU()

	def forward(self, x: torch.Tensor):
		x = self.first(x)
        x = self.act1(x)
        x = self.second(x)
        return self.act2(x)
下采样
红色箭头代表2x2的最大池化操作。
class DownSample(nn.Module):
    def __init__(self):
        super().__init__()
        self.pool = nn.MaxPool2d(2)

    def forward(self,x:torch.Tensor):
        return self.pool(x)
上采样
绿色箭头代表2x2的反卷积操作.
class UpSample(nn.Module):
    def __init__(self,input_channals:int,output_channals:int):
        super().__init__()
        self.up = nn.ConvTranspose2d(input_channals,output_channals,kernel_size=2,stride=2)

    def forward(self,x:torch.Tensor):
        return self.up(x)
裁剪并连接特征图
在扩展路径中的每个步骤,来自收缩路径的对应特征图与当前特征图连接。
contracting_x:将特征图从收缩路径裁剪为当前特征图的大小
class CropAndConcat(nn.Module):

    def forward(self,x:torch.Tensor,contracting_x:torch.Tensor):
        contracting_x = torchvision.transforms.functional.center_crop(contracting_x,[x.shape[2],x.shape[3]])
        x = torch.cat([x,contracting_x],dim=1)
        return x
网络架构代码
class Unet(nn.Module):
    def __init__(self,input_channals:int,output_channals:int):
        super().__init__()

        self.down_conv = nn.ModuleList([DoubleConvolution(i,0) for i,o in [(input_channals,64),(64,128),(128,256),(256,512)]])
        self.down_sample = nn.ModuleList([DownSample() for _ in range(4)])
        self.middel_conv = DoubleConvolution(512,1024)
        self.up_sample = nn.ModuleList([UpSample(i,o) for i,o in [(1024,512),(512,256),(256,128),(128,64)]])
        self.up_conv = nn.ModuleList([DoubleConvolution(i,o) for i,o in [(1024,512),(512,256),(256,128),(128,64)]])
        self.concat = nn.ModuleList(CropAndConcat() for _ in range(4))
        self.final_conv = nn.Conv2d(64,output_channals,kernel_size=1)

    def forward(self,x:torch.Tensor):
        pass_through = []

        for i in range(len(self.down_conv)):
            x = self.down_conv[i](x)
            pass_through.append(x)
            x = self.down_sample[i](x)

        x = self.middel_conv(x)

        for i in range(len(self.up_conv)):
            x = self.up_sample[i](x)
            x = self.concat[i](x,pass_through.pop())
            x = self.up_conv[i](x)

        x = self.final_conv(x)

        return x


 774
774


 被折叠的 条评论
为什么被折叠?
被折叠的 条评论
为什么被折叠?
 到【灌水乐园】发言


