一、shiro认证流程源码
使用shiro框架做登录,只需调用subject的login方法即可,代码如下:
 public AjaxResult ajaxLogin(String username, String password, Boolean rememberMe)
    {
        UsernamePasswordToken token = new UsernamePasswordToken(username, password, rememberMe);
        Subject subject = SecurityUtils.getSubject();
        try
        {
            subject.login(token);
            return success();
        }
        catch (AuthenticationException e)
        {
            String msg = "用户或密码错误";
            if (StringUtils.isNotEmpty(e.getMessage()))
            {
                msg = e.getMessage();
            }
            return error(msg);
        }
    }
下面,就看subject的login方法内部实现思路。
通过debug,进入了DelegatingSubject类的login方法:
public void login(AuthenticationToken token) throws AuthenticationException {
        clearRunAsIdentitiesInternal();
        Subject subject = securityManager.login(this, token);

        PrincipalCollection principals;

        String host = null;

        if (subject instanceof DelegatingSubject) {
            DelegatingSubject delegating = (DelegatingSubject) subject;
            //we have to do this in case there are assumed identities - we don't want to lose the 'real' principals:
            principals = delegating.principals;
            host = delegating.host;
        } else {
            principals = subject.getPrincipals();
        }

        if (principals == null || principals.isEmpty()) {
            String msg = "Principals returned from securityManager.login( token ) returned a null or " +
                    "empty value.  This value must be non null and populated with one or more elements.";
            throw new IllegalStateException(msg);
        }
        this.principals = principals;
        this.authenticated = true;
        if (token instanceof HostAuthenticationToken) {
            host = ((HostAuthenticationToken) token).getHost();
        }
        if (host != null) {
            this.host = host;
        }
        Session session = subject.getSession(false);
        if (session != null) {
            this.session = decorate(session);
        } else {
            this.session = null;
        }
    }
可以看出,里面调用了securityManager的login方法,继续进入该方法,最终,走到了AbstractAuthenticator类的authenticate方法,这就是Shiro的认证方法,最终追到了如下方法:
  protected AuthenticationInfo doAuthenticate(AuthenticationToken authenticationToken) throws AuthenticationException {
        assertRealmsConfigured();
        Collection<Realm> realms = getRealms();
        if (realms.size() == 1) {
            return doSingleRealmAuthentication(realms.iterator().next(), authenticationToken);
        } else {
            return doMultiRealmAuthentication(realms, authenticationToken);
        }
    }
这里,获取realm域,如果是一个,那就是单数据库的,如果是多个,那就是多数据库的,需要从多个数据库中查询用户信息。这里我们看单realm的方法doSingleRealmAuthentication,重点代码来到如下方法:
  public final AuthenticationInfo getAuthenticationInfo(AuthenticationToken token) throws AuthenticationException {
        //登录操作,没有缓存,不走这个方法
        AuthenticationInfo info = getCachedAuthenticationInfo(token);
        if (info == null) {
            //otherwise not cached, perform the lookup:
            //进入这个方法
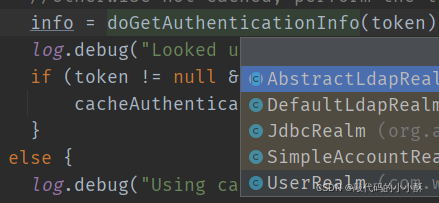
            info = doGetAuthenticationInfo(token);
            log.debug("Looked up AuthenticationInfo [{}] from doGetAuthenticationInfo", info);
            if (token != null && info != null) {
                cacheAuthenticationInfoIfPossible(token, info);
            }
        } else {
            log.debug("Using cached authentication info [{}] to perform credentials matching.", info);
        }

        if (info != null) {
            assertCredentialsMatch(token, info);
        } else {
            log.debug("No AuthenticationInfo found for submitted AuthenticationToken [{}].  Returning null.", token);
        }

        return info;
    }
doGetAuthenticationInfo方法就调用了我们自定义的Realm类的doGetAuthenticationInfo方法,从数据库查询用户信息,然后返回。

自定义Realm类的doGetAuthenticationInfo方法如下:
 protected AuthenticationInfo doGetAuthenticationInfo(AuthenticationToken token) throws AuthenticationException
    {
        UsernamePasswordToken upToken = (UsernamePasswordToken) token;
        String username = upToken.getUsername();
        String password = "";
        if (upToken.getPassword() != null)
        {
            password = new String(upToken.getPassword());
        }

        SysUser user = null;
        try
        {
            user = loginService.login(username, password);
        }
        catch (CaptchaException e)
        {
            throw new AuthenticationException(e.getMessage(), e);
        }
        catch (UserNotExistsException e)
        {
            throw new UnknownAccountException(e.getMessage(), e);
        }
        catch (UserPasswordNotMatchException e)
        {
            throw new IncorrectCredentialsException(e.getMessage(), e);
        }
        catch (UserPasswordRetryLimitExceedException e)
        {
            throw new ExcessiveAttemptsException(e.getMessage(), e);
        }
        catch (UserBlockedException e)
        {
            throw new LockedAccountException(e.getMessage(), e);
        }
        catch (RoleBlockedException e)
        {
            throw new LockedAccountException(e.getMessage(), e);
        }
        catch (Exception e)
        {
            log.info("对用户[" + username + "]进行登录验证..验证未通过{}", e.getMessage());
            throw new AuthenticationException(e.getMessage(), e);
        }
        SimpleAuthenticationInfo info = new SimpleAuthenticationInfo(user, password, getName());
        return info;
    }
可见,其就是通过查询数据库,获取用户信息,然后和传入的token做对比,判断认证是否通过。
至此,登录验证过程完成。通过上面的分析我们可以知道,shiro给程序员留出的口就是查询数据库,对比token,判断是否登录成功。这似乎和我们不使用shiro框架的操作一样啊,不使用shiro框架不也是查询数据库,比较用户名密码,判断是否登录吗?那使用shiro还有啥用呢?我们看认证成功后,shiro又做了哪些操作。
二、认证成功后续操作流程源码
接着上面getAuthenticationInfo方法看,
public final AuthenticationInfo getAuthenticationInfo(AuthenticationToken token) throws AuthenticationException {
        //登录操作,没有缓存,不走这个方法
        AuthenticationInfo info = getCachedAuthenticationInfo(token);
        if (info == null) {
            //otherwise not cached, perform the lookup:
            //进入这个方法
            info = doGetAuthenticationInfo(token);
            log.debug("Looked up AuthenticationInfo [{}] from doGetAuthenticationInfo", info);
            if (token != null && info != null) {
            //缓存用户信息
                cacheAuthenticationInfoIfPossible(token, info);
            }
        } else {
            log.debug("Using cached authentication info [{}] to perform credentials matching.", info);
        }

        if (info != null) {
            assertCredentialsMatch(token, info);
        } else {
            log.debug("No AuthenticationInfo found for submitted AuthenticationToken [{}].  Returning null.", token);
        }

        return info;
    }
可以看到,认证成功后,会调用cacheAuthenticationInfoIfPossible方法,进行缓存,看其源码,
 private void cacheAuthenticationInfoIfPossible(AuthenticationToken token, AuthenticationInfo info) {
        if (!isAuthenticationCachingEnabled(token, info)) {
            log.debug("AuthenticationInfo caching is disabled for info [{}].  Submitted token: [{}].", info, token);
            //return quietly, caching is disabled for this token/info pair:
            return;
        }
         //获取到Cache对象
        Cache<Object, AuthenticationInfo> cache = getAvailableAuthenticationCache();
        if (cache != null) {
            //通过token,生成一个key,
            Object key = getAuthenticationCacheKey(token);
            //将key和登录信息info存入缓存中。
            cache.put(key, info);
            log.trace("Cached AuthenticationInfo for continued authentication.  key=[{}], value=[{}].", key, info);
        }
    }
这里可以知道,认证成功后,shiro将认证信息存入了缓存对象Cache中。
我们继续往上回查代码,看认证成功得到info后,还有哪些操作。
在AbstractAuthenticator的authenticate认证方法中,认证成功后,调用了如下方法:
notifySuccess(token, info);
看其方法内部:
protected void notifySuccess(AuthenticationToken token, AuthenticationInfo info) {
        for (AuthenticationListener listener : this.listeners) {
            listener.onSuccess(token, info);
        }
    }
可以看出,这个方法利用了观察者模式,用于认证成功后,通知AuthenticationListener 的实现类。这里提供了监听用户认证成功的豁口,所以,我们想在一个用户登录时做一些操作的话,可以实现AuthenticationListener 接口来做操作,如提醒谁上线的需求,就可以用这个豁口来实现。AuthenticationListener 类的研究我们单独讲解,这里看流程。
继续往上回查代码,看SecurityManager的login方法,看这行代码:
Subject loggedIn = createSubject(token, info, subject);
这里,根据info认证信息,生成了subject对象,点进去看方法,
 public Subject createSubject(SubjectContext subjectContext) {
        //create a copy so we don't modify the argument's backing map:
        SubjectContext context = copy(subjectContext);

        //ensure that the context has a SecurityManager instance, and if not, add one:
        context = ensureSecurityManager(context);//设置SecurityManager

        //Resolve an associated Session (usually based on a referenced session ID), and place it in the context before
        //sending to the SubjectFactory.  The SubjectFactory should not need to know how to acquire sessions as the
        //process is often environment specific - better to shield the SF from these details:
        context = resolveSession(context);//设置session

        //Similarly, the SubjectFactory should not require any concept of RememberMe - translate that here first
        //if possible before handing off to the SubjectFactory:
        context = resolvePrincipals(context);//设置用户登录信息

        Subject subject = doCreateSubject(context);//生成subject

        //save this subject for future reference if necessary:
        //(this is needed here in case rememberMe principals were resolved and they need to be stored in the
        //session, so we don't constantly rehydrate the rememberMe PrincipalCollection on every operation).
        //Added in 1.2:
        save(subject);

        return subject;
    }
可以看出,创建subject,就是往subject里设置了SecurityManager,session和Principals信息。
然后,看SecurityManager的login方法的这行代码;
onSuccessfulLogin(token, info, loggedIn);
这行代码是"记住我"功能的支持,这里我们分析主流程,这行代码我们单独分析。继续往回追代码,到了DelegatingSubject的login方法,看剩余的方法:
PrincipalCollection principals;

        String host = null;

        if (subject instanceof DelegatingSubject) {
            DelegatingSubject delegating = (DelegatingSubject) subject;
            //we have to do this in case there are assumed identities - we don't want to lose the 'real' principals:
            principals = delegating.principals;
            host = delegating.host;
        } else {
            principals = subject.getPrincipals();
        }

        if (principals == null || principals.isEmpty()) {
            String msg = "Principals returned from securityManager.login( token ) returned a null or " +
                    "empty value.  This value must be non null and populated with one or more elements.";
            throw new IllegalStateException(msg);
        }
        this.principals = principals;
        this.authenticated = true;
        if (token instanceof HostAuthenticationToken) {
            host = ((HostAuthenticationToken) token).getHost();
        }
        if (host != null) {
            this.host = host;
        }
        Session session = subject.getSession(false);
        if (session != null) {
            this.session = decorate(session);
        } else {
            this.session = null;
        }
可以看出,就是对session,principals等一些数据的初始化赋值操作。至此,subject的login方法流程分析完成。
三、总结
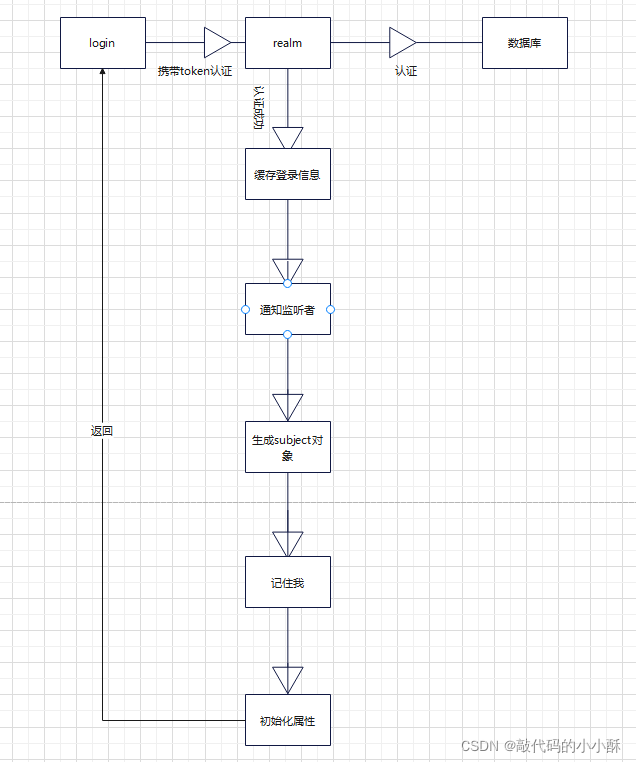
下面,总结一下上面的分析过程。


 789
789


 被折叠的 条评论
为什么被折叠?


