


Spring boot 发送邮件 + 使用html模板发送邮件
简介
以目前IT系统功能来看,邮件功能是非常重要的一个功能。例如:找回密码、邮箱验证,邮件动态码、忘记密码,邮件营销等,都需要用到邮件功能。结合当下最流行的spring boot微服务,推出了spring-boot-starter-mail邮件支持包。
pom依赖
 <dependency>
	<groupId>org.springframework.boot</groupId>
	<artifactId>spring-boot-starter-mail</artifactId>
</dependency>
yml配置
既然要发邮件,那肯定需要一个发件人邮箱,这时候就看你到底使用@163还是@qq还是@outlook(outlook邮箱目前不需要授权码,密码就是自己的邮箱密码),比较直接,所以我就拿outlook举例
spring:
  mail:
    username: ***********@outlook.com
    password: **** #邮箱的登录密码 非授权码
    host: smtp-mail.outlook.com
    port: 587
    properties:
      mail:
        smtp:
          starttls:
            required: true
一个简单的deom
首先我们要使用依赖spring-boot-starter-mail中JavaMailSenderImpl类,所以咱们把它注入咱们的测试类中;
 	@Autowired
    JavaMailSenderImpl mailSender;
我们需要调用他的发送邮件方法 send(message),根据参数new出他所需要的参数类SimpleMailMessage,并set赋值
SimpleMailMessage message = new SimpleMailMessage();
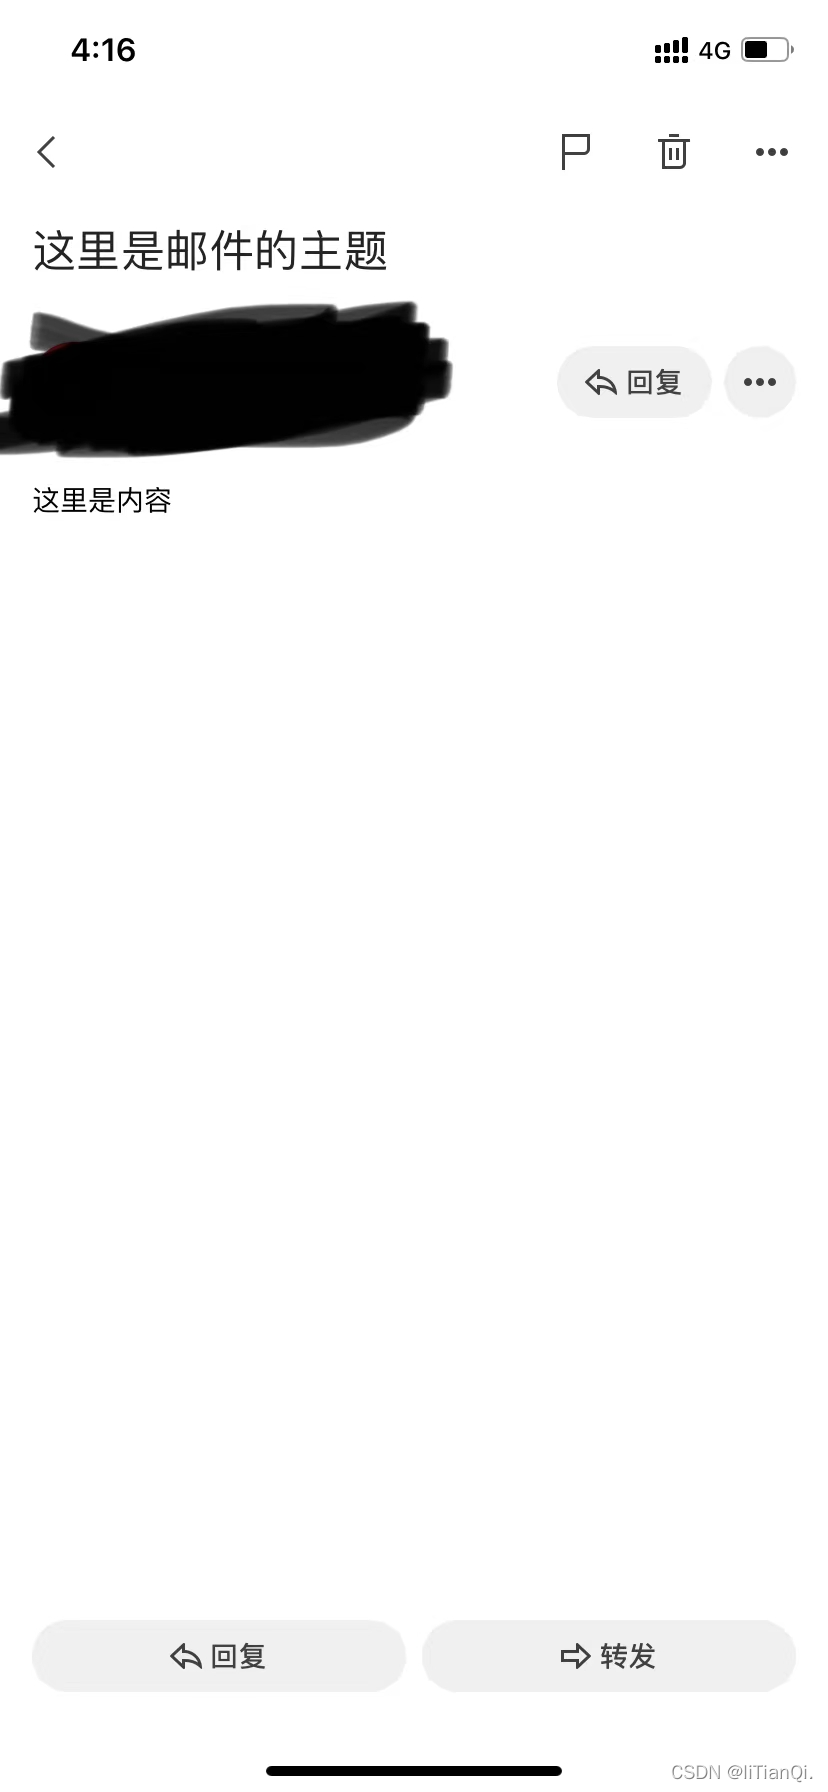
message.setSubject("这里是邮件的主题");
message.setText("这里是内容");
//发给谁(接受人)
message.setTo("*****@163.com");
//谁发的(发送人)
//最好用@Value直接获取yml配置文件中的邮箱
message.setFrom("*****@outlook.com");
//发送
mailSender.send(message);
结果展示:
使用html5模板发送邮件(验证码模板)
我们要使用html5发送邮件,可以直接在代码里面加<font>,<image src=''>,<dev>等标签,设置css样式,但是这些一般情况先 并不能满足我们的实际使用。所以我们需要在外定义一个html模板,这里我们生成ftl(freemarker)文件;
模板mailtemplate.ftl
<!DOCTYPE html>
<html xmlns:th="http://www.thymeleaf.org">
<head>
<meta charset="utf-8">
<meta http-equiv="X-UA-Compatible" content="IE=edge">
<meta name="description" content="email code">
<meta name="viewport" content="width=device-width, initial-scale=1">
</head>
<!--邮箱验证码模板-->
<body>
<div style="background-color:#ECECEC; padding: 35px;">
<table cellpadding="0" align="center"
style="width: 800px;height: 100%; margin: 0px auto; text-align: left; position: relative; border-top-left-radius: 5px; border-top-right-radius: 5px; border-bottom-right-radius: 5px; border-bottom-left-radius: 5px; font-size: 14px; font-family:微软雅黑, 黑体; line-height: 1.5; box-shadow: rgb(153, 153, 153) 0px 0px 5px; border-collapse: collapse; background-position: initial initial; background-repeat: initial initial;background:#fff;">
<tbody>
<tr>
<th valign="middle"
style="height: 25px; line-height: 25px; padding: 15px 35px; border-bottom-width: 1px; border-bottom-style: solid; border-bottom-color: RGB(148,0,211); background-color: RGB(148,0,211); border-top-left-radius: 5px; border-top-right-radius: 5px; border-bottom-right-radius: 0px; border-bottom-left-radius: 0px;">
<font face="微软雅黑" size="5" style="color: rgb(255, 255, 255); ">这里输入name</font>
</th>
</tr>
<tr>
<td style="word-break:break-all">
<div style="padding:25px 35px 40px; background-color:#fff;opacity:0.8;">
<h2 style="margin: 5px 0px; ">
<font color="#333333" style="line-height: 20px; ">
<font style="line-height: 22px; " size="4">
尊敬的用户:</font>
</font>
</h2>
<!-- 中文 -->
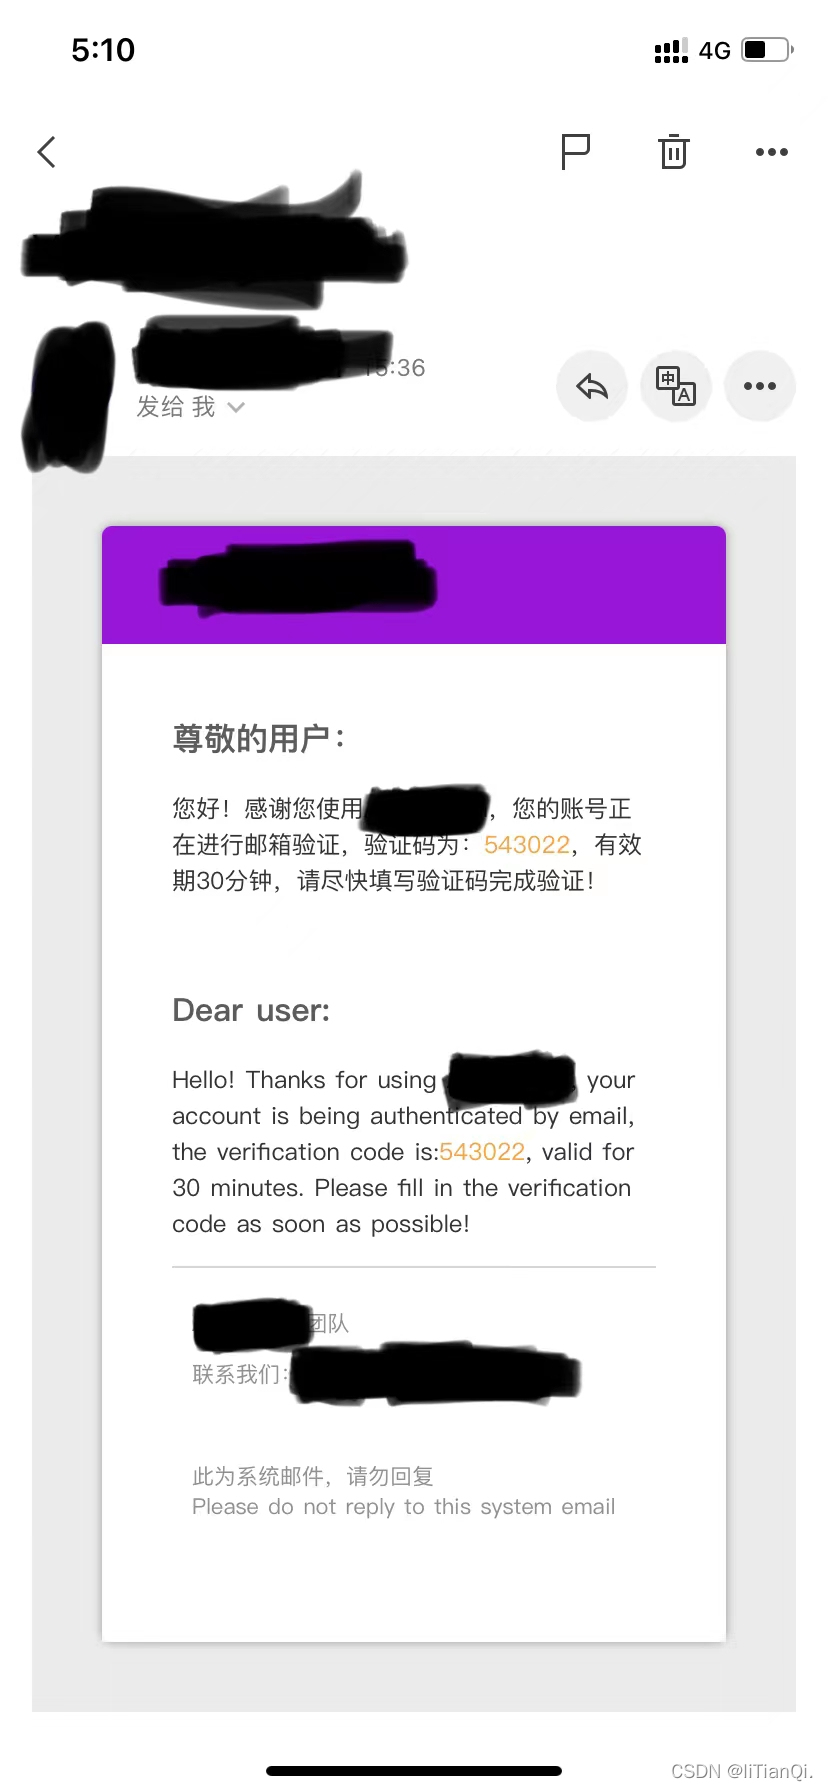
<p>您好!感谢您使用****,您的账号正在进行邮箱验证,验证码为:<font color="#ff8c00">{0}</font>,有效期30分钟,请尽快填写验证码完成验证!</p><br>
<!-- 英文 -->
<h2 style="margin: 5px 0px; ">
<font color="#333333" style="line-height: 20px; ">
<font style="line-height: 22px; " size="4">
Dear user:</font>
</font>
</h2>
<p>Hello! Thanks for using *****, your account is being authenticated by email, the
verification code is:<font color="#ff8c00">{0}</font>, valid for 30 minutes. Please fill in the verification code as soon as
possible!</p>
<div style="width:100%;margin:0 auto;">
<div style="padding:10px 10px 0;border-top:1px solid #ccc;color:#747474;margin-bottom:20px;line-height:1.3em;font-size:12px;">
<p>****团队</p>
<p>联系我们:********</p>
<br>
<p>此为系统邮件,请勿回复<br>
Please do not reply to this system email
</p>
<!--<p>©***</p>-->
</div>
</div>
</div>
</td>
</tr>
</tbody>
</table>
</div>
</body>
</html>
模板展示

实现
话不多说,直接上代码
首先 我们要获取到mailtemplate.ftl信息,加载模板,我们在模板中定义了{0},把他替换为我们自定义的值:参数title
/**
     * 读取邮件模板
     * 替换模板中的信息
     *
     * @param title 内容
     * @return
     */
    public String buildContent(String title) {
        //加载邮件html模板
        Resource resource = new ClassPathResource("mailtemplate.ftl");
        InputStream inputStream = null;
        BufferedReader fileReader = null;
        StringBuffer buffer = new StringBuffer();
        String line = "";
        try {
            inputStream = resource.getInputStream();
            fileReader = new BufferedReader(new InputStreamReader(inputStream));
            while ((line = fileReader.readLine()) != null) {
                buffer.append(line);
            }
        } catch (Exception e) {
            log.info("发送邮件读取模板失败{}", e);
        } finally {
            if (fileReader != null) {
                try {
                    fileReader.close();
                } catch (IOException e) {
                    e.printStackTrace();
                }
            }
            if (inputStream != null) {
                try {
                    inputStream.close();
                } catch (IOException e) {
                    e.printStackTrace();
                }
            }
        }
        //替换html模板中的参数
        return MessageFormat.format(buffer.toString(), title);
    }
替换模板中值的方法写好后,我们来写发送邮件的逻辑
- 注入依赖
JavaMailSender - 自定义随机数用作为验证码,并存入redis设置过期时间(根据自己的需要来做)
- 调用
javaMailSender.createMimeMessage()方法获发送所需的参数MimeMessage new MimeMessageHelper(message, true)生成MimeMessageHelper对象,将主要信息写入helper.setText(buildContent(自定义验证码),true)获取模板html的字符串send(message)完成邮件发送
@Autowired
private JavaMailSender javaMailSender;

 /**
     * 向用户邮箱发送短信
     *
     * @param email 收件人邮箱
     */
    public void sendEmailMessage(String email) {
        MimeMessage message = javaMailSender.createMimeMessage();
        try {
            //获取验证码 存入redis
            int randomCode = (int) ((Math.random() * 9 + 1) * 100000);
            redisUtil.set(Constant.CUSTOMER_EMAIL + email, randomCode, 1800);
            //邮箱发送内容组成
            MimeMessageHelper helper = new MimeMessageHelper(message, true);
            helper.setSubject("主题");
            helper.setText(buildContent(randomCode + ""), true);
            helper.setTo(email);
            helper.setFrom("发件人名字" + '<' + "**发件人邮箱***@out.com" + '>');
            javaMailSender.send(message);
        } catch (MessagingException e) {
            throw new CustomerException(messageSourceUtil.getMessage(I18nConstant.SYSTEM_ERROR), "500");
        }
    }
好了 大功告成,开始调用方法
结果展示


 1083
1083

 被折叠的 条评论
为什么被折叠?
被折叠的 条评论
为什么被折叠?
 到【灌水乐园】发言


