


先给大家看一下效果图:

第一步、添加listBox控件
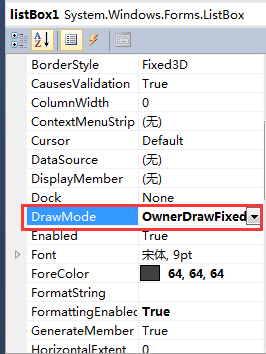
1、拖入一个listBox控件,将DrawMode属性设置为:OwnerDrawFixed
2、添加一个ColoredListBoxItem.cs类,代码如下:
using System;
using System.Collections.Generic;
using System.Linq;
using System.Text;
using System.Drawing;

namespace myTools
{
    public class ColoredListBoxItem
    {
        /// <summary>
        /// creates a new ColoredListBoxItem
        /// </summary>
        /// <param name="prefix">the prefix which will be used</param>
        /// <param name="text">the real message</param>
        /// <param name="color">the color of both</param>
        public ColoredListBoxItem(DateTime time, string prefix, string text, Color color)
        {
            Time = time;
            Text = text;
            Prefix = prefix;
            TextColor = color;
        }

        /// <summary>
        /// the real message
        /// </summary>
        public DateTime Time { get; set; }

        /// <summary>
        /// the prefix of the text
        /// </summary>
        public string Prefix { get; set; }

        /// <summary>
        /// the real message
        /// </summary>
        public string Text { get; set; }

        /// <summary>
        /// the color of the message
        /// </summary>
        public Color TextColor { get; set; }
    }

    public enum LogType
    {
        /// <summary>
        /// OpenVPN changed the internal state.l
        /// </summary>
        Created,

        /// <summary>
        /// The management interface wants to say something.
        /// </summary>
        Changed,

        /// <summary>
        /// A "normal" message is logged by OpenVPN via Management Interface.
        /// </summary>
        Deleted,

        /// <summary>
        /// A debug message is sent. This is primary for internal usage.
        /// </summary>
        Renamed
    }

}
3、给listBox1添加DrawItem事件,代码如下:
        private void listBox1_DrawItem(object sender, DrawItemEventArgs e)
        {
            if (e.Index == -1)
                return;

            Font prefixFont = new Font(e.Font, FontStyle.Bold);
            ColoredListBoxItem li = (ColoredListBoxItem)((ListBox)sender).Items[e.Index];
            Brush br = new SolidBrush(li.TextColor);

            int timeWidth = (int)e.Graphics.MeasureString(" " + new DateTime(2222, 12, 22, 22, 22, 22, 222, CultureInfo.CurrentCulture.Calendar, DateTimeKind.Local).ToString(), prefixFont, e.Bounds.Width, StringFormat.GenericDefault).Width;
            int prefixWidth = (int)e.Graphics.MeasureString(" [Management]", prefixFont, e.Bounds.Width, StringFormat.GenericDefault).Width;
            string prefix = "";
            switch (li.Prefix)
            {
                case "Created":
                    prefix = "[创建文件] ";
                    break;
                case "Changed":
                    prefix = "[修改文件] ";
                    break;
                case "Deleted":
                    prefix = "[删除文件] ";
                    break;
                case "Renamed":
                    prefix = "[重命名文件] ";
                    break;
                default:
                    break;
            }

            e.DrawBackground();
            Rectangle newBounds = new Rectangle(e.Bounds.Location, e.Bounds.Size);

            e.Graphics.DrawString(li.Time.ToString(), prefixFont, br, newBounds, StringFormat.GenericDefault);
            newBounds.X += timeWidth;
            newBounds.Width -= timeWidth;

            e.Graphics.DrawString(prefix, prefixFont, br, newBounds, StringFormat.GenericDefault);
            newBounds.X += prefixWidth;
            newBounds.Width -= prefixWidth;

            e.Graphics.DrawString(
                li.Text, e.Font, br, newBounds.X, newBounds.Y,
                StringFormat.GenericDefault);

            e.DrawFocusRectangle();

        }
4、编写一个“添加日志到listBox的项里”的方法,代码如下:
/// <summary>
        /// 添加日志到listBox的项里
        /// </summary>
        /// <param name="prefix"></param>
        /// <param name="text"></param>
        public void AddLog(LogType prefix, string text)
        {
            if (listBox1.InvokeRequired)
            {
                try
                {
                    //listBox1.BeginInvoke(new UtilsHelper.Action<LogType, string>(AddLog), prefix, text);
                }
                catch (ObjectDisposedException)
                {
                }
                return;
            }

            Color rowColor = Color.Black;
            switch (prefix)
            {
                case LogType.Created://创建
                    rowColor = Color.Green;
                    break;

                case LogType.Changed://修改
                    rowColor = Color.DarkBlue;
                    break;

                case LogType.Deleted://删除
                    rowColor = Color.Brown;
                    break;
                case LogType.Renamed: //重命名
                    rowColor = Color.Black;
                    break;
            }

            listBox1.BeginUpdate();
            if (listBox1.Items.Count == 2048)
                listBox1.Items.RemoveAt(0);

            listBox1.Items.Add(new ColoredListBoxItem(DateTime.Now, prefix.ToString(), text, rowColor));

            int h = listBox1.ClientSize.Height - listBox1.Margin.Vertical;
            int i = listBox1.Items.Count - 1;
            while (h >= 0 && i > 0)
            {
                int nh = listBox1.GetItemHeight(i);

                if (nh > h)
                    break;
                else
                {
                    h -= nh;
                    i--;
                }
            }

            listBox1.TopIndex = i;
            listBox1.EndUpdate();
        }
第二步、添加fileSystemWatcher控件
1、拖入一个fileSystemWatcher控件,分别添加Changed、Created、Deleted、Renamed事件,代码如下:
        private void fileSystemWatcher1_Changed(object sender, FileSystemEventArgs e)
        {
            AddLog(LogType.Changed, e.FullPath);
        }

        private void fileSystemWatcher1_Created(object sender, FileSystemEventArgs e)
        {
            AddLog(LogType.Created, e.FullPath);
        }

        private void fileSystemWatcher1_Deleted(object sender, FileSystemEventArgs e)
        {
            AddLog(LogType.Deleted, e.FullPath);
        }

        private void fileSystemWatcher1_Renamed(object sender, RenamedEventArgs e)
        {
            AddLog(LogType.Renamed, e.FullPath);
        }
2、fileSystemWatcher的常规设置:
 //监控类型为文件名、目录名
fileSystemWatcher1.NotifyFilter = NotifyFilters.FileName | NotifyFilters.DirectoryName;
//是否监控子目录
fileSystemWatcher1.IncludeSubdirectories = true; 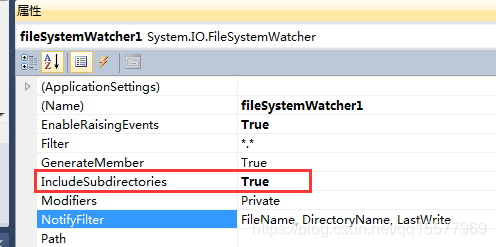
到这里其实已经差不多了,最后提供一下“开始监控”按钮的点击事件代码:
private void btnWatch_Click(object sender, EventArgs e)
        {
            string path = this.txtDirPath.Text.Trim();
            if (string.IsNullOrEmpty(path) | !Directory.Exists(path))
            {
                MessageBox.Show("请先选择要查看的目录");
                picDir_Click(sender, e);
                return;
            }
            if (this.btnWatch.Text == "开始监控")
            {
                this.btnWatch.Text = "停止监控";
                this.btnWatch.BackColor = Color.Red;
                fileSystemWatcher1.Path = path;
                fileSystemWatcher1.EnableRaisingEvents = true;
            }
            else
            {
                DialogResult diagorel = MessageBox.Show("确定要停止监控吗,停止后就不能实时查看目录文件的变动情况了?", "选择", MessageBoxButtons.YesNo, MessageBoxIcon.Warning);
                if (diagorel == DialogResult.Yes)
                {
                    this.btnWatch.Text = "开始监控";
                    this.btnWatch.BackColor = Color.Green;
                    fileSystemWatcher1.EnableRaisingEvents = false;
                }
            }
        }
//说明,picDir是选择目录的那个文件夹图片
private void picDir_Click(object sender, EventArgs e)
        {
            //获取文件和路径名 一起显示在 txtbox 控件里
            FolderBrowserDialog folder = new FolderBrowserDialog();
            if (folder.ShowDialog() == DialogResult.OK)
            {
                this.txtDirPath.Text = folder.SelectedPath;
            }
        }


 3685
3685


 被折叠的 条评论
为什么被折叠?
被折叠的 条评论
为什么被折叠?
 到【灌水乐园】发言


