


 本文深入探讨Netty中的ByteBuf机制,包括其扩容、缩容策略及类继承关系,详细分析堆内与堆外内存的管理方式,以及Netty内存分配体系。
Netty学习之旅------第4篇---ByteBuf的扩容和类继承关系
温馨提示:内容局限于本人的理解,如果有错误,请指正,谢谢!
学习目标:
(1)了解ByteBuf的扩容机制
(2)了解ByteBuf 的基本类继承关系
(3)了解ByteBufAllocator(内存分配)的类继承关系
1. ByteBuf 的扩容和缩容
上一篇说到,ByteBuf基于ByteBuffer的痛点做了优化,比如扩容就是很重要的一项优化,下面以writeBytes(byte[] src)为例来看下它的扩容机制。首先,在ByteBuf中只是定义了抽象方法,扩容的代码在AbstractByteBuf中
1.1 容量计算
@Override
    public ByteBuf writeBytes(byte[] src) {
        writeBytes(src, 0, src.length);//@1
        return this;
    }
@Override
    public ByteBuf writeBytes(ByteBuf src, int length) {
        if (length > src.readableBytes()) {
            throw new IndexOutOfBoundsException(String.format(
                    "length(%d) exceeds src.readableBytes(%d) where src is: %s", length, src.readableBytes(), src));
        }
        writeBytes(src, src.readerIndex(), length);//@1
        src.readerIndex(src.readerIndex() + length);//@2
        return this;
    }
@1 扩容逻辑
@2 更新readerIndex
继续进入@1
	@Override
    public ByteBuf writeBytes(ByteBuf src, int srcIndex, int length) {
        ensureAccessible();//@1
        ensureWritable(length);//@2
        setBytes(writerIndex, src, srcIndex, length);
        writerIndex += length;
        return this;
    }
	@Override
    public ByteBuf ensureWritable(int minWritableBytes) {
        if (minWritableBytes < 0) {
            throw new IllegalArgumentException(String.format(
                    "minWritableBytes: %d (expected: >= 0)", minWritableBytes));
        }
        ensureWritable0(minWritableBytes);
        return this;
    }
	private void ensureWritable0(int minWritableBytes) {
        if (minWritableBytes <= writableBytes()) {//@3
            return;
        }

        if (minWritableBytes > maxCapacity - writerIndex) {//@4
            throw new IndexOutOfBoundsException(String.format(
                    "writerIndex(%d) + minWritableBytes(%d) exceeds maxCapacity(%d): %s",
                    writerIndex, minWritableBytes, maxCapacity, this));
        }

        // Normalize the current capacity to the power of 2.
        int newCapacity = alloc().calculateNewCapacity(writerIndex + minWritableBytes, maxCapacity);@5

        // Adjust to the new capacity.
        capacity(newCapacity);
    }
@1 检查缓冲区是否可以访问,检查refCnt==0会被回收
@2 传入待写字节的长度,进行扩容,确保可以写入。
@3 判断写入的长度,如果当前缓冲区可以写入,直接结束,无需扩容。
@4 写入的内容长度大于可写的最大容量,则抛出IndexOutOfBoundsException异常
@5 就是扩容了,扩容有2中方式,一种是申请堆内内存,一种申请堆外内存,下面来看下具体的实现
calculateNewCapacity就是计算新的ByteBuf的大小
	@Override
    public int calculateNewCapacity(int minNewCapacity, int maxCapacity) {
        if (minNewCapacity < 0) {
            throw new IllegalArgumentException("minNewCapacity: " + minNewCapacity + " (expected: 0+)");
        }
        if (minNewCapacity > maxCapacity) {
            throw new IllegalArgumentException(String.format(
                    "minNewCapacity: %d (expected: not greater than maxCapacity(%d)",
                    minNewCapacity, maxCapacity));
        }
        final int threshold = CALCULATE_THRESHOLD; // 4 MiB page  //@6

        if (minNewCapacity == threshold) {
            return threshold;
        }

        // If over threshold, do not double but just increase by threshold.
        if (minNewCapacity > threshold) {@7
            int newCapacity = minNewCapacity / threshold * threshold;
            if (newCapacity > maxCapacity - threshold) {
                newCapacity = maxCapacity;
            } else {
                newCapacity += threshold;
            }
            return newCapacity;
        }

        // Not over threshold. Double up to 4 MiB, starting from 64.
        int newCapacity = 64;
        while (newCapacity < minNewCapacity) {@8
            newCapacity <<= 1;
        }

        return Math.min(newCapacity, maxCapacity);
    }
@6 定义了一个常量4MB每页
@7 如果申请最小的容量刚好等于4MB,则直接返回4MB.如果申请的大小超过了4MB,则需要重新计算新容量大小= minNewCapacity / threshold * threshold;也就是不会翻倍的扩容,只会以4MB为基数,在申请的容量上,进行扩容,比如:
threshold =4
maxCapacity =20
| 写入大小 | minNewCapacity | newCapacity |
|---|---|---|
| 第一组 | 6 | (6/4*4)+4= 8 |
| 第二组 | 8 | (8/4*4)+4= 12 |
| 第三组 | 19 | (19/4*4)+4= 20 |
| 第三组 | 20 | (20/4*4)>20-4,直接返回20 |
@8 以64位基础,每次翻倍扩容,64–>128–>256–>512–>1024…
原理就是满足你写入的大小,在缓冲区还不大的情况下,直接以64MB为基础,翻倍扩容,当缓冲区达到一定的大小,就采用以4MB为基数来扩容,这样的设计的好处是,往往缓冲区较小,需要写入的数据比较大,为了避免频繁的扩容,影响效率,才一次性扩容的粒度较大,如果数据持续增加,再以更小的粒度进行扩容,扩容完成后,调用setBytes子类的方法,进行写入。
经过上面的步骤,已经计算出了缓冲区所需的大小,接下来就是申请缓冲区的空间了。因为缓冲区分为堆内内存和堆外内存2中,所以有不同的实现,堆内比较简单,先来看下具体实现。
1.2 堆内内存的扩容和缩容
UnpooledHeapByteBuf#capacity
    @Override
    public ByteBuf capacity(int newCapacity) {
        checkNewCapacity(newCapacity);

        int oldCapacity = array.length;
        byte[] oldArray = array;
        if (newCapacity > oldCapacity) {@1
            byte[] newArray = allocateArray(newCapacity);
            System.arraycopy(oldArray, 0, newArray, 0, oldArray.length);
            setArray(newArray);
            freeArray(oldArray);
        } else if (newCapacity < oldCapacity) {@2
            byte[] newArray = allocateArray(newCapacity);
            int readerIndex = readerIndex();
            if (readerIndex < newCapacity) {@3
                int writerIndex = writerIndex();
                if (writerIndex > newCapacity) {
                    writerIndex(writerIndex = newCapacity);
                }
                System.arraycopy(oldArray, readerIndex, newArray, readerIndex, writerIndex - readerIndex);
            } else {
                setIndex(newCapacity, newCapacity);@4
            }
            setArray(newArray);@5
            freeArray(oldArray);@6
        }
        return this;@7
    }
@1 如果当前所需的大小大于旧缓冲区的最大容量,进行扩容,则通过System.arraycopy拷贝到新的数组中,然后释放旧的数组(因为堆内存储是存储在数组中)。
@2 如果当前所需大小小于旧缓冲区的最大容量,进行缩容,也通过allocateArray新建一个新的byte数组newArray
@3 如果有未读的数据,关系如:readerIndex< newCapacity < writerIndex,则更新writeIndex的值为新缩容后的大小。并通过System.arraycopy方法,将旧ByteBuf中未读数据拷贝到新的ByteBuf中
@4 如果 readerIndex < writerIndex < newCapacity 关系成立,直接更新readerIndex=writerIndex=newCapacity
@5 将新的数组赋值到当前缓冲区的array
@6 释放旧的数组
@7 无需扩容和缩容,直接返回当前的缓冲区。
1.3 堆外内存的扩容和缩容
UnpooledDirectByteBuf#capacity
    @Override
    public ByteBuf capacity(int newCapacity) {
        checkNewCapacity(newCapacity);

        int readerIndex = readerIndex();
        int writerIndex = writerIndex();

        int oldCapacity = capacity;
        if (newCapacity > oldCapacity) {@1
            ByteBuffer oldBuffer = buffer;
            ByteBuffer newBuffer = allocateDirect(newCapacity);
            oldBuffer.position(0).limit(oldBuffer.capacity());
            newBuffer.position(0).limit(oldBuffer.capacity());
            newBuffer.put(oldBuffer);
            newBuffer.clear();
            setByteBuffer(newBuffer);
        } else if (newCapacity < oldCapacity) {@2
            ByteBuffer oldBuffer = buffer;
            ByteBuffer newBuffer = allocateDirect(newCapacity);
            if (readerIndex < newCapacity) {
                if (writerIndex > newCapacity) {
                    writerIndex(writerIndex = newCapacity);
                }
                oldBuffer.position(readerIndex).limit(writerIndex);
                newBuffer.position(readerIndex).limit(writerIndex);
                newBuffer.put(oldBuffer);
                newBuffer.clear();
            } else {
                setIndex(newCapacity, newCapacity);
            }
            setByteBuffer(newBuffer);
        }
        return this;
    }
@1 需要扩容,申请一块大小为newCapacity的新ByteBuffer newBuffer,将oldBuffer、newBuffer的position=0,limit为oldBuffer.capacity,等于将2个缓冲区对齐。将oldBuffer put到新的newBuffer里面,设置newBuffer的position = 0、 limit = capacity、mark = -1。将newBuffer 赋值到当前的缓冲区,并更新当前缓冲区的capacity=newBuffer的limit-position,在读的模式下,那capacity就是当前有内容的长度,在写的模式下,那就是可写长度的。
@2 需要缩容,满足readerIndex < newCapacity < writerIndex 关系,更新writerIndex=newCapacity,设置oldBuffer、newBuffer缩容后的大小,将2缓冲区对齐,将oldBuf put newBuffer, 到如果满足readerIndex < writerIndex < newCapacity 关系,说明缩容后,没有影响到之前的读写区域。 直接更新readerIndex=writerIndex=newCapacity
@3 无需扩容和缩容,直接返回当前的缓冲区。
缩容和扩容也涉及池化的机制,即在池化的缓冲区中如何缩容和扩容,这些在后面的博文里面再介绍。
2. Netty ByteBuf 主要功能继承图
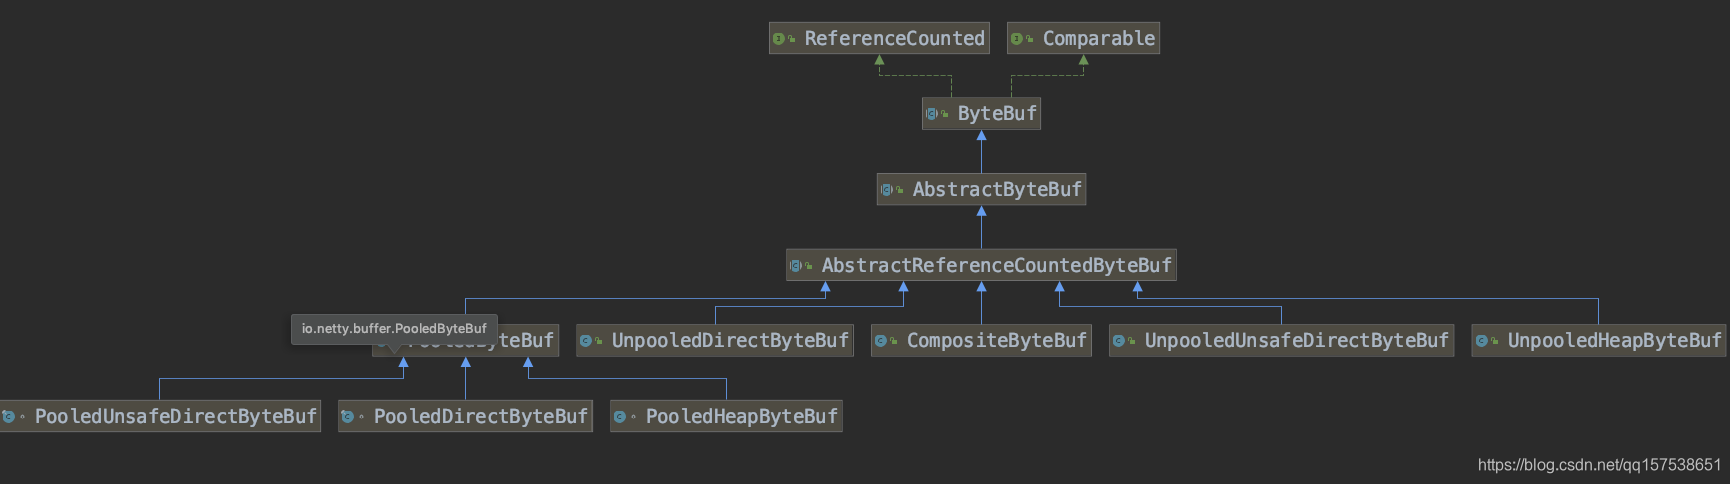
| 类名 | 描述 |
|---|---|
| ByteBuf | 缓冲区的顶层抽象类,子类主要分2大类,一类是池化(对象池)类,另外一类是非池化类。例如:UnpooledUnsafeDirectByteBuf、UnpooledDirectByteBuf、UnpooledHeapByteBuf都是非池化的子类,因为不管池化和非池化,都有堆内存、堆外内存。 |
| AbstractByteBuf | 继承自ByteBuf,提供了公共方法的实现,差异化的功能由子类实现。 |
| AbstractReferenceCountedByteBuf | 主要管理缓冲区的引用次数,每调用一次retain方法,refCnt会加1,每调用一次release方法,refCnt减1, 当refCnt=0,该缓冲区是会被回收掉的。 |
| UnpooledDirectByteBuf | 非池化+使用堆外内存的Buf |
| UnpooledHeapByteBuf | 非池化+堆内存的Buf |
| PooledDirectByteBuf | 池化+堆外内存的Buf |
| PooledHeapByteBuf | 池化+堆内存的Buf |
3. Netty内存分配继承图
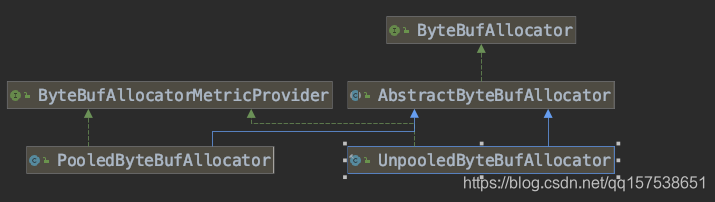
| 类名 | 描述 |
|---|---|
| ByteBufAllocator | 顶层内存分配接口,定义了公共的分配方法 |
| AbstractByteBufAllocator | 实现自ByteBufAllocator接口 |
| UnpooledByteBufAllocator | 继承自AbstractByteBufAllocator,分配非池化的ByteBuf |
| PooledByteBufAllocator | 继承自AbstractByteBufAllocator,分配池化的ByteBuf |
4. 总结
从内存分配的角度,主要分为堆内内存和堆外内存的分配。从内存回收的角度,可以分为池化和非池化,池化就是内部维护了一个对象池,可以重用ByteBuf对象。在高负载的情况下,池化的表现更加平稳,可以降低高负载带来的频繁GC,单池化的内部实现要复杂,使用的时候也要更加谨慎。


 被折叠的 条评论
为什么被折叠?
被折叠的 条评论
为什么被折叠?
 到【灌水乐园】发言


