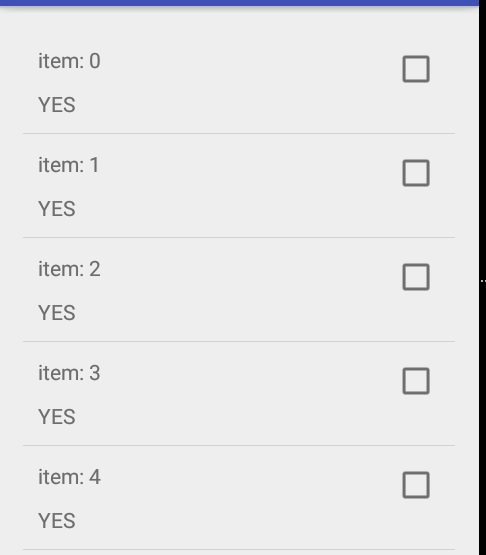
在上一篇文章我们已经知道了简单的onData的使用了,但是我们都知道,在真正的测试中,我们的ListView或者GridView不可能为这么简单的数据的,所以我们还是需要用一些复杂的数据来进行测试。
SimpleAdapter
对于Android有一定了解的应该都对它有一定的了解吧。
SimpleAdapter的构造函数是:
public SimpleAdapter (Context context, List<? extends Map<String, ?>> data, int resource, String[] from, int[] to)
我们就自己来简单实现一个SimleAdapter的Demo.
listView的具体布局如下:
<?xml version="1.0" encoding="utf-8"?>
<RelativeLayout xmlns:android="http://schemas.android.com/apk/res/android"
    android:layout_width="match_parent"
    android:layout_height="match_parent"
    android:padding="10dip">

    <TextView
        android:id="@+id/rowContent1"
        android:layout_width="wrap_content"
        android:layout_height="wrap_content"
        android:layout_alignParentLeft="true"
        />


    <TextView
        android:id="@+id/rowContent2"
        android:layout_width="wrap_content"
        android:layout_height="wrap_content"
        android:layout_below="@+id/rowContent1"
        android:layout_marginTop="10dip"/>


    <CheckBox
        android:id="@+id/checkbox"
        android:layout_width="wrap_content"
        android:layout_height="wrap_content"
        android:layout_alignParentRight="true"/>

</RelativeLayout>
SimpleAdapter的具体实现如下:
@VisibleForTesting
    protected static Map<String, Object> makeItem(int forRow) {
        Map<String, Object> dataRow = Maps.newHashMap();
        dataRow.put(ROW_TEXT1, String.format(ITEM_TEXT_FORMAT, forRow));
        dataRow.put(ROW_TEXT2, "YES");
        dataRow.put(ROW_CHECKBOX,false);
        return dataRow;
    }

    private void initData() {
        for (int i = 0; i < NUMBER_OF_ITEMS; i++) {
            data.add(makeItem(i));
        }
        String from[] = new String[]{ROW_TEXT1,ROW_TEXT2,ROW_CHECKBOX};
        int to[] = new int[]{R.id.rowContent1,R.id.rowContent2,R.id.checkbox};
        layoutInflater = getLayoutInflater();
        MySimpleAdapter mySimpleAdapter = new MySimpleAdapter(this,data,R.layout.listview_item,from,to);
        listView.setAdapter(mySimpleAdapter);

    }
下来我们就要开始进行编写我们的测试代码了。
@RunWith(AndroidJUnit4.class)
@LargeTest
public class TestSimpleAdapter {

    private static final String TEXT_ITEM_50 = "item: 95";

    @Rule
    public ActivityTestRule<MainActivity> mActivityRule = new ActivityTestRule<>(MainActivity.class);

    //对内容为item: 95的那一项的checkbox进行点击操作。
    @Test
    public void testCheckBoxClick() {
        onRow(TEXT_ITEM_50).onChildView(withId(R.id.checkbox)).perform(click());
        onRow(TEXT_ITEM_50).onChildView(withId(R.id.checkbox)).check(matches(isChecked()));
    }

    public static DataInteraction onRow(String str) {
        return  onData(hasEntry(is(MainActivity.ROW_TEXT1),is(str)));
    }
}
类对象
下面的例子我们参考 EspressoExamples 的例子
这个例子就是我们经常测试中都会碰到的了。
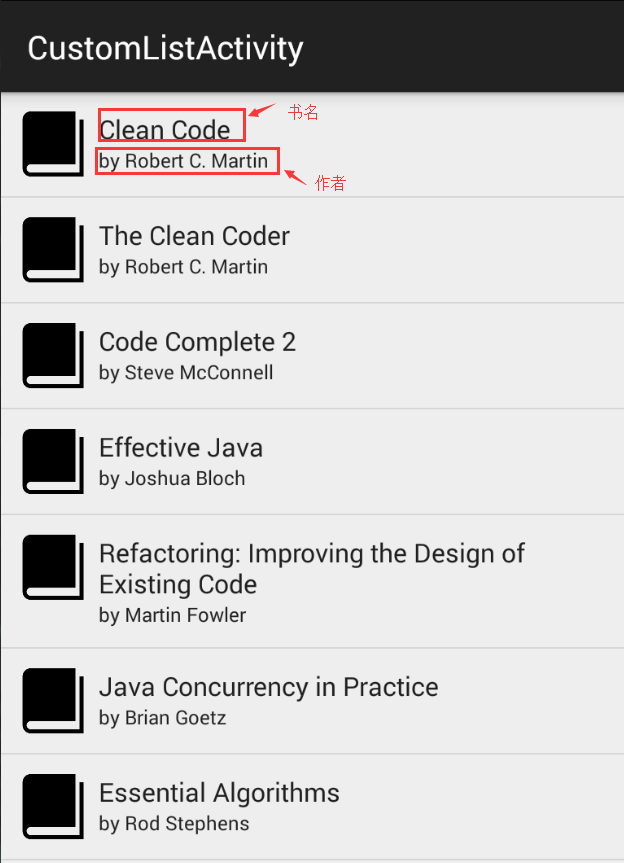
我们看上边的图片就能够发现,界面显示的内容都可以用一个类Book来描述,当然实际情况下,可能书的封面会根据不同的书显示,这些都可以在book这个类对象里面进行描述。
/**
 * @author vgrec, created on 3/18/15.
 */
public class Book {
    private int id;
    private String title;
    private String author;

    public Book(int id, String title, String author) {
        this.id = id;
        this.title = title;
        this.author = author;
    }

    public String getTitle() {
        return title;
    }

    public String getAuthor() {
        return author;
    }

    public int getId() {
        return id;
    }
}
以上是Book类的定义, 它的成员变量以及方法,程序的其他代码这里就不贴出来了。大家可以自己去前面的链接去查看。
那下面问题来了,我需要点击书名为 “Effective Java“ 的书籍时,应该如何做呢。
首先我们可以指定一个单一条件
onData(is(instanceOf(Book.class)))
但是这个单一条件肯定是不能满足的,因为我现在要做的是点击对应的书名的item。所以我们需要更精确的去寻找一个AdapterView中指定的条目,于是我们需要用allof()来构造一个符合匹配的条件
onData(allOf(is(instanceOf(Book.class)), myCustomMatcher()))
上面的myCustomMatcher()方法构造了一个自定义的Matcher,我们可以采用自己的自定义Matcher来更加精准地进行数据的匹配。
自定义Matcher
下来就是我们自定义的Matcher:
public static Matcher<Object> withBookTitle(final String bookTitle) {
    return new BoundedMatcher<Object, Book>(Book.class) {
        @Override
        protected boolean matchesSafely(Book book) {
            return bookTitle.equals(book.getTitle());
        }

        @Override
        public void describeTo(Description description) {
            description.appendText("with id: " + bookTitle);
        }
    };
}
我们对上面的内容分析一下吧。
1. @return Matcher
很显然,返回值必须是一个Matcher对象,代表一个针对于Object数据的匹配规则。这也是onData()方法入参的要求。
- BoundedMatcher
以上方法实际上是构造了一个BoundedMatcher,我们先来看一下BoundedMatcher的定义:
/**
 * Some matcher sugar that lets you create a matcher for a given type
 * but only process items of a specific subtype of that matcher.
 *
 * @param <T> The desired type of the Matcher.
 * @param <S> the subtype of T that your matcher applies safely to.
 */
public abstract class BoundedMatcher<T, S extends T> extends BaseMatcher<T> {
    // ...
    protected abstract boolean matchesSafely(S item);
    // ...
}
由以上定义我们可以看到,BoundedMatcher为我们指定了一个针对目标类型的子类型进行匹配的匹配规则。比如,我们现在需要一个Matcher对象,但实际上我们需要考察的目标类型是Book,而Book又是Object的子类,因此,我们可以通过BoundedMatcher来构造这个Matcher对象,只不过我们实际上进行检查的转变成了Book类型,只要采用如下写法:
return new BoundedMatcher<Object, Book>(Book.class) {...}
- matchesSafely()
上述复写的matchesSafely()方法便是真正执行匹配的地方了!大家可以看到,我由BoundedMatcher指定了Book类型,因此matchesSafely()方法也接收了Book类型的入参,我们只要去考察入参提供的这个Book对象是否符合我们的匹配条件即可:
return bookTitle.equals(book.getTitle());具体代码如下:
public void testOpenBookByTitleAndAuthor() {
    // Match a book with a specific title and author name
    onData(allOf(withBookTitle(BOOK_TITLE), withBookAuthor(BOOK_AUTHOR))).perform(click());

    // Check the correct book title is displayed
    onView(withId(R.id.book_title)).check(matches(withText(BOOK_TITLE)));

    // Check the correct author is displayed
    onView(withId(R.id.book_author)).check(matches(withText(BOOK_AUTHOR)));
}
结束语
遇到一个问题,修改将其修改成Rule形式的时候,应该是导入了重复的jar包,导致一直报错:
Error:Execution failed for task ':app:dexDebugAndroidTest'. > com.android.ide.common.process.ProcessException: org.gradle.process.internal.ExecException: Process 'command 'C:\Program Files\Java\jdk1.8.0_11\bin\java.exe'' finished with non-zero exit value 2
目前还不清楚到底是什么包导入引起的,原来范例用了很多的jar包,到时候单独抽取出来看看问题是什么。


 本文介绍如何使用SimpleAdapter填充ListView,并通过Espresso编写UI测试。包括创建适配器实例、自定义Matcher进行精确匹配等关键技术点。


 2149
2149

 被折叠的 条评论
为什么被折叠?


