


 本文详细介绍如何使用 Android 中的 ListView 控件来展示数据列表,并通过实例演示如何创建自定义适配器、设置数据源以及实现点击事件。
学习android三天了,发现这个ListView在android里应用非常的多,于是就花了一些时间仔细学习了一下!
以下是我个人的理解,如果有错误或不周到的地方,还请各位看客留言!有错误才有进步,这是我的名言!!!呵呵!
简单的介绍以下,ListVeiw就像一个对象集合,可以将数据一列一列的显示出来,而且可以添加点击事件,非常方便用户操作
手机自带的系统用的比较多
比如手机的设置界面:
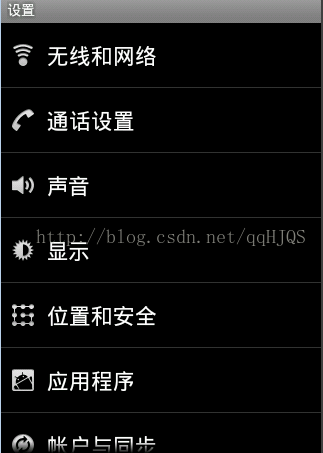
*布局设计
这样的界面需要两个Layout制作,一个就是MainLayout,里面包含一个ListView
代码如下:
<LinearLayout xmlns:android="http://schemas.android.com/apk/res/android"
    xmlns:tools="http://schemas.android.com/tools"
    android:layout_width="match_parent"
    android:layout_height="match_parent"
    android:orientation="vertical"
>
	<ListView
	    android:id="@+id/listview"
	    android:layout_width="wrap_content"
	    android:layout_height="wrap_content"
	    />
</LinearLayout>
下面是PerListViewLayout,里面是每一条数据的样式
代码如下:
<LinearLayout xmlns:android="http://schemas.android.com/apk/res/android"
    xmlns:tools="http://schemas.android.com/tools"
    android:layout_width="match_parent"
    android:layout_height="match_parent"
    android:orientation="horizontal"
>

    <ImageView
        android:id="@+id/imageViewId"
        android:layout_height="wrap_content"
        android:layout_width="wrap_content"
        android:src="@drawable/ic_launcher"
        />

    <TextView
        android:layout_width="20dp"
        android:layout_height="wrap_content"
        />
    <LinearLayout
        android:layout_width="wrap_content"
        android:layout_height="wrap_content"
        android:orientation="vertical"
        >
        <TextView
            android:id="@+id/textviewId1"
            android:layout_height="wrap_content"
            android:layout_width="wrap_content"
            android:textSize="30sp"
            android:text="content1"
            />
        <TextView
            android:id="@+id/textviewId2"
            android:layout_height="wrap_content"
            android:layout_width="wrap_content"
            android:text="content1"
            />
    </LinearLayout>
</LinearLayout>
大概可以分成这几个部分:
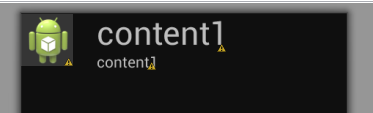

这个可以成为每一列数据的样式与布局
以后MainLayout里面的每条数据都会以这样的方式显示出来
* 数据源的创建
首先要取出数据,及要显示几条数据
穿件三个数组,分别存入imageView、textView1、textView2
代码如下:
private int[] picts = {R.drawable.ic_launcher, R.drawable.pict1, R.drawable.pict2, R.drawable.dog_bew};
	private String[] contents1 = {"zhangsan", "lisi", "wangwu", "wangliu"};
private String[] contents2 = {"zhangsan_1", "lisi_1", "wangwu_1", "wangliu_1"};将数据存入List里
代码如下:
// 创建数据源
		List<Map<String, Object>> data;
		data = new ArrayList<Map<String,Object>>();
		for (int i = 0; i < picts.length; i++)
		{
			Map<String,Object> oneLine = new HashMap<String, Object>();
			oneLine.put("pict", picts[i]);
			oneLine.put("contents1", contents1[i]);
			oneLine.put("contents2", contents2[i]);

			data.add(oneLine);
		}
这里用List<Map<String,Objuct>>最好
开始创建自定义适配器
代码如下:
	class MyAdapter extends SimpleAdapter
	{

		public MyAdapter(Context context, List<? extends Map<String, ?>> data,
				int resource, String[] from, int[] to) {
			super(context, data, resource, from, to);
		}

		@Override
		public View getView(int position, View convertView, ViewGroup parent) {
			View view =  super.getView(position, convertView, parent);

			ImageView imageview = (ImageView)view.findViewById(R.id.imageViewId);
			TextView textview1 = (TextView)view.findViewById(R.id.textviewId1);
			TextView textview2 = (TextView)view.findViewById(R.id.textviewId2);
			imageview.setOnClickListener(new View.OnClickListener() {
				@Override
				public void onClick(View arg0) {
					Toast.makeText(ListViewActivity3.this, "点击的是图片", Toast.LENGTH_SHORT).show();
				}
			});
			textview1.setOnClickListener(new View.OnClickListener() {
				@Override
				public void onClick(View arg0) {
					Toast.makeText(ListViewActivity3.this, "点击的是文字1", Toast.LENGTH_SHORT).show();
				}
			});
			textview2.setOnClickListener(new View.OnClickListener() {
				@Override
				public void onClick(View arg0) {
					Toast.makeText(ListViewActivity3.this, "点击的是文字2", Toast.LENGTH_SHORT).show();
				}
			});
			// 实现事件。。。
			return view;
		}


}创建适配器
代码如下:
	// 创建适配器
		MyAdapter adapter = new MyAdapter(ListViewActivity3.this, data, R.layout.listview_one_linex, from, to);
		listview.setAdapter(adapter);


		listview.setOnItemClickListener(new AdapterView.OnItemClickListener() {

			@Override
			public void onItemClick(AdapterView<?> arg0, View arg1, int position,
					long arg3) {
				Toast.makeText(ListViewActivity3.this, "第"+ (position+1) + "行", Toast.LENGTH_SHORT).show();

			}
});context - The context where the View associated with this SimpleAdapter is running
data - A List of Maps. Each entry in the List corresponds to one row in the list. The Maps contain the data for each row, and should include all the entri<span style="white-space:pre"> </span>es specified in "from"
resource - Resource identifier of a view layout that defines the views for this list item. The layout file should include at least those named views defin<span style="white-space:pre"> </span>ed in "to"
from - A list of column names that will be added to the Map associated with each item.
to - The views that should display column in the "from" parameter. These should all be TextViews. The first N views in this list are given the values of t<span style="white-space:pre"> </span>he first N columns in the from parameter.
这样定义:
private String[] from = {"pict","contents1","contents2"};
	private int[] to = {R.id.imageViewId, R.id.textviewId1, R.id.textviewId2};
代码运行起来的结果
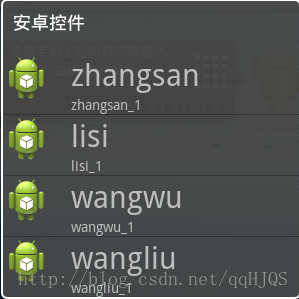
下面是我做的图

这个是我自己的理解,肯定有很多地方不合理,我自己是懂了!!!!


 被折叠的 条评论
为什么被折叠?
被折叠的 条评论
为什么被折叠?
 到【灌水乐园】发言


