


1.安装vite-plugin-svg-icons插件
yarn add vite-plugin-svg-icons -D2.配置vite.config.ts文件,配置插件
import path from 'path'
import { createSvgIconsPlugin } from 'vite-plugin-svg-icons'


plugins: [
    vue(),
    // 配置svg
    createSvgIconsPlugin({
      // 指定需要缓存的图标文件夹
      iconDirs: [path.resolve(process.cwd(), 'src/assets/icons')],
      // 指定symbolId格式
      symbolId: 'icon-[dir]-[name]'
    })
  ],
3.在main.ts入口文件导入svg配置文件
// 使用svg 需要引入svg-icons-register 配置
import 'virtual:svg-icons-register'
4.使用vite-plugin-svg-icons插件还需要fast-glob依赖
yarn add fast-glob5.使用svg图标
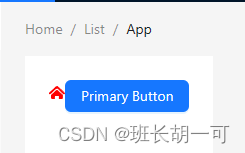
 <!-- 测试使用svg图标 -->
<!-- svg 为使用根标签 图标大小放在svg 标签中-->
<!-- svg得配合use标签使用 xlink:href属性值是:#icon-svg文件名,fill属性为图标颜色 -->
<svg style="width: 16px;height: 16px;">
    <use xlink:href="#icon-home" fill="red"></use>
</svg>
效果如下:

6.为了更好地复用,接下来将svg封装成一个全局组件,以后使用更加方便,新建component/svgicons/index.vue
<!-- vue3 -->
<!-- 封装svg组件 -->
<template>
    <!-- svg 为使用根标签 图标大小放在svg 标签中-->
    <!-- svg得配合use标签使用 xlink:href属性值是:#icon-svg文件名,fill属性为图标颜色 -->
    <svg :style="{ width, height }">
        <use :xlink:href="prefix + name" :fill="color"></use>
    </svg>
</template>

<script setup lang='ts'>
//接收父组件传来的参数
defineProps({
    // 接收父组件传来的前缀
    prefix: {
        type: String,
        default: '#icon-'
    },
    // 接收父组件传来的svg文件名
    name: {
        type: String,
        default: 'default'
    },
    // 接收父组件传来的图标颜色
    color: {
        type: String,
        default: '#ccc'
    },
    // 接收父组件传来的图标宽度
    width: {
        type: String,
        default: '16px'
    },
    // 接收父组件传来的图标高度
    height: {
        type: String,
        default: '16px'
    }
})


</script>

<style scope></style>
7.使用svgicon组件
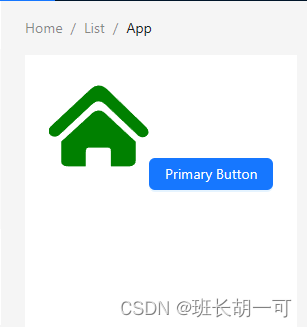
<!-- 测试使用svg图标 -->
<svgIcons name="home" color="red" width="100px" height="100px" />

<script setup lang='ts'>
import svgIcons from '@/components/svgIcons/index.vue'
</script>
效果如下:

8.因为项目使用svg组件频率很高,所以将svg组件注册成全局组件,新建service/globalComponent/index.ts
// 引入全局组件
import svgIcons from '@/components/svgIcons/index.vue'
import globalC from '@/components/global/index.vue'

// 引入vue内置app 和component 类型
import type { App, Component } from 'vue'


// 新建全局组件对象,将全局组件对象添加到全局组件对象中,是类型限定
const globalComponents: { [name: string]: Component } = { svgIcons, globalC }


// 导出全局组件对象
export default {
    install(app: App) {
        // Object.keys(globalComponents)可以获取所有全局组件的key数组
        // .forEach(key => { }) 遍历key 数组,得到每个全局组件的值
        // app.component(key, globalComponents[key]) 将全局组件添加到app中
        Object.keys(globalComponents).forEach(key => {
            app.component(key, globalComponents[key])
        })
    }
}
9.在main.ts中引入并使用
// 引入全局组件配置
import globalComponent from './service/globalComponent/index.ts'

// 实例化应用app
const app = createApp(App)
// 注册全局组件
app.use(globalComponent)
// 挂载app
app.mount('#app')
10.使用全局组件
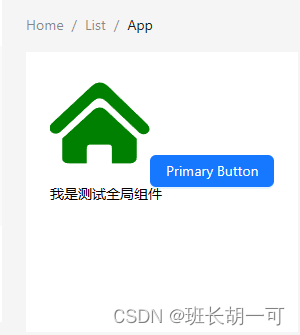
<!-- 测试使用svg图标 -->
<svgIcons name="home" color="green" width="100px" height="100px" />

<!-- 测试使用antd 按钮 -->
<a-button type="primary">Primary Button</a-button>

<!-- 测试使用全局组件 -->
<globalC />
效果如下:


 4300
4300


 被折叠的 条评论
为什么被折叠?
被折叠的 条评论
为什么被折叠?
 到【灌水乐园】发言


