


笔记目录
- 语言
- 1.MyBatis
- 2.Thymeleaf
- 3.Shiro
- 4.BootStrap
- 5.Spring
- 6.SpringMVC
- 7.SpringBoot
- 7.1 简介
- 7.2 功能
- 7.3 配置
- 7.3.1 常见配置
- 7.3.1.1 mvc
- 7.3.1.2 messages
- 7.3.1.3 mobile
- 7.3.1.4 view
- 7.3.1.5 resource
- 7.3.1.6 multipart
- 7.3.1.7 freemarker
- 7.3.1.8 velocity
- 7.3.1.9 thymeleaf
- 7.3.1.10 mustcache
- 7.3.1.11 groovy
- 7.3.1.12 http
- 7.3.1.13 json
- 7.3.1.14 jersey
- 7.3.1.15 cookie and session
- 7.3.1.16 ssl
- 7.3.1.17 tomcat
- 7.3.1.18 undertow
- 7.3.1.19 datasource
- 7.3.1.20 logback
- 7.3.1.21 servlet
- 7.3.2 拆分配置文件环境
- 7.3.3 Thymeleaf配置
- 7.3.4 WebMvcConfigurer接口使用
- 7.4 注解
- 7.5 源码解析
- 7.6 问题
- 8.Vue.js
- 9.JQuery
- 10.JavaScript
- 11.Json
- 12.Redis
- 13.Mybatis Plus
- 环境
- 问题
- 工具
- 依赖
- 1. junit
- 2. thymeleaf
- 3. spring-webmvc
- 4. javax.servlet-api
- 5. Jstl
- 6. lombok
- 7. shiro-spring
- 8. spring-boot-devtools
- 9. tomcat-embed-jasper
- 10. mybatis-spring-boot-starter
- 11. mysql-connector-java
- 12. druid
- 13. spring-jdbc
- 14. spring-webmvc
- 15. aspectjweaver
- 16. spring-aop
- 17. spring-boot-starter-aop
- 18. jackson-databind
- 19. thymeleaf-extras-springsecurity4
- 8. spring-boot-devtools
- 9. tomcat-embed-jasper
- 10. mybatis-spring-boot-starter
- 11. mysql-connector-java
- 12. druid
- 13. spring-jdbc
- 14. spring-webmvc
- 15. aspectjweaver
- 16. spring-aop
- 17. spring-boot-starter-aop
- 18. jackson-databind
- 19. thymeleaf-extras-springsecurity4
语言
1.MyBatis
1.1 普通用法
1.1.1 配置文件
<?xml version="1.0" encoding="UTF-8" ?>
<!DOCTYPE configuration
PUBLIC "-//mybatis.org//DTD Config 3.0//EN"
"http://mybatis.org/dtd/mybatis-3-config.dtd">
<configuration>
<typeAliases></typeAliases>
<environments default="development">
<environment id="development">
<transactionManager type="JDBC"/>
<dataSource type="POOLED">
<property name="driver" value="com.mysql.jdbc.Driver"/>
<property name="url" value="jdbc:mysql://localhost:3306/database?useUnicode=true&characterEncoding=UTF-8"/>
<property name="username" value="username"/>
<property name="password" value="password"/>
</dataSource>
</environment>
</environments>
<mappers></mappers>
</configuration>
1.1.2 mapper文件
1.2 通用mapper文件
<?xml version="1.0" encoding="UTF-8" ?>
<!DOCTYPE mapper
        PUBLIC "-//mybatis.org//DTD Config 3.0//EN"
        "http://mybatis.org/dtd/mybatis-3-mapper.dtd">
<mapper namespace="">

</mapper>
2.Thymeleaf
2.1 命名空间
xmlns:th="http://www.thymeleaf.org"
2.2 依赖
2.3 thymeleaf 配置
常用固定费配置
# thymeleaf配置
spring.thymeleaf.prefix=classpath:/templates/
spring.thymeleaf.suffix=.html
spring.thymeleaf.encoding=UTF-8
spring.thymeleaf.cache=false
spring.thymeleaf.servlet.content-type=text/html
spring.resources.static-locations=classpath:/templates/,classpath:/static/
thymeleaf全部配置:点击跳转
2.4 thymeleaf 语法
<!DOCTYPE html>
<html lang="en" xmlns:th="http://www.thymeleaf.org">
<head>
    <meta charset="UTF-8">
    <title>thymeleaf语法总览</title>
</head>
<body>
<h1>展示单个数据</h1>
<!--后端通过Model对象存储name属性值-->
直接取值不解析:<span th:text="${name}"></span>
<span>[[${name}]]</span>

<!--假设传过来的是<a href="">name属性</a>-->
先解析html在渲染值:<span th:utext="${name}"></span>

<!--将值填充到表单控件-->
<input type="text" th:value="${name}">

<--------------------------------------------------------------------->
<h1>展示对象数据</h1>
<!--假设有一个user对象,包含id,name,age,bir等数据-->
<ul>
    <li>id:<span th:text="${user.id}"/></li>
    <li>name:<span th:text="${user.name}"/></li>
    <li>age:<span th:text="${user.age}"/></li>
    <!--自定义日期格式-->
    <li>bir:<span th:text="${#dates.format(user.bir,'yyyy-MM-dd')}"/></li>
</ul>

<--------------------------------------------------------------------->
<h1>有条件展示数据</h1>
<!--注意:在thymeleaf中是没有else的,一般使用if就足够了-->
<!--
运算符:
gt:great tha[大于]    >
ge:great equal[大于等于]    >=
eq:equal[等于]    =
lt:less than[小于]    <
le:less equal[小于等于]    <=
ne:not equal[不等于]    !=
-->
<!--判断年龄小于等于23才展示name属性-->
<span th:if="${user.age} le 23" th:text="${user.name]}"></span>

<--------------------------------------------------------------------->
<h1>展示多个数据</h1>
<!--集合:通过后端传入一个名为users的list集合-->
<!--==th:each="对象名,状态:${后端传入的集合名}==-->
<!--
size:总条数
index:当前遍历索引
even:是否偶数
count:当前遍历次数
current:是否为当前遍历
first:第一个
last:最后一个
odd:是否奇数
-->
<ul th:each="u,uStat:${users}">
    <li>当前遍历的次数:<span th:text="${uStat.count}"/></li>
    <li>当前遍历的索引:<span th:text="${uStat.index}"/></li>
    <li>当前遍历是否为奇数:<span th:text="${uStat.odd}"/></li>
    <li>当前遍历是否为偶数:<span th:text="${uStat.even}"/></li>
    <li><span th:text="${u.id}"/></li>
    <li><span th:text="${u.name}"/></li>
    <li><span th:text="${u.age}"/></li>
    <li><span th:text="${#dates.format(u.bir,'yyyy-MM-dd')}"/></li>
    <!--获取遍历的状态-->
    <li>集合中的总记录数:<span th:text="${uStat.size}"/></li>
</ul>

<--------------------------------------------------------------------->
<h1>引入静态资源</h1>
<!--首先在资源目录下新建static目录用于存放静态资源;static下可建css/js/img等目录-->
<!--注意:若是没生效可能是因为缓存问题,清除浏览器缓存即可。再不行就请检查资源路径是否正确-->
<link rel="stylesheet" th:href="@{/css/xxx.css}">
<script th:src="@{/js/xxx.js}"></script>
<img th:src="@{/img/xxx.jpg}">

<--------------------------------------------------------------------->
<h1>链接数据</h1>
<!--普通写法-->
<a th:href="@{/user/delete}">删除记录</a>
<!--若后端需要接收单个前端传递的参数时,通过()传参即可-->
<a th:href="@{/user/delete(id=20)}">删除记录</a>
<!--若后端需要接收多个前端传递的参数时,通过()传参,逗号分隔即可-->
<a th:href="@{/user/delete(id=20,neme='hey')}">删除记录</a>

<--------------------------------------------------------------------->
</body>
</html>
2.5 thymeleaf 属性
3.Shiro
3.1 简介
Shiro(Apache Shiro)是java的一个安全框架。在项目开发中,使用Shiro的人越来越多,因为它相当简单。相比Spring Security,可能没有Spring Security的功能强大。但实际开发中我们很少用到那么复杂的东西,所以使用比较小的Shiro完全足够应对日常的开发。主要功能:认证、授权、加密、回话管理。
百度百科:https://baike.baidu.com/item/shiro/17753571?fr=aladdin
官方介绍:http://shiro.apache.org/architecture.html
3.2 相关功能
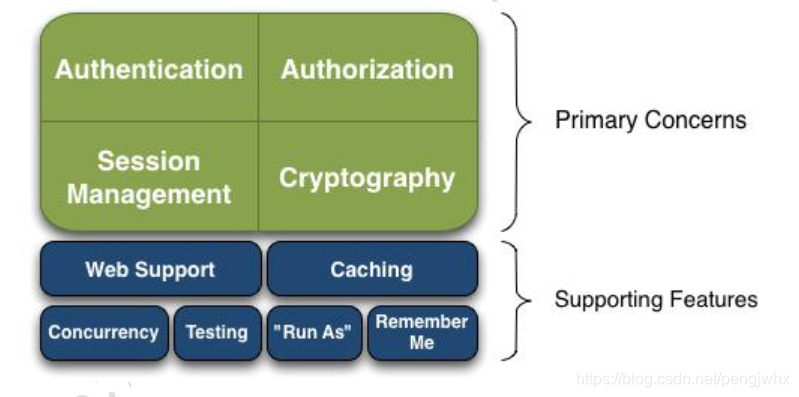
- Authentication:身份认证/登录,验证用户是不是拥有相应的身份;
- Authorization:授权,即权限验证,验证某个已认证的用户是否拥有某个权限;即判断用
户是否能做事情,常见的如:验证某个用户是否拥有某个角色。或者细粒度的验证某个用
户对某个资源是否具有某个权限; - Session Manager:会话管理,即用户登录后就是一次会话,在没有退出之前,它的所有信
息都在会话中;会话可以是普通 JavaSE 环境的,也可以是如 Web 环境的; - Cryptography:加密,保护数据的安全性,如密码加密存储到数据库,而不是明文存储;
- Web Support:Web 支持,可以非常容易的集成到 Web 环境;
- Caching:缓存,比如用户登录后,其用户信息、拥有的角色/权限不必每次去查,这样可以提高效率;
- Concurrency:Shiro支持多线程应用的并发验证,即如在一个线程中开启另一个线程,能
把权限自动传播过去; - Testing:提供测试支持;
- Run As:允许一个用户假装为另一个用户(如果他们允许)的身份进行访问;
- Remember Me:记住我,这个是非常常见的功能,即一次登录后,下次再来的话不用登录
注意:Shiro 不会去维护用户、维护权限;这些需要我们自己去设计/提供;然后通过
相应的接口注入给 Shiro 即可。
3.3 实现原理

实现一个简单的Shiro应用:代码通过Subject来进行认证和授权,而Subject又委托给了SecurityManager(安全管理)。所以我们需要给Shiro的SecurityManager注入Realm,来让SecurityManager得到合法的用户及其权限进行判断;
3.4 架构理解

-
Subject:主体,可以看到主体可以是任何可以与应用交互的“用户”;
-
SecurityManager:相 当 于SpringMVC或Struts2中的DispatcherServle;
-
FilterDispatcher:Shiro的核心,所有具体的交互都通过SecurityManager进行控制;它管理着所有Subject、且负责进行认证和授权、及会话、缓存的管理。
-
Authenticator:认证器,负责主体认证的,这是一个扩展点,若用户觉得Shiro默认的不好,可以自定义实现;其需要认证策略(Authentication Strategy),即什么情况下算用户认证通过了;
-
Authrizer:授权器,或者访问控制器,用来决定主体是否有权限进行相应的操作;即控制着用户能访问应用中的哪些功能;
-
Realm:可以有 1 个或多个 Realm,可以认为是安全实体数据源,即用于获取安全实体的;可以是 JDBC 实现,也可以是 LDAP 实现,或者内存实现等等;由用户提供。注意:Shiro不知道你的用户/权限存储在哪及以何种格式存储;所以我们一般在应用中都需要实现自己的 Realm;
-
SessionManager:管理Session生命周期,这个组件就是SessionManager;而Shiro并不仅仅可以用在 Web 环境,也可以用在如普通的 JavaSE 环境、JavaEE环境、EJB 等环境;所有Shiro就抽象了一个自己的Session来管理主体与应用之间交互的数据;这样的话,比如我们在 Web 环境用,刚开始是一台Web 服务器;接着又上了台 EJB 服务器;这时想把两台服务器的会话数据放到一个地方,这个时候就可以实现自己的分布式会话(如把数据放到 Memcached 服务器);
-
SessionDAO:DAO数据访问对象,用于会话的 CRUD,比如我们想把 Session保存到数据库,那么可以实现自己的 SessionDAO,通过如 JDBC 写到数据库;比如想把Session 放到 Memcached 中,可以实现自己的 Memcached SessionDAO;另外 SessionDAO中可以使用 Cache 进行缓存,以提高性能;
-
CacheManager:缓存控制器,来管理如用户、角色、权限等的缓存的;因为这些数据基本
上很少去改变,放到缓存中后可以提高访问的性能 -
Cryptography:密码模块,Shiro 提高了一些常见的加密组件用于如密码加密
3.5 Shiro认证(Authentication)流程

@Test
public void HelloWord() {

    //1、获取 SecurityManager 工厂,此处使用 Ini 配置文件初始化 SecurityManager
Factory<org.apache.shiro.mgt.SecurityManager> factory =
new IniSecurityManagerFactory("classpath:shiro.ini");

    //2、得到 SecurityManager 实例 并绑定给 SecurityUtils
org.apache.shiro.mgt.SecurityManager securityManager = factory.getInstance();
SecurityUtils.setSecurityManager(securityManager);

    //3、得到 Subject 及创建用户名/密码身份验证 Token(即用户身份/凭证)
Subject subject = SecurityUtils.getSubject();
// UsernamePasswordToken 继承
UsernamePasswordToken token = new UsernamePasswordToken("zhang", "123");
try {

    //4、登录,即身份验证
subject.login(token);
} catch (AuthenticationException e) {

    //5、身份验证失败
}
Assert.assertEquals(true, subject.isAuthenticated()); //断言用户已经登录

    //6、退出
subject.logout();
1、UsernamePasswordToken 实现HostAuthenticationToken和RemeberAuthenticationToken,HostAuthenticationToken实现AuthenticationToken
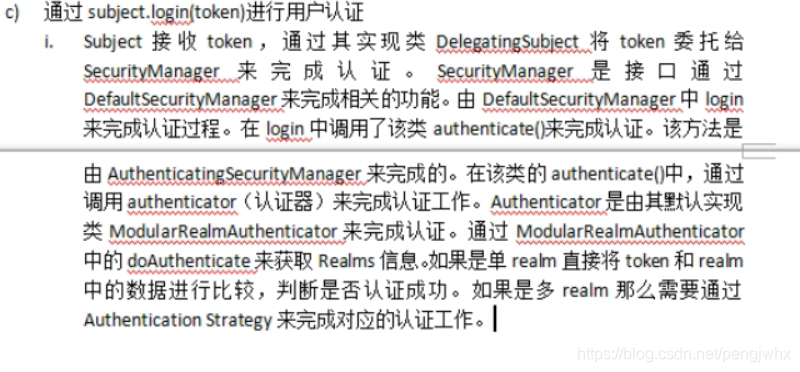
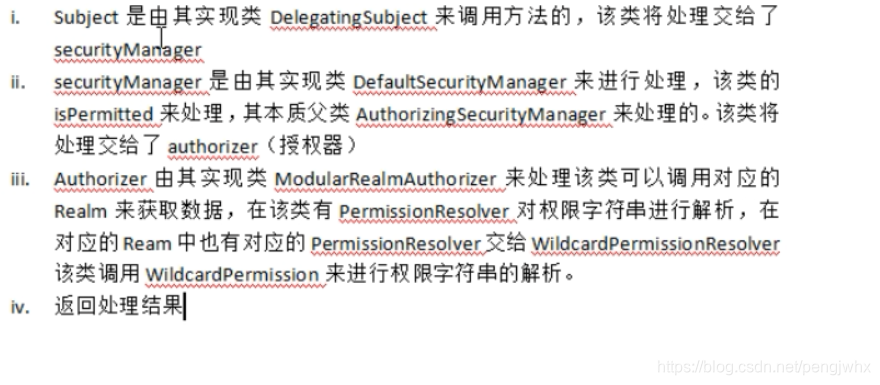
2、首先调用 Subject.login(token)进行登录,其会自动委托给 Security Manager,调用之前必
须通过 SecurityUtils. setSecurityManager()设置;
3、SecurityManager 负责真正的身份验证逻辑;它会委托给 Authenticator 进行身份验证;SecurityManager j接口继承Authenticator、Authrizer、sessionManage接口
4、Authenticator 才是真正的身份验证者,Shiro API 中核心的身份认证入口点,此处可以自
定义插入自己的实现;
5、Authenticator 可能会委托给相应的 AuthenticationStrategy 进行多 Realm 身份验证,默认
ModularRealmAuthenticator 会调用 AuthenticationStrategy 进行多 Realm 身份验证;
6、Authenticator 会把相应的 token 传入 Realm,从 Realm 获取身份验证信息,如果没有返
回/抛出异常表示身份验证失败了。此处可以配置多个 Realm,将按照相应的顺序及策略进
行访问。
SecurityManager实现类结构关系
Realm
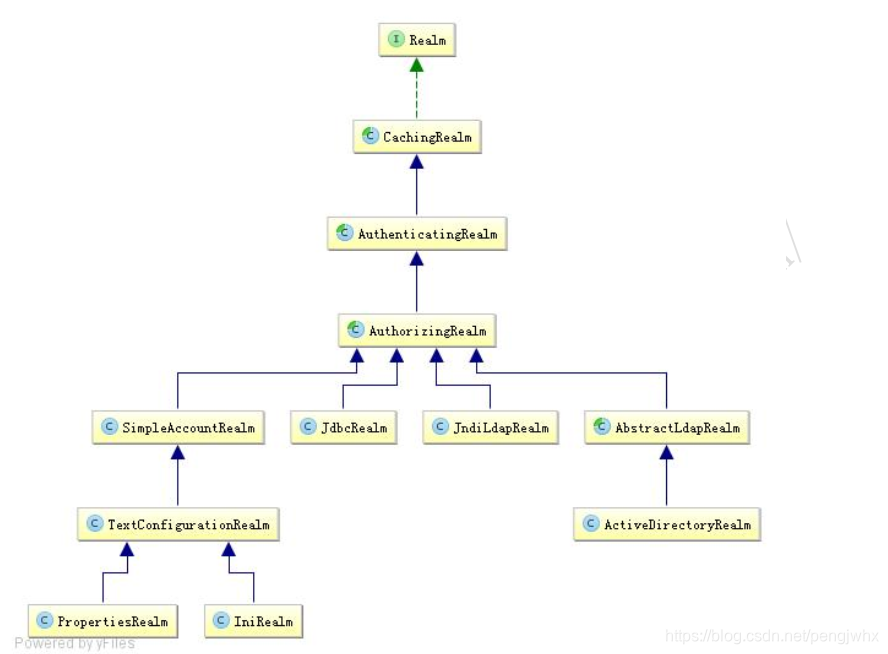
一般继承 AuthorizingRealm(授权)即可;其继承了 AuthenticatingRealm(即身份验证),而且也间接继承了 CachingRealm(带有缓存实现),重写里面AuthenticationInfo 认证和doGetAuthorizationInfo授权方法。
3.6 shiro授权实现的方式以及流程
- 基于角色访问控制(隐式角色)
- 基于资源访问控制(显式角色)
如何实现;
// 1. 编程式(单个和多个角色)
subject.hasRole(“admin”), Array.aslist("admin1","admin2");

//2. 注解
@RequiresRoles("admin")

//3. 页面控制
<shiro:hasRole name="admin">

//4. shiro配置文件中配置
 <property name="filterChainDefinitions">
            <value>
                /commons/** = anon
                /plugins/** = anon
                /assets/** = anon
                /css/** = anon
                /js/** = anon
                /img/** = anon
                /fonts/** = anon
                /bootstrap/** = anon
                /login = anon
                /interface/** = anon
                /** = user

            </value>
</property>
Shiro拦截器(规则):

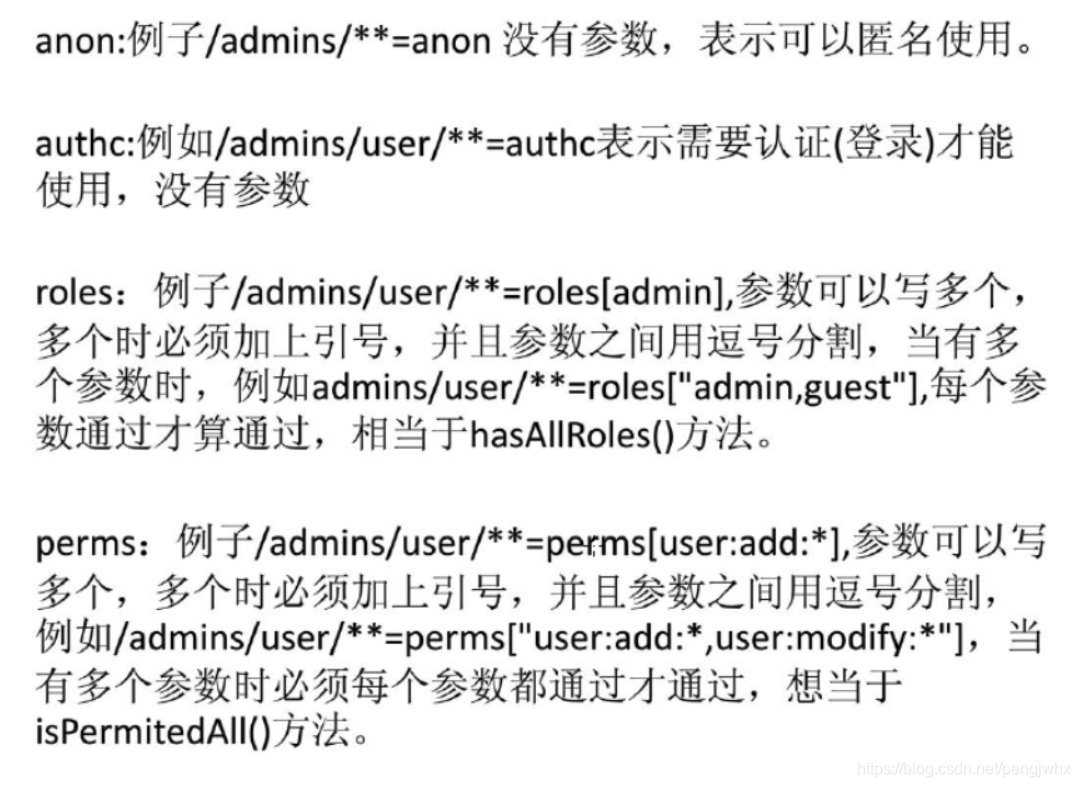
实现流程:
3.7 shiro集成spring框架代码实现
- 引入shiro相关包
<!--shiro-->
<dependency>
   <groupId>org.apache.shiro</groupId>
   <artifactId>shiro-all</artifactId>
   <version>1.4.0</version>
   <type>pom</type>
</dependency>

<!--缓存-->
<dependency>
   <groupId>org.ehcache</groupId>
   <artifactId>ehcache</artifactId>
   <version>3.6.0</version>
</dependency>
- 在web.xml中配置ShiroFilter
<filter>
<filter-name>shiroFilter</filter-name>
<!--通过代理设置,有spring 创建交由servlet管理 -->
<filter-class>org.springframework.web.filter.DelegatingFilterProxy</filter-class>
<init-param>
 <!--表示用bean 的生命周期由servlet管理 -->
<param-name>targetFilterLifecycle</param-name>
<param-value>true</param-value>
</init-param>
<init-param>
 <!--表示spring中bean的id,若不配置,改属性默认和filter-name一致-->
<param-name>targetBeanName</param-name>
<param-value>shiroFilter</param-value>
</init-param>
</filter>
<filter-mapping>
<filter-name>shiroFilter</filter-name>
<url-pattern>/*</url-pattern>
<dispatcher>REQUEST</dispatcher>
<dispatcher>FORWARD</dispatcher>
</filter-mapping>
- 添加Sping-Shiro.xml配置文件
<?xml version="1.0" encoding="UTF-8"?>
<beans xmlns="http://www.springframework.org/schema/beans"
xmlns:xsi="http://www.w3.org/2001/XMLSchema-instance" xmlns:aop="http://www.springframework.org/schema/aop"
xsi:schemaLocation="http://www.springframework.org/schema/beans http://www.springframework.org/schema/beans/spring-beans.xsd http://www.springframework.org/schema/aop http://www.springframework.org/schema/aop/spring-aop.xsd">
<!-- 定义shiro安全管理器,并配置需要实现的功能-->
<bean id="securityManager" class="org.apache.shiro.mgt.DefaultSecurityManager">
<!--实现realm功能-->
<property name="shiroRealm" ref="shiroRealm"/>
<!--实现cacheManager功能-->
<property name="cacheManager" ref="cacheManager"/>
<!--实现seeionManager功能-->
<property name="sessionManager" ref="sessionManager"/>
<!--实现记住我功能-->
<property name="remeberMe" ref="remeberMe"/>
</bean>
<!-- 定义自己实现的realm域,并配置凭证匹配器-->
<bean id="shiroRealm" class="com.entity.ShiroRealm">
<property name="credentialsMatcher" ref="credentialsMatcher"/>
</bean>
<!-- 配置shiro过滤器-->
<bean id="shiroFilter" class="org.apache.shiro.spring.web.ShiroFilterFactoryBean">
<property name="securityManager" ref="securityManager"/>
<property name="loginUrl" value="/login"/>
<property name="successUrl" value="/index"/>
<property name="unauthorizedUrl" value="/unauth"/>
<property name="filterChainDefinitions">
<value>
/commons/** = anon
/plugins/** = anon
/assets/** = anon
/css/** = anon
/js/** = anon
/img/** = anon
/fonts/** = anon
/bootstrap/** = anon
/index = user <!--user表示用remeberMe功能-->
/login = anon <!--登录页面可以匿名访问 -->
/interface/** = anon <!--anon表示可以匿名访问-->
/logout=logout <!--登出功能 -->
/** = user
</value>
</property>
</bean>
<!--配置logout登出管理,id只能为logout,并且在shiro拦截器中需要定义lgout-->
<bean id="logout" class="org.apache.shiro.web.filter.authc.LogoutFilter">
<property name="redirectUrl" value="/login"/>
</bean>
<!--实现cacha缓存,读取ehcache配置文件-->
<bean id="cacheManager" class="org.apache.shiro.cache.ehcache.EhCacheManager">
<property name="cacheManagerConfigFile" value="classpath:config/ehcache.xml"/>
</bean>
<!--配置session管理器-->
<bean id="sessionManager" class="org.apache.shiro.web.session.mgt.DefaultWebSessionManager">
<property name="globalSessionTimeout" ref="300000"/>
<property name="deleteInvalidSessions" value="true"/>
</bean>
<!--设置记住我-->
<bean id="remeberMe" class="org.apache.shiro.web.mgt.CookieRememberMeManager">
<property name="cookie" ref="remeberMeCookies"/>
</bean>
<!-- cookis配置-->
<bean id="remeberMeCookies" class="org.apache.shiro.web.servlet.SimpleCookie">
<!--设置最大存活时间和cookie名称-->
<property name="maxAge" value="604800"/>
<property name="name" value="remeberMe"/>
</bean>
<!--开启shiro权限注解功能,并配置securityManager属性-->
<aop:config proxy-target-class="true"></aop:config>
<bean class="org.apache.shiro.spring.security.interceptor.AuthorizationAttributeSourceAdvisor">
<property name="securityManager" ref="securityManager"/>
</bean>
<!--定义凭证匹配器,也就是对密码进行算法加密和次数-->
<bean id="credentialsMatcher" class="org.apache.shiro.authc.credential.HashedCredentialsMatcher">
<property name="hashAlgorithmName" value="md5"/>
<property name="hashIterations" value="2"/>
</bean>
<!--配置ahtuc过滤器(表单域名称),在页面中账号和密码的name属性的值必须和下面定义的相同-->
<bean id ="authc" class="org.apache.shiro.web.filter.authc.FormAuthenticationFilter">
<property name="usernameParam" value="username"/>
<property name="passwordParam" value="password"/>
<property name="rememberMeParam" value="remeberMe"/>
</bean>
<!--异常处理-->
<bean class="org.springframework.web.servlet.handler.SimpleMappingExceptionResolver">
<property name="exceptionMappings" >
<props>
<!--认证异常和授权异常 -->
<prop key="org.apache.shiro.authz.UnauthenticatedException">login</prop>
<prop key="org.apache.shiro.authz.UnauthorizedException">refuse</prop>
</props>
</property>
</bean>
<!-- 保证实现了Shiro内部lifecycle函数的bean执行,另一种实现注解的方式 -->
<!-- <bean id="lifecycleBeanPostProcessor" class="org.apache.shiro.spring.LifecycleBeanPostProcessor"/>
<!– AOP式方法级权限检查 –>
<bean
class="org.springframework.aop.framework.autoproxy.DefaultAdvisorAutoProxyCreator"
depends-on="lifecycleBeanPostProcessor">
<property name="proxyTargetClass" value="false" />
</bean>
<!– 启用shrio授权注解拦截方式 –>
<bean class="org.apache.shiro.spring.security.interceptor.AuthorizationAttributeSourceAdvisor">
<property name="securityManager" ref="securityManager"/>
</bean>-->
</beans>
- ehcache配置文件
<ehcache>
    <!-- 指定一个目录:当 EHCache 把数据写到硬盘上时, 将把数据写到这个目录下.-->
    <diskStore path="d:\\tempDirectory"/>
    <!-- 设置缓存的默认数据过期策略 -->
    <defaultCache
            maxElementsInMemory="10000"
            eternal="false"
            timeToIdleSeconds="120"
            timeToLiveSeconds="120"
            overflowToDisk="true"
    />
    <!--
        设定具体的命名缓存的数据过期策略。每个命名缓存代表一个缓存区域
        缓存区域(region):一个具有名称的缓存块,可以给每一个缓存块设置不同的缓存策略。
        如果没有设置任何的缓存区域,则所有被缓存的对象,都将使用默认的缓存策略。即:<defaultCache.../>
        Hibernate 在不同的缓存区域保存不同的类/集合。
         对于类而言,区域的名称是类名。如:com.atguigu.domain.Customer
         对于集合而言,区域的名称是类名加属性名。如com.atguigu.domain.Customer.orders
    -->
    <!--
        name: 设置缓存的名字,它的取值为类的全限定名或类的集合的名字
        maxElementsInMemory: 设置基于内存的缓存中可存放的对象最大数目

        eternal: 设置对象是否为永久的, true表示永不过期, 此时将忽略timeToIdleSeconds 和 timeToLiveSeconds属性; 默认值是false
       timeToIdleSeconds:设置对象空闲最长时间,以秒为单位, 超过这个时间,对象过期。当对象过期时,EHCache会把它从缓存中清除。如果此值为0,表示对象可以无限期地                  处于空闲状态。
        timeToLiveSeconds:设置对象生存最长时间,超过这个时间,对象过期。如果此值为0,表示对象可以无限期地存在于缓存中.
                该属性值必须大于或等于 timeToIdleSeconds 属性值

        overflowToDisk:设置基于内存的缓存中的对象数目达到上限后,是否把溢出的对象写到基于硬盘的缓存中
    -->
    <cache name="com.atguigu.hibernate.entities.Employee"
           maxElementsInMemory="1"
           eternal="false"
           timeToIdleSeconds="300"
           timeToLiveSeconds="600"
           overflowToDisk="true"
    />
    <cache name="com.atguigu.hibernate.entities.Department.emps"
           maxElementsInMemory="1000"
           eternal="true"
           timeToIdleSeconds="0"
           timeToLiveSeconds="0"
           overflowToDisk="false"
    />
</ehcache>
- 实现用户实体类
@Data
@AllArgsConstructor
@NoArgsConstructor
public class StudentDTO implements Serializable {
    private String stuNo; //学生学号
    private String stuName; //名字
    private String stuAge; //年龄
    private  String cno; //课程号
    private  String score; //分数
    private String stuGender;//性别
    private String password; //密码
    private String salt; //密码加密盐
    private Date modifyDate; //更新时间
}
- 自定义的ShiroRealm域
 @Autowired
    StudentService studentService;

    @Override
    protected AuthorizationInfo doGetAuthorizationInfo(PrincipalCollection principalCollection) {


        // 从 principals获取主身份信息,将getPrimaryPrincipal方法返回值转为真实身份类型(在上边的doGetAuthenticationInfo认证通过填充到SimpleAuthenticationInfo中身份类型),
        String userName = (String) principalCollection.getPrimaryPrincipal()

        // 根据身份信息获取权限信息,模拟从数据库获取到数据
        List<String> permissions = new ArrayList<String>();
        permissions.add("user:create");// 用户的创建
        permissions.add("items:add");// 商品添加权限

        // 查到权限数据,返回授权信息(要包括 上边的permissions)
        SimpleAuthorizationInfo simpleAuthorizationInfo = new SimpleAuthorizationInfo();
        // 将上边查询到授权信息填充到simpleAuthorizationInfo对象中
        simpleAuthorizationInfo.addStringPermissions(permissions);

        return simpleAuthorizationInfo;

    }

    @Override
    protected AuthenticationInfo doGetAuthenticationInfo(AuthenticationToken authenticationToken) throws AuthenticationException {
        UsernamePasswordToken token = (UsernamePasswordToken) authenticationToken;
        //从authenticationToken获取用户名
        StudentDTO un = studentService.getStudentDTOBystuNo(token.getUsername());
        // 账号不存在
        if (un == null) {
            return null;
        }
        //去认证
        return new SimpleAuthenticationInfo(un, un.getPassword(), ByteSource.Util.bytes(un.getSalt()),getName());
    }


    //清理缓存方法
    public void clearCache(){
        Subject subject= SecurityUtils.getSubject();
        //获得用户信息,并清除
        super.clearCache(subject.getPrincipals());
    }
}
常用的权限注解
@RequiresAuthentication
表示当前 Subject 已经通过 login 进行了身份验证;即 Subject. isAuthenticated()返回 true@RequiresUser
表示当前 Subject 已经身份验证或者通过记住我登录的。@RequiresGuest
表示当前 Subject 没有身份验证或通过记住我登录过,即是游客身份@RequiresRoles(value={“admin”, “user”}, logical= Logical.AND)
表示当前 Subject 需要角色 admin 和 user。@RequiresPermissions (value={“user:a”, “user:b”}, logical= Logical.OR)
表示当前 Subject 需要权限 user:a 或 user:b
- shiro 框架controller实现
@SystemControllerLog(operatePoint=OperatePointConstants.LOGIN, operateType=OperateTypeConstants.LOGIN)
   @PostMapping("/login")
   @CsrfToken(remove = true)
   @ResponseBody
   public Object loginPost(String username, String password) {
       logger.info("POST请求登录");


       if (StringUtils.isBlank(username)) {
           return renderError("用户名不能为空");
       }
       if (StringUtils.isBlank(password)) {
           return renderError("密码不能为空");
       }else{
       password = SymmetricEncoder.encryptStr(secretkey, password);
        LOGGER.info(password);
       }
       Subject user = SecurityUtils.getSubject();
       UsernamePasswordToken token = new UsernamePasswordToken(username,password);
       Result result=new Result();
       try {
           user.login(token);                                                                                                                                                          //在这一步跳入入自己实现的域即shiroDbRealm中验证
           return renderSuccess();
       } catch (UnknownAccountException e) {
       result.setMsg("账号不存在");
       return result;
           /*throw new RuntimeException("账号不存在!", e);*/
       } catch (DisabledAccountException e) {
       result.setMsg("账号未启用");
       return result;
           /*throw new RuntimeException("账号未启用", e);*/
       } catch (IncorrectCredentialsException e) {
       result.setMsg("密码错误,请重试");
       return result;
           /*throw new RuntimeException("密码错误,请重试", e);*/
       } catch (Throwable e) {
       result.setMsg("未知错误,请联系管理员");
       return result;
          throw new RuntimeException("未知错误,请联系管理员", e);
       }

   }
3.8 SpringBoot整合Shiro
4.BootStrap
5.Spring
5.1 简介
Spring框架 ==> “春天”
Spring官网:https://spring.io/
官方文档:https://docs.spring.io/spring/docs/5.2.5.RELEASE/spring-framework-reference/
百度百科:https://baike.baidu.com/item/spring%E6%A1%86%E6%9E%B6
IOC和AOP==【重点】==
轮子理论:“不要重复造轮子”。
- 目的:解决企业应用开发的复杂性
- 功能:使用基本的JavaBean代替EJB,并提供了更多的企业应用功能
- 范围:任何Java应用
- 理念:实现有的技术更加容易,本身就是一个大杂烩,整合了现有的技术框架!
- SSH:struct2+Spring+hibernate
- SSM:SpringMVC+Spring+Mybatis
- 核心:Spring是一个轻量级控制反转(IoC)和面向切面(AOP)的容器框架
优点
- spring是一个开源的免费的框架(容器)
- spring是一个轻量级、非入侵式的框架
- 控制反转(IOC)、面向切面编程(AOP)
- 支持事务管理处理,对框架整合的支持
总结:Spring就是一个轻量级的控制反转(IOC)和面向切面编程(AOP)的框架。
5.2 maven依赖
5.2.1 Spring依赖
<!--Spring-->
<dependency>
    <groupId>org.springframework</groupId>
    <artifactId>spring-webmvc</artifactId>
    <version>5.2.5.RELEASE</version>
</dependency>
<dependency>
    <groupId>org.springframework</groupId>
    <artifactId>spring-jdbc</artifactId>
    <version>5.2.5.RELEASE</version>
</dependency>
5.2.2 AOP 织入
<!--aspectjweaver-->
<dependency>
    <groupId>org.aspectj</groupId>
    <artifactId>aspectjweaver</artifactId>
    <version>1.9.5</version>
</dependency>
5.3 xml配置
5.3.1 Spring基础格式
<?xml version="1.0" encoding="UTF-8"?>
<beans xmlns="http://www.springframework.org/schema/beans"
       xmlns:xsi="http://www.w3.org/2001/XMLSchema-instance"
       xsi:schemaLocation="http://www.springframework.org/schema/beans
        https://www.springframework.org/schema/beans/spring-beans.xsd">

</beans>
5.3.1.1 Bean
    <!--扫描指定的包-->
    <context:component-scan base-package="com.cqipc.pojo"/>
    <!--注解支持-->
    <context:annotation-config/>
5.3.1.2 开启注解
 	<!--注解支持-->
    <context:annotation-config/>
5.3.2 AOP
<?xml version="1.0" encoding="UTF-8"?>
<beans xmlns="http://www.springframework.org/schema/beans"
       xmlns:xsi="http://www.w3.org/2001/XMLSchema-instance"
       xmlns:aop="http://www.springframework.org/schema/aop"
       xsi:schemaLocation="http://www.springframework.org/schema/beans
        https://www.springframework.org/schema/beans/spring-beans.xsd
        http://www.springframework.org/schema/aop
        https://www.springframework.org/schema/aop/spring-aop.xsd ">

</beans>
5.3.2.1 AOP配置例子
- 方式一
<!--注册bean-->
    <bean id="userService" class="com.cqipc.edu.service.UserServiceImpl"/>
    <bean id="log" class="com.cqipc.edu.log.Log"/>
    <bean id="afterLog" class="com.cqipc.edu.log.AfterLog"/>

    <!--方式一:使用Spring API接口-->
    <!--配置aop:需要导入aop的约束-->
    <aop:config>
        <!--
            切入点 ===> 表达式:expression = execution(要执行的位置...)
        -->
        <aop:pointcut id="pointcut" expression="execution(* com.cqipc.edu.service.UserServiceImpl.*(..))"/>
        <!--执行环绕-->
        <aop:advisor advice-ref="log" pointcut-ref="pointcut"/>
        <aop:advisor advice-ref="afterLog" pointcut-ref="pointcut"/>
    </aop:config>
- 方式二
    <!--方式二:自定义类-->
    <bean id="diy" class="com.cqipc.edu.diy.DiyPointcut"/>
    <aop:config>
        <!--自定义切面   ref 要引用的类-->
        <aop:aspect ref="diy">
            <!--切入点-->
            <aop:pointcut id="point" expression="execution(* com.cqipc.edu.service.UserServiceImpl.* (..))"/>
            <!--通知-->
            <aop:before method="before" pointcut-ref="point"/>
            <aop:after method="after" pointcut-ref="point"/>

        </aop:aspect>
    </aop:config>
- 方式三
    <!--方式三-->
    <bean id="auto" class="com.cqipc.edu.diy.apptest"/>
    <!--开启注解支持-->
    <aop:aspectj-autoproxy/>
5.3.3 P/C命名空间
xmlns:p="http://www.springframework.org/schema/p"
或
xmlns:c="http://www.springframework.org/schema/c"
5.4 整合Mybatis
- spring-dao.xml
<?xml version="1.0" encoding="UTF-8"?>
<beans xmlns="http://www.springframework.org/schema/beans"
xmlns:xsi="http://www.w3.org/2001/XMLSchema-instance"
xmlns:aop="http://www.springframework.org/schema/aop"
xsi:schemaLocation="http://www.springframework.org/schema/beans
https://www.springframework.org/schema/beans/spring-beans.xsd
http://www.springframework.org/schema/aop
https://www.springframework.org/schema/aop/spring-aop.xsd ">
<!--配置DataSource(即mybatis数据库配置)-->
<bean id="dataSource" class="org.springframework.jdbc.datasource.DriverManagerDataSource">
<property name="driverClassName" value="com.mysql.jdbc.Driver"/>
<property name="url" value="jdbc:mysql://localhost:3306/javawork?useUnicode=true&characterEncoding=UTF-8"/>
<property name="username" value="root"/>
<property name="password" value="123456"/>
</bean>
<!--创建sqlSessionFactory(工厂),依赖于上面的DataSource-->
<bean id="sqlSessionFactory" class="org.mybatis.spring.SqlSessionFactoryBean">
<property name="dataSource" ref="dataSource"/>
<!--绑定mybatis配置-->
<property name="configLocation" value="classpath:mybatis-config.xml"/>
<property name="mapperLocations" value="classpath:com/cqipc/edu/mapper/*.xml"/>
</bean>
<!--SqlSessionTemplate:就是sqlsession对象【核心】-->
<bean id="sqlsession" class="org.mybatis.spring.SqlSessionTemplate">
<!--只能使用构造器注入,因为他没有set方法-->
<constructor-arg index="0" ref="sqlSessionFactory"/>
</bean>
<bean id="commodityMapper" class="com.cqipc.edu.mapper.commodityMapperImpl">
<property name="sqlsession" ref="sqlsession"/>
</bean>
</beans>
- applicationContext.xml
<?xml version="1.0" encoding="UTF-8"?>
<beans xmlns="http://www.springframework.org/schema/beans"
       xmlns:xsi="http://www.w3.org/2001/XMLSchema-instance"
       xsi:schemaLocation="http://www.springframework.org/schema/beans
        https://www.springframework.org/schema/beans/spring-beans.xsd">

    <import resource="spring-dao.xml"/>

    <bean id="commodityMapper" class="com.cqipc.edu.mapper.commodityMapperImpl">
        <property name="sqlsession" ref="sqlsession"/>
    </bean>
</beans>
- sqlSessionFactory
<!--配置于spring-dao.xml中-->
<!--配置DataSource(即mybatis数据库配置)-->
<bean id="dataSource" class="org.springframework.jdbc.datasource.DriverManagerDataSource">
<property name="driverClassName" value="com.mysql.jdbc.Driver"/>
<property name="url" value="jdbc:mysql://localhost:3306/javawork?useUnicode=true&characterEncoding=UTF-8"/>
<property name="username" value="root"/>
<property name="password" value="123456"/>
</bean>
<!--创建sqlSessionFactory(工厂),依赖于上面的DataSource-->
<bean id="sqlSessionFactory" class="org.mybatis.spring.SqlSessionFactoryBean">
<property name="dataSource" ref="dataSource"/>
<!--绑定mybatis配置-->
<property name="configLocation" value="classpath:mybatis-config.xml"/>
<property name="mapperLocations" value="classpath:com/cqipc/edu/mapper/*.xml"/>
</bean>
- sqlSessionTemplate
 	<!--配置于spring-dao.xml中-->
	<!--SqlSessionTemplate:就是sqlsession对象【核心】-->
    <bean id="sqlsession" class="org.mybatis.spring.SqlSessionTemplate">
        <!--只能使用构造器注入,因为他没有set方法-->
        <constructor-arg index="0" ref="sqlSessionFactory"/>
    </bean>
- 实现类注入Spring
    <!--配置于applicationContex.xml中-->
	<bean id="commodityMapper" class="com.cqipc.edu.mapper.commodityMapperImpl">
        <property name="sqlsession" ref="sqlsession"/>
    </bean>
6.SpringMVC
6.1 简介
官方文档:https://docs.spring.io/spring/docs/5.2.5.RELEASE/spring-framework-reference/web.html#spring-web
注解大全:https://blog.csdn.net/weixin_37490221/article/details/78406810
MVC框架:https://baike.baidu.com/item/MVC%E6%A1%86%E6%9E%B6?fromtitle=mvc&fromid=85990
MVC:模型(Dao、Service) 视图(Jsp) 控制器(Servlet)
SpringMVC执行流程+SSM框架整合==【重点】==
6.2 依赖
6.2.1 spring-webmvc
6.2.2 junit
6.2.3 servlet-api
6.2.4 jstl
6.3 配置
6.3.1 Spring基础格式
<?xml version="1.0" encoding="UTF-8"?>
<beans xmlns="http://www.springframework.org/schema/beans"
       xmlns:xsi="http://www.w3.org/2001/XMLSchema-instance"
       xsi:schemaLocation="http://www.springframework.org/schema/beans
        https://www.springframework.org/schema/beans/spring-beans.xsd">

</beans>
6.3.2 Maven父工程公共依赖
<!--public dependence-->
<dependencies>
    <dependency>
        <groupId>junit</groupId>
        <artifactId>junit</artifactId>
        <version>4.12</version>
    </dependency>
    <dependency>
        <groupId>org.springframework</groupId>
        <artifactId>spring-webmvc</artifactId>
        <version>5.2.5.RELEASE</version>
    </dependency>
    <dependency>
        <groupId>javax.servlet</groupId>
        <artifactId>servlet-api</artifactId>
        <version>2.5</version>
    </dependency>
    <dependency>
        <groupId>javax.servlet</groupId>
        <artifactId>jstl</artifactId>
        <version>1.2</version>
    </dependency>
</dependencies>
6.3.3 通用pox.xml依赖配置
<!--public dependence-->
    <dependencies>
        <!--Junit-->
        <dependency>
            <groupId>junit</groupId>
            <artifactId>junit</artifactId>
            <version>4.12</version>
            <scope>test</scope>
        </dependency>
        <!--MySQL驱动-->
        <dependency>
            <groupId>mysql</groupId>
            <artifactId>mysql-connector-java</artifactId>
            <version>5.1.48</version>
        </dependency>
        <!--数据库连接池-->
        <dependency>
            <groupId>com.mchange</groupId>
            <artifactId>c3p0</artifactId>
            <version>0.9.5.5</version>
        </dependency>
        <!--servlet-->
        <dependency>
            <groupId>javax.servlet</groupId>
            <artifactId>servlet-api</artifactId>
            <version>3.0-alpha-1</version>
        </dependency>
        <!--jsp-->
        <dependency>
            <groupId>javax.servlet.jsp</groupId>
            <artifactId>jsp-api</artifactId>
            <version>2.2.1-b03</version>
        </dependency>
        <!--JSTL-->
        <dependency>
            <groupId>javax.servlet</groupId>
            <artifactId>jstl</artifactId>
            <version>1.2</version>
        </dependency>
        <!--MyBatis-->
        <dependency>
            <groupId>org.mybatis</groupId>
            <artifactId>mybatis</artifactId>
            <version>3.5.4</version>
        </dependency>
        <!--MyBatis - Spring-->
        <dependency>
            <groupId>org.mybatis</groupId>
            <artifactId>mybatis-spring</artifactId>
            <version>2.0.4</version>
        </dependency>
        <!--Spring - WebMVC-->
        <dependency>
            <groupId>org.springframework</groupId>
            <artifactId>spring-webmvc</artifactId>
            <version>5.2.5.RELEASE</version>
        </dependency>
        <!--Spring - Jdbc-->
        <dependency>
            <groupId>org.springframework</groupId>
            <artifactId>spring-jdbc</artifactId>
            <version>5.2.5.RELEASE</version>
        </dependency>
        <!--lombok-->
        <dependency>
            <groupId>org.projectlombok</groupId>
            <artifactId>lombok</artifactId>
            <version>1.18.12</version>
        </dependency>
    </dependencies>

    <!--静态资源过滤问题-->
    <build>
        <resources>
            <resource>
                <directory>src/main/java</directory>
                <includes>
                    <include>**/*.properties</include>
                    <include>**/*.xml</include>
                </includes>
                <filtering>false</filtering>
            </resource>
            <resource>
                <directory>src/main/resources</directory>
                <includes>
                    <include>**/*.properties</include>
                    <include>**/*.xml</include>
                </includes>
                <filtering>false</filtering>
            </resource>
        </resources>
    </build>
6.3.4 通用web.xml配置【注解】
<?xml version="1.0" encoding="UTF-8"?>
<web-app xmlns="http://xmlns.jcp.org/xml/ns/javaee"
         xmlns:xsi="http://www.w3.org/2001/XMLSchema-instance"
         xsi:schemaLocation="http://xmlns.jcp.org/xml/ns/javaee http://xmlns.jcp.org/xml/ns/javaee/web-app_4_0.xsd"
         version="4.0">

    <!--注册DispatcherServlet-->
    <servlet>
        <servlet-name>springmvc</servlet-name>
        <servlet-class>org.springframework.web.servlet.DispatcherServlet</servlet-class>
        <!--关联springmvc配置文件【路径】-->
        <init-param>
            <param-name>contextConfigLocation</param-name>
            <param-value>classpath:applicationContext.xml</param-value>
        </init-param>
        <!--设置启动级别-1-->
        <load-on-startup>1</load-on-startup>
    </servlet>
    <!--所有请求都会被springmvc拦截-->
    <servlet-mapping>
        <servlet-name>springmvc</servlet-name>
        <url-pattern>/</url-pattern>
    </servlet-mapping>

    <!--配置SpringMVC乱码过滤器-->
    <filter>
        <filter-name>encoding</filter-name>
        <filter-class>org.springframework.web.filter.CharacterEncodingFilter</filter-class>
        <init-param>
            <param-name>encoding</param-name>
            <param-value>utf-8</param-value>
        </init-param>
    </filter>
    <filter-mapping>
        <filter-name>encoding</filter-name>
        <url-pattern>/*</url-pattern>
    </filter-mapping>

    <!--配置session过期时间-->
    <session-config>
        <session-timeout>15</session-timeout>
    </session-config>

</web-app>
6.3.5 通用database.properties配置
jdbc.driver=com.mysql.jdbc.Driver
jdbc.url=jdbc:mysql://localhost:3306/librarymanager?useSSL=true&useUnicode=true&characterEncoding=utf-8
jdbc.username=root
jdbc.password=123456
6.3.6 通用mybatis-config.xml配置
<?xml version="1.0" encoding="UTF-8" ?>
<!DOCTYPE configuration
        PUBLIC "-//mybatis.org//DTD Config 3.0//EN"
        "http://mybatis.org/dtd/mybatis-3-config.dtd">
<configuration>

    <!--注意包名对应【package:实体类包路径】-->
    <typeAliases>
        <package name="com.cqipc.edu.pojo"/>
    </typeAliases>

    <mappers>
        <mapper class="com.cqipc.edu.dao.BookMapper"/>
    </mappers>

</configuration>
6.3.7 通用spring-mvc.xml配置【注解】
<?xml version="1.0" encoding="UTF-8"?>
<beans xmlns="http://www.springframework.org/schema/beans"
       xmlns:xsi="http://www.w3.org/2001/XMLSchema-instance"
       xmlns:context="http://www.springframework.org/schema/context"
       xmlns:mvc="http://www.springframework.org/schema/mvc"
       xsi:schemaLocation="http://www.springframework.org/schema/beans
        https://www.springframework.org/schema/beans/spring-beans.xsd
        http://www.springframework.org/schema/context
        https://www.springframework.org/schema/context/spring-context.xsd
        http://www.springframework.org/schema/mvc
        https://www.springframework.org/schema/mvc/spring-mvc.xsd">

    <!--自动扫描包:扫描指定路径下带注解的类,由ioc容器统一管理【base-package可更换为自己的controller类路径】-->
    <context:component-scan base-package="com.cqipc.edu.controller"/>
    <!--SpringMVC不处理静态资源 .css/.js/.html/.mp3/.mp4/.*-->
    <mvc:default-servlet-handler/>
    <!--SpringMVC注解驱动【DefaultAnnotationHandlerMapping和AnnotationMethodHandlerAdapter】-->
    <mvc:annotation-driven/>

    <!--视图解析器-->
    <bean class="org.springframework.web.servlet.view.InternalResourceViewResolver" id="internalResourceViewResolver">
        <!--前缀-->
        <property name="prefix" value="/WEB-INF/jsp/"/>
        <!--后缀-->
        <property name="suffix" value=".jsp"/>
    </bean>
    <!--JSON乱码问题【若不使用JSON可忽略此配置】-->
    <mvc:annotation-driven>
        <mvc:message-converters>
            <bean class="org.springframework.http.converter.StringHttpMessageConverter">
                <constructor-arg value="UTF-8"/>
            </bean>
            <bean class="org.springframework.http.converter.json.MappingJackson2HttpMessageConverter">
                <property name="objectMapper">
                    <bean class="org.springframework.http.converter.json.Jackson2ObjectMapperFactoryBean">
                        <property name="failOnEmptyBeans" value="false"/>
                    </bean>
                </property>
            </bean>
        </mvc:message-converters>
    </mvc:annotation-driven>

    <!--配置拦截器-->
    <mvc:interceptors>
        <mvc:interceptor>
            <!--/:表示当前;/**:表示过滤所有【一般用这个】-->
            <mvc:mapping path="/**"/>
            <bean class="com.cqipc.edu.config.MyInterceptor"/>
        </mvc:interceptor>
    </mvc:interceptors>

</beans>
6.3.8 通用spring-dao.xml配置
<?xml version="1.0" encoding="UTF-8"?>
<beans xmlns="http://www.springframework.org/schema/beans"
       xmlns:xsi="http://www.w3.org/2001/XMLSchema-instance"
       xmlns:context="http://www.springframework.org/schema/context"
       xsi:schemaLocation="http://www.springframework.org/schema/beans
        https://www.springframework.org/schema/beans/spring-beans.xsd
        http://www.springframework.org/schema/context
        https://www.springframework.org/schema/context/spring-context.xsd">

    <!--关联数据库配置文件-->
    <context:property-placeholder location="classpath:database.properties"/>

    <!--连接池-->
    <bean id="dataSoure" class="com.mchange.v2.c3p0.ComboPooledDataSource">
        <property name="driverClass" value="${jdbc.driver}"/>
        <property name="jdbcUrl" value="${jdbc.url}"/>
        <property name="user" value="${jdbc.username}"/>
        <property name="password" value="${jdbc.password}"/>
    </bean>

    <!--SqlSessionFactory-->
    <bean id="sqlSessionFactory" class="org.mybatis.spring.SqlSessionFactoryBean">
        <property name="dataSource" ref="dataSoure"/>
        <!--绑定MyBatis的配置文件-->
        <property name="configLocation" value="classpath:mybatis-config.xml"/>
    </bean>

    <!--配置dao接口扫描包,动态实现dao接口注入到Spring-->
    <bean class="org.mybatis.spring.mapper.MapperScannerConfigurer">
        <!--注入-->
        <property name="sqlSessionFactoryBeanName" value="sqlSessionFactory"/>
        <!--扫描要扫描的包【路径】-->
        <property name="basePackage" value="com.cqipc.edu.dao"/>
    </bean>
</beans>
6.3.9 通用spring-service.xml配置
<?xml version="1.0" encoding="UTF-8"?>
<beans xmlns="http://www.springframework.org/schema/beans"
       xmlns:xsi="http://www.w3.org/2001/XMLSchema-instance"
       xmlns:context="http://www.springframework.org/schema/context"
       xsi:schemaLocation="http://www.springframework.org/schema/beans
        https://www.springframework.org/schema/beans/spring-beans.xsd http://www.springframework.org/schema/context https://www.springframework.org/schema/context/spring-context.xsd">

    <!--扫描service下的包【路径】-->
    <context:component-scan base-package="com.cqipc.edu.service"/>

    <!--将所有业务类注入到Spring【路径】-->
    <bean id="BookServiceImpl" class="com.cqipc.edu.service.BookServiceImpl">
        <property name="bookMapper" ref="bookMapper"/>
    </bean>

    <!--声明式事务-->
    <bean id="TransactionManager" class="org.springframework.jdbc.datasource.DataSourceTransactionManager">
        <property name="dataSource" ref="dataSoure"/>
    </bean>

</beans>
6.3.10 通用applicationContext.xml配置
<?xml version="1.0" encoding="UTF-8"?>
<beans xmlns="http://www.springframework.org/schema/beans"
       xmlns:xsi="http://www.w3.org/2001/XMLSchema-instance"
       xsi:schemaLocation="http://www.springframework.org/schema/beans
        https://www.springframework.org/schema/beans/spring-beans.xsd">

    <import resource="classpath:spring-dao.xml"/>
    <import resource="classpath:spring-service.xml"/>
    <import resource="classpath:spring-mvc.xml"/>

</beans>
6.4 问题
6.4.1 乱码
若直接通过表单提交【POST/GET】,通过Controller传回的中文会出现乱码【乱码出现在Java层面】
如何解决:使用过滤器
- 编写过滤器类
public class exampleFilter implements Filter {

    @Override
    public void init(FilterConfig filterConfig) throws ServletException {

    }

    @Override
    public void doFilter(ServletRequest request, ServletResponse response, FilterChain chain) throws IOException, ServletException {
        request.setCharacterEncoding("utf-8");
        response.setCharacterEncoding("utf-8");
        chain.doFilter(request, response);
    }

    @Override
    public void destroy() {

    }
}
- 在web.xml注册过滤器
<filter>
   <filter-name>exampleFilter</filter-name>
   <filter-class>com.cqipc.edu.filter.exampleFilter</filter-class>
</filter>
    <filter-mapping>
        <filter-name>exampleFilter</filter-name>
        <url-pattern>/*</url-pattern>
    </filter-mapping>
注意:若以上方法无法解决乱码问题,可通过设置Tomcat目录下的server.xml的编码解决
<Connector connectionTimeout="20000" port="8080" protocol="HTTP/1.1" redirectPort="8443" URLEncoding="UTF-8"/>
7.SpringBoot
7.1 简介
SpringBoot注解手册:https://www.jianshu.com/p/b283acf7001d
7.2 功能
7.2.1 整合MyBatis
- 引入整合依赖 ==> mybatis-spring-boot-starter
- 引入JDBC驱动包
- 引入druid【阿里巴巴连接池】
<!--integrate mybatis-->
<dependency>
      <groupId>org.mybatis.spring.boot</groupId>
      <artifactId>mybatis-spring-boot-starter</artifactId>
      <version>2.1.2</version>
</dependency>
<dependency>
     <groupId>mysql</groupId>
     <artifactId>mysql-connector-java</artifactId>
     <version>5.1.48</version>
</dependency>
<dependency>
      <groupId>com.alibaba</groupId>
      <artifactId>druid</artifactId>
      <version>1.1.22</version>
</dependency>
- 导入所有依赖后需要在入口类上加上@mapperScan()注解,用于扫描Dao接口所在的包;
@SpringBootApplication
@MapperScan("com.codesky.dao")
public class SpringbootMybatisApplication {

    public static void main(String[] args) {
        SpringApplication.run(SpringbootMybatisApplication.class, args);
    }

}
- 数据库建表以及开发实体对象类
- 配置数据源及mybatis相关设置
# 配置数据源
spring.datasource.type=com.alibaba.druid.pool.DruidDataSource
spring.datasource.driver-class-name=com.mysql.jdbc.Driver
spring.datasource.url=jdbc:mysql://localhost:3306/springboot-mybatis?serverTimezone=UTC&useUnicode=true
spring.datasource.username=root
spring.datasource.password=123456

# MyBatis设置
mybatis.mapper-locations=classpath:/mybatis/mapper/*.xml
mybatis.type-aliases-package=com.codesky.pojo
- mapper配置文件开发/注解SQL开发【开发Dao接口】==>单击跳转
- 开发Service和ServiceImpl
- 开发控制器 ==> 页面
7.2.2 整合 Logback日志框架
7.2.2.1 简介
Logback是由
log4j创始人设计的又一个开源日志组件。logback当前分成三个模块:logback-core,logback- classic和logback-access。logback-core是其它两个模块的基础模块。logback-classic是log4j的一个 改良版本。此外logback-classic完整实现SLF4J API使你可以很方便地更换成其它日志系统如log4j或JDK14 Logging。logback-access访问模块与Servlet容器集成提供通过Http来访问日志的功能。
版本发布:2011年11月03日,logback 1.0 发布,Java 日志框架。
7.2.2.2 日志级别
DEBUG < INFO < WARN < ERROR
日志级别越高,输出的信息越少;
注意:在SpringBoot中默认已经集成了Logback的依赖;
7.2.2.3 日志分类
日志分为两类:
- 根日志【rootLogger】
- 子日志【指定某个包】
7.2.2.4 日志配置
- 新建名为logback.xml的配置文件【不建议使用】
<?xml version="1.0" encoding="UTF-8" ?>
<configuration>
    <!--设置项目中日志输出位置-->
    <appender name="stdout" class="ch.qos.logback.core.ConsoleAppender">
        <layout class="ch.qos.logback.classic.PatternLayout">
            <!--设置项目中日志输出格式-->
            <patter>[%p] data:%d{yyyy-MM-dd HH:mm:ss} [line:%L] [class:%c] %m %n</patter>
        </layout>
    </appender>
    <!--项目中根日志控制-->
    <root level="INFO">
        <appender-ref ref="stdout"/>
    </root>
    <logger name="com.codesky.dao" level="DEBUG"/>
</configuration>
- 在application中配置
# 设置根日志级别
logging.level.root=info

# 设置某个包的日志级别【可设置多个】
logging.level.com.codesky.dao=debug
- 类中使用日志
import org.slf4j.Logger;
import org.slf4j.LoggerFactory;

@RestController
public class UserControllre {

    @Autowired
    private UserMapper userMapper;
    //在该类中动态使用日志
    private static final Logger logger = LoggerFactory.getLogger(UserControllre.class);

    @GetMapping("/queryUserAll")
    public List<User> queryUserAll() {
        List<User> userAll = userMapper.queryUserAll();
        logger.info("INFO==>" + userAll);
        logger.debug("DEBUG==>" + userAll);
        return userAll;
    }
}
- 注解使用日志
注意:该方法首先要导入Lombok依赖
@RestController
//使用该注解会产生一个变量log
@Slf4j
public class UserControllre {

    @Autowired
    private UserMapper userMapper;
    @GetMapping("/queryUserAll")
    public List<User> queryUserAll() {
        List<User> userAll = userMapper.queryUserAll();
        log.info("INFO==>" + userAll);
        log.debug("DEBUG==>" + userAll);
        return userAll;
    }
}
7.2.3 面向切面编程
7.2.3.1 简介
在软件业,AOP为Aspect Oriented Programming的缩写,意为:面向切面编程,通过预编译方式和运行期间动态代理实现程序功能的统一维护的一种技术。AOP是OOP的延续,是软件开发中的一个热点,也是Spring框架中的一个重要内容,是函数式编程的一种衍生范型。利用AOP可以对业务逻辑的各个部分进行隔离,从而使得业务逻辑各部分之间的耦合度降低,提高程序的可重用性,同时提高了开发的效率。
主要功能
日志记录,性能统计,安全控制,事务处理,异常处理]等等。
主要意图
将日志记录,性能统计,安全控制,事务处理[异常处理等代码从业务逻辑代码中划分出来,通过对这些行为的分离,我们希望可以将它们独立到非指导业务逻辑的方法中,进而改变这些行为的时候不影响业务逻辑的代码。
AOP/OOP
AOP、OOP在字面上虽然非常类似,但却是面向不同领域的两种设计思想。OOP(面向对象编程)针对业务处理过程的实体及其属性和行为进行抽象封装,以获得更加清晰高效的逻辑单元划分。
而AOP则是针对业务处理过程中的切面进行提取,它所面对的是处理过程中的某个步骤或阶段,以获得逻辑过程中各部分之间低耦合性的隔离效果。这两种设计思想在目标上有着本质的差异。
上面的陈述可能过于理论化,举个简单的例子,对于“雇员”这样一个业务实体进行封装,自然是OOP/OOD的任务,我们可以为其建立一个“Employee”类,并将“雇员”相关的属性和行为封装其中。而用AOP设计思想对“雇员”进行封装将无从谈起。
同样,对于“权限检查”这一动作片断进行划分,则是AOP的目标领域。而通过OOD/OOP对一个动作进行封装,则有点不伦不类。
换而言之,OOD/OOP面向名词领域,AOP面向动词领域。
7.2.3.2 如何使用
7.2.3.2.1 基础配置
- 引入依赖 ==> spring-boot-starter-aop【必要依赖】
<!--springboot aop-->
<dependency>
   <groupId>org.springframework.boot</groupId>
   <artifactId>spring-boot-starter-aop</artifactId>
</dependency>
- 相关注解
/*
@Aspect  用在类上,代表这是一个切面类
@Before()  用在方法上,代表这个方法是一个前置通知方法
@After()  用在方法上,代表这个方法是一个后置通知方法
@Around()  用在方法上,代表这个方法是一个环绕方法
*/
7.2.3.2.2 具体使用
@Aspect
@Configuration
public class MyAspect {

    /*
    获取目标方法名:joinPoint.getSignature().getName()
    获取目标参数:joinPoint.getArgs()
    获取目标对象:joinPoint.getTarget()
     */

    //前置通知方法,在目标方法执行之前的操作  @Before表示要切入的位置
    @Before("within(com.codesky.service.*ServiceImpl)")
    public void before(JoinPoint joinPoint) {
        System.out.println("前置通知业务处理");
        System.out.println("目标方法:" + joinPoint.getSignature().getName());
        System.out.println("目标参数:" + joinPoint.getArgs());
        System.out.println("目标对象:" + joinPoint.getTarget());
    }

    //后置通知方法,在目标方法执行之后的操作  @After()表示要切入的位置
    @After("within(com.codesky.service.*ServiceImpl)")
    public void after() {
        System.out.println("后置通知业务处理");
    }

    //环绕通知方法【常用,环绕包含了前置和后置】;环绕必须有一个返回值  Object;以@Around()注解表示
    //当目标方法执行时会先进入环绕通知,然后在环绕方法执行之后进入目标方法,目标方法执行完成之后回到环绕通知
    //执行目标方法:首先-->环绕通知-->目标方法-->环绕通知[注意:环绕通知参数是ProceedingJoinPoint,与前置和和后置都不同]
    @Around("within(com.codesky.service.*ServiceImpl)")
    public Object around(ProceedingJoinPoint proceedingJoinPoint) throws Throwable {
        System.out.println("进入环绕通知业务处理");
        //放行执行业务方法
        Object proceed = proceedingJoinPoint.proceed();
        System.out.println("业务方法执行之后业务处理");
        return proceed;
    }

}
扩展:
假设要控制多个切面的执行顺序时,可以写两个切面类,并在垒上标注@Order注解,数字越小执行越大;
7.2.4 文件操作
7.2.4.1 文件上传
定义:用户访问当前系统的本地的资源通过浏览器将文件上传到所在服务器中的操作叫做文件上传;
7.2.4.1.1 默认文件上传
- 使用文件上传首先需要给用户准备一个文件上传的页面
<!DOCTYPE html>
<html lang="en">
<head>
    <meta charset="UTF-8">
    <title>文件上传</title>
</head>
<body>
<h1>选择文件</h1>
<!--enctype默认为application/x-www-form-urlencoded不能对二进制文件做编码-->
<!--上传文件时提交方式是post,并且enctype为multipart/form-data-->
<!--默认只能操作10M大小的文件,否则报错,如果要上传超过10M的内容则需要在配置文件中做相应配置-->
<form action="/springboot-upload/file/upload" method="post" enctype="multipart/form-data">
    <input type="file" name="aaa">
    <br>
    <input type="submit" value="确认上传">
</form>
</body>
</html>
- 新建提交的Controller类
@Controller
@RequestMapping("/file")
public class FileController {

    @PostMapping("/upload")
    //由于在前端传过来的是一个multipart数据类型的文件
    //所以这里接收的也是一个multipart数据类型的文件
    //接收到的名字要与表单中的名字对应
    public String upload(MultipartFile aaa, HttpServletRequest request) throws IOException {
        /*
        获取文件的相关信息:
        System.out.println("文件名:" + aaa.getOriginalFilename());
        System.out.println("文件类型:" + aaa.getContentType());
        System.out.println("文件大小:" + aaa.getSize() + "bt");
        */
        //处理文件上传
        String realPath = request.getServletContext().getRealPath("/files");
        File dir = new File(realPath);
        System.out.println("文件上传位置:" + realPath);
        if (!dir.exists()) dir.mkdirs();
        aaa.transferTo(new File(dir, aaa.getOriginalFilename()));
        return "redirect:/upload.html";
    }
}
- 配置文件
server.port=8080
server.servlet.context-path=/springboot-upload
spring.thymeleaf.prefix=classpath:/templates/
spring.thymeleaf.suffix=.html
spring.resources.static-locations=classpath:/templates/,classpath:/static/
spring.servlet.multipart.max-file-size=500MB
spring.servlet.multipart.max-request-size=500MB
7.2.4.1.2 自定义文件上传
注意:首先参照默认上传的使用方法
项目默认上传在临时的tomcat文件夹中,如何自定上传文件位置,只需要改造一下controller即可;
/**
 * 功能:将文件上传到static/file文件夹下
 */
@Controller
@RequestMapping("/file")
public class FileController {
    @PostMapping("/upload")
    public String upload(MultipartFile aaa, HttpServletRequest request) throws IOException {
        //设置文件上传的位置
        String realPath = ResourceUtils.getURL("classpath:").getPath() + "static/file";
        File dir = new File(realPath);
        System.out.println("文件上传位置:" + realPath);
        if (!dir.exists()) dir.mkdirs();
        aaa.transferTo(new File(dir, aaa.getOriginalFilename()));
        return "redirect:/upload.html";
    }
}
7.2.4.1.2 修改文件名
/**
 * 功能:将文件上川到static/file文件夹下,并修改文件名及文件后缀
 */
@Controller
@RequestMapping("/file")
public class FileController {
    @PostMapping("/upload")
    //由于在前端传过来的是一个multipart数据类型的文件
    //所以这里接收的也是一个multipart数据类型的文件
    //接收到的名字要与表单中的名字对应
    public String upload(MultipartFile aaa, HttpServletRequest request) throws IOException {
        //设置文件上传的位置
        String realPath = ResourceUtils.getURL("classpath:").getPath() + "static/file";
        File dir = new File(realPath);
        System.out.println("文件上传位置:" + realPath);
        if (!dir.exists()) dir.mkdirs();
        //修改文件名
        String newFileNamePrefix =
                new SimpleDateFormat("yyyy-MM-dd HH:mm:ss").format(new Date()) + UUID.randomUUID().toString();
        //文件后缀
        String extension = FilenameUtils.getExtension((aaa.getOriginalFilename()));
        String newFileName = newFileNamePrefix + "." + extension;
        aaa.transferTo(new File(dir, newFileName));
        return "redirect:/upload.html";
    }
}
/**
 * 功能:将文件上川到static/file文件夹下,并且根据不同日期创建不同的日期文件夹
 */
@Controller
@RequestMapping("/file")
public class FileController {

    @PostMapping("/upload")
    //由于在前端传过来的是一个multipart数据类型的文件
    //所以这里接收的也是一个multipart数据类型的文件
    //接收到的名字要与表单中的名字对应
    public String upload(MultipartFile aaa, HttpServletRequest request) throws IOException {
        //设置文件上传的位置
        String realPath = ResourceUtils.getURL("classpath:").getPath() + "/static/file";
        //设置日期文件夹格式
        String dateDir = new SimpleDateFormat("yyyy-MM-dd").format(new Date());
        File dir = new File(realPath, dateDir);
        if (!dir.exists()) dir.mkdirs();
        //修改文件名
        String newFileNamePrefix =
                new SimpleDateFormat("yyyyMMddHHmmss").format(new Date()) + UUID.randomUUID().toString();
        //文件后缀
        String extension = FilenameUtils.getExtension((aaa.getOriginalFilename()));
        String newFileName = newFileNamePrefix + "." + extension;
        aaa.transferTo(new File(dir, newFileName));
        return "redirect:/upload.html";
    }
}
7.2.4.2 文件下载
文件下载:用户访问当前系统,对当前系统提高的文件进行下载到本地计算机的过程。
注意:
- 系统中哪些文件可以被下载
- 下载的文件放在服务器中具体目录中
- 在系统中某个页面中开发下载链接
- 用户请求下载页面进行文件下载
7.2.4.3 上传下载案例
7.2.5 整合SpringBootSecurity(安全)
若过滤器和拦截器很熟练也可以不使用Security也可以实现安全管理,使用框架是为了简化代码
参考:https://spring.io/projects/spring-security
7.2.5.1 简介
主要功能:认证和授权
7.2.5.2 如何使用
- 创建SpringSecurity配置类
7.2.6 thymeleaf整合SpringSecurity
- 引入整合包
<dependency>
   <groupId>org.thymeleaf.extras</groupId>
   <artifactId>thymeleaf-extras-springsecurity5</artifactId>
</dependency>
- 自定义SpringSecurity配置类
/**
 * SpringSecurity配置类
 */
@EnableWebSecurity
public class SecurityConfig extends WebSecurityConfigurerAdapter {

    /**
     * 定义授权规则
     *
     * @param http
     * @throws Exception
     */
    @Override
    protected void configure(HttpSecurity http) throws Exception {
        //首页所有人可访问,功能也对应有权限的人才可以访问[链式编程]
        //请求授权的规则
        http.authorizeRequests()
                .antMatchers("/").permitAll()
                .antMatchers("/level1/**").hasRole("vip1")
                .antMatchers("/level2/**").hasRole("vip2")
                .antMatchers("/level3/**").hasRole("vip3");
        //没有权限默认会到登录页,需要开启登录的页面
        http.formLogin();
        //开启注销功能,注销成功会重定向到主页面
        http.logout().logoutSuccessUrl("/");
        //开启记住我功能
        http.rememberMe().rememberMeParameter("remember");
    }

    /**
     * Auth定义认证规则
     *
     * @param auth
     * @throws Exception
     */
    @Override
    protected void configure(AuthenticationManagerBuilder auth) throws Exception {
        /**
         * JDBC认证:auth.jdbcAuthentication()
         * 内存认证:auth.inMemoryAuthentication()
         */
        //在SpringBoot 2.1.x版本之上,会有PasswordEncoder这个错误
        //PasswordEncoder:密码编码[加密]
        //SpringSecurity 5.0+增加了很多的加密方法
        auth.inMemoryAuthentication().passwordEncoder(new BCryptPasswordEncoder())
                .withUser("zs").password(new BCryptPasswordEncoder().encode("123456")).roles("vip2", "vip3")
                .and()
                .withUser("admin").password(new BCryptPasswordEncoder().encode("123456")).roles("vip1", "vip2", "vip3")
                .and()
                .withUser("guest").password(new BCryptPasswordEncoder().encode("123123")).roles("vip1");
    }
}
- 引入命名空间
xmlns:sec="http://www.thymeleaf.org/thymeleaf-extras-springsecurity4
- 判断是否认证、获取用户角色和判断是否拥有角色
<!--判断认证-->
<!--未认证-->
<div sec:authorize="!isAuthenticated()">显示未认证内容</div>
<!--已认证-->
<div sec:authorize="isAuthenticated()">显示认证内容</div>

<!--获取用户和角色-->
<!--获取用户-->
<span sec:authentication="name"></span>
<!--获取角色-->
<span sec:authentication="principal.authorities"></span>

<!--判断是否拥有角色-->
<div sec:authorize="hasRole('VIP1')"></div>
7.2.7 springboot整合shiro
- 创建一个SpringBoot项目并导入Thymeleaf以来进行测试是否配置异常
- 导入相关依赖【thymeleaf以及shiro】
<!--SpringBoot ==> Shiro-->
<dependency>
     <groupId>org.apache.shiro</groupId>
     <artifactId>shiro-spring</artifactId>
     <version>1.5.3</version>
</dependency>
- 编写html页面
<!DOCTYPE html>
<html lang="en" xmlns:th="http://www.thymeleaf.org">
<head>
    <meta charset="UTF-8">
    <title>Title</title>
</head>
<body>
<h1>首页</h1>
<p th:text="${msg}"></p>
</body>
</html>
- 编写controller实现
@Controller
public class IndexController {

    @RequestMapping({"/", "/index", "/index.html"})
    public String index(Model model) {
        model.addAttribute("msg", "Hello,Shiro");
        return "index";
    }

}
- 自定义Realm类(继承AuthorizingRealm类)
@Configuration
public class ShiroConfig {

    //1.Realm ==> 创建对象(自定义)
    @Bean
    public UserRealm userRealm() {
        return new UserRealm();
    }

    //2.DefaultWebSecurityManager ==> 接管对象
    @Bean
    public DefaultWebSecurityManager getDefaultWebSecurityManager(@Qualifier("userRealm") UserRealm userRealm) {
        DefaultWebSecurityManager securityManager = new DefaultWebSecurityManager();
        //关联Realm
        securityManager.setRealm(userRealm);
        return securityManager;
    }

    //3.ShiroFilterFactoryBean ==> 连接前端
    @Bean
    public ShiroFilterFactoryBean getShiroFilterFactoryBean(@Qualifier("getDefaultWebSecurityManager") DefaultWebSecurityManager defaultWebSecurityManager) {
        ShiroFilterFactoryBean shiroFilterFactoryBean = new ShiroFilterFactoryBean();
        //设置安全管理器
        shiroFilterFactoryBean.setSecurityManager(defaultWebSecurityManager);
        return shiroFilterFactoryBean;
    }
}
7.2.8 springboot集成Redis
引入依赖
<!--Redis依赖-->
<dependency>
    <groupId>org.springframework.boot</groupId>
    <artifactId>spring-boot-starter-data-redis</artifactId>
</dependency>
配置
# 配置Redis
spring.redis.host=127.0.0.1
spring.redis.port=6379
测试
[外链图片转存失败,源站可能有防盗链机制,建议将图片保存下来直接上传(img-xa7K6jEG-1639115251084)(C:\Users\HY\AppData\Roaming\Typora\typora-user-images\image-20200526220145332.png)]
7.3 配置
7.3.1 常见配置
7.3.1.1 mvc
# 指定MVC的前缀和后缀【.jsp/.html等】
spring.mvc.view.prefix=/
spring.mvc.view.suffix=.html

# 指定使用的Locale
spring.mvc.locale=

# 设定async请求的超时时间,以毫秒为单位,如果没有设置的话,以具体实现的超时时间为准,比如tomcat的servlet3的话是10秒.
spring.mvc.async.request-timeout=

# 设定日期的格式,比如dd/MM/yyyy.
spring.mvc.date-format=yyyy-MM-dd

# 是否支持favicon.ico,默认为:=true
spring.mvc.favicon.enabled=true

# 在重定向时是否忽略默认model的内容,默认为true
spring.mvc.ignore-default-model-on-redirect=true

# 指定message=codes的格式化策略【prefix_error_code/postfix_error_code】
spring.mvc.message-codes-resolver-format=prefix_error_code
7.3.1.2 messages
# 指定message的basename,多个以逗号分隔,如果不加包名的话,默认从classpath路径开始,默认:=messages
spring.messages.basename=messages

# 设定加载的资源文件缓存失效时间,-1的话为永不过期,默认为-1
spring.messages.cache-seconds=-1

# 设定Message=bundles的编码,默认:=UTF-8
spring.messages.encoding=UTF-8
7.3.1.3 mobile
# 是否支持fallback的解决方案,默认false
spring.mobile.devicedelegatingviewresolver.enable-fallback=false

# 是否开始device=view=resolver,默认为:=false
spring.mobile.devicedelegatingviewresolver.enabled=false

# 设定mobile端视图的前缀,默认为:mobile/
spring.mobile.devicedelegatingviewresolver.mobile-prefix=mobile/

# 设定mobile视图的后缀
spring.mobile.devicedelegatingviewresolver.mobile-suffix=

# 设定普通设备的视图前缀
spring.mobile.devicedelegatingviewresolver.normal-prefix=

# 设定普通设备视图的后缀
spring.mobile.devicedelegatingviewresolver.normal-suffix=

# 设定平板设备视图前缀,默认:tablet/
spring.mobile.devicedelegatingviewresolver.tablet-prefix=tablet/

# 设定平板设备视图后缀
spring.mobile.devicedelegatingviewresolver.tablet-suffix=

# 是否启用SitePreferenceHandler,默认为: true
spring.mobile.sitepreference.enabled=true
7.3.1.4 view
# 设定mvc视图的前缀
spring.view.prefix=/

# 设定mvc视图的后缀【.jsp/.html】
spring.view.suffix=.html
7.3.1.5 resource
# 是否开启默认的资源处理,默认为true
spring.resources.add-mappings=false

# 设定资源的缓存时效,以秒为单位
spring.resources.cache-period=

# 是否开启缓存,默认为:=true
spring.resources.chain.cache=false

# 是否开启资源=handling=chain,默认为false
spring.resources.chain.enabled=true

# 是否开启h5应用的cache=manifest重写,默认为:=false
spring.resources.chain.html-application-cache=true

# 是否开启内容版本策略,默认为false
spring.resources.chain.strategy.content.enabled=true

# 指定要应用的版本的路径,多个以逗号分隔,默认为:[/**]
spring.resources.chain.strategy.content.paths=/**

# 是否开启固定的版本策略,默认为false
spring.resources.chain.strategy.fixed.enabled=true

# 指定要应用版本策略的路径,多个以逗号分隔
spring.resources.chain.strategy.fixed.paths=

# 指定版本策略使用的版本号
spring.resources.chain.strategy.fixed.version=

# 指定静态资源路径,默认为classpath:[/META-INF/resources/,/resources/, /static/, /public/]以及context:/
spring.resources.static-locations=classpath:/templates/,classpath:/static/
7.3.1.6 multipart
# 是否开启文件上传支持,默认为true
multipart.enabled=false

# 设定文件写入磁盘的阈值,单位为MB或KB,默认为0
multipart.file-size-threshold=0

# 指定文件上传路径
multipart.location=

# 指定文件大小最大值,默认1MB
multipart.max-file-size=

# 指定每次请求的最大值,默认为10MB
multipart.max-request-size=
7.3.1.7 freemarker
# 指定HttpServletRequest的属性是否可以覆盖controller的model的同名项
spring.freemarker.allow-request-override=

# 指定HttpSession的属性是否可以覆盖controller的model的同名项
spring.freemarker.allow-session-override=

# 是否开启template caching
spring.freemarker.cache=true

# 设定Template的编码
spring.freemarker.charset=UTF-8

#是否检查templates路径是否存在
spring.freemarker.check-template-location=true

# 设定Content-Type
spring.freemarker.content-type=

# 是否允许mvc使用freemarker
spring.freemarker.enabled=true

# 设定所有request的属性在merge到模板的时候,是否要都添加到model中
spring.freemarker.expose-request-attributes=

# 设定所有HttpSession的属性在merge到模板的时候,是否要都添加到model中
spring.freemarker.expose-session-attributes=true

# 设定是否以springMacroRequestContext的形式暴露RequestContext给Spring’s macro library使用
spring.freemarker.expose-spring-macro-helpers=true

# 是否优先从文件系统加载template,以支持热加载,默认为true
spring.freemarker.prefer-file-system-access=false

# 设定freemarker模板的前缀
spring.freemarker.prefix=

# 指定RequestContext属性的名
spring.freemarker.request-context-attribute=

# 设定FreeMarker keys
spring.freemarker.settings=

# 设定模板的后缀
spring.freemarker.suffix=

# 设定模板的加载路径,多个以逗号分隔,默认: [“classpath:/templates/”]
spring.freemarker.template-loader-path=

# 指定使用模板的视图列表
spring.freemarker.view-names=
7.3.1.8 velocity
# 指定HttpServletRequest的属性是否可以覆盖controller的model的同名项
spring.velocity.allow-request-override=

# 指定HttpSession的属性是否可以覆盖controller的model的同名项
spring.velocity.allow-session-override=

# 是否开启模板缓存
spring.velocity.cache=

# 设定模板编码
spring.velocity.charset=UTF-8

# 是否检查模板路径是否存在
spring.velocity.check-template-location=

# 设定ContentType的值
spring.velocity.content-type=

# 设定暴露给velocity上下文使用的DateTool的名
spring.velocity.date-tool-attribute=

# 设定是否允许mvc使用velocity
spring.velocity.enabled=

# 是否在merge模板的时候,将request属性都添加到model中
spring.velocity.expose-request-attributes=

# 是否在merge模板的时候,将HttpSession属性都添加到model中
spring.velocity.expose-session-attributes=

# 设定是否以springMacroRequestContext的名来暴露RequestContext给Spring’s macro类库使用
spring.velocity.expose-spring-macro-helpers=

# 设定暴露给velocity上下文的NumberTool的名
spring.velocity.number-tool-attribute=

# 是否优先从文件系统加载模板以支持热加载,默认为true
spring.velocity.prefer-file-system-access=false

# 设定velocity模板的前缀
spring.velocity.prefix=

# 设置velocity的额外属性
spring.velocity.properties=

# 设定RequestContext attribute的名
spring.velocity.request-context-attribute=

# 设定模板路径,默认为: classpath:/templates/
spring.velocity.resource-loader-path=classpath:/templates/

# 设定velocity模板的后缀
spring.velocity.suffix=

# 设定Velocity Toolbox配置文件的路径,比如 /WEB-INF/toolbox.xml
spring.velocity.toolbox-config-location=

# 设定需要解析的视图名称
spring.velocity.view-names=
7.3.1.9 thymeleaf
# 是否开启模板缓存,默认true【配合热部署使用】
spring.thymeleaf.cache=false

# 使用模板响应类型
spring.thymeleaf.servlet.content-type=text/html

# 指定Content-Type,默认为: text/html
spring.thymeleaf.content-type=text/html

# 是否检查模板路径是否存在,默认true
spring.thymeleaf.check-template-location=true

# 是否允许MVC使用Thymeleaf,默认为: true
spring.thymeleaf.enabled=true

# 指定模板的编码,默认为: UTF-8
spring.thymeleaf.encoding=UTF-8

# 指定不使用模板的视图名称,多个以逗号分隔
spring.thymeleaf.excluded-view-names=

# 指定模板的模式,具体查看StandardTemplateModeHandlers,默认为: HTML5
spring.thymeleaf.mode=HTML5

# 指定模板的前缀,默认为:classpath:/templates/
spring.thymeleaf.prefix=classpath:/templates/

# 指定模板的后缀,默认为:.html
spring.thymeleaf.suffix=.html

# 指定模板的解析顺序,默认为第一个
spring.thymeleaf.template-resolver-order=1

# 指定使用模板的视图名,多个以逗号分隔
spring.thymeleaf.view-names=
7.3.1.10 mustcache
# 是否开启 template 缓存
spring.mustache.cache=

# 指定Template的编码,默认UTF-8
spring.mustache.charset=UTF-8

# 是否检查默认的路径是否存在,默认true
spring.mustache.check-template-location=

# 指定Content-Type
spring.mustache.content-type=

# 是否开启mustcache的模板支持
spring.mustache.enabled=

# 指定模板的前缀,默认: classpath:/templates/
spring.mustache.prefix=classpath:/templates/

# 指定模板的后缀,默认: .html
spring.mustache.suffix=.html

# 指定要使用模板的视图名
spring.mustache.view-names=
7.3.1.11 groovy
# 指定HttpServletRequest的属性是否可以覆盖controller的model的同名项
spring.groovy.template.allow-request-override=

# 指定HttpSession的属性是否可以覆盖controller的model的同名项
spring.groovy.template.allow-session-override=

# 是否开启模板缓存
spring.groovy.template.cache=

# 指定Template编码
spring.groovy.template.charset=UTF-8

# 是否检查模板的路径是否存在
spring.groovy.template.check-template-location=true

# 是否在渲染模板时自动排查model的变量,默认为: false
spring.groovy.template.configuration.auto-escape=false

# 是否在渲染模板时自动缩进,默认为false
spring.groovy.template.configuration.auto-indent=false

# 如果自动缩进启用的话,是使用SPACES还是TAB,默认为: SPACES
spring.groovy.template.configuration.auto-indent-string=SPACES

# 渲染模板时是否要输出换行,默认为false
spring.groovy.template.configuration.auto-new-line=false

# 指定template base class
spring.groovy.template.configuration.base-template-class=

# 是否要缓存模板,默认为true
spring.groovy.template.configuration.cache-templates=true

# 在写入declaration header时使用的编码
spring.groovy.template.configuration.declaration-encoding=UTF-8

# 是使用这种形式,还是这种展开模式,默认为: false
spring.groovy.template.configuration.expand-empty-elements=false

# 指定template locale
spring.groovy.template.configuration.locale=

# 当启用自动换行时,换行的输出,默认为系统的line.separator属性的值
spring.groovy.template.configuration.new-line-string=

# 指定groovy的模板路径,默认为classpath:/templates/
spring.groovy.template.configuration.resource-loader-path=classpath:/templates/

# 指定属性要使用双引号还是单引号,默认为false
spring.groovy.template.configuration.use-double-quotes=false

# 指定Content-Type
spring.groovy.template.content-type=

# 是否开启groovy模板的支持
spring.groovy.template.enabled=

# 设定所有request的属性在merge到模板的时候,是否要都添加到model中
spring.groovy.template.expose-request-attributes=

# 设定所有request的属性在merge到模板的时候,是否要都添加到model中
spring.groovy.template.expose-session-attributes=

# 设定是否以springMacroRequestContext的形式暴露RequestContext给Spring’s macro library使用
spring.groovy.template.expose-spring-macro-helpers=

# 指定模板的前缀
spring.groovy.template.prefix=

# 指定RequestContext属性的名
spring.groovy.template.request-context-attribute=

# 指定模板的路径,默认为: classpath:/templates/
spring.groovy.template.resource-loader-path=classpath:/templates/

# 指定模板的后缀
spring.groovy.template.suffix=

# 指定要使用模板的视图名称
spring.groovy.template.view-names=
7.3.1.12 http
# 设定是否对object mapper也支持HATEOAS,默认为: true
spring.hateoas.apply-to-primary-object-mapper=true

# 是否优先使用JSON mapper来转换
spring.http.converters.preferred-json-mapper=

# 指定http请求和相应的Charset,默认: UTF-8
spring.http.encoding.charset=UTF-8

# 是否开启http的编码支持,默认为true
spring.http.encoding.enabled=true

# 是否强制对http请求和响应进行编码,默认为true
spring.http.encoding.force=true
7.3.1.13 json
# 指定日期格式,比如yyyy-MM-dd HH:mm:ss,或者具体的格式化类的全限定名
spring.jackson.date-format=yyyy-MM-dd HH:mm:ss

# 是否开启Jackson的反序列化
spring.jackson.deserialization=

# 是否开启json的generators
spring.jackson.generator=

# 指定Joda date/time的格式,比如yyyy-MM-dd HH:mm:ss). 如果没有配置的话,dateformat会作为backup
spring.jackson.joda-date-time-format=yyyy-MM-dd HH:mm:ss

# 指定json使用的Locale
spring.jackson.locale=

# 是否开启Jackson通用的特性
spring.jackson.mapper=

# 是否开启jackson的parser特性
spring.jackson.parser=

# 指定PropertyNamingStrategy (CAMEL_CASE_TO_LOWER_CASE_WITH_UNDERSCORES)或者指定PropertyNamingStrategy子类的全限定类名
spring.jackson.property-naming-strategy=

# 是否开启jackson的序列化
spring.jackson.serialization=

# 指定序列化时属性的inclusion方式,具体查看JsonInclude.Include枚举
spring.jackson.serialization-inclusion=

# 指定日期格式化时区,比如America/Los_Angeles或者GMT+10.
spring.jackson.time-zone=
7.3.1.14 jersey
# 指定Jersey filter的order,默认为: 0
spring.jersey.filter.order=0

# 指定传递给Jersey的初始化参数
spring.jersey.init=

# 指定Jersey的集成类型,可以是servlet或者filter.server配置
spring.jersey.type=

# 指定server绑定的地址
server.address=

# 是否开启压缩,默认为false
server.compression.enabled=

# 指定不压缩的user-agent,多个以逗号分隔,默认值为:text/html,text/xml,text/plain,text/css
server.compression.excluded-user-agents=

# 指定要压缩的MIME type,多个以逗号分隔
server.compression.mime-types=

# 执行压缩的阈值,默认为2048
server.compression.min-response-size=2048

# 设置servlet context 参数
server.context-parameters.[param name]=

# 设定应用的context-path
server.context-path=

# 设定应用的展示名称,默认: application
server.display-name=application

# 设定编译JSP用的servlet,默认: org.apache.jasper.servlet.JspServlet)
server.jsp-servlet.class-name=org.apache.jasper.servlet.JspServlet

# 设置JSP servlet 初始化参数
server.jsp-servlet.init-parameters.[param name]=

# 设定JSP servlet是否注册到内嵌的servlet容器,默认true
server.jsp-servlet.registered=true

# 设置端口号
server.port=8080

# 设定dispatcher servlet的监听路径,默认为: /
server.servlet-path=/
7.3.1.15 cookie and session
# 指定session cookie的comment
server.session.cookie.comment=

# 指定session cookie的domain
server.session.cookie.domain=

# 是否开启HttpOnly
server.session.cookie.http-only=

# 设定session cookie的最大age
server.session.cookie.max-age=

# 设定Session cookie 的名称
server.session.cookie.name=

# 设定session cookie的路径
server.session.cookie.path=

# 设定session cookie的“Secure” flag
server.session.cookie.secure=

# 重启时是否持久化session,默认false
server.session.persistent=

# 超时时间
server.session.timeoutsession=

# 设定Session的追踪模式(cookie, url, ssl)
server.session.tracking-modes=
7.3.1.16 ssl
# 是否支持SSL ciphers
server.ssl.ciphers=true

# 设定client authentication是wanted 还是 needed
server.ssl.client-auth=needed

# 是否开启ssl,默认: true
server.ssl.enabled=false

# 设定key store中key的别名
server.ssl.key-alias=

# 访问key store中key的密码
server.ssl.key-password=

# 设定持有SSL certificate的key store的路径,通常是一个.jks文件.
server.ssl.key-store=

# 设定访问key store的密码
server.ssl.key-store-password=

# 设定key store的提供者
server.ssl.key-store-provider=

# 设定key store的类型
server.ssl.key-store-type=

# 使用的SSL协议,默认: TLS
server.ssl.protocol=TLS

# 持有SSL certificates的Trust store
server.ssl.trust-store=

# 访问trust store的密码
server.ssl.trust-store-password=

# 设定trust store的提供者
server.ssl.trust-store-provider=

# 指定trust store的类型
server.ssl.trust-store-type=
7.3.1.17 tomcat
# 是否开启access log ,默认: false
server.tomcat.access-log-enabled=true

# 设定access logs的格式,默认: common
server.tomcat.access-log-pattern=common

# 设定log的目录,默认: logs
server.tomcat.accesslog.directory=logs

# 是否开启access log,默认: false
server.tomcat.accesslog.enabled=true

# 设定access logs的格式,默认: common
server.tomcat.accesslog.pattern=common

# 设定Log 文件的前缀,默认: access_log
server.tomcat.accesslog.prefix=access_log

# 设定Log 文件的后缀,默认: .log
server.tomcat.accesslog.suffix=.log

# 后台线程方法的Delay大小: 30
server.tomcat.background-processor-delay=30

# 设定Tomcat的base 目录,如果没有指定则使用临时目录
server.tomcat.basedir=

# 设定信任的正则表达式,默认:“10.\d{1,3}.\d{1,3}.\d{1,3}| 192.168.\d{1,3}.\d{1,3}| 169.254.\d{1,3}.\d{1,3}| 127.\d{1,3}.\d{1,3}.\d{1,3}| 172.1[6-9]{1}.\d{1,3}.\d{1,3}| 172.2[0-9]{1}.\d{1,3}.\d{1,3}|172.3[0-1]{1}.\d{1,3}.\d{1,3}”
server.tomcat.internal-proxies=

# 设定http header的最小值,默认: 0
server.tomcat.max-http-header-size=0

# 设定tomcat的最大工作线程数,默认为: 0
server.tomcat.max-threads=0

# 设定http header使用的,用来覆盖原来port的value
server.tomcat.port-header=

# 设定Header包含的协议,通常是 X-Forwarded-Proto,如果remoteIpHeader有值,则将设置为RemoteIpValve
server.tomcat.protocol-header=

# 设定使用SSL的header的值,默认https
server.tomcat.protocol-header-https-value=https

# 设定remote IP的header,如果remoteIpHeader有值,则设置为RemoteIpValve
server.tomcat.remote-ip-header=

# 设定URI的解码字符集
server.tomcat.uri-encoding=
7.3.1.18 undertow
# 设定Undertow access log 的目录,默认: logs
server.undertow.access-log-dir=logs

# 是否开启access log,默认: false
server.undertow.access-log-enabled=true

# 设定access logs的格式,默认: common
server.undertow.access-log-pattern=common

# 设定access log 的目录
server.undertow.accesslog.dir=

# 设定buffer的大小
server.undertow.buffer-size=

# 设定每个region的buffer数
server.undertow.buffers-per-region=

# 设定堆外内存
server.undertow.direct-buffers=

# 设定I/O线程数
server.undertow.io-threads=

# 设定工作线程数
server.undertow.worker-threads=
7.3.1.19 datasource
# 是否开启PersistenceExceptionTranslationPostProcessor,默认为true
spring.dao.exceptiontranslation.enabled=true

# 设定超时被废弃的连接占到多少比例时要被关闭或上报
spring.datasource.abandon-when-percentage-full=

# 使用Hikari pool时,是否允许连接池暂停,默认为: false
spring.datasource.allow-pool-suspension=true

# 是否允许替代的用户名
spring.datasource.alternate-username-allowed=

# 指定updates是否自动提交
spring.datasource.auto-commit=

# 指定默认的catalog
spring.datasource.catalog=

#设置当连接被归还时,是否要提交所有还未完成的事务
spring.datasource.commit-on-return=

# 指定连接被创建,再被添加到连接池之前执行的sql
spring.datasource.connection-init-sql=

# 使用DBCP connection pool时,指定初始化时要执行的sql
spring.datasource.connection-init-sqls=

# 在使用DBCP connection pool时指定要配置的属性
spring.datasource.connection-properties.[key]

# 指定校验连接合法性执行的sql语句
spring.datasource.connection-test-query=

# 指定连接的超时时间,毫秒单位
spring.datasource.connection-timeout=

# 在初始化数据库时,遇到错误是否继续,默认false
spring.datasource.continue-on-error=true

# 指定Data (DML)脚本
spring.datasource.data=

# 指定数据源的全限定名
spring.datasource.data-source-class-name=
7.3.1.20 logback
# 设置根日志级别
logging.level.root=info

# 设置某个包的日志级别【可设置多个】
logging.level.com.codesky.dao=debug
7.3.1.21 servlet
# 设置文件最大上传大小  默认为10MB
spring.servlet.multipart.max-file-size=500MB
spring.servlet.multipart.max-request-size=500MB
7.3.2 拆分配置文件环境
# 默认环境
server:
  port: 8090
# 通过这个设置环境【不设置时为默认环境】
spring:
  profiles:
    active: dev

---
# 开发环境
server:
  port: 8091
spring:
  profiles: dev

---
# 测试环境
server:
  port: 8092
spring:
  profiles: test
7.3.3 Thymeleaf配置
7.3.4 WebMvcConfigurer接口使用
作用:WebMvcConfigurer是一个接口,web的相关配置都可以在实现了该接口的类中进行配置。
[ WebMvcConfigurer接口详解](https://blog.csdn.net/zhangpower1993/article/details/89016503#2.2 addViewControllers:页面跳转)
主要功能
- [addInterceptors:拦截器](https://blog.csdn.net/zhangpower1993/article/details/89016503#2.1 addInterceptors:拦截器)
- [addViewControllers:页面跳转](https://blog.csdn.net/zhangpower1993/article/details/89016503#2.2 addViewControllers:页面跳转)
- [addResourceHandlers:静态资源](https://blog.csdn.net/zhangpower1993/article/details/89016503#2.3 addResourceHandlers:静态资源)
- [configureDefaultServletHandling:默认静态资源处理器](https://blog.csdn.net/zhangpower1993/article/details/89016503#2.4 configureDefaultServletHandling:默认静态资源处理器)
- [configureViewResolvers:视图解析器](https://blog.csdn.net/zhangpower1993/article/details/89016503#2.5 configureViewResolvers:视图解析器)
- [configureContentNegotiation:配置内容裁决的一些参数](https://blog.csdn.net/zhangpower1993/article/details/89016503#2.6 configureContentNegotiation:配置内容裁决的一些参数)
- [addCorsMappings:跨域](https://blog.csdn.net/zhangpower1993/article/details/89016503#2.7 addCorsMappings:跨域)
- [configureMessageConverters:信息转换器](https://blog.csdn.net/zhangpower1993/article/details/89016503#2.8 configureMessageConverters:信息转换器)
7.4 注解
7.4.1 service层
@Service和@Transactional和@Autowired配合使用,放置于serviceImpl之上;
注意:一般serviceImpl中@Autowired Dao接口,controller层中@Autowired service接口。
7.4.2 入口类
@SpringBootApplication和@MapperScan(“com.codesky.dao”)配合使用;
7.5 源码解析
7.5.1 WebMvcConfigurer接口
//拦截器配置
void addInterceptors(InterceptorRegistry var1);
//视图跳转控制器
void addViewControllers(ViewControllerRegistry registry);
//静态资源处理
void addResourceHandlers(ResourceHandlerRegistry registry);
//默认静态资源处理器
void configureDefaultServletHandling(DefaultServletHandlerConfigurer configurer);
//这里配置视图解析器
void configureViewResolvers(ViewResolverRegistry registry);
//配置内容裁决的一些选项
void configureContentNegotiation(ContentNegotiationConfigurer configurer);
//添加类型转换器和格式化器
void addFormatters(FormatterRegistry registry)
//跨域支持
void addCorsMappings(CorsRegistry registry)
解释:https://blog.csdn.net/fmwind/article/details/81235401
使用:https://blog.csdn.net/She_lock/article/details/86241685
7.5.2 HandlerInterceptorAdapter(配置拦截器)
7.6 问题
7.6.1 @Autowired注解引入的DAO或者Service有红色波浪线
这是IDEA自身的检测机制,不是代码bug,不会影响项目正常运行,改变检测的级别即可消除,按照下图配置即可:
[外链图片转存失败,源站可能有防盗链机制,建议将图片保存下来直接上传(img-QDjxhkh0-1639115251085)(C:\Users\HY\AppData\Roaming\Typora\typora-user-images\image-20200522112817732.png)]
8.Vue.js
8.1 快速开始
Vue官网:https://cn.vuejs.org/index.html
GitHub:https://github.com/vuejs/vue
官方文档:https://cn.vuejs.org/v2/guide/
官方API:https://cn.vuejs.org/v2/api/
8.1.1 在线引入vue.js文件
<!-- 开发环境版本,包含了有帮助的命令行警告 -->
<script src="https://cdn.jsdelivr.net/npm/vue/dist/vue.js"></script>
或
<!-- 生产环境版本,优化了尺寸和速度 -->
<script src="https://cdn.jsdelivr.net/npm/vue"></script>
8.1.2 本地引入vue.js文件
通过https://cn.vuejs.org/v2/guide/installation.html网站下载vue.js文件并将其引入即可;
[外链图片转存失败,源站可能有防盗链机制,建议将图片保存下来直接上传(img-nZhFXLpl-1639115251086)(C:\Users\HY\AppData\Roaming\Typora\typora-user-images\image-20200512153201480.png)]
9.JQuery
10.JavaScript
11.Json
11.1 简介
JSON:https://baike.baidu.com/item/JSON
- JSON是一种轻量级的数据交换格式,目前使用特别广泛;
- 采用完全独立于编程语言的文本格式来存储表示数据;
- 简介和清晰的层次结构使得JSON成为理想的数据交换语言;
- 易于阅读和编写,同时也易于机器解析和生成,并有效地提供网络传输效率;
前后端分离时代:
-
后端部署后端,提供接口、提供数据;
-
前端独立部署,负责渲染后端数据;
-
而JSON则是后端与前端相关联的其中一种标记语言;
在JavaScript语言中一切都是对象,任何JavaScript支持的类型都可以通过JSON来表示
- 对象表示为键值对,数据由逗号分隔;
- 花括号保存对象
- 方括号保存数组
- JavaScript和JSON可互转
<!DOCTYPE html>
<html lang="en">
<head>
    <meta charset="UTF-8">
    <title>Title</title>

    <script type="text/javascript">
        //编写一个JavaScript
        var user = {
            name: "yhe",
            age: 3,
            sex: "男"
        }
        //将JavaScript对象装换为JSON对象
        var json = JSON.stringify(user);
        console.log(json);
        //将JSON对象装换为JavaScript对象
        var js = JSON.parse(json);
        console.log(js);
    </script>
</head>
<body>

</body>
</html>
11.2 通过Controller返回JSON数据
Jackson:目前比较好的JSON解析工具,还有阿里巴巴的fastjson等等;
- 导入Jackson的jar包依赖
<dependency>
    <groupId>com.fasterxml.jackson.core</groupId>
    <artifactId>jackson-databind</artifactId>
    <version>2.11.0.rc1</version>
</dependency>
- 配置固定web.xml和SpringMVC-Servlet.xml
web.xml
<?xml version="1.0" encoding="UTF-8"?>
<web-app xmlns="http://xmlns.jcp.org/xml/ns/javaee"
         xmlns:xsi="http://www.w3.org/2001/XMLSchema-instance"
         xsi:schemaLocation="http://xmlns.jcp.org/xml/ns/javaee http://xmlns.jcp.org/xml/ns/javaee/web-app_4_0.xsd"
         version="4.0">

    <!--注册DispatcherServlet-->
    <servlet>
        <servlet-name>SpringMVC</servlet-name>
        <servlet-class>org.springframework.web.servlet.DispatcherServlet</servlet-class>
        <!--关联springmvc配置文件-->
        <init-param>
            <param-name>contextConfigLocation</param-name>
            <param-value>classpath:SpringMVC-Servlet.xml</param-value>
        </init-param>
        <!--设置启动级别-1-->
        <load-on-startup>1</load-on-startup>
    </servlet>

    <!--所有请求都会被springmvc拦截-->
    <servlet-mapping>
        <servlet-name>SpringMVC</servlet-name>
        <url-pattern>/</url-pattern>
    </servlet-mapping>
</web-app>
SpringMVC-Servlet.xml
<?xml version="1.0" encoding="UTF-8"?>
<beans xmlns="http://www.springframework.org/schema/beans"
       xmlns:xsi="http://www.w3.org/2001/XMLSchema-instance"
       xmlns:context="http://www.springframework.org/schema/context"
       xmlns:mvc="http://www.springframework.org/schema/mvc"
       xsi:schemaLocation="http://www.springframework.org/schema/beans
        https://www.springframework.org/schema/beans/spring-beans.xsd
        http://www.springframework.org/schema/context
        https://www.springframework.org/schema/context/spring-context.xsd
        http://www.springframework.org/schema/mvc
        https://www.springframework.org/schema/mvc/spring-mvc.xsd">

    <!--自动扫描包:扫描指定路径下带注解的类,由ioc容器统一管理【base-package可更换为自己的controller类路径】-->
    <context:component-scan base-package="com.cqipc.edu.controller"/>
    <!--配置SpringMVC不处理静态资源 .css/.js/.html/.mp3/.mp4/*-->
    <mvc:default-servlet-handler/>
    <!--配置SpringMVC注解驱动【DefaultAnnotationHandlerMapping和AnnotationMethodHandlerAdapter】-->
    <mvc:annotation-driven/>
    <!--配置视图解析器-->
    <bean class="org.springframework.web.servlet.view.InternalResourceViewResolver" id="internalResourceViewResolver">
        <!--前缀-->
        <property name="prefix" value="/WEB-INF/jsp/"/>
        <!--后缀-->
        <property name="suffix" value=".jsp"/>
    </bean>

</beans>
12.Redis
13.Mybatis Plus
13.1 快速开始
创建SpringBoot项目
添加依赖
引入 Spring Boot Starter 父工程
<parent>
    <groupId>org.springframework.boot</groupId>
    <artifactId>spring-boot-starter-parent</artifactId>
    <version>2.3.0.RELEASE</version>
    <relativePath/>
</parent><parent>
    <groupId>org.springframework.boot</groupId>
    <artifactId>spring-boot-starter-parent</artifactId>
    <version>2.3.0.RELEASE</version>
    <relativePath/>
</parent>
引入 spring-boot-starter、spring-boot-starter-test、mybatis-plus-boot-starter、lombok、h2 依赖
<dependencies>
    <dependency>
        <groupId>org.springframework.boot</groupId>
        <artifactId>spring-boot-starter</artifactId>
    </dependency>
    <dependency>
        <groupId>org.springframework.boot</groupId>
        <artifactId>spring-boot-starter-test</artifactId>
        <scope>test</scope>
    </dependency>
    <dependency>
        <groupId>org.projectlombok</groupId>
        <artifactId>lombok</artifactId>
        <optional>true</optional>
    </dependency>
    <dependency>
        <groupId>com.baomidou</groupId>
        <artifactId>mybatis-plus-boot-starter</artifactId>
        <version>3.3.2</version>
    </dependency>
    <dependency>
        <groupId>com.h2database</groupId>
        <artifactId>h2</artifactId>
        <scope>runtime</scope>
    </dependency>
</dependencies><dependencies>
    <dependency>
        <groupId>org.springframework.boot</groupId>
        <artifactId>spring-boot-starter</artifactId>
    </dependency>
    <dependency>
        <groupId>org.springframework.boot</groupId>
        <artifactId>spring-boot-starter-test</artifactId>
        <scope>test</scope>
    </dependency>
    <dependency>
        <groupId>org.projectlombok</groupId>
        <artifactId>lombok</artifactId>
        <optional>true</optional>
    </dependency>
    <dependency>
        <groupId>com.baomidou</groupId>
        <artifactId>mybatis-plus-boot-starter</artifactId>
        <version>3.3.2</version>
    </dependency>
    <dependency>
        <groupId>com.h2database</groupId>
        <artifactId>h2</artifactId>
        <scope>runtime</scope>
    </dependency>
</dependencies>
相关配置
在 application.yaml 配置文件中添加 H2 数据库的相关配置
spring:
  datasource:
    driver-class-name: org.h2.Driver
    schema: classpath:db/schema-h2.sql
    data: classpath:db/data-h2.sql
    url: jdbc:h2:mem:test
    username: root
    password: test
在 Spring Boot 启动类中添加 @MapperScan 注解,扫描 Mapper 文件夹
@SpringBootApplication
@MapperScan("com.codesky.mapper")
public class Application {
    public static void main(String[] args) {
        SpringApplication.run(QuickStartApplication.class, args);
    }
}
编写实体类
编写实体类 User.java(此处使用了 Lombok 简化代码)
@Data
public class User {
    private Long id;
    private String name;
    private Integer age;
    private String email;
}
编写mapper接口
//该接口需要继承BaseMapper<这里是mapper的实体类>
public interface UserMapper extends BaseMapper<User> {

}
测试
@RunWith(SpringRunner.class)
@SpringBootTest
public class SampleTest {

    @Autowired
    private UserMapper userMapper;

    @Test
    public void testSelect() {
        //查询所有的数据并且返回一个集合(mbatisplus内置方法实现);括号中的代表是条件,若为空的话代表没有条件
        List<User> userList = userMapper.selectList(null);
        Assert.assertEquals(5, userList.size());
        userList.forEach(System.out::println);
    }
}
注意:UserMapper 中的 selectList() 方法的参数为 MP 内置的条件封装器 Wrapper,所以不填写就是无任何条件
完整代码:SpringBoot和SpringMVC
总结
在使用MybBatisPlus实现CRUD功能的时候,可以看出是不需要配置xml文件的,省去了使用MyBatis时需要配置xml文件的繁杂操作,更为简单高效,使用更加简单;
13.2 注解开发
@TableName
描述:表名注解
| 属性 | 类型 | 必须指定 | 默认值 | 描述 |
|---|---|---|---|---|
| value | String | 否 | “” | 表名 |
| schema | String | 否 | “” | schema |
| keepGlobalPrefix | boolean | 否 | false | 是否保持使用全局的 tablePrefix 的值(如果设置了全局 tablePrefix 且自行设置了 value 的值) |
| resultMap | String | 否 | “” | xml 中 resultMap 的 id |
| autoResultMap | boolean | 否 | false | 是否自动构建 resultMap 并使用(如果设置 resultMap 则不会进行 resultMap 的自动构建并注入) |
@TableId
描述:主键注解
| 属性 | 类型 | 必须指定 | 默认值 | 描述 |
|---|---|---|---|---|
| value | String | 否 | “” | 主键字段名 |
| type | Enum | 否 | IdType.NONE | 主键类型 |
IdType
| 值 | 描述 |
|---|---|
| AUTO | 数据库ID自增 |
| NONE | 无状态,该类型为未设置主键类型(注解里等于跟随全局,全局里约等于 INPUT) |
| INPUT | insert前自行set主键值 |
| ASSIGN_ID | 分配ID(主键类型为Number(Long和Integer)或String)(since 3.3.0),使用接口IdentifierGenerator的方法nextId(默认实现类为DefaultIdentifierGenerator雪花算法) |
| ASSIGN_UUID | 分配UUID,主键类型为String(since 3.3.0),使用接口IdentifierGenerator的方法nextUUID(默认default方法) |
| ID_WORKER | 分布式全局唯一ID 长整型类型(please use ASSIGN_ID) |
| UUID | 32位UUID字符串(please use ASSIGN_UUID) |
| ID_WORKER_STR | 分布式全局唯一ID 字符串类型(please use ASSIGN_ID) |
@TableField
描述:字段注解(非主键)
| 属性 | 类型 | 必须指定 | 默认值 | 描述 |
|---|---|---|---|---|
| value | String | 否 | “” | 数据库字段名 |
| el | String | 否 | “” | 映射为原生 #{ ... } 逻辑,相当于写在 xml 里的 #{ ... } 部分 |
| exist | boolean | 否 | true | 是否为数据库表字段 |
| condition | String | 否 | “” | 字段 where 实体查询比较条件,有值设置则按设置的值为准,没有则为默认全局的 %s=#{%s},参考 |
| update | String | 否 | “” | 字段 update set 部分注入, 例如:update=“%s+1”:表示更新时会set version=version+1(该属性优先级高于 el 属性) |
| insertStrategy | Enum | N | DEFAULT | 举例:NOT_NULL: insert into table_a(column) values (#{columnProperty}) |
| updateStrategy | Enum | N | DEFAULT | 举例:IGNORED: update table_a set column=#{columnProperty} |
| whereStrategy | Enum | N | DEFAULT | 举例:NOT_EMPTY: where column=#{columnProperty} |
| fill | Enum | 否 | FieldFill.DEFAULT | 字段自动填充策略 |
| select | boolean | 否 | true | 是否进行 select 查询 |
| keepGlobalFormat | boolean | 否 | false | 是否保持使用全局的 format 进行处理 |
| jdbcType | JdbcType | 否 | JdbcType.UNDEFINED | JDBC类型 (该默认值不代表会按照该值生效) |
| typeHandler | Class<? extends TypeHandler> | 否 | UnknownTypeHandler.class | 类型处理器 (该默认值不代表会按照该值生效) |
| numericScale | String | 否 | “” | 指定小数点后保留的位数 |
FieldStrategy
| 值 | 描述 |
|---|---|
| IGNORED | 忽略判断 |
| NOT_NULL | 非NULL判断 |
| NOT_EMPTY | 非空判断(只对字符串类型字段,其他类型字段依然为非NULL判断) |
| DEFAULT | 追随全局配置 |
| 值 | 描述 |
|---|---|
| DEFAULT | 默认不处理 |
| INSERT | 插入时填充字段 |
| UPDATE | 更新时填充字段 |
| INSERT_UPDATE | 插入和更新时填充字段 |
@Version
描述:乐观锁注解、标记 @Verison 在字段上
@EnumValue
描述:通枚举类注解(注解在枚举字段上)
@TableLogic
描述:表字段逻辑处理注解(逻辑删除)
| 属性 | 类型 | 必须指定 | 默认值 | 描述 |
|---|---|---|---|---|
| value | String | 否 | “” | 逻辑未删除值 |
| delval | String | 否 | “” | 逻辑删除值 |
@SqlParser
描述:租户注解,支持method上以及mapper接口上
| 属性 | 类型 | 必须指定 | 默认值 | 描述 |
|---|---|---|---|---|
| filter | boolean | 否 | false | true: 表示过滤SQL解析,即不会进入ISqlParser解析链,否则会进解析链并追加例如tenant_id等条件 |
@KeySequence
描述:序列主键策略 oracle
属性:value、resultMap
| 属性 | 类型 | 必须指定 | 默认值 | 描述 |
|---|---|---|---|---|
| value | String | 否 | “” | 序列名 |
| clazz | Class | 否 | Long.class | id的类型, 可以指定String.class,这样返回的Sequence值是字符串"1" |
环境
1.jdk
1.1 下载
官网下载:Java SE Downloads
1.2 环境变量
JAVA_HOME:jdk路径
Path:%JAVA_HOME%\bin;%JAVA_HOME%\jre\bin
CLASSPATH:.;%JAVA_HOME%\bin;%JAVA_HOME%\lib\dt.jar;%JAVA_HOME%\lib\tools.jar;
注意:CLASSPATH在jdk1.5之后可以不在设置,但建议保留设置。
1.3 测试
打开Windows powershell输入java、javac、java -version,出现以下内容即为成功。
Microsoft Windows [版本 10.0.18363.836]
(c) 2019 Microsoft Corporation。保留所有权利。

C:\Users\HY>java
用法: java [-options] class [args...]
           (执行类)
   或  java [-options] -jar jarfile [args...]
           (执行 jar 文件)
其中选项包括:
    -d32          使用 32 位数据模型 (如果可用)
    -d64          使用 64 位数据模型 (如果可用)
    -server       选择 "server" VM
                  默认 VM 是 server.

    -cp <目录和 zip/jar 文件的类搜索路径>
    -classpath <目录和 zip/jar 文件的类搜索路径>
                  用 ; 分隔的目录, JAR 档案
                  和 ZIP 档案列表, 用于搜索类文件。
    -D<名称>=<值>
                  设置系统属性
    -verbose:[class|gc|jni]
                  启用详细输出
    -version      输出产品版本并退出
    -version:<值>
                  警告: 此功能已过时, 将在
                  未来发行版中删除。
                  需要指定的版本才能运行
    -showversion  输出产品版本并继续
    -jre-restrict-search | -no-jre-restrict-search
                  警告: 此功能已过时, 将在
                  未来发行版中删除。
                  在版本搜索中包括/排除用户专用 JRE
    -? -help      输出此帮助消息
    -X            输出非标准选项的帮助
    -ea[:<packagename>...|:<classname>]
    -enableassertions[:<packagename>...|:<classname>]
                  按指定的粒度启用断言
    -da[:<packagename>...|:<classname>]
    -disableassertions[:<packagename>...|:<classname>]
                  禁用具有指定粒度的断言
    -esa | -enablesystemassertions
                  启用系统断言
    -dsa | -disablesystemassertions
                  禁用系统断言
    -agentlib:<libname>[=<选项>]
                  加载本机代理库 <libname>, 例如 -agentlib:hprof
                  另请参阅 -agentlib:jdwp=help 和 -agentlib:hprof=help
    -agentpath:<pathname>[=<选项>]
                  按完整路径名加载本机代理库
    -javaagent:<jarpath>[=<选项>]
                  加载 Java 编程语言代理, 请参阅 java.lang.instrument
    -splash:<imagepath>
                  使用指定的图像显示启动屏幕
有关详细信息, 请参阅 http://www.oracle.com/technetwork/java/javase/documentation/index.html。

C:\Users\HY>javac
用法: javac <options> <source files>
其中, 可能的选项包括:
  -g                         生成所有调试信息
  -g:none                    不生成任何调试信息
  -g:{lines,vars,source}     只生成某些调试信息
  -nowarn                    不生成任何警告
  -verbose                   输出有关编译器正在执行的操作的消息
  -deprecation               输出使用已过时的 API 的源位置
  -classpath <路径>            指定查找用户类文件和注释处理程序的位置
  -cp <路径>                   指定查找用户类文件和注释处理程序的位置
  -sourcepath <路径>           指定查找输入源文件的位置
  -bootclasspath <路径>        覆盖引导类文件的位置
  -extdirs <目录>              覆盖所安装扩展的位置
  -endorseddirs <目录>         覆盖签名的标准路径的位置
  -proc:{none,only}          控制是否执行注释处理和/或编译。
  -processor <class1>[,<class2>,<class3>...] 要运行的注释处理程序的名称; 绕过默认的搜索进程
  -processorpath <路径>        指定查找注释处理程序的位置
  -parameters                生成元数据以用于方法参数的反射
  -d <目录>                    指定放置生成的类文件的位置
  -s <目录>                    指定放置生成的源文件的位置
  -h <目录>                    指定放置生成的本机标头文件的位置
  -implicit:{none,class}     指定是否为隐式引用文件生成类文件
  -encoding <编码>             指定源文件使用的字符编码
  -source <发行版>              提供与指定发行版的源兼容性
  -target <发行版>              生成特定 VM 版本的类文件
  -profile <配置文件>            请确保使用的 API 在指定的配置文件中可用
  -version                   版本信息
  -help                      输出标准选项的提要
  -A关键字[=值]                  传递给注释处理程序的选项
  -X                         输出非标准选项的提要
  -J<标记>                     直接将 <标记> 传递给运行时系统
  -Werror                    出现警告时终止编译
  @<文件名>                     从文件读取选项和文件名


C:\Users\HY>java -version
java version "1.8.0_212"
Java(TM) SE Runtime Environment (build 1.8.0_212-b10)
Java HotSpot(TM) 64-Bit Server VM (build 25.212-b10, mixed mode)
2.maven
2.1 下载
2.2 环境变量
MAVEN_HOME:maven路径
Path:%MAVEN_HOME%\bin
2.3 测试
打开Windows powershell输入mvn -v出现以下内容即为成功;
Microsoft Windows [版本 10.0.18363.836]
(c) 2019 Microsoft Corporation。保留所有权利。

C:\Users\HY>mvn -v
Apache Maven 3.6.3 (cecedd343002696d0abb50b32b541b8a6ba2883f)
Maven home: D:\Install\Packges\Apache\apache-maven-3.6.3\bin\..
Java version: 1.8.0_212, vendor: Oracle Corporation, runtime: D:\Install\JDK\jdk-8\jre
Default locale: zh_CN, platform encoding: GBK
OS name: "windows 10", version: "10.0", arch: "amd64", family: "windows"
2.4 maven配置
找到maven路径下conf/settings.xml文件,在文件在文件中添加相应代码;
2.4.1 设置本地仓库
<localRepository>本地仓库的路径</localRepository>
2.4.2 修改maven默认的JDK版本
<profile>
    <id>JDK-1.8</id>
    <activation>
        <activeByDefault>true</activeByDefault>
        <jdk>1.8</jdk>
    </activation>
    <properties>
        <maven.compiler.source>1.8</maven.compiler.source>
        <maven.compiler.target>1.8</maven.compiler.target>
        <maven.compiler.compilerVersion>1.8</maven.compiler.compilerVersion>
    </properties>
</profile>
2.4.3 添加阿里镜像源
<mirrors>
	<mirror>
      <id>alimaven</id>
      <mirrorOf>central</mirrorOf>
      <name>aliyun maven</name>
       <url>http://maven.aliyun.com/nexus/content/repositories/central/</url>
   </mirror>
</mirrors>
3.tomcat
3.1 下载
官网下载:[Download Apache Tomcat
3.2 环境变量
CATALINA_BASE:tomcat路径
CATALINA_HOME:tomcat路径
Path:%CATALINA_HOME%\bin;%CATALINA_HOME%\lib
3.3 测试
打开windows powershell,输入startup.bat启动tomcat服务器,打开浏览器输入http://127.0.0.1:8080若能正常访问即配置成功;输入shutdown.bat关闭tomcat服务器;
Microsoft Windows [版本 10.0.18363.836]
(c) 2019 Microsoft Corporation。保留所有权利。

C:\Users\HY>startup.bat
Using CATALINA_BASE:   "D:\Install\Packges\Apache\apache-tomcat-9.0.30"
Using CATALINA_HOME:   "D:\Install\Packges\Apache\apache-tomcat-9.0.30"
Using CATALINA_TMPDIR: "D:\Install\Packges\Apache\apache-tomcat-9.0.30\temp"
Using JRE_HOME:        "D:\Install\JDK\jdk-8\jre"
Using CLASSPATH:       "D:\Install\Packges\Apache\apache-tomcat-9.0.30\bin\bootstrap.jar;D:\Install\Packges\Apache\apache-tomcat-9.0.30\bin\tomcat-juli.jar"
C:\Users\HY>
[外链图片转存失败,源站可能有防盗链机制,建议将图片保存下来直接上传(img-0DLPV1X0-1639115251087)(C:\Users\HY\AppData\Roaming\Typora\typora-user-images\image-20200529222043645.png)]
4.mysql
4.1 下载
官网下载:Download MySQL
4.2 环境配置
MYSQL_HOME:mysql路径
Path:%MYSQL_HOME%\bin
注意:在安装mysql时会提示设置密码及其相关设置,本人时已经安装好了,直接配置环境变量即可。
4.3 测试
输入命令 mysql -u root -p,输入数据库密码即可;
命令:mysql -u 数据库用户名(默认是root) -p
Microsoft Windows [版本 10.0.18363.836]
(c) 2019 Microsoft Corporation。保留所有权利。

C:\Users\HY>mysql -u root -p
Enter password: ******
Welcome to the MariaDB monitor.  Commands end with ; or \g.
Your MariaDB connection id is 50
Server version: 10.4.7-MariaDB mariadb.org binary distribution

Copyright (c) 2000, 2018, Oracle, MariaDB Corporation Ab and others.

Type 'help;' or '\h' for help. Type '\c' to clear the current input statement.

MariaDB [(none)]>
问题
1.乱码
1.1 界面乱码
上面已说明:单击跳转
1.2 Tomcat控制台乱码
解决方法:https://www.jianshu.com/p/e8a8cce37b3b
2.IDEA导入
2.1 导入时缺失java.servlet包
-
打开项目结构
-
选择Models
-
再选择Dependencies
-
添加Tomcat的Library
-
完成
工具
1.IDEA
1.1 常用插件
- Lombok
- Vue.js
- Translation
- Grep Console
- JRebel for IntelliJ
- SonarLint
- Maven Helpler
- EasyCode
- Key Promoter X
1.2 常用快捷键
- Reformat Code【ctrl+shify+f】==> 格式化代码
- Optimize Imports【ctrl+alt+o】==> 优化导入
- Delete Line【ctrl+d】==> 删除行
- Path From Source Root【alt+c】==> 复制根路径
- Build Project【alt+b】==> 构建项目
- Code Completion-Basic【alt+/】==> 代码提示
- Duplicate Line Selection【ctrl+shift+c】==>复制当前行
- Find Action【ctrl+shift+a】==> 查找操作
- Run【alt+s】==> 程序执行
- Rename【ctrl+r】 ==> 重命名
- Surround With【alt+t】 ==>try–cath
1.3 常用设置
1.3.1 设置字符编码
- File | Settings | Editor | File Encodings
1.3.2 启用自动导入
- File | Settings | Editor | General | Auto Import
1.3.3 忽略大小写提示
- File | Settings | Editor | General | Code Completion | 取消勾选
Match case
1.3.4 Maven仓库设置
- File | Settings | Build, Execution, Deployment | Build Tools | Maven
1.3.5 web浏览器
- File | Settings | Tools | Web Browsers
1.3.6 开启自动编译[配合热部署使用]
- File | Settings | Build, Execution, Deployment | Compiler | 勾选
Build project automatically
1.3.7 开启允许在运行过程中修改文件[配合热部署使用]
- 按住ctrl+alt+shift+/ ==> Rigistry ==> 勾选
compiler.automake.allow.when.app.running
1.3.8 取消双击Shift弹出全局搜索[适用于所有IntelliJ公司的软件]
- 按ctrl+shift+a ==> 输入registry ==> 勾选【ide.suppress.double.click.handler】
依赖
1. junit
作用:单元测试框架
<!--unit test framework-->
<dependency>
    <groupId>junit</groupId>
    <artifactId>junit</artifactId>
    <version>4.13</version>
    <scope>test</scope>
</dependency>
2. thymeleaf
作用:在SpringBoot中解析Thymeleaf模板所需要的的依赖;
<!--tymeleaf template-->
<dependency>
     <groupId>org.thymeleaf</groupId>
     <artifactId>thymeleaf-spring5</artifactId>
</dependency>
<dependency>
     <groupId>org.thymeleaf.extras</groupId>
     <artifactId>thymeleaf-extras-java8time</artifactId>
</dependency>
或者
<dependency>
     <groupId>org.springframework.boot</groupId>
<artifactId>spring-boot-starter-thymeleaf</artifactId>
</dependency>
3. spring-webmvc
<!--tymeleaf template-->
<dependency>
    <groupId>org.springframework</groupId>
    <artifactId>spring-webmvc</artifactId>
    <version>5.2.6.RELEASE</version>
</dependency>
4. javax.servlet-api
<!--jsp servlet-->
<dependency>
    <groupId>javax.servlet</groupId>
    <artifactId>javax.servlet-api</artifactId>
    <version>4.0.1</version>
    <scope>provided</scope>
</dependency>
5. Jstl
名称:标准标签库
<!--standard label Library-->
<dependency>
    <groupId>javax.servlet.jsp.jstl</groupId>
    <artifactId>jstl</artifactId>
    <version>1.2</version>
</dependency>
6. lombok
介绍:https://www.jianshu.com/p/b7094a0f6ebe
**用途:**用于自动生成geter/seter等方法
<!-- https://mvnrepository.com/artifact/org.projectlombok/lombok -->
<dependency>
    <groupId>org.projectlombok</groupId>
    <artifactId>lombok</artifactId>
    <version>1.18.12</version>
    <scope>provided</scope>
</dependency>
使用方法
- @NonNull:避免出现空指针
- @Cleanup:自动调用close()方法【主要用于IO流,用于关闭IO流 ===> in.close()】
- @Getter/@Setter:自动生成Getter/Setter方法
- @ToString:生成ToString()方法
- @Builder:通过Builder创建poji对象【流式编程】
- @Log:日志输出
- @NoArgsConstructor:自动生成无参构造函数
- @AllArgsConstructor:自动生成全参构造函数
- @Data:自动为字段添加**@ToString**, @EqualsAndHashCode, @Getter方法,为非final字段添加**@Setter**,和**@RequiredArgsConstructor****@RequiredArgsConstructor**
7. shiro-spring
作用:用于SpringBoot整合Shiro的包;
<!-- https://mvnrepository.com/artifact/org.apache.shiro/shiro-spring -->
<!--SpringBoot ==> Shiro-->
<dependency>
    <groupId>org.apache.shiro</groupId>
    <artifactId>shiro-spring</artifactId>
    <version>1.5.3</version>
</dependency>
8. spring-boot-devtools
作用:用于实现SpringBoot的热部署;
<!--hot deployment-->
<dependency>
    <groupId>org.springframework.boot</groupId>
    <artifactId>spring-boot-devtools</artifactId>
     <optional>true</optional>
</dependency>
使用方法
1.开启自动编译
- File ==> Settings ==> Build, Execution, Deployment ==> Compiler ==> 勾选【Build project automatically】
2.开启允许在运行过程中修改文件
- 按住ctrl+alt+shift+/ ==> Rigistry ==> 勾选【compiler.automake.allow.when.app.running】
设置【compiler.document.save.trigger.delay==500】
3.开启IDEA的热部署策略【重要】
- 点击项目名 ==> Edit Configurations ==>SpringBoot ==> 【On ‘Update’ action/On frame deactivation】 ==> Update classes and resources
4.关闭浏览器缓存【可省略,若无法实现热部署时请关闭浏览器缓存】
- 浏览器中按F12 ==> Network ==> 勾选【Disable cache】
5.启动项目
- 若发现启动时启动面板上显示
[ restartedMain]则表示配置成功;
注意
- thymeleaf:若是使用thymeleaf热部署则需要关闭thymeleaf的缓存
# 关闭thymeleaf缓存
spring:
  thymeleaf:
    cache: false
9. tomcat-embed-jasper
作用;用于在SpringBoot中解析JSP模板页面的包;
<!--parsing jsp-->
<dependency>
     <groupId>org.apache.tomcat.embed</groupId>
     <artifactId>tomcat-embed-jasper</artifactId>
</dependency>
10. mybatis-spring-boot-starter
作用:Springboot整合mybatis的依赖包,配合JDBC包使用;
<!--springboot integrates mybatis-->
<dependency>
      <groupId>org.mybatis.spring.boot</groupId>
      <artifactId>mybatis-spring-boot-starter</artifactId>
      <version>2.1.2</version>
</dependency>
11. mysql-connector-java
名称:MySQL驱动
<!--mysql driver-->
<dependency>
    <groupId>mysql</groupId>
    <artifactId>mysql-connector-java</artifactId>
    <version>5.1.48</version>
</dependency>
12. druid
名称:阿里巴巴数据库连接池
<!--database connection pool-->
<dependency>
      <groupId>com.alibaba</groupId>
      <artifactId>druid</artifactId>
      <version>1.1.22</version>
</dependency>
13. spring-jdbc
作用:Spring框架用来连接数据库所用的依赖包,只适用与jdbc连接,如果是mybatis整合Spring或者其他工具请参考其他连接方法;
<!--spring jdbc-->
<dependency>
    <groupId>org.springframework</groupId>
    <artifactId>spring-jdbc</artifactId>
    <version>5.2.5.RELEASE</version>
</dependency>
14. spring-webmvc
作用:Spring框架用来与web连接所使用的依赖包,用于控制web的视图跳转、spring管理等;
<!--spring webmvc-->
<dependency>
    <groupId>org.springframework</groupId>
    <artifactId>spring-webmvc</artifactId>
    <version>5.2.5.RELEASE</version>
</dependency>
15. aspectjweaver
名称:AOP织入
作用:支持切入点表达式等等;aspectjweaver包含aspectjrt,所以我们只需要引入aspectjweaver依赖包就可以了
<!--aspectjweaver-->
<dependency>
    <groupId>org.aspectj</groupId>
    <artifactId>aspectjweaver</artifactId>
    <version>1.9.5</version>
</dependency>
16. spring-aop
作用AOP核心功能,例如代理工厂等等;
注意:一般13、14、15、16在Spring中是配合使用的;
<!--spring aop-->
<dependency>
    <groupId>org.springframework</groupId>
    <artifactId>spring-aop</artifactId>
    <version>5.2.6.RELEASE</version>
</dependency>
17. spring-boot-starter-aop
<!--springboot aop-->
<dependency>
   <groupId>org.springframework.boot</groupId>
   <artifactId>spring-boot-starter-aop</artifactId>
</dependency>
18. jackson-databind
名称:JSON解析工具
功能:通过Controller层返回Json数据,具体使用请单击
<dependency>
    <groupId>com.fasterxml.jackson.core</groupId>
    <artifactId>jackson-databind</artifactId>
    <version>2.11.0.rc1</version>
</dependency>
19. thymeleaf-extras-springsecurity4
作用:thymeleaf整合springsecurity4【版本可自行变化】
<dependency>
    <groupId>org.thymeleaf.extras</groupId>
    <artifactId>thymeleaf-extras-springsecurity4</artifactId>
</dependency>
用于SpringBoot整合Shiro的包;
<!-- https://mvnrepository.com/artifact/org.apache.shiro/shiro-spring -->
<!--SpringBoot ==> Shiro-->
<dependency>
    <groupId>org.apache.shiro</groupId>
    <artifactId>shiro-spring</artifactId>
    <version>1.5.3</version>
</dependency>
8. spring-boot-devtools
作用:用于实现SpringBoot的热部署;
<!--hot deployment-->
<dependency>
    <groupId>org.springframework.boot</groupId>
    <artifactId>spring-boot-devtools</artifactId>
     <optional>true</optional>
</dependency>
使用方法
1.开启自动编译
- File ==> Settings ==> Build, Execution, Deployment ==> Compiler ==> 勾选【Build project automatically】
2.开启允许在运行过程中修改文件
- 按住ctrl+alt+shift+/ ==> Rigistry ==> 勾选【compiler.automake.allow.when.app.running】
设置【compiler.document.save.trigger.delay==500】
3.开启IDEA的热部署策略【重要】
- 点击项目名 ==> Edit Configurations ==>SpringBoot ==> 【On ‘Update’ action/On frame deactivation】 ==> Update classes and resources
4.关闭浏览器缓存【可省略,若无法实现热部署时请关闭浏览器缓存】
- 浏览器中按F12 ==> Network ==> 勾选【Disable cache】
5.启动项目
- 若发现启动时启动面板上显示
[ restartedMain]则表示配置成功;
注意
- thymeleaf:若是使用thymeleaf热部署则需要关闭thymeleaf的缓存
# 关闭thymeleaf缓存
spring:
  thymeleaf:
    cache: false
9. tomcat-embed-jasper
作用;用于在SpringBoot中解析JSP模板页面的包;
<!--parsing jsp-->
<dependency>
     <groupId>org.apache.tomcat.embed</groupId>
     <artifactId>tomcat-embed-jasper</artifactId>
</dependency>
10. mybatis-spring-boot-starter
作用:Springboot整合mybatis的依赖包,配合JDBC包使用;
<!--springboot integrates mybatis-->
<dependency>
      <groupId>org.mybatis.spring.boot</groupId>
      <artifactId>mybatis-spring-boot-starter</artifactId>
      <version>2.1.2</version>
</dependency>
11. mysql-connector-java
名称:MySQL驱动
<!--mysql driver-->
<dependency>
    <groupId>mysql</groupId>
    <artifactId>mysql-connector-java</artifactId>
    <version>5.1.48</version>
</dependency>
12. druid
名称:阿里巴巴数据库连接池
<!--database connection pool-->
<dependency>
      <groupId>com.alibaba</groupId>
      <artifactId>druid</artifactId>
      <version>1.1.22</version>
</dependency>
13. spring-jdbc
作用:Spring框架用来连接数据库所用的依赖包,只适用与jdbc连接,如果是mybatis整合Spring或者其他工具请参考其他连接方法;
<!--spring jdbc-->
<dependency>
    <groupId>org.springframework</groupId>
    <artifactId>spring-jdbc</artifactId>
    <version>5.2.5.RELEASE</version>
</dependency>
14. spring-webmvc
作用:Spring框架用来与web连接所使用的依赖包,用于控制web的视图跳转、spring管理等;
<!--spring webmvc-->
<dependency>
    <groupId>org.springframework</groupId>
    <artifactId>spring-webmvc</artifactId>
    <version>5.2.5.RELEASE</version>
</dependency>
15. aspectjweaver
名称:AOP织入
作用:支持切入点表达式等等;aspectjweaver包含aspectjrt,所以我们只需要引入aspectjweaver依赖包就可以了
<!--aspectjweaver-->
<dependency>
    <groupId>org.aspectj</groupId>
    <artifactId>aspectjweaver</artifactId>
    <version>1.9.5</version>
</dependency>
16. spring-aop
作用AOP核心功能,例如代理工厂等等;
注意:一般13、14、15、16在Spring中是配合使用的;
<!--spring aop-->
<dependency>
    <groupId>org.springframework</groupId>
    <artifactId>spring-aop</artifactId>
    <version>5.2.6.RELEASE</version>
</dependency>
17. spring-boot-starter-aop
<!--springboot aop-->
<dependency>
   <groupId>org.springframework.boot</groupId>
   <artifactId>spring-boot-starter-aop</artifactId>
</dependency>
18. jackson-databind
名称:JSON解析工具
功能:通过Controller层返回Json数据,具体使用请单击
<dependency>
    <groupId>com.fasterxml.jackson.core</groupId>
    <artifactId>jackson-databind</artifactId>
    <version>2.11.0.rc1</version>
</dependency>
19. thymeleaf-extras-springsecurity4
作用:thymeleaf整合springsecurity4【版本可自行变化】
<dependency>
    <groupId>org.thymeleaf.extras</groupId>
    <artifactId>thymeleaf-extras-springsecurity4</artifactId>
</dependency>


 被折叠的 条评论
为什么被折叠?
被折叠的 条评论
为什么被折叠?
 到【灌水乐园】发言


