


一、shiro框架介绍
1.什么是shiro呢?
shiro是apache的一个开源框架,是一个权限管理的框架,实现 用户认证、用户授权。
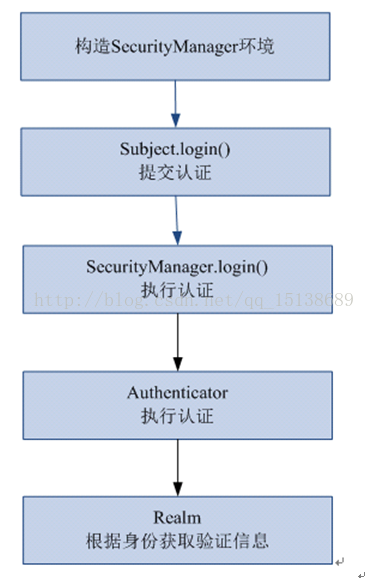
2.shiro的认证流程
3.shiro的依赖jar包
<!-- Spring 整合Shiro需要的依赖 -->
<dependency>
<groupId>org.apache.shiro</groupId>
<artifactId>shiro-core</artifactId>
<version>${shiro.version}</version>
</dependency>
<dependency>
<groupId>org.apache.shiro</groupId>
<artifactId>shiro-web</artifactId>
<version>${shiro.version}</version>
</dependency>
<dependency>
<groupId>org.apache.shiro</groupId>
<artifactId>shiro-ehcache</artifactId>
<version>${shiro.version}</version>
</dependency>
<dependency>
<groupId>org.apache.shiro</groupId>
<artifactId>shiro-spring</artifactId>
<version>${shiro.version}</version>
</dependency>
</dependencies>
4.shiro的权限功能有哪些?
1.身份认证/登录,验证用户是不是拥有相应的身份;
2.授权,即权限验证,验证某个已认证的用户是否拥有某个权限;即判断用户是否能做事情,常见的如:验证某个用户是否拥有某个角色。或者细粒度的验证某个用户对某个资源是否具有某个权限;
3.会话管理,即用户登录后就是一次会话,在没有退出之前,它的所有信息都在会话中;会话可以是普通JavaSE环境的,也可以是如Web环境的;
4.加密,保护数据的安全性,如密码加密存储到数据库,而不是明文存储;
5.Web支持,可以非常容易的集成到Web环境;
Caching:缓存,比如用户登录后,其用户信息、拥有的角色/权限不必每次去查,这样可以提高效率;
6.shiro支持多线程应用的并发验证,即如在一个线程中开启另一个线程,能把权限自动传播过去;
7.记住我,这个是非常常见的功能,即一次登录后,下次再来的话不用登录了。
5.什么是权限呢?
权限管理是系统的安全范畴,要求必须是合法的用户才可以访问系统(用户认证),且必须具有该资源的访问权限才可以访问该资源(授权)。
二、shiro实例详解
1.shiro需要依赖的jar包上面已经注上了这里就不再废话了
2.需要的实体类
权限类(表),用户类(表),角色类(表),角色用户关联类(表),角色权限关联类(表)
这几个类与表没什么东西在此就不写了
3.用户信息类
public class ActiveUser implements Serializable{
private int userid;//用户id(主键)
private String usercode;// 用户账号
private String username;// 用户名称
private List<Permission> menus;// 菜单
private List<Permission> permissions;// 权限
get{},set{}略
3.自定义的realm
package com.pment.controller.filter;
import java.util.ArrayList;
import java.util.HashMap;
import java.util.List;
import java.util.Map;
import org.apache.shiro.SecurityUtils;
import org.apache.shiro.authc.AuthenticationException;
import org.apache.shiro.authc.AuthenticationInfo;
import org.apache.shiro.authc.AuthenticationToken;
import org.apache.shiro.authc.SimpleAuthenticationInfo;
import org.apache.shiro.authc.UsernamePasswordToken;
import org.apache.shiro.authz.AuthorizationInfo;
import org.apache.shiro.authz.SimpleAuthorizationInfo;
import org.apache.shiro.realm.AuthorizingRealm;
import org.apache.shiro.session.Session;
import org.apache.shiro.subject.PrincipalCollection;
import org.apache.shiro.subject.Subject;
import org.springframework.beans.factory.annotation.Autowired;
import com.pment.model.ActiveUser;
import com.pment.model.Permission;
import com.pment.model.User;
import com.pment.service.PermissionService;
import com.pment.service.UserService;
/**
* Title: CustomRealm
* Description:自定义realm
* @author yuanst
*/
public class CustomRealm extends AuthorizingRealm {
//注入service
@Autowired
private UserService userService;
@Autowired
private PermissionService permissionService;
// 设置realm的名称
@Override
public void setName(String name) {
super.setName("customRealm");
}
//realm的认证方法,从数据库查询用户信息 登录时验证
@Override
protected AuthenticationInfo doGetAuthenticationInfo(
AuthenticationToken authcToken) throws AuthenticationException {
// token是用户输入的用户名和密码
// 第一步从token中取出用户名
UsernamePasswordToken token = (UsernamePasswordToken) authcToken;
String name=token.getUsername();
// 第二步:根据用户输入的userCode从数据库查询
User user=null;
try {
user = userService.getByName(name);
} catch (Exception e1) {
// TODO Auto-generated catch block
e1.printStackTrace();
}
// 如果查询不到返回null
if(user==null){//
return null;
}
// 从数据库查询到密码
String password = user.getPassword();
// 如果查询到返回认证信息AuthenticationInfo
//activeUser就是用户身份信息
ActiveUser activeUser = new ActiveUser();
activeUser.setUserid(user.getId());
activeUser.setUsercode(user.getLoginName());
activeUser.setUsername(user.getName());
//..
//根据用户id取出菜单
List<Permission> permissionList = null;
try {
//通过service取出菜单
permissionList = permissionService.findMenuListByUserId(user.getId());
} catch (Exception e) {
// TODO Auto-generated catch block
e.printStackTrace();
}
//将用户菜单 设置到activeUser
activeUser.setMenus(permissionList);
List<String> permissions = new ArrayList<String>();
if(permissionList!=null){
for(Permission permission:permissionList){
//将数据库中的权限标签 符放入集合
permissions.add(permission.getPermissionName());
}
}
this.setSession("USER", user);
SimpleAuthenticationInfo simpleAuthenticationInfo = new SimpleAuthenticationInfo(
activeUser, password, this.getName());
return simpleAuthenticationInfo;
}
// 用于授权
@Override
protected AuthorizationInfo doGetAuthorizationInfo(
PrincipalCollection principals) {
//从 principals获取主身份信息
//将getPrimaryPrincipal方法返回值转为真实身份类型(在上边的doGetAuthenticationInfo认证通过填充到SimpleAuthenticationInfo中身份类型),
ActiveUser activeUser = (ActiveUser) principals.getPrimaryPrincipal();
//根据身份信息获取权限信息
//从数据库获取到权限数据
List<Permission> permissionList = null;
try {
permissionList = permissionService.findPermissionListByUserId(activeUser.getUserid());
} catch (Exception e) {
// TODO Auto-generated catch block
e.printStackTrace();
}
//单独定一个集合对象
List<String> permissions = new ArrayList<String>();
if(permissionList!=null){
for(Permission permission:permissionList){
//将数据库中的权限标签 符放入集合
permissions.add(permission.getPermissionCode());
}
}
//查到权限数据,返回授权信息(要包括 上边的permissions)
SimpleAuthorizationInfo simpleAuthorizationInfo = new SimpleAuthorizationInfo();
//将上边查询到授权信息填充到simpleAuthorizationInfo对象中
simpleAuthorizationInfo.addStringPermissions(permissions);
return simpleAuthorizationInfo;
}
//清除缓存
public void clearCached() {
PrincipalCollection principals = SecurityUtils.getSubject().getPrincipals();
super.clearCache(principals);
}
/**
* 将一些数据放到ShiroSession中,以便于其它地方使用
*
* @see 比如Controller,使用时直接用HttpSession.getAttribute(key)就可以取到
*/
private void setSession(Object key, Object value) {
Subject currentUser = SecurityUtils.getSubject();
if (null != currentUser) {
Session session = currentUser.getSession();
//System.out.println("AuthRealm.setSession():Session默认超时时间为[" + session.getTimeout() + "]毫秒");
if (null != session) {
session.setAttribute(key, value);
}
}
}
}
4.shiro.xml文件配置
<beans xmlns="http://www.springframework.org/schema/beans"
xmlns:xsi="http://www.w3.org/2001/XMLSchema-instance" xmlns:mvc="http://www.springframework.org/schema/mvc"
xmlns:context="http://www.springframework.org/schema/context"
xmlns:aop="http://www.springframework.org/schema/aop" xmlns:tx="http://www.springframework.org/schema/tx"
xsi:schemaLocation="http://www.springframework.org/schema/beans
http://www.springframework.org/schema/beans/spring-beans-3.2.xsd
http://www.springframework.org/schema/mvc
http://www.springframework.org/schema/mvc/spring-mvc-3.2.xsd
http://www.springframework.org/schema/context
http://www.springframework.org/schema/context/spring-context-3.2.xsd
http://www.springframework.org/schema/aop
http://www.springframework.org/schema/aop/spring-aop-3.2.xsd
http://www.springframework.org/schema/tx
http://www.springframework.org/schema/tx/spring-tx-3.2.xsd ">
<!-- web.xml中shiro的filter对应的bean -->
<!-- Shiro 的Web过滤器 -->
<bean id="shiroFilter" class="org.apache.shiro.spring.web.ShiroFilterFactoryBean">
<property name="securityManager" ref="securityManager" />
<!-- loginUrl认证提交地址,如果没有认证将会请求此地址进行认证,请求此地址将由formAuthenticationFilter进行表单认证 -->
<property name="loginUrl" value="/user/login" />
<!-- 认证成功统一跳转到此路径,建议不配置,shiro认证成功自动到上一个请求路径 -->
<!-- <property name="successUrl" value="/user/getAll"/> -->
<!-- 通过unauthorizedUrl指定没有权限操作时跳转页面-->
<property name="unauthorizedUrl" value="/index" />
<!-- 自定义filter配置 -->
<!-- 过虑器链定义,从上向下顺序执行,一般将/**放在最下边 -->
<property name="filterChainDefinitions">
<value>
<!-- 对静态资源设置匿名访问 -->
/resources/**=anon
<!-- 退出shiro 自动清除shiro与token shiro自带 不需要写此方法也是可以的 -->
/logout = logout
<!-- /** = authc 所有url都必须认证通过才可以访问-->
/** = authc
</value>
</property>
</bean>
<!-- securityManager安全管理器 -->
<bean id="securityManager" class="org.apache.shiro.web.mgt.DefaultWebSecurityManager">
<property name="realm" ref="customRealm" />
<!-- 注入缓存管理器 -->
<property name="cacheManager" ref="cacheManager"/>
<!-- 注入session管理器 -->
<!-- <property name="sessionManager" ref="sessionManager" /> -->
<!-- 记住我 -->
<property name="rememberMeManager" ref="rememberMeManager"/>
</bean>
<!-- realm -->
<bean id="customRealm" class="com.pment.controller.filter.CustomRealm">
<property name="authorizationCacheName" value="shiro-authorizationCache"/>
<!-- 将凭证匹配器设置到realm中,realm按照凭证匹配器的要求进行散列 -->
<!-- <property name="credentialsMatcher" ref="credentialsMatcher"/> -->
</bean>
<!-- 缓存管理器 -->
<bean id="cacheManager" class="org.apache.shiro.cache.ehcache.EhCacheManager">
<property name="cacheManagerConfigFile" value="classpath:ehcache/shiro-ehcache.xml"/>
</bean>
<!-- rememberMeManager管理器,写cookie,取出cookie生成用户信息 -->
<bean id="rememberMeManager" class="org.apache.shiro.web.mgt.CookieRememberMeManager">
<property name="cookie" ref="rememberMeCookie" />
</bean>
<!-- 记住我cookie -->
<bean id="rememberMeCookie" class="org.apache.shiro.web.servlet.SimpleCookie">
<!-- rememberMe是cookie的名字 -->
<constructor-arg value="rememberMe" />
<!-- 记住我cookie生效时间30天 -->
<property name="maxAge" value="2592000" />
</bean>
</beans>
5.缓存配置文件shiro-ehcache.xml
<ehcache xmlns:xsi="http://www.w3.org/2001/XMLSchema-instance"
xsi:noNamespaceSchemaLocation="../config/ehcache.xsd">
<!--diskStore:缓存数据持久化的目录 地址 -->
<defaultCache
maxElementsInMemory="1000"
maxElementsOnDisk="10000000"
eternal="false"
overflowToDisk="false"
diskPersistent="false"
timeToIdleSeconds="120"
timeToLiveSeconds="120"
diskExpiryThreadIntervalSeconds="120"
memoryStoreEvictionPolicy="LRU">
</defaultCache>
</ehcache>
此就只是将用户已验证过的信息存入到缓存中
6.web.xml配置
<?xml version="1.0" encoding="UTF-8"?>
<web-app xmlns:xsi="http://www.w3.org/2001/XMLSchema-instance"
xmlns="http://java.sun.com/xml/ns/javaee" xmlns:web="http://java.sun.com/xml/ns/javaee/web-app_2_5.xsd"
xsi:schemaLocation="http://java.sun.com/xml/ns/javaee http://java.sun.com/xml/ns/javaee/web-app_2_5.xsd"
id="taotao" version="2.5">
<display-name>pment-manger</display-name>
<welcome-file-list>
<welcome-file>index.html</welcome-file>
<welcome-file>index.htm</welcome-file>
<welcome-file>index.jsp</welcome-file>
<welcome-file>default.html</welcome-file>
<welcome-file>default.htm</welcome-file>
<welcome-file>default.jsp</welcome-file>
</welcome-file-list>
<!-- 加载spring容器 -->
<context-param>
<param-name>contextConfigLocation</param-name>
<param-value>classpath:spring/applicationContext-*.xml</param-value>
</context-param>
<listener>
<listener-class>org.springframework.web.context.ContextLoaderListener</listener-class>
</listener>
<filter>
<filter-name>sitemesh</filter-name>
<filter-class>org.sitemesh.config.ConfigurableSiteMeshFilter</filter-class>
</filter>
<!-- shiro 代理过滤器 -->
<filter>
<filter-name>shiroFilter</filter-name>
<filter-class>org.springframework.web.filter.DelegatingFilterProxy</filter-class>
<!-- 设置true由servlet容器控制filter的生命周期 -->
<init-param>
<param-name>targetFilterLifecycle</param-name>
<param-value>true</param-value>
</init-param>
<!-- 设置spring容器filter的bean id,如果不设置则找与filter-name一致的bean-->
<init-param>
<param-name>targetBeanName</param-name>
<param-value>shiroFilter</param-value>
</init-param>
</filter>
<filter-mapping>
<filter-name>shiroFilter</filter-name>
<url-pattern>/*</url-pattern>
</filter-mapping>
<filter-mapping>
<filter-name>sitemesh</filter-name>
<url-pattern>/*</url-pattern>
</filter-mapping>
<!-- 解决post乱码 -->
<filter>
<filter-name>CharacterEncodingFilter</filter-name>
<filter-class>org.springframework.web.filter.CharacterEncodingFilter</filter-class>
<init-param>
<param-name>encoding</param-name>
<param-value>utf-8</param-value>
</init-param>
</filter>
<filter-mapping>
<filter-name>CharacterEncodingFilter</filter-name>
<url-pattern>/*</url-pattern>
</filter-mapping>
<servlet>
<servlet-name>pment-manger</servlet-name>
<servlet-class>org.springframework.web.servlet.DispatcherServlet</servlet-class>
<!-- contextConfigLocation不是必须的, 如果不配置contextConfigLocation, springmvc的配置文件默认在:WEB-INF/servlet的name+"-servlet.xml" -->
<init-param>
<param-name>contextConfigLocation</param-name>
<param-value>classpath:spring/springmvc.xml</param-value>
</init-param>
<load-on-startup>1</load-on-startup>
</servlet>
<!-- 加载静态资源 -->
<servlet-mapping>
<servlet-name>default</servlet-name>
<url-pattern>*.js</url-pattern>
<url-pattern>*.css</url-pattern>
<url-pattern>/resources/*</url-pattern>
</servlet-mapping>
<servlet-mapping>
<servlet-name>pment-manger</servlet-name>
<url-pattern>/</url-pattern>
</servlet-mapping>
</web-app>
7.controller代码
package com.pment.controller;
import java.util.ArrayList;
import java.util.Date;
import java.util.Enumeration;
import java.util.HashMap;
import java.util.HashSet;
import java.util.List;
import java.util.Map;
import java.util.Set;
import javax.servlet.http.HttpServletRequest;
import javax.servlet.http.HttpServletResponse;
import javax.servlet.http.HttpSession;
import org.apache.shiro.SecurityUtils;
import org.apache.shiro.authc.AuthenticationException;
import org.apache.shiro.authc.ExcessiveAttemptsException;
import org.apache.shiro.authc.IncorrectCredentialsException;
import org.apache.shiro.authc.UnknownAccountException;
import org.apache.shiro.authc.UsernamePasswordToken;
import org.apache.shiro.subject.Subject;
import org.slf4j.Logger;
import org.slf4j.LoggerFactory;
import org.springframework.beans.factory.annotation.Autowired;
import org.springframework.stereotype.Controller;
import org.springframework.web.bind.annotation.PathVariable;
import org.springframework.web.bind.annotation.RequestMapping;
import org.springframework.web.bind.annotation.ResponseBody;
import com.alibaba.fastjson.JSON;
import com.pment.common.util.MD5Utils;
import com.pment.model.Record;
import com.pment.model.User;
import com.pment.service.RecordService;
import com.pment.service.UserService;
import com.pment.vo.UserVo;
@Controller
@RequestMapping("user")
public class UserController extends BaseController{
/**
* 日志记录器
*/
private static final Logger LOGGER = LoggerFactory.getLogger(UserController.class);
@Autowired
private UserService userService;
@Autowired
private RecordService recordService;
@RequestMapping("/login")
public String login(HttpServletRequest request) throws Exception{
String name=request.getParameter("username"); //前台页面获取的用户名称
String password=request.getParameter("password"); //前台用户输入的密码
String passwordMD5=MD5Utils.encryptByMD5(password); // 将用户输入的密码加密(这是我自己写的MD5加密,需要根据自己的情况加密与否)
UsernamePasswordToken token = new UsernamePasswordToken(name, passwordMD5);
Subject subject = SecurityUtils.getSubject();
try {
subject.login(token); // 将用户提交到realm进行验证
} catch(UnknownAccountException uae){
SecurityUtils.getSubject().logout(); // 此处是进行用户登录将错误的信息token清除以下雷同
LOGGER.warn("对用户[" + name + "]进行登录验证..验证未通过,未知账户");
request.getSession().setAttribute("message_login", "未知账户");
}catch(IncorrectCredentialsException ice){
SecurityUtils.getSubject().logout();
LOGGER.warn("对用户[" + name + "]进行登录验证..验证未通过,错误的凭证");
request.getSession().setAttribute("message_login", "密码不正确");
}catch(ExcessiveAttemptsException eae){
SecurityUtils.getSubject().logout();
LOGGER.warn("对用户[" + name + "]进行登录验证..验证未通过,错误次数过多");
request.getSession().setAttribute("message_login", "用户名或密码错误次数过多");
}catch(AuthenticationException ae){
//通过处理Shiro的运行时AuthenticationException就可以控制用户登录失败或密码错误时的情景
LOGGER.warn("对用户[" + name + "]进行登录验证..验证未通过,堆栈轨迹如下");
ae.printStackTrace();
request.getSession().setAttribute("message_login", "用户名或密码不正确");
}
if(subject.isAuthenticated()){
System.out.println("认证通过");
return "redirect:/user/getAll"; //这里我写的是登录后固定进入此页面而不是进入刷新时的页面(因为我不知道如何进入刷新时的那个页面)
}else{
token.clear();
return "login"; //登录错误返回登录页面
}
}
@RequestMapping("/getAll")
public String getAll(HttpServletRequest request)
{
//用于获取session中用户的信息
User user=(User) request.getSession().getAttribute("USER");
String type=request.getParameter("listtype");
Map map=new HashMap();
/**
* 用于获取所有值
*/
Enumeration enu=request.getParameterNames();
/**
* 解析接收的值并放入map中
*/
List<Record> list=null;
while(enu.hasMoreElements())
{
String paraName=(String)enu.nextElement();
map.put(paraName, request.getParameter(paraName));
}
Map<String, Object> chartData = new HashMap<String, Object>();
list=recordService.getAll(map);
List<String> proname=new ArrayList<String>();
List<Integer> inok=new ArrayList<Integer>();
List<Integer> innotok=new ArrayList<Integer>();
List<Integer> count=new ArrayList<Integer>();
if(list.size() > 0)
{
for (int i = 0; i < list.size(); i++)
{
proname.add(list.get(i).getProjectname());
if(list.get(i).getResult()!=null){
if(list.get(i).getResult() == 0)
{
inok.add(list.get(i).getCount());
}
else if(list.get(i).getResult() == 1)
{
innotok.add(list.get(i).getCount());
}
}
}
if (inok.size()>0) {
for (int i = 0; i < inok.size(); i++) {
count.add(inok.get(i)+innotok.get(i));
}
}
}
/**
* proname 去除重复项目
*/
Set set=new HashSet();
List listpro=new ArrayList();
for (String name:proname) {
if(set.add(name)){
listpro.add(name);
}
}
/* HashSet h = new HashSet(proname);
proname.clear();
proname.addAll(h); */
chartData.put("count", count);
chartData.put("proname", listpro);
chartData.put("inok", inok);
chartData.put("notok", innotok);
List<Record> records =recordService.listPro();
String data=JSON.toJSONString(chartData);
request.setAttribute("data",data);
request.setAttribute("map", map);
request.setAttribute("records", records);
return "record/chart";
}
}
8.login.jsp页面
<%@ page language="java" contentType="text/html; charset=utf-8"
pageEncoding="utf-8"%>
<%@include file="/WEB-INF/view/common.jsp" %>
<!DOCTYPE html PUBLIC "-//W3C//DTD HTML 4.01 Transitional//EN" "http://www.w3.org/TR/html4/loose.dtd">
<html>
<head>
<meta http-equiv="Content-Type" content="text/html; charset=utf-8">
<title>shiro</title>
<style>
body{ width:100vw; height:100vh; background:url(${static_common}/images/login-bg.png) no-repeat center #08213f ; padding:18vh 0}
</style>
</head>
<body>
<div class="Login">
<form action="${ctx}/user/login" method="post">
<div class="form-group">
<label >
<span>用户名:</span>
<input type="text" name="username"/>
</label>
</div>
<div class="form-group">
<label>
<span >密码:</span>
<input type="password" name="password"/>
</label>
<span id="userspan"></span>
</div>
<div class="form-group">
<label>
<button>登录</button>
</label>
</div>
</form>
</div>
<script type="text/javascript">
var data=${data};
if(data=="nameerror"){
$("#userspan").text("用户名不可用");
}else if(data=="passerror"){
$("#userspan").text("密码错误");
}
</script>
</body>
</html>
9.登录成功
<shiro:hasPermission name="YHGL">
<li><a href="${ctx}/user/list">用户管理</a></li>
</shiro:hasPermission>
登录成功后就可以根据权限名称判断用户是否有此权限
三、总结
在搭建shiro框架的时候一定要了解shiro的原理以及它的实现机制,不然在搭建过程中遇到的问题解决都不知道从何下手去解决。我在此分享一下我在搭建shiro的过程中遇到的问题 (1)刚开始我是在网上搜索了一个项目代码复制过来就开跑,于是启动项目就报错提示什么tokenException,session异常等等,项目报错了怎么办?怎么解决呢?这些问题我在开发过程中从未遇到过只能网上查,有的说什么seesion过期,token失效,还有的说jar包版本不对,因此我整整看了一周左右没有解决问题。于是自己从新看实现原理,终于发现自己的配置文件多了session的会话配置 <!-- <bean id="sessionManager" class="org.apache.shiro.web.session.mgt.DefaultWebSessionManager">
<property name="globalSessionTimeout" value="1800000"/>
<property name="deleteInvalidSessions" value="true"/>
<property name="sessionValidationSchedulerEnabled" value="true"/>
<property name="sessionIdCookieEnabled" value="true"/>
<property name="sessionIdCookie" ref="sessionIdCookie"/>
</bean>
<bean id="sessionIdCookie" class="org.apache.shiro.web.servlet.SimpleCookie">
<constructor-arg name="name" value="meta.session.id"/>
</bean> -->但是我并没有对此配置做任何处理于是就报错了注释掉可以正常启动了
(2)开始登陆又报错了,用户名密码错误,我密码都是加密后去验证的怎么还会报错呢?看数据库密码与提交密码在看配置
<!-- 凭证匹配器 -->
<!-- <bean id="credentialsMatcher"
class="org.apache.shiro.authc.credential.HashedCredentialsMatcher">
<property name="hashAlgorithmName" value="md5" />
<property name="hashIterations" value="1" />
</bean> -->我这是用于加密提交后的密码的,后来我直接提交1去验证还是登录失败,不管是加密还是不加密都是报错,干脆注释掉,注释掉可以登录,虽然问题解决了
但是你不知道为何,于是又研究,在一篇博客中看到数据库有一个自带的md5加密和我自己写的MD5不一样又学会了一招
(3)登录成功了。(4)退出:登录可以了下一步肯定是退出,但是退出又出问题了,我同事说没有清除session用户,当时由于自己不懂就remove.session清除,但是并没有任何效果,同事说是用户登录的时候seesion就没有存进去,又搞了几天没有搞懂,接着回去看原理了发现和什么session没有任何关系,只是需要登录提交token 退出清理token即可。明白了原理机制,我没有写退出方法也实现了退出登录<property name="filterChainDefinitions">
<value>
<!-- 对静态资源设置匿名访问 -->
/resources/**=anon
<!-- /timerController/**=anon -->
<!-- 退出shiro 自动清除shiro与token shiro自带 不需要写此方法也是可以的 -->
/logout = logout
<!-- /** = authc 所有url都必须认证通过才可以访问-->
/** = authc
</value>
</property>
终上所述:在搭建框架的时候一定要看看实现原理以免走错方向带来不必要的时间浪费。


 351
351


 被折叠的 条评论
为什么被折叠?
被折叠的 条评论
为什么被折叠?
 到【灌水乐园】发言


