


系列文章目录
第一章 OkHttp3源码解析 - 请求流程
第二章 OkHttp3源码解析 - 拦截器
第三章 OkHttp3源码解析 - 连接机制和缓存机制
文章目录
前言
本文基于okhttp3.12.13源码进行分析
拦截器是OkHttp中比较优秀的一个设计,也是OkHttp的核心功能所在,其中包含五大内置拦截器和自定义拦截器,每个拦截器各司其职,通过责任链模式将请求逐层分发。
一、五大内置拦截器
okhttp的又一大特点是整个请求流程是由拦截器一层层分发下去,最后得到结果再一层层返回上来。 如下图:
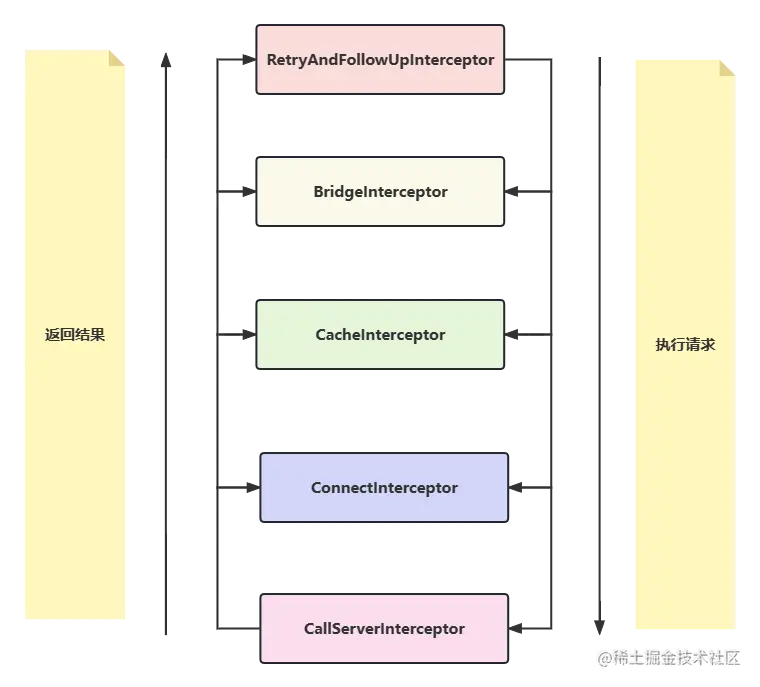
okhttp 内置了五大拦截器,这五大拦截器各司其职,通过责任链模式将请求逐层分发下去,每层完成自己这层该做的事,最后拿到相应结果逐层往上返回结果:
- RetryAndFollowUpInterceptor:重试重定向拦截器,负责失败重试以及重定向。请求失败自动重试,如果 DNS 设置了多个ip地址会自动重试其余ip地址。
- BridgeInterceptor:桥接拦截器,负责把用户构造的请求转换为发送给服务器的请求,把服务器返回的响应转换为对用户友好的响应。会补全我们请求中的请求头,例如Host,Cookie,Accept-Encoding等。
- CacheInterceptor:缓存拦截器,负责读取缓存以及更新缓存。会选择性的将响应结果进行保存,以便下次直接读取,不再需要再向服务器索要数据。
- ConnectInterceptor:连接拦截器,负责与服务器建立连接。建立连接并得到对应的socket;管理连接池,从中存取连接,以便达到连接复用的目的。
- CallServerInterceptor:服务请求拦截器,负责从服务器读取响应的数据。服务请求与服务器建立连接,具体进行网络请求,并将结果逐层返回的地方。
这五个是系统内置的拦截器,我们也可以通过 addInterceptor() 加入我们自己写的拦截器.下面我们详细看下拦截器的分发流程。
二、拦截器分发流程
我们从开启拦截器的入口函数 getResponseWithInterceptorChain() 看起:
RealCall.java
  // 五大拦截器的起始入口
  Response getResponseWithInterceptorChain() throws IOException {
    // 用一个集合保存所有的拦截器
    List<Interceptor> interceptors = new ArrayList<>();
    // 这个interceptor就是我们自己可以加的第一个拦截器,因为位于所有拦截器的第一个,与我们的应用直接相连, 因此这个拦截器又被称为 Application Interceptor
    interceptors.addAll(client.interceptors());
    // 重试重定向拦截器
    interceptors.add(retryAndFollowUpInterceptor);
    // 桥接拦截器
    interceptors.add(new BridgeInterceptor(client.cookieJar()));
    // 缓存拦截器
    interceptors.add(new CacheInterceptor(client.internalCache()));
    // 连接拦截器
    interceptors.add(new ConnectInterceptor(client));
    if (!forWebSocket) {
      //这个interceptor也是我们自己可以加的一个拦截器,因为位于真正请求返回结果的拦截器前面,可以拿到服务器返回的最原始的结果,因此这个拦截器又被称为 Network Interceptor
      interceptors.addAll(client.networkInterceptors());
    }
    //服务请求拦截器
    interceptors.add(new CallServerInterceptor(forWebSocket));

	// 构建RealInterceptorChain对象,我们正是通过此对象将请求逐层往下传递的
    Interceptor.Chain chain = new RealInterceptorChain(interceptors, null, null, null, 0,
        originalRequest, this, eventListener, client.connectTimeoutMillis(),
        client.readTimeoutMillis(), client.writeTimeoutMillis());

	// 调用RealInterceptorChain的proceed()方法,将请求向下一个连接器传递
    Response response = chain.proceed(originalRequest);
    if (retryAndFollowUpInterceptor.isCanceled()) {
      closeQuietly(response);
      throw new IOException("Canceled");
    }
    // 返回响应结果
    return response;
  }
从这个方法中我们大概可以总结出,它将所有的拦截器包括用户自定义的拦截器全部通过一个集合保存了下来,然后构建出了 RealInterceptorChain 对象,并调用其 proceed() 方法开始了拦截器逐层分发工作。
那么它是怎么做到逐层分发的呢?
其实很简单,每一个拦截器中都会通过 proceed() 方法再构建一个 RealInterceptorChain 对象,然后调用 intercpt去执行下个拦截器中的任务,如此循环,最终走到最后一个拦截器后退出。如下图所示:
//RealInterceptorChain.java

public Response proceed(Request request, StreamAllocation streamAllocation, HttpCodec httpCodec,
      RealConnection connection) throws IOException {

    // Call the next interceptor in the chain.
    RealInterceptorChain next = new RealInterceptorChain(interceptors, streamAllocation, httpCodec,
        connection, index + 1, request, call, eventListener, connectTimeout, readTimeout,
        writeTimeout);
    Interceptor interceptor = interceptors.get(index);
    Response response = interceptor.intercept(next);
    ...
    // 将结果放回到上一个拦截器中
    return response;
  }
以上我们搞清楚了拦截器是如何一步一步往下传递任务,并逐层往上返回结果的,现在我们来具体看看每个拦截器都做了什么事情。
1.RetryAndFollowUpInterceptor-重试重定向拦截器
RetryAndFollowUpInterceptor.java
// 所有拦截求都实现了 Interceptor 接口
@Override public Response intercept(Chain chain) throws IOException {
    Request request = chain.request();
    RealInterceptorChain realChain = (RealInterceptorChain) chain;
    Call call = realChain.call();
    EventListener eventListener = realChain.eventListener();

	//1. 构建一个StreamAllocation对象,StreamAllocation相当于是个管理类,维护了
    //Connections、Streams和Calls之间的管理,该类初始化一个Socket连接对象,获取输入/输出流对象。
    StreamAllocation streamAllocation = new StreamAllocation(client.connectionPool(),
        createAddress(request.url()), call, eventListener, callStackTrace);
    this.streamAllocation = streamAllocation;

	//重定向次数
    int followUpCount = 0;
    Response priorResponse = null;
    // 这是个死循环,意思就是如果请求失败就需要一直重试,直到主动退出循环(followUpCount>20)
    while (true) {
      if (canceled) {
        streamAllocation.release();
        throw new IOException("Canceled");
      }

	  // 响应结果
      Response response;
      boolean releaseConnection = true;
      try {
      	// 2.调用下一个拦截器,即 BridgeInterceptor, 整个请求可能会失败,需要捕获然后重试重定向,因此有一个try catch
        response = realChain.proceed(request, streamAllocation, null, null);
        releaseConnection = false;
      } catch (RouteException e) {//1.进行重试
        //3. 抛出异常,则检测连接是否还可以继续。
        if (!recover(e.getLastConnectException(), streamAllocation, false, request)) {
          throw e.getFirstConnectException();
        }
        releaseConnection = false;
        // 失败继续重试
        continue;
      } catch (IOException e) {
        // 和服务端建立连接失败
        boolean requestSendStarted = !(e instanceof ConnectionShutdownException);
        if (!recover(e, streamAllocation, requestSendStarted, request)) throw e;
        releaseConnection = false;
        // 失败继续重试
        continue;
      } finally {
        //检测到其他未知异常,则释放连接和资源
        if (releaseConnection) {
          streamAllocation.streamFailed(null);
          streamAllocation.release();
        }
      }

      //构建响应体,这个响应体的body为空。
      if (priorResponse != null) {
        response = response.newBuilder()
            .priorResponse(priorResponse.newBuilder()
                    .body(null)
                    .build())
            .build();
      }

	  //4.根据响应码处理请求,返回Request不为空时则进行重定向处理。
      Request followUp;
      try {
        followUp = followUpRequest(response, streamAllocation.route());
      } catch (IOException e) {
        streamAllocation.release();
        throw e;
      }

	  // followUp为空,代表没有重定向,直接返回结果response
      if (followUp == null) {
        streamAllocation.release();
        return response;
      }

      closeQuietly(response.body());

	  //重定向的次数不能超过20次,超过则抛出异常
      if (++followUpCount > MAX_FOLLOW_UPS) {
        streamAllocation.release();
        throw new ProtocolException("Too many follow-up requests: " + followUpCount);
      }

	  //followUp不为空,但是body中设置了只能请求一次(默认),返回重定向后的结果response
      if (followUp.body() instanceof UnrepeatableRequestBody) {
        streamAllocation.release();
        throw new HttpRetryException("Cannot retry streamed HTTP body", response.code());
      }

	  //是否可重用此引擎使用的连接
      if (!sameConnection(response, followUp.url())) {
        streamAllocation.release();
        streamAllocation = new StreamAllocation(client.connectionPool(),
            createAddress(followUp.url()), call, eventListener, callStackTrace);
        this.streamAllocation = streamAllocation;
      } else if (streamAllocation.codec() != null) {
        throw new IllegalStateException("Closing the body of " + response
            + " didn't close its backing stream. Bad interceptor?");
      }

	  // 将之前重定向后的Request对象赋值给request进行重新请求
      request = followUp;
      priorResponse = response;
    }
  }
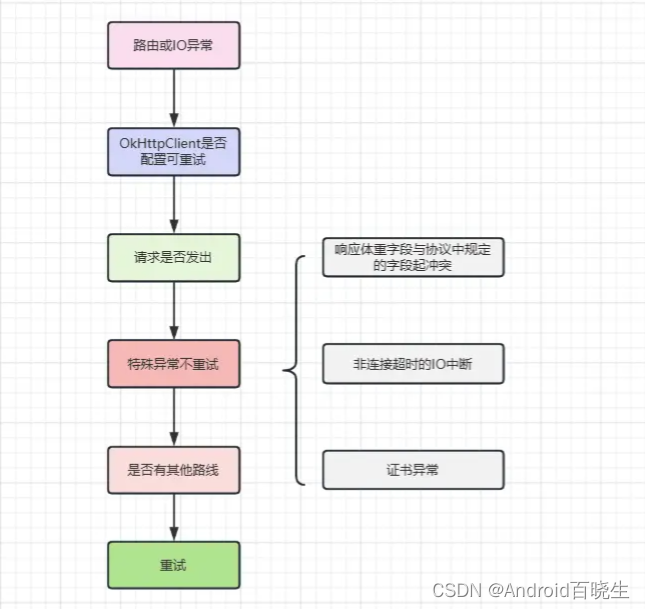
简单来说,RetryAndFollowUpInterceptor拦截器帮我们干了两件事。第一是重试,第二是重定向。
1.我们先来看看什么情况下它会进行重试。
//RetryAndFollowUpInterceptor.java

// 这个方法就是来判断当前请求是否需要重试的
private boolean recover(IOException e, StreamAllocation streamAllocation,
      boolean requestSendStarted, Request userRequest) {
    streamAllocation.streamFailed(e);

    // 构建OkHttpClient时配置不重试,则返回false
    if (!client.retryOnConnectionFailure()) return false;

    /**
    * 返回false:
    * 1、如果是IO异常(非http2中断异常)表示请求可能发出
    * 2、如果请求体只能被使用一次(默认为false)
    */
    if (requestSendStarted && requestIsUnrepeatable(e, userRequest)) return false;

    // 返回false:协议异常、IO中断异常(除Socket读写超时之外),ssl认证异常
    if (!isRecoverable(e, requestSendStarted)) return false;

    // 无更多的路线,返回false
    if (!streamAllocation.hasMoreRoutes()) return false;

    // 以上情况都不是,则返回true 表示可以重试
    return true;
  }
画个图做个总结下请求重连过程:
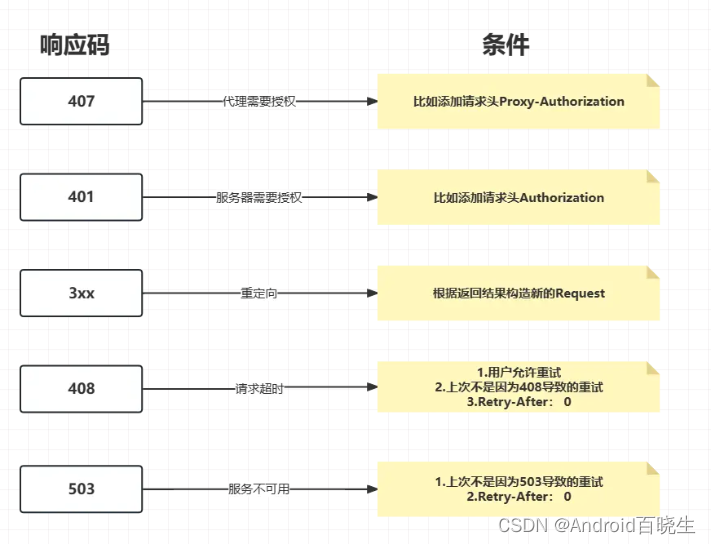
2.来看看如何判断是否需要重定向的:
  private Request followUpRequest(Response userResponse, Route route) throws IOException {
    if (userResponse == null) throw new IllegalStateException();
    int responseCode = userResponse.code();

    final String method = userResponse.request().method();
    switch (responseCode) {
    // 407 代理需要授权,通过proxyAuthenticator获得request,向其中添加请求头 Proxy-Authorization。
      case HTTP_PROXY_AUTH:
        Proxy selectedProxy = route.proxy();//然后构建一个新的request对象返回出去,准备再次请求
        if (selectedProxy.type() != Proxy.Type.HTTP) {
          throw new ProtocolException("Received HTTP_PROXY_AUTH (407) code while not using proxy");
        }
        return client.proxyAuthenticator().authenticate(route, userResponse);

	  // 401 服务器请求需授权,通过authenticator获得到了Request,添加Authorization请求头
	  //然后构建一个新的request对象返回出去,准备再次请求
      case HTTP_UNAUTHORIZED:
        return client.authenticator().authenticate(route, userResponse);

	  // 返回的响应码是3xx,这就准备进行重定向,构建新的Request对象
      case HTTP_PERM_REDIRECT:
      case HTTP_TEMP_REDIRECT:
        // "If the 307 or 308 status code is received in response to a request other than GET
        // or HEAD, the user agent MUST NOT automatically redirect the request"
        if (!method.equals("GET") && !method.equals("HEAD")) {
          return null;
        }
        // fall-through
      case HTTP_MULT_CHOICE:
      case HTTP_MOVED_PERM:
      case HTTP_MOVED_TEMP:
      case HTTP_SEE_OTHER:
        // Does the client allow redirects?
        if (!client.followRedirects()) return null;

        String location = userResponse.header("Location");
        if (location == null) return null;
        HttpUrl url = userResponse.request().url().resolve(location);

        // Don't follow redirects to unsupported protocols.
        if (url == null) return null;

        // If configured, don't follow redirects between SSL and non-SSL.
        boolean sameScheme = url.scheme().equals(userResponse.request().url().scheme());
        if (!sameScheme && !client.followSslRedirects()) return null;

        // Most redirects don't include a request body.
        Request.Builder requestBuilder = userResponse.request().newBuilder();
        if (HttpMethod.permitsRequestBody(method)) {
          final boolean maintainBody = HttpMethod.redirectsWithBody(method);
          if (HttpMethod.redirectsToGet(method)) {
            requestBuilder.method("GET", null);
          } else {
            RequestBody requestBody = maintainBody ? userResponse.request().body() : null;
            requestBuilder.method(method, requestBody);
          }
          if (!maintainBody) {
            requestBuilder.removeHeader("Transfer-Encoding");
            requestBuilder.removeHeader("Content-Length");
            requestBuilder.removeHeader("Content-Type");
          }
        }

        // When redirecting across hosts, drop all authentication headers. This
        // is potentially annoying to the application layer since they have no
        // way to retain them.
        if (!sameConnection(userResponse, url)) {
          requestBuilder.removeHeader("Authorization");
        }

        return requestBuilder.url(url).build();

	  // 408 请求超时
      case HTTP_CLIENT_TIMEOUT:
        // 用户设置是否可以进行重试(默认允许)
        if (!client.retryOnConnectionFailure()) {
          // The application layer has directed us not to retry the request.
          return null;
        }

        if (userResponse.request().body() instanceof UnrepeatableRequestBody) {
          return null;
        }

		 // 如果上次也是因为408导致重试,这次请求又返回的408,则不会再去重试了,直接返回nul
        if (userResponse.priorResponse() != null
            && userResponse.priorResponse().code() == HTTP_CLIENT_TIMEOUT) {
          // We attempted to retry and got another timeout. Give up.
          return null;
        }

		// 服务器返回的 Retry-After:0 或者未响应Retry-After就不会再次去请求
        if (retryAfter(userResponse, 0) > 0) {
          return null;
        }

		// 返回当前的request对象,准备再次请求
        return userResponse.request();

	  // 503 服务不可用
      case HTTP_UNAVAILABLE:
      	// 和408相似,如果两次都是503导致请求重试,那么这次就不会再重试了,直接返回null
        if (userResponse.priorResponse() != null
            && userResponse.priorResponse().code() == HTTP_UNAVAILABLE) {
          // We attempted to retry and got another timeout. Give up.
          return null;
        }

		// 服务端返回的有Retry-After: 0,则立即重试
        if (retryAfter(userResponse, Integer.MAX_VALUE) == 0) {
          // specifically received an instruction to retry without delay
          return userResponse.request();
        }

        return null;

      default:
        return null;
    }
  }
依旧通过一张图来看下请求重连过程:
2.BridgeInterceptor-桥接拦截器
接下来,来到第二个拦截器 BridgeInterceptor。这个拦截器前面说过,主要就是用来补全请求头的,除此之外就是如果响应头中有Content-Encoding: gzip,则会用 GzipSource 进行解析。
BridgeInterceptor.java
public final class BridgeInterceptor implements Interceptor {
  private final CookieJar cookieJar;

  public BridgeInterceptor(CookieJar cookieJar) {
    this.cookieJar = cookieJar;
  }

  @Override public Response intercept(Chain chain) throws IOException {
    Request userRequest = chain.request();
    Request.Builder requestBuilder = userRequest.newBuilder();

	//补全请求头
    RequestBody body = userRequest.body();
    if (body != null) {
      //进行Header的包装
      MediaType contentType = body.contentType();
      if (contentType != null) {
        requestBuilder.header("Content-Type", contentType.toString());
      }

      long contentLength = body.contentLength();
      if (contentLength != -1) {
        requestBuilder.header("Content-Length", Long.toString(contentLength));
        requestBuilder.removeHeader("Transfer-Encoding");
      } else {
        requestBuilder.header("Transfer-Encoding", "chunked");
        requestBuilder.removeHeader("Content-Length");
      }
    }

    if (userRequest.header("Host") == null) {
      requestBuilder.header("Host", hostHeader(userRequest.url(), false));
    }

    if (userRequest.header("Connection") == null) {
      requestBuilder.header("Connection", "Keep-Alive");
    }

	//这里有个坑:如果你在请求的时候主动添加了"Accept-Encoding: gzip" ,transparentGzip=false,那你就要自己解压,如果
    // 你没有吹解压,或导致response.string()乱码。
    // If we add an "Accept-Encoding: gzip" header field we're responsible for also decompressing
    // the transfer stream.
    boolean transparentGzip = false;
    if (userRequest.header("Accept-Encoding") == null && userRequest.header("Range") == null) {
      transparentGzip = true;
      requestBuilder.header("Accept-Encoding", "gzip");
    }

	//创建OkhttpClient配置的cookieJar
    List<Cookie> cookies = cookieJar.loadForRequest(userRequest.url());
    if (!cookies.isEmpty()) {
      requestBuilder.header("Cookie", cookieHeader(cookies));
    }

    if (userRequest.header("User-Agent") == null) {
      requestBuilder.header("User-Agent", Version.userAgent());
    }

	// 去调用下一个拦截器,并得到响应结果
    Response networkResponse = chain.proceed(requestBuilder.build());

	//解析服务器返回的Header,如果没有这事cookie,则不进行解析
    HttpHeaders.receiveHeaders(cookieJar, userRequest.url(), networkResponse.headers());

    Response.Builder responseBuilder = networkResponse.newBuilder()
        .request(userRequest);

	// 根据响应头中的 Content-Encoding,判断服务器是否支持gzip压缩,如果支持,则将压缩提交给Okio库来处理
    if (transparentGzip
        && "gzip".equalsIgnoreCase(networkResponse.header("Content-Encoding"))
        && HttpHeaders.hasBody(networkResponse)) {
      GzipSource responseBody = new GzipSource(networkResponse.body().source());
      Headers strippedHeaders = networkResponse.headers().newBuilder()
          .removeAll("Content-Encoding")
          .removeAll("Content-Length")
          .build();
      responseBuilder.headers(strippedHeaders);
      String contentType = networkResponse.header("Content-Type");
      // 进行gzip解析
      responseBuilder.body(new RealResponseBody(contentType, -1L, Okio.buffer(responseBody)));
    }

    return responseBuilder.build();
  }
}
桥接拦截器其实工作内容也很简单,在请求之前,向我们的请求头中添加必要的参数,然后拿到请求的响应后,根据响应头中的参数去判断是否需要 gzip 解析,如果需要则用 GzipSource 去解析就好了。
3.CacheInterceptor-缓存拦截器
在讲 CacheInterceptor 拦截器之前,我们先来了解一下 HTTP的缓存规则。 我们按照其行为将其分为两大类:强缓存和协商缓存。
- 强缓存:浏览器并不会将请求发送给服务器。强缓存是利用 http 的返回头中的 Expires 或者 Cache-Control 两个字段来控制的,用来表示资源的缓存时间。
- 协商缓存:浏览器会将请求发送至服务器。服务器根据 http 头信息中的 Last-Modify/If-Modify-Since 或 Etag/If-None-Match 来判断是否命中协商缓存。如果命中,则 http 返回码为 304 ,客户端从本地缓存中加载资源。
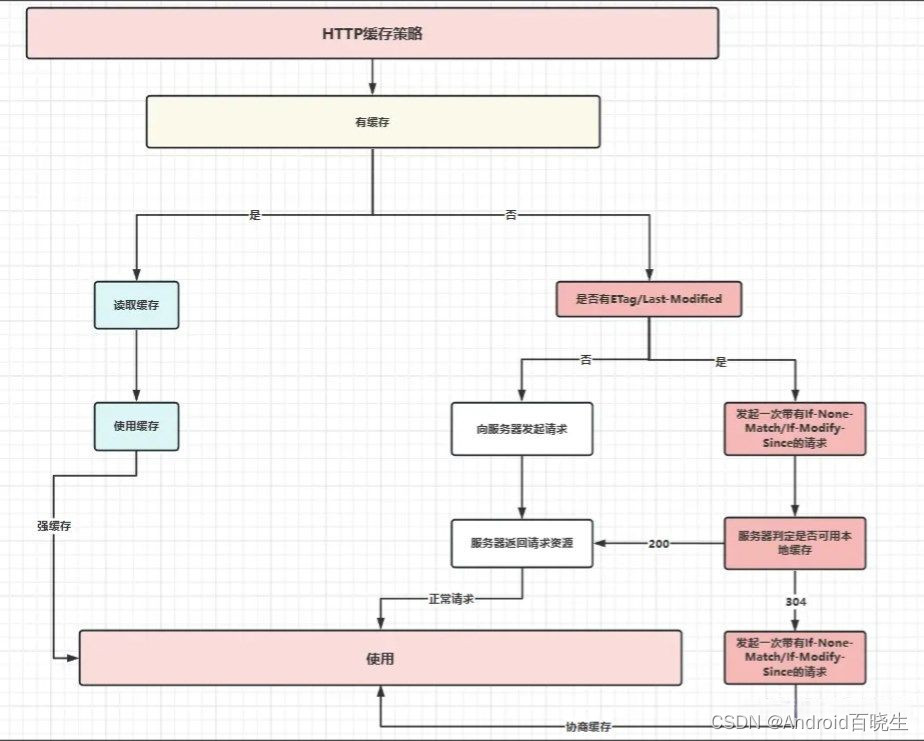
搞清楚 Http的缓存策略 后,我们来看看 CacheInterceptor 拦截器所做的工作:
public final class CacheInterceptor implements Interceptor {

  @Override public Response intercept(Chain chain) throws IOException {

	//1. 读取候选缓存,具体如何读取的我们下面会讲。
    Response cacheCandidate = cache != null
        ? cache.get(chain.request())
        : null;

    long now = System.currentTimeMillis();

	//2. 创建缓存策略,强制缓存、对比缓存等,关于缓存策略我们下面也会讲。
    CacheStrategy strategy = new CacheStrategy.Factory(now, chain.request(), cacheCandidate).get();
    // 代表需要发起请求
    Request networkRequest = strategy.networkRequest;
    // 代表直接使用本地缓存
    Response cacheResponse = strategy.cacheResponse;

    if (cache != null) {
      cache.trackResponse(strategy);
    }

    if (cacheCandidate != null && cacheResponse == null) {
      closeQuietly(cacheCandidate.body()); // The cache candidate wasn't applicable. Close it.
    }

    // //3. 根据策略,不使用网络,又没有缓存的直接报错,并返回错误码504。
    if (networkRequest == null && cacheResponse == null) {
      return new Response.Builder()
          .request(chain.request())
          .protocol(Protocol.HTTP_1_1)
          .code(504)
          .message("Unsatisfiable Request (only-if-cached)")
          .body(Util.EMPTY_RESPONSE)// 构建一个空的response返回过去
          .sentRequestAtMillis(-1L)
          .receivedResponseAtMillis(System.currentTimeMillis())
          .build();
    }

    //4. 根据策略,不使用网络,有缓存的直接返回。
    if (networkRequest == null) {
      return cacheResponse.newBuilder()
          .cacheResponse(stripBody(cacheResponse))
          .build();
    }

    Response networkResponse = null;
    try {
      //5. 前面两个都没有返回,继续执行下一个Interceptor,即ConnectInterceptor。
      networkResponse = chain.proceed(networkRequest);
    } finally {
      //如果发生IO异常,则释放掉缓存
      if (networkResponse == null && cacheCandidate != null) {
        closeQuietly(cacheCandidate.body());
      }
    }

    //6. 接收到网络结果,如果响应code式304,则使用缓存,返回缓存结果。
    if (cacheResponse != null) {
      if (networkResponse.code() == HTTP_NOT_MODIFIED) {
        Response response = cacheResponse.newBuilder()
            .headers(combine(cacheResponse.headers(), networkResponse.headers()))
            .sentRequestAtMillis(networkResponse.sentRequestAtMillis())
            .receivedResponseAtMillis(networkResponse.receivedResponseAtMillis())
            .cacheResponse(stripBody(cacheResponse))
            .networkResponse(stripBody(networkResponse))
            .build();
        networkResponse.body().close();

        // Update the cache after combining headers but before stripping the
        // Content-Encoding header (as performed by initContentStream()).
        cache.trackConditionalCacheHit();
        cache.update(cacheResponse, response);
        return response;
      } else {
        closeQuietly(cacheResponse.body());
      }
    }

	//7. 读取网络结果。
    Response response = networkResponse.newBuilder()
        .cacheResponse(stripBody(cacheResponse))
        .networkResponse(stripBody(networkResponse))
        .build();

	//8. 对数据进行缓存。
    if (cache != null) {
      if (HttpHeaders.hasBody(response) && CacheStrategy.isCacheable(response, networkRequest)) {
        // 将本次最新得到的响应存到cache中去
        CacheRequest cacheRequest = cache.put(response);
        return cacheWritingResponse(cacheRequest, response);
      }

      if (HttpMethod.invalidatesCache(networkRequest.method())) {
        try {
          cache.remove(networkRequest);
        } catch (IOException ignored) {
          // The cache cannot be written.
        }
      }
    }

	//9. 返回网络读取的结果,给上一层拦截器
    return response;
  }
}
总结一下缓存拦截器处理缓存的流程:首先得到 RealInterceptorChain 对象,然后通过它再得到两个很重要的对象:networkRequest 和 cacheResponse 。networkRequest 代表去发起一个网络请求, cacheResponse 代表使用本地缓存。通过这两个对象是否为 null来判断此次请求是使用直接缓存,还是去请求新的资源,还是去使用协商缓存。最后就是会更新缓存,把每次新请求的资源都重新保存至 cache 中。
整个方法的流程如下所示:
- 读取候选缓存。
- 创建缓存策略,强制缓存、对比缓存等。
- 根据策略,不使用网络,又没有缓存的直接报错,并返回错误码504。
- 根据策略,不使用网络,有缓存的直接返回。
- 前面两个都没有返回,继续执行下一个Interceptor,即ConnectInterceptor。
- 接收到网络结果,如果响应code式304,则使用缓存,返回缓存结果。
- 读取网络结果。
- 对数据进行缓存。
- 返回网络读取的结果。
4.ConnectInterceptor-连接拦截器
在RetryAndFollowUpInterceptor里初始化了一个StreamAllocation对象,我们说在这个StreamAllocation对象里初始化了一个Socket对象用来做连接,但是并没有
真正的连接,等到处理完hader和缓存信息之后,才调用ConnectInterceptor来进行真正的连接。
ConnectInterceptor.java
public final class ConnectInterceptor implements Interceptor {

  @Override public Response intercept(Chain chain) throws IOException {
    RealInterceptorChain realChain = (RealInterceptorChain) chain;
    Request request = realChain.request();
    StreamAllocation streamAllocation = realChain.streamAllocation();

    boolean doExtensiveHealthChecks = !request.method().equals("GET");
    //创建输出流
    HttpCodec httpCodec = streamAllocation.newStream(client, chain, doExtensiveHealthChecks);
    //建立连接
    RealConnection connection = streamAllocation.connection();

	// 继续调用下一个拦截器去请求数据
    return realChain.proceed(request, streamAllocation, httpCodec, connection);
  }
}
ConnectInterceptor在Request阶段建立连接,处理方式也很简单,创建了两个对象:
HttpCodec:用来编码HTTP requests和解码HTTP responses
RealConnection:连接对象,负责发起与服务器的连接。
连接池默认的空闲连接数是5个,空闲的连接时间是5分钟,如果空闲连接数超出了5个,那么就清理掉最近最久未使用的连接数,直到连接池中的连接数小于等于5个。
这里事实上包含了连接、连接池等一整套的Okhttp的连接机制,我们放在后面单独讲,先来继续看最后一个Interceptor:CallServerInterceptor。
5. CallServerInterceptor - 请求服务拦截器
public final class CallServerInterceptor implements Interceptor {

  @Override public Response intercept(Chain chain) throws IOException {

	//这些对象在前面的Interceptor都已经创建完毕
    RealInterceptorChain realChain = (RealInterceptorChain) chain;
    HttpCodec httpCodec = realChain.httpStream();
    StreamAllocation streamAllocation = realChain.streamAllocation();
    RealConnection connection = (RealConnection) realChain.connection();
    Request request = realChain.request();

    long sentRequestMillis = System.currentTimeMillis();

    realChain.eventListener().requestHeadersStart(realChain.call());
    //1. 写入请求头
    httpCodec.writeRequestHeaders(request);
    realChain.eventListener().requestHeadersEnd(realChain.call(), request);

    Response.Builder responseBuilder = null;
    if (HttpMethod.permitsRequestBody(request.method()) && request.body() != null) {
      // 大容量请求体会带有 Expect: 100-continue 字段,服务器识别同意后,才能继续发送请求给服务端
      if ("100-continue".equalsIgnoreCase(request.header("Expect"))) {
        // 与服务器进行请求
        httpCodec.flushRequest();
        realChain.eventListener().responseHeadersStart(realChain.call());
        responseBuilder = httpCodec.readResponseHeaders(true);
      }

	  //2 写入请求体
      if (responseBuilder == null) {
        // Write the request body if the "Expect: 100-continue" expectation was met.
        realChain.eventListener().requestBodyStart(realChain.call());
        long contentLength = request.body().contentLength();
        // 大部分情况都是走这里,通过IO流把响应结果写入response中
        CountingSink requestBodyOut =
            new CountingSink(httpCodec.createRequestBody(request, contentLength));
        BufferedSink bufferedRequestBody = Okio.buffer(requestBodyOut);

        request.body().writeTo(bufferedRequestBody);
        bufferedRequestBody.close();
        realChain.eventListener()
            .requestBodyEnd(realChain.call(), requestBodyOut.successfulCount);
      } else if (!connection.isMultiplexed()) {
        // 没有响应 Expect:100 continue则阻止此连接得到复用,并且会关闭相关的socket
        streamAllocation.noNewStreams();
      }
    }

    httpCodec.finishRequest();

	//3 读取响应头
    if (responseBuilder == null) {
      realChain.eventListener().responseHeadersStart(realChain.call());
      responseBuilder = httpCodec.readResponseHeaders(false);
    }

    Response response = responseBuilder
        .request(request)
        .handshake(streamAllocation.connection().handshake())
        .sentRequestAtMillis(sentRequestMillis)
        .receivedResponseAtMillis(System.currentTimeMillis())
        .build();

	//4 读取响应体
    int code = response.code();
    if (code == 100) {
      // 返回100 表示接收大请求体请求 继续发送请求体,得到response后返回结果
      responseBuilder = httpCodec.readResponseHeaders(false);

	  // 构建响应体
      response = responseBuilder
              .request(request)
              .handshake(streamAllocation.connection().handshake())
              .sentRequestAtMillis(sentRequestMillis)
              .receivedResponseAtMillis(System.currentTimeMillis())
              .build();

      code = response.code();
    }

    realChain.eventListener()
            .responseHeadersEnd(realChain.call(), response);

    if (forWebSocket && code == 101) {
      // 如果状态码是101并且是webSocket就返回空的response
      response = response.newBuilder()
          .body(Util.EMPTY_RESPONSE)
          .build();
    } else {
      response = response.newBuilder()
          .body(httpCodec.openResponseBody(response))
          .build();
    }

    if ("close".equalsIgnoreCase(response.request().header("Connection"))
        || "close".equalsIgnoreCase(response.header("Connection"))) {
      streamAllocation.noNewStreams();
    }

    if ((code == 204 || code == 205) && response.body().contentLength() > 0) {
      throw new ProtocolException(
          "HTTP " + code + " had non-zero Content-Length: " + response.body().contentLength());
    }

    return response;
  }
}
在 okhttp 中,面对比较大的请求体时,会先去询问服务器是否接收此请求体,如果服务器接收并返回响应码 200,则 okhttp 继续发送请求体,否则就直接返回给客户端。如果服务器忽略此请求,则不会响应,最后客户端会超时抛出异常。
6.小节
整个 okhttp 功能的实现就在这五个默认的拦截器中,所以先理解拦截器模式的工作机制是先决条件。这五个拦截器分别为: 重试拦截器、桥接拦截器、缓存拦截器、连接拦截器、请求服务拦截器。每一个拦截器负责的工作不一样,就好像工厂流水线,最终经过这五道工序,就完成了最终的产品。
但是与流水线不同的是,okhttp 中的拦截器每次发起请求都会在交给下一个拦截器之前干另一些事情,在获得了结果之后又干一些事情。整个过程在请求向是顺序的,而响应则是逆序。
从上面的描述可知,Request是按照Interpretor的顺序正向处理,而Response是逆向处理的。这参考了OSI七层模型的原理。上面我们也提到过。CallServerInterceptor相当于最底层的物理层,请求从上到逐层包装下发,响应从下到上再逐层包装返回。很漂亮的设计。
三、自定义拦截器
了解了系统内置的五大拦截器后,就可以自己写一个拦截器了。我们按照系统中的样子:
- 通过责任链分发下来的网络请求,拿到 Request 对象后根据需求做一些自己的事情。
- 然后将网络请求分发到下一个责任链上,并保存相应结果。
- 拿到返回结果后,再根据自己的业务需求,对 response 进行加工。
- 将 response 返回给上一个拦截器。
结合官方的图片,感受会更加清晰:

举个例子:
public class MyInterceptor implements Interceptor {

    @Override
    public Response intercept(Chain chain) throws IOException {

        Request request = chain.request();
        // TODO do what you want...
        ...
        Response response = chain.proceed(request);
        return response;
    }
}
然后在构建 OkHttpClient 的时候将拦截器添加进去:
private static OkHttpClient createOkHttpClient(){
        OkHttpClient.Builder build = new OkHttpClient.Builder()
                .retryOnConnectionFailure(true)
                .followRedirects(true)
                .addInterceptor(new MyInterceptor())
                .addNetworkInterceptor(new MyNetWorkInterceptor());
        return build.build();
}


 460
460


 被折叠的 条评论
为什么被折叠?
被折叠的 条评论
为什么被折叠?
 到【灌水乐园】发言


