


1、创建工程
(1)创建maven工程
导入相应的依赖,本文使用JDK17和SpringBoot版本3.2.4
<parent>
    <groupId>org.springframework.boot</groupId>
    <artifactId>spring-boot-starter-parent</artifactId>
    <version>3.2.4</version>
</parent>
<dependencies>
    <dependency>
        <groupId>org.springframework.boot</groupId>
        <artifactId>spring-boot-starter-oauth2-client</artifactId>
    </dependency>
    <dependency>
        <groupId>org.springframework.boot</groupId>
        <artifactId>spring-boot-starter-oauth2-authorization-server</artifactId>
    </dependency>
</dependencies>
(2)创建AuthorizationServerConfig
package org.com.ck.config;

import com.nimbusds.jose.jwk.JWKSet;
import com.nimbusds.jose.jwk.RSAKey;
import com.nimbusds.jose.jwk.source.ImmutableJWKSet;
import com.nimbusds.jose.jwk.source.JWKSource;
import com.nimbusds.jose.proc.SecurityContext;
import org.springframework.context.annotation.Bean;
import org.springframework.context.annotation.Configuration;
import org.springframework.core.annotation.Order;
import org.springframework.http.MediaType;
import org.springframework.security.config.Customizer;
import org.springframework.security.config.annotation.web.builders.HttpSecurity;
import org.springframework.security.oauth2.core.AuthorizationGrantType;
import org.springframework.security.oauth2.core.ClientAuthenticationMethod;
import org.springframework.security.oauth2.core.oidc.OidcScopes;
import org.springframework.security.oauth2.jwt.JwtDecoder;
import org.springframework.security.oauth2.server.authorization.client.InMemoryRegisteredClientRepository;
import org.springframework.security.oauth2.server.authorization.client.RegisteredClient;
import org.springframework.security.oauth2.server.authorization.client.RegisteredClientRepository;
import org.springframework.security.oauth2.server.authorization.config.annotation.web.configuration.OAuth2AuthorizationServerConfiguration;
import org.springframework.security.oauth2.server.authorization.config.annotation.web.configurers.OAuth2AuthorizationServerConfigurer;
import org.springframework.security.oauth2.server.authorization.settings.AuthorizationServerSettings;
import org.springframework.security.oauth2.server.authorization.settings.ClientSettings;
import org.springframework.security.web.SecurityFilterChain;
import org.springframework.security.web.authentication.LoginUrlAuthenticationEntryPoint;
import org.springframework.security.web.util.matcher.MediaTypeRequestMatcher;

import java.security.KeyPair;
import java.security.KeyPairGenerator;
import java.security.interfaces.RSAPrivateKey;
import java.security.interfaces.RSAPublicKey;
import java.util.UUID;

@Configuration
public class AuthorizationServerConfig {

    @Bean
    @Order(1)
    public SecurityFilterChain authorizationServerSecurityFilterChain(HttpSecurity http)
            throws Exception {
        //针对 Spring Authorization Server 最佳实践配置
        OAuth2AuthorizationServerConfiguration.applyDefaultSecurity(http);
        http
                .getConfigurer(OAuth2AuthorizationServerConfigurer.class)
                .oidc(Customizer.withDefaults())
        ;  // Enable OpenID Connect 1.0

        http
                .exceptionHandling((exceptions) -> exceptions
                        .defaultAuthenticationEntryPointFor(
                                new LoginUrlAuthenticationEntryPoint("/login"),
                                new MediaTypeRequestMatcher(MediaType.TEXT_HTML)
                        )
                )
                .oauth2ResourceServer((resourceServer) -> resourceServer
                        .jwt(Customizer.withDefaults()));

        return http.build();
    }

    /**
     * 注册客户信息
     * 注册client信息
     *
    */
    @Bean
    public RegisteredClientRepository registeredClientRepository() {
        RegisteredClient oidcClient = RegisteredClient.withId(UUID.randomUUID().toString())
                .clientId("oidc-client")
                .clientSecret("{noop}secret")
                /**
                * client_secret_basic: 将 clientId 和 clientSecret 通过 ‘:’ 号拼接,( clientId 和 clientSecret 都在上面配置中,)并使用 Base64 进行编码得到一串字符,再在前面加个 注意有个 Basic   前缀(Basic后有一个空格)
                * client_secret_post :clientId 和 clientSecret 放到表单去发送请求
                */
                .clientAuthenticationMethod(ClientAuthenticationMethod.CLIENT_SECRET_BASIC)
                .authorizationGrantType(AuthorizationGrantType.AUTHORIZATION_CODE)
                .authorizationGrantType(AuthorizationGrantType.REFRESH_TOKEN)
                .authorizationGrantType(AuthorizationGrantType.CLIENT_CREDENTIALS)
                .redirectUri("http://www.baidu.com")
                .redirectUri("http://localhost:9001/login/oauth2/code/oidc-client")
                .redirectUri("http://localhost:9001/api/login/welcome")
                .postLogoutRedirectUri("http://127.0.0.1:8080/")
                .scope(OidcScopes.OPENID)
                .scope(OidcScopes.PROFILE)
                .scope("message.read")
                .scope("message.write")
                .scope("all")
                // 设置 Client 需要页面审核授权
                .clientSettings(ClientSettings.builder().requireAuthorizationConsent(true).build())
                .build();

        return new InMemoryRegisteredClientRepository(oidcClient);
    }

    /**
     * 默认发放令牌
     * @return
     */
    @Bean
    public JWKSource<SecurityContext> jwkSource() {
        KeyPair keyPair = generateRsaKey();
        RSAPublicKey publicKey = (RSAPublicKey) keyPair.getPublic();
        RSAPrivateKey privateKey = (RSAPrivateKey) keyPair.getPrivate();
        RSAKey rsaKey = new RSAKey.Builder(publicKey)
                .privateKey(privateKey)
                .keyID(UUID.randomUUID().toString())
                .build();
        JWKSet jwkSet = new JWKSet(rsaKey);
        return new ImmutableJWKSet<>(jwkSet);
    }

    private static KeyPair generateRsaKey() {
        KeyPair keyPair;
        try {
            KeyPairGenerator keyPairGenerator = KeyPairGenerator.getInstance("RSA");
            keyPairGenerator.initialize(2048);
            keyPair = keyPairGenerator.generateKeyPair();
        }
        catch (Exception ex) {
            throw new IllegalStateException(ex);
        }
        return keyPair;
    }

    @Bean
    public JwtDecoder jwtDecoder(JWKSource<SecurityContext> jwkSource) {
        return OAuth2AuthorizationServerConfiguration.jwtDecoder(jwkSource);
    }

    @Bean
    public AuthorizationServerSettings authorizationServerSettings() {
        return AuthorizationServerSettings.builder().build();
    }
}
(3)创建ResourceConfig
package org.com.ck.config;

import org.springframework.context.annotation.Bean;
import org.springframework.context.annotation.Configuration;
import org.springframework.core.annotation.Order;
import org.springframework.security.config.Customizer;
import org.springframework.security.config.annotation.web.builders.HttpSecurity;
import org.springframework.security.config.annotation.web.configuration.EnableWebSecurity;
import org.springframework.security.core.userdetails.User;
import org.springframework.security.core.userdetails.UserDetails;
import org.springframework.security.core.userdetails.UserDetailsService;
import org.springframework.security.provisioning.InMemoryUserDetailsManager;
import org.springframework.security.web.SecurityFilterChain;
import org.springframework.security.web.util.matcher.AntPathRequestMatcher;

@EnableWebSecurity
@Configuration(proxyBeanMethods = false)
public class ResourceConfig {
    @Bean
    @Order(2)
    public SecurityFilterChain defaultSecurityFilterChain(HttpSecurity http)
            throws Exception {
        http
                .authorizeHttpRequests((authorize) -> authorize
                        .requestMatchers(new AntPathRequestMatcher("/actuator/**"),
                                new AntPathRequestMatcher("/oauth2/**"),
                                new AntPathRequestMatcher("/**/*.json"),
                                new AntPathRequestMatcher("/**/*.html")).permitAll()
                        .anyRequest().authenticated()
                )
                .cors(Customizer.withDefaults())
                .csrf((csrf) -> csrf.disable())
                .formLogin(Customizer.withDefaults())
                .oauth2ResourceServer((resourceServer) -> resourceServer
                                .jwt(Customizer.withDefaults())
                )
        ;

        return http.build();
    }

    @Bean
    public UserDetailsService userDetailsService() {
        UserDetails userDetails = User.withDefaultPasswordEncoder()
                .username("user")
                .password("password")
                .roles("USER")
                .build();

        return new InMemoryUserDetailsManager(userDetails);
    }
}
(4)创建测试接口
package org.com.ck.controller;

import org.springframework.web.bind.annotation.RequestMapping;
import org.springframework.web.bind.annotation.RestController;

@RestController
@RequestMapping("/test")
public class TestController {

    @RequestMapping("/test")
    public String test() {
        return "test";
    }
}
(5)创建启动类
package org.com.ck;

import org.springframework.boot.SpringApplication;
import org.springframework.boot.autoconfigure.SpringBootApplication;

@SpringBootApplication
public class SpringBootMain {
    public static void main(final String[] args) {
        SpringApplication.run(SpringBootMain.class, args);
    }
}
2、工程使用(模式为例)
(1)获取authorization_code模式的code
浏览器输入地址:
因为没有认证,跳转至登录页进行认证:http://localhost:9001/login

输入user password 进行登录,
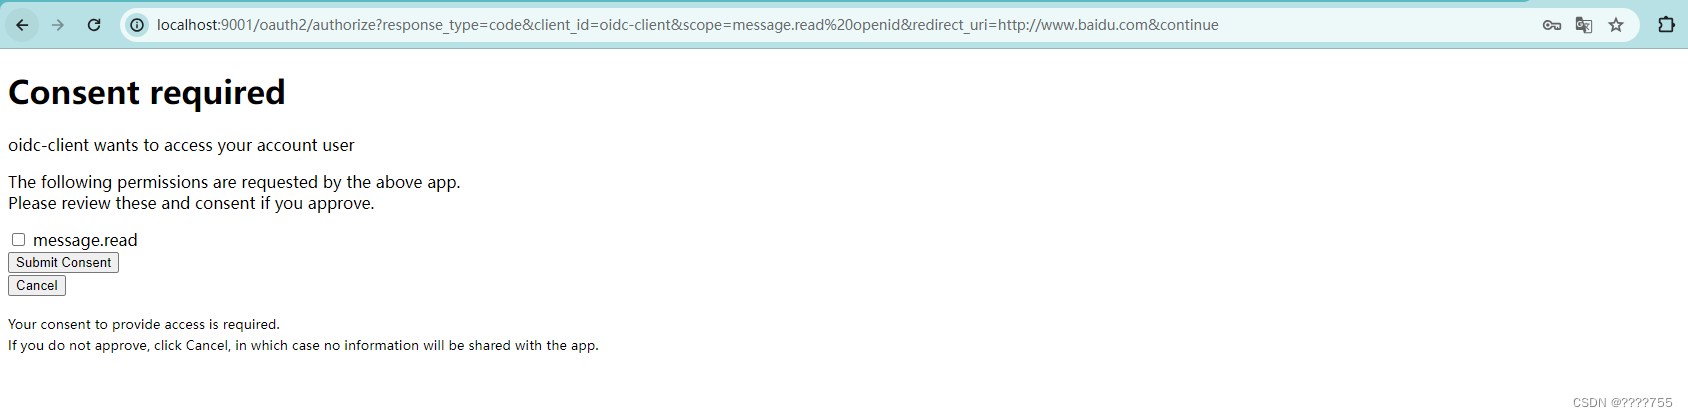
然后跳转至授权页面进行授权,勾线复选框,继续提交
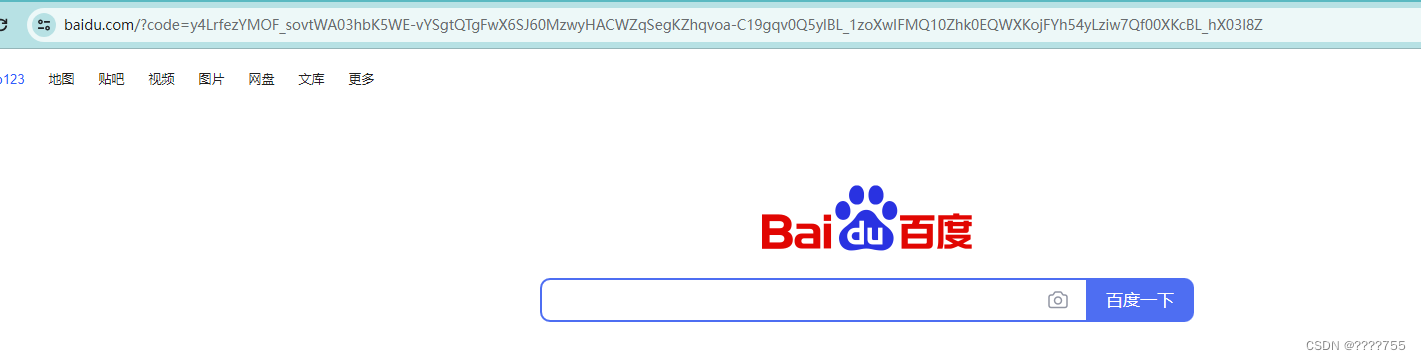
然后跳转至百度页面,url后面会带着authorization_code模式的code
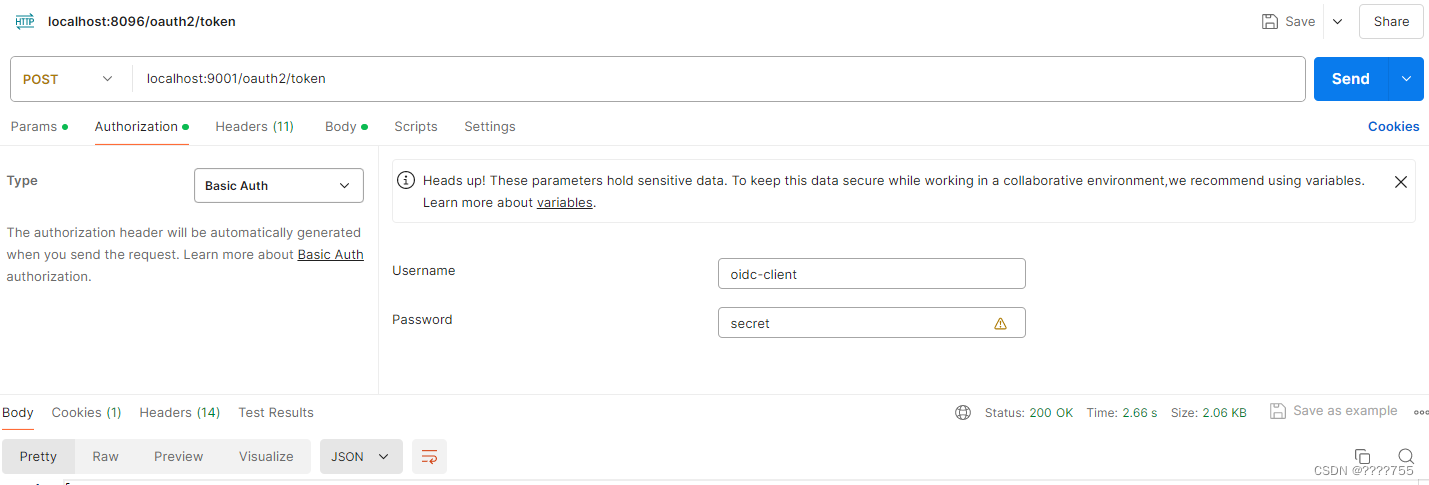
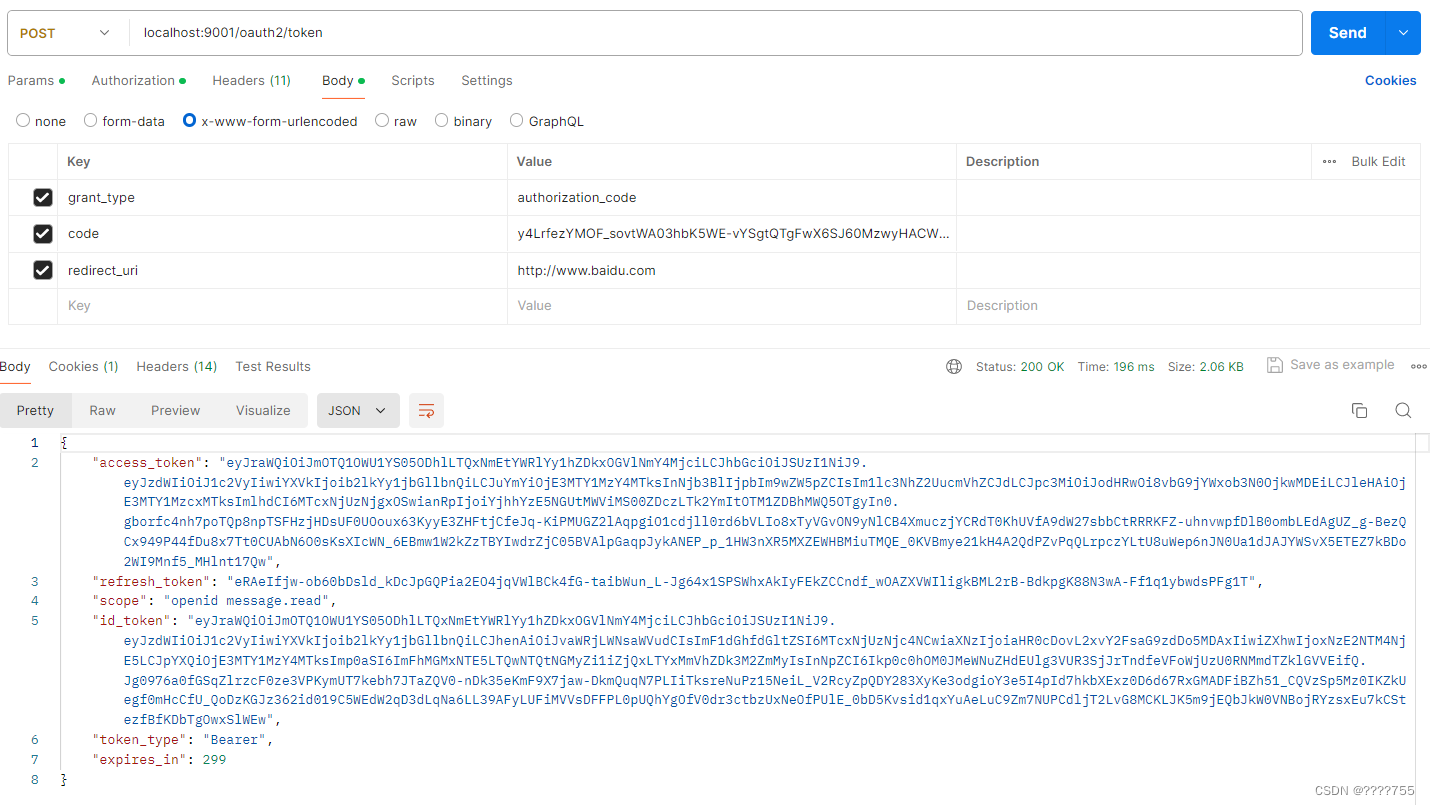
(2)用code兑换oauth2的 access_token和refresh_token
header中通过basic Auth生成Authorization
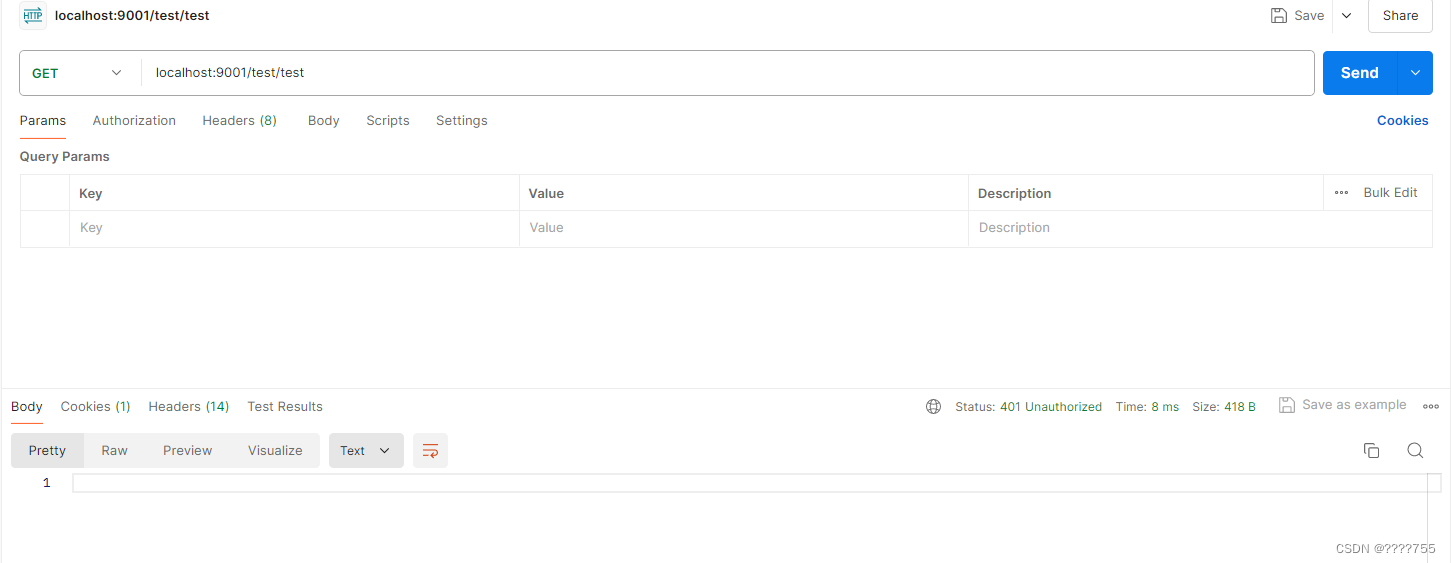
(3)测试接口
不携带 Authorization Token,会报401错误错
携带 Authorization Token,会成功


 1万+
1万+


 被折叠的 条评论
为什么被折叠?
被折叠的 条评论
为什么被折叠?
 到【灌水乐园】发言


