


47.Android 自定义PopupWindow技巧
前言
其实PopupWindow自定义过程是很简单的,唯一头疼的是:PopupWindow显示的定位问题。
定位问题尤为恶心一点:有时候要涉及到PopupWindow的宽高问题。我们都知道,在没show之前是拿不到宽高的,show的时候定位需要宽高,如此矛盾。以下,都给予回答。
其次的问题也有:PopupWindow的显示、消失动画设计问题。
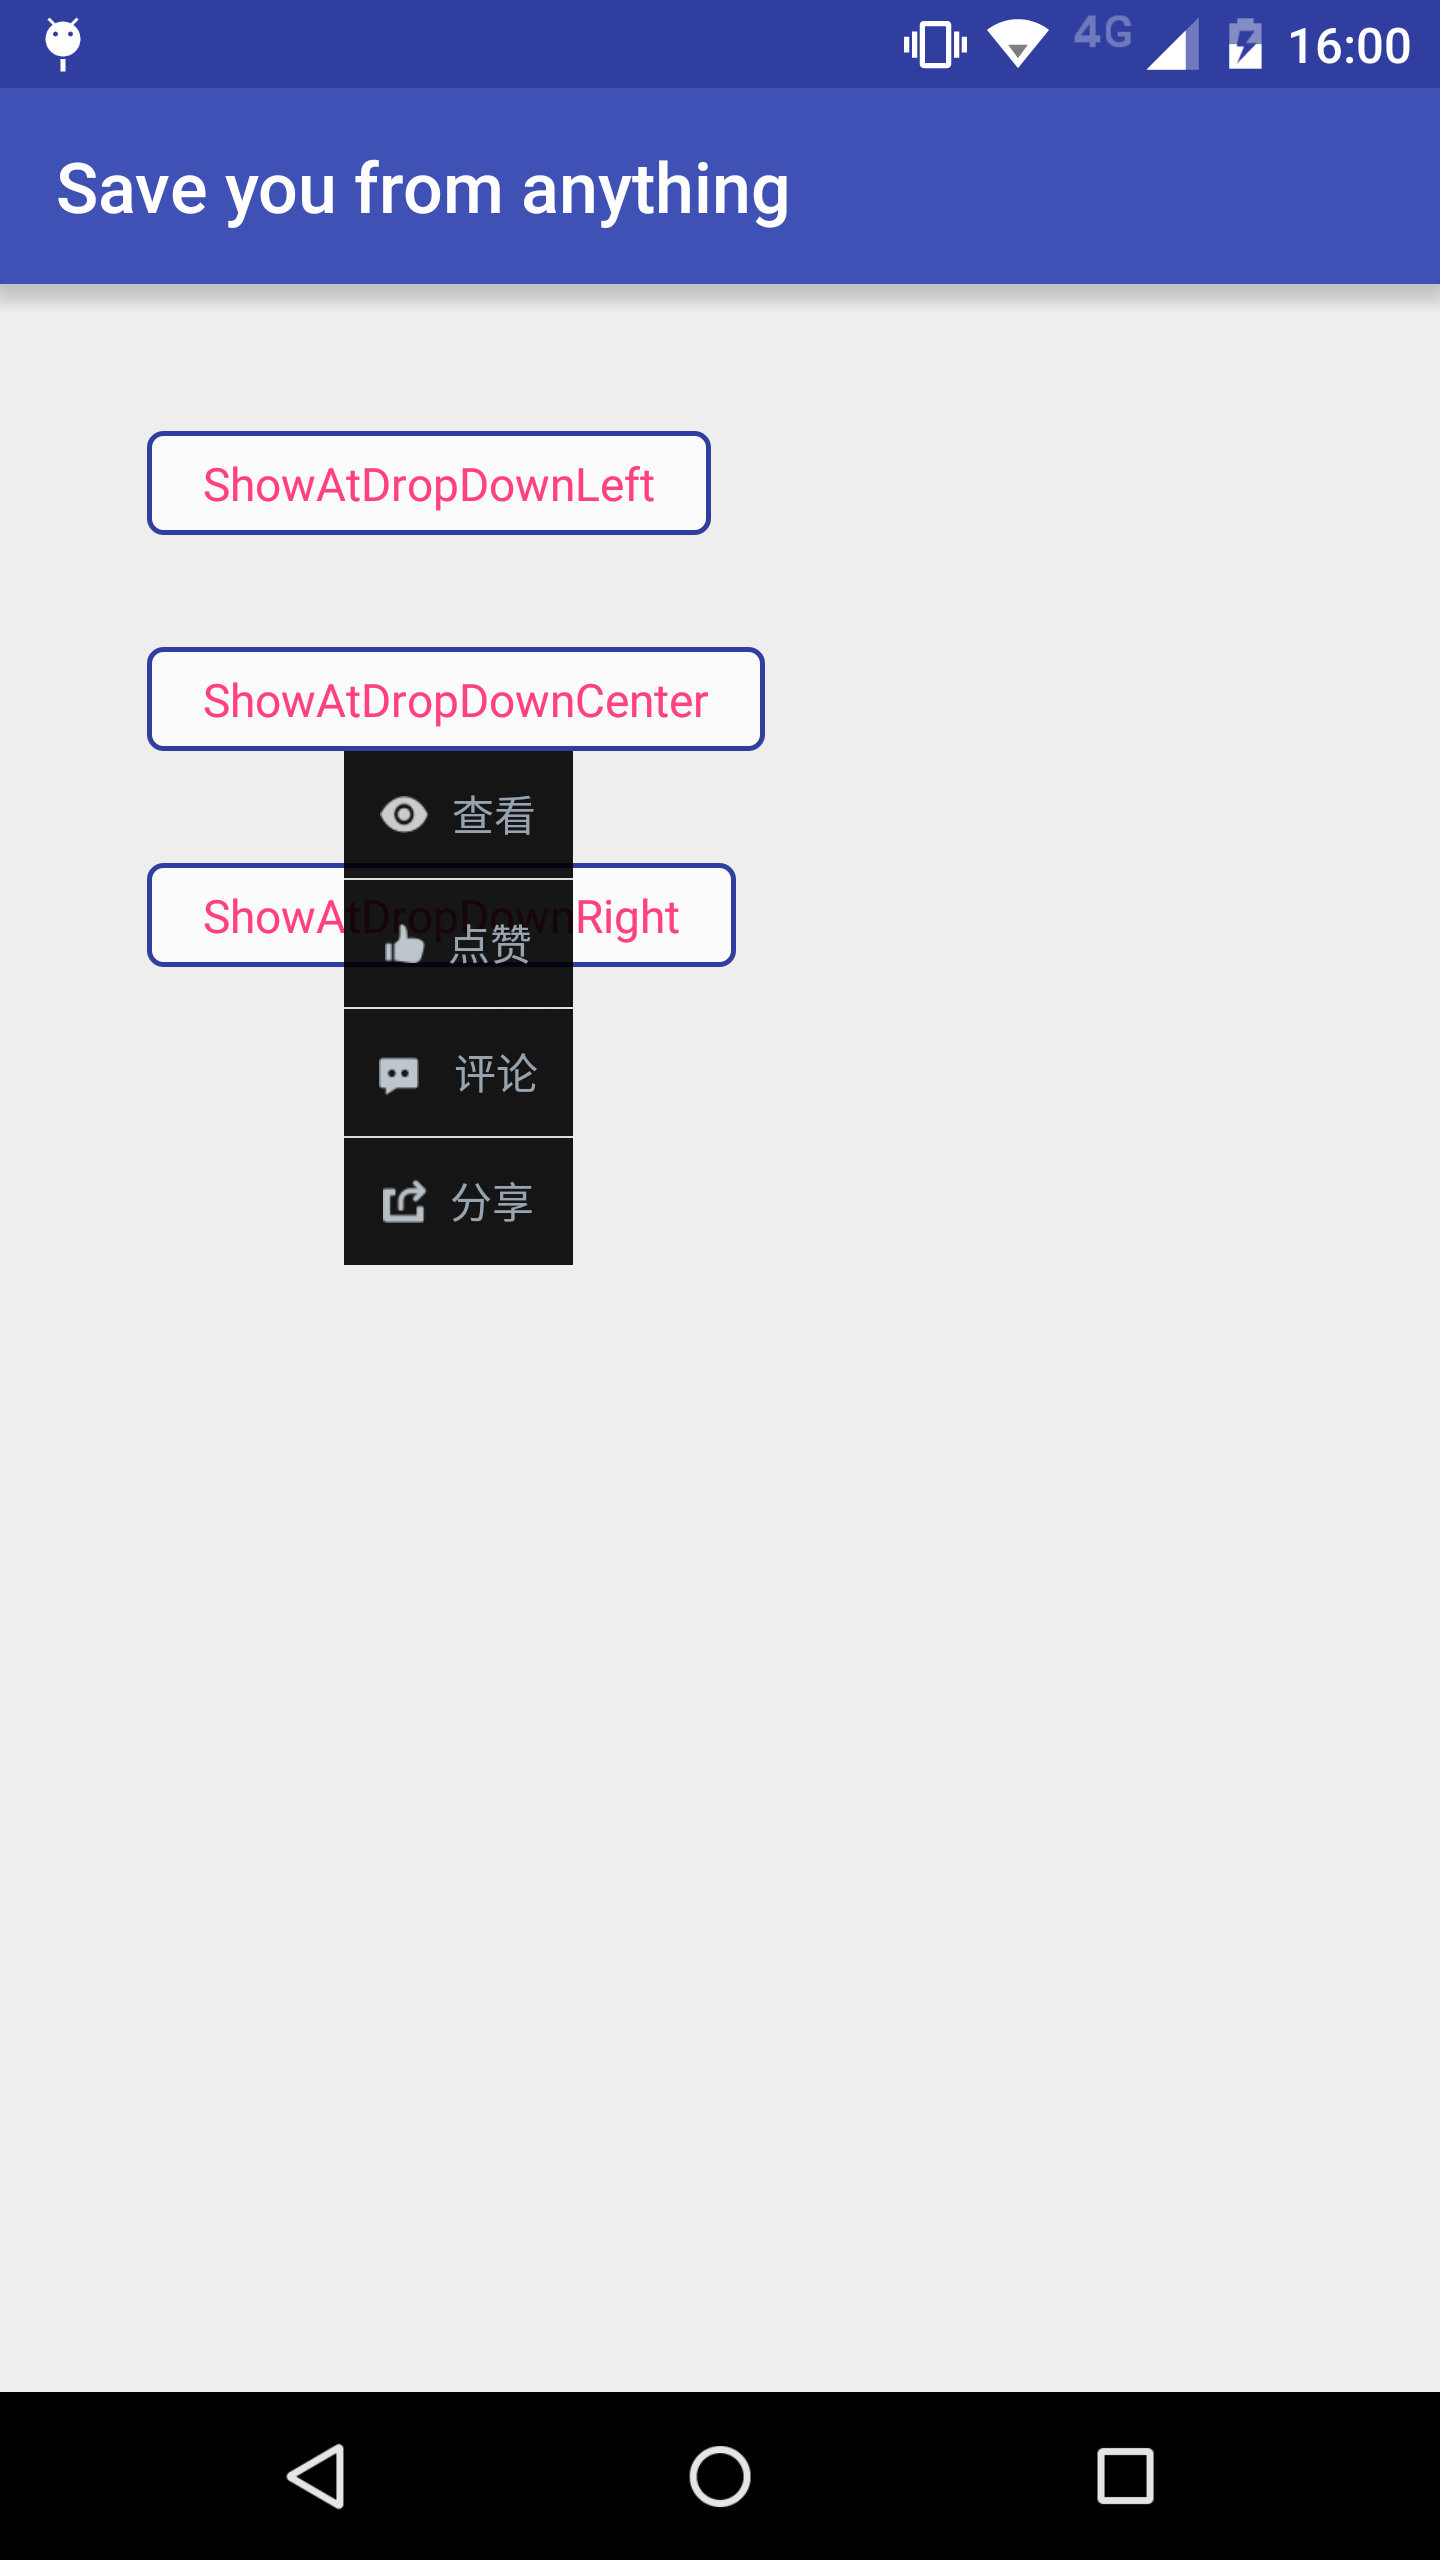
以下也在我自定义的PopupWindow中提供了三个简单的定位方法:
显示在控件的下左位置
显示在控件的下中位置
显示在控件的下右位置
PopupWindow的宽高
我们可以在PopupWindow初始化的时候,强制绘制Layout,而拿到PopupWindow的宽高。
// 用于保存PopupWindow的宽度
private int width;
// 用于保存PopupWindow的高度
private int height;

public CustomPopupWindow(Activity activity) {
    super(activity);
    this.activity = activity;
    this.initPopupWindow();
}

private void initPopupWindow() {
    LayoutInflater inflater = (LayoutInflater) activity
            .getSystemService(Context.LAYOUT_INFLATER_SERVICE);
    this.contentView = inflater.inflate(R.layout.popupwindow_custom, null);
    this.setContentView(contentView);
    // 设置弹出窗体的宽
    this.setWidth(ViewGroup.LayoutParams.WRAP_CONTENT);
    // 设置弹出窗体的高
    this.setHeight(ViewGroup.LayoutParams.WRAP_CONTENT);
    // 设置弹出窗体可点击
    this.setTouchable(true);
    this.setFocusable(true);
    // 设置点击是否消失
    this.setOutsideTouchable(true);
    //设置弹出窗体动画效果
    this.setAnimationStyle(R.style.PopupAnimation);
    //实例化一个ColorDrawable颜色为半透明
    ColorDrawable background = new ColorDrawable(0x4f000000);
    //设置弹出窗体的背景
    this.setBackgroundDrawable(background);
    // 绘制
    this.mandatoryDraw();
}

/**
 * 强制绘制popupWindowView,并且初始化popupWindowView的尺寸
 */
private void mandatoryDraw() {
    this.contentView.measure(View.MeasureSpec.UNSPECIFIED, View.MeasureSpec.UNSPECIFIED);
    /**
     * 强制刷新后拿到PopupWindow的宽高
     */
    this.width = this.contentView.getMeasuredWidth();
    this.height = this.contentView.getMeasuredHeight();
}
PopupWindow定位在下左位置
/**
 * 显示在控件的下左方
 *
 * @param parent parent
 */
public void showAtDropDownLeft(View parent) {
    if (parent.getVisibility() == View.GONE) {
        this.showAtLocation(parent, 0, 0, 0);
    } else {
        // x y
        int[] location = new int[2];
        //获取在整个屏幕内的绝对坐标
        parent.getLocationOnScreen(location);
        this.showAtLocation(parent, 0, location[0], location[1] + parent.getHeight());
    }
}
PopupWindow定位在下中位置
/**
 * 显示在控件的下中方
 *
 * @param parent parent
 */
public void showAtDropDownCenter(View parent) {
    if (parent.getVisibility() == View.GONE) {
        this.showAtLocation(parent, 0, 0, 0);
    } else {
        // x y
        int[] location = new int[2];
        //获取在整个屏幕内的绝对坐标
        parent.getLocationOnScreen(location);
        this.showAtLocation(parent, 0, location[0] / 2 + parent.getWidth() / 2 - this.width / 6, location[1] + parent.getHeight());
    }
}
PopupWindow定位在下右位置
/**
 * 显示在控件的下右方
 *
 * @param parent parent
 */
public void showAtDropDownRight(View parent) {
    if (parent.getVisibility() == View.GONE) {
        this.showAtLocation(parent, 0, 0, 0);
    } else {
        // x y
        int[] location = new int[2];
        //获取在整个屏幕内的绝对坐标
        parent.getLocationOnScreen(location);
        this.showAtLocation(parent, 0, location[0] + parent.getWidth() - this.width, location[1] + parent.getHeight());
    }
}
PopupWindow动画
设计一个从PopWindow开始的时候右上角逐步展示,然后结束的时候往右上角逐步收起的动画:
styles.xml
<style name="PopupAnimation" parent="android:Animation" mce_bogus="1">
    <item name="android:windowEnterAnimation">@anim/popwindow_in</item>
    <item name="android:windowExitAnimation">@anim/popwindow_out</item>
</style>
popwindow_in.xml
<set xmlns:android="http://schemas.android.com/apk/res/android"
    android:interpolator="@android:anim/decelerate_interpolator">

    <!--
        时间 0.2秒
        开始的时候 x y 全是0 没有大小
        结束的时候 x y 全是1 实际大小
        pivotX 100% 表示最右边
        pivotY 0% 表示最顶边
        以上定位右上角 缩放时不变位置
    -->
    <scale
        android:duration="200"
        android:fromXScale="0.0"
        android:fromYScale="0.0"
        android:pivotX="100%"
        android:pivotY="0%"
        android:toXScale="1.0"
        android:toYScale="1.0" />
    <!--
        时间 0.2秒
        开始全透明
        结束一点都不透明
    -->
    <alpha
        android:duration="200"
        android:fromAlpha="0.0"
        android:toAlpha="1.0" />
</set>
popwindow_out.xml
<set xmlns:android="http://schemas.android.com/apk/res/android"
    android:interpolator="@android:anim/decelerate_interpolator">
    <!--
        时间 0.2秒
        开始的时候 x y 全是1 实际大小
        结束的时候 x y 全是0 没有大小
        pivotX 100% 表示最右边
        pivotY 0% 表示最顶边
        以上定位右上角 缩放时不变位置
    -->
    <scale
        android:duration="200"
        android:fromXScale="1.0"
        android:fromYScale="1.0"
        android:pivotX="100%"
        android:pivotY="0%"
        android:toXScale="0.0"
        android:toYScale="0.0" />

    <!--
        时间 0.2秒
        开始一点都不透明
        结束全透明
    -->
    <alpha
        android:duration="200"
        android:fromAlpha="1.0"
        android:toAlpha="0.0" />
</set>
自定义PopupWindow
public class CustomPopupWindow extends android.widget.PopupWindow {

    private Activity activity;
    private View contentView;

    // 用于保存PopupWindow的宽度
    private int width;
    // 用于保存PopupWindow的高度
    private int height;

    public CustomPopupWindow(Activity activity) {
        super(activity);
        this.activity = activity;
        this.initPopupWindow();
    }

    private void initPopupWindow() {
        LayoutInflater inflater = (LayoutInflater) activity
                .getSystemService(Context.LAYOUT_INFLATER_SERVICE);
        this.contentView = inflater.inflate(R.layout.popupwindow_custom, null);
        this.setContentView(contentView);
        // 设置弹出窗体的宽
        this.setWidth(ViewGroup.LayoutParams.WRAP_CONTENT);
        // 设置弹出窗体的高
        this.setHeight(ViewGroup.LayoutParams.WRAP_CONTENT);
        // 设置弹出窗体可点击
        this.setTouchable(true);
        this.setFocusable(true);
        // 设置点击是否消失
        this.setOutsideTouchable(true);
        //设置弹出窗体动画效果
        this.setAnimationStyle(R.style.PopupAnimation);
        //实例化一个ColorDrawable颜色为半透明
        ColorDrawable background = new ColorDrawable(0x4f000000);
        //设置弹出窗体的背景
        this.setBackgroundDrawable(background);
        // 绘制
        this.mandatoryDraw();
    }

    /**
     * 强制绘制popupWindowView,并且初始化popupWindowView的尺寸
     */
    private void mandatoryDraw() {
        this.contentView.measure(View.MeasureSpec.UNSPECIFIED, View.MeasureSpec.UNSPECIFIED);
        /**
         * 强制刷新后拿到PopupWindow的宽高
         */
        this.width = this.contentView.getMeasuredWidth();
        this.height = this.contentView.getMeasuredHeight();
    }

    /**
     * 显示在控件的下右方
     *
     * @param parent parent
     */
    public void showAtDropDownRight(View parent) {
        if (parent.getVisibility() == View.GONE) {
            this.showAtLocation(parent, 0, 0, 0);
        } else {
            // x y
            int[] location = new int[2];
            //获取在整个屏幕内的绝对坐标
            parent.getLocationOnScreen(location);
            this.showAtLocation(parent, 0, location[0] + parent.getWidth() - this.width, location[1] + parent.getHeight());
        }
    }

    /**
     * 显示在控件的下左方
     *
     * @param parent parent
     */
    public void showAtDropDownLeft(View parent) {
        if (parent.getVisibility() == View.GONE) {
            this.showAtLocation(parent, 0, 0, 0);
        } else {
            // x y
            int[] location = new int[2];
            //获取在整个屏幕内的绝对坐标
            parent.getLocationOnScreen(location);
            this.showAtLocation(parent, 0, location[0], location[1] + parent.getHeight());
        }
    }

    /**
     * 显示在控件的下中方
     *
     * @param parent parent
     */
    public void showAtDropDownCenter(View parent) {
        if (parent.getVisibility() == View.GONE) {
            this.showAtLocation(parent, 0, 0, 0);
        } else {
            // x y
            int[] location = new int[2];
            //获取在整个屏幕内的绝对坐标
            parent.getLocationOnScreen(location);
            this.showAtLocation(parent, 0, location[0] / 2 + parent.getWidth() / 2 - this.width / 6, location[1] + parent.getHeight());
        }
    }

    public static class PopupWindowBuilder {
        private static String activityHashCode;
        private static CustomPopupWindow popupWindow;
        public static PopupWindowBuilder ourInstance;

        public static PopupWindowBuilder getInstance(Activity activity) {
            if (ourInstance == null) ourInstance = new PopupWindowBuilder();
            String hashCode = String.valueOf(activity.hashCode());
            /**
             * 不同一个Activity
             */
            if (!hashCode.equals(String.valueOf(activityHashCode))) {
                activityHashCode = hashCode;
                popupWindow = new CustomPopupWindow(activity);
            }
            return ourInstance;
        }

        public PopupWindowBuilder setTouchable(boolean touchable) {
            popupWindow.setTouchable(touchable);
            return this;
        }

        public PopupWindowBuilder setAnimationStyle(int animationStyle) {
            popupWindow.setAnimationStyle(animationStyle);
            return this;
        }

        public PopupWindowBuilder setBackgroundDrawable(Drawable background) {
            popupWindow.setBackgroundDrawable(background);
            return this;
        }

        public CustomPopupWindow getPopupWindow() {
            popupWindow.update();
            return popupWindow;
        }

    }

}


 1259
1259

 被折叠的 条评论
为什么被折叠?
被折叠的 条评论
为什么被折叠?
 到【灌水乐园】发言


