


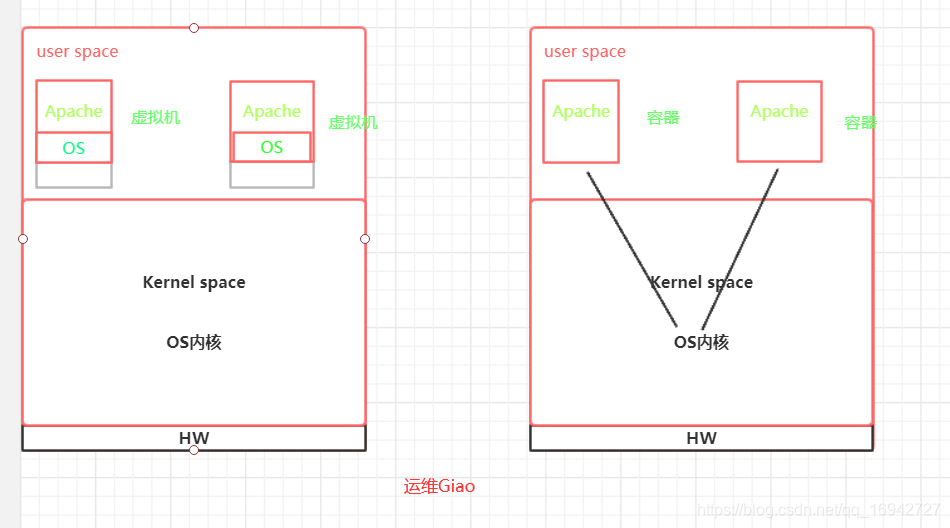
一、什么是容器?
- 用于存储物品
- 现在使用的是虚拟机,可以通过虚拟机部署同类型的应用;通过虚拟机隔离应用运行的环境
- 虚拟机优点:隔离环境
- 虚拟机缺点:需要单独安装操作系统;虚拟机磁盘占用物理机磁盘空间;启动过程浪费时间
- 马上要使用的容器:不需要安装操作系统;能够像虚拟机一样可以提供应用运行的隔离环境;启动过程时间较短
二、容器管理工具
- 虚拟机管理工具
- vmware workstation
- virtualbox
- hyper-v
- kvm
- 容器管理工具
- docker-ce
- docker-ee
三、容器管理工具部署Docker
3.1 docker 官网
www.docker.com
3.2 docker部署文档地址
docs.docke.com
3.3获取YUM源
[root@localhost yum.repos.d]# wget https://mirrors.tuna.tsinghua.edu.cn/docker-ce/linux/centos/docker-ce.repo
[root@localhost yum.repos.d]# ls
CentOS-Base.repo  CentOS-Debuginfo.repo  CentOS-Media.repo    CentOS-Vault.repo
CentOS-CR.repo    CentOS-fasttrack.repo  CentOS-Sources.repo  docker-ce.repo
[root@localhost ~]# yum install -y docker-ce
3.4 启动docker
[root@localhost ~]# systemctl enable docker
Created symlink from /etc/systemd/system/multi-user.target.wants/docker.service to /usr/lib/systemd/system/docker.service.
[root@localhost ~]# systemctl start docker
[root@localhost ~]# docker version
Client: Docker Engine - Community
 Version:           19.03.7
 API version:       1.40
 Go version:        go1.12.17
 Git commit:        7141c199a2
 Built:             Wed Mar  4 01:24:10 2020
 OS/Arch:           linux/amd64
 Experimental:      false

Server: Docker Engine - Community
 Engine:
  Version:          19.03.7
  API version:      1.40 (minimum version 1.12)
  Go version:       go1.12.17
  Git commit:       7141c199a2
  Built:            Wed Mar  4 01:22:45 2020
  OS/Arch:          linux/amd64
  Experimental:     false
 containerd:
  Version:          1.2.13
  GitCommit:        7ad184331fa3e55e52b890ea95e65ba581ae3429
 runc:
  Version:          1.0.0-rc10
  GitCommit:        dc9208a3303feef5b3839f4323d9beb36df0a9dd
 docker-init:
  Version:          0.18.0
  GitCommit:        fec3683
3.5 配置镜像加速器
首先访问阿里云,然后用户登录,搜索容器加速器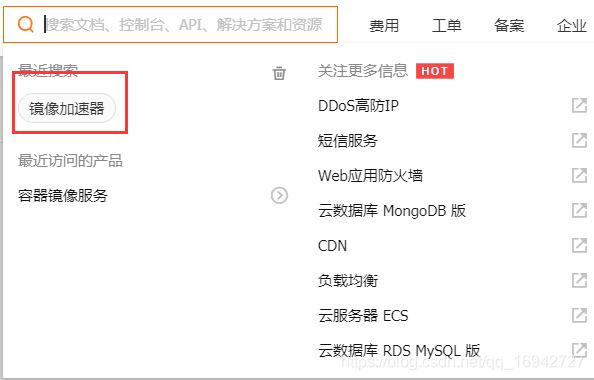
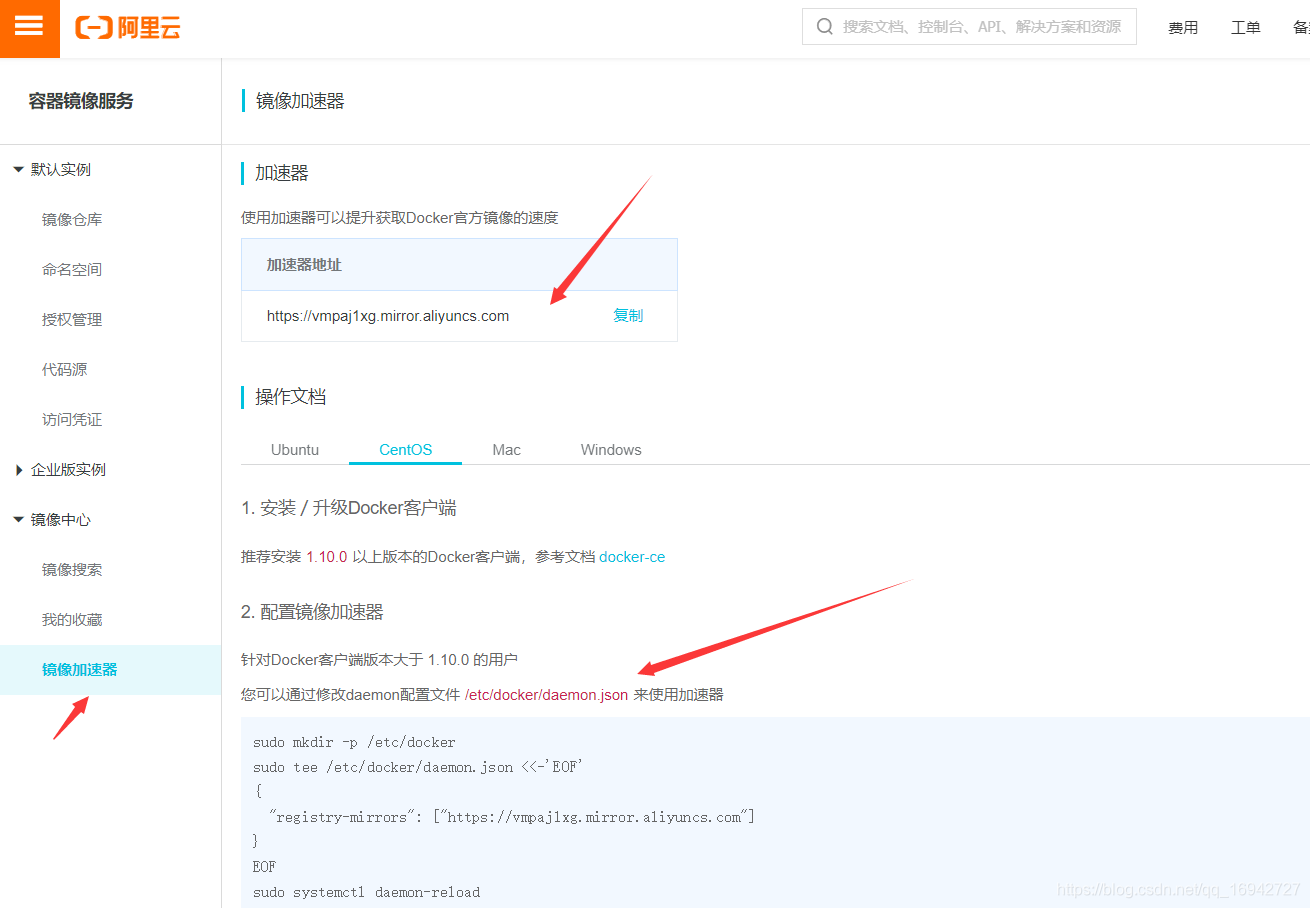
[root@localhost ~]# vim /etc/docker/daemon.json
{
  "registry-mirrors": ["https://vmpaj1xg.mirror.aliyuncs.com"]
}
[root@localhost ~]# systemctl daemon-reload
[root@localhost ~]# systemctl restart docker
四、容器管理工具生态
- 容器镜像
- 包含对容器文件或目录的组织方式
- docker daemon
- docker守护进程
- 容器镜像仓库
- docker官方容器镜像网址:hub.docker.com
- docker client
- 通过docker client访问API给docker daemon下达创建容器的指令
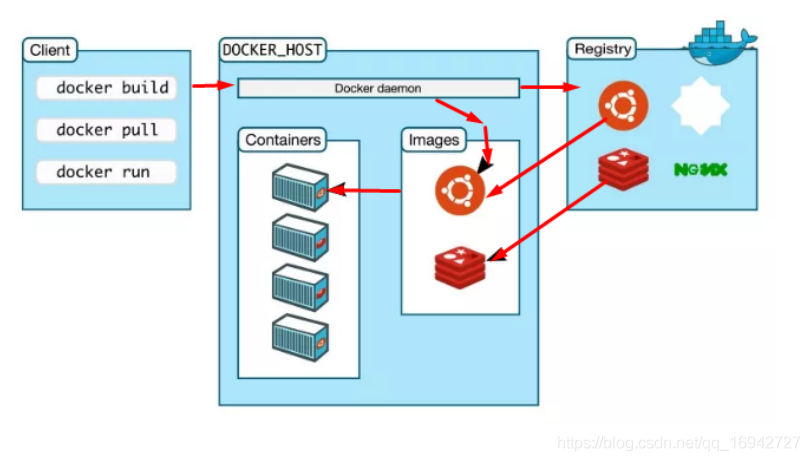
- 通过docker client访问API给docker daemon下达创建容器的指令
五、容器运行
5.1 运行一个容器的条件
- docker daemon
- docker client
- 容器镜像
- 容器镜像仓库 dockerhub hub.docker.com
5.2 下载一个容器镜像
5.2.1 容器镜像分类
- 系统类容器镜像CentOS
- 应用类容器镜像Apache
- 基础系统类容器镜像,包含文件系统,不包含操作系统。
5.2.2 下载一个系统类容器镜像
搜索dockerhub是否centos镜像
[root@localhost ~]# docker search centos
NAME                               DESCRIPTION                                     STARS               OFFICIAL            AUTOMATED
centos                             The official build of CentOS.                   5855                [OK]

下载centos容器镜像
[root@localhost ~]# docker pull centos
Using default tag: latest
latest: Pulling from library/centos
8a29a15cefae: Pull complete
Digest: sha256:fe8d824220415eed5477b63addf40fb06c3b049404242b31982106ac204f6700
Status: Downloaded newer image for centos:latest
docker.io/library/centos:latest

验证centos容器镜像是否下载
[root@localhost ~]# docker images
REPOSITORY          TAG                 IMAGE ID            CREATED             SIZE
centos              latest              470671670cac        6 weeks ago         237MB
如果pull的时候提供超时,再重新pull一次。
5.3 运行一个容器
[root@localhost ~]# docker run -itd --name=centos centos:latest /bin/bash
42a9bd3733cac70a34f84534cbb4e22e715c6d93c35496a87a811385cfd58baa

验证容器是否运行成功
[root@localhost ~]# docker ps -a
CONTAINER ID        IMAGE               COMMAND             CREATED             STATUS              PORTS               NAMES
42a9bd3733ca        centos:latest       "/bin/bash"         27 seconds ago      Up 25 seconds                           centos
六、使用容器部署wordpress
6.1准备部署wordpress需要的镜像文件
- wordpress:latest
- mysql:5.7
[root@localhost ~]# docker pull wordpress:latest
[root@localhost ~]# docker pull mysql:5.7
[root@localhost ~]# docker images
REPOSITORY          TAG                 IMAGE ID            CREATED             SIZE
mysql               5.7                 895f791fab9f        34 hours ago        435MB
wordpress           latest              126aa00ecc0c        6 days ago          540MB
centos              latest              470671670cac        6 weeks ago         237MB
6.2 准备docker-compose工具
为接下来启动容器进行编排
LAMP先启动mysql,再启动apache
部署wordpress应用时,应该先启动mysql容器,再启动wordpress
准备epel YUM源
[root@localhost ~]# wget -O /etc/yum.repos.d/epel.repo http://mirrors.aliyun.com/repo/epel-7.repo

准备pip工具,用于批量管理python语言开发的工具包
[root@localhost ~]# yum install -y python2-pip

由于有安装依赖,先安装依赖包,再安装docker-compose
[root@localhost ~]# yum update -y
[root@localhost ~]# yum install -y gcc libffi-devel python-devel openssl-devel openldap-devel

[root@localhost ~]# pip install python-ldap --user -U
[root@localhost ~]# pip install six --user -U
[root@localhost ~]# pip install pyudev --user -U
[root@localhost ~]# pip install dnspython --user -U
[root@localhost ~]# pip install cffi --user -U
[root@localhost ~]# pip install docker-compose --ignore-installed requests

验证是否安装成功
[root@localhost ~]# docker-compose version
docker-compose version 1.25.4, build unknown
docker-py version: 4.2.0
CPython version: 2.7.5
OpenSSL version: OpenSSL 1.0.2k-fips  26 Jan 2017
pip install的时候可能会速度过慢导致超时
报错信息:
raise ReadTimeoutError(self._pool, None, 'Read timed out.')
ReadTimeoutError: HTTPSConnectionPool(host='files.pythonhosted.org', port=443): Read timed out.

解决方法:
1. 临时方法:可以在使用pip的时候加参数-i
例如:pip install -i https://pypi.tuna.tsinghua.edu.cn/simple six
这样就会从清华那边的镜像去安装six
2. 永久修改:
首先创建一个隐藏目录
[root@localhost ~]# mkdir ~/.pip/
然后创建一个配置文件
[root@localhost ~]# vim ~/.pip/pip.conf
[global]
index-url = https://pypi.tuna.tsinghua.edu.cn/simple
[install]
trusted-host=mirrors.aliyun.com
将镜像源改为国内的阿里云提供,速度会提升很多。
6.3 准备部署文件
准备容器镜像文件
[root@localhost ~]# docker images
REPOSITORY          TAG                 IMAGE ID            CREATED             SIZE
mysql               5.7                 895f791fab9f        35 hours ago        435MB
wordpress           latest              126aa00ecc0c        6 days ago          540MB
centos              latest              470671670cac        6 weeks ago         237MB
6.3.1 YAML文件介绍
- YAML也是一种标记语言
6.3.2 wordpress部署文件准备
6.3.2.1 工程目录创建
[root@localhost ~]# mkdir wordpressproject
[root@localhost ~]# cd wordpressproject/
6.3.2.2 包含工程文件
工程文件就是docker-compose.yaml
工程文件中包含service
本次工程文件中包含wordpress、db服务
服务使用容器运行
[root@localhost wordpressproject]# vim docker-compose.yaml
version: '3'
service:
  db:
    image: mysql:5.7
    volumes:
    - "./data:/var/lib/mysql"
    restart: always
    environment:
      MYSQL_ROOT_PASSWORD: 000000
      MYSQL_DATABASE: wordpress
      MYSQL_USER: wordpress
      MYSQL_PASSWORD: wordpress
    expose:
    - "3306"
  wordpress:
    depends_on:
    - db
    image: wordpress:latest
    links:
    - db
    ports:
    - "8080:80"
    restart: always
    environment:
      WORDPRESS_DB_HOST=: db:3306
      WORDPRESS_DB_PASSWORD: wordpress

这个应用定义了两个容器服务:db、wordpress

db容器通过mysql:5.7镜像启动
	- mysql的数据库目录挂载到当前目录./data,此目录不存在会自动创建
	- 容器重启策略为always
	- 设置了连接mysql的4个变量

wordpress容器通过wordpress:latest启动
	- 需要db容器先启动再启动wordpress容器
	- wordpress容器要link连接db容器
	- wordpress容器将80端口映射到宿主机的8080端口
	- 容器重启策略为always
	- 设置连接数据库的变量
6.3.2.3 启动工程
首先开启IP转发功能(必须)
[root@localhost wordpressproject]# echo 'net.ipv4.ip_forward = 1' >> /etc/sysctl.conf
[root@localhost wordpressproject]# sysctl -p
net.ipv4.ip_forward = 1

[root@localhost wordpressproject]# docker-compose up
#只能在工程目录中使用,用于启动工程

[root@localhost wordpressproject]# docker-compose down
#停止并删除工程已经创建的容器
6.4 访问

根据步骤创建管理员用户、密码,最后install安装即可
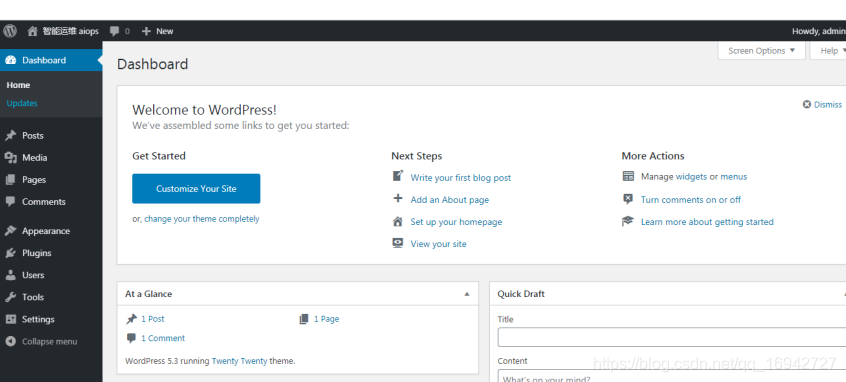
安装成功后的后台登录页面


 1208
1208


 被折叠的 条评论
为什么被折叠?
被折叠的 条评论
为什么被折叠?
 到【灌水乐园】发言


