ElasticSearch
视频教程:Elastic Stack 从入门到实践
1、官方文档:https://www.elastic.co/guide/cn/elasticsearch/guide/current/foreword_id.html
下载ElasticSearch:https://www.elastic.co/downloads/elasticsearch
2、elasticsearch的启动和配置:https://blog.csdn.net/u014073556/article/details/80666393
3、著名的开源爬虫程序SolrNutchGrubAperture
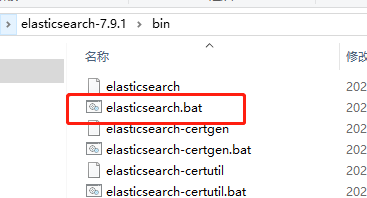
4、启动程序是哪个?讲真的bin目录下太多文件,作为新手的我还真不知道点哪一个 elasticsearch.bat

5、如何修改端口:和大多数apache项目一样 elasticsearch 的配置文件和日志文件在config文件夹中elasticsearch.yml
默认端口 9200
#设置本机端口
network.host: localhost
http.port: 9200

#磁盘不足警告
cluster.routing.allocation.disk.threshold_enabled: false
#cluster.routing.allocation.disk.watermark.low: 30gb
#cluster.routing.allocation.disk.watermark.high: 20gb

#跨域
http.cors.enabled: true
http.cors.allow-origin: "*"
6、最终效果:

elasticsearch-head
7、elasticsearch-head安装
elasticsearch-head是一个用于管理Elasticsearch的web前端插件
https://github.com/mobz/elasticsearch-head
运行环境准备NodeJS,Grunt
npm install -g grunt-cli
git clone git://github.com/mobz/elasticsearch-head.git
cd elasticsearch-head
npm install
修改elasticsearch.yml,增加跨域的配置(需要重启es才能生效)
http.cors.enabled: true
http.cors.allow-origin: "*"
编辑elasticsearch-head/Gruntfile.js,修改服务器监听地址,connect节点增加hostname属性,将其值设置为*
connect: {
server: {
options: {
hostname:'*',
port: 9100,
base: '.',
keepalive: true
}
}
}
编辑elasticsearch-head/_site/app.js, 修改默认es地址为http://http://localhost:9200/, 也可以不修改。
启动
npm run start
注意下列信息需要在Logstash连接ES上后才可以展现。

ES数据默认存储位置:D:\xxxxxxx\elasticsearch-5.4.3\data
ElasticSearch可视化工具kibana(可以监听nginx等日志)


 1130
1130


 被折叠的 条评论
为什么被折叠?


