


文章目录
代码地址:easypan
文件上传后端
FileInfoController#uploadFile
- 文件上传接口,所有文件上传,都调用此接口
- 实现了分片上传逻辑,上传完最后一个分片,自动合并分片为一个完整的文件
- 对 图片 / 视频 这 2种文件类型,做转码处理
- 视频:转为ts文件,并分段(ffmeg);生成视频播放缩略图(ffmeg)
- 图片:生成图片缩略图(ffmeg)
/**
 * 文件信息 Controller
 */
@RestController("fileInfoController")
@RequestMapping("/file")
public class FileInfoController extends CommonFileController {

	// ...

    // 上传文件
    @RequestMapping("/uploadFile")
    @GlobalInterceptor(checkParams = true)
    public ResponseVO uploadFile(HttpSession session,
                                 String fileId,
                                 MultipartFile file,
                                 @VerifyParam(required = true) String fileName,
                                 @VerifyParam(required = true) String filePid,
                                 @VerifyParam(required = true) String fileMd5,
                                 @VerifyParam(required = true) Integer chunkIndex,
                                 @VerifyParam(required = true) Integer chunks) {

        SessionWebUserDto webUserDto = getUserInfoFromSession(session);

        // 文件上传入口处
        UploadResultDto resultDto = fileInfoService.uploadFile(webUserDto, fileId, file, fileName, filePid, fileMd5, chunkIndex, chunks);

        return getSuccessResponseVO(resultDto);
    }

}
FileInfoService#uploadFile
/**
 * 文件信息 业务接口实现
 */
@Service("fileInfoService")
public class FileInfoServiceImpl implements FileInfoService {

    @Override
    @Transactional(rollbackFor = Exception.class)
    public UploadResultDto uploadFile(SessionWebUserDto webUserDto, String fileId, MultipartFile file, String fileName, String filePid, String fileMd5,
                                      Integer chunkIndex, Integer chunks) {

        File tempFileFolder = null;
        Boolean uploadSuccess = true;

        try {

            UploadResultDto resultDto = new UploadResultDto();

            // 前端上传的第一个分片是没有fileId的,生成一个随机的fileId
            if (StringTools.isEmpty(fileId)) {
                fileId = StringTools.getRandomString(Constants.LENGTH_10);
            }

            // 把fileId给前端,上传后面的分片需要将此fileId携带过来
            resultDto.setFileId(fileId);

            Date curDate = new Date();

            // 从redis中获取当前用户网盘空间的情况(已使用空间大小 和 总可使用空间大小)
            UserSpaceDto spaceDto = redisComponent.getUserSpaceUse(webUserDto.getUserId());

            // 上传的是第一个分片
            if (chunkIndex == 0) {

                FileInfoQuery infoQuery = new FileInfoQuery();

                // fileMd5值是前端通过读取文件字节数据获取的 可以表示当前文件的 一个数据标识
                // 如果2个文件的md5值一致,在后台看来,这2个文件就是同一个文件,如果该md5值存在,那么作秒传处理
                infoQuery.setFileMd5(fileMd5);

                infoQuery.setSimplePage(new SimplePage(0, 1));
                infoQuery.setStatus(FileStatusEnums.USING.getStatus());

                // 其实不用分页的,反正只会取一个
                List<FileInfo> dbFileList = this.fileInfoMapper.selectList(infoQuery);

                //秒传(文件的md5值已经存在了,没必要再上传了)
                if (!dbFileList.isEmpty()) {

                    // 获取这个md5值一致的数据 dbFile
                    FileInfo dbFile = dbFileList.get(0);

                    //判断空间是否足够(当前正在上传的文件大小 + 用户已使用空间大小 > 用户可使用总空间大小)
                    if (dbFile.getFileSize() + spaceDto.getUseSpace() > spaceDto.getTotalSpace()) {
                        throw new BusinessException(ResponseCodeEnum.CODE_904);
                    }

                    // dbFile重新设置新值, 然后会作插入
                    dbFile.setFileId(fileId);
                    dbFile.setFilePid(filePid);
                    dbFile.setUserId(webUserDto.getUserId());
                    dbFile.setCreateTime(curDate);
                    dbFile.setLastUpdateTime(curDate);
                    dbFile.setStatus(FileStatusEnums.USING.getStatus());
                    dbFile.setDelFlag(FileDelFlagEnums.USING.getFlag());
                    dbFile.setFileMd5(fileMd5);

                    // 自动重命名(应对在当前文件夹中有同名文件的情况,如果文件名已存在的话,才会重命名)
                    fileName = autoRename(filePid, webUserDto.getUserId(), fileName);
                    // 设置文件名
                    dbFile.setFileName(fileName);

                    // 插入dbFile
                    // (那么这再用户看来是2个文件的数据,但实际上这2条数据所保存的文件路径是同一个磁盘位置的路径)
                    this.fileInfoMapper.insert(dbFile);

                    // 响应给前端 秒传成功
                    resultDto.setStatus(UploadStatusEnums.UPLOAD_SECONDS.getCode());

                    //更新用户空间使用
                    //(更新到db,更新到redis)
                    updateUserSpace(webUserDto, dbFile.getFileSize());

                    return resultDto;
                }
            }

            //暂存在临时目录 D:/document/easypan/easypan-java/temp/
            String tempFolderName = appConfig.getProjectFolder() + Constants.FILE_FOLDER_TEMP;

            // {userId}{fileId} 组合
            String currentUserFolderName = webUserDto.getUserId() + fileId;

            //创建临时目录(分片存储在 D:/document/easypan/easypan-java/temp/{userId}{fileId})
            tempFileFolder = new File(tempFolderName + currentUserFolderName);
            if (!tempFileFolder.exists()) {
                tempFileFolder.mkdirs();
            }

            //判断磁盘空间
            // 【用户已使用的空间 + 用户上传的当前文件所占用的临时空间(之前上传的分片临时空间大小) + 用户上传的当前文件的当前分片大小】
            // 与 【用户的总可用空间】 大小比较
            // 所以就有可能出现 用户同时上传多个文件时,刚开始检查,都满足条件(用户已使用空间大小 + 当前文件大小 <= 用户总可用空间大小)
            //               但是多个文件加起来,却会超出用户总可用空间大小
            Long currentTempSize = redisComponent.getFileTempSize(webUserDto.getUserId(), fileId);
            if (file.getSize() + currentTempSize + spaceDto.getUseSpace() > spaceDto.getTotalSpace()) {
                // 用户空间不足
                throw new BusinessException(ResponseCodeEnum.CODE_904);
            }

            // 当前上传的文件的 分片 保存的路径
            File newFile = new File(tempFileFolder.getPath() + "/" + chunkIndex);
            file.transferTo(newFile);
            //保存临时大小
            //(每保存完上传的一个分片,就将此分片的文件累计到 redis中)
            redisComponent.saveFileTempSize(webUserDto.getUserId(), fileId, file.getSize());

            //不是最后一个分片,直接返回(状态为上传中)
            if (chunkIndex < chunks - 1) {
                resultDto.setStatus(UploadStatusEnums.UPLOADING.getCode());
                // 第一个分片,将会把fileId写回前端(如果文件比较小,第一个分片就上传完了,就不会走这里的逻辑)
                return resultDto;
            }

            // 执行到这里,所有的分片已全部上传完成,
            // 接下来是先写入db(数据库中会有该条数据了,不过须要事务提交后才有该数据),然后再合并分片(异步)

            //最后一个分片上传完成,记录数据库,异步合并分片
            String month = DateUtil.format(curDate, DateTimePatternEnum.YYYYMM.getPattern());

            // 获取文件后缀,如:01_什么是jvm.mp4 获取到 .mp4
            String fileSuffix = StringTools.getFileSuffix(fileName);

            //真实文件名
            String realFileName = currentUserFolderName + fileSuffix;

            // 根据文件后缀 获取 文件类型枚举
            FileTypeEnums fileTypeEnum = FileTypeEnums.getFileTypeBySuffix(fileSuffix);

            //自动重命名
            fileName = autoRename(filePid, webUserDto.getUserId(), fileName);

            // 待插入db的 文件记录
            FileInfo fileInfo = new FileInfo();
            fileInfo.setFileId(fileId);
            fileInfo.setUserId(webUserDto.getUserId());
            fileInfo.setFileMd5(fileMd5); // 文件md5值
            fileInfo.setFileName(fileName);
            fileInfo.setFilePath(month + "/" + realFileName);
            fileInfo.setFilePid(filePid);
            fileInfo.setCreateTime(curDate);
            fileInfo.setLastUpdateTime(curDate);
            fileInfo.setFileCategory(fileTypeEnum.getCategory().getCategory());
            fileInfo.setFileType(fileTypeEnum.getType());
            fileInfo.setStatus(FileStatusEnums.TRANSFER.getStatus()); // 转码中
            fileInfo.setFolderType(FileFolderTypeEnums.FILE.getType()); // 文件类型
            fileInfo.setDelFlag(FileDelFlagEnums.USING.getFlag());

            // 将当前上传的文件 记录成一条数据 写入db(此时,事务尚未提交),标识为了转码中
            this.fileInfoMapper.insert(fileInfo);

            // 用户的使用空间 更新到redis缓存中,更新到db
            Long totalSize = redisComponent.getFileTempSize(webUserDto.getUserId(), fileId);
            updateUserSpace(webUserDto, totalSize);

            // 响应已上传完成
            resultDto.setStatus(UploadStatusEnums.UPLOAD_FINISH.getCode());

            //事务提交后调用异步方法(注册事务同步回调,在事务提交之后,开始做转码)
            // 为什么要写在事务同步回调中呢?
            //      上面写完数据后,当前方法(开启了事务)的事务并未提交,数据还未真正的插入到数据库中,
            //      而当前类的transferFile合并方法是个异步方法(前提是:正确使用@Async注解修饰的方法,才会异步执行,否则,仍会同步执行)
            //      ,并未纳入到当前方法的事务,所以异步方法 不一定能够查询出刚刚插入到db中的数据,如果查不到数据的话,就无法完成分片合并的动作,
            //      (注意是:不一定,因为还是得看异步方法执行的时候,当前事务是否已经提交了,存在异步方法执行时,当前的这个事务仍未提交的情况)
            // 采用异步的原因是
            //      合并分片文件需要花费时间,并且合并完分片之后,如果遇到视频文件,又需要截图,又需要转码,很耗时间,应当先响应给用户,剩下的要后台自己处理
            TransactionSynchronizationManager.registerSynchronization(new TransactionSynchronization() {
                @Override
                public void afterCommit() {
                    fileInfoService.transferFile(fileInfo.getFileId(), webUserDto);
                }
            });

            return resultDto;

        } catch (BusinessException e) {
            // 标记上传失败
            uploadSuccess = false;
            logger.error("文件上传失败", e);
            throw e;
        } catch (Exception e) {
            // 标记上传失败
            uploadSuccess = false;
            logger.error("文件上传失败", e);
            throw new BusinessException("文件上传失败");
        } finally {
            // 如果上传失败,清除临时目录
            if (tempFileFolder != null && !uploadSuccess) {
                try {
                    FileUtils.deleteDirectory(tempFileFolder);
                } catch (IOException e) {
                    logger.error("删除临时目录失败");
                }
            }
        }
    }
}
FileInfoService#transferFile
- 转码处理
- 异步执行
@Async // 异步方法(须得代理的方式调用此方法,才会在异步任务线程池中执行)
       // 文件分片上传完成后的处理
public void transferFile(String fileId, SessionWebUserDto webUserDto) {

    Boolean transferSuccess = true;
    String targetFilePath = null;
    String cover = null;
    FileTypeEnums fileTypeEnum = null;

    // 查询到文件上传完成时的那条文件记录数据(因此,需要确保此方法在当前查询之前,数据已被插入到数据库)
    FileInfo fileInfo = fileInfoMapper.selectByFileIdAndUserId(fileId, webUserDto.getUserId());

    try {

        // 找不到文件 或者 状态不处于转码中,忽略掉
        if (fileInfo == null || !FileStatusEnums.TRANSFER.getStatus().equals(fileInfo.getStatus())) {
            return;
        }

        //临时目录 D:/document/easypan/easypan-java/temp/
        String tempFolderName = appConfig.getProjectFolder() + Constants.FILE_FOLDER_TEMP;

        // {userId}{fileId}
        String currentUserFolderName = webUserDto.getUserId() + fileId;

        // 当前用户上传文件时的临时位置 D:/document/easypan/easypan-java/temp/{userId}{fileId}
        File fileFolder = new File(tempFolderName + currentUserFolderName);

        // 没必要创建了吧
        if (!fileFolder.exists()) {
            fileFolder.mkdirs();
        }

        //文件后缀  如:01_什么是jvm.mp4 获取到 .mp4
        String fileSuffix = StringTools.getFileSuffix(fileInfo.getFileName());

        // 当前年月 如:202305
        String month = DateUtil.format(fileInfo.getCreateTime(), DateTimePatternEnum.YYYYMM.getPattern());

        //目标目录 D:/document/easypan/easypan-java/file/
        String targetFolderName = appConfig.getProjectFolder() + Constants.FILE_FOLDER_FILE;

        // 目标文件夹: D:/document/easypan/easypan-java/file//202305
        File targetFolder = new File(targetFolderName + "/" + month);
        if (!targetFolder.exists()) {
            targetFolder.mkdirs();
        }

        //真实文件名 如:{userId}{fileId}.mp4
        String realFileName = currentUserFolderName + fileSuffix;

        //真实文件路径 如:D:/document/easypan/easypan-java/file//202305/{userId}{fileId}.mp4
        targetFilePath = targetFolder.getPath() + "/" + realFileName;

        //合并文件
        // 使用RandomAccessFile可从任意位置开始读取文件(可参考:RandomAccessFile类 & 断点续传(https://blog.csdn.net/qq_16992475/article/details/130009930))
        // 第1个路径是:D:/document/easypan/easypan-java/temp/{userId}{fileId}(它是上传的分片所在的临时文件夹)
        // 第2个路径是:D:/document/easypan/easypan-java/file//202305/{userId}{fileId}.mp4(它是最终要合并到的文件路径)
        union(fileFolder.getPath(), targetFilePath, fileInfo.getFileName(), true);

        // 至此,文件合并完成

        //视频文件切割(通过文件名后缀判断是否为视频文件)
        fileTypeEnum = FileTypeEnums.getFileTypeBySuffix(fileSuffix);

        // 如果是视频文件
        if (FileTypeEnums.VIDEO == fileTypeEnum) {

            // 对视频文件进行切片处理(拆分ts分片)
            // 第二个路径,如 D:/document/easypan/easypan-java/file//202305/{userId}{fileId}.mp4
            cutFile4Video(fileId, targetFilePath);

            //视频生成封面路径,如:202305/{userId}{fileId}.png
            //(注意到最终合并的文件路径为:D:/document/easypan/easypan-java/file//202305/{userId}{fileId}.mp4,
            // 视频封面路径和视频的路径 会在同一个目录下面)
            cover = month + "/" + currentUserFolderName + Constants.IMAGE_PNG_SUFFIX;

            // 视频封面路径 D:/document/easypan/easypan-java/file//202305/{userId}{fileId}.png
            String coverPath = targetFolderName + "/" + cover;

            // 创建宽度为 150像素的 视频缩略图 作为 视频封面
            ScaleFilter.createCover4Video(new File(targetFilePath), Constants.LENGTH_150, new File(coverPath));


        } else if (FileTypeEnums.IMAGE == fileTypeEnum) {

            // 图片生成缩略图

            // 生成缩略图路径: 202305/{userId}{fileId}_.png
            // 会在同一目录下,并且文件名中所有的.都会替换为_.
            cover = month + "/" + realFileName.replace(".", "_.");

            // 图片缩略图路径: D:/document/easypan/easypan-java/file//202305/{userId}{fileId}_.png
            String coverPath = targetFolderName + "/" + cover;

            // 创建缩略图(宽度为150px)
            Boolean created = ScaleFilter.createThumbnailWidthFFmpeg(new File(targetFilePath), Constants.LENGTH_150, new File(coverPath), false);

            // 创建不成功的话,直接复制整个图片作为缩略图
            if (!created) {
                FileUtils.copyFile(new File(targetFilePath), new File(coverPath));
            }

        }
    } catch (Exception e) {
        logger.error("文件转码失败,文件Id:{},userId:{}", fileId, webUserDto.getUserId(), e);
        transferSuccess = false;
    } finally {

        FileInfo updateInfo = new FileInfo();

        // 转码后, 将文件大小 和 封面 更新到数据库
        updateInfo.setFileSize(new File(targetFilePath).length());
        updateInfo.setFileCover(cover);

        // 转码成功 或者 转码失败
        updateInfo.setStatus(transferSuccess ? FileStatusEnums.USING.getStatus() : FileStatusEnums.TRANSFER_FAIL.getStatus());
        fileInfoMapper.updateFileStatusWithOldStatus(fileId, webUserDto.getUserId(), updateInfo, FileStatusEnums.TRANSFER.getStatus());
    }
}
FileInfoService#union合并文件
- 使用RandomAccessFile将分片合并成一个完整的文件
private void union(String dirPath, String toFilePath, String fileName, boolean delSource) throws BusinessException {

    File dir = new File(dirPath);
    if (!dir.exists()) {
        throw new BusinessException("目录不存在");
    }

    // 获取到 D:/document/easypan/easypan-java/temp/{userId}{fileId}下的所有分片文件
    File fileList[] = dir.listFiles();

    // 获取到要写入的目标文件位置:D:/document/easypan/easypan-java/file//202305/{userId}{fileId}.mp4(它是最终要合并到的文件路径)
    File targetFile = new File(toFilePath);

    RandomAccessFile writeFile = null;

    try {

        // 使用RandomAccessFile合并文件
        writeFile = new RandomAccessFile(targetFile, "rw");

        byte[] b = new byte[1024 * 10];

        // 将分片文件写入到目标文件位置(按分片文件顺序)
        for (int i = 0; i < fileList.length; i++) {

            int len = -1;

            //创建读块文件的对象
            // D:/document/easypan/easypan-java/temp/{userId}{fileId}/0 -- 第0个分片
            // D:/document/easypan/easypan-java/temp/{userId}{fileId}/1 -- 第1个分片
            // ...
            File chunkFile = new File(dirPath + File.separator + i);

            RandomAccessFile readFile = null;
            try {
                readFile = new RandomAccessFile(chunkFile, "r");
                while ((len = readFile.read(b)) != -1) {
                    writeFile.write(b, 0, len);
                }
            } catch (Exception e) {
                logger.error("合并分片失败", e);
                throw new BusinessException("合并文件失败");
            } finally {
                readFile.close();
            }
        }
    } catch (Exception e) {
        logger.error("合并文件:{}失败", fileName, e);
        throw new BusinessException("合并文件" + fileName + "出错了");
    } finally {
        try {
            if (null != writeFile) {
                writeFile.close();
            }
        } catch (IOException e) {
            logger.error("关闭流失败", e);
        }
        if (delSource) {
            if (dir.exists()) {
                try {
                    FileUtils.deleteDirectory(dir);
                } catch (IOException e) {
                    e.printStackTrace();
                }
            }
        }
    }
}
FileInfoService#cutFile4Video 视频分段
- 视频文件分割为ts分段文件
private void cutFile4Video(String fileId, String videoFilePath) {

    // videoFilePath 如: D:/document/easypan/easypan-java/file//202305/{userId}{fileId}.mp4

    //创建同名切片目录,
    // tsFolder 与 视频文件在同一目录下,并且tsFolder是以视频真实文件名(不带后缀)作为文件夹名
    // tsFolder 如: D:/document/easypan/easypan-java/file//202305/{userId}{fileId} - 这是个文件夹
    File tsFolder = new File(videoFilePath.substring(0, videoFilePath.lastIndexOf(".")));

    if (!tsFolder.exists()) {
        tsFolder.mkdirs();
    }

    // 这里也尝试过直接对mp4文件直接转为.m3u8 + ts分段视频文件,但转的速度比较慢,不知道是不是参数设置的原因,ffmpeg不是很清楚它的命令
    // 命令如:ffmpeg -i ./jvm.mp4 -c:v h264 -flags +cgop -g 30 -hls_time 60 -hls_list_size 0 -hls_segment_filename index%3d.ts index.m3u8
    // 这个命令,会将执行命令时所在的当前目录下的jvm.mp4文件按照视频的每60s切割成一个ts文件 和 .m3u8索引文件 到 当前目录

    // 这里先转为ts文件,然后,再切割这个ts文件,生成.m3u8索引文件(速度比上面快)

    // 1. 将 整个视频文件 转成ts文件:index.ts
    //    ffmpeg -y -i {mp4视频文件路径}  -vcodec copy -acodec copy -vbsf h264_mp4toannexb {放入到哪一个文件位置}
    //    如:ffmpeg -y -i D:/test/jvm.mp4  -vcodec copy -acodec copy -vbsf h264_mp4toannexb D:/test/jvm/index.ts
    //    这个命令会将 第一个 所指向的mp4视频文件 转成 ts文件 存储到 D:/test/jvm/index.ts,注意第二个文件路径在执行命令前必须要存在

    // 2. 将index.ts文件进行分片
    //    ffmpeg -i {index文件的文件路径} -c copy -map 0 -f segment -segment_list {要生成的m3u8索引文件路径} -segment_time 30 {生成的ts切片路径}/{文件名前面部分}_%4d.ts
    //    生成的ts文件路径%%4d,写了2个百分号是为了防止jdk的MessageFormat处理
    //    如:ffmpeg -i D:/test/jvm/index.ts -c copy -map 0 -f segment -segment_list D:/test/jvm/index.m3u8 -segment_time 30 D:/test/jvm/jjvvmm_%4d.ts
    //    这个 命令会将 第一个 所指向的ts视频文件 按照 每30s 切割成一个小的ts视频文件,放入到指定的文件夹中,并且有指定格式的文件名(占4位,递增),并且会生成一个m3u8的索引文件

    // mp4转ts文件的ffmpeg命令
    // 如:ffmpeg -y -i D:/document/easypan/easypan-java/file//202305/{userId}{fileId}.mp4  -vcodec copy -acodec copy -vbsf h264_mp4toannexb D:/document/easypan/easypan-java/file//202305/{userId}{fileId}/index.ts
    final String CMD_TRANSFER_2TS = "ffmpeg -y -i %s  -vcodec copy -acodec copy -vbsf h264_mp4toannexb %s";

    // ts文件拆分成小的ts文件 和 生成一个.m3u8文件
    // 如:ffmpeg -i D:/document/easypan/easypan-java/file//202305/{userId}{fileId}/index.ts -c copy -map 0 -f segment -segment_list D:/document/easypan/easypan-java/file//202305/{userId}{fileId}/index.m3u8 -segment_time 30 D:/document/easypan/easypan-java/file//202305/{userId}{fileId}/{fileId}_%%4d.ts
    final String CMD_CUT_TS = "ffmpeg -i %s -c copy -map 0 -f segment -segment_list %s -segment_time 30 %s/%s_%%4d.ts";

    // 转成的ts文件所在路径:D:/document/easypan/easypan-java/file//202305/{userId}{fileId}/index.ts
    String tsPath = tsFolder + "/" + Constants.TS_NAME;

    // mp4转ts文件的ffmpeg命令(上面已展示示例)
    String cmd = String.format(CMD_TRANSFER_2TS, videoFilePath, tsPath);
    // java调用exe命令
    ProcessUtils.executeCommand(cmd, false);

    //生成索引文件.m3u8 和切片.ts(上面已展示示例)
    cmd = String.format(CMD_CUT_TS, tsPath, tsFolder.getPath() + "/" + Constants.M3U8_NAME, tsFolder.getPath(), fileId);

    // java调用exe命令
    ProcessUtils.executeCommand(cmd, false);

    //删除index.ts
    new File(tsPath).delete();
}
ProcessUtils#executeCommand 调用exe命令
- ProcessUtils完整代码
- 使用java调用exe程序命令
public class ProcessUtils {
    private static final Logger logger = LoggerFactory.getLogger(ProcessUtils.class);

    public static String executeCommand(String cmd, Boolean outprintLog) throws BusinessException {
        if (StringTools.isEmpty(cmd)) {
            logger.error("--- 指令执行失败,因为要执行的FFmpeg指令为空! ---");
            return null;
        }

        Runtime runtime = Runtime.getRuntime();
        Process process = null;
        try {
            process = Runtime.getRuntime().exec(cmd);
            // 执行ffmpeg指令
            // 取出输出流和错误流的信息
            // 注意:必须要取出ffmpeg在执行命令过程中产生的输出信息,如果不取的话当输出流信息填满jvm存储输出留信息的缓冲区时,线程就回阻塞住
            PrintStream errorStream = new PrintStream(process.getErrorStream());
            PrintStream inputStream = new PrintStream(process.getInputStream());
            errorStream.start();
            inputStream.start();
            // 等待ffmpeg命令执行完
            process.waitFor();
            // 获取执行结果字符串
            String result = errorStream.stringBuffer.append(inputStream.stringBuffer + "\n").toString();
            // 输出执行的命令信息

            if (outprintLog) {
                logger.info("执行命令:{},已执行完毕,执行结果:{}", cmd, result);
            } else {
                logger.info("执行命令:{},已执行完毕", cmd);
            }
            return result;
        } catch (Exception e) {
            // logger.error("执行命令失败:{} ", e.getMessage());
            e.printStackTrace();
            throw new BusinessException("视频转换失败");
        } finally {
            if (null != process) {
                ProcessKiller ffmpegKiller = new ProcessKiller(process);
                runtime.addShutdownHook(ffmpegKiller);
            }
        }
    }

    /**
     * 在程序退出前结束已有的FFmpeg进程
     */
    private static class ProcessKiller extends Thread {
        private Process process;

        public ProcessKiller(Process process) {
            this.process = process;
        }

        @Override
        public void run() {
            this.process.destroy();
        }
    }


    /**
     * 用于取出ffmpeg线程执行过程中产生的各种输出和错误流的信息
     */
    static class PrintStream extends Thread {
        InputStream inputStream = null;
        BufferedReader bufferedReader = null;
        StringBuffer stringBuffer = new StringBuffer();

        public PrintStream(InputStream inputStream) {
            this.inputStream = inputStream;
        }

        @Override
        public void run() {
            try {
                if (null == inputStream) {
                    return;
                }
                bufferedReader = new BufferedReader(new InputStreamReader(inputStream));
                String line = null;
                while ((line = bufferedReader.readLine()) != null) {
                    stringBuffer.append(line);
                }
            } catch (Exception e) {
                logger.error("读取输入流出错了!错误信息:" + e.getMessage());
            } finally {
                try {
                    if (null != bufferedReader) {
                        bufferedReader.close();
                    }
                    if (null != inputStream) {
                        inputStream.close();
                    }
                } catch (IOException e) {
                    logger.error("调用PrintStream读取输出流后,关闭流时出错!");
                }
            }
        }
    }
}
ScaleFilter#createCover4Video 视频帧缩略图
- 使用ffmpeg生成视频封面
- ScaleFilter完整代码
public class ScaleFilter {
    private static final Logger logger = LoggerFactory.getLogger(ScaleFilter.class);


    public static Boolean createThumbnailWidthFFmpeg(File file, int thumbnailWidth, File targetFile, Boolean delSource) {
        try {

            // 读取图片的宽高
            BufferedImage src = ImageIO.read(file);

            //thumbnailWidth 缩略图的宽度   thumbnailHeight 缩略图的高度
            int sorceW = src.getWidth();
            int sorceH = src.getHeight();

            //小于 指定宽度不压缩
            if (sorceW <= thumbnailWidth) {
                return false;
            }

            compressImage(file, thumbnailWidth, targetFile, delSource);
            return true;
        } catch (Exception e) {
            e.printStackTrace();
        }
        return false;
    }

    public static void compressImageWidthPercentage(File sourceFile, BigDecimal widthPercentage, File targetFile) {
        try {
            BigDecimal widthResult = widthPercentage.multiply(new BigDecimal(ImageIO.read(sourceFile).getWidth()));
            compressImage(sourceFile, widthResult.intValue(), targetFile, true);
        } catch (Exception e) {
            logger.error("压缩图片失败");
        }
    }

    public static void createCover4Video(File sourceFile, Integer width, File targetFile) {
        try {
            // 生成mp4视频封面的ffmpeg命令:ffmpeg -i {视频文件路径} -y -vframes 1 -vf scale=%d:%d/a {生成的封面路径}
            // 命令如:ffmpeg -i D:\test\jvm.mp4 -y -vframes 1 -vf scale=150:150/a D:\test\jvm.png
            String cmd = "ffmpeg -i %s -y -vframes 1 -vf scale=%d:%d/a %s";
            ProcessUtils.executeCommand(String.format(cmd, sourceFile.getAbsoluteFile(), width, width, targetFile.getAbsoluteFile()), false);
        } catch (Exception e) {
            logger.error("生成视频封面失败", e);
        }
    }
    public static void compressImage(File sourceFile, Integer width, File targetFile, Boolean delSource) {
        String cmd = null;
        try {
            // ffmpeg -i {原图片路径} -vf scale=%d:-1 {生成的图片路径} -y
            // ffmpeg -i /usr/local/blog/easypan/backend/file/202305/3178033358JHNvrMfGeL.png -vf scale=150:-1 /usr/local/blog/easypan/backend/file/202305/3178033358JHNvrMfGeL_1.png -y
            // 压缩图片宽度,但是会保持比例
            cmd = "ffmpeg -i %s -vf scale=%d:-1 %s -y";

            ProcessUtils.executeCommand(String.format(cmd, sourceFile.getAbsoluteFile(), width, targetFile.getAbsoluteFile()), false);
            if (delSource) {
                FileUtils.forceDelete(sourceFile);
            }
        } catch (Exception e) {
            logger.error("cmd: {}", cmd);
            logger.error("压缩图片失败", e);
        }
    }

    public static void main(String[] args) {
        compressImageWidthPercentage(new File("C:\\Users\\Administrator\\Pictures\\微信图片_20230107141436.png"), new BigDecimal(0.7),
                new File("C:\\Users\\Administrator" +
                        "\\Pictures" +
                        "\\微信图片_202106281029182.jpg"));
    }
}
ScaleFilter#createThumbnailWidthFFmpeg 图片缩略图
- 使用ffmpeg获取图片的缩略图
- ScaleFilter完整代码,见:ScaleFilter#createCover4Video节
public class ScaleFilter {

	// ...
    public static Boolean createThumbnailWidthFFmpeg(File file, int thumbnailWidth, File targetFile, Boolean delSource) {
        try {

            // 读取图片的宽高
            BufferedImage src = ImageIO.read(file);

            //thumbnailWidth 缩略图的宽度   thumbnailHeight 缩略图的高度
            int sorceW = src.getWidth();
            int sorceH = src.getHeight();

            //小于 指定宽度不压缩
            if (sorceW <= thumbnailWidth) {
                return false;
            }

            compressImage(file, thumbnailWidth, targetFile, delSource);
            return true;
        } catch (Exception e) {
            e.printStackTrace();
        }
        return false;
    }

    // ...
}
CommonFileController 公共逻辑处理
- 读取指定路径的文件 到 响应流 中
- 获取层级目录导航(前端按顺序传,后端使用order by 指定该顺序)
- 读取图片
- 读取(m3u8文件 + ts视频) + 其它类型文件
- 创建临时下载码,然后,根据下载码下载资源
public class CommonFileController extends ABaseController {

    private static final Logger logger = LoggerFactory.getLogger(ABaseController.class);

    @Resource
    protected FileInfoService fileInfoService;

    @Resource
    protected AppConfig appConfig;

    @Resource
    private RedisComponent redisComponent;

    public ResponseVO getFolderInfo(String path, String userId) {
        String[] pathArray = path.split("/");
        FileInfoQuery infoQuery = new FileInfoQuery();
        infoQuery.setUserId(userId);
        infoQuery.setFolderType(FileFolderTypeEnums.FOLDER.getType());
        infoQuery.setFileIdArray(pathArray);

        // order by 按指定的顺序排序, 生成层级目录导航 如:aaa > bbb > ccc > ddd
        String orderBy = "field(file_id,\"" + StringUtils.join(pathArray, "\",\"") + "\")";
        infoQuery.setOrderBy(orderBy);
        List<FileInfo> fileInfoList = fileInfoService.findListByParam(infoQuery);
        return getSuccessResponseVO(CopyTools.copyList(fileInfoList, FolderVO.class));
    }

    public void getImage(HttpServletResponse response, String imageFolder, String imageName) {
        if (StringTools.isEmpty(imageFolder) || StringUtils.isBlank(imageName)) {
            return;
        }

        String imageSuffix = StringTools.getFileSuffix(imageName);

        // D:/document/easypan/easypan-java/file/{图片文件夹}/{图片名称}
        String filePath = appConfig.getProjectFolder() + Constants.FILE_FOLDER_FILE + imageFolder + "/" + imageName;

        // 写入mimeType到Content-Type响应头
        imageSuffix = imageSuffix.replace(".", "");

        String contentType = "image/" + imageSuffix;
        response.setContentType(contentType);
        response.setHeader("Cache-Control", "max-age=2592000");

        // 以流的方式读取 指定路径 的图片,写入到响应流当中
        readFile(response, filePath);
    }

    // 读取指定路径的磁盘文件 到 响应流 中
    private void readFile(HttpServletResponse response, String filePath) {
        if (!StringTools.pathIsOk(filePath)) {
            return;
        }
        OutputStream out = null;
        FileInputStream in = null;
        try {
            File file = new File(filePath);
            if (!file.exists()) {
                return;
            }
            in = new FileInputStream(file);
            byte[] byteData = new byte[1024];
            out = response.getOutputStream();
            int len = 0;
            while ((len = in.read(byteData)) != -1) {
                out.write(byteData, 0, len);
            }
            out.flush();
        } catch (Exception e) {
            logger.error("读取文件异常", e);
        } finally {
            if (out != null) {
                try {
                    out.close();
                } catch (IOException e) {
                    logger.error("IO异常", e);
                }
            }
            if (in != null) {
                try {
                    in.close();
                } catch (IOException e) {
                    logger.error("IO异常", e);
                }
            }
        }
    }

    protected void getFile(HttpServletResponse response, String fileId, String userId) {


        String filePath = null;

        // 获取 分片的ts视频文件
        if (fileId.endsWith(".ts")) {

            // 访问请求如:http://127.0.0.1:1024/api/file/ts/getVideoInfo/YsIlFSjnlh_0000.ts

            // 此处传入的fileId 为 {真实的fileId}_序号.ts

            // ts分片文件的名的前面部分是fileId,即:{fileId}_0001.ts
            String[] tsAarray = fileId.split("_");

            String realFileId = tsAarray[0];

            // 获取到视频文件信息
            FileInfo fileInfo = fileInfoService.getFileInfoByFileIdAndUserId(realFileId, userId);

            if (fileInfo == null) {
                return;
            }

            // 这里的fileName其实是:202305/3178033358YsIlFSjnlh.mp4
            String fileName = fileInfo.getFilePath();

            // ts文件的地址在 以最终合并的视频文件的名称作为文件夹 下
            // 因此fileName为:202305/3178033358YsIlFSjnlh/YsIlFSjnlh_0000.ts
            fileName = StringTools.getFileNameNoSuffix(fileName) + "/" + fileId;

            // D:/document/easypan/easypan-java/file/202305/3178033358YsIlFSjnlh/YsIlFSjnlh_0000.ts
            filePath = appConfig.getProjectFolder() + Constants.FILE_FOLDER_FILE + fileName;

        } else {

            // 此时传入的fileId 就是真实的fileId

            // 获取文件记录
            FileInfo fileInfo = fileInfoService.getFileInfoByFileIdAndUserId(fileId, userId);

            if (fileInfo == null) {
                return;
            }

            //视频文件读取.m3u8文件
            if (FileCategoryEnums.VIDEO.getCategory().equals(fileInfo.getFileCategory())) {

                // 访问请求如:http://127.0.0.1:1024/api/file/ts/getVideoInfo/YsIlFSjnlh
                // 返回的index.m3u8文件信息是:
                /*
                    #EXTM3U
                    #EXT-X-VERSION:3
                    #EXT-X-MEDIA-SEQUENCE:0
                    #EXT-X-ALLOW-CACHE:YES
                    #EXT-X-TARGETDURATION:30
                    #EXTINF:30.000000,
                    YsIlFSjnlh_0000.ts
                    #EXTINF:30.000000,
                    YsIlFSjnlh_0001.ts
                    #EXTINF:30.000000,
                    YsIlFSjnlh_0002.ts
                    #EXTINF:30.000000,
                    YsIlFSjnlh_0003.ts
                    #EXTINF:30.000000,
                    ...
                    YsIlFSjnlh_0017.ts
                    #EXTINF:5.400000,
                    YsIlFSjnlh_0018.ts
                    #EXT-X-ENDLIST
                */

                // 202305/3178033358YsIlFSjnlh.mp4 去掉后缀 为 202305/3178033358YsIlFSjnlh
                String fileNameNoSuffix = StringTools.getFileNameNoSuffix(fileInfo.getFilePath());

                // D:/document/easypan/easypan-java/file/202305/3178033358YsIlFSjnlh/index.m3u8
                filePath = appConfig.getProjectFolder() + Constants.FILE_FOLDER_FILE + fileNameNoSuffix + "/" + Constants.M3U8_NAME;

            } else {

                // 其它文件 直接读取:D:/document/easypan/easypan-java/file/{filePath}

                filePath = appConfig.getProjectFolder() + Constants.FILE_FOLDER_FILE + fileInfo.getFilePath();
            }
        }


        File file = new File(filePath);
        if (!file.exists()) {
            return;
        }

        // 以流的方式写给浏览器
        readFile(response, filePath);
    }


    protected ResponseVO createDownloadUrl(String fileId, String userId) {
        FileInfo fileInfo = fileInfoService.getFileInfoByFileIdAndUserId(fileId, userId);
        if (fileInfo == null) {
            throw new BusinessException(ResponseCodeEnum.CODE_600);
        }
        if (FileFolderTypeEnums.FOLDER.getType().equals(fileInfo.getFolderType())) {
            throw new BusinessException(ResponseCodeEnum.CODE_600);
        }
        String code = StringTools.getRandomString(Constants.LENGTH_50);
        DownloadFileDto downloadFileDto = new DownloadFileDto();
        downloadFileDto.setDownloadCode(code);
        downloadFileDto.setFilePath(fileInfo.getFilePath());
        downloadFileDto.setFileName(fileInfo.getFileName());

        redisComponent.saveDownloadCode(code, downloadFileDto);

        return getSuccessResponseVO(code);
    }

    protected void download(HttpServletRequest request, HttpServletResponse response, String code) throws Exception {
        DownloadFileDto downloadFileDto = redisComponent.getDownloadCode(code);
        if (null == downloadFileDto) {
            return;
        }
        String filePath = appConfig.getProjectFolder() + Constants.FILE_FOLDER_FILE + downloadFileDto.getFilePath();
        String fileName = downloadFileDto.getFileName();
        response.setContentType("application/x-msdownload; charset=UTF-8");
        if (request.getHeader("User-Agent").toLowerCase().indexOf("msie") > 0) {//IE浏览器
            fileName = URLEncoder.encode(fileName, "UTF-8");
        } else {
            fileName = new String(fileName.getBytes("UTF-8"), "ISO8859-1");
        }
        response.setHeader("Content-Disposition", "attachment;filename=\"" + fileName + "\"");
        readFile(response, filePath);
    }
}
FileInfoController#getFile/{fileId}
// 读取非视频类型文件
@RequestMapping("/getFile/{fileId}")
public void getFile(HttpServletResponse response, HttpSession session, @PathVariable("fileId") @VerifyParam(required = true) String fileId) {

    SessionWebUserDto webUserDto = getUserInfoFromSession(session);

    super.getFile(response, fileId, webUserDto.getUserId());
}
FileInfoController#getVideoInfo
// 读取视频文件
// 1. 前端会先读取 m3u8文件获取到视频索引
// 2. 然后根据 m3u8文件, 获取到相对路径下的ts视频文件
// 这里的认证是依靠浏览器自动携带cookie(JSESSIONID)来做的, 这是浏览器的默认行为,所以未登录的话,是访问不了这个接口的
@RequestMapping("/ts/getVideoInfo/{fileId}")
public void getVideoInfo(HttpServletResponse response,
						 HttpSession session,
						 @PathVariable("fileId") @VerifyParam(required = true) String fileId) {

    // 获取当前用户
    SessionWebUserDto webUserDto = getUserInfoFromSession(session);

    super.getFile(response, fileId, webUserDto.getUserId());
}
FileInfoController#createDownloadUrl/{fileId}
// 根据fileId ,获取到文件路径和文件名称 ,随机生成一个code关联此文件记录,将此code返回
@RequestMapping("/createDownloadUrl/{fileId}")
@GlobalInterceptor(checkParams = true)
public ResponseVO createDownloadUrl(HttpSession session, @PathVariable("fileId") @VerifyParam(required = true) String fileId) {

    return super.createDownloadUrl(fileId, getUserInfoFromSession(session).getUserId());
}
FileInfoController#download/{code}
// 根据上面的code,从redis中找到关联的文件路径和文件名称,将流以下载的方式写回给浏览器
@RequestMapping("/download/{code}")
@GlobalInterceptor(checkLogin = false, checkParams = true)
public void download(HttpServletRequest request, HttpServletResponse response, @PathVariable("code") @VerifyParam(required = true) String code) throws Exception {

    super.download(request, response, code);
}
文件预览
axios请求相关
Request.js
import axios from 'axios'

import { ElLoading } from 'element-plus'
import router from '@/router'

import Message from '../utils/Message'

const contentTypeForm = 'application/x-www-form-urlencoded;charset=UTF-8'
const contentTypeJson = 'application/json'
//arraybuffer	ArrayBuffer对象
//blob	Blob对象
//document	Documnet对象
//json	JavaScript object, parsed from a JSON string returned by the server
//text	DOMString
const responseTypeJson = "json"

let loading = null;
const instance = axios.create({
    baseURL: '/api',
    timeout: -1,
});
//请求前拦截器
instance.interceptors.request.use(
    (config) => {
        if (config.showLoading) {
            loading = ElLoading.service({
                lock: true,
                text: '加载中......',
                background: 'rgba(0, 0, 0, 0.0)',
            });
        }
        return config;
    },
    (error) => {
        if (config.showLoading && loading) {
            loading.close();
        }
        Message.error("请求发送失败");
        return Promise.reject("请求发送失败");
    }
);
//请求后拦截器
instance.interceptors.response.use(
    (response) => {
        // 这里的response.config是什么? todo, 感觉应该就是axios发起请求前传入的配置对象
        const { showLoading, errorCallback, showError = true, responseType } = response.config;
        if (showLoading && loading) {
            loading.close()
        }
        const responseData = response.data;
        // 获取到响应类型是response.config.responseType todo
        if (responseType == "arraybuffer" || responseType == "blob") {
            return responseData;
        }
        //正常请求
        if (responseData.code == 200) {
            return responseData;
        } else if (responseData.code == 901) {
            //登录超时
            // 登录超时跳转到登录前, 对当前路径进行uri编码, 记录此路径到url上
            router.push("/login?redirectUrl=" + encodeURI(router.currentRoute.value.path));
            return Promise.reject({ showError: false, msg: "登录超时" });
        } else {
            //其他错误
            if (errorCallback) {
                errorCallback(responseData.info);
            }
            return Promise.reject({ showError: showError, msg: responseData.info });
        }
    },
    (error) => {
        // error里面也可以拿到config吗? todo
        if (error.config.showLoading && loading) {
            loading.close();
        }
        return Promise.reject({ showError: true, msg: "网络异常" })
    }
);

const request = (config) => {
    const { url, params, dataType, showLoading = true, responseType = responseTypeJson } = config;
    let contentType = contentTypeForm;
    let formData = new FormData();// 创建form对象
    for (let key in params) {
        formData.append(key, params[key] == undefined ? "" : params[key]);
    }
    if (dataType != null && dataType == 'json') {
        contentType = contentTypeJson;
    }
    let headers = {
        'Content-Type': contentType,
        'X-Requested-With': 'XMLHttpRequest',
    }
    instance({

    })
    return instance.post(url, formData, {
        onUploadProgress: (event) => {
            if (config.uploadProgressCallback) {
                config.uploadProgressCallback(event);
            }
        },
        responseType: responseType, // responsType是axios中已定义的配置选项
        headers: headers,
        showLoading: showLoading,
        errorCallback: config.errorCallback,
        showError: config.showError
    }).catch(error => {
        console.log(error);
        if (error.showError) {
            Message.error(error.msg);
        }
        return null;
    });
};

export default request;
预览组件
封装Preview.vue组件
- 根据文件分类类型传入不同的width给Window.vue组件,以决定展示的宽度,而Window.vue组件中,又使用计算属性根据此传递的width值与当前窗口宽度作比较(width值不允许超过当前窗口宽度),返回作为windowContentWidth
- showPreview方法( 入口)暴露给父组件Main.vue调用(其实,要展示弹框有2种方法,要么在父组件中定义一个响应式数据,然后以prop传给子组件,子组件根据此响应式数据作出对应展示。要么子组件暴露一个方法给外界调用,让外界通过此方法传入数据。很显然,这里用的是第二种方式)
如何展示多种不同类型的文件?Main组件中使用Preview组件,调用<Preview ref=“previewRef”>组件的previewRef.value.showPreview(row, 0)方法,将文件数据传递了过去,并且指定url使用FILE_URL_MAP[0],然后,在<Preview>组件中,根据文件数据中的文件类型使用不同的组件作展示(不然,所有的根据文件类型展示不同的组件,都要写在Main.vue组件中,那这样的话,Main.vue组件就过于复杂了)<Preview>组件用到了Window.vue(用于模拟弹窗)配合展示不同文件类型的组件(不包括图片类型,PreviewXXX组件)和<el-image-viewer>组件(专门展示图片)- 不同文件类型请求路径(后端处理这些请求的详细代码在上面已贴出)
- 非视频文件类型文件 预览的url
0 - fileUrl: "/file/getFile"1 - fileUrl: "/admin/getFile"2 - fileUrl: "/showShare/getFile"
- 视频文件类型文件的url取
0 - videoUrl: /file/ts/getVideoInfo"1 - videoUrl: /admin/ts/getVideoInfo"2 - videoUrl: /showShare/ts/getVideoInfo"
- 非视频文件类型文件 预览的url
<template>

  <!-- 图片类型文件 预览(通过v-if 控制是否渲染)-->
  <PreviewImage
    ref="imageViewerRef"
    :imageList="[imageUrl]"
    v-if="fileInfo.fileCategory == 3" >
  </PreviewImage>

  <!-- 非图片类型文件 预览 -->
  <Window
    :show="windowShow"
    @close="closeWindow"
    :width="fileInfo.fileCategory == 1 ? 1500 : 900"
    :title="fileInfo.fileName"
    :align="fileInfo.fileCategory == 1 ? 'center' : 'top'"
    v-else>

	<!-- 视频类型文件 -->
    <PreviewVideo :url="url" v-if="fileInfo.fileCategory == 1"></PreviewVideo>

    <!-- xlsx类型文件 -->
    <PreviewExcel :url="url" v-if="fileInfo.fileType == 6"></PreviewExcel>

    <!-- doc类型文件 -->
    <PreviewDoc :url="url" v-if="fileInfo.fileType == 5"></PreviewDoc>

    <!-- pdf 类型文件 -->
    <PreviewPdf :url="url" v-if="fileInfo.fileType == 4"></PreviewPdf>

    <!-- txt 和 code 类型文件 -->
    <PreviewTxt :url="url" v-if="fileInfo.fileType == 7 || fileInfo.fileType == 8"></PreviewTxt>

    <!-- 音频分类文件 -->
    <PreviewMusic :url="url" :fileName="fileInfo.fileName" v-if="fileInfo.fileCategory == 2"></PreviewMusic>

    <!-- 其它文件类型: 下载 -->
    <PreviewDownload :createDownloadUrl="createDownloadUrl" :downloadUrl="downloadUrl"
                     :fileInfo="fileInfo" v-if="fileInfo.fileCategory == 5 && fileInfo.fileType != 8"></PreviewDownload>

  </Window>
</template>

<script setup>

import PreviewDoc from "@/components/preview/PreviewDoc.vue";
import PreviewExcel from "@/components/preview/PreviewExcel.vue";
import PreviewImage from "@/components/preview/PreviewImage.vue";
import PreviewPdf from "@/components/preview/PreviewPdf.vue";
import PreviewVideo from "@/components/preview/PreviewVideo.vue";
import PreviewTxt from "@/components/preview/PreviewTxt.vue";
import PreviewDownload from "@/components/preview/PreviewDownload.vue";
import PreviewMusic from "@/components/preview/PreviewMusic.vue";

import { ref, reactive, getCurrentInstance, nextTick, computed } from "vue";
import { useRouter, useRoute } from "vue-router";
const { proxy } = getCurrentInstance();
const router = useRouter();
const route = useRoute();

const imageUrl = computed(() => {

  // proxy.globalInfo.imageUrl就是:/api/file/getImage/
  return (proxy.globalInfo.imageUrl + fileInfo.value.fileCover.replaceAll("_.", "."));

});

const windowShow = ref(false);
const closeWindow = () => {
  windowShow.value = false;
};

const FILE_URL_MAP = {
  0: {
    fileUrl: "/file/getFile",
    videoUrl: "/file/ts/getVideoInfo",
    createDownloadUrl: "/file/createDownloadUrl",
    downloadUrl: "/api/file/download",
  },
  1: {
    fileUrl: "/admin/getFile",
    videoUrl: "/admin/ts/getVideoInfo",
    createDownloadUrl: "/admin/createDownloadUrl",
    downloadUrl: "/api/admin/download",
  },
  2: {
    fileUrl: "/showShare/getFile",
    videoUrl: "/showShare/ts/getVideoInfo",
    createDownloadUrl: "/showShare/createDownloadUrl",
    downloadUrl: "/api/showShare/download",
  },
};

const url = ref(null);

const createDownloadUrl = ref(null);

const downloadUrl = ref(null);

const fileInfo = ref({});

const imageViewerRef = ref();

// 显示文件预览的方法(暴露给外部调用)
const showPreview = (data, showPart) => {

  // 外部传入的文件数据
  fileInfo.value = data;

  // 如果是图片类型文件
  if (data.fileCategory == 3) {

    nextTick(() => {
      // 调用图片预览组件暴露的show方法,显示索引为0的图片
      imageViewerRef.value.show(0);
    });

  } else {

  	// 非图片类型文件

  	// 使用Window组件展示
    windowShow.value = true;

    // 文件资源请求路径前缀, 一般文件都是在FILE_URL_MAP的fileUrl, 其中, 视频文件是在videoUrl
    let _url = FILE_URL_MAP[showPart].fileUrl;
    // 视频地址单独处理
    if (data.fileCategory == 1) {
      _url = FILE_URL_MAP[showPart].videoUrl;
    }

    // 从FILE_URL_MAP 中拿到 showPart对应类型的 createDownloadUrl
    let _createDownloadUrl = FILE_URL_MAP[showPart].createDownloadUrl;

    // 从FILE_URL_MAP 中拿到 showPart对应类型的 downloadUrl
    let _downloadUrl = FILE_URL_MAP[showPart].downloadUrl;

	// 如果是用户在自己的后台查看
    if (showPart == 0) {

   	  // 路径为: /file/getFile/{fileId}, 或 /file/ts/getVideoInfo/{fileId}
      _url = _url + "/" + data.fileId;

      // 路径为: /file/createDownloadUrl/{fileId}
      _createDownloadUrl = _createDownloadUrl + "/" + data.fileId;

    } else if (showPart == 1) {

	  // 如果是管理员在后台查看

	  // 路径为: /admin/getFile/{userId}/{fileId}, 或 /admin/ts/getVideoInfo/{userId}/{fileId}
      _url = _url + "/" + data.userId + "/" + data.fileId;

      // 路径为: /admin/createDownloadUrl/{userId}/{fileId}
      _createDownloadUrl = _createDownloadUrl + "/" + data.userId + "/" + data.fileId;

    } else if (showPart == 2) {

      // 用户从分享中查看文件

      // 路径为: /showShare/getFile/{shareId}/{fileId}, 或 /showShare/ts/getVideoInfo/{shareId}/{fileId}
      _url = _url + "/" + data.shareId + "/" + data.fileId;

	  // 路径为: /showShare/createDownloadUrl/{shareId}/{fileId}
      _createDownloadUrl = _createDownloadUrl + "/" + data.shareId + "/" + data.fileId;

    }

    // url用于展示文件资源(二进制流)
    url.value = _url;

    // createDownloadUrl用于下载步骤中的获取下载码
    createDownloadUrl.value = _createDownloadUrl;

    // downloadUrl根据下载码获取下载的文件资源(二进制流)
    downloadUrl.value = _downloadUrl;

  }
};

defineExpose({ showPreview });

</script>

<style lang="scss"></style>
封装Window.vue组件
- 相当于手动封装一个弹框组件
- 使用window.innerWidth获取当前窗口宽度作为响应式数据windowWidth的初始值,并使用
计算属性绑定给style,并且监听窗口大小变化事件(window.addEventListener('resize',handler),其中handler去修改计算属性中使用的windowWidth响应式数据的值),以此达到此弹框的宽度永远最大不能超过当前窗口的宽度(即使弹框指定的宽度大于当前窗口宽度),并且当窗口变化时,Window组件的宽度能随着窗口变化而变化(最大不超过当前窗口宽度)。 - 使用计算属性,计算Window组件内容居中时,距离左侧的的left值,
绑定给style属性,以此达到让弹框内容永远居中
<template>
  <div class="window" v-if="show">
    <div class="window-mask" v-if="show" @click="close"></div>
    <div class="close" @click="close">
      <span class="iconfont icon-close2"> </span>
    </div>
    <div
      class="window-content"
      :style="{
        top: '0px',
        left: windowContentLeft + 'px',
        width: windowContentWidth + 'px',
      }"
    >
      <div class="title">
        {{ title }}
      </div>
      <div class="content-body" :style="{ 'align-items': align }">
        <slot></slot>
      </div>
    </div>
  </div>
</template>

<script setup>
import { computed, onMounted, onUnmounted, ref } from "vue";

const props = defineProps({
  show: {
    type: Boolean,
  },
  width: {
    type: Number,
    default: 1000,
  },
  title: {
    type: String,
  },
  align: {
    type: String,
    default: "top",
  },
});

const windowWidth = ref( window.innerWidth);

// 窗口内容宽度(计算属性) (随窗口大小变化而变化)
const windowContentWidth = computed(() => {
  return props.width > windowWidth.value ? windowWidth.value : props.width;
});

const resizeWindow = () => {
  windowWidth.value = window.innerWidth;
};

// 监听窗口大小变化
onMounted(() => {
  window.addEventListener("resize", resizeWindow);
});

onUnmounted(() => {
  window.removeEventListener("resize", resizeWindow);
});

// 窗口内容 如要居中 距离左侧距离 - 计算属性 (随窗口大小变化而变化)
const windowContentLeft = computed(() => {
  let left = windowWidth.value - props.width;
  return left < 0 ? 0 : left / 2;
});

const emit = defineEmits(["close"]);
const close = () => {
  emit("close");
};


</script>

<style lang="scss" scoped>
.window {
  .window-mask {
    top: 0px;
    left: 0px;
    width: 100%;
    height: calc(100vh);
    z-index: 200;
    opacity: 0.5;
    background: #000;
    position: fixed;
  }
  .close {
    z-index: 202;
    cursor: pointer;
    position: absolute;
    top: 40px;
    right: 30px;
    width: 44px;
    height: 44px;
    border-radius: 22px;
    background: #606266;
    display: flex;
    justify-content: center;
    align-items: center;
    .iconfont {
      font-size: 20px;
      color: #fff;
      z-index: 100000;
    }
  }
  .window-content {
    top: 0px;
    z-index: 201;
    position: absolute;
    background: #fff;
    .title {
      text-align: center;
      line-height: 40px;
      border-bottom: 1px solid #ddd;
      font-weight: bold;
    }
    .content-body {
      height: calc(100vh - 41px);
      display: flex;
      overflow: auto;
    }
  }
}
</style>
图片预览
PreviewImage组件
- 须区分缩略图和原图,生成原图的缩略图
- 使用elment-ui的el-image-viewer预览图片,而没有直接使用 <el-image>
- 在使用滚轮缩放预览图片时,禁止页面跟随滚动
<template>

  <div class="image-viewer">

    <el-image-viewer
      :initial-index="previewImgIndex"
      hide-on-click-modal
      :url-list="imageList"
      @close="closeImgViewer"
      v-if="previewImgIndex != null">
    </el-image-viewer>

  </div>

</template>

<script setup>

import { ref } from "vue";

const prosp = defineProps({
  imageList: {
    type: Array,
  },
});

const previewImgIndex = ref(null);

const show = (index) => {
  stopScroll();
  previewImgIndex.value = index;
};

defineExpose({ show });

const closeImgViewer = () => {
  startScroll();
  previewImgIndex.value = null;
};

//禁止滚动
const stopScroll = () => {
  document.body.style.overflow = "hidden";
};

// 开始滚动
const startScroll = () => {
  document.body.style.overflow = "auto";
};
</script>

<style lang="scss" scoped>
.image-viewer {
  .el-image-viewer__mask {
    opacity: 0.7;
  }
}
</style>
图片预览效果

el-image-viewer使用示例
- 第一种: 使用el-image - 通过点击小图, 然后预览大图, 这是官方文档提供的方法
- 第二种: 使用el-image-viewer
- 可以通过这个示例,看下element-ui是怎么做的图片预览
<template>
    <div class="preview-box">
        <!-- 第一种: 使用el-image - 通过点击小图, 然后预览大图, 这是官方文档提供的方法 -->
        <el-image :preview-src-list="['/api/file/getImage/202307/3178033358P0KiZY3YV2.png',
                                      '/api/file/getImage/202307/3178033358bd1LTA0mLK.png']"
                   :initial-index="0"
                   src="/api/file/getImage/202307/3178033358P0KiZY3YV2_.png"/>

        <!-- 第二种: 使用el-image-viewer
            1. 必须使用v-if来控制预览效果的显示和隐藏,不能使用v-show(使用v-show无效)
            2. 需要监听close事件, 当点击蒙层 或 关闭按钮时, 会触发close事件, 此时需要手动关闭预览, 否则预览不会关闭
            3. initial-index属性为显示图片的索引
        -->
        <el-button @click="showImage(0)">显示图片0</el-button>
        <el-button @click="showImage(1)">显示图片1</el-button>
        <el-image-viewer
            v-if="show"
            :url-list="['/api/file/getImage/202307/3178033358P0KiZY3YV2.png','/api/file/getImage/202307/3178033358bd1LTA0mLK.png']"
            :initial-index="initialIndex"
            @close="closeImageViewer"
            :hide-on-click-modal="true" />
    </div>
</template>

<script setup>

import { ref, reactive } from 'vue'

// 预览图片显示的初始索引
const initialIndex = ref(0)

// 是否展示图片预览
const show = ref(false)

// 显示图片预览的方法
function showImage(idx) {
    initialIndex.value = idx
    show.value = true // 展示预览
}

// 关闭图片预览的方法
function closeImageViewer() {
    show.value = false
}
</script>

<style lang="scss"></style>
后台实现
缩略图
- 前面为视频文件和图片文件,这2种类型文件生成了缩略图,因此,在文件列表中,可以通过缩略图的方式查看文件。
FileInfoController#getImage
- 用于预览缩略图(前端直接用img标签的src去指向这个接口即可)
- 用于展示原图(缩略图和原图仅有名字上的微小区别)
- 完整代码参看: CommonFileController 公共逻辑处理 部分
@RestController("fileInfoController")
@RequestMapping("/file")
public class FileInfoController extends CommonFileController {

    // 读取图片
    @RequestMapping("/getImage/{imageFolder}/{imageName}")
    public void getImage(HttpServletResponse response, @PathVariable("imageFolder") String imageFolder, @PathVariable("imageName") String imageName) {
        super.getImage(response, imageFolder, imageName);
    }

}
视频预览
PreviewVideo.vue组件
- 使用DPlayer
- 引入hls(如果导入hls的包报错的话,可考虑在index.html中直接cdn引入hls.min.js)
<template>
  <div ref="player" id="player"></div>
</template>

<script setup>
import DPlayer from "dplayer";
import { nextTick, onMounted, ref, getCurrentInstance } from "vue";
const { proxy } = getCurrentInstance();

const props = defineProps({
  url: {
    type: String,
  },
});

const videoInfo = ref({
  video: null,
});

// console.log(props.url,'视频地址url');

const player = ref();
const initPlayer = () => {
  const dp = new DPlayer({
    element: player.value,
    theme: "#b7daff",
    screenshot: true,
    video: {
      //  pic: videoInfo.img, // 封面
      url: `/api${props.url}`,
      type: "customHls",
      customType: {
        customHls: function (video1, player) {
          // debugger

          let config = {
            xhrSetup: function (xhr, url) {
              console.log(xhr,url,'hlss');
              xhr.setRequestHeader("token", "123");
            },
          }

          const hls = new Hls(config);
          // console.log(video1,'video1');
          // console.dir(video1);
          // console.log(video1.src,'video1.src');
          hls.loadSource(video1.src); // 其实就是m3u8文件的地址
          hls.attachMedia(video1);
        },
      },
    },
  });
};

onMounted(() => {
  initPlayer();
});
</script>

<style lang="scss" scoped>
#player {
  width: 100%;

  :deep .dplayer-video-wrap {
    text-align: center;

    .dplayer-video {
      margin: 0px auto;
      max-height: calc(100vh - 41px);
    }
  }
}
</style>
视频预览实现效果
- 可以看到请求的路径
- http://127.0.0.1:1025/api/file/getFile/4zSahYM3fG
- http://127.0.0.1:1025/api/file/getFile/4zSahYM3fG_0000.ts

DPlayer使用示例
<template>
    <div class="preview-box">
        <div id="dplayer"></div>
        <el-button @click="changeVideo">切换视频</el-button>
    </div>
</template>

<script setup>

import { ref, reactive, onMounted } from 'vue'
import Hls from 'hls.js';
import DPlayer from 'dplayer';

// DPlayers实例
let dp = null

// 另一种方式,使用 customType
onMounted(() => {
    dp = new DPlayer({
        container: document.getElementById('dplayer'),
        video: {
            url: '/api/file/ts/getVideoInfo/zwizcojhc7',
            // url: '/api/file/ts/getVideoInfo/PakZTUpyp9',
            type: 'customHls',
            customType: {
                customHls: function (video, player) {
                    let config = {
                        xhrSetup: function (xhr, url) {
                            xhr.withCredentials = true; // 会携带cookie
                            xhr.setRequestHeader('token', "my-token")
                        },
                    }
                    const hls = new Hls(config);
                    hls.loadSource(video.src);
                    hls.attachMedia(video);
                },
            },
        },
    });
})

// 切换视频
function changeVideo() {
    dp.switchVideo({
        // url: '/api/file/ts/getVideoInfo/zwizcojhc7',
        url: '/api/file/ts/getVideoInfo/PakZTUpyp9',
        type: 'customHls',
        customType: {
            customHls: function (video, player) {
                let config = {
                    xhrSetup: function (xhr, url) {
                        xhr.withCredentials = true; // 会携带cookie
                        xhr.setRequestHeader('token', "my-token")
                    },
                }
                const hls = new Hls(config);
                hls.loadSource(video.src);
                hls.attachMedia(video);
            },
        },
    })
}


</script>

<style lang="scss">
#dplayer {
    width: 600px;
    height: 300px;
}
</style>
Docx文件预览
PreviewDocx.vue组件
- 使用docx-preview这个插件(npm i docx-preview -S)
- axios的responseType配置为blob
- 后台返回的是二进制数据(后台读取文件流,将流数据写入response),前端接受此流数据,传入给docx-preview插件处理
<template>
  <div ref="docRef" class="doc-content"></div>
</template>

<script setup>
import * as docx from "docx-preview";
import { ref, reactive, getCurrentInstance, onMounted } from "vue";
const { proxy } = getCurrentInstance();

const props = defineProps({
  url: {
    type: String,
  },
});

const docRef = ref();
const initDoc = async () => {
  let result = await proxy.Request({
    url: props.url,
    responseType: "blob", // 这里的responseType表示接收的是二进制流数据(注意,在axios的响应式拦截器中,要将response.data直接返回)
  });
  if (!result) {
    return;
  }
  docx.renderAsync(result, docRef.value);
};
onMounted(() => {
  initDoc();
});
</script>

<style lang="scss" scoped>
.doc-content {
  margin: 0px auto;
  :deep .docx-wrapper {
    background: #fff;
    padding: 10px 0px;
  }

  :deep .docx-wrapper > section.docx {
    margin-bottom: 0px;
  }
}
</style>
文档预览效果

docx-preview使用示例
<template>
   <div class="doc-box">
        <div ref="docRef" id="doc-content"></div>
   </div>
</template>

<script setup>
import { ref,reactive } from 'vue'
import axios from 'axios'
import {renderAsync} from 'docx-preview'

const props = defineProps({
    url:{
        type: String
    },
    fileInfo: {
        type: Object
    }
})
const docRef = ref()
axios({
    url:`${props.url}${props.fileInfo.fileId}`,
    method: 'POST',
    responseType: 'blob',
}).then(res=>{
    console.log(res.data,'res.data');
    renderAsync(res.data, docRef.value)
})


</script>

<style lang="scss" scoped>


.doc-box {
    height: 100%;
    overflow: auto;
}
</style>
vue-office组件
Excel文件预览
PreviewExcel.vue组件
- 安装xlsx这个插件
- axios的responseType配置为arraybuffer(注意都是小写)
- 后台返回的是二进制数据(后台读取文件流,将流数据写入response),前端接受此流数据,传入给xlsx插件处理
- l将插件处理得到的html,使用v-html 插入到 div标签中
<template>

  <div v-html="excelContent" class="talbe-info"></div>

</template>

<script setup>

import * as XLSX from "xlsx";

import { ref, reactive, getCurrentInstance, onMounted } from "vue";

const { proxy } = getCurrentInstance();

const props = defineProps({
  url: {
    type: String,
  },
});

const excelContent = ref();

const initExcel = async () => {

  let result = await proxy.Request({
    url: props.url,
    responseType: "arraybuffer",
  });

  if (!result) {
    return;
  }

   // 解析数据
  let workbook = XLSX.read(new Uint8Array(result), { type: "array" });

  // workbook.SheetNames 下存的是该文件每个工作表名字,这里取出第一个工作表
  var worksheet = workbook.Sheets[workbook.SheetNames[0]];

  excelContent.value = XLSX.utils.sheet_to_html(worksheet);
};

onMounted(() => {
  initExcel();
});
</script>

<style lang="scss" scoped>
.talbe-info {
  width: 100%;
  padding: 10px;
  :deep table {
    width: 100%;
    border-collapse: collapse;
    td {
      border: 1px solid #ddd;
      border-collapse: collapse;
      padding: 5px;
      height: 30px;
      min-width: 50px;
    }
  }
}
</style>
表格预览效果

Xlsx组件使用示例
- 下面的responseType一定要写成arraybuffer
- 如果responseType写的是blob的话,那么一定要调用
res.data.arraybuffer(),这个调用返回结果是个Promise,把此Promise得到的结果给到new Uint8Array(promise的结果)也可以
<template>
    <div class="xlsx-box">
         <div ref="xlsxRef" id="xlsx-content" v-html="excelContent"></div>
    </div>
 </template>

 <script setup>
 import { ref,reactive } from 'vue'
 import axios from 'axios'
 import * as XLSX from 'xlsx'

 const props = defineProps({
     url:{
         type: String
     },
     fileInfo: {
         type: Object
     }
 })
const excelContent = ref();
 axios({
     url:`${props.url}${props.fileInfo.fileId}`,
     method: 'POST',
     responseType: 'arraybuffer',
 }).then(res=>{
     console.log(res.data,'res.data');
     let workbook = XLSX.read(new Uint8Array(res.data), { type: "array" });
     var worksheet = workbook.Sheets[workbook.SheetNames[0]];
     excelContent.value = XLSX.utils.sheet_to_html(worksheet);
 })


 </script>

 <style lang="scss" scoped>


 .xlsx-box {
     height: 100%;
     width: 100%;
     overflow: auto;
     padding: 20px;
     :deep table {
        width: 100%;
        border-collapse: collapse;

        td {
            border: 1px solid #ddd;
            line-height: 2;
            padding: 0 5px 0;
            min-width: 30px;
            height: 30px;
        }
     }
 }
 </style>
PDF预览
PreviewPDF.vue组件
- 须安装VuePdfEmbed 、vue3-pdfjs插件
<template>

  <div class="pdf">

    <vue-pdf-embed
      ref="pdfRef"
      :source="state.url"
      class="vue-pdf-embed"
      width="850"
      :page="state.pageNum"
      :style="scaleFun"
    />

  </div>

</template>

<script setup>

import VuePdfEmbed from "vue-pdf-embed";

import { createLoadingTask } from "vue3-pdfjs";

import { ElLoading } from "element-plus";

import { ref, reactive, getCurrentInstance, computed } from "vue";
import { useRouter, useRoute } from "vue-router";
const { proxy } = getCurrentInstance();
const router = useRouter();
const route = useRoute();

const props = defineProps({
  url: {
    type: String,
  },
});
const scaleFun = computed(() => {
  return "transform:scale(${state.scale})";
});

const state = reactive({
  url: "",     // 预览pdf文件地址
  pageNum: 0,  // 当前页面
  numPages: 0, // 总页数
});

const init = () => {

  const url = "/api" + props.url;

  state.url = url;

  const loading = ElLoading.service({
    lock: true,
    text: "加载中......",
    background: "rgba(0, 0, 0, 0.7)",
  });

  const loadingTask = createLoadingTask(state.url);

  loadingTask.promise.then((pdf) => {
    loading.close();
    state.numPages = pdf.numPages;
  });

};

init();

</script>

<style lang="scss" scoped>
.pdf {
  width: 100%;
}
</style>
pdf预览效果

vue-pdf-embed组件使用
<template>
      <div class="pdf-box" v-loading="loading">
        <VuePdfEmbed
            @loaded="loading = false"
            :source="pdfUrl"
            ref="pdfRef">
        </VuePdfEmbed>
   </div>
</template>

<script setup>
import { ref,reactive, computed } from 'vue'
import axios from 'axios'
import VuePdfEmbed from "vue-pdf-embed";

const loading = ref(true)

const props = defineProps({
    url:{
        type: String
    },
    fileInfo: {
        type: Object
    }
})
const pdfRef = ref()

const pdfUrl = computed(()=>{
    return `${props.url}${props.fileInfo.fileId}`
})


</script>

<style lang="scss">
    .pdf-box {
        height: 100%;
        overflow: auto;
        width: 100%;
        overflow-x: hidden;
    }
</style>
文本预览
PreviewTxt.vue
-
允许手动选择编码格式(使用了FileReader#readAsText(blob,encode)指定编码,将文件流读取为文本字符串)
-
如果是代码,允许复制(使用了vue-clipboard3插件)
-
代码高亮(使用了@highlightjs/vue-plugin插件)
// main.js中引入代码高亮

//引入代码高亮
import HljsVuePlugin from '@highlightjs/vue-plugin'
import "highlight.js/styles/atom-one-light.css";
import 'highlight.js/lib/common'
<template>

  <div class="code">

    <div class="top-op">

      <div class="encode-select">

        <el-select
          placeholder="选择编码"
          v-model="encode"
          @change="changeEncode">
          <el-option value="utf8" label="utf8编码"></el-option>
          <el-option value="gbk" label="gbk编码"></el-option>
        </el-select>

        <div class="tips">乱码了?切换编码试试</div>

      </div>

      <div class="copy-btn">
        <el-button type="primary" @click="copy">复制</el-button>
      </div>

    </div>

    <!-- main.js中安装的@highlightjs/vue-plugin插件,全局注册了highlightjs这个组件 -->
    <highlightjs autodetect :code="txtContent" />

  </div>
</template>

<script setup>

import useClipboard from "vue-clipboard3";

const { toClipboard } = useClipboard();

import { ref, reactive, getCurrentInstance, onMounted, nextTick } from "vue";

const { proxy } = getCurrentInstance();

const props = defineProps({
  url: {
    type: String,
  },
});

const txtContent = ref(""); // 读取文件流数据得到的文本字符串(使用FileReader读取文件流数据)

const blobResult = ref();   // 文件流数据

const encode = ref("utf8"); // 编码

const readTxt = async () => {

  let result = await proxy.Request({
    url: props.url,
    responseType: "blob", // 指定响应类型为blob
  });

  if (!result) {
    return;
  }

  // 存储文件流数据
  blobResult.value = result;

  showTxt();
};

// 更换编码
const changeEncode = (e) => {

  encode.value = e;

  showTxt();
};

// 使用FileReader读取文本二进制数据为字符串(可指定编码格式)
const showTxt = () => {

  const reader = new FileReader();

  reader.onload = () => {
    let txt = reader.result; // FileReader读取到的结果在result属性中
    txtContent.value = txt;  // 获取的数据data
  };

  // 使用FileReader对象,将blob数据,读取为文本字符串(可以指定编码)
  reader.readAsText(blobResult.value, encode.value);
};

// 组件挂载后,获取文本流数据, 并读取为文本字符串
onMounted(() => {
  readTxt();
});

// 实现复制
const copy = async () => {
  // 姜内容拷贝到剪贴板上, 并提示成功
  await toClipboard(txtContent.value);
  proxy.Message.success("复制成功");
};
</script>

<style lang="scss" scoped>
.code {
  width: 100%;
  .top-op {
    display: flex;
    align-items: center;
    justify-content: space-around;
  }
  .encode-select {
    flex: 1;
    display: flex;
    align-items: center;
    margin: 5px 10px;
    .tips {
      margin-left: 10px;
      color: #828282;
    }
  }
  .copy-btn {
    margin-right: 10px;
  }
  pre {
    margin: 0px;
  }
}
</style>
文本预览效果

@highlightjs/vue-plugin使用示例
<template>

    <div class="txt-box">

        <div class="header">

            <div class="header-left">
                <el-select v-model="encode" @change="changeEncode" placeholder="请选择编码">
                    <el-option label="UTF-8" value="UTF-8"/>
                    <el-option label="GBK" value="GBK"/>
                </el-select>
                <el-popover placement="right" trigger="hover" :width="180" style="">
                    <template #reference>
                        <i class="iconfont icon-tishi" style="color: #1a73e8;margin-left: 8px;vertical-align: middle;"></i>
                    </template>
                    <template #default>
                        乱码了? 切换编码试试~
                    </template>
                </el-popover>
            </div>

            <div class="header-right">
                <el-button @click="copyToClipBoard">复制</el-button>
            </div>

        </div>

        <div class="txt-content">
            <highlightjs  :code="txtContent" />
        </div>

    </div>
</template>

<script setup>
import { ref, reactive, computed,getCurrentInstance } from 'vue'
import axios from 'axios'

import useClipboard from "vue-clipboard3";
const { toClipboard } = useClipboard();

const {proxy} = getCurrentInstance();


const props = defineProps({
    url:{
        type: String
    },
    fileInfo: {
        type: Object
    }
})

// 编码
const encode = ref('UTF-8')

// 文本blob二进制数据
const blobResult = ref(null)

// 文本字符串
const txtContent = ref('')

// 显示文本
function showTxt() {
    let fileReader = new FileReader()
    fileReader.onload = () => {
        txtContent.value = fileReader.result
    }
    // fileReader读取文本
    fileReader.readAsText(blobResult.value, encode.value)
}


const init = ()=>{
    axios({
        url:`${props.url}${props.fileInfo.fileId}`,
        method: 'POST',
        responseType: 'blob', // 响应类型指定为blob
    }).then(res=>{
        console.log(res.data,'res.data');
        blobResult.value = res.data
        showTxt()
    })
}

init()

function changeEncode() {
    showTxt()
}

// 拷贝文本到剪贴板
function copyToClipBoard() {
    toClipboard(`${txtContent.value}`).then(res=>{
        proxy.Messager.ok('复制成功')
    })
}

</script>

<style lang="scss" scoped>
    .txt-box {
        padding: 10px;
        height: 100%;
        width: 100%;

        display: flex;
        flex-direction: column;

        .header {
            display: flex;
            align-items: center;
            justify-content: space-between;
        }
        .txt-content {
            margin-top: 10px;
            overflow: auto;
        }
    }
</style>
音频预览
PreviewMusic.vue组件
- 使用APlayer,官方使用文档:APlayer
- 使用new URL(`@/assets/music_icon.png`, import.meta.url).href,引入本地图片做封面,这个是写在script标签里用的(而在模板中仍然用的是使用@/assets/music_cover.png去引用)
<template>

  <div class="music">

    <div class="body-content">

      <div class="cover">
        <img src="@/assets/music_cover.png" />
      </div>

      <div ref="playerRef" class="music-player"></div>

    </div>

  </div>

</template>

<script setup>

import APlayer from "APlayer";

import "APlayer/dist/APlayer.min.css";

import { ref, reactive, getCurrentInstance, computed, onMounted, onUnmounted } from "vue";
import { useRouter, useRoute } from "vue-router";
const { proxy } = getCurrentInstance();
const router = useRouter();
const route = useRoute();

const props = defineProps({
  url: {
    type: String,
  },
  fileName: {
    type: String,
  },
});

const playerRef = ref();

const player = ref();

onMounted(() => {

  player.value = new APlayer({

    container: playerRef.value,

    audio: {
      url: `/api${props.url}`,
      name: `${props.fileName}`,
      cover: new URL(`@/assets/music_icon.png`, import.meta.url).href,
      artist: "",
    },
  });

});

onUnmounted(() => {
  player.value.destroy();
});

</script>

<style lang="scss" scoped>
.music {
  display: flex;
  align-items: center;
  justify-content: center;
  width: 100%;
  .body-content {
    text-align: center;
    width: 80%;
    .cover {
      margin: 0px auto;
      width: 200px;
      text-align: center;
      img {
        width: 100%;
      }
    }
    .music-player {
      margin-top: 20px;
    }
  }
}
</style>
音频预览效果
Aplayer使用示例
官方文档:Aplayer
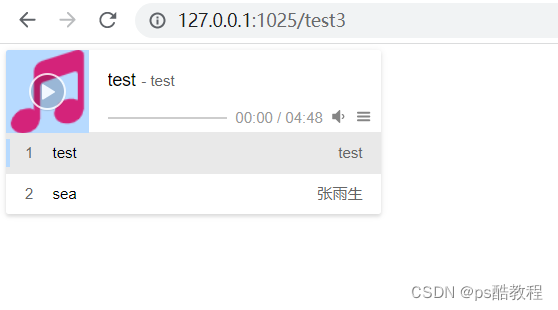
<template>
    <div class="aplayer-box">
        <div class="aplayer" ref="aplayerRef" id="aplayer"></div>
    </div>
</template>

<script setup>
import { ref,reactive, onMounted } from 'vue'
import 'APlayer/dist/APlayer.min.css';
import APlayer from 'APlayer';

const aplayerRef = ref()


const init = () =>{
    const player = new APlayer({
        container: aplayerRef.value,
        audio: [ // 歌单列表
            {
                name: 'test',
                artist: 'test',
                url: '/api/file/getFile/JJ0cYTXu3x',
                /* 引用本项目中的图片 */
                cover: new URL(`@/assets/imgs/music_icon.png`,import.meta.url).href
            },
            {
                name: 'sea',
                artist: '张雨生',
                url: '/api/file/getFile/lHJ8fXoISN',
                cover: new URL(`@/assets/imgs/music_icon.png`,import.meta.url).href
            }
        ]
    })

}
onMounted(()=>{
    init()
})
</script>

<style lang="scss">
#aplayer {
    width: 300px;
}
</style>
问题1:关闭了弹窗,音频仍然在播放
这个需要在关闭弹窗时(即PreviewMusic.vue组件销毁时,需要调用播放器实例的销毁方法)
<template>
    <div class="music-box">
        <div ref="musicRef" id="misic-player"></div>
   </div>
</template>

<script setup>
import { ref,reactive, onMounted,onUnmounted } from 'vue'
import 'APlayer/dist/APlayer.min.css';
import APlayer from 'APlayer';
import axios from 'axios'

const props = defineProps({
    url:{
        type: String
    },
    fileInfo: {
        type: Object
    }
})

const musicRef = ref()

let blobUrl = null

// 播放器实例
let aPlayer = ref()

const init = () => {

    aPlayer.value = new APlayer({
        container: musicRef.value,
        audio: [
            {
                name: 'test',
                artist: 'test',
                url: `${props.url}${props.fileInfo.fileId}`,
                /* 引用本项目中的图片 */
                cover: new URL(`@/assets/imgs/music_icon.png`,import.meta.url).href,
                /* 引用服务器的图片 */
                // cover: '/api/file/getImage/202307/31780333584zSahYM3fG.png',
            },
        ]
    })
}


onMounted(()=>{
    init()
})

// 在组件销毁时,销毁播放器实例
onUnmounted(()=>{
    aPlayer.value.destroy()
})

</script>

<style lang="scss">
    .music-box {
        height: 100%;
        display: flex;
        align-items: center;
        justify-content: center;
        margin: auto;
        width: 80%;
        .aplayer {
            width: 100%;
        }
    }
</style>
问题2:播放音频时,不能拖动进度条
这个出现与之前播放视频同样的问题:video标签学习 & xgplayer视频播放器分段播放mp4,拖动进度条无效。
这也反映出了一个问题:对于视频、音频这种文件类型,如果后端的接口只是把文件读取后,将整个流写到response里,那前端播放时,会把它当作一个实时的流(自己瞎猜的)
ResourceHttpRequestHandler解决问题
解决方法:前端代码不用动,后台借助spring提供的ResourceHttpRequestHandler解决。
修改CommonFileController#getFile代码中的逻辑,遇到mp3时,就修改为使用ResourceHttpRequestHandler解决
播放效果

protected void getFile(HttpServletResponse response, String fileId, String userId) {


        String filePath = null;

        // 获取 分片的ts视频文件
        if (fileId.endsWith(".ts")) {

            // 访问请求如:http://127.0.0.1:1024/api/file/ts/getVideoInfo/YsIlFSjnlh_0000.ts

            // 此处传入的fileId 为 {真实的fileId}_序号.ts

            // ts分片文件的名的前面部分是fileId,即:{fileId}_0001.ts
            String[] tsAarray = fileId.split("_");

            String realFileId = tsAarray[0];

            // 获取到视频文件信息
            FileInfo fileInfo = fileInfoService.getFileInfoByFileIdAndUserId(realFileId, userId);

            if (fileInfo == null) {
                return;
            }

            // 这里的fileName其实是:202305/3178033358YsIlFSjnlh.mp4
            String fileName = fileInfo.getFilePath();

            // ts文件的地址在 以最终合并的视频文件的名称作为文件夹 下
            // 因此fileName为:202305/3178033358YsIlFSjnlh/YsIlFSjnlh_0000.ts
            fileName = StringTools.getFileNameNoSuffix(fileName) + "/" + fileId;

            // D:/document/easypan/easypan-java/file/202305/3178033358YsIlFSjnlh/YsIlFSjnlh_0000.ts
            filePath = appConfig.getProjectFolder() + Constants.FILE_FOLDER_FILE + fileName;

        } else {

            // 此时传入的fileId 就是真实的fileId

            // 获取文件记录
            FileInfo fileInfo = fileInfoService.getFileInfoByFileIdAndUserId(fileId, userId);

            if (fileInfo == null) {
                return;
            }

            //视频文件读取.m3u8文件
            if (FileCategoryEnums.VIDEO.getCategory().equals(fileInfo.getFileCategory())) {

                // 访问请求如:http://127.0.0.1:1024/api/file/ts/getVideoInfo/YsIlFSjnlh
                // 返回的index.m3u8文件信息是:
                /*
                    #EXTM3U
                    #EXT-X-VERSION:3
                    #EXT-X-MEDIA-SEQUENCE:0
                    #EXT-X-ALLOW-CACHE:YES
                    #EXT-X-TARGETDURATION:30
                    #EXTINF:30.000000,
                    YsIlFSjnlh_0000.ts
                    #EXTINF:30.000000,
                    YsIlFSjnlh_0001.ts
                    #EXTINF:30.000000,
                    YsIlFSjnlh_0002.ts
                    #EXTINF:30.000000,
                    YsIlFSjnlh_0003.ts
                    #EXTINF:30.000000,
                    ...
                    YsIlFSjnlh_0017.ts
                    #EXTINF:5.400000,
                    YsIlFSjnlh_0018.ts
                    #EXT-X-ENDLIST
                */

                // 202305/3178033358YsIlFSjnlh.mp4 去掉后缀 为 202305/3178033358YsIlFSjnlh
                String fileNameNoSuffix = StringTools.getFileNameNoSuffix(fileInfo.getFilePath());

                // D:/document/easypan/easypan-java/file/202305/3178033358YsIlFSjnlh/index.m3u8
                filePath = appConfig.getProjectFolder() + Constants.FILE_FOLDER_FILE + fileNameNoSuffix + "/" + Constants.M3U8_NAME;

            } else {

                // 其它文件 直接读取:D:/document/easypan/easypan-java/file/{filePath}

                filePath = appConfig.getProjectFolder() + Constants.FILE_FOLDER_FILE + fileInfo.getFilePath();
            }
        }


        File file = new File(filePath);
        if (!file.exists()) {
            return;
        }

        if (!filePath.endsWith(".mp3")) {
            // 以流的方式写给浏览器
            readFile(response, filePath);
        }else{
            request.setAttribute(nonStaticResourceHttpRequestHandler.filepath, filePath);
            // 利用 ResourceHttpRequestHandler.handlerRequest() 实现返回音频流
            try {
                nonStaticResourceHttpRequestHandler.handleRequest(request, response);
            } catch (Exception e) {
                logger.error("发生错误啦!!!");
                e.printStackTrace();
            }
        }
    }
@Component
public class NonStaticResourceHttpRequestHandler extends ResourceHttpRequestHandler implements SmartInitializingSingleton {
    // 定义视频路径
    public String filepath = "filepath";

    @Override
    protected Resource getResource(HttpServletRequest request) {
        // 获取视频路径对象
        final String filePath = (String) request.getAttribute(filepath);
        // 用 FileSystemResource 加载资源
        return new FileSystemResource(filePath);
    }

    @Override
    public void afterSingletonsInstantiated() {
        this.setSupportedMethods(HttpMethod.GET.name(),HttpMethod.POST.name(), HttpMethod.HEAD.name());

    }

}
原生audio解决问题
后端代码还是用原来的不用动,只修改前端代码逻辑:先把整个音频文件请求下来,得到blob,然后通过URL.createObjectUrl根据这个blob得到一个url,把这个url给到原生的audio标签,就可以拖动进度条了。注意:这个url给到aplayer没有作用。
<template>

    <!-- 使用原生的audio标签播放 -->
    <audio :src="blobUrl" controls></audio>

</template>

<script setup>
import { ref,reactive, onMounted,onUnmounted } from 'vue'
import axios from 'axios'

const props = defineProps({
    url:{
        type: String
    },
    fileInfo: {
        type: Object
    }
})

const musicRef = ref()

let blobUrl = ref('')

let aPlayer = ref()

const init = () => {
    console.log('init url', `${props.url}${props.fileInfo.fileId}`);
    axios({
        url:`${props.url}${props.fileInfo.fileId}`,
        method: 'POST',
        responseType: 'blob',
    }).then(res=>{
        // debugger
        let blob = res.data
        let ablob = new Blob([blob])
        blobUrl.value = window.URL.createObjectURL(ablob)
    })

}


onMounted(()=>{
    init()
})

onUnmounted(()=>{
    window.URL.revokeObjectURL(blobUrl)
})


</script>

<style lang="scss">
    .music-box {
        height: 100%;
        display: flex;
        align-items: center;
        justify-content: center;
        margin: auto;
        width: 80%;
        .aplayer {
            width: 100%;
        }
    }
</style>
文件下载
PreviewDownload.vue
- 先获取一个临时的code,再以此code请求另外一个下载链接(直接使用location.href指向下载链接去做下载,如果当前地址栏有地址,则不会地址栏;如果当前地址栏是空的-比如浏览器直接打开一个空白网页,然后在控制台输入location.href=‘下载地址’,此时地址栏就会变成下载地址)
- 文件列表中的下载也是同样的做法
<template>

  <div class="others">

    <div class="body-content">

      <div>
	        <icon
	          :iconName="fileInfo.fileType == 9 ? 'zip' : 'others'"
	          :width="80">
	        </icon>
      </div>

      <div class="file-name">{{ fileInfo.fileName }}</div>

      <div class="tips">该类型的文件暂不支持预览,请下载后查看</div>

      <div class="download-btn">
	        <el-button type="primary" @click="download">
	        	点击下载 {{ proxy.Utils.sizeToStr(fileInfo.fileSize) }}
	        </el-button>
      </div>

    </div>

  </div>

</template>

<script setup>

import { ref, reactive, getCurrentInstance } from "vue";
import { useRouter, useRoute } from "vue-router";
const { proxy } = getCurrentInstance();
const router = useRouter();
const route = useRoute();

const props = defineProps({
  createDownloadUrl: {
    type: String,
  },
  downloadUrl: {
    type: String,
  },
  fileInfo: {
    type: Object,
  },
});

//下载文件
const download = async () => {

  let result = await proxy.Request({
    url: props.createDownloadUrl,
  });

  if (!result) {
    return;
  }

  // 下载(使用这种方式会弹出一个下载位置选择框, 地址栏不会变化; 指向的地址所属controller方法,以下载方式往response中写流)
  window.location.href = props.downloadUrl + "/" + result.data;
};

</script>

<style lang="scss" scoped>
.others {
  display: flex;
  align-items: center;
  justify-content: center;
  width: 100%;
  .body-content {
    text-align: center;
    .file-name {
      font-weight: bold;
    }
    .tips {
      color: #999898;
      margin-top: 5px;
      font-size: 13px;
    }
    .download-btn {
      margin-top: 20px;
    }
  }
}
</style>
axios下载示例

<template>
    <div class="download-box">
        <div class="download-div">
            <div class="ico-div">
                <Icon :fileType="fileInfo.fileType" :size="60"></Icon>
            </div>

            <div class="file-name">
                {{ fileInfo.fileName }}
            </div>

            <div class="tips">该类型的文件暂不支持预览, 请下载后查看</div>

            <el-button type="primary" @click="downloadFile">点击下载({{ proxy.Utils.formatSize(fileInfo.fileSize) }})</el-button>
        </div>
    </div>
</template>

<script setup>
import { ref, reactive, onMounted, onUnmounted, getCurrentInstance } from 'vue'
import axios from 'axios'
const { proxy } = getCurrentInstance()
const props = defineProps({
    url: {
        type: String
    },
    fileInfo: {
        type: Object
    }
})

async function downloadFile() {
    let res = await axios({
        url: `/api/file/createDownloadUrl/${props.fileInfo.fileId}`,
        method: 'POST',
    })
    let downloadCode = res.data.data
    if(!downloadCode) {
        proxy.Messager.error('下载出错')
        return
    }
    axios({
        url: `/api/file/download/${downloadCode}`,
        method: 'POST',
        responseType:'blob'
    }).then(res=>{
        return res.data
    }).then(data=>{
        let blob = data
        let ablob = new Blob([blob])
        let blobUrl = window.URL.createObjectURL(ablob)
        let tmpLink = document.createElement('a')
        tmpLink.style.display = 'none'
        tmpLink.href = blobUrl
        tmpLink.setAttribute('download', props.fileInfo.fileName)
        document.body.appendChild(tmpLink)
        tmpLink.click()
        document.body.removeChild(tmpLink)
        window.URL.revokeObjectURL(blobUrl)
    })
}


</script>

<style lang="scss">
.download-box {
    display: flex;
    align-items: center;
    justify-content: center;
    width: 100%;
    .download-div {
        display: flex;
        flex-direction: column;
        align-items: center;
        margin-top: 49px;
        .ico-div {
            width: 80px;
            height: 80px;
            display: flex;
            align-items: center;
            justify-content: center;
        }
        .file-name {
            color: #494b4d;
            font-weight: bold;
            margin-bottom: 10px;
        }
        .tips {
            color: #999;
            font-size: 12px;
        }
        .el-button {
            margin-top: 15px;
        }
    }
}

</style>


 2109
2109

 被折叠的 条评论
为什么被折叠?
被折叠的 条评论
为什么被折叠?
 到【灌水乐园】发言


