


Vue.js启航——英雄编辑器(四)
前言
这系列的博客已经超过一个月没有更新了,其中也有原因吧,首先是学业上各种大作业的中期审查,实验等压得几乎没有时间;然后是在学习Vue路由的时候遇到了一些问题一直都没有解决。最近实验做完了,大作业近期该交的也交完了,再静下心来解决一下,没想到茅塞顿开,问题都迎刃而解了,所以就开始写这篇博客了。
简介
上一篇文章写到了多组件应用的构建,使用的都是全局组件而且没有发生组件间视图的跳转。在这篇文章中我们将会接触局部组件和组件视图间的路由。
带路由功能的英雄编辑器
使用路由功能可以将组件映射到路由,然后再根据路由规则在规定的地方进行渲染。通过路由技术能够创建丰富的单页应用。使用路由功能重构我们前面所做的英雄编辑器的结果已经很接近最终的效果了,具体效果如下

全局组件和局部组件
全局组件使用Vue.component定义,然后在html文件中使用定义的名称使用,例如定义的全局组件是Vue.component("app",....),那么在html文件中使用这个全局组件就是<app></app>,全局组件在小型应用里可以当自定义标签来用,但当项目复杂的时候就会出现,定义的全局组件越来越多,命名越来越复杂。
局部组件就是定义一个有template,data,methods等选项的js对象,然后根据情况再实例化。局部组件几乎是路由视图的唯一选择,能够根据不同路由地址实例化不同的组件并进行渲染。而且局部组件能够向单文件组件平滑过渡,单文件组件基本上是构建Vue.js应用的通用手段。单文件组件将会在以后的博客中描述。下面就会介绍几个局部组件的定义。
主页面全局组件
主页面全局组件主要包含的是突出英雄仪表盘和英雄列表的路由链接和路由视图的容器,具体的模版代码如下
template:'\
	<div>\
	  <h1>{{title}}</h1>\
	  <nav>\
	      <router-link to="/dashboard">Dashboard</router-link>\
	      <router-link to="/heroes">Heroes</router-link>\
	  </nav>\
	  <router-view></router-view>\
	</div>\
'
这里使用的路由链接是最简单的,因为是确定的。router-link和router-view的对应关系主要通过路由规则来控制,先来看一下/dashboard和/heroes路由链接对应的路由规则
{path:'/dashboard',component:dash},
{path:'/heroes',component:heroes},
这个路由规则的意思是当浏览器url后缀为/dashboard时就将dash组件实例化到router-view容器中,当浏览器url后缀为/heroes时就将heroes组件实例化到router-view容器中。
各种局部组件
先来大概看一下路由的导航结构,

通过上图可以看出,整个应用的局部组件分为
- 突出英雄仪表盘
- 英雄详情
- 英雄列表+英雄概览
突出英雄仪表盘局部组件
这个局部组件是最简单的局部组件,用到的新知识有命名路由和动态路由匹配,先看一下核心的路由代码
<router-link  v-for="hero in heroes" :to="{name:'detail',params:{heroid:hero.id}}"class="col-1-4">
    <div class="module hero">
        <h4>{{hero.name}}</h4>
    </div>
</router-link>普通路由使用的是to指令,而命名路由使用的是:to指令加以区分。接着分析一下:to指令中表达的内容,其中name选项确定的是命名路由的规则,而params确定的是动态路由的参数。这个指令中具体匹配的是如下的路由规则
{path:'/detail/:heroid',name:'detail',component:herodetail}
结合路由规则就可以确定路由地址所对应的视图。当点击某个路由链接的时候我们跳转到的是/detail/:heroid的页面,heroid是由每个hero的id提供。渲染的组件是herodetail。herodetail组件将会在下面介绍。
英雄列表局部组件
英雄列表局部组件主要包括的是一组英雄列表和当选择了相应英雄之后会有相应的提示和进入查看详情的按钮。这里主要实现路由的功能是在查看详情的按钮,使用v-if进行条件渲染实现选择了相应英雄之后查看详情在 本系列(二) 中已经有详细介绍。这里就着重介绍查看详情的路由跳转
gotoDetail:function(){
    this.$router.push({name:'detail',params:{heroid:this.selectedHero.id}})
}
查看详情的路由跳转主要使用了编程式导航的技术,Vue-Router的编程式导航主要分为三种
router.push()添加新的历史并跳转router.replace()替换历史并跳转router.go()进行历史操作,类似于window.history.go()
这里主要使用了router.push()进行路由来进入选择的英雄的详情页面,其中name是命名路由的名称,params是需要传递的路由参数。
英雄详情局部组件
英雄详情的局部组件主要包括英雄的名称和id,以及改名字的功能,还有一个返回按钮。在多组件构建的英雄编辑器中我们使用的是消息总线的方式实现消息的传递。在这里我们使用的是通过url将选择的英雄信息传递到英雄详情组件。使用的是data选项通过组件的路由对象来获取路由的参数,进而得到英雄的信息,具体代码如下
data:function(){
    heroid=this.$route.params.heroid;
    return {hero:HEROES.find(function(hero){
        return hero.id===heroid
    })};
},
路由的参数就是在英雄仪表盘或英雄列表中传递过来的heroid的参数,然后使用JS集合的find()方法从HEROES集合中找到相应的英雄然后将其和模版结合起来渲染得出结果。
在英雄详情组件中还有一个Back按钮用于返回之前的页面。这里使用的是另外一种编程式路由的方法router.go(),主要的代码如下
methods:{
    goBack:function(){
        this.$router.go(-1);
    }
},
获取路由对象之后,然后调用路由对象的go(-1)就是返回之前的页面
构造路由对象
路由对象主要由路由规则来组成,主要的语法是
const router=new VueRouter({
    //路由规则列表
})
路由规则对象主要由path,name,component,redirect组成,path就是路由匹配的路径,name就是指定路由的别名,component指定路由对应需要渲染的组件,redirect就是路由重定向。
当路由对象构造完成之后就把他添加到Vue实例中
var hero=new Vue({
   ...
   router,
   ...
})
这样就把router对象绑定到Vue实例中了。
总结
这篇博客不仅介绍了Vue-Router的简单使用,也介绍了局部组件和全局组件的使用以及他们之间的区别。在这里也记录一下我在实现路由功能时后遇到的一些坑。在Vue-Router的官方指南中关于路由的介绍仅仅是对于API的简单介绍,并没有关于对于在组件中如何获取路由对象的介绍,都是一步步自己慢慢摸索的。在其中也有自己对于对象作用域的不了解。主要是体现在英雄详情组件中获取路由对象的参数那里,一开始获取heroid是这样写的
data:function(){
    return {hero:HEROES.find(function(hero){
        console.log(this) // 用于调试
        return hero.id===this.$route.params.heroid;
    })}
}
得到的报错和调试信息如下
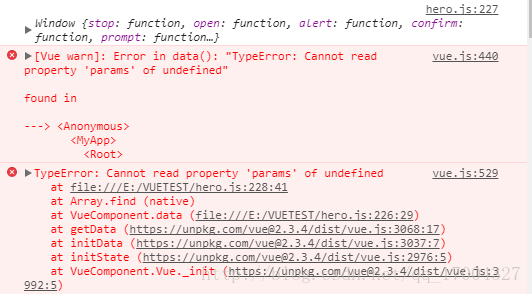
可以看到this的指向的对象是window,window对象并没有$route对象所以报错,其实只要看到这条调试信息加以分析就能很快解决问题。但由于基础知识没有能灵活运用。应为find()方法是HEROES集合对象的,而HEROES对象是全局变量,所以this就是指向window全局对象。对于这个问题的解决方法就是在Vue组件的作用域内获取路由对象然后就能通过这个路由对象获取到参数信息。
所以最后的写法是
data:function(){
    var heroid=this.$route.params.heroid;
    return {hero:HEROES.find(function(hero){
        return hero.id===heroid
    })};
},
通过一个局部变量获取路由对象的参数,然后再将局部变量传递进find()方法,完美解决。
这篇博客涉及的知识点:
- 局部组件和全局组件的区别和使用
- 路由对象的构建
- 动态路由匹配
- 编程式路由导航
- 命名路由的使用
可运行代码
<!--hero.html-->

<!DOCTYPE html>
<html lang="en">
<head>
    <meta charset="UTF-8">
    <meta name="viewport" content="width=device-width, initial-scale=1.0">
    <meta http-equiv="X-UA-Compatible" content="ie=edge">
    <meta name="viewport" content="width=device-width, initial-scale=1">
    <title>Document</title>
    <link rel="stylesheet" href="hero.css">
</head>
<body>
    <div id="hero">
        <my-app v-bind:title="title" v-bind:heroes="heroes"></my-app>
    </div>
</body>
<script src="https://unpkg.com/vue/dist/vue.js"></script>
<script src="https://unpkg.com/vue-router/dist/vue-router.js"></script>
<script src="hero.js"></script>
</html>
//hero.js
//全局组件
Vue.component("my-app",{
props:["title"],
template:'\
<div>\
<h1>{{title}}</h1>\
<nav>\
<router-link to="/dashboard">Dashboard</router-link>\
<router-link to="/heroes">Heroes</router-link>\
</nav>\
<router-view></router-view>\
</div>\
'
})
//局部heroes-list组件
var heroes={
template:'\
<div>\
<h2>My Heroes</h2>\
<ul class="heroes">\
<li v-for="hero in heroes"\
v-on:click="onSelect(hero)"\
v-bind:class="{selected:hero===selectedHero}">\
<span class="badge">{{hero.id}}</span>{{hero.name}}\
</li>\
</ul>\
<div v-if="selectedHero">\
<h2>\
{{selectedHero.name|uppercase}} is my hero\
</h2>\
<button v-on:click="gotoDetail()">View Detail</button>\
</div>\
</div> \
',
methods:{
onSelect:function(hero){
this.selectedHero=hero
bus.$emit("selectHero",this.selectedHero);
},
gotoDetail:function(){
this.$router.push({name:'detail',params:{heroid:this.selectedHero.id}})
}
},
data:function(){
return {selectedHero:"",heroes:HEROES};
}
}
//局部hero-detail组件
var herodetail={
template:'\
<div>\
<h2>{{hero.name}}</h2>\
<div><label>id:</label>{{hero.id}}</div>\
<div>\
<label>name:</label>\
<input v-model="hero.name" placeholder="name"/>\
</div>\
<button v-on:click="goBack()">Back</button>\
</div>\
',
methods:{
goBack:function(){
this.$router.go(-1);
}
},
data:function(){
return {hero:"",heroid:""};
},
created:function(){
var heroid=this.$route.params.heroid;
this.hero=HEROES.find(function(hero){
return hero.id===heroid;
})
}
}
//局部dash组件
var dash={
template:`
<div>
<h3>Top Heroes</h3>
<div class="grid grid-pad">
<router-link v-for="hero in heroes" :to="{name:'detail',params:{heroid:hero.id}}" class="col-1-4">
<div class="module hero">
<h4>{{hero.name}}</h4>
</div>
</router-link>
</div>
</div>
`,
data:function(){
return {heroes:HEROES.slice(1,5)};
}
}
const routes=[
{path:'/', redirect:'/dashboard'},
{path:'/dashboard',component:dash},
{path:'/heroes',component:heroes},
{path:'/detail/:heroid',name:'detail',component:herodetail}
]
//构造路由对象
const router=new VueRouter({
routes
})
//创建Vue实例
var hero=new Vue({
el:"#hero",
data:{
heroes:HEROES,
title:"Tour of Heroes",
},
router,
computed:{
hero:function(){
return bus.hero
}
},
})
/*hero.css*/

h1 {
    color: #369;
    font-family: Arial, Helvetica, sans-serif;
    font-size: 250%;
}
h2, h3 {
    color: #444;
    font-family: Arial, Helvetica, sans-serif;
    font-weight: lighter;
}
.selected {
    background-color: #CFD8DC !important;
    color: white;
}
body {
    margin: 2em;
}
body, input[text] {
    color: #888;
    font-family: Cambria, Georgia;
}
.heroes {
    margin: 0 0 2em 0;
    list-style-type: none;
    padding: 0;
    width: 15em;
}
.heroes li {
    cursor: pointer;
    position: relative;
    left: 0;
    background-color: #EEE;
    margin: .5em;
    padding: .3em 0;
    height: 1.6em;
    border-radius: 4px;
}
.heroes li.selected:hover {
    background-color: #BBD8DC !important;
    color: white;
}
.heroes li:hover {
    color: #607D8B;
    background-color: #DDD;
    left: .1em;
}
.heroes .text {
    position: relative;
    top: -3px;
}
.heroes .badge {
    display: inline-block;
    font-size: small;
    color: white;
    padding: 0.8em 0.7em 0 0.7em;
    background-color: #607D8B;
    line-height: 1em;
    position: relative;
    left: -1px;
    top: -4px;
    height: 1.8em;
    margin-right: .8em;
    border-radius: 4px 0 0 4px;
}
[class*='col-'] {
    float: left;
    padding-right: 20px;
    padding-bottom: 20px;
}
[class*='col-']:last-of-type {
    padding-right: 0;
}
a {
    text-decoration: none;
}
h3 {
    text-align: center; margin-bottom: 0;
}
h4 {
    position: relative;
}
.grid {
    margin: 0;
}
.col-1-4 {
    width: 23%;
}
.module {
    padding: 20px;
    text-align: center;
    color: #eee;
    max-height: 120px;
    min-width: 120px;
    background-color: #607D8B;
    border-radius: 2px;
}
.module:hover {
    background-color: #EEE;
    cursor: pointer;
    color: #607d8b;
}
.grid-pad {
    padding: 10px 0;
}
.grid-pad > [class*='col-']:last-of-type {
    padding-right: 20px;
}
@media (max-width: 600px) {
.module {
    font-size: 10px;
    max-height: 75px; }
}
@media (max-width: 1024px) {
.grid {
    margin: 0;
}
.module {
    min-width: 60px;
}
}
nav a {
    padding: 5px 10px;
    text-decoration: none;
    margin-top: 10px;
    display: inline-block;
    background-color: #eee;
    border-radius: 4px;
}
nav a:visited, a:link {
    color: #607D8B;
}
nav a:hover {
    color: #039be5;
    background-color: #CFD8DC;
}
nav a.router-link-active {
    color: #039be5;
}
button {
    margin-top: 20px;
    font-family: Arial;
    background-color: #eee;
    color: #888888;
    border: none;
    padding: 5px 10px;
    border-radius: 4px;
    cursor: pointer; cursor: hand;
}
button:hover {
    background-color: #cfd8dc;
}
    button:disabled {
    background-color: #eee;
    color: #ccc;
    cursor: auto;
}


 1384
1384

 被折叠的 条评论
为什么被折叠?
被折叠的 条评论
为什么被折叠?
 到【灌水乐园】发言


