


- 想要实现多进程的功能也非常简单,只需要在AndroidManifest文件的应用程序组件中声明一个android:process属性就可以了,比如说我们希望播放音乐的Service可以运行在一个单独的进程当中,就可以这样写
       <service android:name=".PlaybackService"
                android:process=":background" />
这里指定的进程名是background,你也可以将它改成任意你喜欢的名字。需要注意的是,进程名的前面都应该加上一个冒号,表示该进程是一个当前应用程序的私有进程。
Android代码生成dump文件
HPROF文件从Dalvik格式转换成J2SE格式:
Usage:hprof-conv [-z] infile outfile
例如: hprof-conv com.example.administrator.getmemoryinfo.hprof leakmemory.hprof
 public static boolean createDumpFile(Contextcontext) {
        StringLOG_PATH = "/dump.gc/";
        boolean bool = false;
        SimpleDateFormatsdf = new SimpleDateFormat("yyyy-MM-dd_HH.mm.ssss");
        StringcreateTime = sdf.format(new Date(System.currentTimeMillis()));
        Stringstate = android.os.Environment.getExternalStorageState();
        // 判断SdCard是否存在并且是可用的
        if(android.os.Environment.MEDIA_MOUNTED.equals(state)){
            Filefile = new File(Environment.getExternalStorageDirectory().getPath() +LOG_PATH);
            if(!file.exists()) {
                file.mkdirs();
            }
            StringhprofPath = file.getAbsolutePath();
            if(!hprofPath.endsWith("/")) {
                hprofPath+= "/";
            }

            hprofPath+= createTime + ".hprof";
            try {
                android.os.Debug.dumpHprofData(hprofPath);
                bool= true;
                Log.d("ANDROID_LAB", "create dumpfile done!");
            }catch (IOException e) {
                e.printStackTrace();
            }
        } else {
            bool= false;
            Log.d("ANDROID_LAB", "nosdcard!");
        }

        return bool;
    }
不要忘记了在AndroidManifest.xml中声明SDCard写权限。
<uses-permission android:name="android.permission.WRITE_EXTERNAL_STORAGE" />- drawable
- dp、dip、dpi、sp、px
px:表示屏幕实际的像素。例如,1200×1920的屏幕在横向有1200个像素,在纵向有1920个像素。
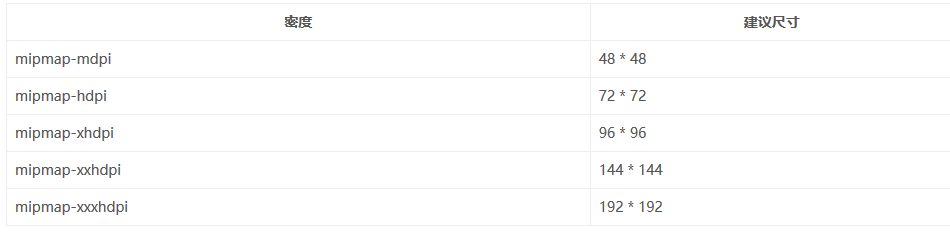
dpi(dot per inch):表示屏幕密度是指每英寸上的像素点数。Android将根据不同的dpi将Android设备分成多个显示级别。:
每种密度下的icon应该设计成什么尺寸其实Android也是给出了最佳建议,icon的尺寸最好不要随意设计,因为过低的分辨率会造成图标模糊,而过高的分辨率只会徒增APK大小。建议尺寸如下表所示:
Genymotion上的Nexus 4.1上是320,320的具体概念
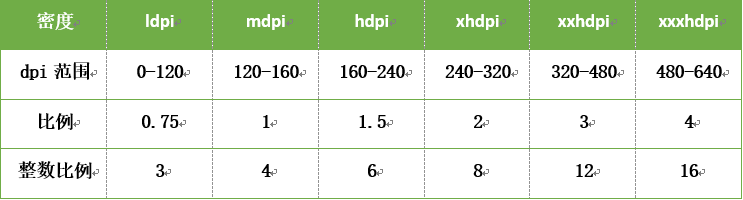
dp:也叫dip(density independent pixel)直译为密度无关的像素。我们猜测如果使用了这个单位,我们在不同屏幕密度的设备上显示的长度就会是相同的。问题来了,在屏幕上显示图像时都是在屏幕上填充像素点,而使用这种与密度无关的像素(我们在布局文件中使用的 dp/dip 就是与密度无关的像素)是如何转换成像素的呢?
其实在安卓中,将屏幕密度为160dpi的中密度设备屏幕作为基准屏幕,在这个屏幕中,1dp=1px。其他屏幕密度的设备按照比例换算,具体如下
sp:sp,即scale-independent pixels,与dp类似,但是可以在设置里面调节字号的时候,文字会随之改变。当安卓系统字号设为“普通”时,sp与px的尺寸换算和dp与px是一样的。

Android系统中有个DisplayMetrics的类,通过这个类就可以得到上述的所有属性。
        DisplayMetrics displayMetrics = getResources().getDisplayMetrics();
        float density = displayMetrics.density; //屏幕密度
        int densityDpi = displayMetrics.densityDpi;//屏幕密度dpi
        int heightPixels = displayMetrics.heightPixels;//屏幕高度的像素
        int widthPixels = displayMetrics.widthPixels;//屏幕宽度的像素
        float scaledDensity = displayMetrics.scaledDensity;//字体的放大系数
        float xdpi = displayMetrics.xdpi;//宽度方向上的dpi
        float ydpi = displayMetrics.ydpi;//高度方向上的dpi
        Log.i(TAG, "density = " + density);
        Log.i(TAG, "densityDpi = " + densityDpi);
        Log.i(TAG, "scaledDensity = " + scaledDensity);
        Log.i(TAG, "Screen resolution = " + widthPixels + "×" + heightPixels);
        Log.i(TAG, "xdpi = " + xdpi);
        Log.i(TAG, "ydpi = " + ydpi);


 704
704

 被折叠的 条评论
为什么被折叠?
被折叠的 条评论
为什么被折叠?
 到【灌水乐园】发言


