


相信初学者通常以为只能在主线程更新UI,那么能在其他线程更新UI?下面这篇文章将讨论下能否在子线程中更新UI
文章地址:http://blog.csdn.net/self_study
问题描述
做过Android开发基本都遇见过ViewRootImpl$CalledFromWrongThreadException,上网一查,得到结果基本都是只能在主线程中更改ui,子线程要修改ui只能post到主线程或者使用handler之类。但是仔细看看exception的描述并不是这样的,“Only the original thread that created a view hierarchy can touch its views”,只有创建该 view 布局层次的原始线程才能够修改其所属view的布局属性,所以“只能在主线程中更改ui”这句话本身是有点不严谨的,接下来分析一下。
android.view.ViewRootImpl$CalledFromWrongThreadException: Only the original thread that created a view hierarchy can touch its views.
at android.view.ViewRootImpl.checkThread(ViewRootImpl.java:6498)
at android.view.ViewRootImpl.invalidateChildInParent(ViewRootImpl.java:954)
at android.view.ViewGroup.invalidateChild(ViewGroup.java:4643)
at android.view.View.invalidateInternal(View.java:11775)
at android.view.View.invalidate(View.java:11739)
at android.view.View.invalidate(View.java:11723)
at android.widget.TextView.checkForRelayout(TextView.java:7002)
at android.widget.TextView.setText(TextView.java:4073)
at android.widget.TextView.setText(TextView.java:3931)
at android.widget.TextView.setText(TextView.java:3906)
at com.android.sample.HomeTestActivity$1.run(HomeTestActivity.java:114)
at java.lang.Thread.run(Thread.java:818)
问题分析
我们根据 exception 的StackTrace信息,了解一下源码,以setText为例,如果 textview 已经被绘制出来了,调用setText函数,会调用到View的invalidate函数,其中又会调用到invalidateInternal函数,接着调用到parent.invalidateChildInParent函数,其中parent对象就是父控件ViewGroup,最后会调用到ViewRootImpl的invalidateChildInParent函数,为什么最后会调用到ViewRootImpl类中呢,这里就需要说到布局的创建过程了:
Activity的启动和布局创建过程
先分析一下Activity启动过程,startActivity和startActivityForResult函数用来启动一个activity,最后他们最终都会调用到一个函数
public void startActivityForResult(Intent intent, int requestCode, @Nullable Bundle options)中,接着函数中会调用Instrumentation的execStartActivity方法,该函数中会调用ActivityManagerNative.getDefault().startActivity方法,ActivityManagerNative类的定义
public abstract class ActivityManagerNative extends Binder implements IActivityManager该类继承自Binder并实现了IActivityManager这个接口,IActivityManager继承自IInterface接口,用过AIDL的应该知道,基本和这个结构相似,所以肯定是用来跨进程通信的,ActivityManagerService 类也是继承自 ActivityManagerNative接口,因此ActivityManagerService也是一个Binder,他是IActivityManager接口的具体实现类,getDefault函数是通过一个Singleton对象对外提供,他最后返回的是ActivityManagerService的Binder对象,所以startActivity方法最终实现是在ActivityManagerService类中(这里讲的比较简单,如果大家对相关类层次结构和调用方式感兴趣的,可以看看我的博客: java/android 设计模式学习笔记(9)—代理模式,里面有详细介绍到),接着进行完一系列的操作之后会回调到IApplicationThread中,这个类也是一个继承自IInterface的Binder类型接口,ApplicationThreadNative虚类继承自该接口,在该类中的onTransact函数中,根据code不同会进行不同的操作,最后ActivityThread类的内部类ApplicationThread继承自ApplicationThreadNative类,最终的实现者就是ApplicationThread类,在ApplicationThreadNative中根据code进行不同操作的实现代码都在ApplicationThread类中,最后会回调到ApplicationThread类中的scheduleLaunchActivity方法:
@Override
public final void scheduleLaunchActivity(Intent intent, IBinder token, int ident,
                                         ActivityInfo info, Configuration curConfig, Configuration overrideConfig,
                                         CompatibilityInfo compatInfo, String referrer, IVoiceInteractor voiceInteractor,
                                         int procState, Bundle state, PersistableBundle persistentState,
                                         List<ResultInfo> pendingResults, List<ReferrerIntent> pendingNewIntents,
                                         boolean notResumed, boolean isForward, ProfilerInfo profilerInfo) {

    updateProcessState(procState, false);
    ActivityClientRecord r = new ActivityClientRecord();
    ....
    sendMessage(H.LAUNCH_ACTIVITY, r);
}
最终给H这个Handler类发送了一个message,其中调用了的handleLaunchActivity方法,这个方法通过performLaunchActivity方法获取到一个Activity对象,在performLaunchActivity函数中会调用该activity的attach方法,这个方法把一个ContextImpl对象attach到了Activity中,非常典型的装饰者模式:
final void attach(Context context, ActivityThread aThread,
                  Instrumentation instr, IBinder token, int ident,
                  Application application, Intent intent, ActivityInfo info,
                  CharSequence title, Activity parent, String id,
                  NonConfigurationInstances lastNonConfigurationInstances,
                  Configuration config, String referrer, IVoiceInteractor voiceInteractor) {
    attachBaseContext(context);

    mFragments.attachHost(null /*parent*/);

    mWindow = new PhoneWindow(this);
    mWindow.setCallback(this);
    mWindow.setOnWindowDismissedCallback(this);
    mWindow.getLayoutInflater().setPrivateFactory(this);
    if (info.softInputMode != WindowManager.LayoutParams.SOFT_INPUT_STATE_UNSPECIFIED) {
        mWindow.setSoftInputMode(info.softInputMode);
    }
    if (info.uiOptions != 0) {
        mWindow.setUiOptions(info.uiOptions);
    }
    mUiThread = Thread.currentThread();

    ....

    mLastNonConfigurationInstances = lastNonConfigurationInstances;
    if (voiceInteractor != null) {
        if (lastNonConfigurationInstances != null) {
            mVoiceInteractor = lastNonConfigurationInstances.voiceInteractor;
        } else {
            mVoiceInteractor = new VoiceInteractor(voiceInteractor, this, this,
                    Looper.myLooper());
        }
    }

    mWindow.setWindowManager(
            (WindowManager)context.getSystemService(Context.WINDOW_SERVICE),
            mToken, mComponent.flattenToString(),
            (info.flags & ActivityInfo.FLAG_HARDWARE_ACCELERATED) != 0);
    if (mParent != null) {
        mWindow.setContainer(mParent.getWindow());
    }
    mWindowManager = mWindow.getWindowManager();
    mCurrentConfig = config;
}
window是通过下面方法获取的
mWindow = new PhoneWindow(this) 创建完Window之后,Activity会为该Window设置回调,Window接收到外界状态改变时就会回调到Activity中。在activity中会调用setContentView()函数,它是调用 window.setContentView()完成的,最终的具体操作是在PhoneWindow中,PhoneWindow的setContentView方法第一步会检测DecorView是否存在,如果不存在,就会调用generateDecor函数直接创建一个DecorView;第二步就是将Activity的视图添加到DecorView的mContentParent中;第三步是回调Activity中的onContentChanged方法通知Activity视图已经发生改变。
public void setContentView(View view, ViewGroup.LayoutParams params) {
    // Note: FEATURE_CONTENT_TRANSITIONS may be set in the process of installing the window
    // decor, when theme attributes and the like are crystalized. Do not check the feature
    // before this happens.
    if (mContentParent == null) {
        installDecor();
    } else if (!hasFeature(FEATURE_CONTENT_TRANSITIONS)) {
        mContentParent.removeAllViews();
    }

    if (hasFeature(FEATURE_CONTENT_TRANSITIONS)) {
        view.setLayoutParams(params);
        final Scene newScene = new Scene(mContentParent, view);
        transitionTo(newScene);
    } else {
        mContentParent.addView(view, params);
    }
    mContentParent.requestApplyInsets();
    final Window.Callback cb = getCallback();
    if (cb != null && !isDestroyed()) {
        cb.onContentChanged();
    }
}
这些步骤完成之后,DecorView还没有被WindowManager正式添加到Window中,接着会调用到ActivityThread类的handleResumeActivity方法将顶层视图DecorView添加到PhoneWindow窗口,Activity的视图才能被用户看到:
final void handleResumeActivity(IBinder token, boolean clearHide, boolean isForward, boolean reallyResume) {
    .....
    r.window = r.activity.getWindow();
    View decor = r.window.getDecorView();
    decor.setVisibility(View.INVISIBLE);
    ViewManager wm = a.getWindowManager();
    WindowManager.LayoutParams l = r.window.getAttributes();
    a.mDecor = decor;
    l.type = WindowManager.LayoutParams.TYPE_BASE_APPLICATION;
    l.softInputMode |= forwardBit;
    if (a.mVisibleFromClient) {
        a.mWindowAdded = true;
        wm.addView(decor, l);
    }
    .....
}
DecorView和Window的关系代码中已经很清楚了,接下来分析一下addView方法,WindowManager接口继承自ViewManager接口,最终实现类是WindowManagerImpl类(感兴趣的可以去看看我的博客: java/android 设计模式学习笔记(8)—桥接模式,其实这里是有用到桥接模式的),该类并没有直接实现Window的三大操作,而是全部交给了WindowManagerGlobal来处理,WindowManagerGlobal以单例模式的形式向外提供自己的实例,在WindowManagerImpl中有如下一段代码:
private final WindowManagerGlobal mGlobal = WindowManagerGlobal.getinstance();所以 WindowManagerImpl 将 addView操作交给WindowManagerGlobal来实现,WindowManagerGlobal的addView函数中创建了一个ViewRootImpl对象root,然后调用ViewRootImpl类中的setView成员方法:
ViewRootImpl root;
View panelParentView = null;

synchronized (mLock) {
    .....

    root = new ViewRootImpl(view.getContext(), display);

    view.setLayoutParams(wparams);

    mViews.add(view);
    mRoots.add(root);
    mParams.add(wparams);
}

// do this last because it fires off messages to start doing things
try {
    root.setView(view, wparams, panelParentView);
} catch (RuntimeException e) {
    ....
}
setView方法完成了三件事情,将外部参数DecorView赋值给mView成员变量、标记DecorView已添加到ViewRootImpl、调用requestLayout方法请求布局,那么继续跟踪代码到 requestLayout()方法:
public void requestLayout() {
if (!mHandlingLayoutInLayoutRequest) {
checkThread();
mLayoutRequested = true;
scheduleTraversals();
}
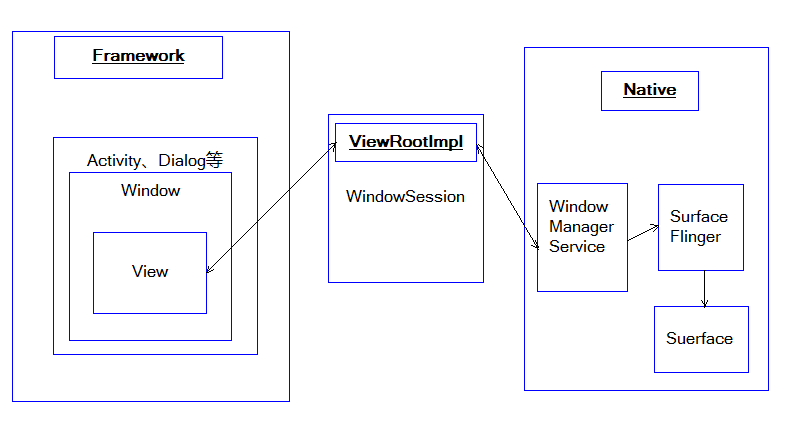
}scheduleTraversals 函数实际是View绘制的入口,该方法会通过 WindowSession 使用 IPC 方式调用 WindowManagerService 中的相关方法去添加窗口(这里我就不做详细介绍了,感兴趣的去看看我上面提到的博客: java/android 设计模式学习笔记(8)—桥接模式),scheduleTraversals函数最后会调用到doTraversal方法,doTraversal方法又调用performTraversals函数,performTraversals函数就非常熟悉了,他会去调用performMeasure,performLayout和performDraw函数去进行view的计算和绘制,我们只是在一个比较高的层次上概括性地梳理了它的整个脉络,它的简化结构:
接下来的绘制过程我在这就不说了,感兴趣的我这推荐一篇非常好的博客:http://blog.csdn.net/jacklam200/article/details/50039189,讲的真的很详细,或者可以看看这个英文资料Android Graphics Architecture。
回到“为什么最后会调用到ViewRootImpl类中”这个问题,从上面可以理解到,每个Window都对应着一个View和一个ViewRootImpl,Window和View是通过ViewRootImpl来建立关联的,所以invalidateChildInParent会一直while循环直到调用到ViewRootImpl的invalidateChildInParent函数中:
do {
    View view = null;
    if (parent instanceof View) {
        view = (View) parent;
    }

    if (drawAnimation) {
        if (view != null) {
            view.mPrivateFlags |= PFLAG_DRAW_ANIMATION;
        } else if (parent instanceof ViewRootImpl) {
            ((ViewRootImpl) parent).mIsAnimating = true;
        }
    }

    ....

    parent = parent.invalidateChildInParent(location, dirty);
    ....
} while (parent != null);这个问题就差不多清楚了,其他的可以再看看老罗的博客:http://blog.csdn.net/luoshengyang/article/details/8223770。
主线程与子线程ui讨论
public ViewRootImpl(Context context, Display display) {
    .....
    mThread = Thread.currentThread();
    .....
}
在初始化一个ViewRootImpl函数的时候,会调用native方法,获取到该线程对象mThread,接着setText函数会调用到requestLayout方法(TextView绘制出来之后,调用setText才会去调用requestLayout方法,没有绘制出来之前,在子线程中调用setText是不会抛出Exception):
public void requestLayout() {
    .....
    checkThread();
    .....
}
....
void checkThread() {
    if (mThread != Thread.currentThread()) {
        throw new CalledFromWrongThreadException(
                "Only the original thread that created a view hierarchy can touch its views.");
    }
}
所以现在“不能在子线程中更新ui”的问题已经很清楚了,不管startActivity函数调用在什么线程,ActivityThread是运行在主线程中的:
/**
 * This manages the execution of the main thread in an
 * application process, scheduling and executing activities,
 * broadcasts, and other operations on it as the activity
 * manager requests.
 */
public final class ActivityThread {
....
}
所以ViewRootImpl对象的创建也是在主线程中,所以一个Activity的对应ViewRootImpl对象中的mThread一定是代表主线程,这也就是“为什么不能在子线程中操作UI的”答案的解释,问题解决!!!
但是不是说这个答案不严谨么?是的,可不可以在子线程中添加Window,并且创建ViewRootImpl呢?当然可以,在子线程中创建一个Window就可以,思路是在子线程中调用WindowManager添加一个view,类似于
windowManager = (WindowManager) getSystemService(Context.WINDOW_SERVICE);
WindowManager.LayoutParams params = new WindowManager.LayoutParams();
params.width = WindowManager.LayoutParams.MATCH_PARENT;
params.height = WindowManager.LayoutParams.MATCH_PARENT;
params.flags = WindowManager.LayoutParams.FLAG_NOT_TOUCH_MODAL;
params.type = WindowManager.LayoutParams.TYPE_SYSTEM_ERROR;
params.format = PixelFormat.TRANSPARENT;
params.gravity = Gravity.CENTER;
params.softInputMode = WindowManager.LayoutParams.SOFT_INPUT_ADJUST_PAN;
....
windowManager.addView(v, params);
android WindowManager解析与骗取QQ密码案例分析博客中介绍到activity和dialog不是系统层级的window,可以使用WindowManager添加自定义的系统window,那么问题又来了,系统级别window是怎么添加的呢,老罗的另一篇博客http://blog.csdn.net/luoshengyang/article/details/8498908中介绍到: “对于非输入法窗口、非壁纸窗口以及非Activity窗口来说,它们所对应的WindowToken对象是在它们增加到WindowManagerService服务的时候创建的……如果参数attrs所描述的一个WindowManager.LayoutParams对象的成员变量token所指向的一个IBinder接口在WindowManagerService类的成员变量mTokenMap所描述的一个HashMap中没有一个对应的WindowToken对象,并且该WindowManager.LayoutParams对象的成员变量type的值不等于TYPE_INPUT_METHOD、TYPE_WALLPAPER,以及不在FIRST_APPLICATION_WINDOW和LAST_APPLICATION_WINDOW,那么就意味着这时候要增加的窗口就既不是输入法窗口,也不是壁纸窗口和Activity窗口,因此,就需要以参数attrs所描述的一个WindowManager.LayoutParams对象的成员变量token所指向的一个IBinder接口为参数来创建一个WindowToken对象,并且将该WindowToken对象保存在WindowManagerService类的成员变量mTokenMap和mTokenList中。”。
了解上面之后,换一种思路,就可以在子线程中创建view并且添加到windowManager中。
实现
有了思路之后,既可以来实现相关代码了:
new Thread(new Runnable() {
    @Override
    public void run() {
        showWindow();
    }
}).start();
......
private void showWindow(){
    windowManager = (WindowManager) getSystemService(Context.WINDOW_SERVICE);
    WindowManager.LayoutParams params = new WindowManager.LayoutParams();
    params.width = WindowManager.LayoutParams.MATCH_PARENT;
    params.height = WindowManager.LayoutParams.MATCH_PARENT;
    params.flags = WindowManager.LayoutParams.FLAG_NOT_TOUCH_MODAL;
    params.type = WindowManager.LayoutParams.TYPE_SYSTEM_ERROR;
    params.format = PixelFormat.TRANSPARENT;
    params.gravity = Gravity.CENTER;
    params.softInputMode = WindowManager.LayoutParams.SOFT_INPUT_ADJUST_PAN;

    LayoutInflater inflater = LayoutInflater.from(this);
    v = (RelativeLayoutWithKeyDetect) inflater.inflate(R.layout.window, null);
    .....
    windowManager.addView(v, params);
}
运行一下,报错:
java.lang.RuntimeException: Can't create handler inside thread that has not called Looper.prepare()
at android.os.Handler.<init>(Handler.java:200)
at android.os.Handler.<init>(Handler.java:114)
at android.view.ViewRootImpl$ViewRootHandler.<init>(ViewRootImpl.java:3185)
at android.view.ViewRootImpl.<init>(ViewRootImpl.java:3483)
at android.view.WindowManagerGlobal.addView(WindowManagerGlobal.java:261)
at android.view.WindowManagerImpl.addView(WindowManagerImpl.java:69)
at com.android.grabqqpwd.BackgroundDetectService.showWindow(BackgroundDetectService.java:208)
at com.android.grabqqpwd.BackgroundDetectService.access$100(BackgroundDetectService.java:39)
at com.android.grabqqpwd.BackgroundDetectService$1.run(BackgroundDetectService.java:67)
at java.lang.Thread.run(Thread.java:818)
这是因为ViewRootImpl类内部会新建一个ViewRootHandler类型的mHandler用来处理相关信息,所以如果线程没有Looper是会报错的,所以添加Looper,修改代码:
new Thread(new Runnable() {
    @Override
    public void run() {
        Looper.prepare();
        showWindow();
        handler = new Handler(){
            @Override
            public void dispatchMessage(Message msg) {
                Looper.myLooper().quit();
                L.e("quit");
            }
        };
        Looper.loop();
    }
}).start();
创建Looper之后,需要在必要时候调用quit函数将其退出。这样就成功显示了
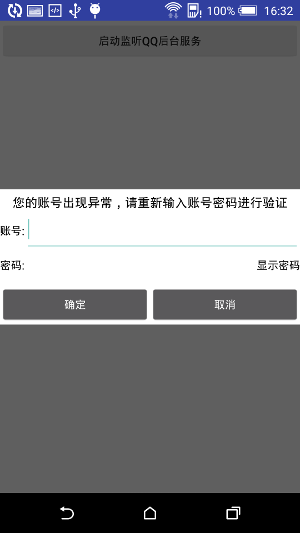
而且创建之后的view只能在子线程中修改,不能在主线程中修改,要不然会抛出最开始的ViewRootImpl$CalledFromWrongThreadException。
扩展
为什么android会设计成只有创建viewRootImpl的原始线程才能更改ui呢?这就要说到Android的单线程模型了,因为如果支持多线程修改View的话,由此产生的线程同步和线程安全问题将是非常繁琐的,所以Android直接就定死了,View的操作必须在UI线程,从而简化了系统设计。
有没有可以在其他非原始线程更新ui的情况呢?有,SurfaceView就可以在其他线程更新,具体的大家可以去网上了解一下相关资料


 1921
1921


 被折叠的 条评论
为什么被折叠?
被折叠的 条评论
为什么被折叠?
 到【灌水乐园】发言


