


1.spring架构
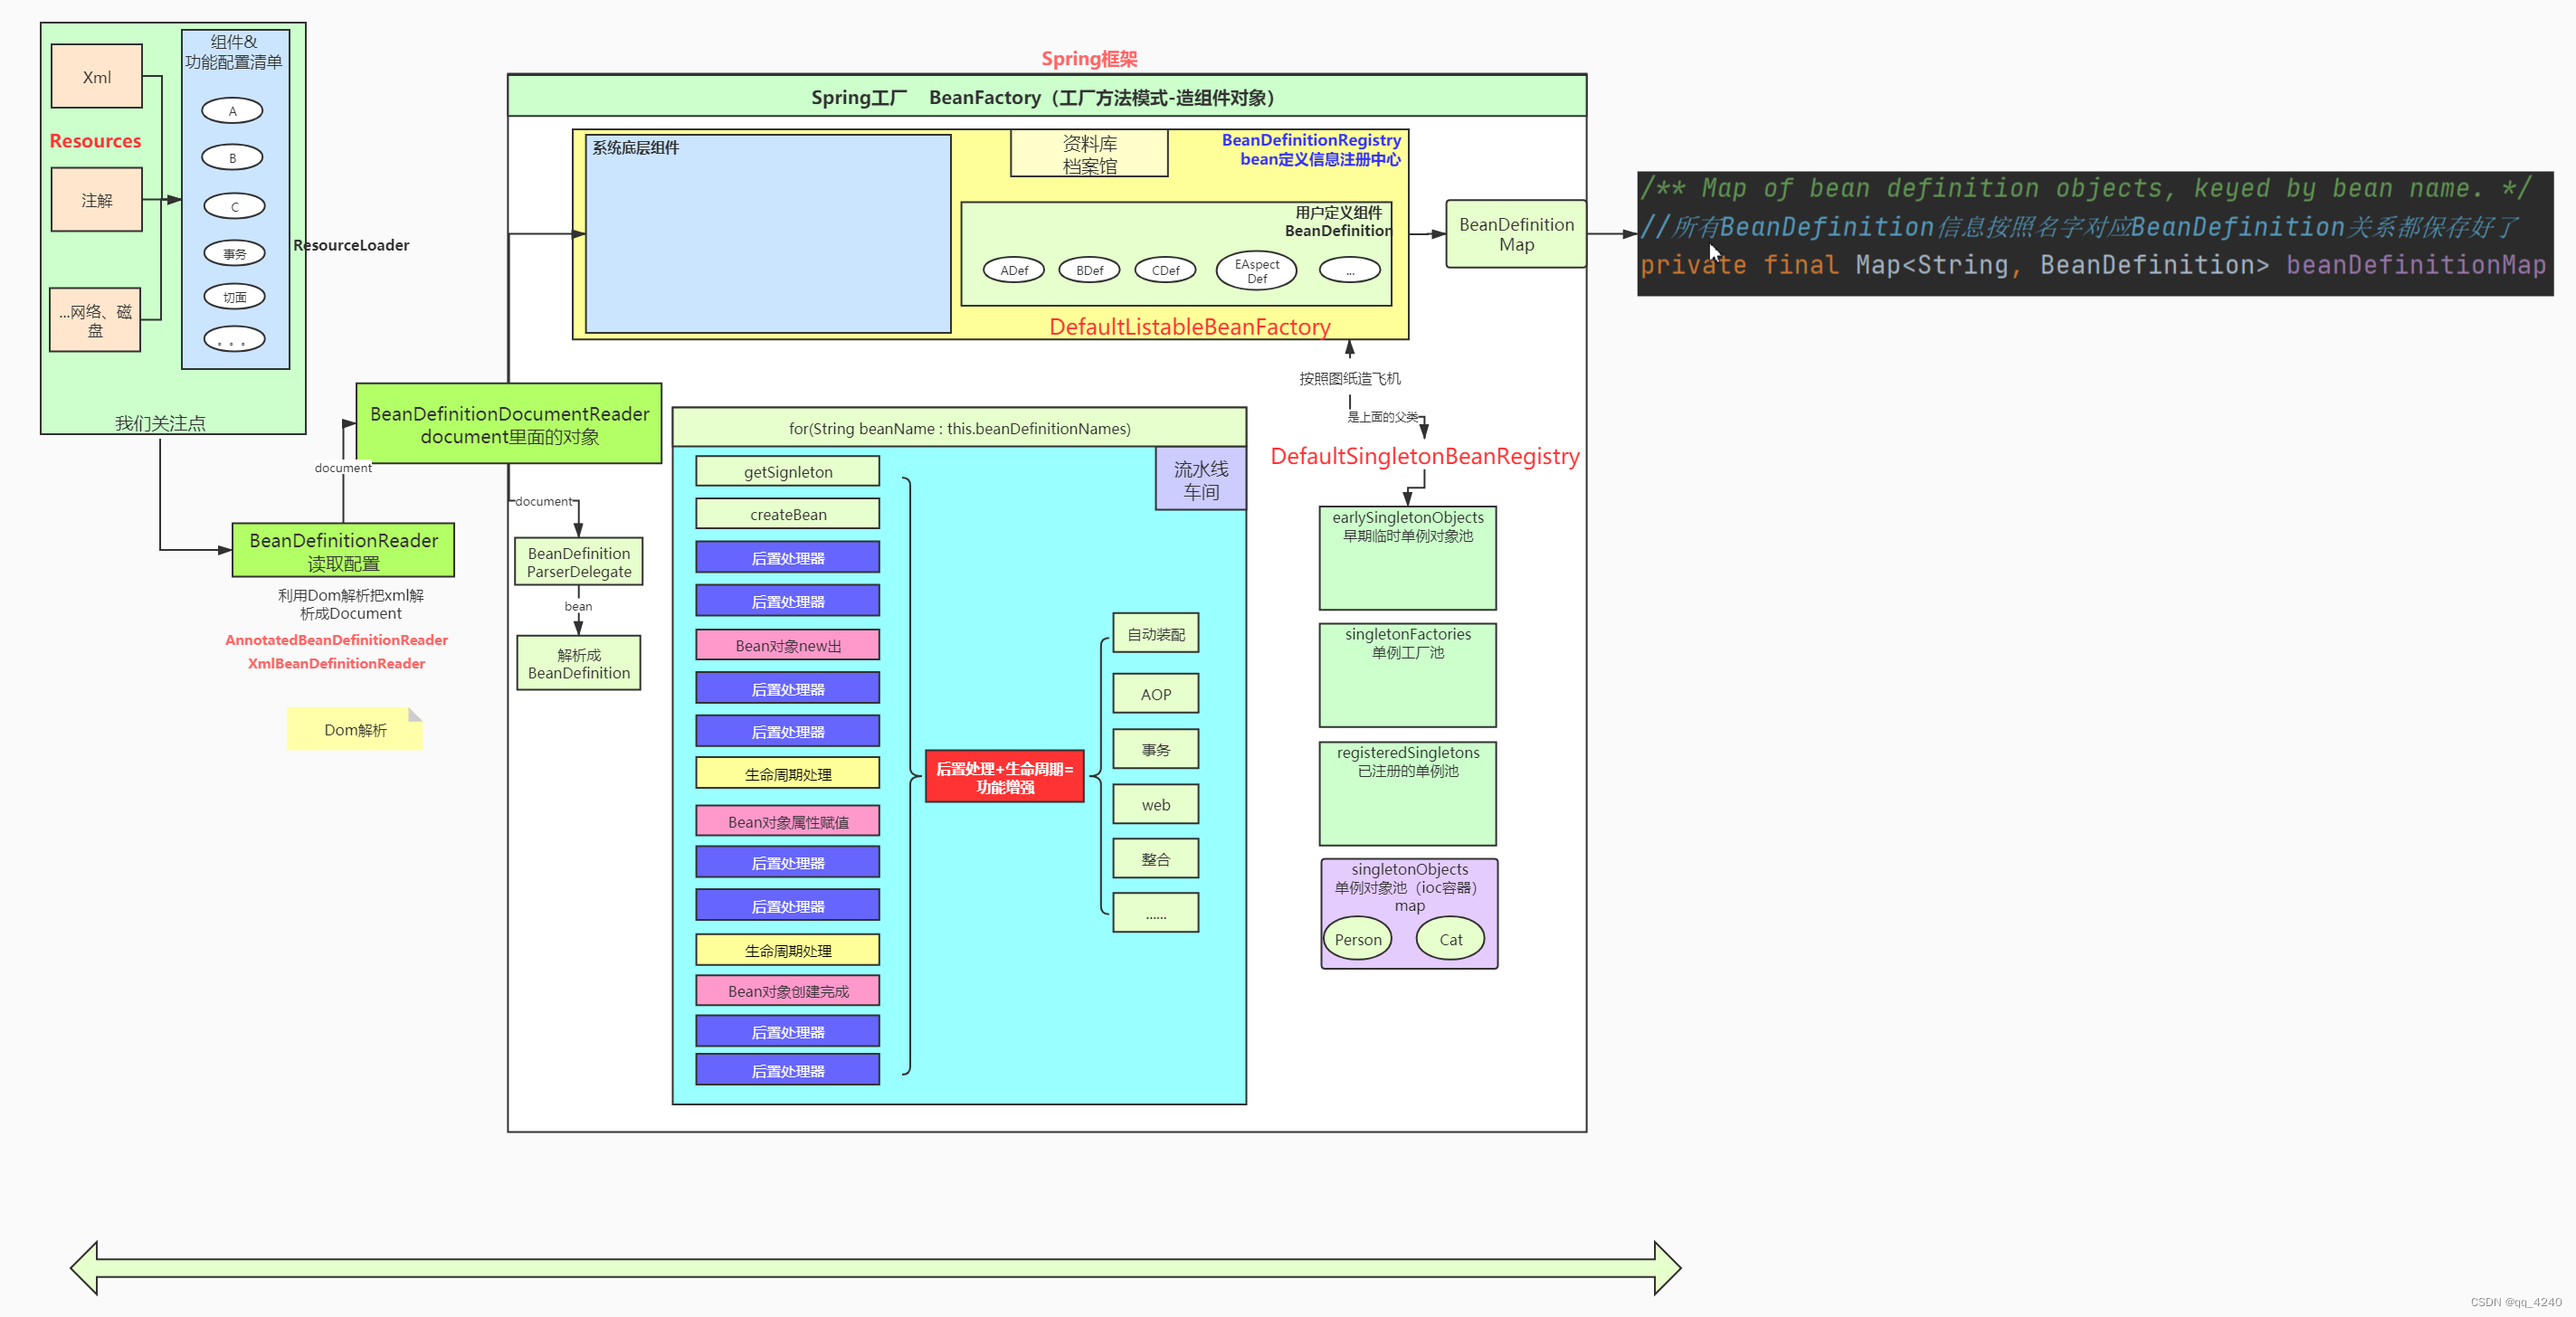
由架构可以看出,spring核心是BeanFactory,可以比做现实生活中工厂。
我们看看一个工厂的大致工作流程:
- 工厂加工一个产品需要有图纸,图纸存放于档案库。
- 有了图纸,需要车间流水线,这个流水线能加工产品,就需要人、加工机器、水电气等等加工环境。
- 环境准备工作好了,就可以按照图纸加工产品了。
再来看看spring生产Bean的大致过程:
- 现实中的零件图纸,在spring中称作BeanDefinition(Bean定义信息),spring要得到Bean定义信息,需要将资源Resource(xml、注解)解析出来得到Bean定义信息,并保存起来。
- 工厂需要加工环境,spring也是一样,需要一些环境,比如加载java的Properties。
- 有了BeanDefinition,就可以创建Bean,在创建Bean的过程中,spring定义后置处理器在一些步骤进行干预,最后完成Bean创建。这里也被称作Bean生命周期过程。
2.Spring容器刷新
测试方法
/**
 * 注解版Spring的用法
 */
public class AnnotationMainTest {

	public static void main(String[] args) {
//		new ClassPathXmlApplicationContext()

		ApplicationContext applicationContext =
				new AnnotationConfigApplicationContext(MainConfig.class);
    }
}
进入构造方法
	/**
	 * Create a new AnnotationConfigApplicationContext, deriving bean definitions
	 * from the given component classes and automatically refreshing the context.
	 * @param componentClasses one or more component classes — for example,
	 * {@link Configuration @Configuration} classes
	 */
	public AnnotationConfigApplicationContext(Class<?>... componentClasses) {
		this();
		register(componentClasses);
		refresh(); //容器完整刷新(创建出所有组件,组织好所有功能)
	}
进入refresh()方法,所有关键逻辑都在这里面
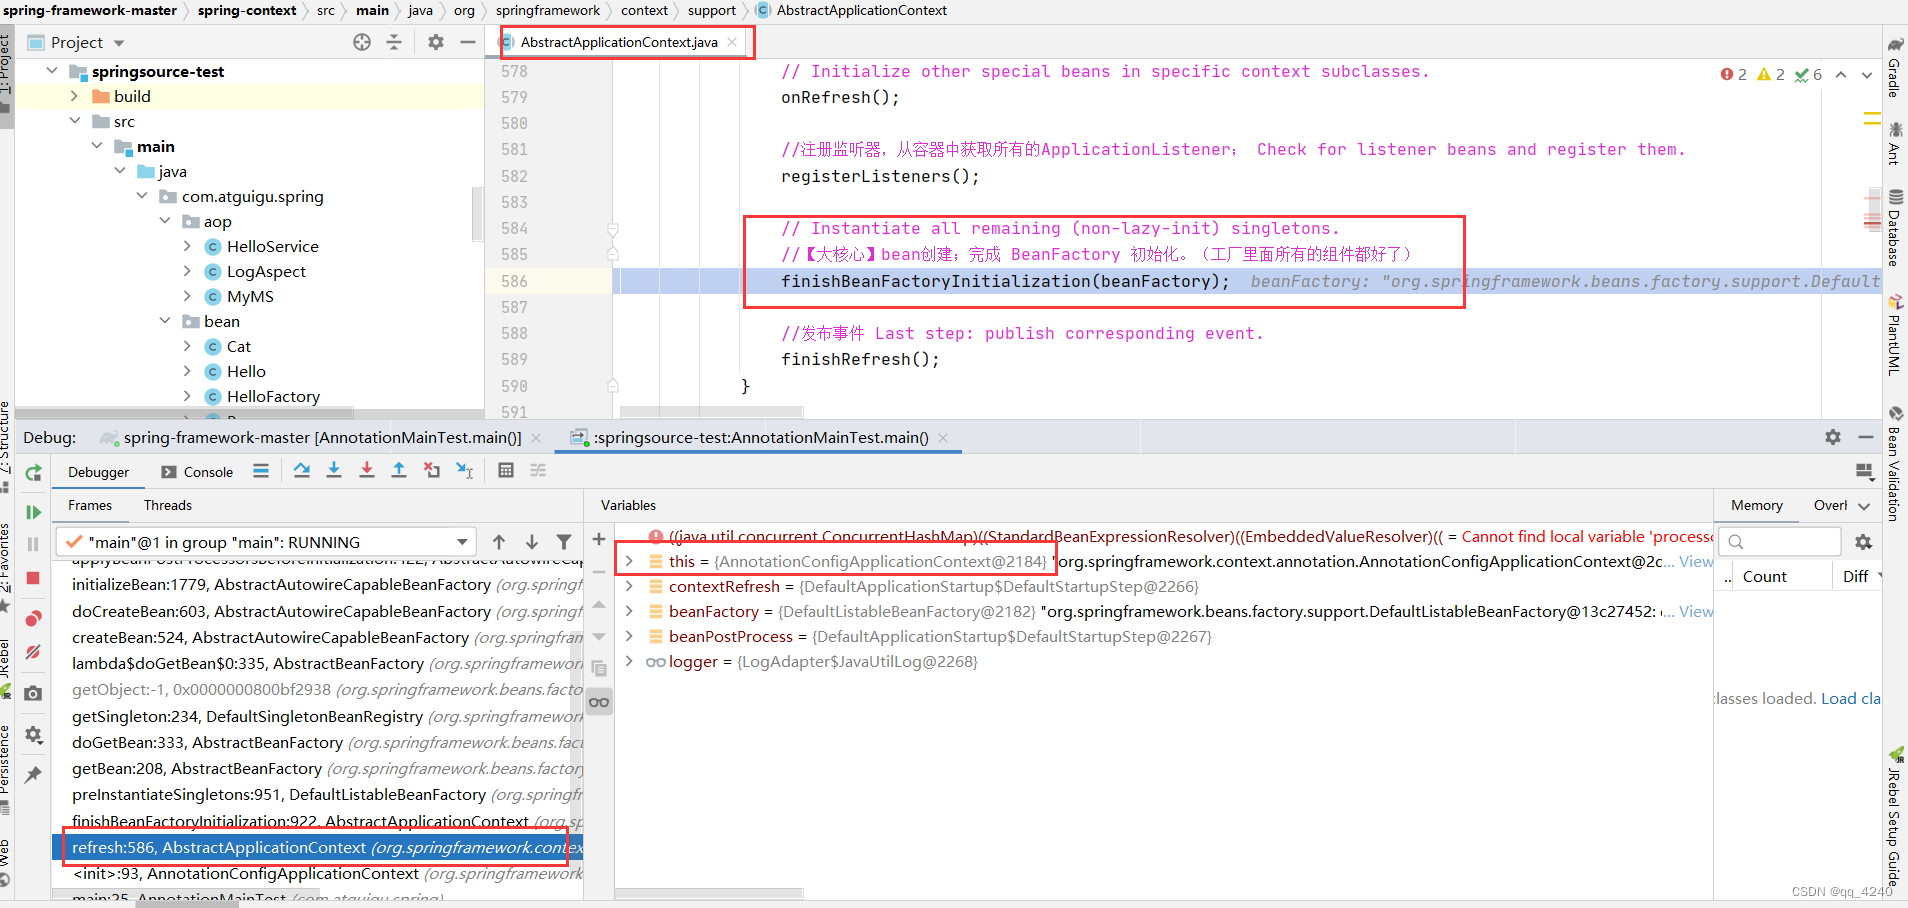
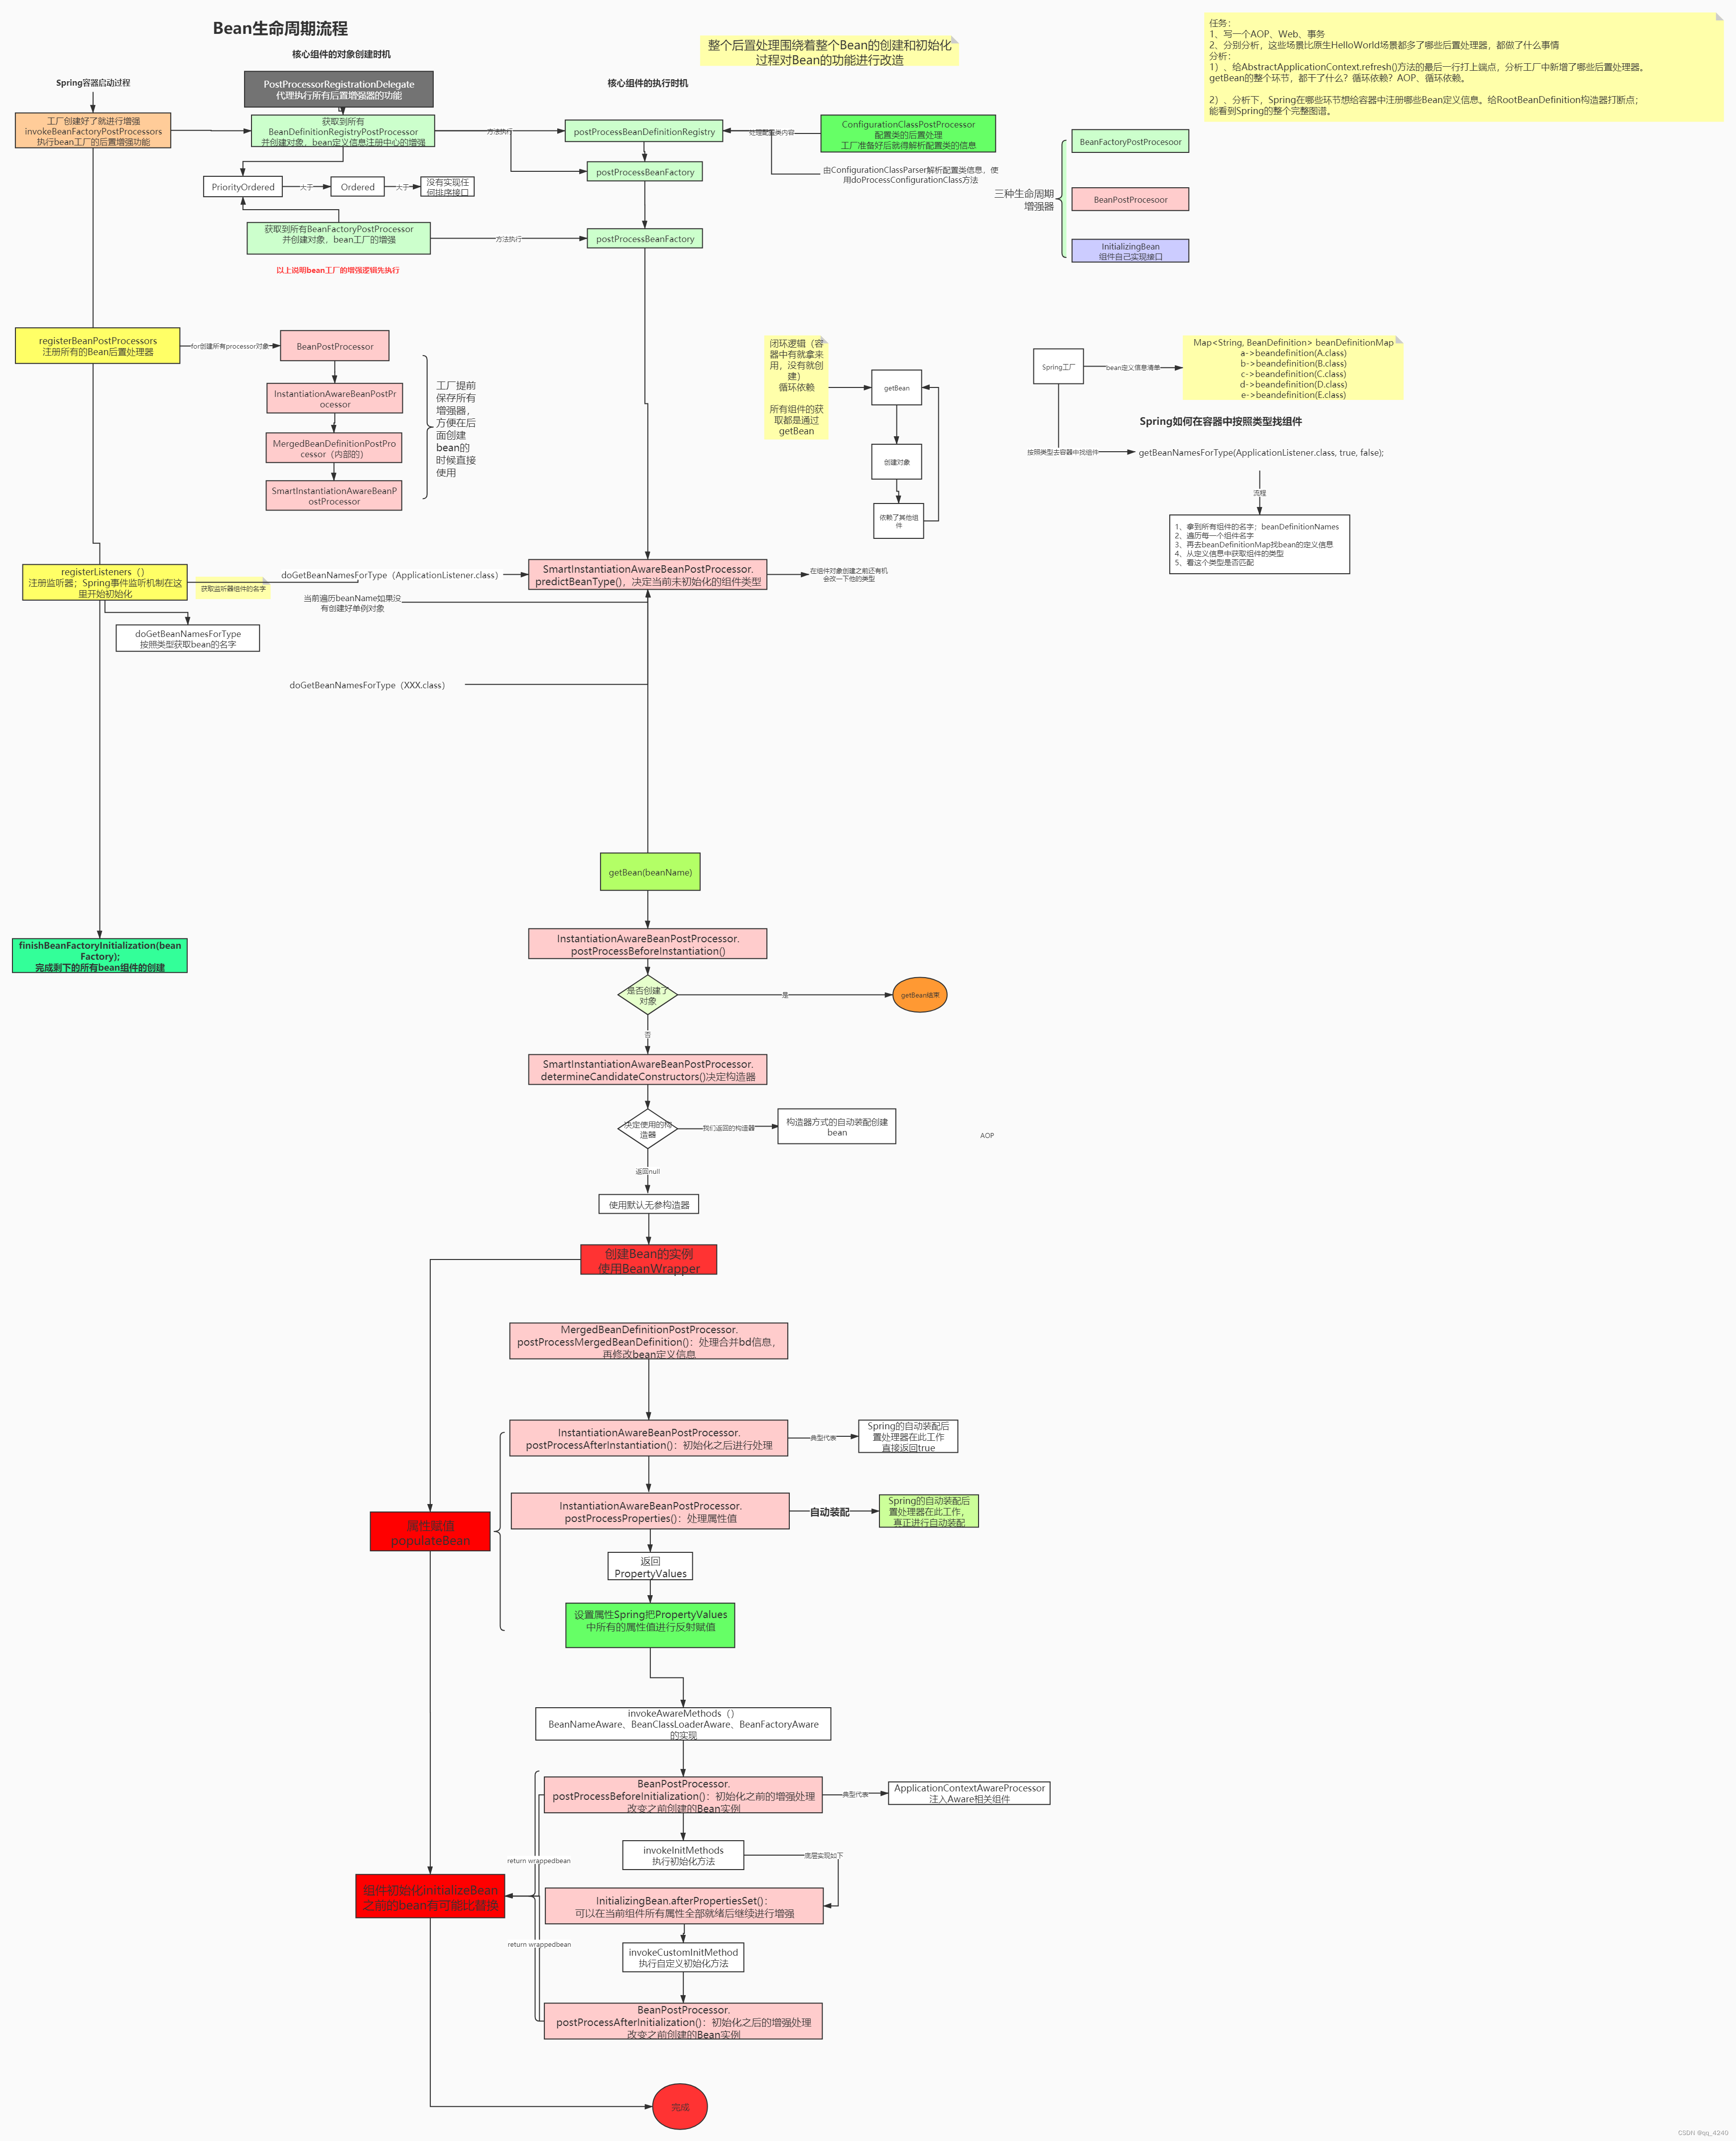
@Override //容器刷新的十二大步。模板模式
public void refresh() throws BeansException, IllegalStateException {
synchronized (this.startupShutdownMonitor) {
StartupStep contextRefresh = this.applicationStartup.start("spring.context.refresh");
//1.准备上下文环境 Prepare this context for refreshing.
prepareRefresh();
// Tell the subclass to refresh the internal bean factory.
// 2.工厂创建:BeanFactory第一次开始创建的时候,有xml解析逻辑。
ConfigurableListableBeanFactory beanFactory = obtainFreshBeanFactory();
//3.给容器中注册了环境信息作为单实例Bean方便后续自动装配;放了一些后置处理器处理(监听、xxAware功能) Prepare the bean factory for use in this context.
prepareBeanFactory(beanFactory);
try {
//4.留给子类的模板方法,允许子类继续对工厂执行一些处理; Allows post-processing of the bean factory in context subclasses.
postProcessBeanFactory(beanFactory);
StartupStep beanPostProcess = this.applicationStartup.start("spring.context.beans.post-process");
//5.【大核心】工厂增强:执行所有的BeanFactory后置增强器;利用BeanFactory后置增强器对工厂进行修改或者增强,配置类会在这里进行解析。 Invoke factory processors registered as beans in the context.
invokeBeanFactoryPostProcessors(beanFactory);
//6.【核心】注册所有的Bean的后置处理器 Register bean processors that intercept bean creation.
registerBeanPostProcessors(beanFactory);
beanPostProcess.end();
//7.初始化国际化功能 Initialize message source for this context.
initMessageSource();
//8.初始化事件多播功能(事件派发) Initialize event multicaster for this context.
initApplicationEventMulticaster();
// 9.Initialize other special beans in specific context subclasses.
onRefresh();
//10.注册监听器,从容器中获取所有的ApplicationListener; Check for listener beans and register them.
registerListeners();
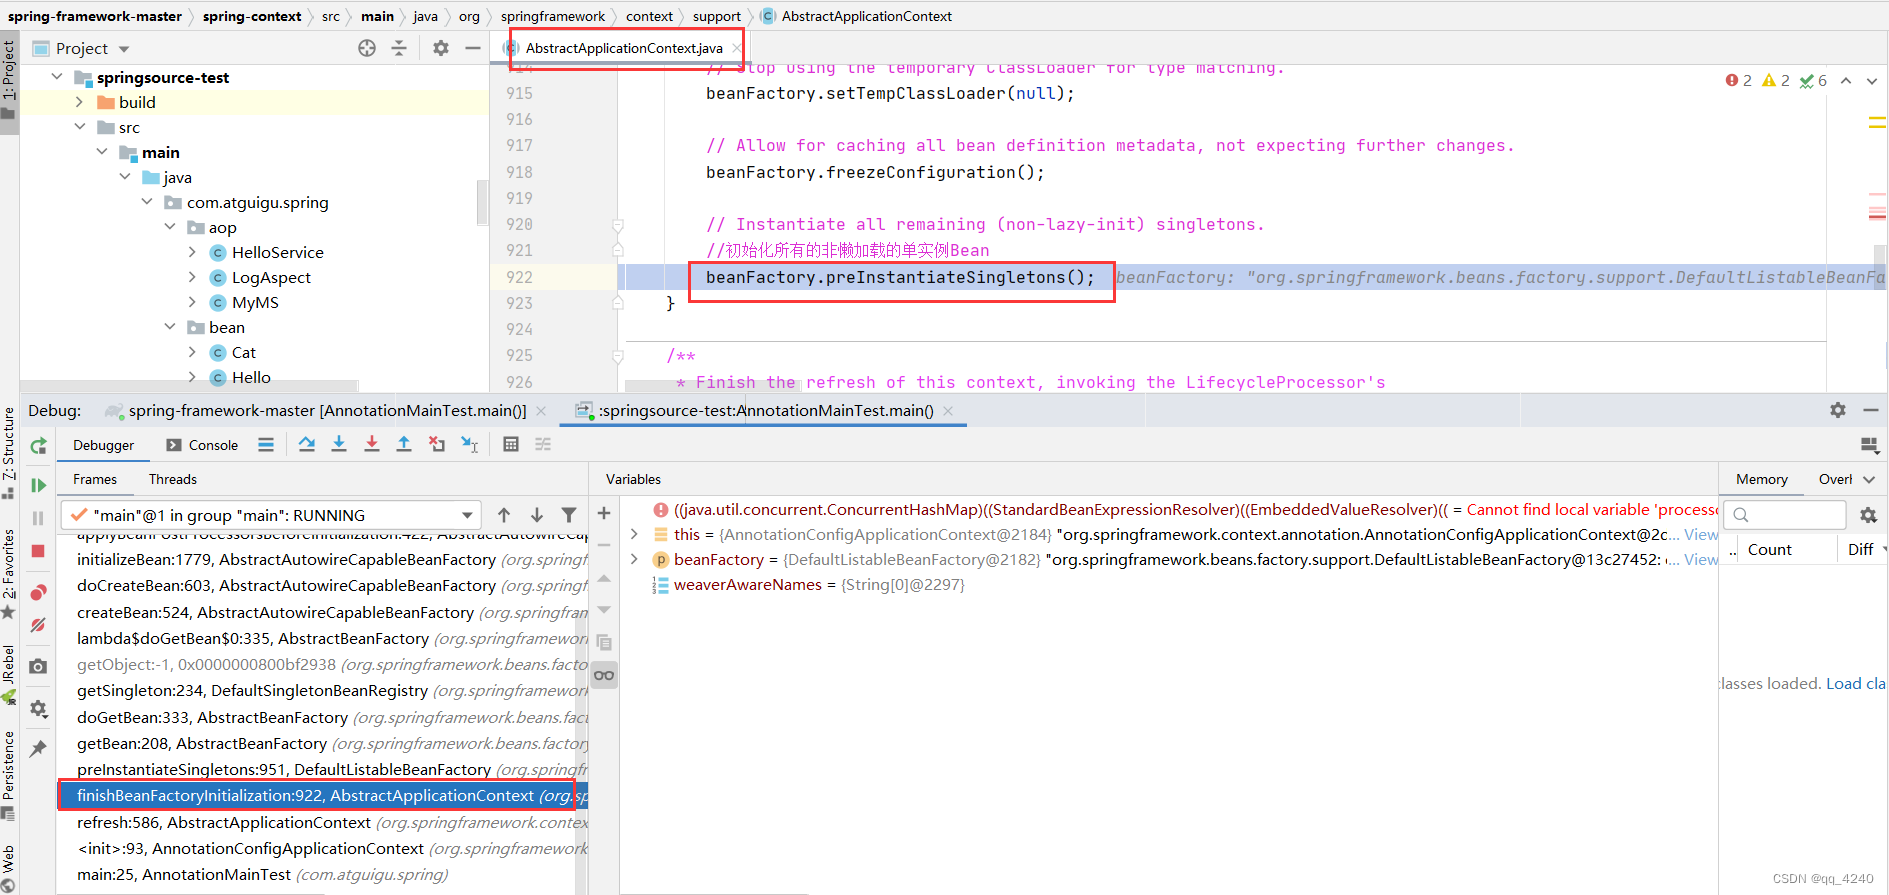
// Instantiate all remaining (non-lazy-init) singletons.
//11.【大核心】bean创建;完成 BeanFactory 初始化。(工厂里面所有的组件都好了)
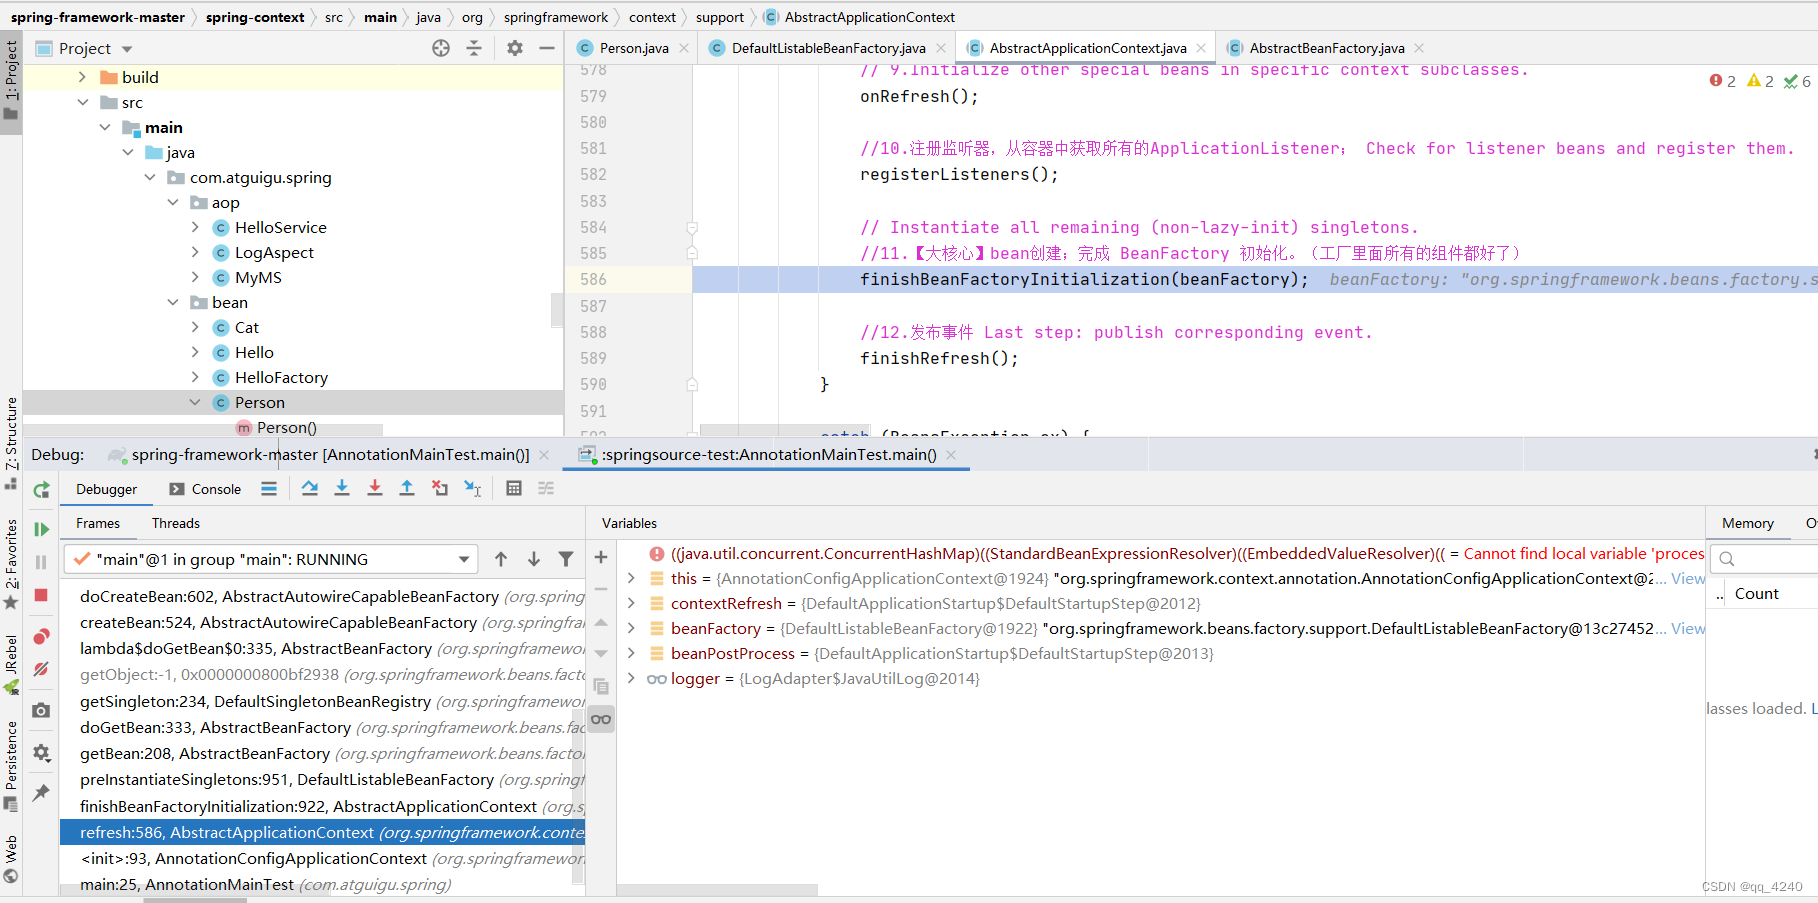
finishBeanFactoryInitialization(beanFactory);
//12.发布事件 Last step: publish corresponding event.
finishRefresh();
}
catch (BeansException ex) {
if (logger.isWarnEnabled()) {
logger.warn("Exception encountered during context initialization - " +
"cancelling refresh attempt: " + ex);
}
// Destroy already created singletons to avoid dangling resources.
destroyBeans();
// Reset 'active' flag.
cancelRefresh(ex);
// Propagate exception to caller.
throw ex;
}
finally {
// Reset common introspection caches in Spring's core, since we
// might not ever need metadata for singleton beans anymore...
resetCommonCaches();
contextRefresh.end();
}
}
}源码调试方法:在关键的方法处打断点,然后查看堆栈调用
3.Aware接口:帮我们装配Spring底层的一些组件
1、Bean的功能增强全部都是有 BeanPostProcessor+InitializingBean  (合起来完成的)
2、骚操作就是 BeanPostProcessor+InitializingBean
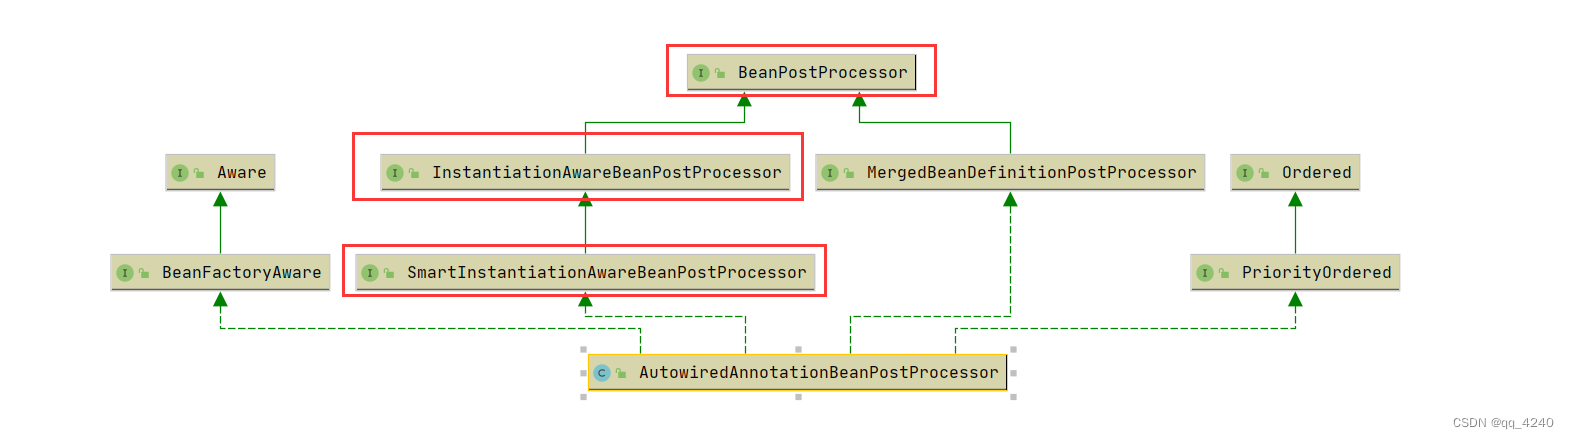
Aware接口的流程图
看一下Aware的子接口:

Aware接口作用是什么?
aware翻译过来是感知。
什么是感知,根据字面意思还是不怎么理解,但是我们看看实现了Aware接口,需要实现的方法。大致可以看出,Aware的作用。
比如setApplicationContext(ApplicationContext applicationContext)。
该方法将容器传过来了,这个时候我们拿到了容器的引用,我们就可以对容器进行一些操作。
由此大致可以理解Aware接口的作用:通过实现这些接口,我们可以拿到容器的某种组件,进而根据组件的暴露的api,来实现我们自己的一些逻辑。
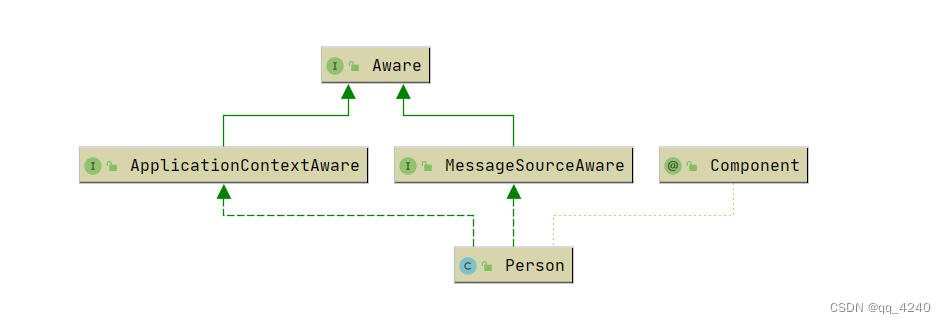
准备Person,该类标注了@Component,将Person成为一个组件,同时实现了ApplicationContextAware,MessageSourceAware接口。Person继承树如下
/**
 * Aware接口;帮我们装配Spring底层的一些组件
 * 1、Bean的功能增强全部都是有 BeanPostProcessor+InitializingBean  (合起来完成的)
 * 2、骚操作就是 BeanPostProcessor+InitializingBean
 *
 * 你猜Autowired是怎么完成的
 * Person为什么能把ApplicationContext、MessageSource当为自己的参数传进来。
 * 	  - 通过实现接口的方式自动注入了 ApplicationContext、MessageSource。是由BeanPostProcessor(Bean的后置处理器完成的)
 *
 */
@Component
public class Person implements ApplicationContextAware, MessageSourceAware {

//	@Autowired
	ApplicationContext context;  //可以要到ioc容器
	MessageSource messageSource;

	public Person(){
		System.out.println("person创建....");
	}
//
//	public ApplicationContext getContext() {
//		return context;
//	}

	private String name;

//	@Autowired  依赖的组件是多实例就不能Autowired
	private Cat cat;


	public void setName(String name) {
		this.name = name;
	}

	public String getName() {
		return name;
	}

	@Autowired  //去发现一下.....
	public void setCat(Cat cat) {
		this.cat = cat;
	}

	//
//	@Lookup  //去容器中找。@Bean的这种方式注册的Person @Lookup不生效
	public Cat getCat() {
		return cat;
	}

	@Override
	public String toString() {
		return "Person{" +
				"name='" + name + '\'' +
				'}';
	}

	public ApplicationContext getContext() {
		return context;
	}

	@Override
	public void setApplicationContext(ApplicationContext applicationContext) throws BeansException {
		//利用回调机制,把ioc容器传入
		this.context = applicationContext;
	}

	@Override
	public void setMessageSource(MessageSource messageSource) {
		this.messageSource = messageSource;
	}
}
setApplicationContext(ApplicationContext applicationContext)在什么时候被调用?
1.初始调用构造
		ApplicationContext applicationContext =
				new AnnotationConfigApplicationContext(MainConfig.class);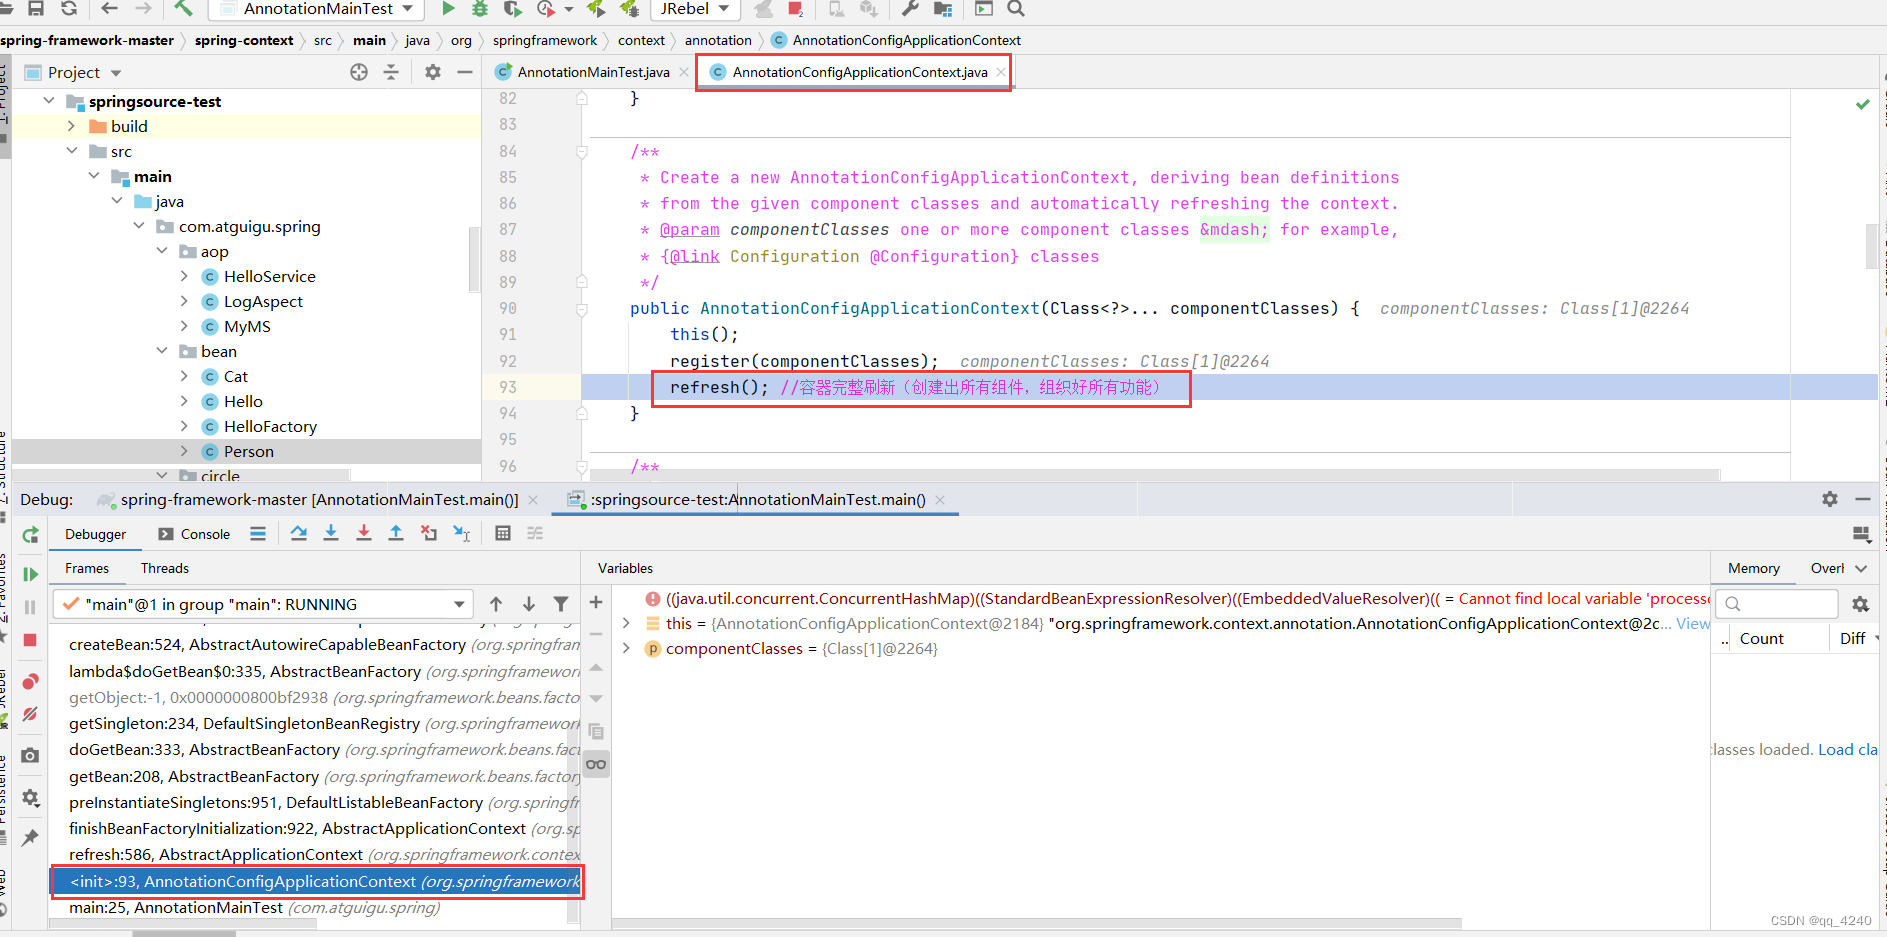
2.调用父类
3.调用finishBeanFactoryInitialization()
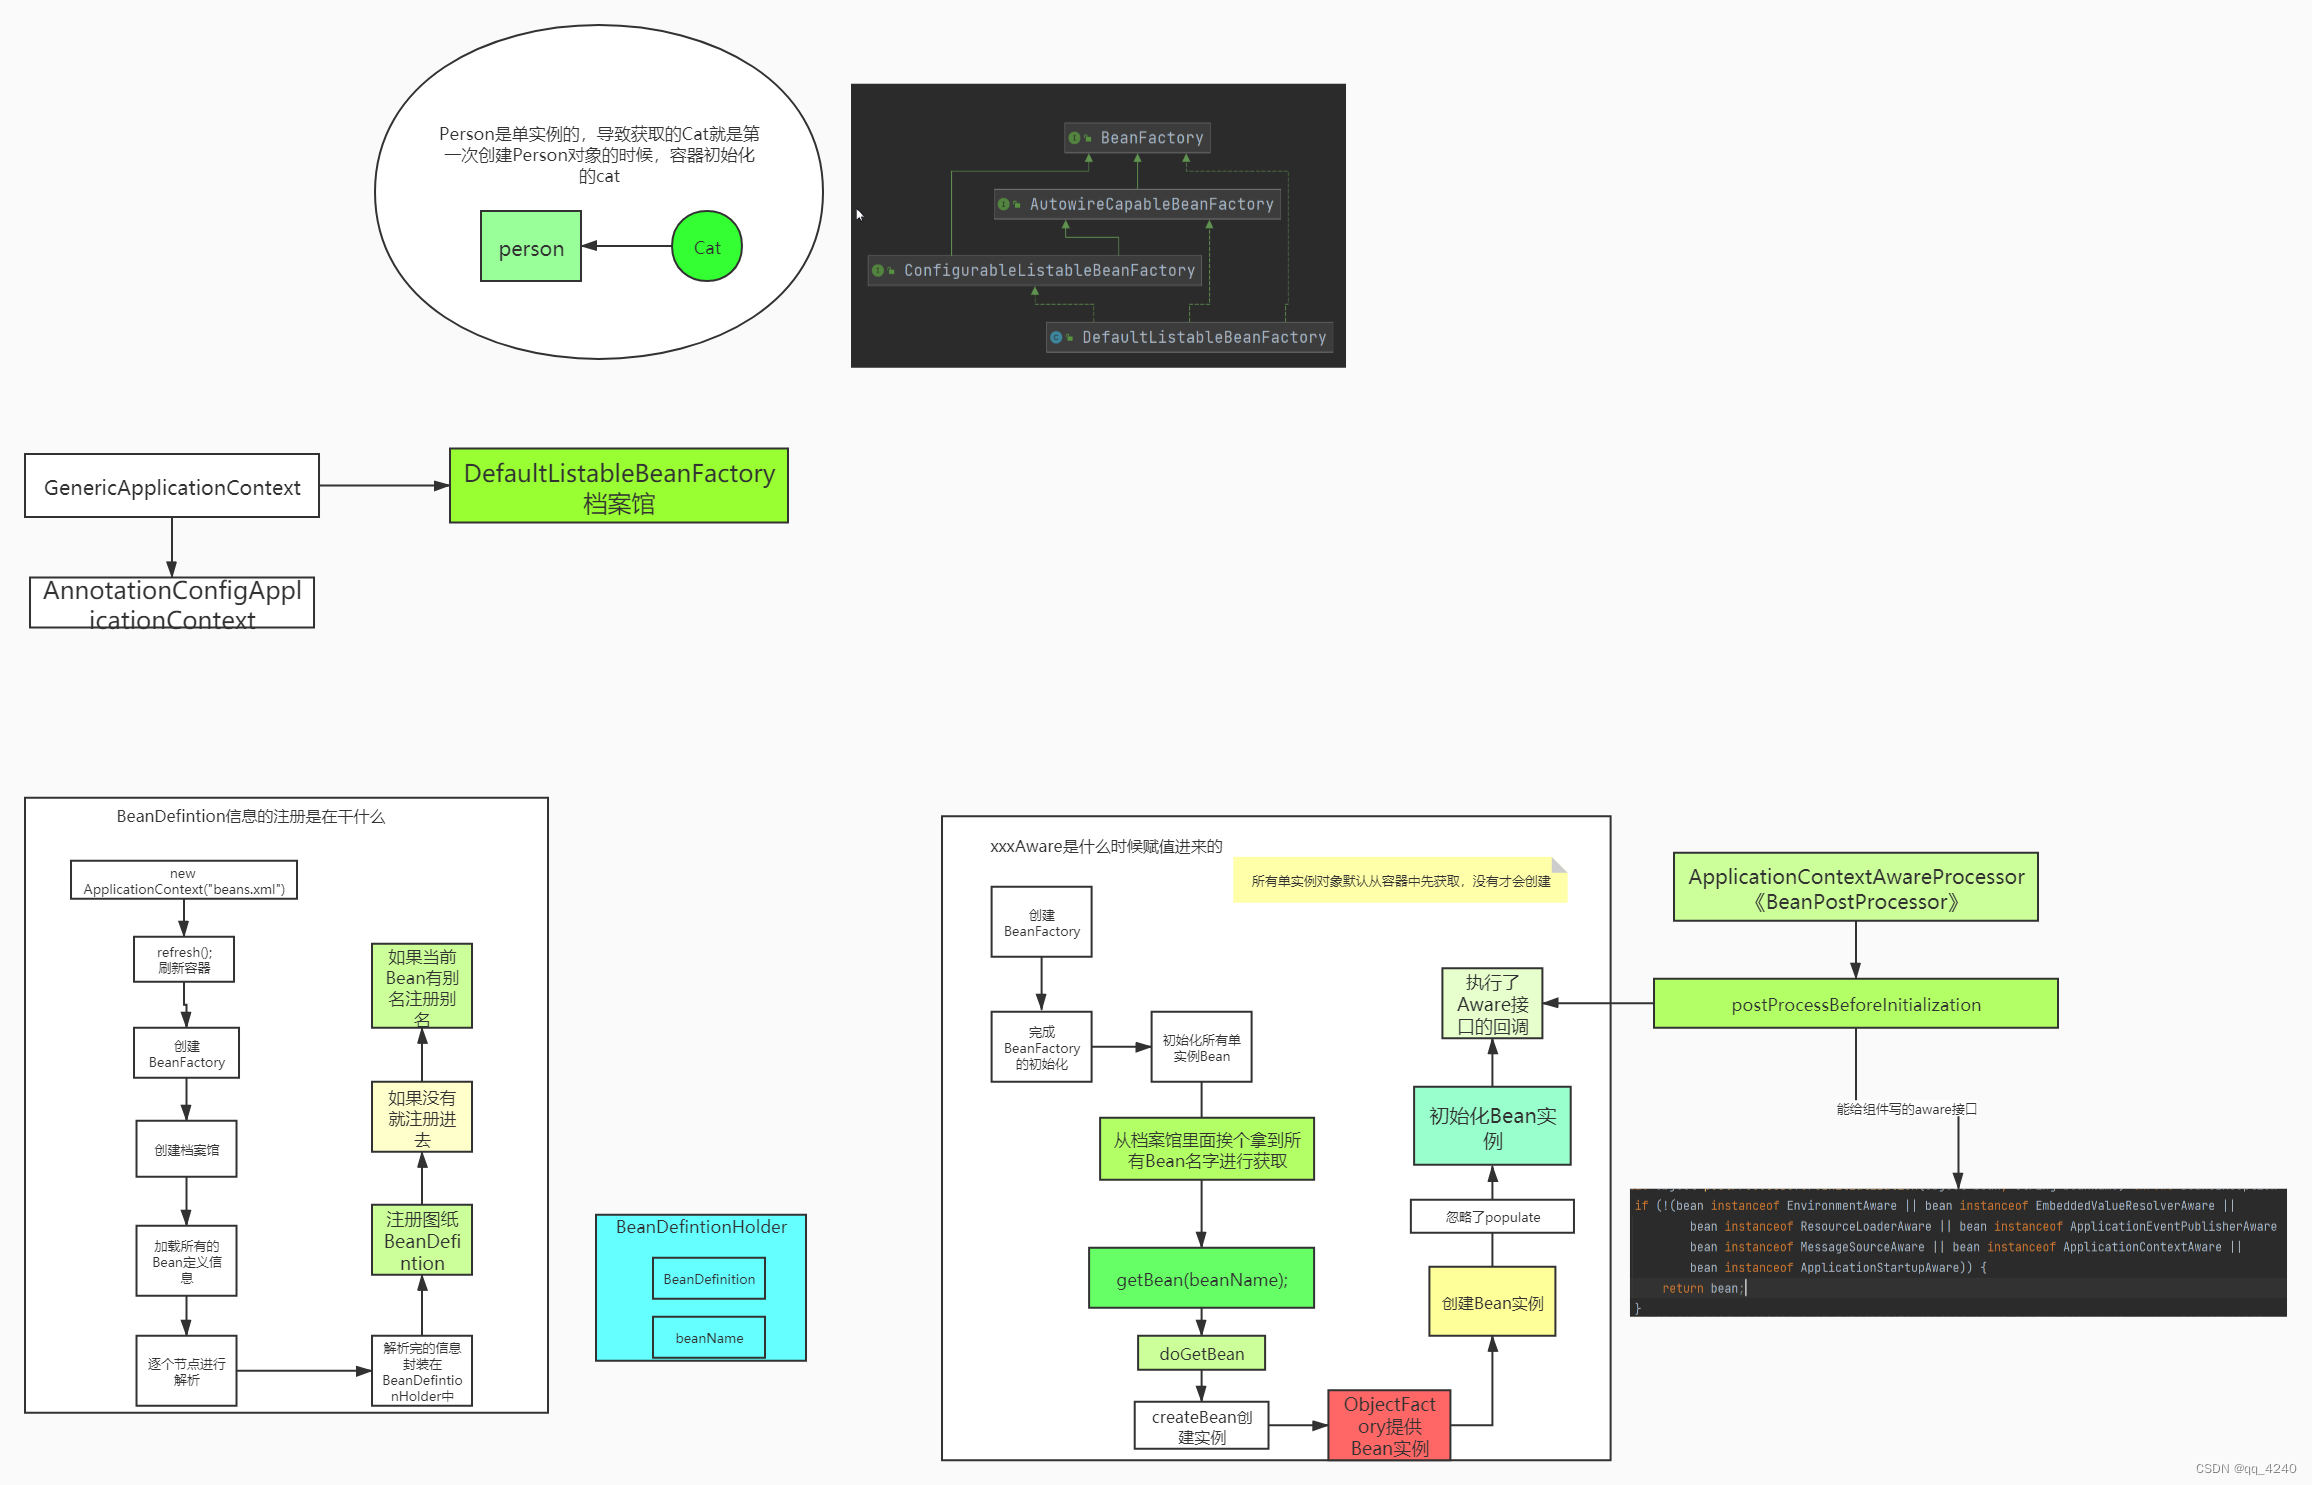
4. this->DefaultListableBeanFactory,调用preInstantiateSingletons()
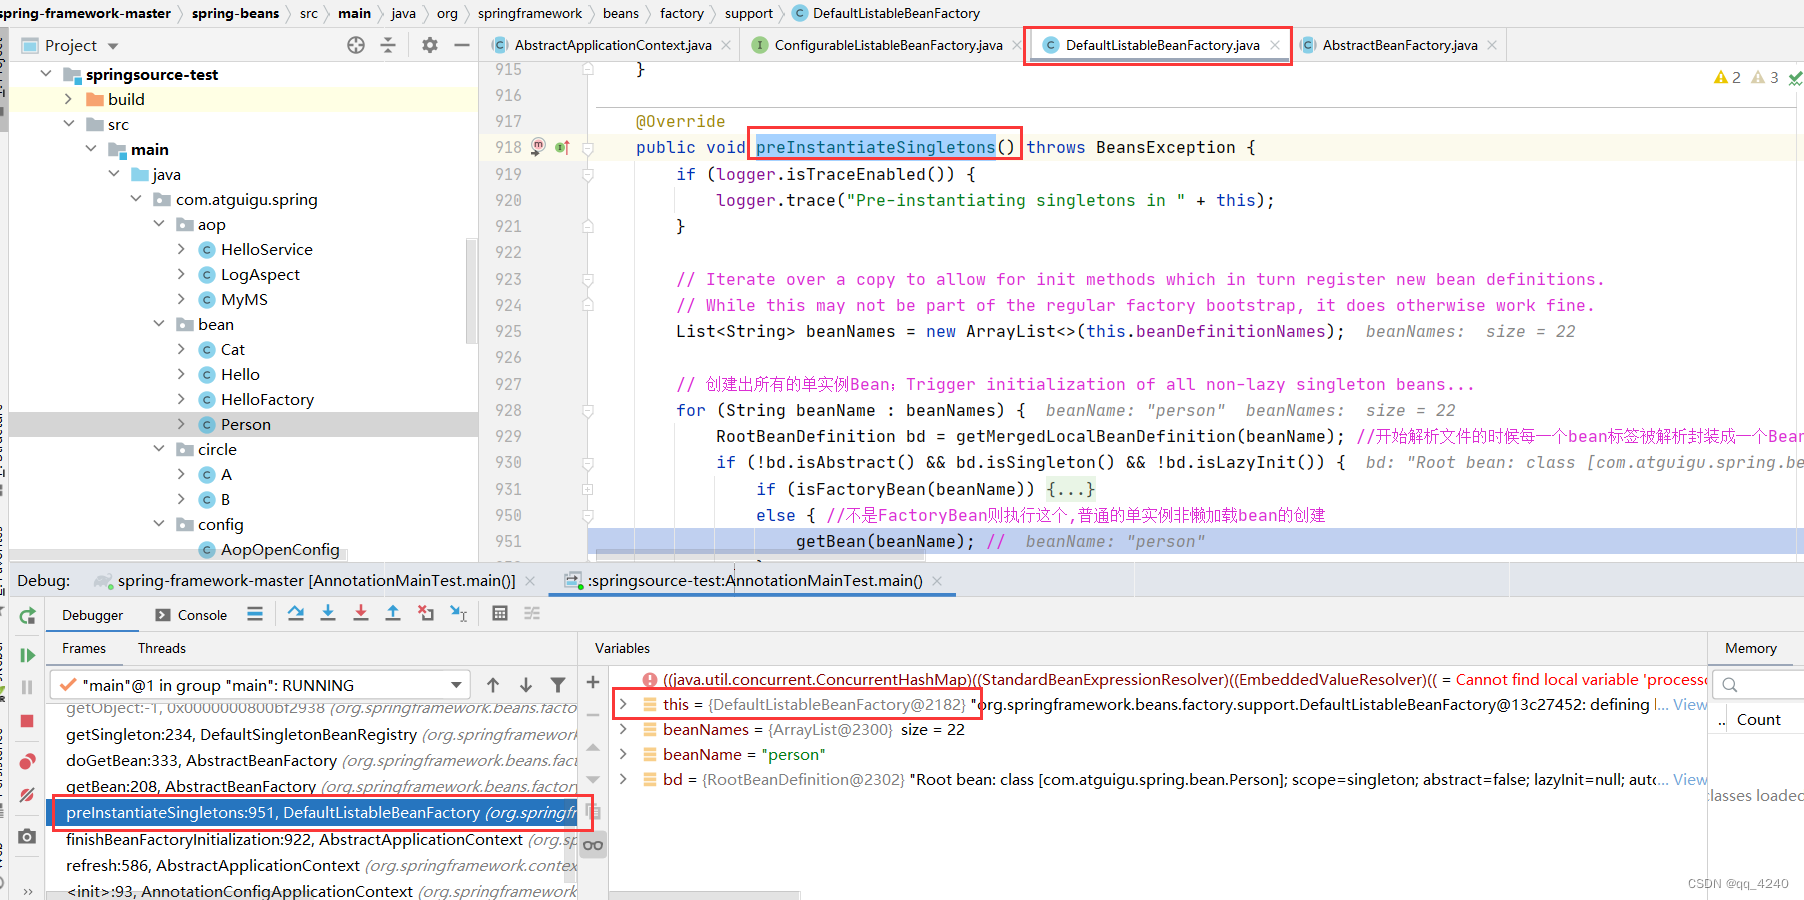
5. this->DefaultListableBeanFactory,父类方法调用getBean()

6.this->DefaultListableBeanFactory,父类方法调用doGetBean()
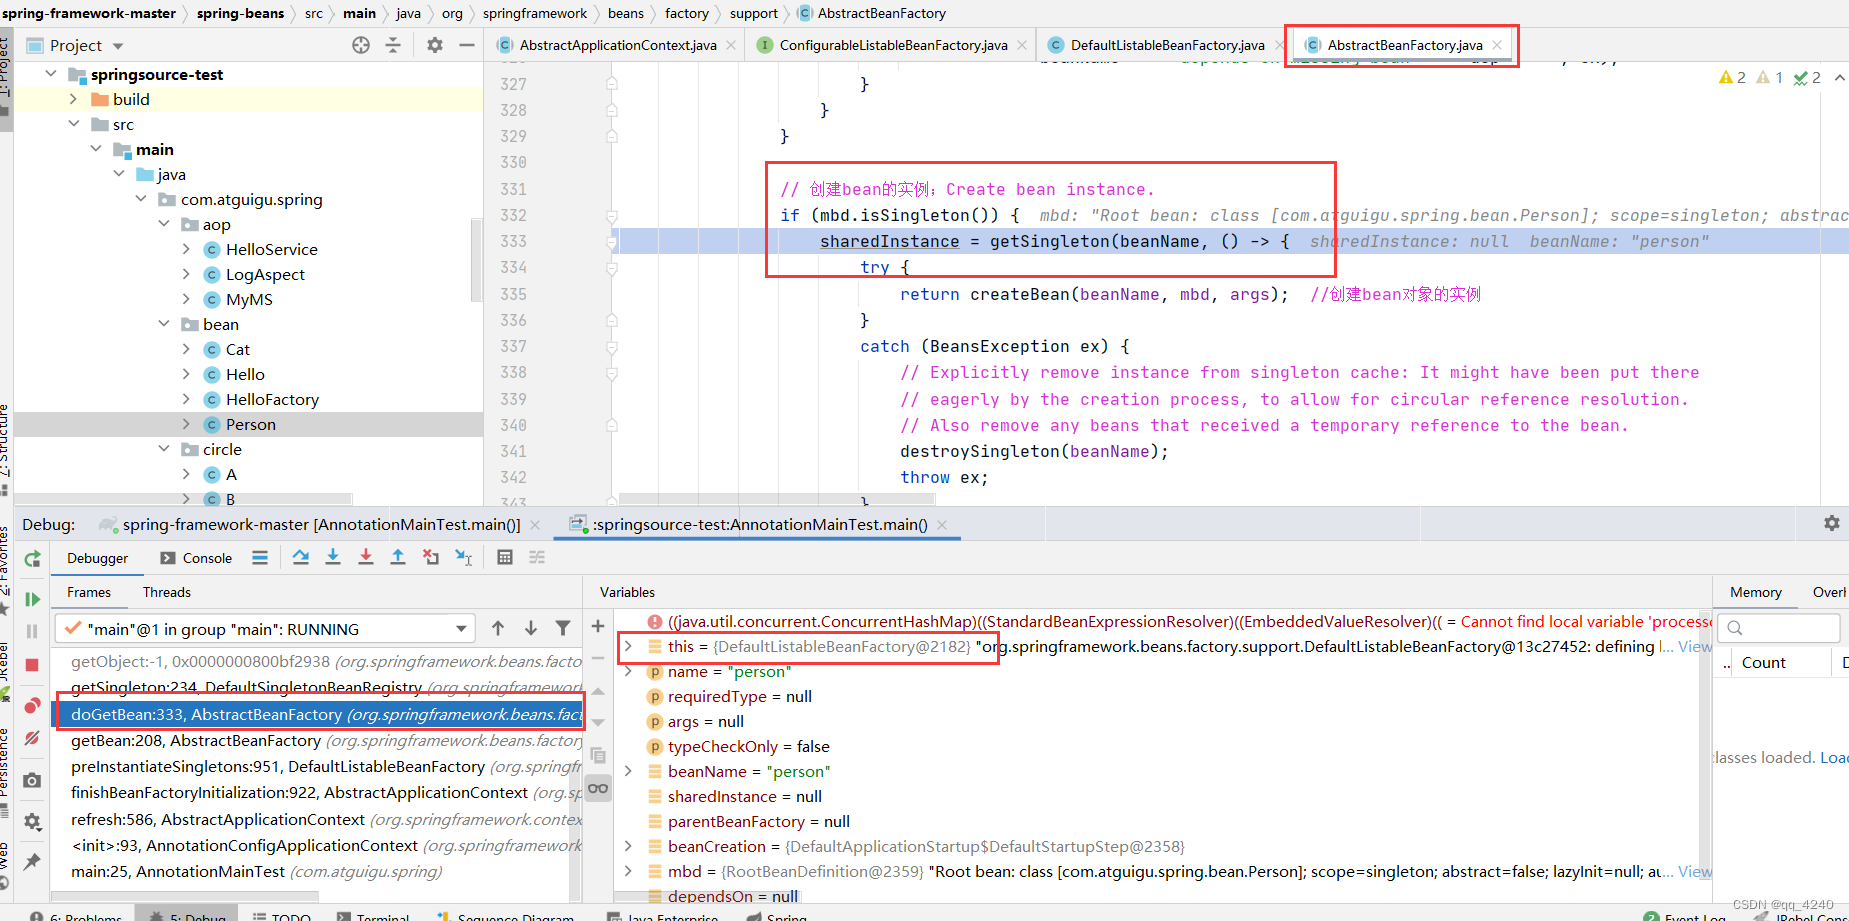
7.this->DefaultListableBeanFactory,父类方法调用getSingleton()
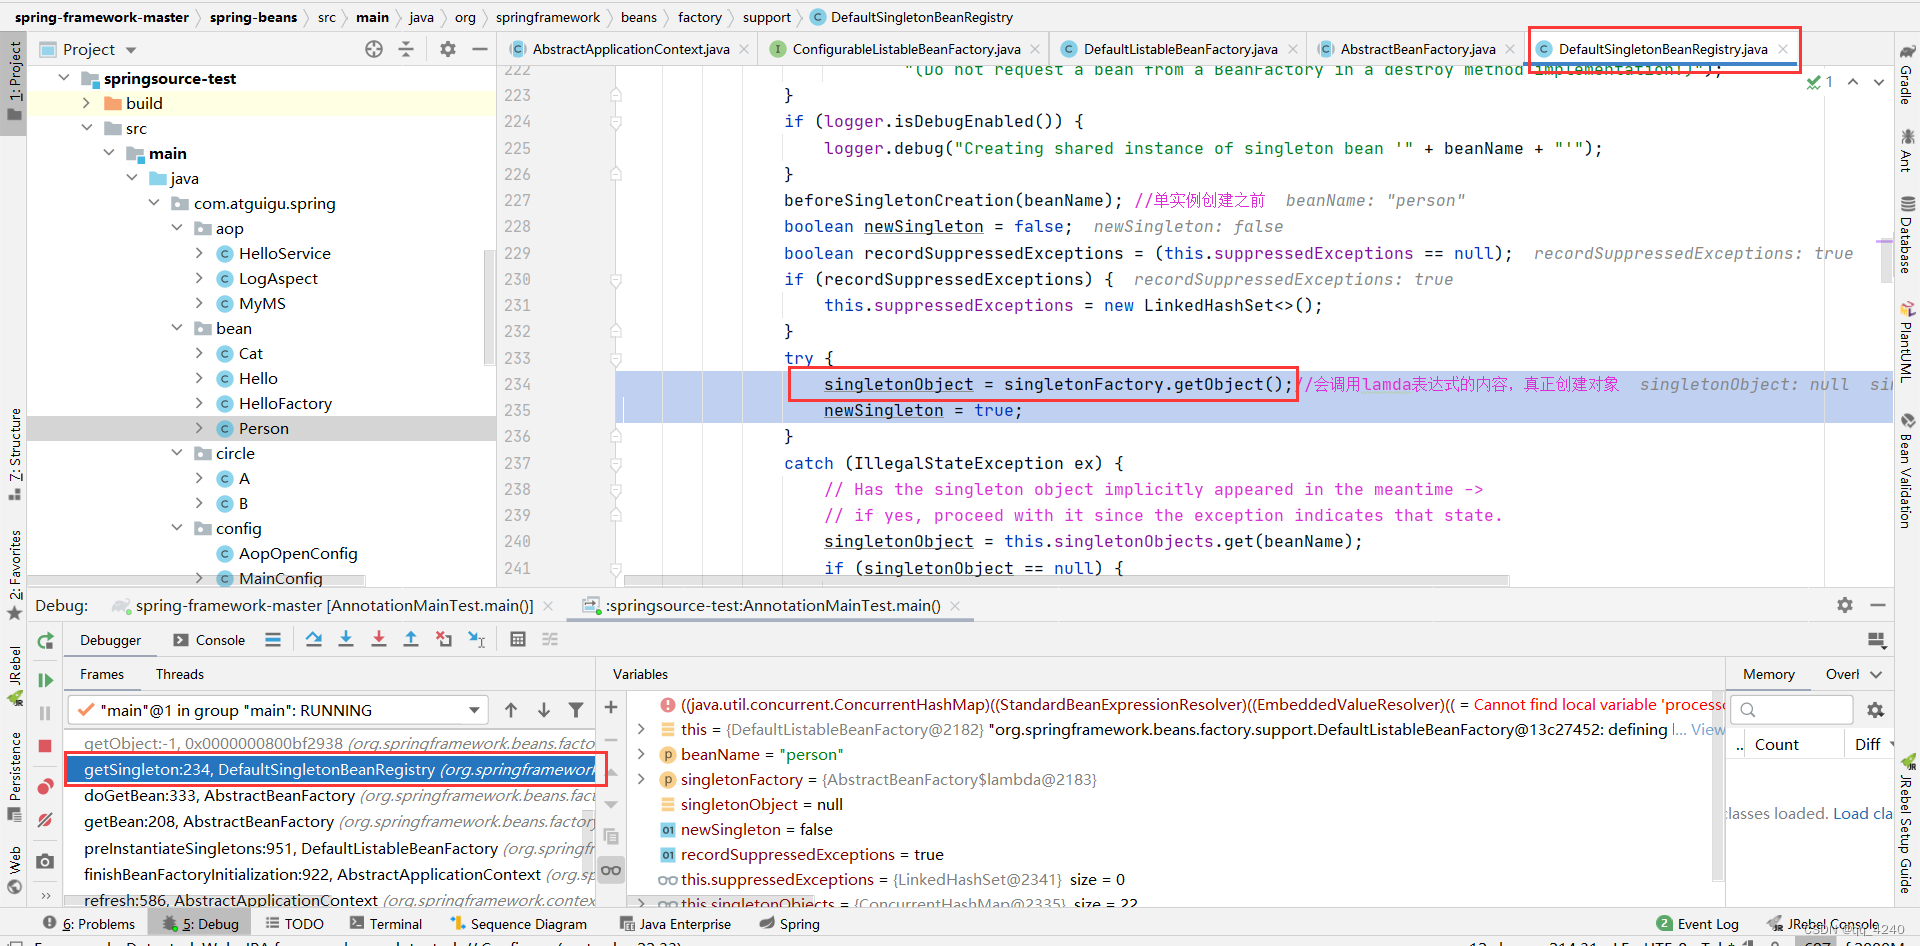
8.this->DefaultListableBeanFactory,调用到父类AbstractAutowireCapableBeanFactory的creatBean()
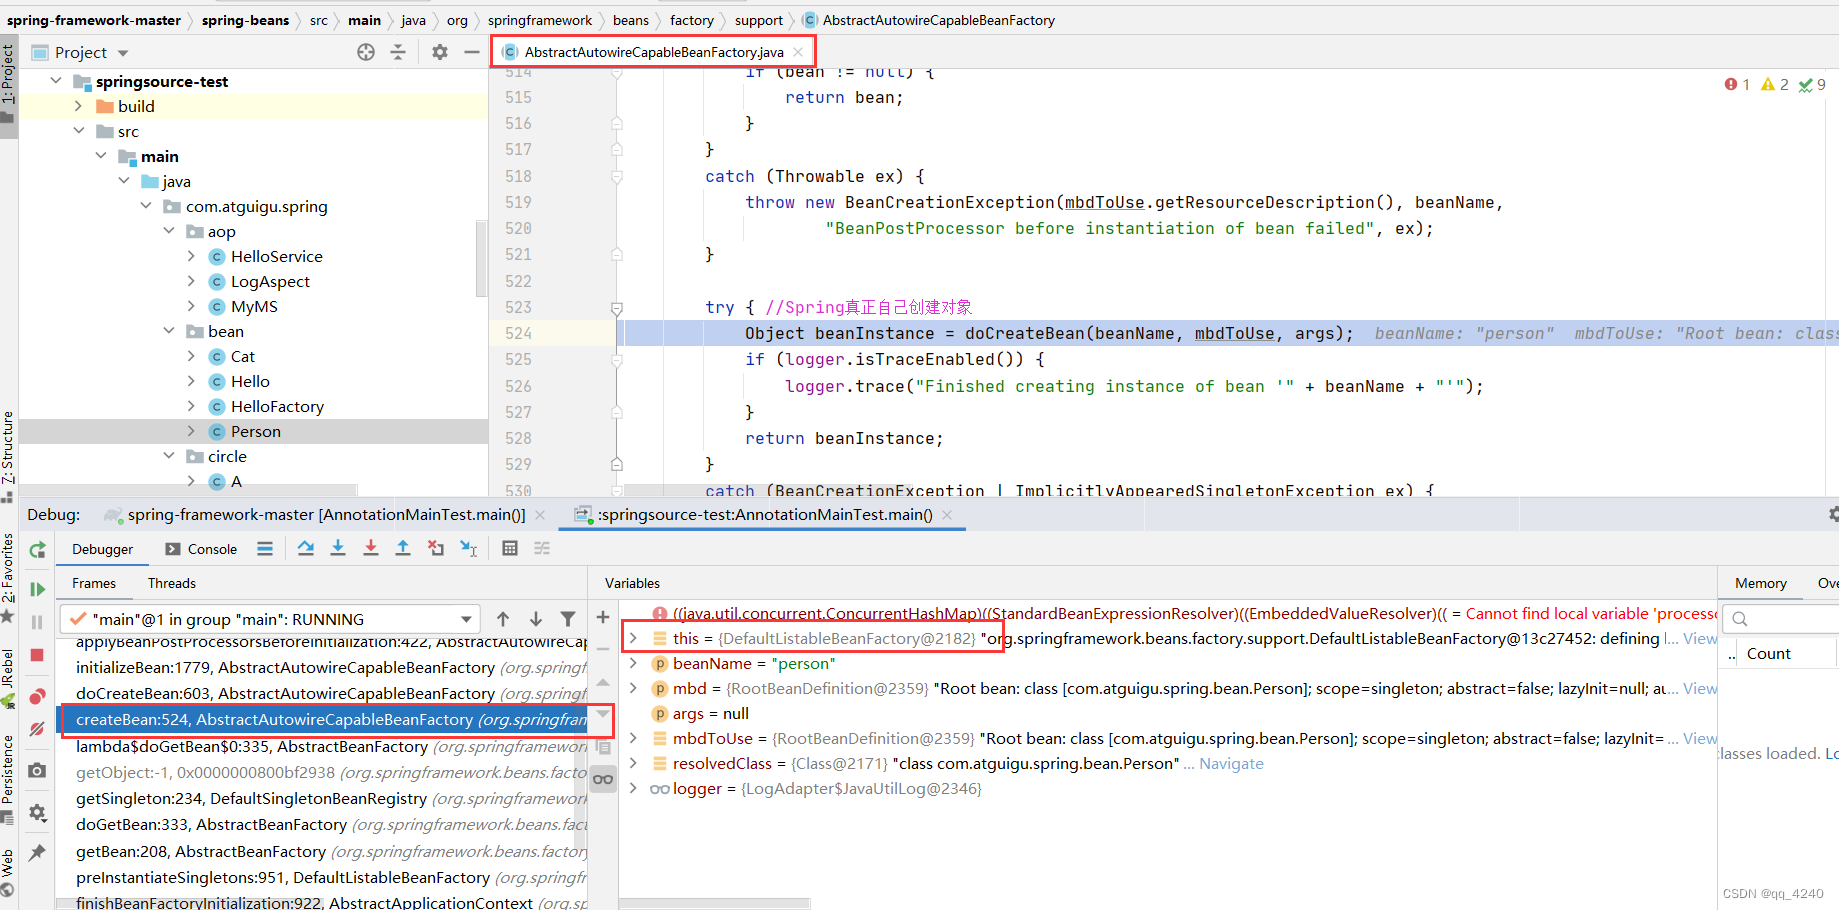
9.this->DefaultListableBeanFactory,调用到AbstractAutowireCapableBeanFactory的doCreatBean()
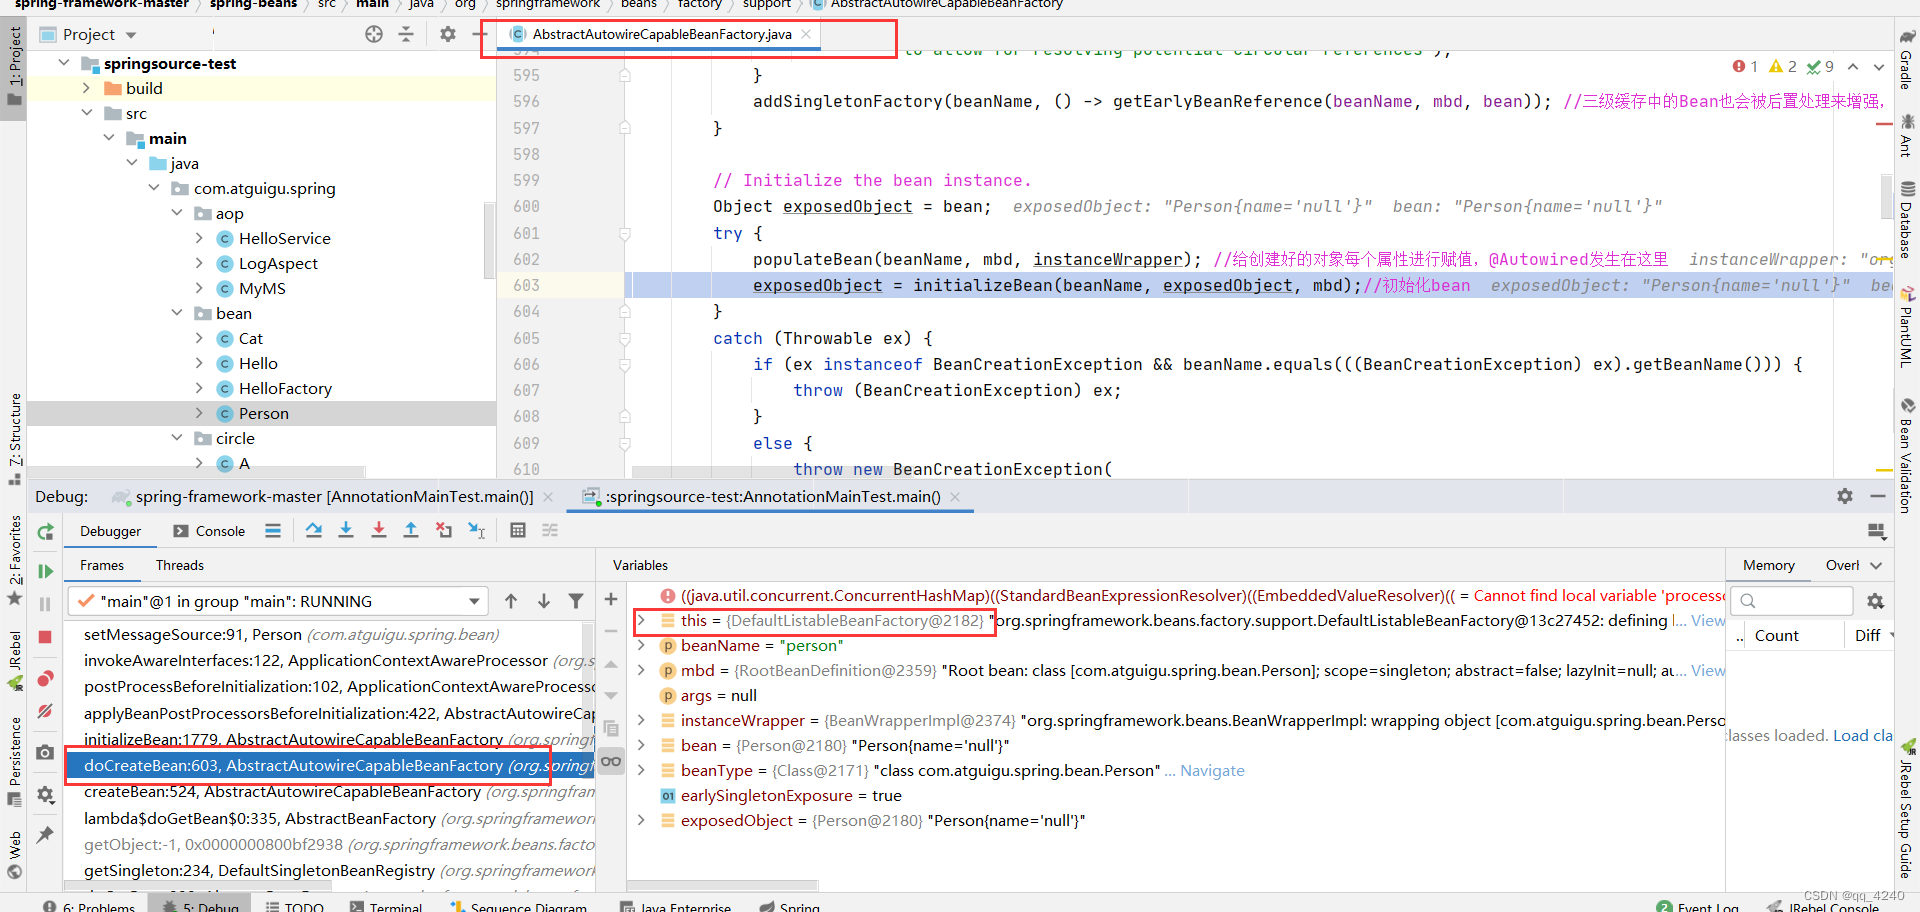
10.this->DefaultListableBeanFactory,调用到AbstractAutowireCapableBeanFactory的initializeBean()
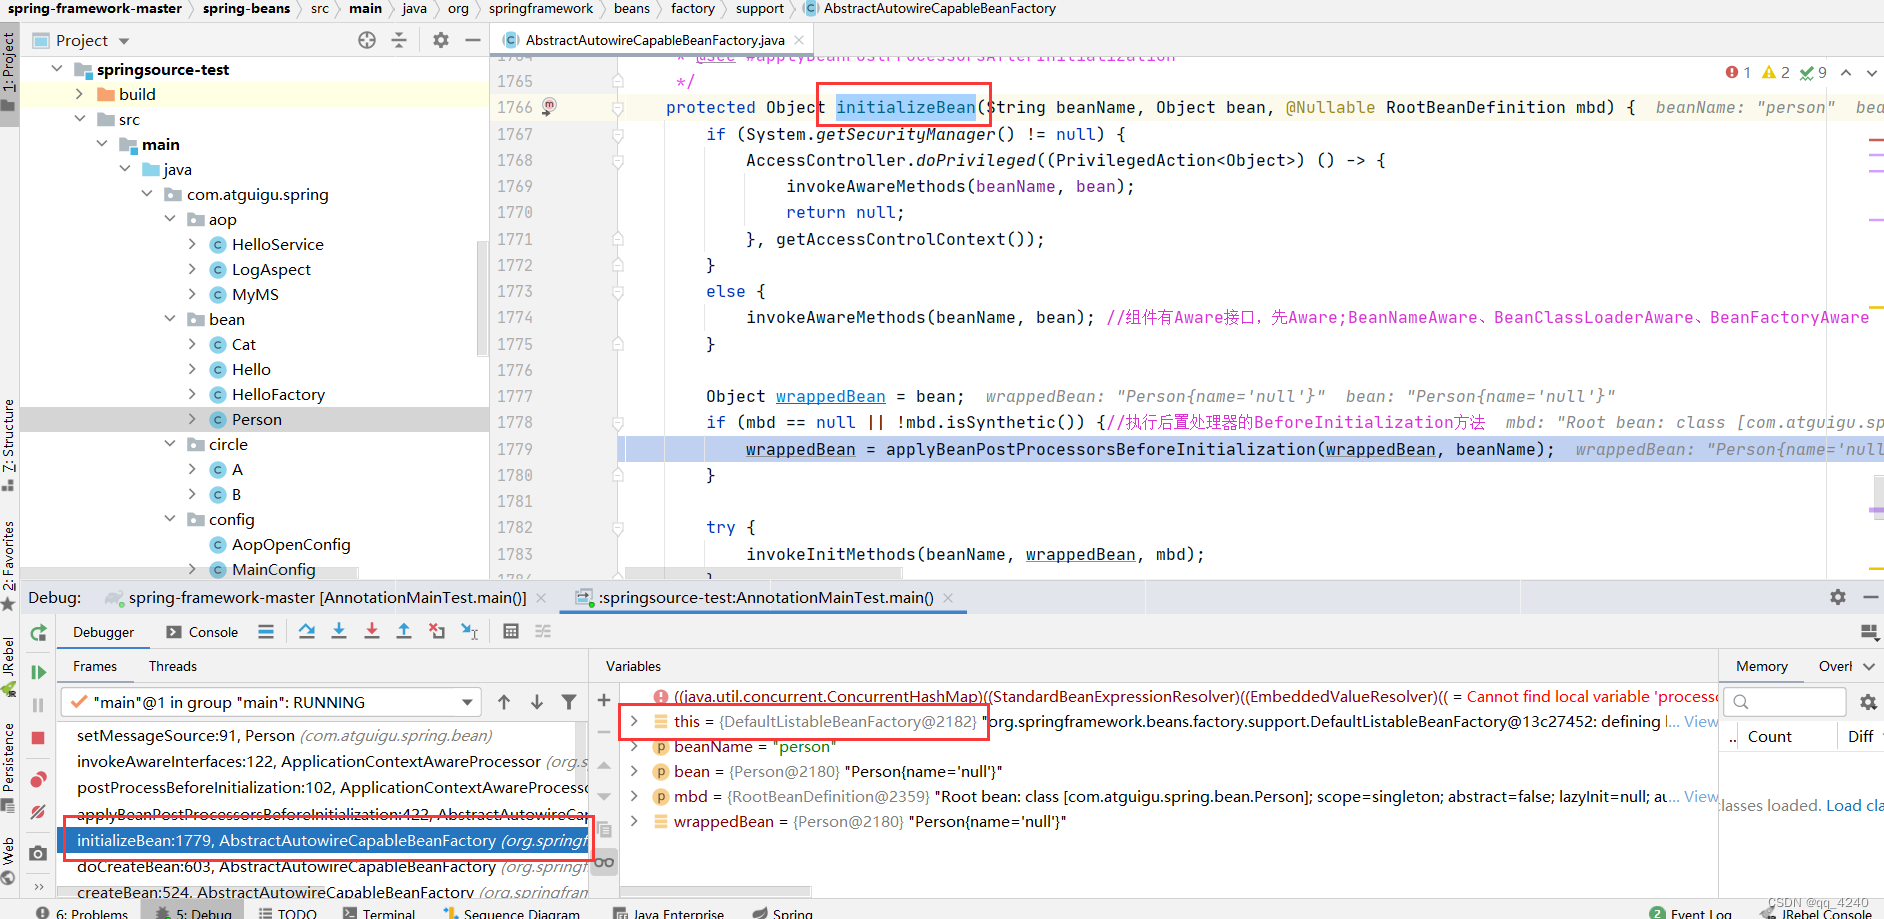
11.this->DefaultListableBeanFactory,调用到AbstractAutowireCapableBeanFactory的applyBeanPostProcessorsBeforeInitialization()

11.this->ApplicationContextAwareProcessor,调用postProcessBeforeInitialization()

12.this->ApplicationContextAwareProcessor,调用invokeAwareInterfaces()
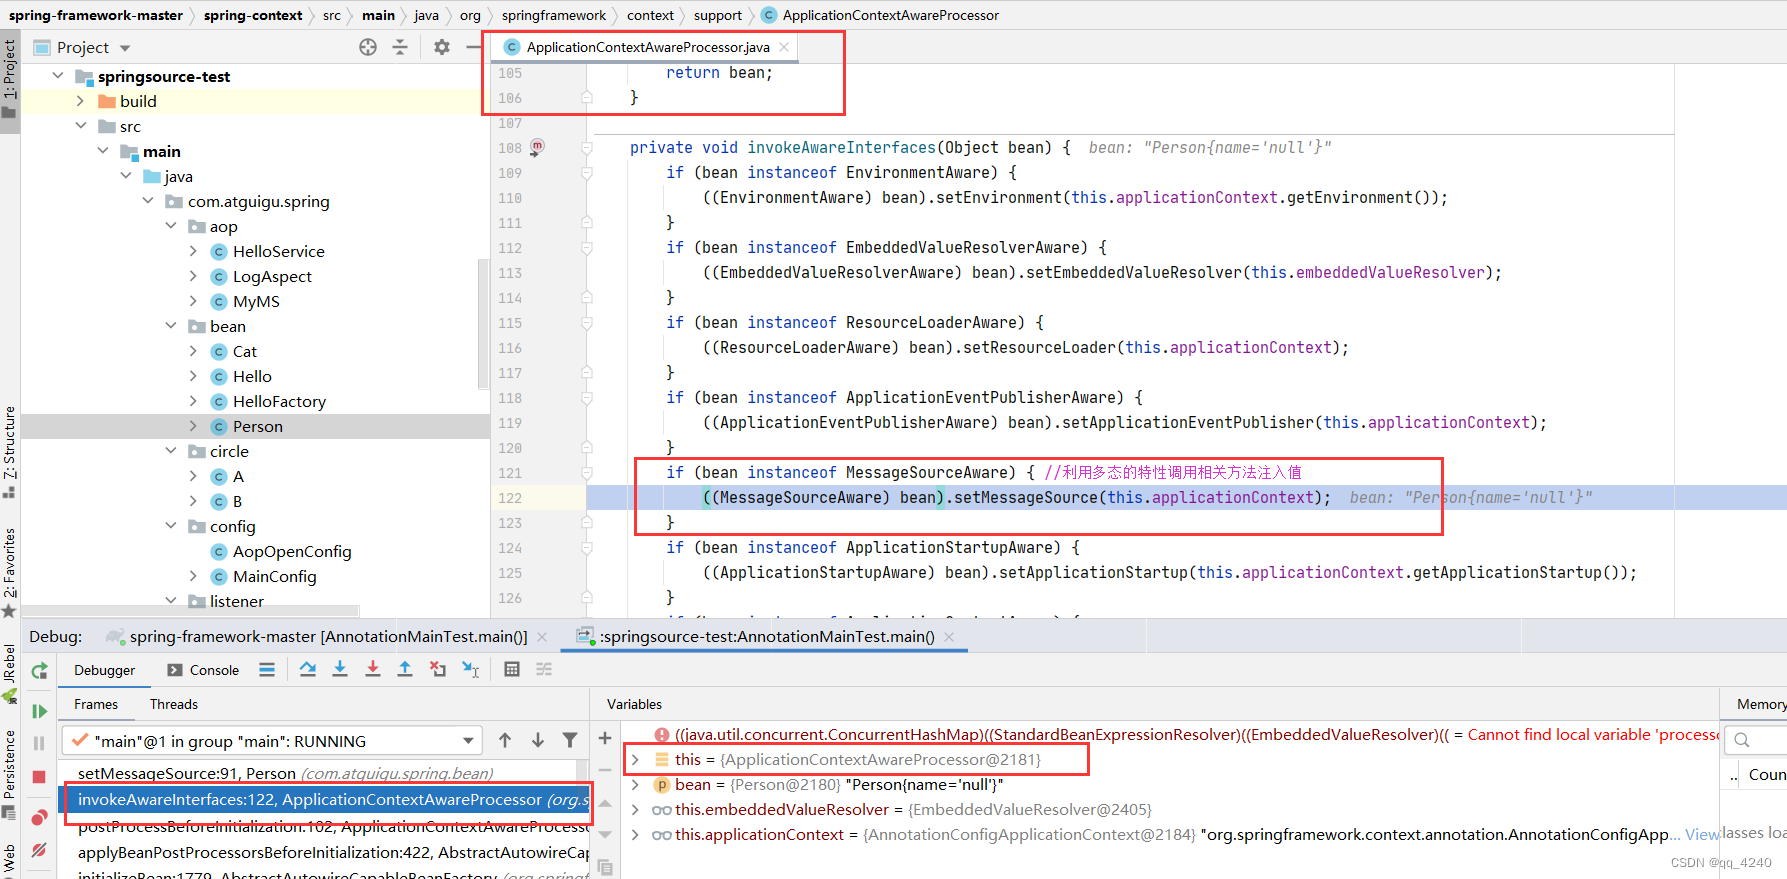
13.person利用反射调用到实现方法
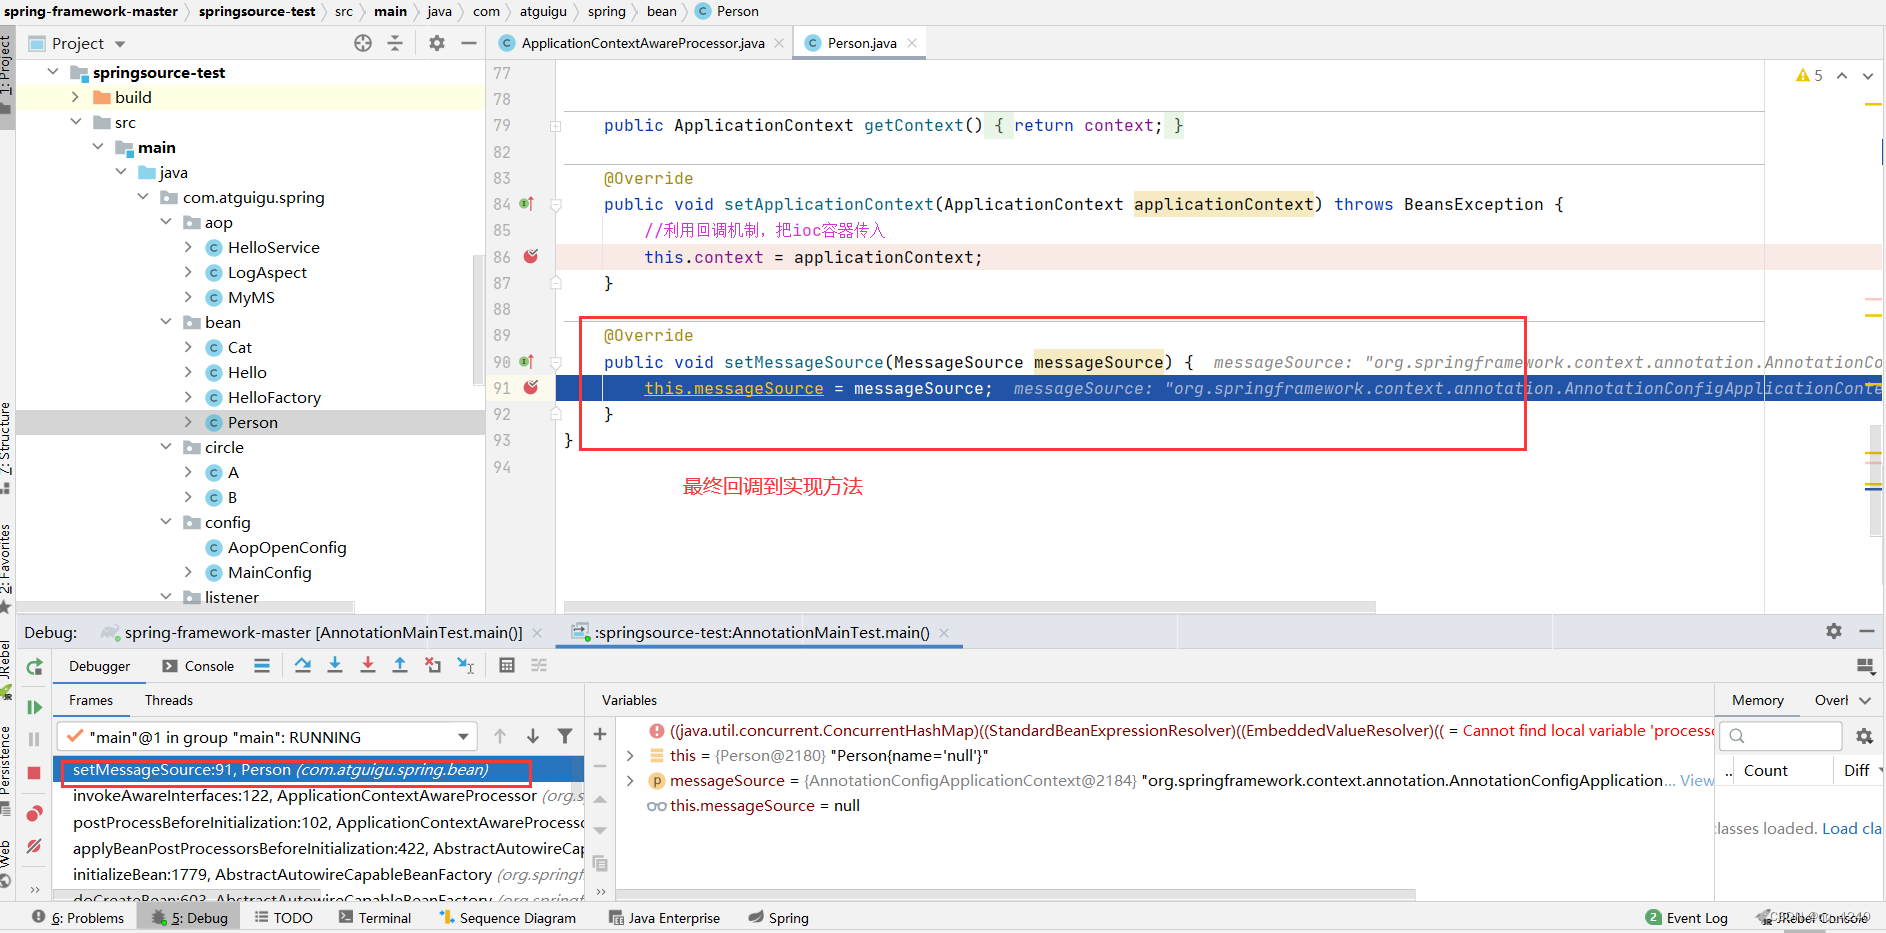
总结:
- person创建Bean时机,在finishBeanFactoryInitialization()
- setApplicationContext,也发生在finishBeanFactoryInitialization()
- 处理ApplicationContextAware接口,是因为Spring为其创建了对应的ApplicationContextAwareProcessor后置处理器,该类实现了BeanPostProcessor接口。在Bean增强环节,调用了对应方法。
 * <p>Application contexts will automatically register this with their
 * underlying bean factory. Applications do not use this directly.
 * BeanPostProcessor:Bean的后置处理器
 * @author Juergen Hoeller
 * @author Costin Leau
 * @author Chris Beams
 * @since 10.10.2003
 * @see org.springframework.context.EnvironmentAware
 * @see org.springframework.context.EmbeddedValueResolverAware
 * @see org.springframework.context.ResourceLoaderAware
 * @see org.springframework.context.ApplicationEventPublisherAware
 * @see org.springframework.context.MessageSourceAware
 * @see org.springframework.context.ApplicationContextAware
 * @see org.springframework.context.support.AbstractApplicationContext#refresh()
 */
class ApplicationContextAwareProcessor implements BeanPostProcessor {}
ApplicationContextAwareProcessor什么时候被Spring创建的?
将ApplicationContextAwareProcessor的构造方法打上断点
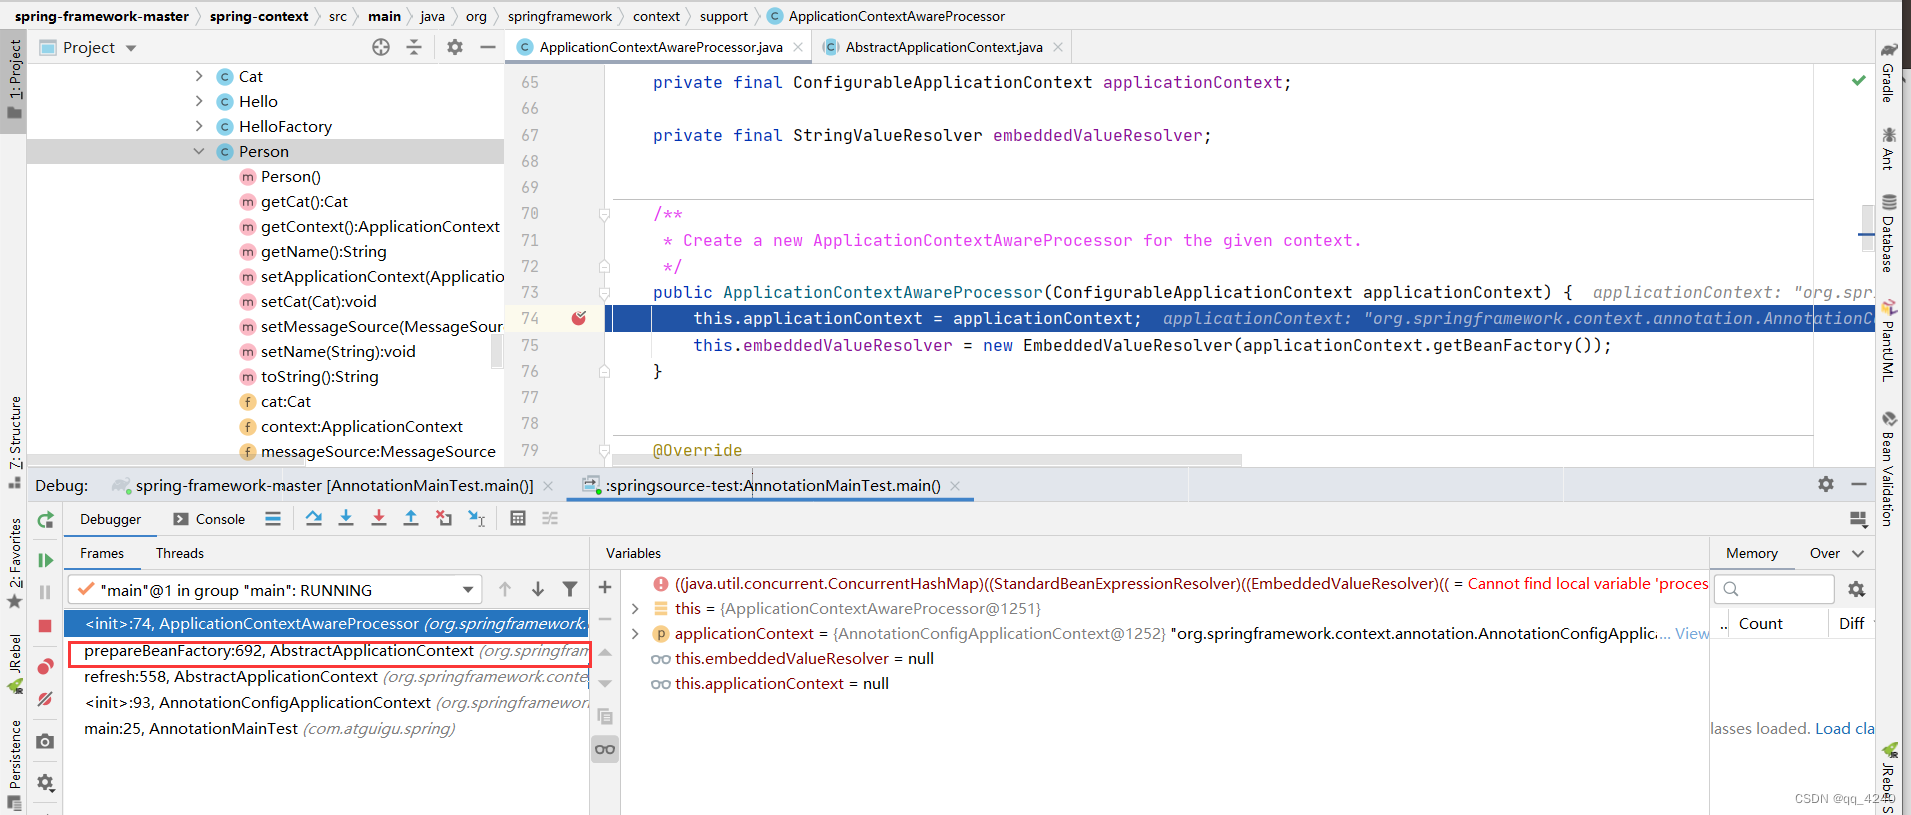
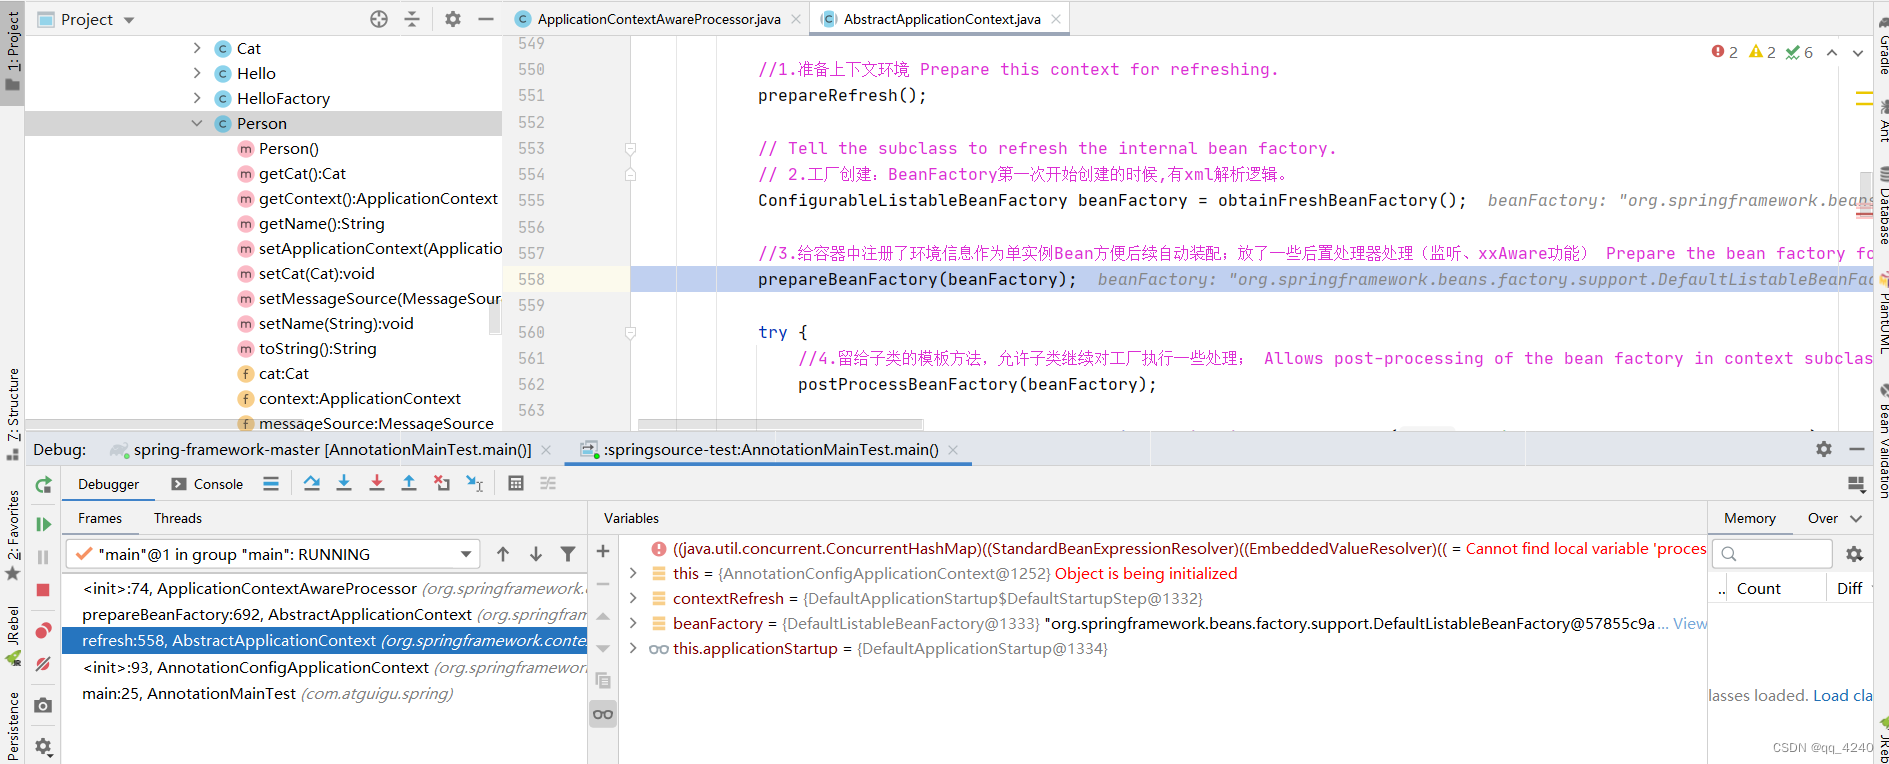
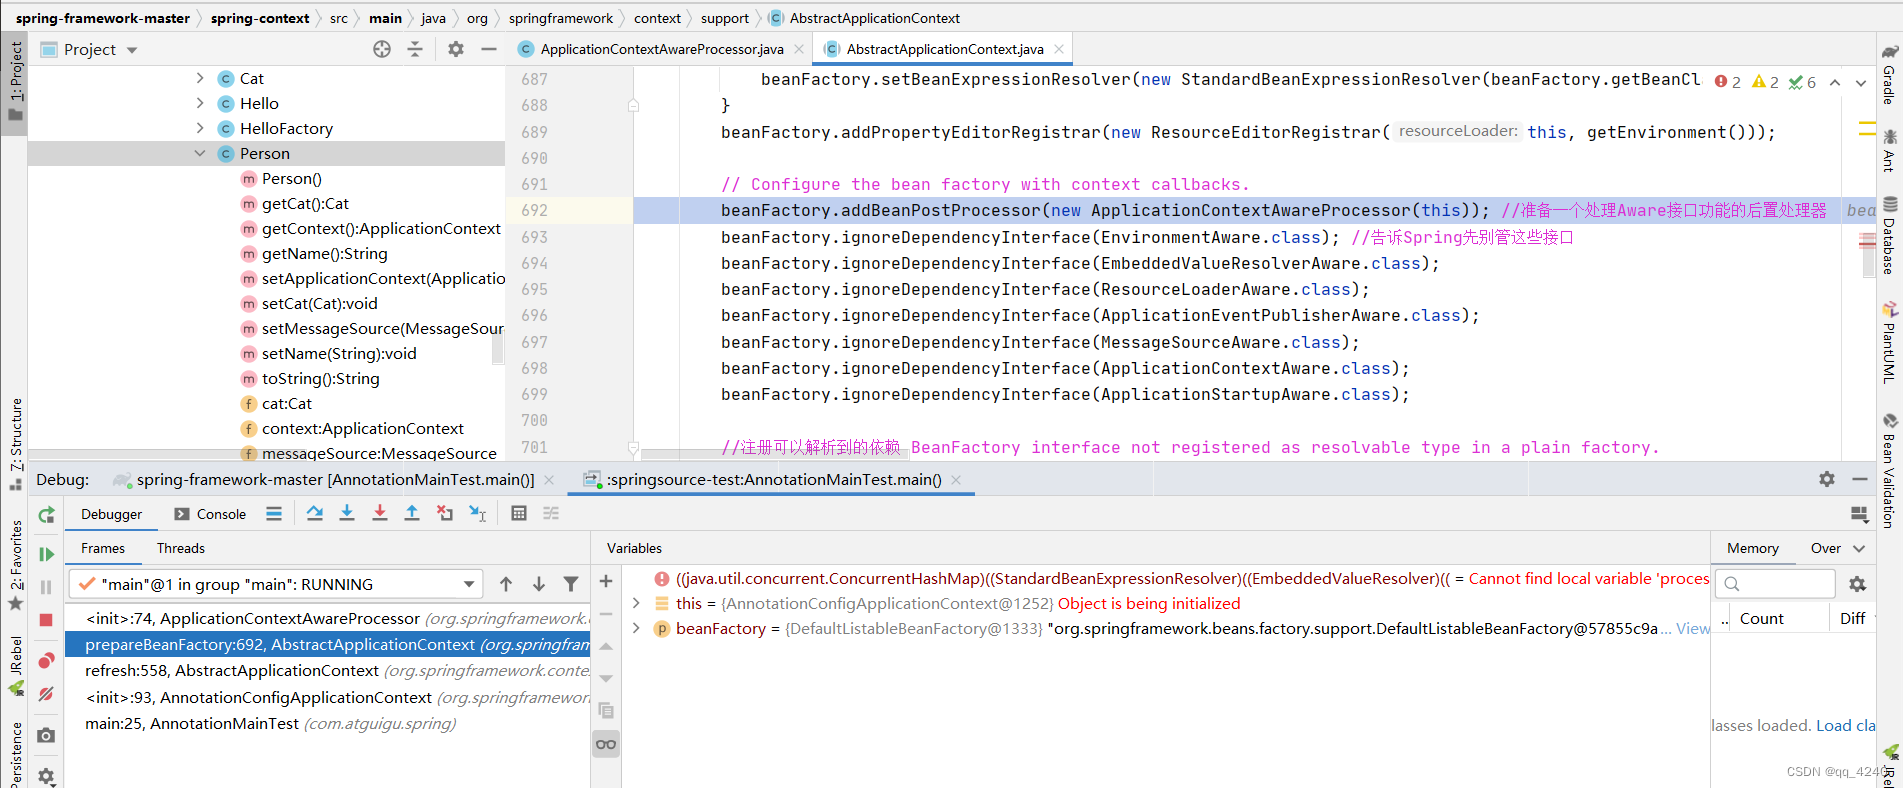
在prepareBeanFactory(),Spring直接new出来方法容器里。
3.BeanFactoryPostProcessor
这个接口增强了什么?
spring底层类ConfigurationClassPostProcessor给我们做了示例
/**
 * {@link BeanFactoryPostProcessor} used for bootstrapping processing of
 * {@link Configuration @Configuration} classes.
 *
 * <p>Registered by default when using {@code <context:annotation-config/>} or
 * {@code <context:component-scan/>}. Otherwise, may be declared manually as
 * with any other {@link BeanFactoryPostProcessor}.
 *
 * <p>This post processor is priority-ordered as it is important that any
 * {@link Bean @Bean} methods declared in {@code @Configuration} classes have
 * their corresponding bean definitions registered before any other
 * {@code BeanFactoryPostProcessor} executes.
 * 主要用来解析主配置类的
 * @author Chris Beams
 * @author Juergen Hoeller
 * @author Phillip Webb
 * @author Sam Brannen
 * @since 3.0
 */
public class ConfigurationClassPostProcessor implements BeanDefinitionRegistryPostProcessor,
		PriorityOrdered, ResourceLoaderAware, ApplicationStartupAware, BeanClassLoaderAware, EnvironmentAware {}
ConfigurationClassPostProcessor 会解析我们的配置类,注册Bean定义信息。
4.探索@Autowired执行时机
断点如下

还是发生在finishBeanFactoryInitialization(beanFactory)-->doCreateBean()-->populateBean()属性设置
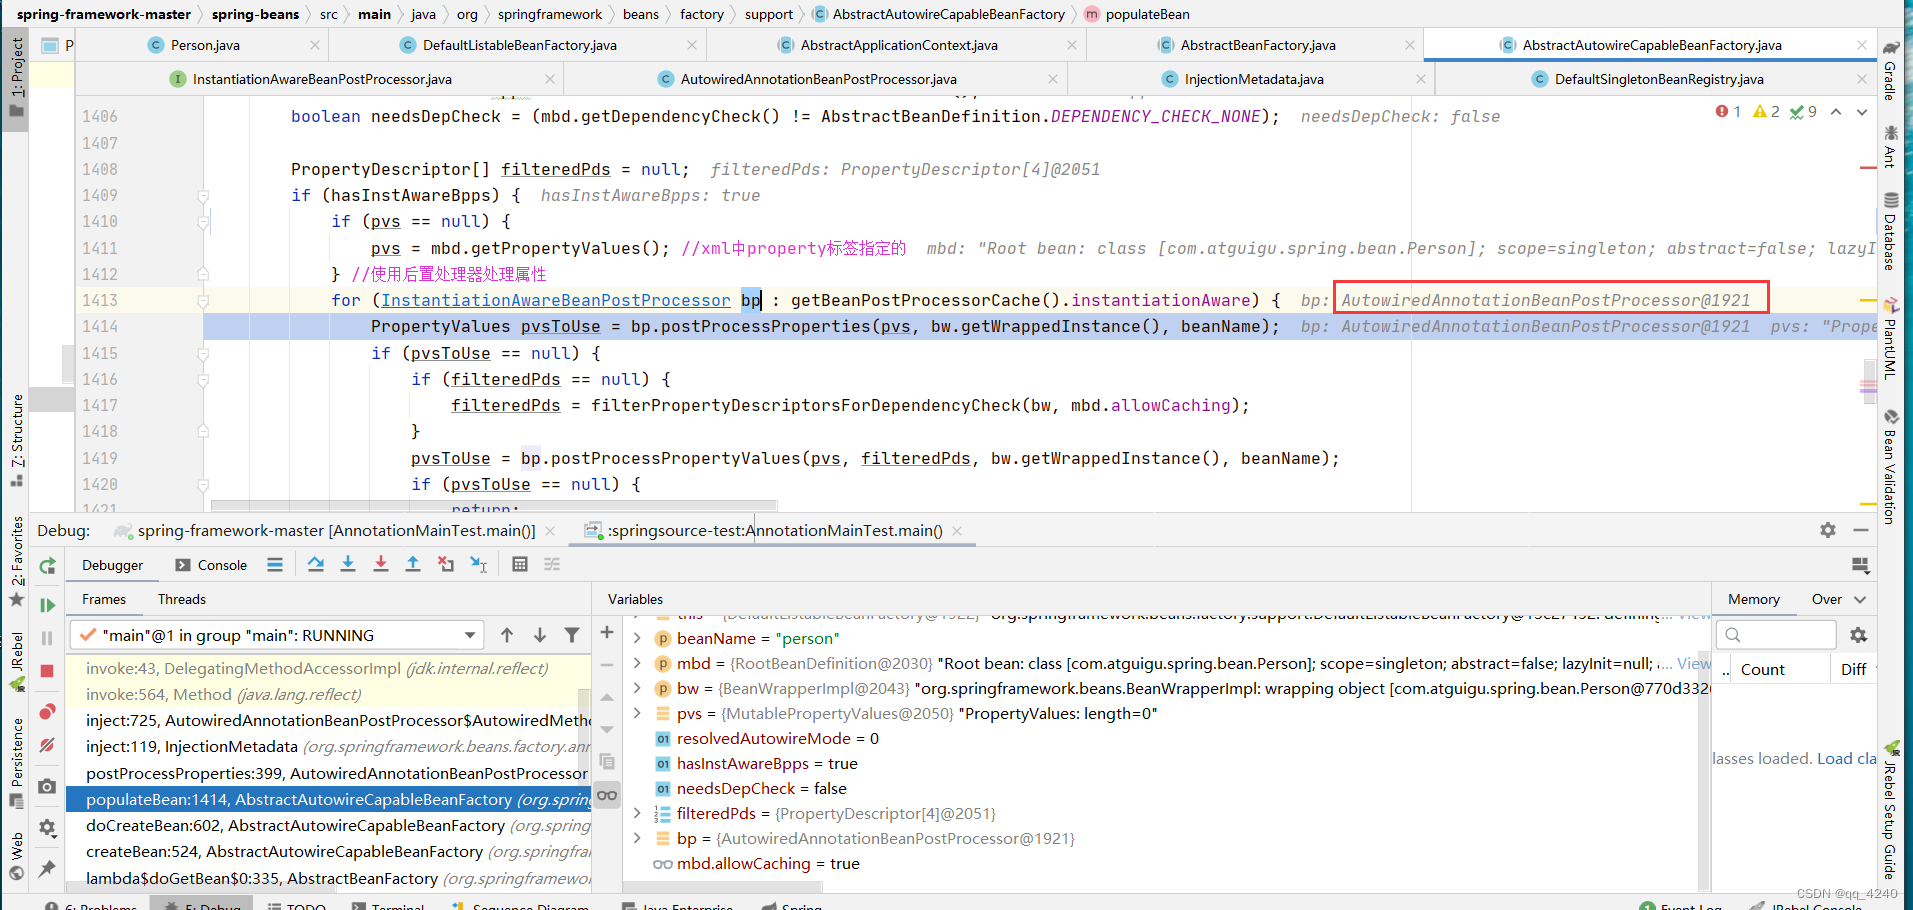
后置处理器是AutowiredAnnotationBeanPostProcessor,最终还是属于BeanPostProcessor
5.探索BeanPostProcessor 干预生命周期过程


 1806
1806


 被折叠的 条评论
为什么被折叠?
被折叠的 条评论
为什么被折叠?
 到【灌水乐园】发言


