


目录
1.2.1 android系统中各种xxx.rc文件结构含义
一,android系统整体框架

1.1 用户空间启动入口
bionic/libc/bionic/libc_init_static.cpp是整个系统启动入口,这段代码是通过汇编调用过来It is called from,arch-$ARCH/bionic/crtbegin_static.S
__noreturn void __libc_init(void* raw_args,
                            void (*onexit)(void) __unused,
                            int (*slingshot)(int, char**, char**),
                            structors_array_t const * const structors) {
  KernelArgumentBlock args(raw_args);
  __libc_init_main_thread(args);

  // Initializing the globals requires TLS to be available for errno.
  __init_thread_stack_guard(__get_thread());
  __libc_init_globals(args);

  __libc_init_AT_SECURE(args);
  __libc_init_common(args);

  apply_gnu_relro();

  // Several Linux ABIs don't pass the onexit pointer, and the ones that
  // do never use it.  Therefore, we ignore it.

  call_array(structors->preinit_array);
  call_array(structors->init_array);

  // The executable may have its own destructors listed in its .fini_array
  // so we need to ensure that these are called when the program exits
  // normally.
  if (structors->fini_array != NULL) {
    __cxa_atexit(__libc_fini,structors->fini_array,NULL);
  }

  exit(slingshot(args.argc, args.argv, args.envp));
}
1.2 init.cpp启动和流程分析
最后会调用到init.cpp,在init.cpp里面会设置系统环境变量
int main(int argc, char** argv) {
    if (!strcmp(basename(argv[0]), "ueventd")) {
        return ueventd_main(argc, argv);
    }

    if (!strcmp(basename(argv[0]), "watchdogd")) {
        return watchdogd_main(argc, argv);
    }

    if (REBOOT_BOOTLOADER_ON_PANIC) {
        InstallRebootSignalHandlers();
    }

    add_environment("PATH", _PATH_DEFPATH);
add_environment("PATH", _PATH_DEFPATH);就是这是系统常用的一些命令,_PATH_DEFPATH的值:
#define _PATH_DEFPATH "/sbin:/system/sbin:/system/bin:/system/xbin:/vendor/bin:/vendor/xbin"为后续准备
首次启动的时候,还需要挂载文件系统,创建需要的文件夹,并且设置对应的权限
if (is_first_stage) {
        boot_clock::time_point start_time = boot_clock::now();

        // Clear the umask.
        umask(0);

        // Get the basic filesystem setup we need put together in the initramdisk
        // on / and then we'll let the rc file figure out the rest.
        mount("tmpfs", "/dev", "tmpfs", MS_NOSUID, "mode=0755");
        mkdir("/dev/pts", 0755);
        mkdir("/dev/socket", 0755);
        mount("devpts", "/dev/pts", "devpts", 0, NULL);
        #define MAKE_STR(x) __STRING(x)
        mount("proc", "/proc", "proc", 0, "hidepid=2,gid=" MAKE_STR(AID_READPROC));
        // Don't expose the raw commandline to unprivileged processes.
        chmod("/proc/cmdline", 0440);
        gid_t groups[] = { AID_READPROC };
        setgroups(arraysize(groups), groups);
        mount("sysfs", "/sys", "sysfs", 0, NULL);
        mount("selinuxfs", "/sys/fs/selinux", "selinuxfs", 0, NULL);
        mknod("/dev/kmsg", S_IFCHR | 0600, makedev(1, 11));
        mknod("/dev/random", S_IFCHR | 0666, makedev(1, 8));
        mknod("/dev/urandom", S_IFCHR | 0666, makedev(1, 9));
设置系统安全策略
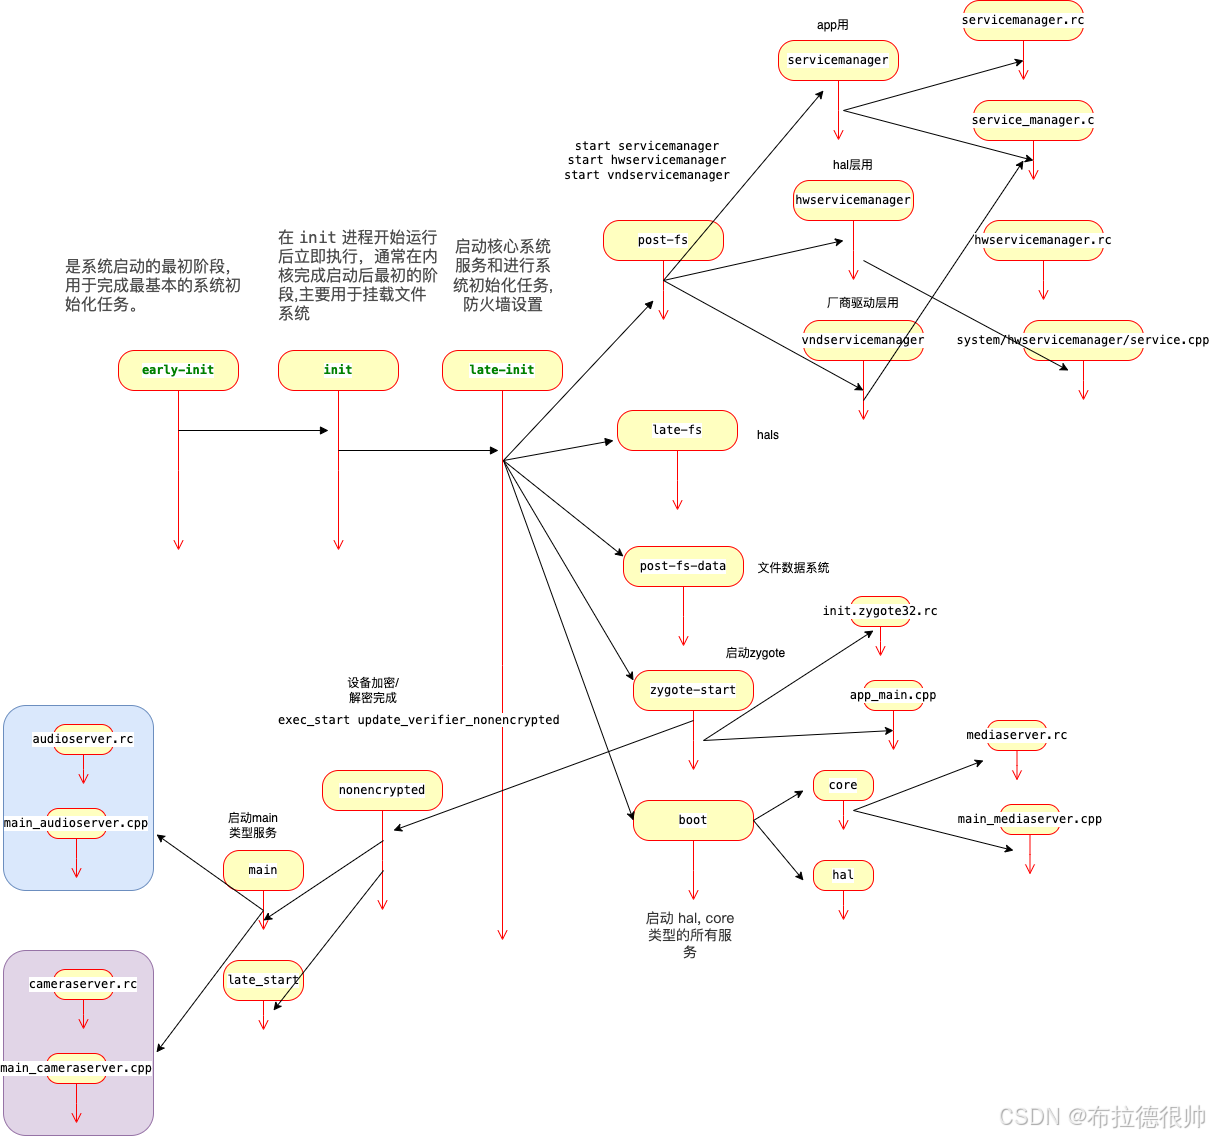
selinux_initialize(true);设置解析init.rc文件的服务,开始准备解析init.rc文件,注意这里的init.rc文件,
在8.0中对init.rc文件进行了拆分,可查看system\core\rootdir目录,包括:
init.zygote32.rc:Zygote对应的执行程序是app_process(纯32位模式);
init.zygote64.rc:Zygote对应的执行程序是app_process64(纯64位模式);
init.zygote32_64.rc:启动两个Zygote进程( zygote 和 zygote_secondary),对应的执行程序是app_process32(主模式)和app_process64;
init.zygote64_32.rc:启动两个Zygote进程( zygote 和 zygote_secondary),对应的执行程序是app_process64(主模式)和app_process32。一个是在32位环境运行,一个是64位环境运行
特别注意这段代码

我们可以看到虽然在8.0中对init.rc文件进行了拆分,但是把这些核心的rc文件都通过import的方式引用进来,做到了指责单一
通过分析/Volumes/aosp/android-8.1.0_r52/system/core/rootdir/init.zygote32.rc文件可以看到,如果 zygote 服务重启时,系统将会重启一些其他关键服务:
audioserver:管理音频相关功能。
cameraserver:管理摄像头服务。
media:处理媒体相关服务。
netd:网络管理服务,负责网络接口的管理。
wificond:管理 Wi-Fi 连接的服务。
service zygote /system/bin/app_process -Xzygote /system/bin --zygote --start-system-server
    class main
    priority -20
    user root
    group root readproc
    socket zygote stream 660 root system
    onrestart write /sys/android_power/request_state wake
    onrestart write /sys/power/state on
    onrestart restart audioserver
    onrestart restart cameraserver
    onrestart restart media
    onrestart restart netd
    onrestart restart wificond
    writepid /dev/cpuset/foreground/tasks
 同时启动surfaceflinger进程,对应的surfaceflinger.rc文件
service surfaceflinger /system/bin/surfaceflinger
    class core animation
    user system
    group graphics drmrpc readproc
    onrestart restart zygote
    writepid /dev/stune/foreground/tasks
    socket pdx/system/vr/display/client     stream 0666 system graphics u:object_r:pdx_display_client_endpoint_socket:s0
    socket pdx/system/vr/display/manager    stream 0666 system graphics u:object_r:pdx_display_manager_endpoint_socket:s0
    socket pdx/system/vr/display/vsync      stream 0666 system graphics u:object_r:pdx_display_vsync_endpoint_socket:s0
对于surfaceflinger我们单独用一篇文章介绍
,对应的入口函数:
/Volumes/aosp/android-8.1.0_r52/frameworks/native/services/surfaceflinger/main_surfaceflinger.cpp
int main(int, char**) {
startHidlServices();
signal(SIGPIPE, SIG_IGN);
// When SF is launched in its own process, limit the number of
// binder threads to 4.
ProcessState::self()->setThreadPoolMaxThreadCount(4);
// start the thread pool
sp<ProcessState> ps(ProcessState::self());
ps->startThreadPool();
// instantiate surfaceflinger
sp<SurfaceFlinger> flinger = new SurfaceFlinger();
setpriority(PRIO_PROCESS, 0, PRIORITY_URGENT_DISPLAY);
set_sched_policy(0, SP_FOREGROUND);
// Put most SurfaceFlinger threads in the system-background cpuset
// Keeps us from unnecessarily using big cores
// Do this after the binder thread pool init
if (cpusets_enabled()) set_cpuset_policy(0, SP_SYSTEM);
// initialize before clients can connect
flinger->init();
// publish surface flinger
sp<IServiceManager> sm(defaultServiceManager());
sm->addService(String16(SurfaceFlinger::getServiceName()), flinger, false);
// publish GpuService
sp<GpuService> gpuservice = new GpuService();
sm->addService(String16(GpuService::SERVICE_NAME), gpuservice, false);
struct sched_param param = {0};
param.sched_priority = 2;
if (sched_setscheduler(0, SCHED_FIFO, ¶m) != 0) {
ALOGE("Couldn't set SCHED_FIFO");
}
// run surface flinger in this thread
flinger->run();
return 0;
}1.2.1 android系统中各种xxx.rc文件结构含义
# 注释
service 服务名 可执行文件路径
class 服务类别
user 用户
group 用户组
socket socket名称 协议类型 权限 所有者 用户组
onrestart 执行的命令
writepid PID文件路径
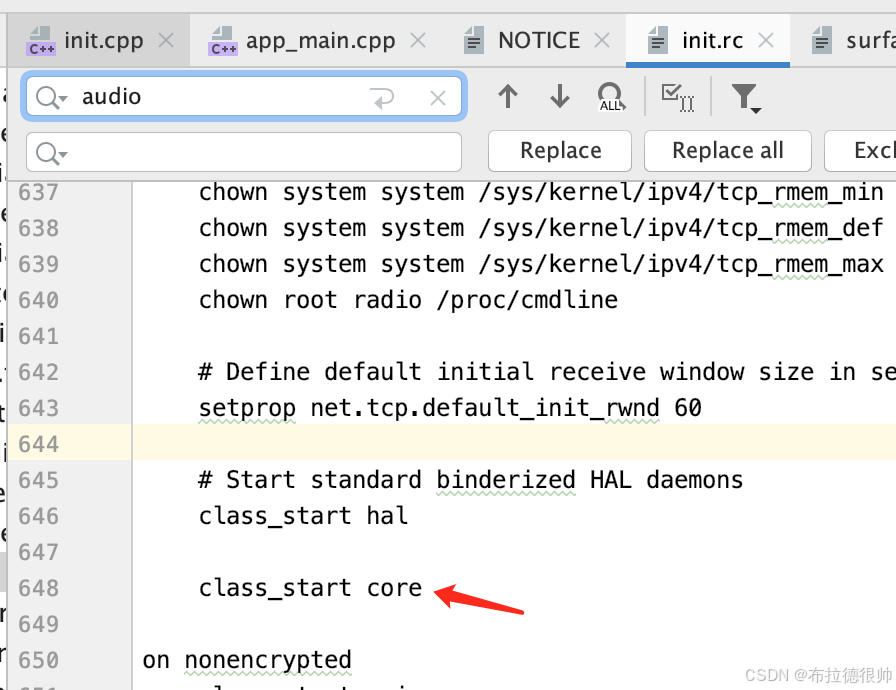
1.2.2 android系统init启动服务顺序
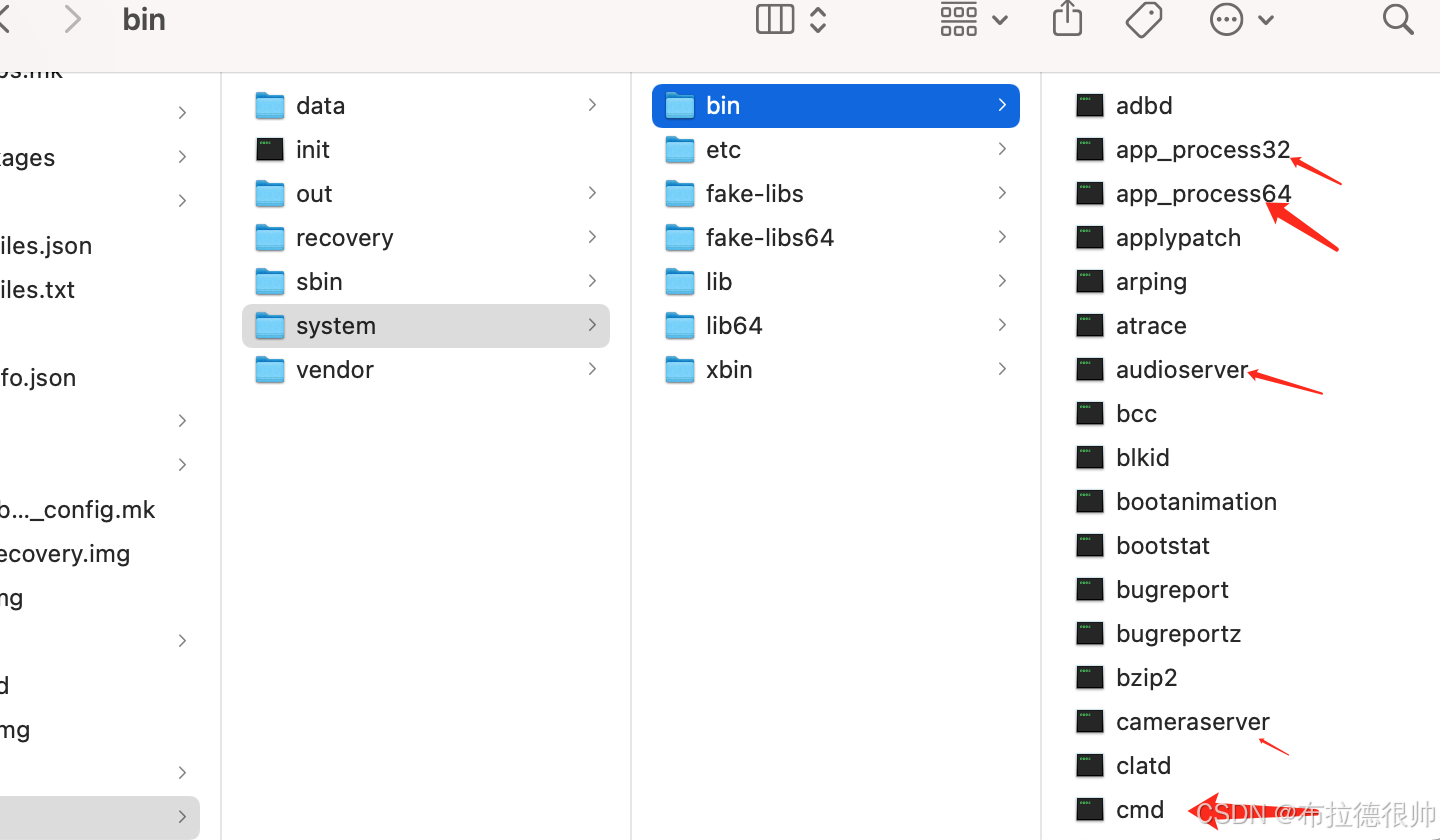
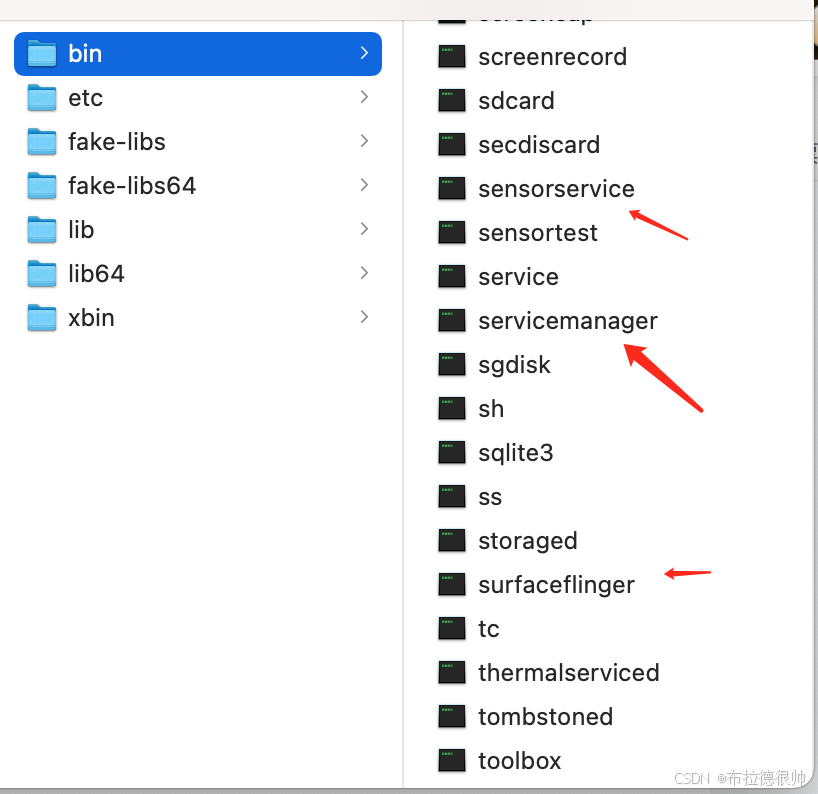
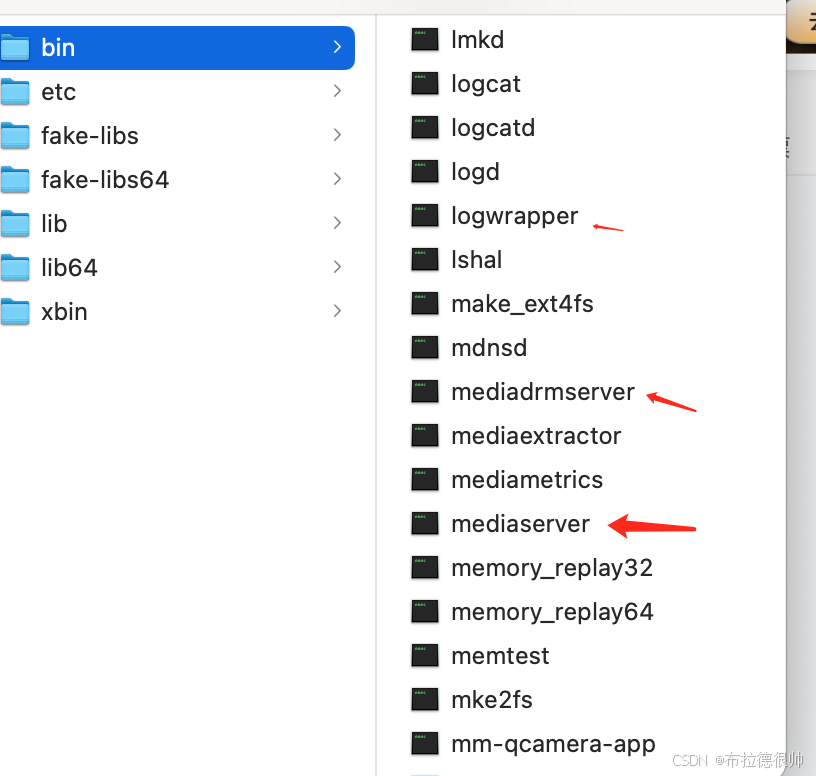
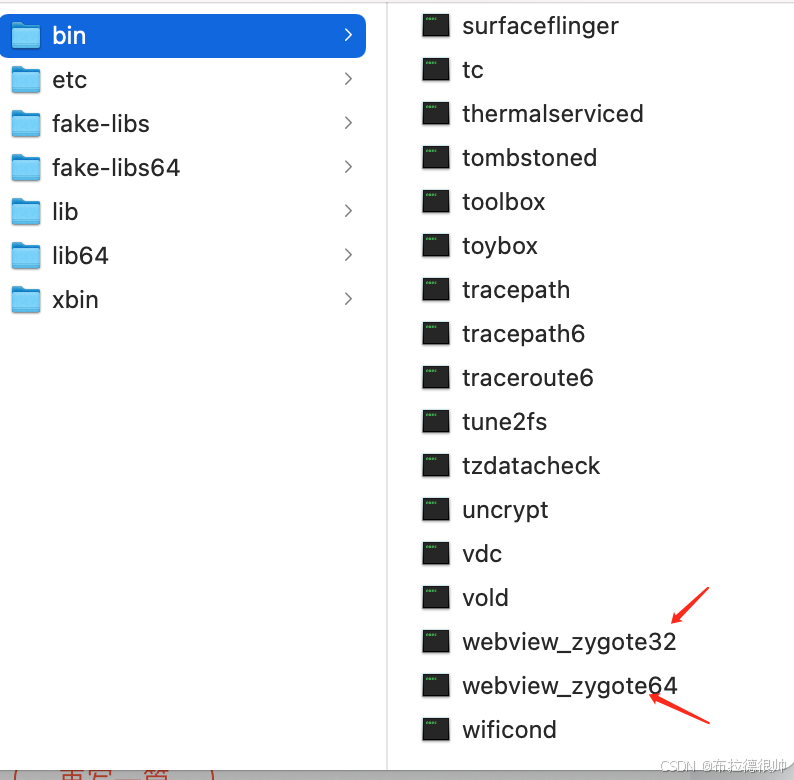
上面说的这些rc文件对应的可执行程序在编译完成系统以后的这个目录下/Volumes/aosp/android-8.1.0_r52/out/target/product/angler/symbols/system
,
1.2.3 小结
对1.2.2章节讲解的 init进程fork其他进程做一个总结可以得出以下几点结论
1)凡是通过init fork出来的进程都会有一个对应的xxx.rc文件,这个xxx.rc文件里面定义了启动对应进程所需要的一个参数,以及对应进程的类别,同时和这个xxx.rc文件对应的有一个main_xxx.app/xx_main.cpp文件
2)凡是通过init fork出来的进程都会有一个编译出来一个二进制可执行的文件,这个文件在/Volumes/aosp/android-8.1.0_r52/out/target/product/angler/symbols/system目录下,二进制对应的源码是和xxx.rc在一起
3)凡是通过init fork出来的进程都不能在android studio里面断点 attach到,如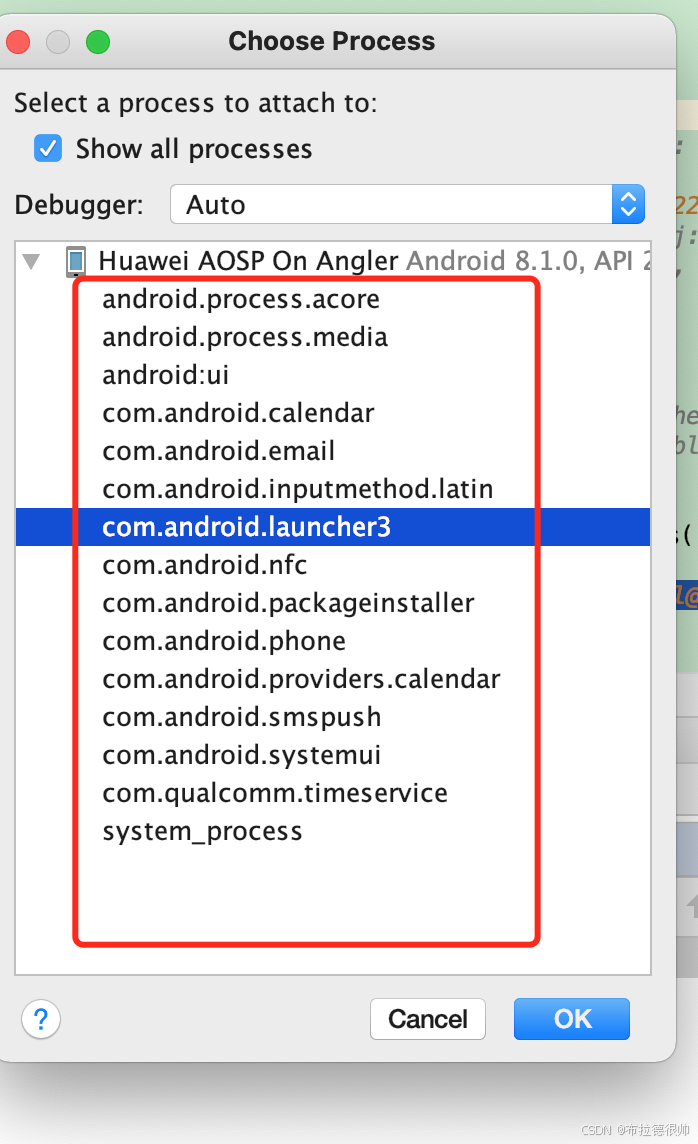
3)凡是通过zygote进程fork出来的子进程都可以在android studio里面attach到
ActionManager& am = ActionManager::GetInstance();
    ServiceManager& sm = ServiceManager::GetInstance();
    Parser& parser = Parser::GetInstance();

    parser.AddSectionParser("service", std::make_unique<ServiceParser>(&sm));
    parser.AddSectionParser("on", std::make_unique<ActionParser>(&am));
    parser.AddSectionParser("import", std::make_unique<ImportParser>(&parser));
    std::string bootscript = GetProperty("ro.boot.init_rc", "");
    if (bootscript.empty()) {
        parser.ParseConfig("/init.rc");
        parser.set_is_system_etc_init_loaded(
                parser.ParseConfig("/system/etc/init"));
        parser.set_is_vendor_etc_init_loaded(
                parser.ParseConfig("/vendor/etc/init"));
        parser.set_is_odm_etc_init_loaded(parser.ParseConfig("/odm/etc/init"));
    } else {
        parser.ParseConfig(bootscript);
        parser.set_is_system_etc_init_loaded(true);
        parser.set_is_vendor_etc_init_loaded(true);
        parser.set_is_odm_etc_init_loaded(true);
    }
这里就到了最关键的init.rc文件了,截取其中的一部分看下,并且设置触发器,只有设置了这些书触发器以后那么init.rc里面的文件会自动执行
 am.QueueEventTrigger("early-init");

    // Queue an action that waits for coldboot done so we know ueventd has set up all of /dev...
    am.QueueBuiltinAction(wait_for_coldboot_done_action, "wait_for_coldboot_done");
    // ... so that we can start queuing up actions that require stuff from /dev.
    am.QueueBuiltinAction(mix_hwrng_into_linux_rng_action, "mix_hwrng_into_linux_rng");
    am.QueueBuiltinAction(set_mmap_rnd_bits_action, "set_mmap_rnd_bits");
    am.QueueBuiltinAction(set_kptr_restrict_action, "set_kptr_restrict");
    am.QueueBuiltinAction(keychord_init_action, "keychord_init");
    am.QueueBuiltinAction(console_init_action, "console_init");

    // Trigger all the boot actions to get us started.
    am.QueueEventTrigger("init");
# Now we can start zygote for devices with file based encryption
trigger zygote-start
# Load persist properties and override properties (if enabled) from /data.
trigger load_persist_props_action
# Remove a file to wake up anything waiting for firmware.
trigger firmware_mounts_complete
trigger early-boot
trigger boot
on zygote-start && property:ro.crypto.state=unsupported
# A/B update verifier that marks a successful boot.
exec_start update_verifier_nonencrypted
start netd
start zygote
start zygote_secondary 开始挂载文件系统
on init
    sysclktz 0

    # Mix device-specific information into the entropy pool
    copy /proc/cmdline /dev/urandom
    copy /default.prop /dev/urandom

    # Backward compatibility.
    symlink /system/etc /etc
    symlink /sys/kernel/debug /d

    # Link /vendor to /system/vendor for devices without a vendor partition.
    symlink /system/vendor /vendor

    # Create energy-aware scheduler tuning nodes
    mkdir /dev/stune
    mount cgroup none /dev/stune schedtune
    mkdir /dev/stune/foreground
    mkdir /dev/stune/background
    mkdir /dev/stune/top-app
    mkdir /dev/stune/rt
    chown system system /dev/stune
    chown system system /dev/stune/foreground
    chown system system /dev/stune/background
    chown system system /dev/stune/top-app
    chown system system /dev/stune/rt
    chown system system /dev/stune/tasks
    chown system system /dev/stune/foreground/tasks
    chown system system /dev/stune/background/tasks
    chown system system /dev/stune/top-app/tasks
    chown system system /dev/stune/rt/tasks
    chmod 0664 /dev/stune/tasks
    chmod 0664 /dev/stune/foreground/tasks
    chmod 0664 /dev/stune/background/tasks
    chmod 0664 /dev/stune/top-app/tasks
    chmod 0664 /dev/stune/rt/tasks

    # Mount staging areas for devices managed by vold
    # See storage config details at http://source.android.com/tech/storage/
    mount tmpfs tmpfs /mnt mode=0755,uid=0,gid=1000
    restorecon_recursive /mnt

    mount configfs none /config
    chmod 0775 /config/sdcardfs
    chown system package_info /config/sdcardfs

    mkdir /mnt/secure 0700 root root
    mkdir /mnt/secure/asec 0700 root root
    mkdir /mnt/asec 0755 root system
    mkdir /mnt/obb 0755 root system
    mkdir /mnt/media_rw 0750 root media_rw
    mkdir /mnt/user 0755 root root
    mkdir /mnt/user/0 0755 root root
    mkdir /mnt/expand 0771 system system
    mkdir /mnt/appfuse 0711 root root

    # Storage views to support runtime permissions
    mkdir /mnt/runtime 0700 root root
    mkdir /mnt/runtime/default 0755 root root
    mkdir /mnt/runtime/default/self 0755 root root
    mkdir /mnt/runtime/read 0755 root root
    mkdir /mnt/runtime/read/self 0755 root root
    mkdir /mnt/runtime/write 0755 root root
    mkdir /mnt/runtime/write/self 0755 root root

    # Symlink to keep legacy apps working in multi-user world
    symlink /storage/self/primary /sdcard
    symlink /storage/self/primary /mnt/sdcard
    symlink /mnt/user/0/primary /mnt/runtime/default/self/primary

    write /proc/sys/kernel/panic_on_oops 1
    write /proc/sys/kernel/hung_task_timeout_secs 0
    write /proc/cpu/alignment 4

    # scheduler tunables
    # Disable auto-scaling of scheduler tunables with hotplug. The tunables
    # will vary across devices in unpredictable ways if allowed to scale with
    # cpu cores.
    write /proc/sys/kernel/sched_tunable_scaling 0
    write /proc/sys/kernel/sched_latency_ns 10000000
    write /proc/sys/kernel/sched_wakeup_granularity_ns 2000000
    write /proc/sys/kernel/sched_child_runs_first 0

    write /proc/sys/kernel/randomize_va_space 2
    write /proc/sys/vm/mmap_min_addr 32768
    write /proc/sys/net/ipv4/ping_group_range "0 2147483647"
    write /proc/sys/net/unix/max_dgram_qlen 600
    write /proc/sys/kernel/sched_rt_runtime_us 950000
    write /proc/sys/kernel/sched_rt_period_us 1000000

    # Assign reasonable ceiling values for socket rcv/snd buffers.
    # These should almost always be overridden by the target per the
    # the corresponding technology maximums.
    write /proc/sys/net/core/rmem_max  262144
    write /proc/sys/net/core/wmem_max  262144

    # reflect fwmark from incoming packets onto generated replies
    write /proc/sys/net/ipv4/fwmark_reflect 1
    write /proc/sys/net/ipv6/fwmark_reflect 1

    # set fwmark on accepted sockets
    write /proc/sys/net/ipv4/tcp_fwmark_accept 1

    # disable icmp redirects
    write /proc/sys/net/ipv4/conf/all/accept_redirects 0
    write /proc/sys/net/ipv6/conf/all/accept_redirects 0

    # /proc/net/fib_trie leaks interface IP addresses
    chmod 0400 /proc/net/fib_trie

    # Create cgroup mount points for process groups
    mkdir /dev/cpuctl
    mount cgroup none /dev/cpuctl cpu
    chown system system /dev/cpuctl
    chown system system /dev/cpuctl/tasks
    chmod 0666 /dev/cpuctl/tasks
    write /dev/cpuctl/cpu.rt_period_us 1000000
    write /dev/cpuctl/cpu.rt_runtime_us 950000

    # sets up initial cpusets for ActivityManager
    mkdir /dev/cpuset
    mount cpuset none /dev/cpuset

    # this ensures that the cpusets are present and usable, but the device's
    # init.rc must actually set the correct cpus
    mkdir /dev/cpuset/foreground
    copy /dev/cpuset/cpus /dev/cpuset/foreground/cpus
    copy /dev/cpuset/mems /dev/cpuset/foreground/mems
    mkdir /dev/cpuset/foreground/boost
    copy /dev/cpuset/cpus /dev/cpuset/foreground/boost/cpus
    copy /dev/cpuset/mems /dev/cpuset/foreground/boost/mems
    mkdir /dev/cpuset/background
    copy /dev/cpuset/cpus /dev/cpuset/background/cpus
    copy /dev/cpuset/mems /dev/cpuset/background/mems

    # system-background is for system tasks that should only run on
    # little cores, not on bigs
    # to be used only by init, so don't change system-bg permissions
    mkdir /dev/cpuset/system-background
    copy /dev/cpuset/cpus /dev/cpuset/system-background/cpus
    copy /dev/cpuset/mems /dev/cpuset/system-background/mems

    mkdir /dev/cpuset/top-app
    copy /dev/cpuset/cpus /dev/cpuset/top-app/cpus
    copy /dev/cpuset/mems /dev/cpuset/top-app/mems

    # change permissions for all cpusets we'll touch at runtime
    chown system system /dev/cpuset
    chown system system /dev/cpuset/foreground
    chown system system /dev/cpuset/foreground/boost
    chown system system /dev/cpuset/background
    chown system system /dev/cpuset/system-background
    chown system system /dev/cpuset/top-app
    chown system system /dev/cpuset/tasks
    chown system system /dev/cpuset/foreground/tasks
    chown system system /dev/cpuset/foreground/boost/tasks
    chown system system /dev/cpuset/background/tasks
    chown system system /dev/cpuset/system-background/tasks
    chown system system /dev/cpuset/top-app/tasks

    # set system-background to 0775 so SurfaceFlinger can touch it
    chmod 0775 /dev/cpuset/system-background

    chmod 0664 /dev/cpuset/foreground/tasks
    chmod 0664 /dev/cpuset/foreground/boost/tasks
    chmod 0664 /dev/cpuset/background/tasks
    chmod 0664 /dev/cpuset/system-background/tasks
    chmod 0664 /dev/cpuset/top-app/tasks
    chmod 0664 /dev/cpuset/tasks


    # qtaguid will limit access to specific data based on group memberships.
    #   net_bw_acct grants impersonation of socket owners.
    #   net_bw_stats grants access to other apps' detailed tagged-socket stats.
    chown root net_bw_acct /proc/net/xt_qtaguid/ctrl
    chown root net_bw_stats /proc/net/xt_qtaguid/stats

    # Allow everybody to read the xt_qtaguid resource tracking misc dev.
    # This is needed by any process that uses socket tagging.
    chmod 0644 /dev/xt_qtaguid

    # Create location for fs_mgr to store abbreviated output from filesystem
    # checker programs.
    mkdir /dev/fscklogs 0770 root system

    # pstore/ramoops previous console log
    mount pstore pstore /sys/fs/pstore
    chown system log /sys/fs/pstore/console-ramoops
    chmod 0440 /sys/fs/pstore/console-ramoops
    chown system log /sys/fs/pstore/console-ramoops-0
    chmod 0440 /sys/fs/pstore/console-ramoops-0
    chown system log /sys/fs/pstore/pmsg-ramoops-0
    chmod 0440 /sys/fs/pstore/pmsg-ramoops-0

    # enable armv8_deprecated instruction hooks
    write /proc/sys/abi/swp 1

    # Linux's execveat() syscall may construct paths containing /dev/fd
    # expecting it to point to /proc/self/fd
    symlink /proc/self/fd /dev/fd

    export DOWNLOAD_CACHE /data/cache

    # set RLIMIT_NICE to allow priorities from 19 to -20
    setrlimit 13 40 40

    # This allows the ledtrig-transient properties to be created here so
    # that they can be chown'd to system:system later on boot
    write /sys/class/leds/vibrator/trigger "transient"
整个解析init.rc文件的顺序
这里有一个很关键的地方就是
start_property_service();启动这个属性服务以后,最后会调用到init.c里面的
void handle_control_message(const std::string& msg, const std::string& name) {
    Service* svc = ServiceManager::GetInstance().FindServiceByName(name);
    if (svc == nullptr) {
        LOG(ERROR) << "no such service '" << name << "'";
        return;
    }

    if (msg == "start") {
        svc->Start();
    } else if (msg == "stop") {
        svc->Stop();
    } else if (msg == "restart") {
        svc->Restart();
    } else {
        LOG(ERROR) << "unknown control msg '" << msg << "'";
    }
}
通过epoll机制,开启epoll循环,没有任务的时候sleep让出cpu,直到epoll里面有事件,启动,关闭,重启服务,当执行的命令是启动zygote服务的时候,此时会调用/Volumes/aosp/android-8.1.0_r52/system/core/init/service.cpp
bool Service::Start() {
    // Starting a service removes it from the disabled or reset state and
    // immediately takes it out of the restarting state if it was in there.
    flags_ &= (~(SVC_DISABLED|SVC_RESTARTING|SVC_RESET|SVC_RESTART|SVC_DISABLED_START));

    // Running processes require no additional work --- if they're in the
    // process of exiting, we've ensured that they will immediately restart
    // on exit, unless they are ONESHOT.
    if (flags_ & SVC_RUNNING) {
        return false;
    }

    bool needs_console = (flags_ & SVC_CONSOLE);
    if (needs_console) {
        if (console_.empty()) {
            console_ = default_console;
        }

        // Make sure that open call succeeds to ensure a console driver is
        // properly registered for the device node
        int console_fd = open(console_.c_str(), O_RDWR | O_CLOEXEC);
        if (console_fd < 0) {
            PLOG(ERROR) << "service '" << name_ << "' couldn't open console '" << console_ << "'";
            flags_ |= SVC_DISABLED;
            return false;
        }
        close(console_fd);
    }

    struct stat sb;
    if (stat(args_[0].c_str(), &sb) == -1) {
        PLOG(ERROR) << "cannot find '" << args_[0] << "', disabling '" << name_ << "'";
        flags_ |= SVC_DISABLED;
        return false;
    }

    std::string scon;
    if (!seclabel_.empty()) {
        scon = seclabel_;
    } else {
        scon = ComputeContextFromExecutable(name_, args_[0]);
        if (scon == "") {
            return false;
        }
    }

    LOG(INFO) << "starting service '" << name_ << "'...";

    pid_t pid = -1;
    if (namespace_flags_) {
        pid = clone(nullptr, nullptr, namespace_flags_ | SIGCHLD, nullptr);
    } else {
        pid = fork();
    }
........
}
上面这段代码的含义,在这里会去fork一个进程,因为此时是创建zygote,所以此时会fork zygote进程,其主要流程如下:
是否正在运行,如正在运行,直接返回;
子进程是否启动,如未启动,调用fork并返回pid值;
如果以上正常,则调用ExpandArgsAndExecve启动该进程,完成Zygote的启动。
启动Zygote进程真正执行的路径为frameworks\base\cmds\app_process\app_main.cpp下的main函数,app_main.cpp是如何被调用起来的,就是用过这段/Volumes/aosp/android-8.1.0_r52/system/core/rootdir/init.zygote32.rc文件中定义的脚步执行的
service zygote /system/bin/app_process -Xzygote /system/bin --zygote --start-system-server1.3 app_main.cpp启动和流程分析
app_main.cpp会被编译成app_process32/64的一个可执行的二进制文件,main方法里面,具体代码,这里的参数就是来自service zygote /system/bin/app_process -Xzygote /system/bin --zygote --start-system-server
AppRuntime runtime(argv[0], computeArgBlockSize(argc, argv));根据命令行里面的参数解析
const char* spaced_commands[] = { "-cp", "-classpath" };解析参数
while (i < argc) {
        const char* arg = argv[i++];
        if (strcmp(arg, "--zygote") == 0) {
            zygote = true;
            niceName = ZYGOTE_NICE_NAME;
        } else if (strcmp(arg, "--start-system-server") == 0) {
            startSystemServer = true;
        } else if (strcmp(arg, "--application") == 0) {
            application = true;
        } else if (strncmp(arg, "--nice-name=", 12) == 0) {
            niceName.setTo(arg + 12);
        } else if (strncmp(arg, "--", 2) != 0) {
            className.setTo(arg);
            break;
        } else {
            --i;
            break;
        }
    }
最后根据解析的参数,来判断是启动ZygoteInit还是RuntimeInit
 if (zygote) {
        runtime.start("com.android.internal.os.ZygoteInit", args, zygote);
    } else if (className) {
        runtime.start("com.android.internal.os.RuntimeInit", args, zygote);
    } else {
        fprintf(stderr, "Error: no class name or --zygote supplied.\n");
        app_usage();
        LOG_ALWAYS_FATAL("app_process: no class name or --zygote supplied.");
    }
这也就是为什么在ZygoteInit还是RuntimeInit的main函数里面能获取到对应参数的原因,接下来就会调用AndroidRuntime.start方法启动
void AndroidRuntime::start(const char* className, const Vector<String8>& options, bool zygote)
{
   ............................................................

    if (startVm(&mJavaVM, &env, zygote) != 0) {
        return;
    }
    onVmCreated(env);

    /*
     * Register android functions.
     */
    if (startReg(env) < 0) {
        ALOGE("Unable to register all android natives\n");
        return;
    }

    ............................................................

    char* slashClassName = toSlashClassName(className != NULL ? className : "");
    jclass startClass = env->FindClass(slashClassName);
    if (startClass == NULL) {
        ALOGE("JavaVM unable to locate class '%s'\n", slashClassName);
        /* keep going */
    } else {
        jmethodID startMeth = env->GetStaticMethodID(startClass, "main",
            "([Ljava/lang/String;)V");
        if (startMeth == NULL) {
            ALOGE("JavaVM unable to find main() in '%s'\n", className);
            /* keep going */
        } else {
            env->CallStaticVoidMethod(startClass, startMeth, strArray);

............................................................
}
总结下,在AndroidRuntime的start方法里面总共就是做了三件事情
1):启动java虚拟机,startVm(&mJavaVM, &env, zygote) != 0
2):动态注册jni,int AndroidRuntime::startReg(JNIEnv* env)
3):Native侧反射调用java方法(ZygoteInit-->main())
二,进入ZygoteInit世界
2.1 入口,是ZygoteInit的main方法
主要做了四件事情
1):创建ZygoteServer服务器,接受有新的进程来了以后创建进程
2):fork子进程,这里很关键的一步是,在fork进程以后,这段代码会执行两边,只有在对于父进程来说,这行检查 pid 是否为 0,这是 fork() 系统调用的标准做法。在 Unix-like 系统中,当调用 fork() 时,子进程会接收到 0,而父进程会接收到子进程的 pid。这意味着这段代码只会在 子进程 中执行,也就是在 SystemServer 进程 中,所以返回的r是空的,此时会打开ZygoteServer循环等待
3):zygoteServer.runSelectLoop(abiList);开启等待,接受新的事件
4):preload(bootTimingsTraceLog);预加载资源,比如所有的
public static void main(String argv[]) {

           ZygoteServer zygoteServer = new ZygoteServer();


            zygoteServer.registerServerSocket(socketName);
            .................................................

             preload(bootTimingsTraceLog);

            if (startSystemServer) {
                Runnable r = forkSystemServer(abiList, socketName, zygoteServer);

                // {@code r == null} in the parent (zygote) process, and {@code r != null} in the
                // child (system_server) process.
                if (r != null) {
                    r.run();
                    return;
                }
            }
 .................................................


            caller = zygoteServer.runSelectLoop(abiList);
        } catch (Throwable ex) {
            Log.e(TAG, "System zygote died with exception", ex);
            throw ex;
        } finally {
            zygoteServer.closeServerSocket();
        }

        // command.
        if (caller != null) {
            caller.run();
        }
    }
2.1.1 创建ZygoteServer,然后开始runSelectLoop
caller = zygoteServer.runSelectLoop(abiList);
Runnable runSelectLoop(String abiList) {
     .........
        while (true) {
            StructPollfd[] pollFds = new StructPollfd[fds.size()];
            .........
                        ZygoteConnection connection = peers.get(i);
                        final Runnable command = connection.processOneCommand(this);

                        if (mIsForkChild) {
.........                            return command;
                        } .............................................
                    }
                }
            }
        }
    }
创建一个链接,然后开始通过socket fork一个进程
Runnable processOneCommand(ZygoteServer zygoteServer) {
        String args[];


        fd = zygoteServer.getServerSocketFileDescriptor();

        if (fd != null) {
            fdsToClose[1] = fd.getInt$();
        }

        fd = null;

        pid = Zygote.forkAndSpecialize(parsedArgs.uid, parsedArgs.gid, parsedArgs.gids,
                parsedArgs.debugFlags, rlimits, parsedArgs.mountExternal, parsedArgs.seInfo,
                parsedArgs.niceName, fdsToClose, fdsToIgnore, parsedArgs.instructionSet,
                parsedArgs.appDataDir);
................................................
    }
最后通过调用Zygote.forkAndSpecialize fork一个新的进程,返回进程以后,通过
ZygoteInit.zygoteInit(parsedArgs.targetSdkVersion, parsedArgs.remainingArgs,
        null /* classLoader */);创建新的进程的binder,然后通过RuntimeInit的findStaticMain方法反射调用新进程的main方法然后返回到ZygoteInit的main方法最后调用
if (caller != null) {
    caller.run();
}
2.2 加载资源
preloadClasses /system/etc/preloaded-classes
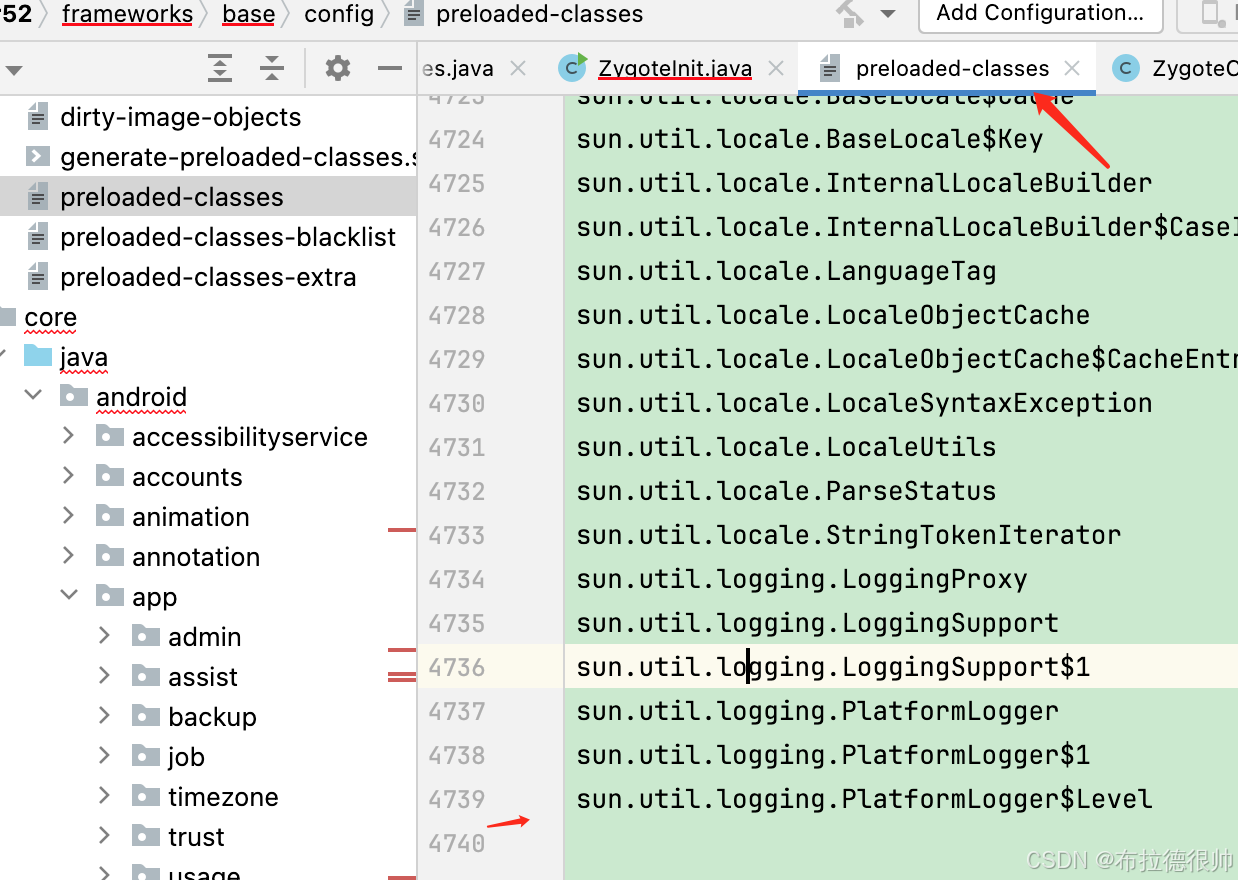
差不多4739个java类
preloadResources
nativePreloadAppProcessHALs();
preloadOpenGL();
preloadSharedLibraries();

preloadTextResources();
WebViewFactory.prepareWebViewInZygote();
endIcuCachePinning();
warmUpJcaProviders();
2.3 fork进程
 public static int forkAndSpecialize(int uid, int gid, int[] gids, int debugFlags,
          int[][] rlimits, int mountExternal, String seInfo, String niceName, int[]
        resetNicePriority();
        int pid = nativeForkAndSpecialize(

        return pid;
    }
三,启动SystemServer进程
SystemServer是在Zygonte进程fork出来的,然后通过反射调用SystemServer的main方法
3.1最核心的就是做了五件事情
1):startBootstrapServices(); 启动电源管理,设备管理等服务
2):startCoreServices();启动核心服务,比如WebViewUpdateService
3):startOtherServices();启动AMS,WMS,PMS等服务
4):Looper.prepareMainLooper(); 创建looper
5):Looper.loop();无限循环
 // Initialize the system context.
            createSystemContext();

            // Create the system service manager.
            mSystemServiceManager = new SystemServiceManager(mSystemContext);
            mSystemServiceManager.setRuntimeRestarted(mRuntimeRestart);
            LocalServices.addService(SystemServiceManager.class, mSystemServiceManager);
            // Prepare the thread pool for init tasks that can be parallelized
            SystemServerInitThreadPool.get();
        } finally {
            traceEnd();  // InitBeforeStartServices
        }

        // Start services.
        try {
            traceBeginAndSlog("StartServices");
            startBootstrapServices();
            startCoreServices();
            startOtherServices();
            SystemServerInitThreadPool.shutdown();
关于SystemServer的启动流程会单独开启一篇文章讲解,可以参考这篇文章
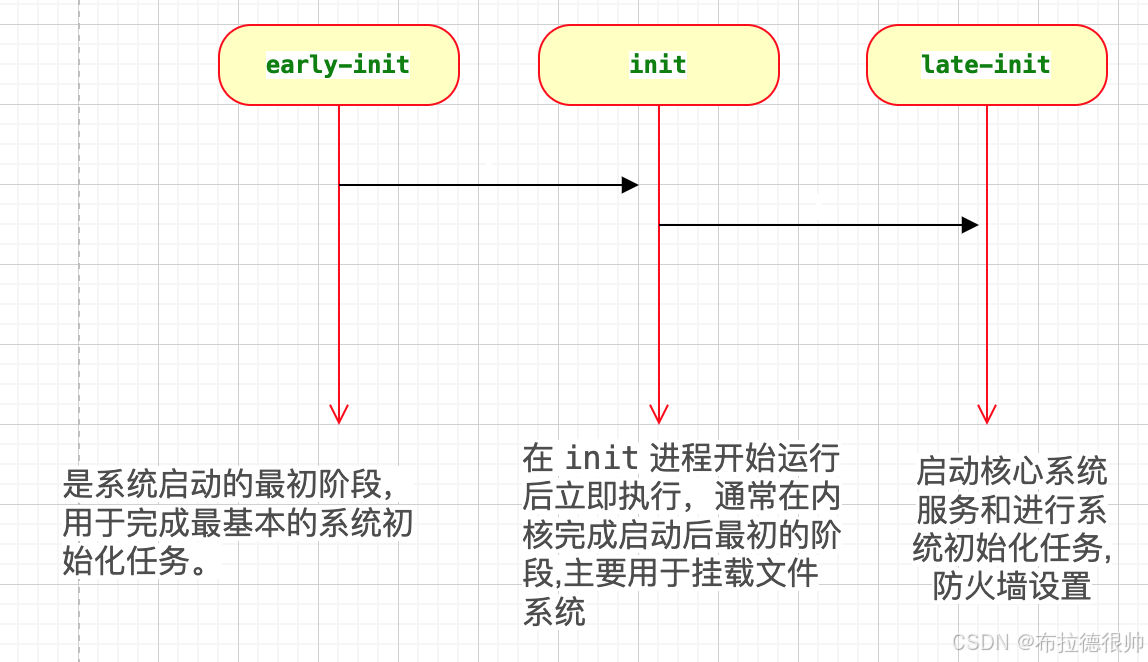
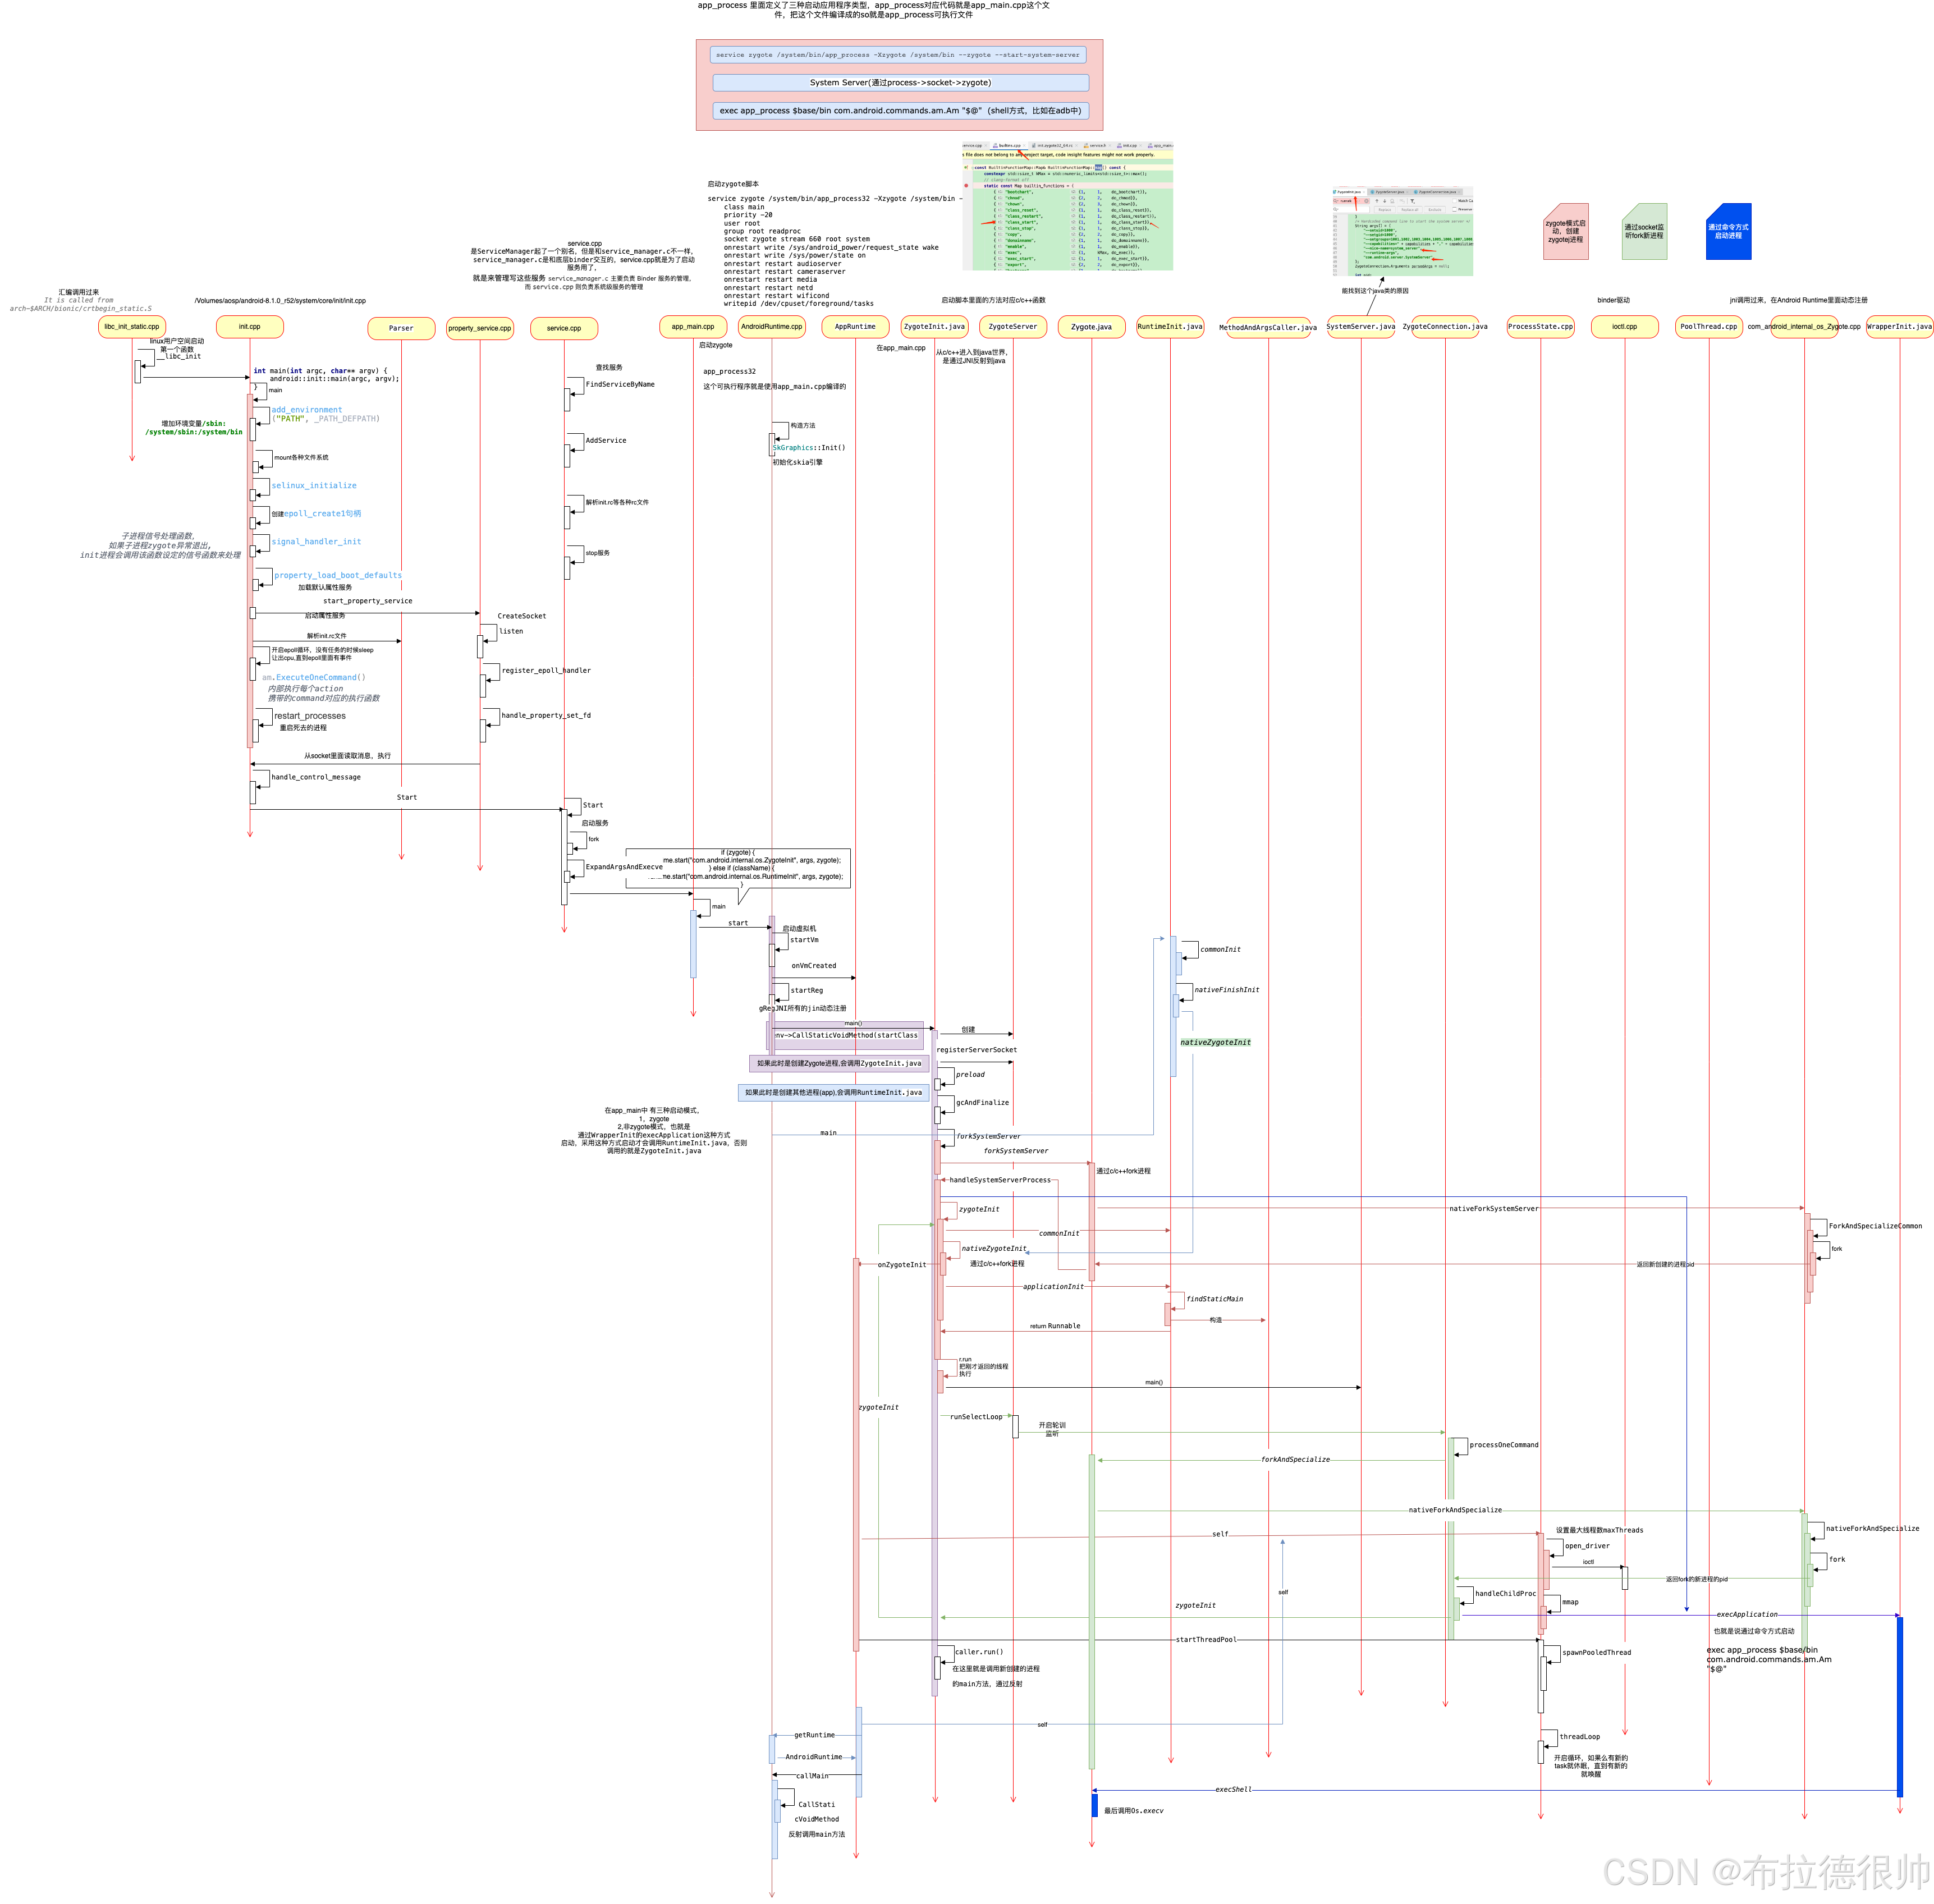
四,上帝视角看android启动流程图
通过这个时序图可以更清楚的看明白
四,fork原理
五,结束语
鉴于作者水平有限,文章之中难免有错误或者遗漏地方,欢迎大家批评指正,也欢迎大家讨论,积极评论哈,谢谢


 2592
2592

 被折叠的 条评论
为什么被折叠?
被折叠的 条评论
为什么被折叠?
 到【灌水乐园】发言


