


springboot容器

⬅️ 上一篇: springboot系列三: sprintboot自动配置
🎉 欢迎来到 springboot系列四: sprintboot容器功能 🎉
在本篇文章中,我们将深入探讨 Spring Boot 的容器功能。通过理解这些容器功能,您可以更加灵活地管理和扩展 Spring Boot 应用程序。
🔧 本篇需要用到的项目: quickstart项目
Spring注入组件的注解
Spring传统注解
说明:@Component,@Controller,@Service,@Repository 这些在Spring中的传统注解仍然有效,通过这些注解可以给容器注入组件。
案例演示
1.创建D:\idea_project\zzw_springboot\quickstart\src\main\java\com\zzw\springboot\bean\A.java
@Repository
public class A {}
2.测试MainApp.java, 其它注解不再一一测试.
@SpringBootApplication(scanBasePackages = "com.zzw")
public class MainApp {
    public static void main(String[] args) {
        //启动springboot应用程序/项目
        ApplicationContext ioc = SpringApplication.run(MainApp.class, args);
        System.out.println("ok");

        //演示Spring中传统的注解依然可以使用 @controler @service @repository
        A aBean = ioc.getBean(A.class);
        System.out.println("aBean=" + aBean);
    }
}
@Configuration
应用实例
●@Configuration应用实例需求
说明: 演示在SpringBoot, 如何通过 @Configuration 创建配置类来注入组件.
传统方式
●回顾传统方式如何通过配置文件注入组件. 基于XML配置bean
1.创建D:\idea_project\zzw_springboot\quickstart\src\main\java\com\zzw\springboot\bean\Monster.java
@Getter
@Setter
@ToString
@NoArgsConstructor
@AllArgsContructor
public class Monster {
    private Integer id;
    private String name;
    private Integer age;
    private String skill;
}
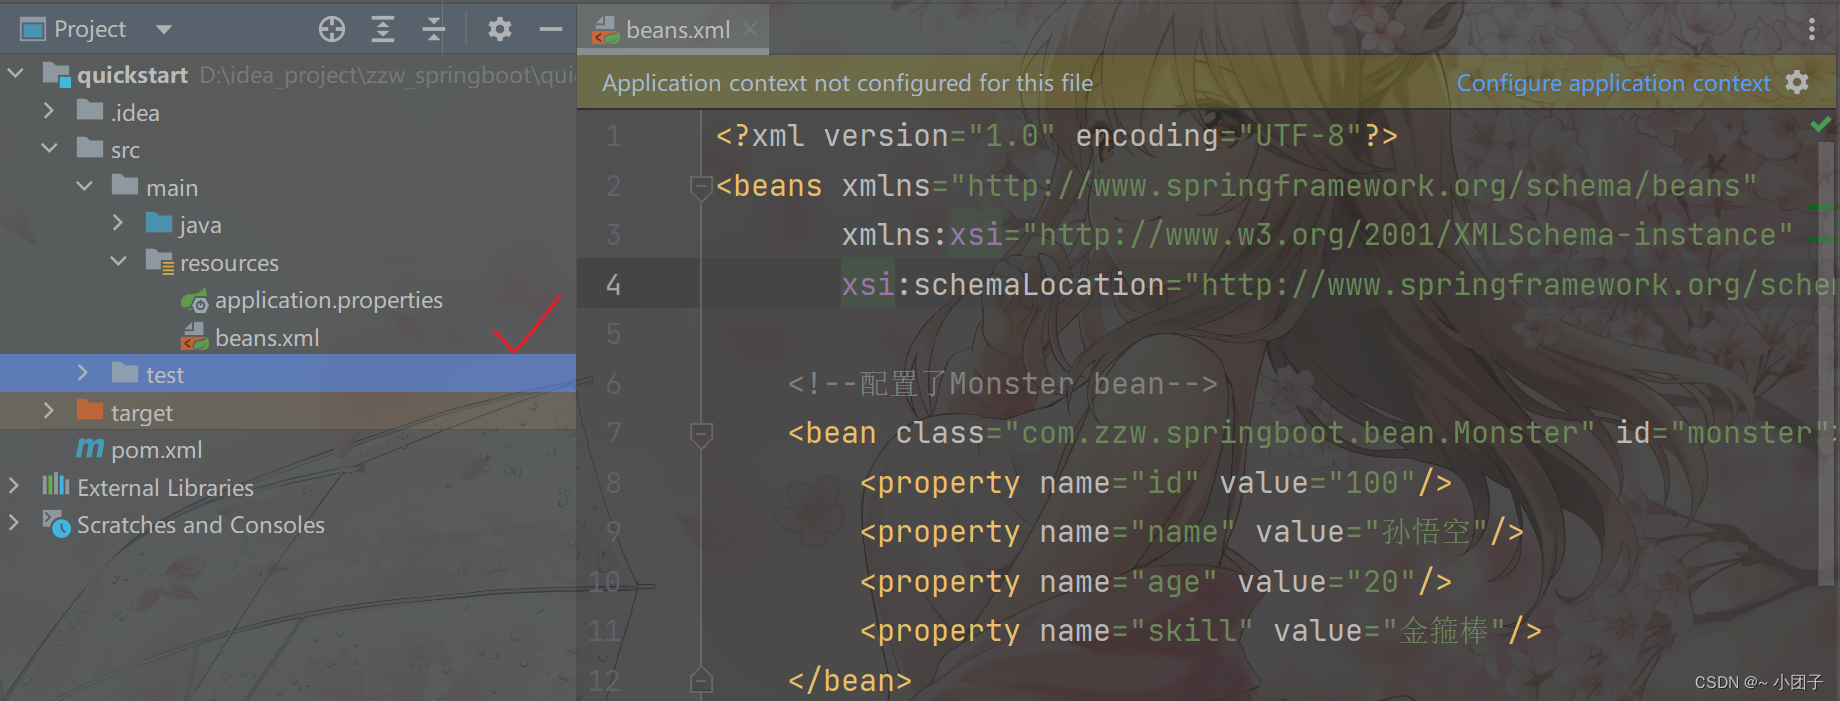
2.创建D:\idea_project\zzw_springboot\quickstart\src\main\resources\beans.xml创建容器配置文件的方式在SpringBoot中依然好使
<!--配置了Monster bean-->
<bean class="com.zzw.springboot.bean.Monster" id="monster">
    <property name="id" value="100"/>
    <property name="name" value="孙悟空"/>
    <property name="age" value="20"/>
    <property name="skill" value="金箍棒"/>
</bean>
3.在springboot项目中,依然可以使用spring的配置bean/注入bean/获取bean方式
@SpringBootApplication(scanBasePackages = "com.zzw")
public class MainApp {
    public static void main(String[] args) {
        //=====演示在springboot项目,依然可以使用spring的配置bean/注入bean/获取bean方式 start===

        ApplicationContext ac =
                new ClassPathXmlApplicationContext("beans.xml");
        Monster monster = ac.getBean("monster" , Monster.class);
        System.out.println("monster=" + monster);

        //=====演示在springboot项目,依然可以使用spring的配置bean/注入bean/获取bean方式 end=====

    }
}
使用@Configuration
●使用SpringBoot的@Configuration添加组件
1.创建D:\idea_project\zzw_springboot\quickstart\src\main\java\com\zzw\springboot\config\BeanConfig.java
配置文件和配置类都差不多, 但是在springboot中开发尽量用配置类来完成Bean的注入.
/**
 * 解读
 * 1.@Configuration 表示这是一个配置类,等价于配置文件
 * 2.程序员可以通过@Bean 注解注入bean对象到容器
 * 3.当一个类被 @Configuration 标识, 该类-Bean 也会注入到容器
 */
@Configuration
public class BeanConfig {

    /**
     * 解读
     * 1.@Bean: 给容器添加组件, 就是一个Monster bean
     * 2.monster01(): 默认 你的方法名monster01 作为bean的名字/id
     * 3.Monster: 注入类型, 注入bean的类型是Monster
     * 4.new Monster(200, "牛魔王" , 500 , "芭蕉扇"); 注入到容器中具体的bean信息
     * 5.@Bean(name = "monster_nmw"): 在配置/注入 bean 指定名字/id monster_nmw
     * 6.默认是单例注入
     * 7.通过 @Scope("prototype") 可以每次返回新的对象, 指定bean是多例
     */
    //@Bean(name = "monster_aliasName")
    @Bean
    public Monster monster01() {
        return new Monster(200, "牛魔王" , 500 , "芭蕉扇");
    }
}
2.修改MainApp.java, 从配置文件/容器获取bean, 并完成测试
hashCode含义
@SpringBootApplication(scanBasePackages = "com.zzw")
public class MainApp {
    public static void main(String[] args) {
        //启动springboot应用程序/项目
        ApplicationContext ioc = SpringApplication.run(MainApp.class, args);

        //=====演示在springboot项目中,@Configuration的使用 start===

        Monster monster01 = ioc.getBean("monster01" , Monster.class);
        Monster monster02 = ioc.getBean("monster01" , Monster.class);
        System.out.println("monster01=" + monster01 + " " + monster01.hashCode());
        System.out.println("monster02=" + monster02 + " " + monster02.hashCode());

        //=====演示在springboot项目中,@Configuration的使用 end=====

    }
}
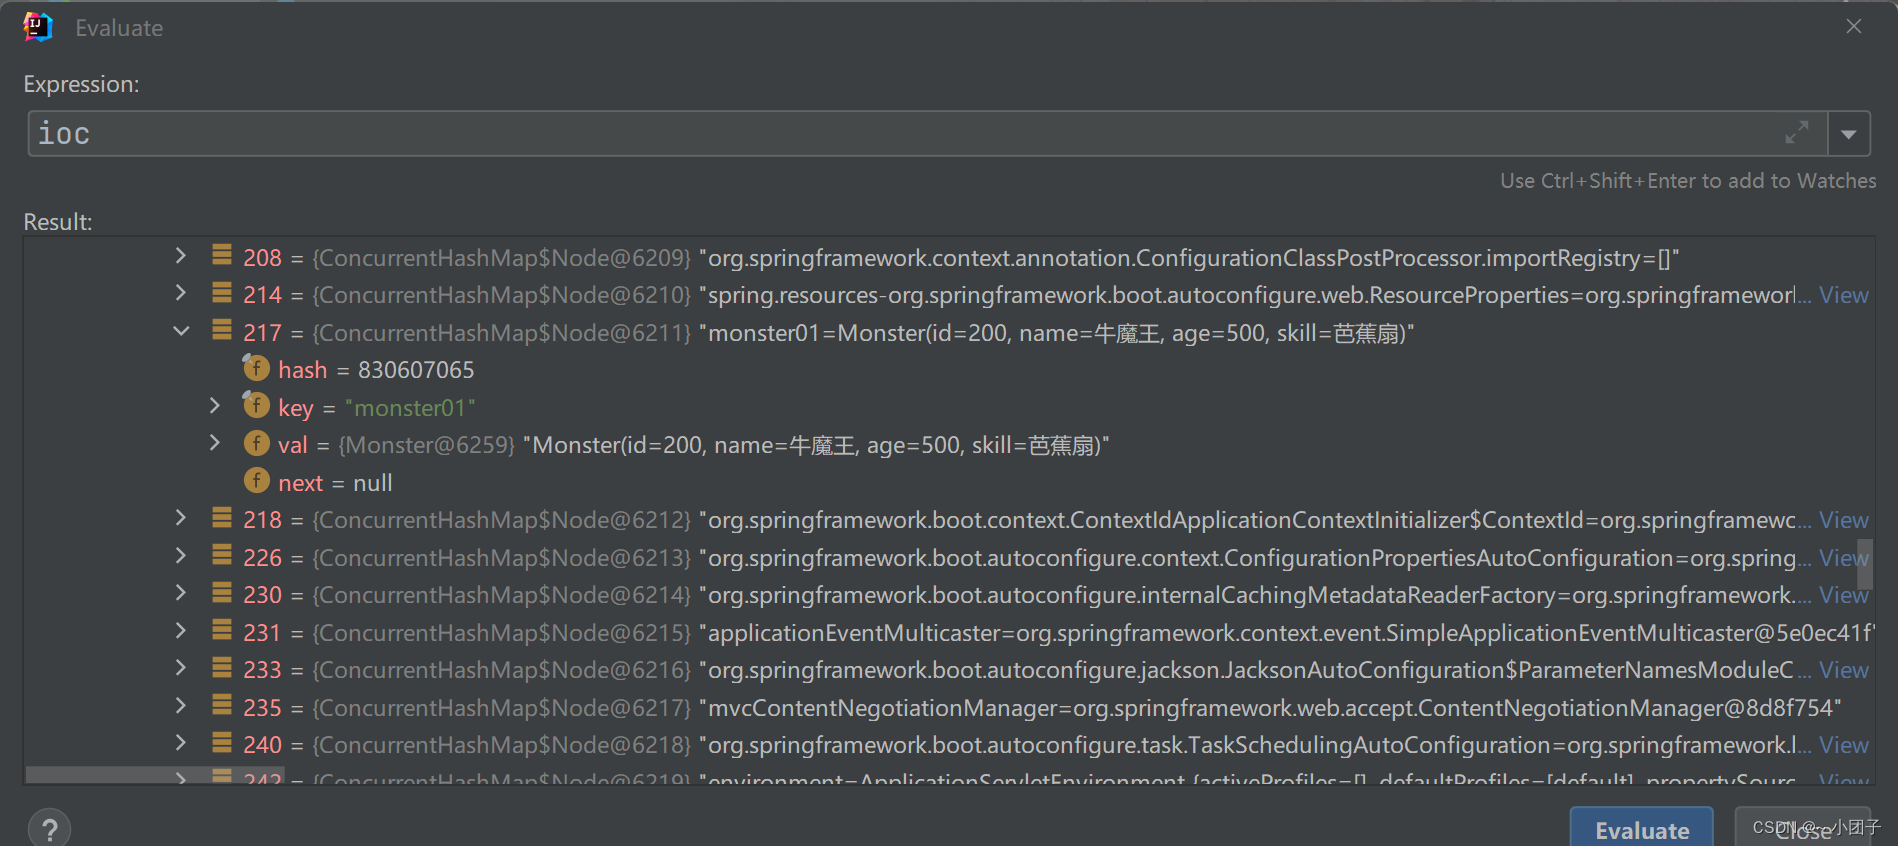
3.也可以通过Debug来查看 ioc 容器是否存在 monster01 的 Bean实例
ioc->beanFactory->beanDefinitionMap->monster01
注意事项和细节
1.配置类本身也是组件, 因此也可以获取. 修改MainApp.java
配置类是CGLIB代理对象. 动态代理jdk的Proxy和Spring的CGlib
@SpringBootApplication(scanBasePackages = "com.zzw")
public class MainApp {
    public static void main(String[] args) {
        //启动springboot应用程序/项目
        ApplicationContext ioc = SpringApplication.run(MainApp.class, args);

        //=====演示 配置类-bean也会注入到容器 start===

        BeanConfig beanConfig = ioc.getBean("beanConfig", BeanConfig.class);
        System.out.println("beanConfig=" + beanConfig + " " + beanConfig.hashCode());

        //=====演示 配置类-bean也会注入到容器 end=====

    }
}
2.SpringBoot2新增特性: proxyBeanMethods 指定 Full模式 和 Lite模式
1)修改D:\idea_project\zzw_springboot\quickstart\src\main\java\com\zzw\springboot\config\BeanConfig.java
/**
 * 第二部分解读
 * 1.proxyBeanMethods: 代理bean的方法
 * 2.Full(proxyBeanMethods = true): (默认)保证每个@Bean方法被调用多少次返回的组件都是单例的, 是代理方法
 * 3.Lite(proxyBeanMethods = false): 保证每个@Bean方法被调用多少次返回的组件都是新创建的, 是非代理方法
 * 4.特别说明: proxyBeanMethods 是在 调用@Bean方法 才生效. 因此, 需要先获取BeanConfig 组件, 再调用方法
 * 而不是直接通过 SpringBoot 主程序得到的容器来获取bean, 注意观察直接通过ioc.getBean() 获取Bean, proxyBeanMethods 值并没有生效
 * 5.如何选择: 组件依赖必须使用默认 Full模式, 如果不需要组件依赖则使用 Lite模式.
 * 6.Lite模式: 也称为轻量级模式, 因为不检测依赖关系, 所以运行速度快
 */
@Configuration(proxyBeanMethods = false)
public class BeanConfig {}
2)修改MainApp.java
@SpringBootApplication(scanBasePackages = "com.zzw")
public class MainApp {
    public static void main(String[] args) {
        //启动springboot应用程序/项目
        ApplicationContext ioc = SpringApplication.run(MainApp.class, args);

        //=====演示 @Configuration(proxyBeanMethods = xxx) start===

        //1.先得到BeanConfig组件
        BeanConfig beanConfig = ioc.getBean("beanConfig", BeanConfig.class);
        Monster monster_01 = beanConfig.monster01();
        Monster monster_02 = beanConfig.monster01();
        System.out.println("monster_01--" + monster_01 + " " + monster_01.hashCode());
        System.out.println("monster_02--" + monster_02 + " " + monster_02.hashCode());

        //特别说明: proxyBeanMethods 是在 调用@Bean方法 才生效. 因此, 需要先获取BeanConfig 组件, 再调用方法
        //1. 而不是直接通过 SpringBoot 主程序得到的容器来获取bean, 注意观察直接通过ioc.getBean() 获取Bean, proxyBeanMethods 值并没有生效
        Monster monster01 = ioc.getBean("monster01", Monster.class);
        Monster monster02 = ioc.getBean("monster01", Monster.class);
        System.out.println("monster01--" + monster01 + " " + monster01.hashCode());
        System.out.println("monster02--" + monster02 + " " + monster02.hashCode());

        //=====演示 @Configuration(proxyBeanMethods = xxx) end===

    }
}
3.配置类可以有多个, 就和Spring可以有多个ioc配置文件一个道理
1)创建D:\idea_project\zzw_springboot\quickstart\src\main\java\com\zzw\springboot\config\BeanConfig2.java
@Configuration
public class BeanConfig2 {
    @Bean
    public Monster monster02() {
        return new Monster(300, "太上老君" , 1000 , "炼丹炉");
    }
}
2)完成测试MainApp.java
@SpringBootApplication(scanBasePackages = "com.zzw")
public class MainApp {
    public static void main(String[] args) {
        //启动springboot应用程序/项目
        ApplicationContext ioc = SpringApplication.run(MainApp.class, args);

        //=====测试可以有多个配置类 start===
        //两个配置类注入的Bean都生效
        Monster monster02 = ioc.getBean("monster02", Monster.class);
        Monster monster01 = ioc.getBean("monster01", Monster.class);
        System.out.println("monster02--" + monster02);
        System.out.println("monster01--" + monster01);

        //=====测试可以有多个配置类 end===
    }
}
@Import
应用实例
说明: 演示在SpringBoot, 如何通过 @Import 来注入组件
1.创建D:\idea_project\zzw_springboot\quickstart\src\main\java\com\zzw\springboot\bean\Cat.java 和 D:\idea_project\zzw_springboot\quickstart\src\main\java\com\zzw\springboot\bean\Dog.java
public class Dog {}

public class Cat {}
2.修改BeanConfig.java, 通过@Import注入组件
/**
 * 解读
 * 1.@Import 源码 可以看到, 我们可以指定 class的数组, 可以注入指定类型的Bean
 * public @interface Import {
 *     Class<?>[] value();
 * }
 * 2.通过@Import 方式注入了组件, 默认组件 名字/id 就是对应类型的全类名
 */
@Import(value = {Dog.class, Cat.class})
@Configuration
public class BeanConfig {}
3.修改MainApp.java, 完成测试
@SpringBootApplication(scanBasePackages = "com.zzw")
public class MainApp {
    public static void main(String[] args) {
        //启动springboot应用程序/项目
        ApplicationContext ioc = SpringApplication.run(MainApp.class, args);

        //=====测试@Import 使用 start===

        Dog dogBean = ioc.getBean(Dog.class);
        Cat catBean = ioc.getBean(Cat.class);
        System.out.println("dogBean---" + dogBean);
        System.out.println("catBean---" + catBean);

        //=====测试@Import 使用 end===
    }
}
@Conditional
@Conditional介绍
1.条件装配: 满足Conditional指定的条件, 则进行组件注入
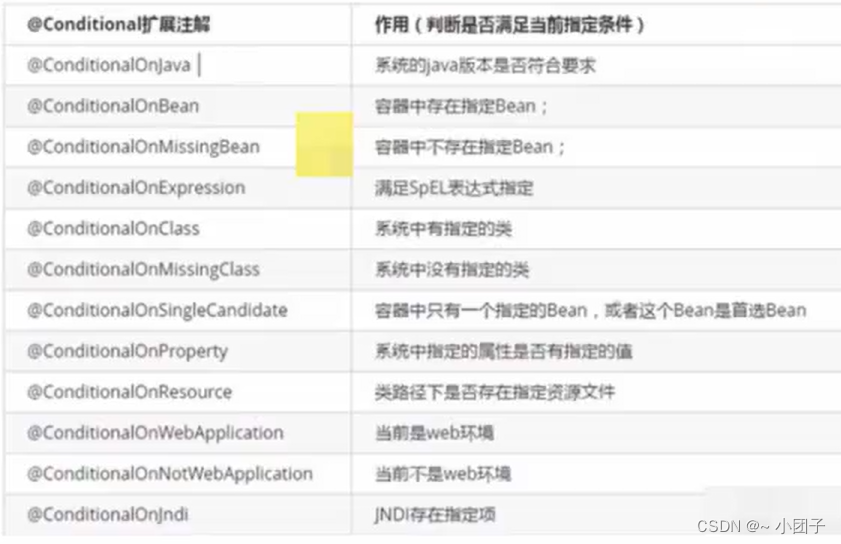
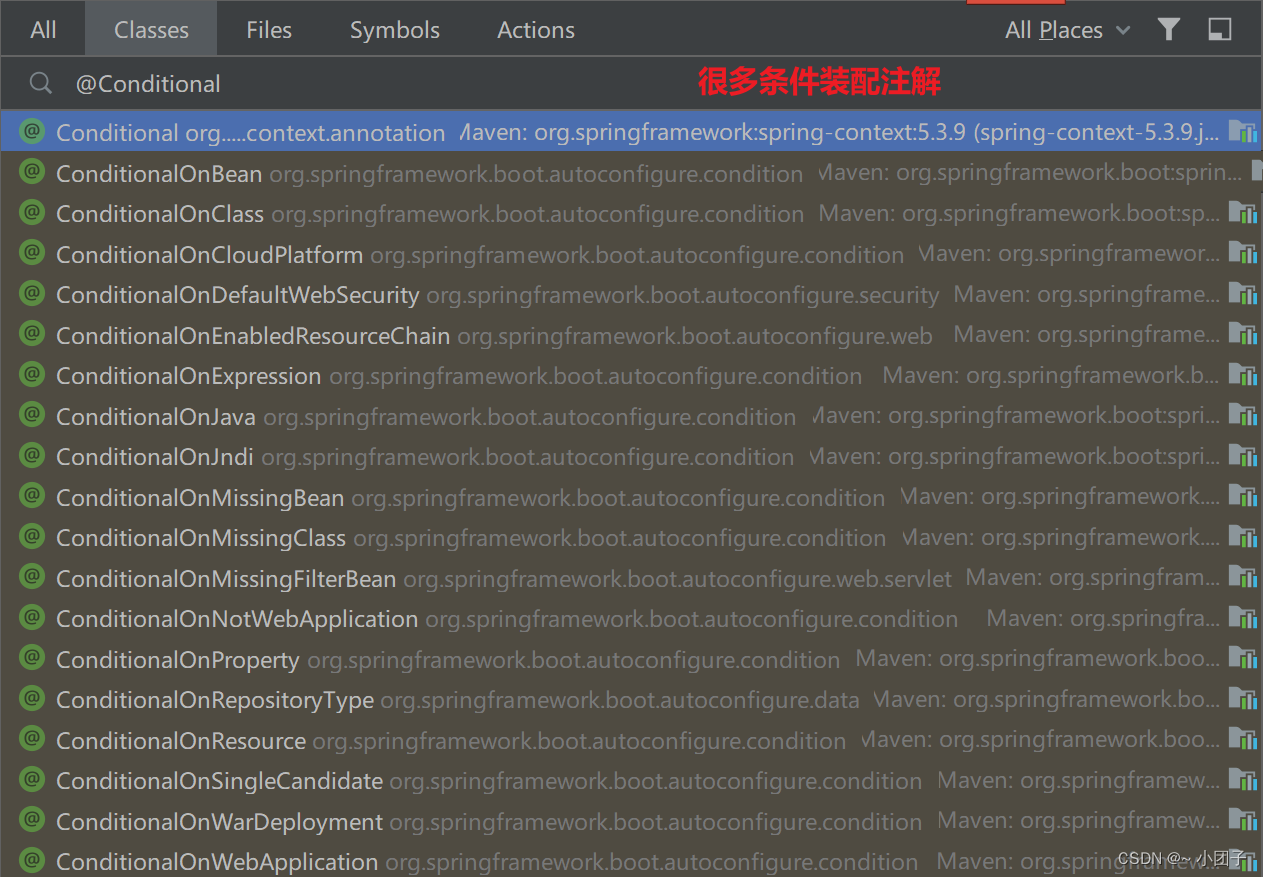
2.@Conditional 是一个根注解, 下面有很多扩展注解
应用实例
1.要求: 演示在SpringBoot, 如何通过 @ConditionalOnBean 来注入组件
2.只有在容器中有 name=monster_nmw 组件时, 才注入 dog01.
@Import(value = {Dog.class, Cat.class})
@Configuration
public class BeanConfig {
    @Bean
    //@Bean(name = "monster_nmw")
    public Monster monster01() {
        return new Monster(200, "牛魔王", 500, "芭蕉扇");
    }

    @Bean
    public Dog dog01() {
        return new Dog();
    }
}
3.先测试下, 当前是否能注入 dog01
@SpringBootApplication(scanBasePackages = "com.zzw")
public class MainApp {
    public static void main(String[] args) {
        //启动springboot应用程序/项目
        ApplicationContext ioc = SpringApplication.run(MainApp.class, args);

        //=====测试@ConditionalOnBean 使用 start===

        Dog dog01 = ioc.getBean("dog01", Dog.class);
        System.out.println("dog01---" + dog01);

        //=====测试@ConditionalOnBean 使用 end===
    }
}
4.修改BeanConfig.java, 加入@ConditionalBean条件约束, 并完成测试
@Import(value = {Dog.class, Cat.class})
@Configuration
public class BeanConfig {
    @Bean
    //@Bean(name = "monster_nmw")
    public Monster monster01() {
        return new Monster(200, "牛魔王", 500, "芭蕉扇");
    }

    @Bean(name = "monster_nmw")
    public Cat cat01() {
        return new Cat();
    }

    @Bean
    /**
     * 解读
     * 1.@ConditionalOnBean(name = "monster_nmw") 表示
     * 2.当容器中有一个Bean, 名字是monster_nmw(类型不做约束), 就注入dog01这个Dog bean
     * 3.如果没有 名字是 monster_nmw 的Bean, 就不注入dog01这个Dog bean.
     * 4.还有很多其它的条件约束注解, 小伙伴可以自己测试
     *
     * 5.@ConditionalOnMissingBean(name = "monster_nmw") 表示在容器中
     * , 没有 名字/id 为 monster_nmw 的Bean, 才注入dog01这个Bean
     *
     * 6.@Conditional根注解及其扩展注解, 也可以修饰类
     * @ConditionalOnBean(name = "monster_nmw")
     * public class BeanConfig {}
     * 表示对该配置类的所有要注入的组件, 都进行条件约束.
     */
    @ConditionalOnBean(name = "monster_nmw")
    //@ConditionalOnMissingBean(name = "monster_nmw")
    public Dog dog01() {
        return new Dog();
    }
}
@ImportResource
作用: 原生配置文件引入, 也就是可以直接导入Spring 传统的beans.xml, 可以认为是SpringBoot 对 Spring 容器文件的兼容.
应用实例
1.需求: 将 beans.xml 导入到 BeanConfig.java 配置类, 并测试是否可以获得 beans.xml 注入/配置 的组件
2.修改BeanConfig.java 或者 创建新的BeanConfig3.java(建议创建新的配置类)来测试, 使用 @ImportResource 导入beans.xml,beans02.xml(复制beans.xml的配置,改改数据)
@Configuration
//导入beans.xml, 就可以获取到beans.xml 中配置的bean
@ImportResource(locations = {"classpath:beans.xml", "classpath:beans02.xml"})
public class BeanConfig3 {
}
3.修改MainApp.java
@SpringBootApplication(scanBasePackages = "com.zzw")
public class MainApp {
    public static void main(String[] args) {
        //启动springboot应用程序/项目
        ApplicationContext ioc = SpringApplication.run(MainApp.class, args);

        //=====演示@ImportResource 使用 start===

        Monster monster = ioc.getBean("monster", Monster.class);
        System.out.println("monster---" + monster);
        System.out.println("monster bean 是否存在-" + ioc.containsBean("monster"));

        Monster monster03 = ioc.getBean("monster03", Monster.class);
        System.out.println("monster03---" + monster03);
        System.out.println("monster03 bean 是否存在-" + ioc.containsBean("monster03"));

        //=====演示@ImportResource 使用 end===
    }
}
配置绑定
一句话:使用Java读取到SpringBoot 核心配置文件 application.properties 的内容,并且把它封装到JavaBean中.
应用实例
1.需求: 将application.properties指定的 k-v 和 JavaBean 绑定
2.application.properties增加配置
#1.设置Furn的属性k-v
#2.前面的furn01 是用于指定/区分不同的绑定对象, 这样可以在绑定Furn bean属性值时
#, 通过furn01 前缀进行区分
#3.furn01.id 中的id 就是你要绑定的 Furn bean的属性名
furn01.id=100
furn01.name=phone
furn01.price=6000
3.创建D:\idea_project\zzw_springboot\quickstart\src\main\java\com\zzw\springboot\bean\Furn.java
@Setter
@Getter
@Component
@ConfigurationProperties(prefix = "furn01")
public class Furn {
    private Integer id;
    private String name;
    private BigDecimal price;
}
4.修改HiController, 完成自动装配
@Controller
public class HiController {
    //装配到HiController
    @Resource
    private Furn furn;

    @RequestMapping("/furn")
    @ResponseBody
    public Furn furn() {
        return furn;
    }
}
5.启动SpringBoot 主程序, 完成测试

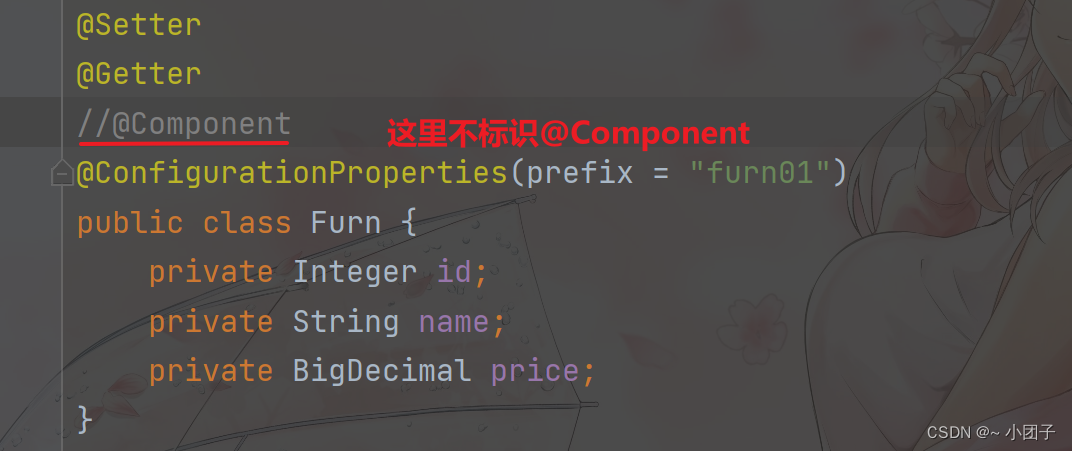
5.配置绑定还有第2种方式, 这里也演示一下, 效果一样.
注意: 注销 @Component 需要在 BeanConfig.java(说明: 也可以是其它配置类) 配置 @EnableConfigurationProperties(Furn.class), 否则会提示错误
/**
 * @EnableConfigurationProperties({Furn.class})解读
 * 1.开启Furn配置绑定功能
 * 2.把Furn组件自动 注册/注入 到容器中
 */
@EnableConfigurationProperties({Furn.class})
public class BeanConfig {}
注意事项和细节
1.如果 application.properties 有中文, 需要转成 unicode 编码写入, 否则会出现乱码. 在线Unicode转中文
以前学SpringMVC创建国际化文件的时候遇到过
furn01.id=100
furn01.name=\u5bb6\u5c45
furn01.price=6000
2.使用 @ConfigurationProperties(prefix=“furn01”) 会提示以下信息, 但是不会影响使用
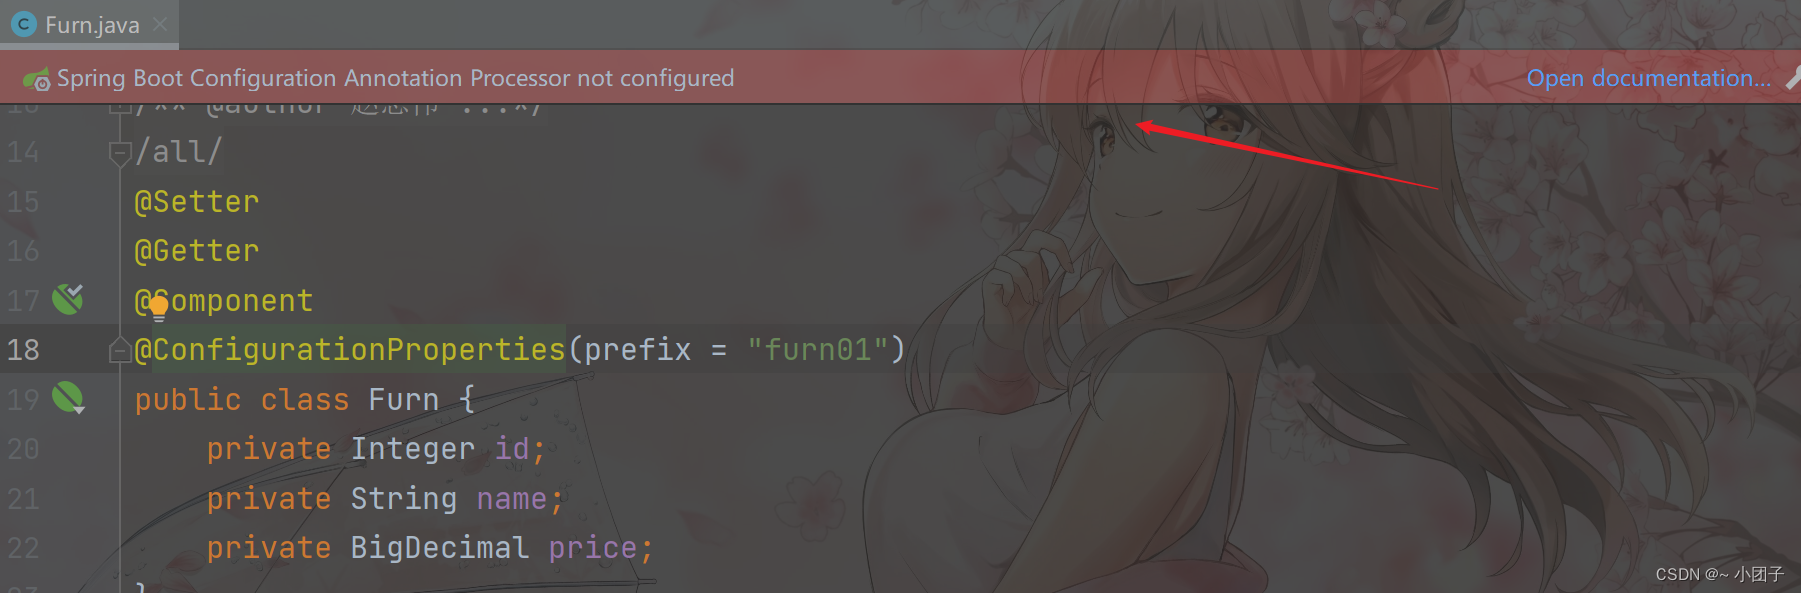
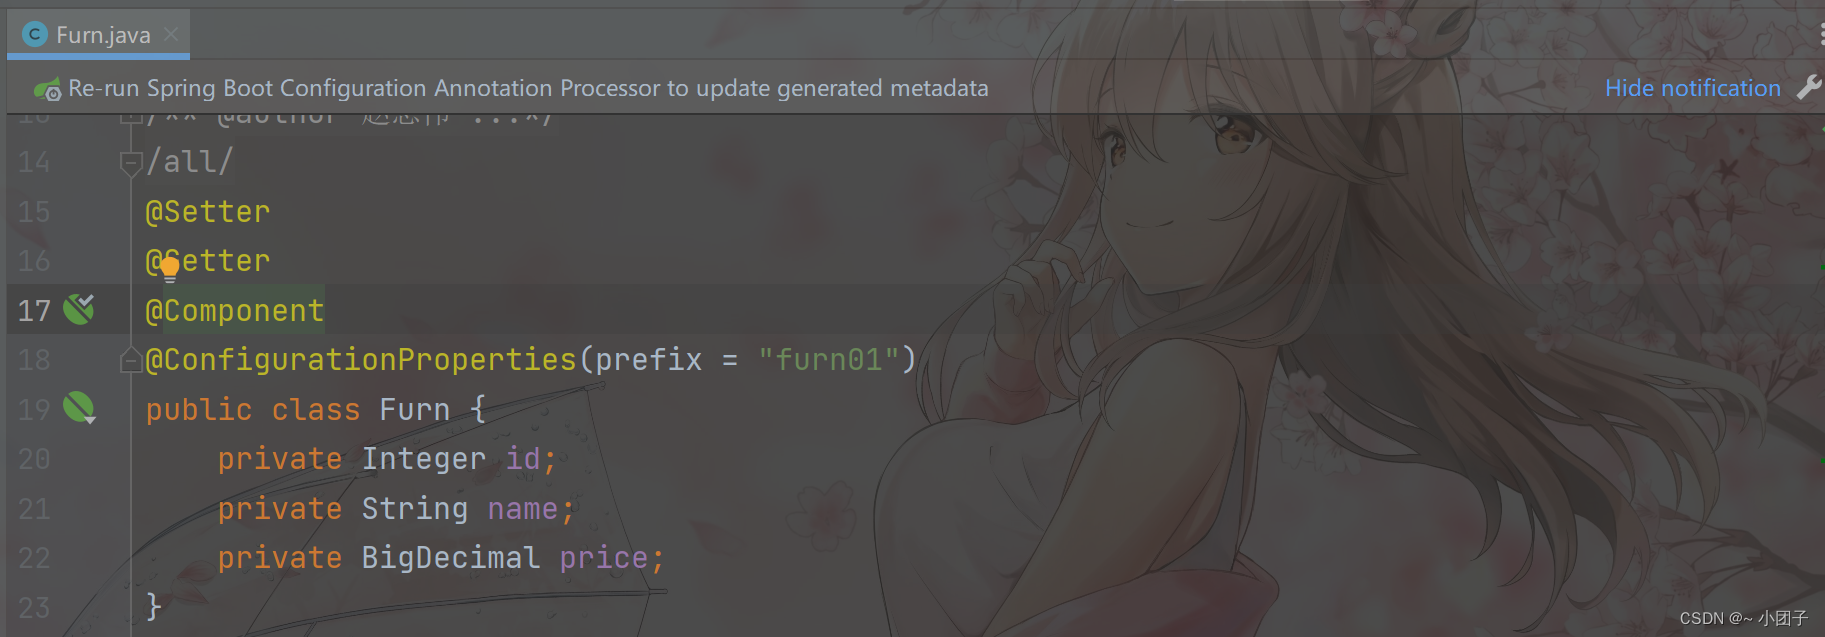
3.解决 @ConfigurationProperties(prefix=“furn01”) 提示信息, 在 pom.xml 增加依赖, 即可
<dependency>
    <groupId>org.springframework.boot</groupId>
    <artifactId>spring-boot-configuration-processor</artifactId>
    <!--
        这里我们配置optional为true
        说明: 表示防止将此依赖传递到其它模块
    -->
    <optional>true</optional>
</dependency>

🔜 下一篇预告: springboot系列五: springboot底层机制实现 上
📚 目录导航 📚
- springboot系列一: springboot初步入门
- springboot系列二: sprintboot依赖管理
- springboot系列三: sprintboot自动配置
- springboot系列四: sprintboot容器功能
- springboot系列五: springboot底层机制实现 上
- springboot系列六: springboot底层机制实现 下
- springboot系列七: Lombok注解,Spring Initializr,yaml语法
…
💬 读者互动 💬
在使用 Spring Boot 容器功能时,您遇到过哪些问题或有何建议?欢迎在评论区留言,让我们一起讨论吧!😊


 3万+
3万+

 被折叠的 条评论
为什么被折叠?
被折叠的 条评论
为什么被折叠?
 到【灌水乐园】发言


