


最近学习了egg.js,发现以前用express开发的node项目真的是惨不忍睹,所以根据之前的express项目进行改造和对比,列一下egg有哪些优势解决了哪些问题。
- log
- swagger自动生成
- validate 参数校验
- 异常处理,统一拦截
- 免router配置
- sequelize降低前端写sql语句门槛
- jwt鉴权
文章步骤中隐去部分代码,便于展示,文章最后会放上完整的demo
项目结构
首先展示下,搭建完基础的内容的项目结构
app
├─router.js  // 路由 不过通过JSDoc自动生成了,可以不用
├─throw
|   └index.js // 异常处理枚举值和一些基本方法
├─service
|    ├─actionToken.js // jwt创建授权service类
|    ├─common.js // 通用类,封装 getCurrentModel方法
|    └member.js // 实际的service类
├─public // 存放公共资源
├─postgres // 在config.default.js配置sequelize的datasource的时候配置的目录,存放model
|    ├─member.js // 成员model
|    ├─project.js // 项目model
|    └task.js // 任务model
├─middleware // 存放各种中间件, egg会自动加载,如果需要修改中间件加载顺序到config.default.js修改
|     └error_handler.js // 统一异常处理
├─extend // egg会把当前目录的文件绑定到ctx 如ctx.helper
|   └helper.js // 提供基本工具支持
├─controller // 接口入口
|     └user.js
├─contract // 接口出入参描述
|    ├─index.js // 通用参数
|    └user.js
config
├─config.default.js // egg各种配置
└plugin.js // egg使用的插件列表
开发步骤
创建项目
npm i egg-init -g
egg-init egg-server --type=simple
cd egg-server
npm i
启动项目
npm run dev
open localhost:7001
debug方式启动项目,并且再vscode直接调试
- 在根目录添加.vscode目录,并且添加launch.json文件
{
  "version": "0.2.0",
  "configurations": [
      {
          "name": "Launch Egg",
          "type": "node",
          "request": "launch",
          "cwd": "${workspaceRoot}/egg/egg-server",
          "runtimeExecutable": "npm",
          "windows": {
              "runtimeExecutable": "npm.cmd"
          },
          "runtimeArgs": [
              "run",
              "debug"
          ],
          "console": "integratedTerminal",
          "protocol": "auto",
          "restart": true,
          "port": 9999,
          "autoAttachChildProcesses": true
      }
  ]
}
2. 在vscode按F5启动项目,这样就能愉快的在vscode上面调试啦
创建controller文件,并且自动生成swagger文档
- 安装依赖包
npm install egg-swagger-doc-feat -s
- 配置文件添加配置
// config/plugin.js
swaggerdoc : {
	enable: true,
	package: 'egg-swagger-doc-feat',
}


// config.default.js
config.swaggerdoc = {
	dirScanner: './app/controller',
	apiInfo: {
		title: 'swagger',
		description: 'swagger-ui for egg',
		version: '1.0.0',
	},
	schemes: ['http', 'https'],
	consumes: ['application/json'],
	produces: ['application/json'],
	enableSecurity: false,
	enableValidate: true, // 这个后续validate会用到
	routerMap: true,
	enable: true,
}
- 添加contoller文件,并且编写JSDoc
controller文件
const { Controller } = require('egg');
class UserController extends Controller {
  constructor(ctx) {
    super(ctx);
  }
  /**
   * @summary 登录
   * @description 登录
   * @router get /api/current/{id}
   * @respone 200 baseResponse 登录成功
   * @request path string *id
   * @request body loginRequest *body
   * @request query string *id
   * @request header string *Authorization eg:Bearer +token
   */
  async current() {
  }
}
module.exports = UserController;
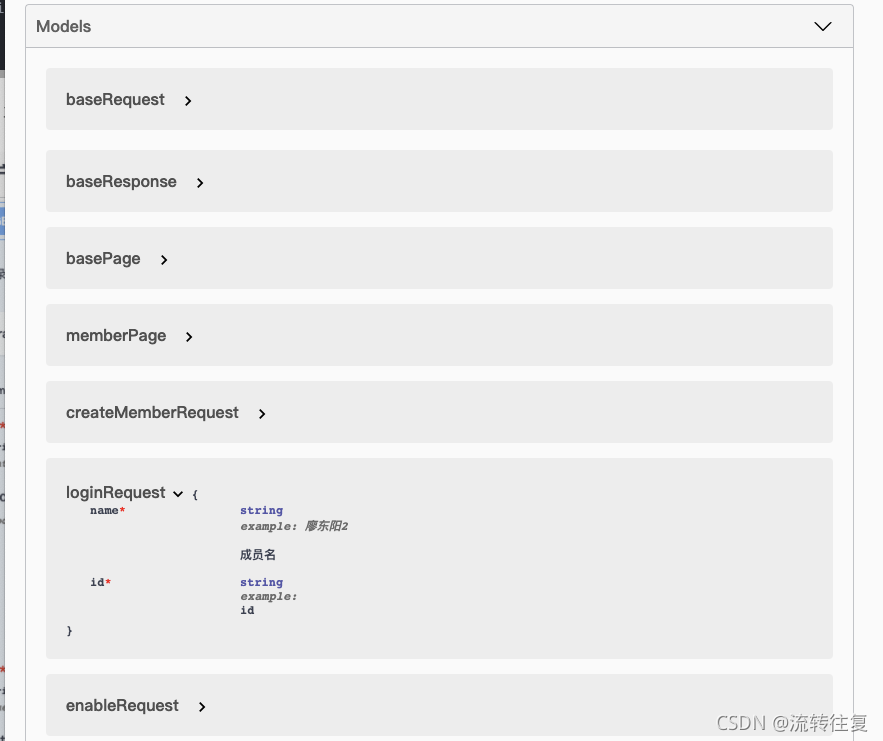
- contract文件(出入参描述,后续使用egg-validate插件进行参数校验)
// app/contract/xx.js
module.exports = {
  loginRequest: {
    name: { type: 'string', required: true, description: '成员名', example: 'ldy' },
    id: { type: 'string', required: true, description: 'id', example: '' }, // 这里还可以使用正则匹配 format: /^1[34578]\d{9}$/
  }
};
至此,再浏览器访问 http://localhost:7001/swagger-ui.html就能够看到swagger自动生成的文档,如下图
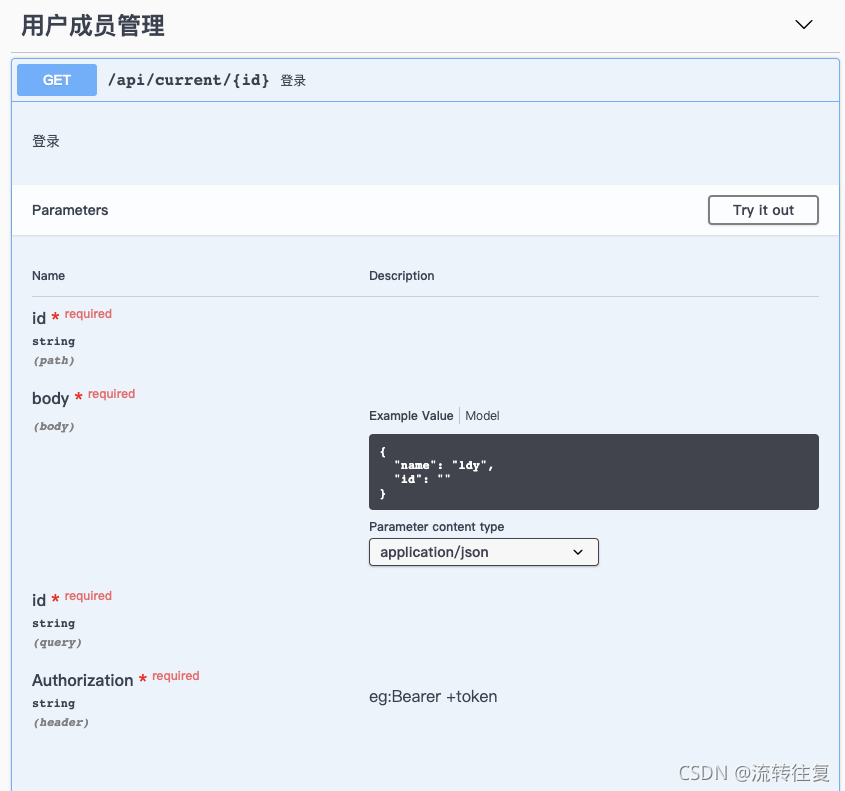
参数说明
自动生成swagger和router的JSDoc说明
  /**
   * @summary 登录
   * @description 登录
   * @router get /api/current/{id}
   * @respone 200 baseResponse 登录成功
   * @request path string *id
   * @request body loginRequest *body
   * @request query string *id
   * @request header string *Authorization eg:Bearer +token
   */
  async current() {
  }
- @summary 接口标题
- @description 接口描述
- @router 自动注册路由 method + path
- @request 请求的参数 允许设置 path body query header 非常丰富
- @respone 返回的参数和状态码 status + (在contract目录下创建的的参数类型)+ 描述
添加参数校验 valiadate
- 安装依赖
npm i egg-validate -s
- 配置文件添加配置
// config/plugin.js
validate: {
	enable: true,
	package: 'egg-validate',
},
- 在controller层一开始,添加参数校验
// app/controller/xx.js
const { Controller } = require('egg');
class UserController extends Controller {
  constructor(ctx) {
    super(ctx);
  }
  /**
   * @request body loginRequest *body
   */
  async current() {
  	// 校验参数
	this.ctx.validate(ctx.rule.loginRequest); // loginRequest对应注释@request的内容,对应contact里面配置的对象
  }
}
module.exports = UserController;
// app/contract/xx.js
module.exports = {
  loginRequest: {
    name: { type: 'string', required: true, description: '成员名', example: 'ldy' },
    id: { type: 'string', required: true, description: 'id', example: '' }, // 这里还可以使用正则匹配 format: /^1[34578]\d{9}$/
  }
};
添加异常统一拦截中间件
- 配置异常状态码枚举
// app/throw/index.js
'use strict';
const FAIL_CODE = {
  PARAMS_LACK: '4001',
  PARAMS_NO_MATCH: '4004',

  DATA_EXIST: '2001',
};
const FAIL_MSG = {
  [FAIL_CODE.PARAMS_LACK]: '参数缺失,请检查参数',
  [FAIL_CODE.PARAMS_NO_MATCH]: '参数匹配失败,请检查参数',
  [FAIL_CODE.DATA_EXIST]: '数据已存在,请勿重复添加',
};
// 通过异常状态码,获取状态码和对应的错误信息
const getFailInfo = failCode => {
  if (!failCode) return [ 500, '未知异常' ];
  console.log('failCode', failCode);
  return [ failCode, FAIL_MSG[failCode] ];
};

module.exports = {
  FAIL_CODE,
  FAIL_MSG,
  getFailInfo,
};
- 创建中间件,并且保证异常拦截中间件是第一个
// app/middleware/error_handler.js
'use strict';
const { FAIL_CODE, FAIL_MSG, getFailInfo } = require('../throw/');
module.exports = (option, app) => {
  console.log(option, app);
  return async function(ctx, next) {
    try {
      await next();
    } catch (err) {
      console.error(err);
      // 通过app触发一个error时间,框架会记录一条错误日志
      app.emit('error', err, this);

      // 异常应答
      // http status 200
      // code
      const status = err.status || 500;
      const message = err.message;
      if (message && FAIL_MSG[message]) {
        // 通过ctx.throw(FAIL_CODE.PARAMS_LACK)抛出异常,这里接收的message就是对应的枚举值
        const [ code, msg ] = getFailInfo(message); // 这里的message是code,别弄混了
        ctx.body = { code, msg };
      } else {
        // 错误信息 生产不要返回详细信息
        const error =
        status === 500 && ctx.app.config.env === 'prod' ? 'Internal Server Error' : message;
        ctx.body = {
          code: status,
          error,
        };

        // 422 接口参数校验
        if (status === 422) {
          ctx.body.detail = err.errors;
        }
      }

      ctx.status = 200;
    }
  };
};
添加model
- 安装依赖
npm i egg-sequelize -s
- 配置文件添加配置
// config/plugin.js
sequelize: {
  enable: true,
  package: 'egg-sequelize'
}
// config/config.default.js
config.sequelize = {
   datasources: [
     {
       dialect: 'postgres',
       host: 'xxx',
       port: 8080,
       database: 'xx',
       username: 'xx',
       password: 'xx',
       delegate: 'postgres',
       baseDir: 'postgres', // 默认是model目录,这里可以修改model对应的目录
       dialectOptions: {
         dateStrings: true,
         typeCase: true,
       },
       define: {
         createdAt: 'created_at', // 重命名
         updatedAt: 'updated_at',// 重命名
       },
       timezone: '+08:00', // 时区
     },
   ],
 };
- 创建model
// app/postgress/xx.js    postgress 对应config.default.js sequelize对应的baseDir
'use strict';
const uuid = require('node-uuid');
module.exports = app => {
  const DataTypes = app.Sequelize;

  const Model = app.postgres.define(
    'member',
    {
      id: {
        type: DataTypes.UUID,
        allowNull: false,
        primaryKey: true,
        autoIncrement: false,
        defaultValue: () => {
          return uuid.v4();
        },
      },
      name: {
        type: DataTypes.STRING(25),
        allowNull: false,
      },
      enable: {
        type: DataTypes.INTEGER,
        allowNull: true,
        defaultValue: 1,
      },
    },
    {
      tableName: 'member',
      timestamps: true,
    }
  );

  Model.associate = function() {};

  return Model;
};
添加service
- 创建一个中间Service类,封装统一的方法
// app/service/common.js
'use strict';
const { Service } = require('egg');
module.exports = class Common extends Service {
  getCurrentModel(model) {
  	// 这里封装了model的获取方法,省去过长的代码串,容易出错
  	// 后续调整数据源目录,这里也可以统一修改
    return this.ctx.postgres.models[model];
  }
};
- 创建业务Service
这里演示了基本的curd的基本方法,sequelize也支持多表关联,想深入的可以查找官方文档了解api和使用方法
// app/service/member.js
'use strict';
const { FAIL_CODE } = require('../throw');
const Common = require('./common');
const SERVICE_NAME = 'member';
class MemberService extends Common {
  /**
   * @description 创建一个成员
   * @param {Object} payload 参数
   * @param {String} payload.name 成员名称
   */
  async create(payload) {
    console.log(payload);
    const { name } = payload;
    const member = this.getCurrentModel(SERVICE_NAME);
    const hasOne = await member.findOne({
      where: {
        name,
      },
    });
    if (hasOne) {
      this.ctx.throw(FAIL_CODE.DATA_EXIST);
    }
    const res = await member.create({ ...payload });
    return { res, msg: '创建成功' };
  }

  /**
   * 获取成员列表
   * @param {Object} payload 查询参数
   */
  async get(payload) {
    const res = await this.getCurrentModel(SERVICE_NAME).findAndCountAll();
    return res;
  }
  /**
   * 获取成员列表 分页
   * @param {Object} payload 查询参数
   * @param {Number} payload.currentPage 当前页码
   * @param {Number} payload.pageSize 每页数据条数
   */
  async getPage(payload) {
    const { currentPage, pageSize } = payload;
    // let res = []
    // let count = 0
    const order = [[ 'name', 'DESC' ]];
    const offset = (Number(currentPage) - 1) * Number(pageSize || 10);
    const memberService = this.getCurrentModel(SERVICE_NAME);
    const res = await memberService.findAndCountAll({
      order,
      where: {},
      offset,
      limit: pageSize,
    });
    console.log(res);
    return res;
  }
  async update(payload) {
    const { enable, id } = payload;
    const res = await this.getOneById(id);
    res.enable = enable;
    await res.save();
  }

  async delete(payload) {
    const { id } = payload;
    // 1.先查找数据后直接操作destroy
    // const res = await this.getOneById(id);
    // await res.destroy();

	// 2. 直接查找并删除记录
    const res = await this.getCurrentModel(SERVICE_NAME).destroy({
      where: {
        id,
      },
    });
    return { msg: '删除成功', res };
  }

  /**
   * 通过id获取这条数据并返回,如果获取失败抛出异常 id错误
   * @param {String} id 唯一id
   */
  async getOneById(id) {
    const res = await this.getCurrentModel(SERVICE_NAME).findOne({
      where: {
        id,
      },
    });
    if (!res) {
      const { ctx } = this;
	  const { helper } = ctx;
      ctx.throw(helper.FAIL_CODE.PARAMS_NO_MATCH);
    }
    return res;
  }
}
module.exports = MemberService;
- 在controller层调用service
// app/controller/xx.js
const { Controller } = require('egg');
class UserController extends Controller {
  constructor(ctx) {
    super(ctx);
  }
  async current() {
	const { ctx } = this;
	const res = await ctx.service.member.get(); // 这里的member对应的 app/service目录下的文件名
  }
}
module.exports = UserController;
创建helper文件,添加统一应答response
- 创建helper
// app/extend/helper.js
'use strict';
const moment = require('moment');
exports.formatTime = (time, format) => moment(time).format(format || 'YYYY-MM-DD HH:mm:ss');
exports.success = ({ ctx, res = null, msg = '请求成功' }) => {
  ctx.body = {
    code: 10000,
    data: res,
    msg,
  };
  ctx.status = 200;
};
- 在controller执行success应答返回response
// app/controller/xx.js
const { Controller } = require('egg');
class UserController extends Controller {
  constructor(ctx) {
    super(ctx);
  }
  async current() {
	this.ctx.helper.success({ ctx, {test: 11} });
  }
}
module.exports = UserController;
创建jwt生成Service类
- 添加jwt依赖
npm i egg-jwt -s
- 配置文件添加配置
// config/plugin.js
bcrypt : {
	enable: true,
	package: 'egg-jwt'
}
// config.default.js
config.jwt = {
	secret: 'xxxxxx', // 密钥
	enable: true,
	match: /^\/api/, // 需要鉴权的目录,egg框架会自动从header里面拿出Authorization校验
}
- 添加app.js
因为egg的加载顺序,如果我们添加了jwt,jwt的报错就会绕过我们的error_handler错误统一拦截处理,所以要添加一个app.js文件,提高error_handler的优先级
参考文章
// 根目录 app.js
'use strict';
class AppBootHook {
  constructor(app) {
    this.app = app;
    // 载入错误拦截中间件;(如果安装了路径别名工具,可以直接"@/middleware/error_handler.js")
    const errorHandle = require('./app/middleware/error_handler.js')({}, this.app);
    this.app.use(errorHandle);
  }
}
module.exports = AppBootHook;
- 创建jwt生成Service类
// app/service/actionToken.js
'use strict';
const { Service } = require('egg');
class ActionTokenService extends Service {
  async apply(_id) {
    const { ctx } = this;
    return ctx.app.jwt.sign(
      {
        data: {
          _id,
        },
        exp: Math.floor(Date.now() / 1000) + 60 * 60 * 24 * 7,
      },
      ctx.app.config.jwt.secret
    );
  }
}
module.exports = ActionTokenService;
- 使用jwt和鉴权步骤(这里就不做代码演示了,后续看完整demo)
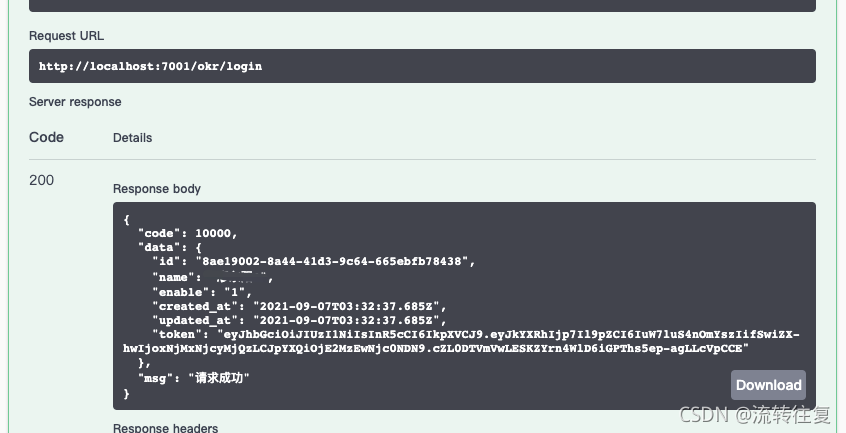
- 在service中调用this.service.actionToken.apply(id) 生成token,并在controller中调用作为response返回
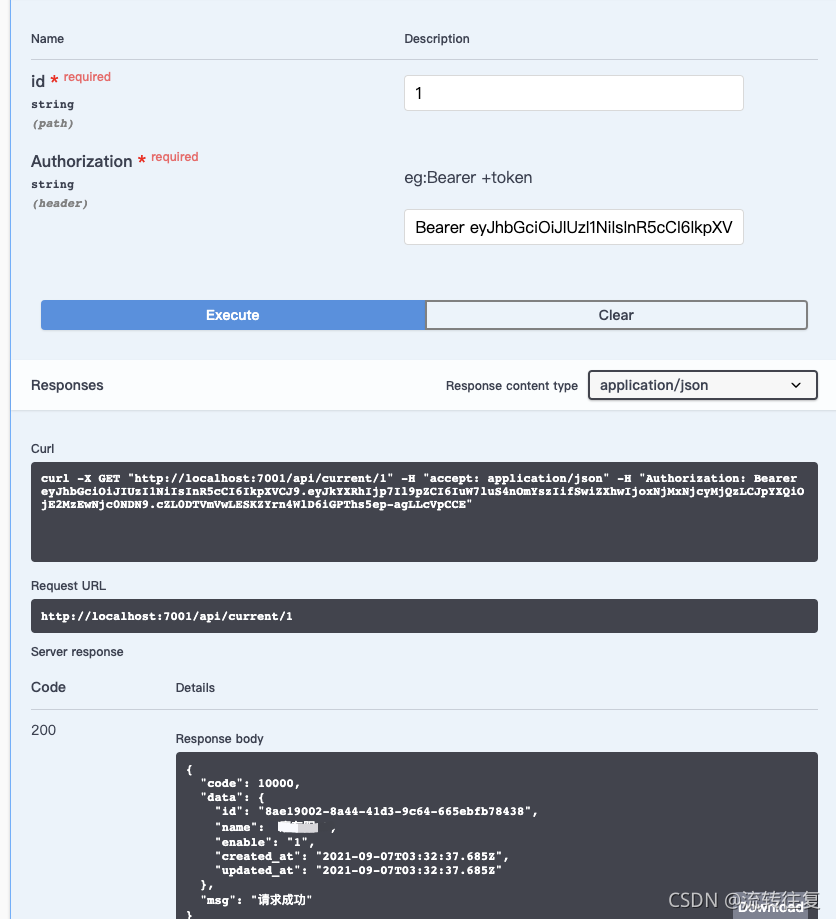
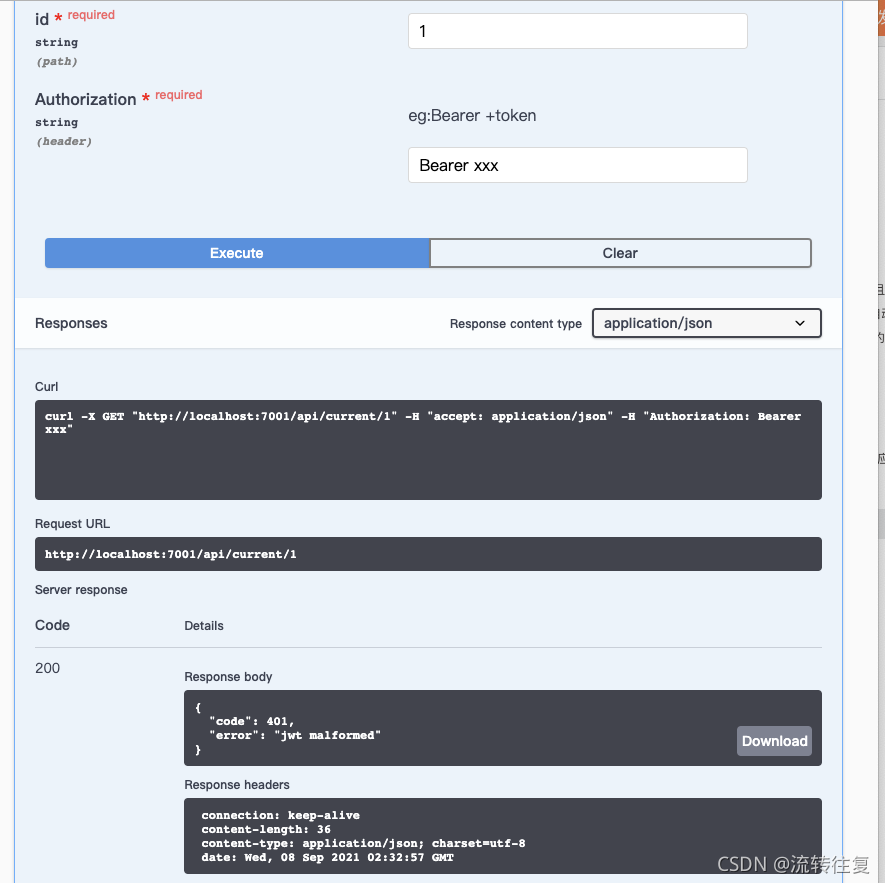
- 把获取的token放在header Authorization 中,内容为Bearer xxxx(xxxx为上一步获取的token)
- 框架在遇到config.default.js中jwt配置与match匹配的接口,框架会自动判断鉴权
首先调用接口,获取token
然后在header添加token
如果没有token,框架自动抛出错误
至此,我们就完成了一个企业级框架的初始环境搭建了。
回顾一下,我们实现了哪些功能的封装
- 通过JSDoc配置,自动路由注册
- 通过JSDoc配置和egg-validate插件,实现参数校验
- 通过JSDoc自动生成swagger文档
- 统一异常处理中间件
- jwt鉴权
一个基础的egg企业级开发框架就这样诞生了,感谢。
附上demo的链接
https://download.csdn.net/download/qq_18837459/22029613


 206
206


 被折叠的 条评论
为什么被折叠?
被折叠的 条评论
为什么被折叠?
 到【灌水乐园】发言


