


项目的源码地址
Spring Cloud Alibaba 工程搭建(1)
Spring Cloud Alibaba 工程搭建连接数据库(2)
Spring Cloud Alibaba 集成 nacos 以及整合 Ribbon 与 Feign 实现负载调用(3)
Spring Cloud Alibaba Ribbon 负载调用说明(4)
Spring Cloud Alibaba 核心理论 CAP与BASE理论简单理解(5)
Spring Cloud Alibaba Sentinel 集成与限流实战(6)
Spring Cloud Alibaba 网关 Gateway 集成(7)
简介
搭建 Spring cloud alibaba 是基于阿里的一整套微服务治理组件,使用 nacos 作为注册中心与服务发现,以及使用 nacos 作为配置中心,使用 sentinel 进行服务限流以及降级处理。使用 gateway 作为网关,采用的数据库为 mysql。
相关组件说明
- 通信⽅式:http restful
- 注册中⼼:nacos
- 配置中⼼:nacos
- 断路器:sentinel
- ⽹关:gateway
- 分布式追踪系统:sleuth + zipkin
环境说明
- spring boot 版本 2.3.3
- spring cloud 版本 Hoxton.SR8
- spring cloud alibaba 2.2.1.RELEASE
- jdk 版本为 11
工程搭建
数据库搭建
我们这里使用的是 MySQL 数据库。我是使用 docker 搭建的 MySQL,方便高效。docker 安装 MySQL戳这里。
创建数据库以及对应的表
这里我们会分别建立三个库以及三张表
- cloud_video 数据库
- video 表
- cloud_user 数据库
- user 表
- cloud_order 数据库
- video_order 表
创建数据库的时候,需要选择对应的字符集为 utf8mb4
cloud_video 数据库


CREATE TABLE `video` (
 `id` int(11) unsigned NOT NULL AUTO_INCREMENT,
 `title` varchar(524) DEFAULT NULL COMMENT '视频标题',
 `summary` varchar(1026) DEFAULT NULL COMMENT '概述',
 `cover_img` varchar(524) DEFAULT NULL COMMENT '封⾯图',
 `price` int(11) DEFAULT NULL COMMENT '价格, 分',
 `create_time` datetime DEFAULT NULL COMMENT '创建时间',
 `point` double(11,2) DEFAULT '8.70' COMMENT '默认8.7,最⾼10分',
 PRIMARY KEY (`id`)
) ENGINE=InnoDB AUTO_INCREMENT=48 DEFAULT
CHARSET=utf8mb4;
cloud_user 数据库

CREATE TABLE `user` (
  `id` int(11) unsigned NOT NULL AUTO_INCREMENT,
  `phone` varchar(32) DEFAULT NULL,
  `pwd` varchar(128) DEFAULT NULL,
  `sex` int(2) DEFAULT NULL,
  `img` varchar(128) DEFAULT NULL,
  `create_time` datetime DEFAULT NULL,
  `role` int(11) DEFAULT NULL COMMENT '1是普通用户,2是管理员',
  `username` varchar(128) DEFAULT NULL,
  `wechat` varchar(128) DEFAULT NULL,
  PRIMARY KEY (`id`)
) ENGINE=InnoDB AUTO_INCREMENT=5 DEFAULT CHARSET=utf8mb4;
cloud_order 数据库

CREATE TABLE `video_order` (
  `id` int(11) unsigned NOT NULL AUTO_INCREMENT,
  `out_trade_no` varchar(64) DEFAULT NULL COMMENT '订单唯一标识',
  `state` int(11) DEFAULT NULL COMMENT '0表示未支付,1表示已支付',
  `create_time` datetime DEFAULT NULL COMMENT '订单生成时间',
  `total_fee` int(11) DEFAULT NULL COMMENT '支付金额,单位分',
  `video_id` int(11) DEFAULT NULL COMMENT '视频主键',
  `video_title` varchar(256) DEFAULT NULL COMMENT '视频标题',
  `video_img` varchar(256) DEFAULT NULL COMMENT '视频图片',
  `user_id` int(12) DEFAULT NULL COMMENT '用户id',
  PRIMARY KEY (`id`)
) ENGINE=InnoDB AUTO_INCREMENT=42 DEFAULT CHARSET=utf8;
工程源码项目搭建
第一步:创建 maven 项目作为父工程


创建完成之后,将 src 文件删除

第二步:创建子 maven 工程
这里是创建 module


创建完了是这样子的,我们这里先是空的工程,后面我们会慢慢补充里面的内容
 最后,我们再创建完 common 模块,order 模块

模块说明:common 是公共的部分,order 是订单模块用来去调用 video 模块的接口
第三步:修改父工程的 pom 配置文件
父工程中的配置文件是为了指定依赖的版本
修改完成之后的 父 pom 文件内容如下:
<?xml version="1.0" encoding="UTF-8"?>
<project xmlns="http://maven.apache.org/POM/4.0.0"
         xmlns:xsi="http://www.w3.org/2001/XMLSchema-instance"
         xsi:schemaLocation="http://maven.apache.org/POM/4.0.0 http://maven.apache.org/xsd/maven-4.0.0.xsd">
    <modelVersion>4.0.0</modelVersion>

    <groupId>com.demo</groupId>
    <artifactId>demo-cloud</artifactId>
    <packaging>pom</packaging>
    <version>1.0-SNAPSHOT</version>

    <modules>
        <module>demo-video</module>
        <module>demo-common</module>
        <module>demo-order</module>
    </modules>

    <properties>
        <maven.compiler.source>11</maven.compiler.source>
        <maven.compiler.target>11</maven.compiler.target>
    </properties>

    <!--  锁定版本  -->
    <dependencyManagement>
        <dependencies>

            <!--https://mvnrepository.com/artifact/org.springframework.boot/spring-boot-dependencies/2.3.3.RELEASE-->
            <!--     依赖的Spring Boot 版本      -->
            <dependency>
                <groupId>org.springframework.boot</groupId>
                <artifactId>spring-boot-dependencies</artifactId>
                <version>2.3.3.RELEASE</version>
                <type>pom</type>
                <scope>import</scope>
            </dependency>

            <!--https://mvnrepository.com/artifact/org.springframework.cloud/spring-cloud-dependencies/Hoxton.SR8-->
            <!--     依赖的Spring cloud 版本      -->
            <dependency>
                <groupId>org.springframework.cloud</groupId>
                <artifactId>spring-cloud-dependencies</artifactId>
                <version>Hoxton.SR8</version>
                <type>pom</type>
                <scope>import</scope>
            </dependency>

            <!--https://mvnrepository.com/artifact/com.alibaba.cloud/spring-cloud-alibaba-dependencies/2.2.1.RELEASE-->
            <!--     依赖的alibaba cloud 版本      -->
            <dependency>
                <groupId>com.alibaba.cloud</groupId>
                <artifactId>spring-cloud-alibaba-dependencies</artifactId>
                <version>2.2.1.RELEASE</version>
                <type>pom</type>
                <scope>import</scope>
            </dependency>

            <dependency>
                <groupId>org.mybatis.spring.boot</groupId>
                <artifactId>mybatis-spring-boot-starter</artifactId>
                <version>2.1.2</version>
                <type>pom</type>
                <scope>import</scope>
            </dependency>

        </dependencies>
    </dependencyManagement>

    <build>
        <plugins>
            <plugin>
                <groupId>org.springframework.boot</groupId>
                <artifactId>spring-boot-maven-plugin</artifactId>
                <configuration>
                    <fork>true</fork>
                    <addResources>true</addResources>
                </configuration>
            </plugin>
        </plugins>
    </build>

</project>
第四步:修改子模块的 POM 文件
在 video 模块与 order 模块中引入对应的 spring-boot-starter-web 依赖
video 模块的 pom 文件
<?xml version="1.0" encoding="UTF-8"?>
<project xmlns="http://maven.apache.org/POM/4.0.0"
         xmlns:xsi="http://www.w3.org/2001/XMLSchema-instance"
         xsi:schemaLocation="http://maven.apache.org/POM/4.0.0 http://maven.apache.org/xsd/maven-4.0.0.xsd">
    <parent>
        <artifactId>demo-cloud</artifactId>
        <groupId>com.demo</groupId>
        <version>1.0-SNAPSHOT</version>
    </parent>
    <modelVersion>4.0.0</modelVersion>

    <artifactId>demo-video</artifactId>

    <properties>
        <maven.compiler.source>11</maven.compiler.source>
        <maven.compiler.target>11</maven.compiler.target>
    </properties>

    <dependencies>
        <dependency>
            <groupId>com.demo</groupId>
            <artifactId>demo-common</artifactId>
            <version>1.0-SNAPSHOT</version>
        </dependency>

        <dependency>
            <groupId>org.springframework.boot</groupId>
            <artifactId>spring-boot-starter-web</artifactId>
        </dependency>
    </dependencies>

    <build>
        <finalName>demo-video</finalName>
        <plugins>
            <plugin>
                <groupId>org.springframework.boot</groupId>
                <artifactId>spring-boot-maven-plugin</artifactId>
            </plugin>
        </plugins>
    </build>
</project>
order 模块的 pom 文件
<?xml version="1.0" encoding="UTF-8"?>
<project xmlns="http://maven.apache.org/POM/4.0.0"
         xmlns:xsi="http://www.w3.org/2001/XMLSchema-instance"
         xsi:schemaLocation="http://maven.apache.org/POM/4.0.0 http://maven.apache.org/xsd/maven-4.0.0.xsd">
    <parent>
        <artifactId>demo-cloud</artifactId>
        <groupId>com.demo</groupId>
        <version>1.0-SNAPSHOT</version>
    </parent>
    <modelVersion>4.0.0</modelVersion>

    <artifactId>demo-order</artifactId>

    <properties>
        <maven.compiler.source>11</maven.compiler.source>
        <maven.compiler.target>11</maven.compiler.target>
    </properties>

    <dependencies>
        <dependency>
            <groupId>com.demo</groupId>
            <artifactId>demo-common</artifactId>
            <version>1.0-SNAPSHOT</version>
        </dependency>

        <dependency>
            <groupId>org.springframework.boot</groupId>
            <artifactId>spring-boot-starter-web</artifactId>
        </dependency>
    </dependencies>

    <build>
        <finalName>demo-order</finalName>
        <plugins>
            <plugin>
                <groupId>org.springframework.boot</groupId>
                <artifactId>spring-boot-maven-plugin</artifactId>
            </plugin>
        </plugins>
    </build>
</project>
common 模块的 pom 文件
<?xml version="1.0" encoding="UTF-8"?>
<project xmlns="http://maven.apache.org/POM/4.0.0"
         xmlns:xsi="http://www.w3.org/2001/XMLSchema-instance"
         xsi:schemaLocation="http://maven.apache.org/POM/4.0.0 http://maven.apache.org/xsd/maven-4.0.0.xsd">
    <parent>
        <artifactId>demo-cloud</artifactId>
        <groupId>com.demo</groupId>
        <version>1.0-SNAPSHOT</version>
    </parent>
    <modelVersion>4.0.0</modelVersion>

    <artifactId>demo-common</artifactId>

    <properties>
        <maven.compiler.source>11</maven.compiler.source>
        <maven.compiler.target>11</maven.compiler.target>
    </properties>

    <build>
        <finalName>demo-common</finalName>
        <plugins>
            <plugin>
                <groupId>org.springframework.boot</groupId>
                <artifactId>spring-boot-maven-plugin</artifactId>
            </plugin>
        </plugins>
    </build>
</project>
第五步:创建对应模块的启动类以及配置文件
order 模块
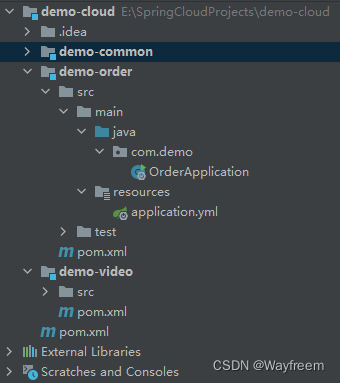
OrderApplication.java
@SpringBootApplication
public class OrderApplication {
    public static void main(String[] args) {
        SpringApplication.run(OrderApplication.class, args);
    }
}
application.yml
server:
  port: 9000

spring:
  application:
    name: demo-order
尝试启动

video 模块
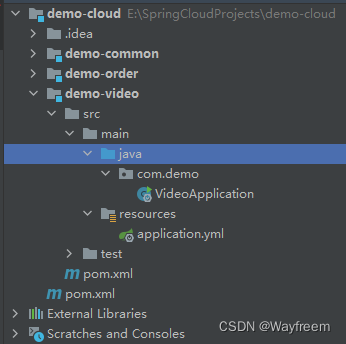
VideoApplication.java
@SpringBootApplication
public class VideoApplication {

    public static void main(String[] args) {
        SpringApplication.run(VideoApplication.class, args);
    }
}
application.yml
server:
  port: 8000

spring:
  application:
    name: demo-video
尝试启动

到此,我们的项目工程就搭建完成,后面一篇会集成数据相关链接,以及慢慢集成 nacos 以及其他的组件。


 1万+
1万+


 被折叠的 条评论
为什么被折叠?
被折叠的 条评论
为什么被折叠?
 到【灌水乐园】发言


