前言
Spring框架的两大核心思想IOC和AOP,IOC在我们开发中可能除了注入之外真正涉及到的内容不多,大多数是原理性的,而AOP在开发过程中实际用到的就多了,例如常用的事务操作、权限框架、日志记录等,本文简单的就AOP的实现原理做出简单的介绍。
一、AOP回顾
对于Spring中AOP大家在入门的时候应该就已经很清楚了,这里就不过多的介绍了,简单的回顾几个概念
| 概念 | 说明 |
|---|---|
| 通知(Advice) | AOP 框架中的增强处理。通知描述了切面何时执行以及如何执行增强处理 |
| 连接点(join point) | 连接点表示应用执行过程中能够插入切面的一个点,这个点可以是方法的调用、异常的抛出 |
| 切点(PointCut) | 可以插入增强处理的连接点 |
| 切面(Aspect) | 切面是通知和切点的结合 |
| 引入(Introduction) | 引入允许我们向现有的类添加新的方法或者属性 |
| 织入(Weaving) | 将增强处理添加到目标对象中,并创建一个被增强的对象,这个过程就是织入 |
下面在Spring源码中创建AOP的例子。
gradle中的配置:
dependencies {
    compile(project(":spring-context"))
    compile(project(":spring-aspects"))
    testCompile group: 'junit', name: 'junit', version: '4.12'
}
写个切面类:
@Aspect
@Component
public class MyAspect {

	@Pointcut("execution(public void com.jack.service.TestService.doSomething())")
	public void point(){}

	@Before("point()")
	public void beforeMethod() {
		System.out.println("beforeMethod----");
	}
}
被代理对象:
@Service
public class TestService {

	public void doSomething(){
		System.out.println("doSomething---");
	}
}
Config配置
@Configuration
@ComponentScan("com.jack.service")
@EnableAspectJAutoProxy(proxyTargetClass = true)
public class JavaConfig {

}
写个测试类:
public static void main(String[] args) {
	ApplicationContext applicationContext = new AnnotationConfigApplicationContext(JavaConfig.class);
	TestService testService = applicationContext.getBean(TestService.class);
	testService.doSomething();
}
执行结果:

二、源码分析
EnableAspectJAutoProxy注解
我们知道想要使切面生效必须加EnableAspectJAutoProxy注解,这个注解具体干了什么呢?咱来看一下
@Import(AspectJAutoProxyRegistrar.class)
public @interface EnableAspectJAutoProxy {

	//true使用Cglib代理,false使用Java的Proxy
	boolean proxyTargetClass() default false;
	//代理的暴露方式
	boolean exposeProxy() default false;
}
看这个类引入了AspectJAutoProxyRegistrar类,这个类里面只有一个方法手动的注册了一个类。
	//注册bean模板
	public void registerBeanDefinitions(
			AnnotationMetadata importingClassMetadata, BeanDefinitionRegistry registry) {
		//
		AopConfigUtils.registerAspectJAnnotationAutoProxyCreatorIfNecessary(registry);

		AnnotationAttributes enableAspectJAutoProxy =
				AnnotationConfigUtils.attributesFor(importingClassMetadata, EnableAspectJAutoProxy.class);
		if (enableAspectJAutoProxy != null) {
			if (enableAspectJAutoProxy.getBoolean("proxyTargetClass")) {
				AopConfigUtils.forceAutoProxyCreatorToUseClassProxying(registry);
			}
			if (enableAspectJAutoProxy.getBoolean("exposeProxy")) {
				AopConfigUtils.forceAutoProxyCreatorToExposeProxy(registry);
			}
		}
	}
代码层层的点击,最后定位到了注册的类为AnnotationAwareAspectJAutoProxyCreator,跟IOC一样注册成为BeanDefinition。
	@Nullable
	public static BeanDefinition registerAspectJAnnotationAutoProxyCreatorIfNecessary(
			BeanDefinitionRegistry registry, @Nullable Object source) {
		return registerOrEscalateApcAsRequired(AnnotationAwareAspectJAutoProxyCreator.class, registry, source);
	}
AnnotationAwareAspectJAutoProxyCreator
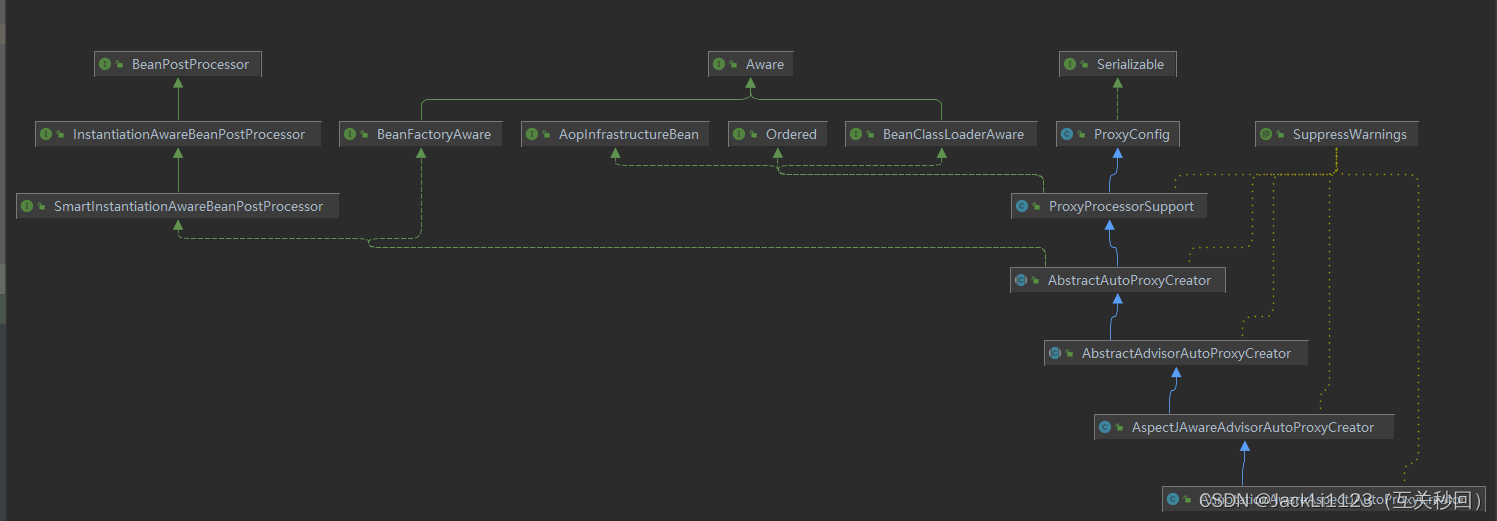
上面我们知道了最终注册的类为AnnotationAwareAspectJAutoProxyCreator,这个类是干什么的呢?找到这个类看一下类图,可以看到它最终实现的是BeanPostProcessor,这个类大家应该很熟悉,Bean的后置处理类,可以在bean对象初始化之前和之后做一些处理。

既然AnnotationAwareAspectJAutoProxyCreator最终实现了BeanPostProcessor,那咱看一下它的前置和后置方法都干了些什么,最终定位到了AbstractAutoProxyCreator父类才实现了前置方法和后置方法,这个地方需要注意一下方法名称因为其中有很多名称相似的方法。
//前置处理没有做任何处理
public Object postProcessBeforeInitialization(Object bean, String beanName) {
	return bean;
}
//后置处理
public Object postProcessAfterInitialization(@Nullable Object bean, String beanName) {
	if (bean != null) {
		Object cacheKey = getCacheKey(bean.getClass(), beanName);
		if (this.earlyProxyReferences.remove(cacheKey) != bean) {
			//在这里创建了代理类
			return wrapIfNecessary(bean, beanName, cacheKey);
		}
	}
	return bean;
}
继续往下看创建代理类
//这个方法是所有bean对象都会进入的,最终根据是否有代理方法判断是否需要处理
protected Object wrapIfNecessary(Object bean, String beanName, Object cacheKey) {
		... //上面是一堆判断
		// 看一下是否有代理方法,这个地方可以打断点看一下其实就是代理的before after arround等方法
		Object[] specificInterceptors = getAdvicesAndAdvisorsForBean(bean.getClass(), beanName, null);
		//如果有代理方法则创建代理类
		if (specificInterceptors != DO_NOT_PROXY) {
			this.advisedBeans.put(cacheKey, Boolean.TRUE);
			Object proxy = createProxy(
					bean.getClass(), beanName, specificInterceptors, new SingletonTargetSource(bean));
			this.proxyTypes.put(cacheKey, proxy.getClass());
			return proxy;
		}
		this.advisedBeans.put(cacheKey, Boolean.FALSE);
		return bean;
	}
根据断点的截图可以看到被代理对象testService拥有代理方法,咱只写了个前置代理方法那所以就一个

	protected Object createProxy(Class<?> beanClass, @Nullable String beanName,
			@Nullable Object[] specificInterceptors, TargetSource targetSource) {
		if (this.beanFactory instanceof ConfigurableListableBeanFactory) {
			AutoProxyUtils.exposeTargetClass((ConfigurableListableBeanFactory) this.beanFactory, beanName, beanClass);
		}
		//代理工厂
		ProxyFactory proxyFactory = new ProxyFactory();
		proxyFactory.copyFrom(this);
		//判断是否设置proxyTargetClass,如果是true的情况下强制使用CGLIB代理,false根据是否实现接口判断
		if (proxyFactory.isProxyTargetClass()) {
			//true的情况增加接口来实现强制CGLIB代理,其实没有强制这一说,接口的用CGLIB代理,通过参数配置接口让其后面用CGLIB代理
			if (Proxy.isProxyClass(beanClass)) {
				for (Class<?> ifc : beanClass.getInterfaces()) {
					proxyFactory.addInterface(ifc);
				}
			}
		}
		else {
			// 此时是false的,判断是否是对类进行的代理,设置对应参数
			if (shouldProxyTargetClass(beanClass, beanName)) {
				proxyFactory.setProxyTargetClass(true);
			}
			else {
				evaluateProxyInterfaces(beanClass, proxyFactory);
			}
		}
		//把其他拦截器和代理合并一下,由于没有其他的方法拦截,所以这里最终结果还是上面截图的那个
		Advisor[] advisors = buildAdvisors(beanName, specificInterceptors);
		proxyFactory.addAdvisors(advisors);
		proxyFactory.setTargetSource(targetSource);
		customizeProxyFactory(proxyFactory);
		proxyFactory.setFrozen(this.freezeProxy);
		if (advisorsPreFiltered()) {
			proxyFactory.setPreFiltered(true);
		}
		//准备工作做完后开始创建代理
		return proxyFactory.getProxy(getProxyClassLoader());
	}
看一下创建代理,最后使用的代理工厂创建的代理
public Object getProxy(@Nullable ClassLoader classLoader) {
	return createAopProxy().getProxy(classLoader);
}
//创建代理方法,config记录了一些配置信息
public AopProxy createAopProxy(AdvisedSupport config) throws AopConfigException {
	if (config.isOptimize() || config.isProxyTargetClass() || hasNoUserSuppliedProxyInterfaces(config)) {
		//获取被代理的对象class,然后做判断区分不同的代理方式
		Class<?> targetClass = config.getTargetClass();
		...
		//看一下,代理接口的时候使用的JDK代理,咱写的Class所以使用的CGLIB代理的
		if (targetClass.isInterface() || Proxy.isProxyClass(targetClass)) {
			return new JdkDynamicAopProxy(config);
		}
		//其他的使用的是CGLIB动态代理
		return new ObjenesisCglibAopProxy(config);
	}
	else {
		return new JdkDynamicAopProxy(config);
	}
}
getProxy()有两个具体实现方法,一个是JDK代理一个是CGLIB代理,通过createAopProxy判断不同的代理方式来调用。


 181
181


 被折叠的 条评论
为什么被折叠?


