


第三章:高级UI组件
第一节:进度条类组件
1.1 进度条<ProgressBar>
标签
<ProgressBar>
属性
-
style:改变进度条的样式,默认为圆形进度条取值:
?android:attr/progressBarStyleHorizontal:细水平长条进度条?android:attr/progressBarStyleSmall:小圆形进度条?android:attr/progressBarStyleLarge:大圆形进度条@android:style/Widget.ProgressBar.Horizontal:粗水平长条进度条@android:style/Widget.ProgressBar.Large:旋转画面的大圆形进度条@android:style/Widget.ProgressBar.small:旋转画面的小圆形进度条
-
android:max:设置最大值 -
android:progress:设置当前进度

实现类似开心消消乐启动界面的水平进度条
<?xml version="1.0" encoding="utf-8"?>
<RelativeLayout xmlns:android="http://schemas.android.com/apk/res/android"
    xmlns:app="http://schemas.android.com/apk/res-auto"
    xmlns:tools="http://schemas.android.com/tools"
    android:layout_width="match_parent"
    android:layout_height="match_parent"
    android:padding="16dp"
    android:background="@mipmap/xxll"
    tools:context=".MainActivity">

    <ProgressBar
        android:id="@+id/progressBar"
        style="@android:style/Widget.ProgressBar.Horizontal"
        android:layout_width="match_parent"
        android:layout_height="wrap_content"
        android:max="100"
        android:layout_alignParentBottom="true"
        android:layout_marginBottom="50dp"
        />

</RelativeLayout>
package com.example.kaixinxiaoxiaoleprogress;

import androidx.annotation.NonNull;
import androidx.appcompat.app.AppCompatActivity;

import android.os.Bundle;
import android.os.Handler;
import android.os.Message;
import android.view.View;
import android.view.WindowManager;
import android.widget.ProgressBar;
import android.widget.Toast;

public class MainActivity extends AppCompatActivity {
    int mProgress;

    @Override
    protected void onCreate(Bundle savedInstanceState) {
        super.onCreate(savedInstanceState);
        setContentView(R.layout.activity_main);
        getWindow().setFlags(WindowManager.LayoutParams.FLAG_FULLSCREEN,WindowManager.LayoutParams.FLAG_FULLSCREEN);

        ProgressBar progressBar=findViewById(R.id.progressBar);
        mProgress=0;
        Handler mHandler=new Handler(){
            @Override
            public void handleMessage(@NonNull Message msg) {
                if (msg.what==0x111){
                    progressBar.setProgress(mProgress);
                }else {
                    Toast.makeText(MainActivity.this, "耗时操作已完成", Toast.LENGTH_SHORT).show();
                    progressBar.setVisibility(View.GONE);
                }
            }
        };
        new Thread(new Runnable() {
            @Override
            public void run() {
                while (true){
                    mProgress=doWork();
                    Message message=new Message();
                    if (mProgress<100){
                        message.what=0x111;
                        mHandler.sendMessage(message);
                    }else {
                        message.what=0x110;
                        mHandler.sendMessage(message);
                        break;
                    }
                }
            }

            private int doWork() {
                mProgress+=Math.random()*10;
                try {
                    Thread.sleep(200);
                } catch (InterruptedException e) {
                    e.printStackTrace();
                }
                return mProgress;
            }

        }).start();
    }
}
1.2 拖动条<SeekBar>
标签
<SeekBar>
属性
android:max:最大进度android:progress:当前进度android:thumb:设置进度条上小圆球的样式(图片)
<?xml version="1.0" encoding="utf-8"?>
<RelativeLayout xmlns:android="http://schemas.android.com/apk/res/android"
    xmlns:app="http://schemas.android.com/apk/res-auto"
    xmlns:tools="http://schemas.android.com/tools"
    android:layout_width="match_parent"
    android:layout_height="match_parent"
    android:padding="16dp"
    tools:context=".MainActivity">

    <SeekBar
        android:id="@+id/seekBar"
        android:layout_width="match_parent"
        android:layout_height="wrap_content"
        android:max="10"
        android:progress="5"
        android:thumb="@drawable/ic_launcher_background"
        />

</RelativeLayout>
package com.example.seekbar;

import androidx.appcompat.app.AppCompatActivity;

import android.os.Bundle;
import android.widget.SeekBar;
import android.widget.Toast;

public class MainActivity extends AppCompatActivity {

    @Override
    protected void onCreate(Bundle savedInstanceState) {
        super.onCreate(savedInstanceState);
        setContentView(R.layout.activity_main);

        SeekBar seekBar=findViewById(R.id.seekBar);
        seekBar.setOnSeekBarChangeListener(new SeekBar.OnSeekBarChangeListener() {
            @Override
            //进度改变时执行的方法
            public void onProgressChanged(SeekBar seekBar, int i, boolean b) {
                Toast.makeText(MainActivity.this, "进度改变"+i, Toast.LENGTH_SHORT).show();
            }

            @Override
            //开始触摸时执行的方法
            public void onStartTrackingTouch(SeekBar seekBar) {
                Toast.makeText(MainActivity.this, "开始触摸", Toast.LENGTH_SHORT).show();
            }

            @Override
            //停止触摸时执行的方法
            public void onStopTrackingTouch(SeekBar seekBar) {
                Toast.makeText(MainActivity.this, "停止触摸", Toast.LENGTH_SHORT).show();
            }
        });
    }
}
实现美图秀秀土拍你透明度拖动条,并为其添加OnSeekBarChangeListener监听器
<?xml version="1.0" encoding="utf-8"?>
<LinearLayout xmlns:android="http://schemas.android.com/apk/res/android"
    xmlns:app="http://schemas.android.com/apk/res-auto"
    xmlns:tools="http://schemas.android.com/tools"
    android:layout_width="match_parent"
    android:layout_height="match_parent"
    android:orientation="vertical"
    tools:context=".MainActivity">

    <ImageView
        android:id="@+id/lijiang"
        android:layout_width="match_parent"
        android:layout_height="650dp"
        android:src="@drawable/lijiang"
        />

    <SeekBar
        android:id="@+id/seekBar"
        android:layout_width="match_parent"
        android:layout_height="wrap_content"
        android:max="255"
        android:progress="255"
        />

    <ImageView
        android:layout_width="match_parent"
        android:layout_height="wrap_content"
        android:src="@drawable/meitu"
        android:scaleType="fitXY"
        />

</LinearLayout>
package com.example.meituxiuxiuseekbar;

import androidx.appcompat.app.AppCompatActivity;

import android.os.Bundle;
import android.widget.ImageView;
import android.widget.SeekBar;

public class MainActivity extends AppCompatActivity {

    @Override
    protected void onCreate(Bundle savedInstanceState) {
        super.onCreate(savedInstanceState);
        setContentView(R.layout.activity_main);

        SeekBar seekBar=findViewById(R.id.seekBar);
        ImageView imageView=findViewById(R.id.lijiang);
        seekBar.setOnSeekBarChangeListener(new SeekBar.OnSeekBarChangeListener() {
            @Override
            public void onProgressChanged(SeekBar seekBar, int i, boolean b) {
                imageView.setImageAlpha(i);
            }

            @Override
            public void onStartTrackingTouch(SeekBar seekBar) {

            }

            @Override
            public void onStopTrackingTouch(SeekBar seekBar) {

            }
        });
    }
}
1.3 星级评分条<RatingBar>
标签
<RatingBar>
属性
android:numStars:设置星星的个数android:rating:有几颗星被点亮了android:stepSize:最小点亮个数android:isIndicator:设置星级不能再次改变
<?xml version="1.0" encoding="utf-8"?>
<RelativeLayout xmlns:android="http://schemas.android.com/apk/res/android"
    xmlns:app="http://schemas.android.com/apk/res-auto"
    xmlns:tools="http://schemas.android.com/tools"
    android:layout_width="match_parent"
    android:layout_height="match_parent"
    android:padding="16dp"
    tools:context=".MainActivity">

    <RatingBar
        android:id="@+id/ratingBar"
        android:layout_width="wrap_content"
        android:layout_height="wrap_content"
        android:numStars="8"
        android:rating="5"
        android:stepSize="0.25"
        />

</RelativeLayout>
package com.example.ratingbar;

import androidx.appcompat.app.AppCompatActivity;

import android.os.Bundle;
import android.widget.RatingBar;
import android.widget.Toast;

public class MainActivity extends AppCompatActivity {

    @Override
    protected void onCreate(Bundle savedInstanceState) {
        super.onCreate(savedInstanceState);
        setContentView(R.layout.activity_main);
        RatingBar ratingBar=findViewById(R.id.ratingBar);
        String rating=String.valueOf(ratingBar.getRating());
        Toast.makeText(MainActivity.this, "Ratring:"+rating, Toast.LENGTH_SHORT).show();
        String stepSize= String.valueOf(ratingBar.getStepSize());
        Toast.makeText(MainActivity.this, "StepSize:"+stepSize, Toast.LENGTH_SHORT).show();
        String progress= String.valueOf(ratingBar.getProgress());
        Toast.makeText(MainActivity.this, "Progress:"+progress, Toast.LENGTH_SHORT).show();
    }
}
实现手机淘宝评价页面的星级评分条
<?xml version="1.0" encoding="utf-8"?>
<RelativeLayout xmlns:android="http://schemas.android.com/apk/res/android"
    xmlns:app="http://schemas.android.com/apk/res-auto"
    xmlns:tools="http://schemas.android.com/tools"
    android:layout_width="match_parent"
    android:layout_height="match_parent"
    android:orientation="vertical"
    android:background="@mipmap/xing1"
    tools:context=".MainActivity">

    <TextView
        android:id="@+id/textView"
        android:layout_width="wrap_content"
        android:layout_height="wrap_content"
        android:text="店铺评分"
        android:textSize="20sp"
        android:layout_marginBottom="130dp"
        android:layout_above="@+id/btn"
        />

    <RatingBar
        android:id="@+id/ratingBar"
        android:layout_width="wrap_content"
        android:layout_height="wrap_content"
        android:rating="5"
        android:layout_above="@+id/btn"
        android:layout_marginBottom="60dp"
        style="?android:attr/ratingBarStyleIndicator"
        />

    <Button
        android:id="@+id/btn"
        android:layout_width="wrap_content"
        android:layout_height="wrap_content"
        android:layout_alignParentBottom="true"
        android:layout_alignParentRight="true"
        android:background="#ff5000"
        android:text="发表评价"
        />


</RelativeLayout>
package com.example.taobaoratingbar;

import androidx.appcompat.app.AppCompatActivity;

import android.os.Bundle;
import android.view.View;
import android.widget.Button;
import android.widget.RatingBar;
import android.widget.Toast;

public class MainActivity extends AppCompatActivity {

    @Override
    protected void onCreate(Bundle savedInstanceState) {
        super.onCreate(savedInstanceState);
        setContentView(R.layout.activity_main);

        RatingBar ratingBar=findViewById(R.id.ratingBar);
        Button button=findViewById(R.id.btn);
        button.setOnClickListener(new View.OnClickListener() {
            @Override
            public void onClick(View view) {
                float rating=ratingBar.getRating();
                Toast.makeText(MainActivity.this, "你得到了:"+rating+"颗星", Toast.LENGTH_SHORT).show();
            }
        });
    }
}
第二节:图像类组件
2.1 图像视图<ImageView>
标签
<ImageView>
属性
android:src:设置图片路径android:background::设置图片的背景android:scaleType:设置图片的拉伸方式fitXY:不保持纵横比地缩放图片,使图片适合x、y轴center:把图像放在ImageView的中间,不进行任何缩放centerCrop:保持纵横比地缩放图片,以保持图片完全盖住ImageViewcenterInside:fitCenter:保持纵横比地缩放图片,保持图片在ImageView的中央fitEnd:保持纵横比地缩放图片,保持图片在ImageView的右部fitStart:保持纵横比地缩放图片,保持图片在ImageView的左部matrix:以矩阵的方式对图像进行缩放
android:adjustViewBounds:用于指定是否调整自己的边界来保持所显示图片的长宽比android:maxWidth:设置最大宽度(只有设置android:adjustViewBounds为true时才能使用)android:maxHeight:设置最大高度(只有设置android:adjustViewBounds为true时才能使用)android:tint:着色属性
<?xml version="1.0" encoding="utf-8"?>
<LinearLayout xmlns:android="http://schemas.android.com/apk/res/android"
    xmlns:app="http://schemas.android.com/apk/res-auto"
    xmlns:tools="http://schemas.android.com/tools"
    android:layout_width="match_parent"
    android:layout_height="match_parent"
    android:orientation="vertical"
    android:padding="16dp"
    tools:context=".MainActivity">

    <ImageView
        android:layout_width="wrap_content"
        android:layout_height="wrap_content"
        android:src="@drawable/flower"
        />

    <ImageView
        android:layout_width="wrap_content"
        android:layout_height="wrap_content"
        android:background="#ff0000"
        android:src="@drawable/flower"
        android:adjustViewBounds="true"
        android:maxWidth="90dp"
        android:maxHeight="90dp"
        android:tint="#77ff0000"
        />

</LinearLayout>
实现应用ImageView组件显示图像
<?xml version="1.0" encoding="utf-8"?>
<LinearLayout xmlns:android="http://schemas.android.com/apk/res/android"
    xmlns:app="http://schemas.android.com/apk/res-auto"
    xmlns:tools="http://schemas.android.com/tools"
    android:layout_width="match_parent"
    android:layout_height="match_parent"
    android:orientation="horizontal"
    android:background="@mipmap/background"
    android:padding="16dp"
    tools:context=".MainActivity">

    <ImageView
        android:layout_width="wrap_content"
        android:layout_height="wrap_content"
        android:src="@drawable/flower"
        android:layout_margin="3dp"
        />

    <ImageView
        android:layout_width="wrap_content"
        android:layout_height="wrap_content"
        android:adjustViewBounds="true"
        android:maxWidth="90dp"
        android:maxHeight="90dp"
        android:layout_margin="3dp"
        android:src="@drawable/flower"
        />

    <ImageView
        android:layout_width="90dp"
        android:layout_height="90dp"
        android:scaleType="fitEnd"
        android:src="@drawable/flower"
        android:layout_margin="3dp"
        />

    <ImageView
        android:layout_width="90dp"
        android:layout_height="90dp"
        android:src="@drawable/flower"
        app:tint="#77ff0000" />

</LinearLayout>
2.2 图像切换器<ImageSwitcher>
标签
<ImageSwitcher>
<?xml version="1.0" encoding="utf-8"?>
<RelativeLayout xmlns:android="http://schemas.android.com/apk/res/android"
    xmlns:app="http://schemas.android.com/apk/res-auto"
    xmlns:tools="http://schemas.android.com/tools"
    android:layout_width="match_parent"
    android:layout_height="match_parent"
    android:padding="16dp"
    tools:context=".MainActivity">

    <ImageSwitcher
        android:id="@+id/imageSwitcher"
        android:layout_width="match_parent"
        android:layout_height="match_parent"
        ></ImageSwitcher>

</RelativeLayout>
package com.example.imageswitcher;

import androidx.appcompat.app.AppCompatActivity;

import android.os.Bundle;
import android.view.View;
import android.view.animation.AnimationUtils;
import android.widget.ImageSwitcher;
import android.widget.ImageView;
import android.widget.ViewSwitcher;

public class MainActivity extends AppCompatActivity {

    @Override
    protected void onCreate(Bundle savedInstanceState) {
        super.onCreate(savedInstanceState);
        setContentView(R.layout.activity_main);

        ImageSwitcher imageSwitcher=findViewById(R.id.imageSwitcher);
        imageSwitcher.setOutAnimation(AnimationUtils.loadAnimation(MainActivity.this, android.R.anim.fade_out));//设置淡出动画
        imageSwitcher.setInAnimation(AnimationUtils.loadAnimation(MainActivity.this, android.R.anim.fade_in));//设置淡入动画
        imageSwitcher.setFactory(new ViewSwitcher.ViewFactory() {
            @Override
            public View makeView() {
                ImageView imageView=new ImageView(MainActivity.this);
                imageView.setImageResource(R.drawable.img01);
                return imageView;
            }
        });
        imageSwitcher.setOnClickListener(new View.OnClickListener() {
            @Override
            public void onClick(View view) {
                ((ImageSwitcher)view).setImageResource(R.drawable.img02);
            }
        });
    }//设置点击切换
}
实现类似手机相册的滑动查看相片功能
<?xml version="1.0" encoding="utf-8"?>
<RelativeLayout xmlns:android="http://schemas.android.com/apk/res/android"
    xmlns:app="http://schemas.android.com/apk/res-auto"
    xmlns:tools="http://schemas.android.com/tools"
    android:layout_width="match_parent"
    android:layout_height="match_parent"
    android:padding="16dp"
    tools:context=".MainActivity">

    <ImageSwitcher
        android:id="@+id/imageSwitcher"
        android:layout_width="wrap_content"
        android:layout_height="wrap_content"
        android:layout_centerVertical="true"
        android:layout_centerHorizontal="true"
        />

</RelativeLayout>
package com.example.shoujixiangcehuodongchakan;

import androidx.appcompat.app.AppCompatActivity;

import android.os.Bundle;
import android.view.MotionEvent;
import android.view.View;
import android.view.WindowManager;
import android.view.animation.AnimationUtils;
import android.widget.ImageSwitcher;
import android.widget.ImageView;
import android.widget.ViewSwitcher;

public class MainActivity extends AppCompatActivity {

    private int index;
    private float touchDowX;
    private float touchUpX;

    @Override
    protected void onCreate(Bundle savedInstanceState) {
        super.onCreate(savedInstanceState);
        setContentView(R.layout.activity_main);
        getWindow().setFlags(WindowManager.LayoutParams.FLAG_FULLSCREEN,WindowManager.LayoutParams.FLAG_FULLSCREEN);
        int[] arrayPic=new int[]{R.drawable.img01,R.drawable.img02,R.drawable.img03,R.drawable.img04,R.drawable.img05,R.drawable.img06,R.drawable.img07,R.drawable.img08,R.drawable.img09};
        ImageSwitcher imageSwitcher=findViewById(R.id.imageSwitcher);
        imageSwitcher.setFactory(new ViewSwitcher.ViewFactory() {
            @Override
            public View makeView() {
                ImageView imageView=new ImageView(MainActivity.this);
                imageView.setImageResource(arrayPic[index]);
                return imageView;
            }
        });
        imageSwitcher.setOnTouchListener(new View.OnTouchListener() {
            @Override
            public boolean onTouch(View view, MotionEvent motionEvent) {
                if (motionEvent.getAction()== MotionEvent.ACTION_DOWN){
                    touchDowX=motionEvent.getX();
                    return true;
                }else if (motionEvent.getAction()== MotionEvent.ACTION_UP){
                    touchUpX=motionEvent.getX();
                    if (touchUpX-touchDowX>100){//从左向右滑动
                        index=index==0?arrayPic.length-1:index-1;
                        imageSwitcher.setInAnimation(AnimationUtils.loadAnimation(MainActivity.this,R.anim.slide_in_left));
                        imageSwitcher.setOutAnimation(AnimationUtils.loadAnimation(MainActivity.this,R.anim.slide_out_right));
                        imageSwitcher.setImageResource(arrayPic[index]);
                    }else if (touchDowX-touchUpX>100){//从右向左滑动
                        index=index==arrayPic.length-1?0:index+1;
                        imageSwitcher.setInAnimation(AnimationUtils.loadAnimation(MainActivity.this,R.anim.slide_in_right));
                        imageSwitcher.setOutAnimation(AnimationUtils.loadAnimation(MainActivity.this,R.anim.slide_out_left));
                        imageSwitcher.setImageResource(arrayPic[index]);
                    }
                    return true;
                }
                return true;
            }
        });
    }
}
2.3 网格视图<GridView>
标签
<GridView>
属性
android:numColumns:为网格视图指定列数android:verticalSpacing:设置垂直方向上格与格之间的间距android:horizontalSpacing:设置水平方向上格与格之间的间距android:columnWidth:设置列宽度
适配器
连接数据源与网格视图的桥梁
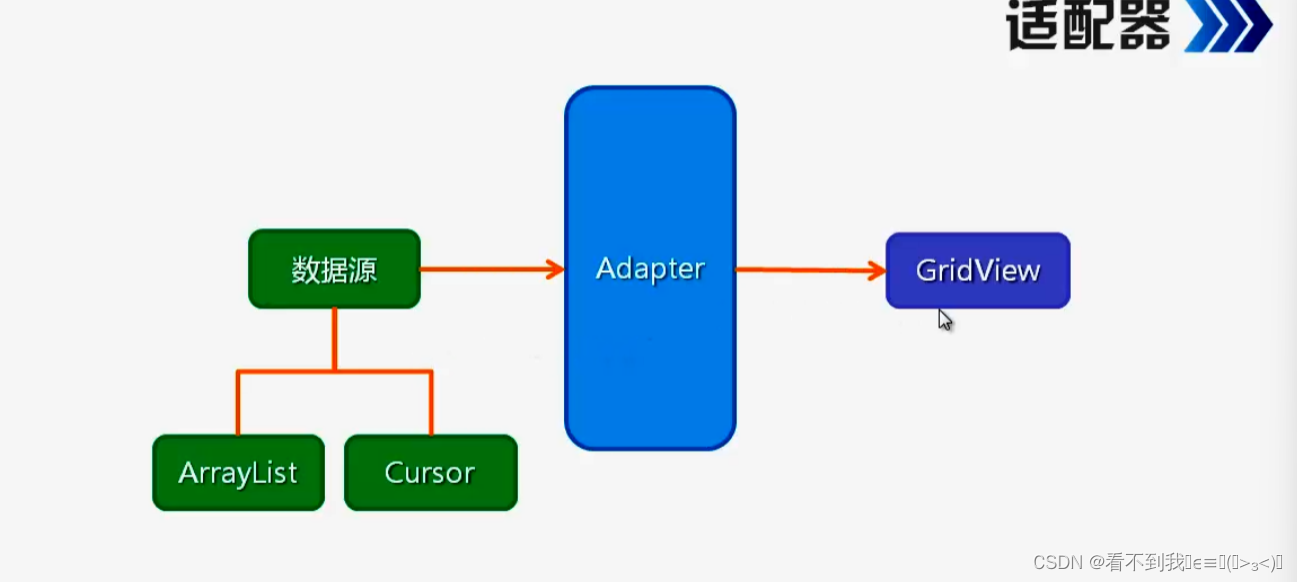
适配器的实现类
ArrayAdapter
数组适配器,通常将数组的多个值包装成多个列表项,只能显示一行文字
SmipleAdapter
简单适配器,通常把list集合的多个值包装成多个列表项,可以自定义多种效果
SmipleCursorAdapter
将数据库的内容以列表的形式展现出来
BaseAdapter
对各个列表项进行最大限度地定制,具有很大的灵活性
<?xml version="1.0" encoding="utf-8"?>
<RelativeLayout xmlns:android="http://schemas.android.com/apk/res/android"
    xmlns:app="http://schemas.android.com/apk/res-auto"
    xmlns:tools="http://schemas.android.com/tools"
    android:layout_width="match_parent"
    android:layout_height="match_parent"
    android:padding="16dp"
    tools:context=".MainActivity">

    <GridView
        android:id="@+id/graidview"
        android:layout_width="match_parent"
        android:layout_height="match_parent"
        android:numColumns="3"
        />

</RelativeLayout>
package com.example.gradeview;

import androidx.appcompat.app.AppCompatActivity;

import android.os.Bundle;
import android.widget.GridView;
import android.widget.SimpleAdapter;

import java.util.ArrayList;
import java.util.HashMap;
import java.util.List;
import java.util.Map;

public class MainActivity extends AppCompatActivity {

    @Override
    protected void onCreate(Bundle savedInstanceState) {
        super.onCreate(savedInstanceState);
        setContentView(R.layout.activity_main);

        int[] pictures=new int[]{R.drawable.img01,R.drawable.img02,R.drawable.img03,R.drawable.img04,R.drawable.img05,R.drawable.img06,R.drawable.img07,R.drawable.img08,R.drawable.img09};
        GridView gridView=findViewById(R.id.graidview);
        List<Map<String,Object>>listItem=new ArrayList<>();
        for (int i = 0; i < pictures.length; i++) {
            Map<String,Object>map=new HashMap<>();
            map.put("image",pictures[i]);
            listItem.add(map);
        }
        SimpleAdapter simpleAdapter=new SimpleAdapter(this,listItem,R.layout.cell,new String[]{"image"},new int[]{R.id.image});
        gridView.setAdapter(simpleAdapter);
    }
}
实现手机QQ相册页面
<?xml version="1.0" encoding="utf-8"?>
<LinearLayout xmlns:android="http://schemas.android.com/apk/res/android"
    xmlns:app="http://schemas.android.com/apk/res-auto"
    xmlns:tools="http://schemas.android.com/tools"
    android:layout_width="match_parent"
    android:layout_height="match_parent"
    android:orientation="vertical"
    tools:context=".MainActivity">

    <ImageView
        android:layout_width="match_parent"
        android:layout_height="wrap_content"
        android:src="@drawable/qqxiang"
        android:adjustViewBounds="true"
        />

    <TextView
        android:layout_width="match_parent"
        android:layout_height="wrap_content"
        android:text="2016年1月19号"
        android:textSize="18sp"
        android:paddingBottom="10dp"
        android:paddingTop="10dp"
        android:paddingLeft="10dp"
        app:layout_constraintBottom_toBottomOf="parent"
        app:layout_constraintLeft_toLeftOf="parent"
        app:layout_constraintRight_toRightOf="parent"
        app:layout_constraintTop_toTopOf="parent" />

    <GridView
        android:id="@+id/gridView"
        android:layout_width="match_parent"
        android:layout_height="match_parent"
        android:numColumns="auto_fit"
        android:gravity="center"
        android:verticalSpacing="5dp"
        android:columnWidth="100dp"
        />

</LinearLayout>
package com.example.qqxiangce;

import androidx.appcompat.app.AppCompatActivity;

import android.content.Context;
import android.os.Bundle;
import android.view.View;
import android.view.ViewGroup;
import android.widget.BaseAdapter;
import android.widget.GridLayout;
import android.widget.GridView;
import android.widget.ImageView;

public class MainActivity extends AppCompatActivity {

    private int[] pictures=new int[]{R.drawable.img01,R.drawable.img02,R.drawable.img03,R.drawable.img04,R.drawable.img05,R.drawable.img06,R.drawable.img07,R.drawable.img08,R.drawable.img09,R.drawable.img10,R.drawable.img11,R.drawable.img12};

    @Override
    protected void onCreate(Bundle savedInstanceState) {
        super.onCreate(savedInstanceState);
        setContentView(R.layout.activity_main);

        GridView gridView=findViewById(R.id.gridView);
        gridView.setAdapter(new ImageAdapter(this));
    }

    public class ImageAdapter extends BaseAdapter{

        private Context mContext;
        public ImageAdapter(Context context){
            mContext=context;
        }

        @Override
        public int getCount() {
            return pictures.length;
        }

        @Override
        public Object getItem(int i) {
            return null;
        }

        @Override
        public long getItemId(int i) {
            return 0;
        }

        @Override
        public View getView(int i, View view, ViewGroup viewGroup) {
            ImageView imageView;
            if (view==null){
                imageView=new ImageView(mContext);
                imageView.setLayoutParams(new ViewGroup.LayoutParams(225,250));
                imageView.setScaleType(ImageView.ScaleType.CENTER_CROP);
            }else {
                imageView= (ImageView) view;
            }
            imageView.setImageResource(pictures[i]);
            return imageView;
        }
    }
}
第三节:列表类组件
3.1 下拉列表框<Spinner>
标签
<Spinner>
属性
android:entries:为下拉列表框指定一个数组资源
<?xml version="1.0" encoding="utf-8"?>
<RelativeLayout xmlns:android="http://schemas.android.com/apk/res/android"
    xmlns:app="http://schemas.android.com/apk/res-auto"
    xmlns:tools="http://schemas.android.com/tools"
    android:layout_width="match_parent"
    android:layout_height="match_parent"
    android:padding="16dp"
    tools:context=".MainActivity">

    <Spinner
        android:id="@+id/spinner"
        android:layout_width="wrap_content"
        android:layout_height="wrap_content"
        />

</RelativeLayout>
package com.example.spinner;

import androidx.appcompat.app.AppCompatActivity;

import android.os.Bundle;
import android.widget.ArrayAdapter;
import android.widget.Spinner;
import android.widget.Toast;

public class MainActivity extends AppCompatActivity {

    @Override
    protected void onCreate(Bundle savedInstanceState) {
        super.onCreate(savedInstanceState);
        setContentView(R.layout.activity_main);

        String[] ctype=new String[]{"全部","美术","音乐","体育"};
        ArrayAdapter<String> arrayAdapter=new ArrayAdapter<String>(this, android.R.layout.simple_spinner_item,ctype);
        arrayAdapter.setDropDownViewResource(android.R.layout.simple_spinner_dropdown_item);
        Spinner spinner=findViewById(R.id.spinner);
        spinner.setAdapter(arrayAdapter);
        Toast.makeText(MainActivity.this, spinner.getSelectedItem().toString(), Toast.LENGTH_SHORT).show();
    }
}
实现豆瓣APP搜索下拉列表,并获取选择项的值
<?xml version="1.0" encoding="utf-8"?>
<LinearLayout xmlns:android="http://schemas.android.com/apk/res/android"
    xmlns:app="http://schemas.android.com/apk/res-auto"
    xmlns:tools="http://schemas.android.com/tools"
    android:layout_width="match_parent"
    android:layout_height="match_parent"
    android:background="@drawable/xila"
    tools:context=".MainActivity">

    <Spinner
        android:layout_marginTop="10dp"
        android:id="@+id/spinner"
        android:layout_width="wrap_content"
        android:layout_height="wrap_content"
        android:entries="@array/ctype"
        android:scrollbarSize="20sp"
        />

    <EditText
        android:layout_marginTop="10dp"
        android:layout_width="wrap_content"
        android:layout_height="wrap_content"
        android:hint="搜索"
        android:textColor="#f8f8ff"
        android:textSize="20sp"
        />

</LinearLayout>
package com.example.doubansearch;

import androidx.appcompat.app.AppCompatActivity;

import android.os.Bundle;
import android.view.View;
import android.view.WindowManager;
import android.widget.AdapterView;
import android.widget.Spinner;
import android.widget.Toast;

public class MainActivity extends AppCompatActivity {

    @Override
    protected void onCreate(Bundle savedInstanceState) {
        super.onCreate(savedInstanceState);
        setContentView(R.layout.activity_main);
        getWindow().setFlags(WindowManager.LayoutParams.FLAG_FULLSCREEN,WindowManager.LayoutParams.FLAG_FULLSCREEN);
        Spinner spinner=findViewById(R.id.spinner);
        spinner.setOnItemSelectedListener(new AdapterView.OnItemSelectedListener() {
            @Override
            public void onItemSelected(AdapterView<?> adapterView, View view, int i, long l) {
                String result=adapterView.getItemAtPosition(i).toString();
                Toast.makeText(MainActivity.this, result, Toast.LENGTH_SHORT).show();
            }

            @Override
            public void onNothingSelected(AdapterView<?> adapterView) {

            }
        });
    }
}
3.2 列表视图<ListView>
标签
<ListView>
属性
android:entries:通过数组资源文件设置列表项
<?xml version="1.0" encoding="utf-8"?>
<RelativeLayout xmlns:android="http://schemas.android.com/apk/res/android"
    xmlns:app="http://schemas.android.com/apk/res-auto"
    xmlns:tools="http://schemas.android.com/tools"
    android:layout_width="match_parent"
    android:layout_height="match_parent"
    android:padding="16dp"
    tools:context=".MainActivity">

    <ListView
        android:id="@+id/listView"
        android:layout_width="match_parent"
        android:layout_height="wrap_content"
        />

</RelativeLayout>
package com.example.listview;

import androidx.appcompat.app.AppCompatActivity;

import android.os.Bundle;
import android.widget.ArrayAdapter;
import android.widget.ListView;

public class MainActivity extends AppCompatActivity {

    @Override
    protected void onCreate(Bundle savedInstanceState) {
        super.onCreate(savedInstanceState);
        setContentView(R.layout.activity_main);
        String[] ctype=new String[]{"全部","图书","游戏","电视"};
        ArrayAdapter<String> arrayAdapter=new ArrayAdapter<String>(this, android.R.layout.simple_list_item_1,ctype);
        ListView listView=findViewById(R.id.listView);
        listView.setAdapter(arrayAdapter);
    }
}
通过列表视图实现微信通讯录朋友列表
<?xml version="1.0" encoding="utf-8"?>
<LinearLayout xmlns:android="http://schemas.android.com/apk/res/android"
    xmlns:app="http://schemas.android.com/apk/res-auto"
    xmlns:tools="http://schemas.android.com/tools"
    android:layout_width="match_parent"
    android:layout_height="match_parent"
    android:orientation="vertical"
    android:layout_alignParentBottom="true"
    tools:context=".MainActivity">

    <ImageView
        android:layout_width="match_parent"
        android:layout_height="wrap_content"
        android:src="@drawable/wei_top"
        android:adjustViewBounds="true"
        />

    <ListView
        android:id="@+id/listView"
        android:layout_width="match_parent"
        android:layout_height="700dp"
        >

    </ListView>

    <ImageView
        android:layout_width="match_parent"
        android:layout_height="wrap_content"
        android:adjustViewBounds="true"
        android:src="@drawable/wei_down" />


</LinearLayout>
package com.example.weixinlistview;

import androidx.appcompat.app.AppCompatActivity;

import android.os.Bundle;
import android.view.View;
import android.widget.AdapterView;
import android.widget.ListView;
import android.widget.SimpleAdapter;
import android.widget.Toast;

import java.util.ArrayList;
import java.util.HashMap;
import java.util.List;
import java.util.Map;

public class MainActivity extends AppCompatActivity {

    @Override
    protected void onCreate(Bundle savedInstanceState) {
        super.onCreate(savedInstanceState);
        setContentView(R.layout.activity_main);

        int[] imageId=new int[]{R.drawable.img01,R.drawable.img02,R.drawable.img03,R.drawable.img04,R.drawable.img05,R.drawable.img06,R.drawable.img07,R.drawable.img08,R.drawable.img09,R.drawable.img03,R.drawable.img04,R.drawable.img05,R.drawable.img06};
        String[] title=new String[]{"刘一","刘二","刘3","刘4","刘5","刘6","刘7","刘8","刘9","刘一","刘二","刘5","刘6"};
        List<Map<String,Object>> listItem=new ArrayList<>();
        for (int i = 0; i < imageId.length; i++) {
            Map<String,Object> map=new HashMap<>();
            map.put("image",imageId[i]);
            map.put("name",title[i]);
            listItem.add(map);
        }
        SimpleAdapter simpleAdapter=new SimpleAdapter(this,listItem,R.layout.main,new String[]{"name","image"},new int[]{R.id.title,R.id.image});
        ListView listView=findViewById(R.id.listView);
        listView.setAdapter(simpleAdapter);
        listView.setOnItemClickListener(new AdapterView.OnItemClickListener() {
            @Override
            public void onItemClick(AdapterView<?> adapterView, View view, int i, long l) {
                Map<String,Object> map=(Map<String, Object>) adapterView.getItemAtPosition(i);
                Toast.makeText(MainActivity.this, map.get("name").toString(), Toast.LENGTH_LONG).show();
            }
        });
    }
}
第四节:通用组件
4.1 滚动视图<ScrollView>
标签
<ScrollView>:竖直滚动条
<HorizontalScrollView>:水平滚动条
注意
在一个滚动视图中只能放置一个组件,如果想要放置多个组件,需要使用一个布局管理器将这些组件括起来
在xml中创建滚动视图
<?xml version="1.0" encoding="utf-8"?>
<RelativeLayout xmlns:android="http://schemas.android.com/apk/res/android"
    xmlns:app="http://schemas.android.com/apk/res-auto"
    xmlns:tools="http://schemas.android.com/tools"
    android:layout_width="match_parent"
    android:layout_height="match_parent"
    android:padding="16dp"
    tools:context=".MainActivity">

    <ScrollView
        android:layout_width="match_parent"
        android:layout_height="wrap_content"
        >
        <TextView
            android:layout_width="match_parent"
            android:layout_height="match_parent"
            android:textSize="40sp"
            android:text="@string/content"
            />
    </ScrollView>

</RelativeLayout>
<?xml version="1.0" encoding="utf-8"?>
<RelativeLayout xmlns:android="http://schemas.android.com/apk/res/android"
    xmlns:app="http://schemas.android.com/apk/res-auto"
    xmlns:tools="http://schemas.android.com/tools"
    android:layout_width="match_parent"
    android:layout_height="match_parent"
    android:padding="16dp"
    tools:context=".MainActivity">

    <HorizontalScrollView
        android:layout_width="wrap_content"
        android:layout_height="match_parent"
        >
        <TextView
            android:layout_width="match_parent"
            android:layout_height="match_parent"
            android:textSize="40sp"
            android:text="@string/content"
            />
    </HorizontalScrollView>

</RelativeLayout>
<?xml version="1.0" encoding="utf-8"?>
<RelativeLayout xmlns:android="http://schemas.android.com/apk/res/android"
    xmlns:app="http://schemas.android.com/apk/res-auto"
    xmlns:tools="http://schemas.android.com/tools"
    android:layout_width="match_parent"
    android:layout_height="match_parent"
    android:padding="16dp"
    tools:context=".MainActivity">

    <HorizontalScrollView
        android:layout_width="match_parent"
        android:layout_height="wrap_content"
        >
        <LinearLayout
            android:orientation="vertical"
            android:layout_width="match_parent"
            android:layout_height="match_parent"
            >
        <TextView
            android:layout_width="match_parent"
            android:layout_height="match_parent"
            android:textSize="40sp"
            android:text="@string/content"
            />
            <TextView
                android:layout_width="match_parent"
                android:layout_height="match_parent"
                android:textSize="40sp"
                android:text="@string/content"
                />
        </LinearLayout>
    </HorizontalScrollView>

</RelativeLayout>
在java文件中创建滚动视图
步骤:
- 使用构造方法
ScrollView(Context c)创建一个滚动视图 - 应用
addView()方法添加组件到滚动视图中 - 将滚动视图添加到布局管理器中
实现为编程词典目录添加垂直滚动条(在java文件中创建滚动视图)
<?xml version="1.0" encoding="utf-8"?>
<LinearLayout xmlns:android="http://schemas.android.com/apk/res/android"
    xmlns:app="http://schemas.android.com/apk/res-auto"
    xmlns:tools="http://schemas.android.com/tools"
    android:layout_width="match_parent"
    android:layout_height="match_parent"
    android:orientation="vertical"
    android:padding="16dp"
    android:id="@+id/linearLayout"
    tools:context=".MainActivity">

</LinearLayout>
package com.example.bianchengscrollview;

import androidx.appcompat.app.AppCompatActivity;

import android.os.Bundle;
import android.widget.ImageView;
import android.widget.LinearLayout;
import android.widget.ScrollView;
import android.widget.TextView;

public class MainActivity extends AppCompatActivity {

    @Override
    protected void onCreate(Bundle savedInstanceState) {
        super.onCreate(savedInstanceState);
        setContentView(R.layout.activity_main);
        LinearLayout linearLayout=findViewById(R.id.linearLayout);
        LinearLayout linearLayout2=new LinearLayout(MainActivity.this);
        linearLayout2.setOrientation(LinearLayout.VERTICAL);
        ScrollView scrollView=new ScrollView(MainActivity.this);
        linearLayout.addView(scrollView);
        scrollView.addView(linearLayout2);
        ImageView imageView=new ImageView(MainActivity.this);
        imageView.setImageResource(R.drawable.cidian);
        linearLayout2.addView(imageView);
        TextView textView=new TextView(MainActivity.this);
        textView.setText(R.string.cidian);
        linearLayout2.addView(textView);
    }
}
4.2 选项卡<TabHost>
使用步骤
- 在布局文件中添加
TabHost、TabWidget、TabContent组件 - 编写各标签的XML布局文件
- 获取并初始化
TabHost组件 - 为
TabHost对象添加标签页
注意
<TabHost>在设置id属性时,必须设置id为:android:id="@android:id/tabhost"
<TabWidget>在设置id属性时,必须设置id为:android:id="@android:id/tabs"
<FrameLayout>在设置id属性时,必须设置id为:android:id="@android:id/tabcontent""
实现模拟微信表情商店的选项卡
<?xml version="1.0" encoding="utf-8"?>
<TabHost xmlns:android="http://schemas.android.com/apk/res/android"
    xmlns:app="http://schemas.android.com/apk/res-auto"
    xmlns:tools="http://schemas.android.com/tools"
    android:layout_width="match_parent"
    android:layout_height="match_parent"
    android:id="@android:id/tabhost"
    tools:context=".MainActivity">

    <LinearLayout
        android:layout_width="match_parent"
        android:layout_height="match_parent"
        android:orientation="vertical"
        >

        <TabWidget
            android:id="@android:id/tabs"
            android:layout_width="match_parent"
            android:layout_height="wrap_content"
            />
        <FrameLayout
            android:id="@android:id/tabcontent"
            android:layout_width="match_parent"
            android:layout_height="match_parent"
            />


    </LinearLayout>

</TabHost>
package com.example.wechatexpressshop;

import androidx.appcompat.app.AppCompatActivity;

import android.os.Bundle;
import android.view.LayoutInflater;
import android.widget.TabHost;

public class MainActivity extends AppCompatActivity {

    @Override
    protected void onCreate(Bundle savedInstanceState) {
        super.onCreate(savedInstanceState);
        setContentView(R.layout.activity_main);

        TabHost tabHost=findViewById(android.R.id.tabhost);
        tabHost.setup();//初始化
        LayoutInflater layoutInflater=LayoutInflater.from(this);
        layoutInflater.inflate(R.layout.tab1,tabHost.getTabContentView());
        layoutInflater.inflate(R.layout.tab2,tabHost.getTabContentView());
        tabHost.addTab(tabHost.newTabSpec("tab1").setIndicator("精选表情").setContent(R.id.left));
        tabHost.addTab(tabHost.newTabSpec("tab2").setIndicator("投稿表情").setContent(R.id.right));
    }
}
<?xml version="1.0" encoding="utf-8"?>
<LinearLayout xmlns:android="http://schemas.android.com/apk/res/android"
    android:id="@+id/left"
    android:orientation="vertical"
    android:layout_width="match_parent"
    android:layout_height="match_parent">

    <ImageView
        android:layout_width="match_parent"
        android:layout_height="match_parent"
        android:src="@drawable/biaoqing_left"/>

</LinearLayout>
<?xml version="1.0" encoding="utf-8"?>
<LinearLayout xmlns:android="http://schemas.android.com/apk/res/android"
    android:id="@+id/right"
    android:orientation="vertical"
    android:layout_width="match_parent"
    android:layout_height="match_parent">

    <ImageView
        android:layout_width="match_parent"
        android:layout_height="match_parent"
        android:src="@drawable/biaoqing_right"/>

</LinearLayout>
第五节:
1.2.7 RecyclerView
RecyclerView能够灵活实现大数据集的展示,视图的复用管理比ListView好,能够显示列表、网格、瀑布流等形式,且不同的ViewHolder能够实现item多元化的功能
但是使用起来会稍微麻烦一点,并且没有类似ListView的onItemClickListener监听事件,需要开发者自己实现
在build.gradle中引入依赖:implementation 'androidx.recyclerview:recyclerview:1.2.1'
1.2.8 WebView
加载网页
- 加载URL(网络或者本地assets文件夹下的html文件)
- 加载html代码
- Native和JavaScript相互调用
加载网络URL
webview.loadUrl("http://...");
加载assets下的html文件
webview.loadUrl("file:///android_asset/...html")
加载html代码
webview.loadData()webview.loadDataWithBaseURL();
网页的前进后退
webview.canGoBack()webview.goBack()webview.canGoForward()webview.goForward()webview.canGoBackOrForward(int steps)webview.goBackOrForward(int steps)
按下返回键,默认时退出当前Activity,如果希望是WebView内页面后退,
@Override
public boolean onKeyDown(int keyCode,KeyEvent event){
    if((keyCode==KeyEvent.KEYCODE_BACK)&&webView.canGoBack()){
        webView.goBack();
        return true;//表示事件处理完了,不需要继续处理
    }
    return super.onKeyDown(keyCode,event);
}
加载本地Html
@Override
protected void onCreate(Bundle savedInstanceState) {
    super.onCreate(savedInstanceState);
    setContentView(R.layout.activity_web_view);
    mWvMain=findViewById(R.id.wv);
    mWvMain.loadUrl("file:///android_asset/all-admin-dataform.html");
}
加载网络URL
在AndroidManifest.xml文件中加入联网的权限
<uses-permission android:name="android.permission.INTERNET"/>
@Override
protected void onCreate(Bundle savedInstanceState) {
    super.onCreate(savedInstanceState);
    setContentView(R.layout.activity_web_view);
    //加载网络url
    mWvMain=findViewById(R.id.wv);
    mWvMain.getSettings().setJavaScriptEnabled(true);//设置可以运行js
    mWvMain.loadUrl("https://m.baidu.com");
}
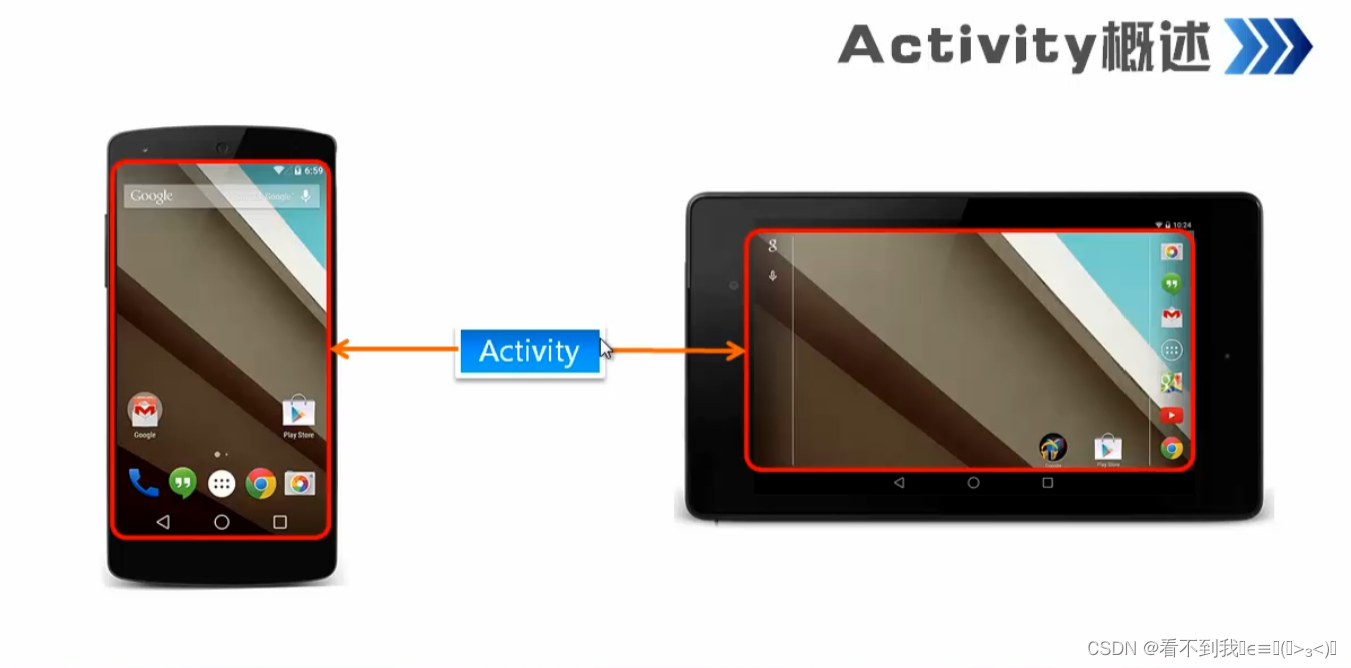
第四章:基本程序单元Activity
第一节:Activity概述
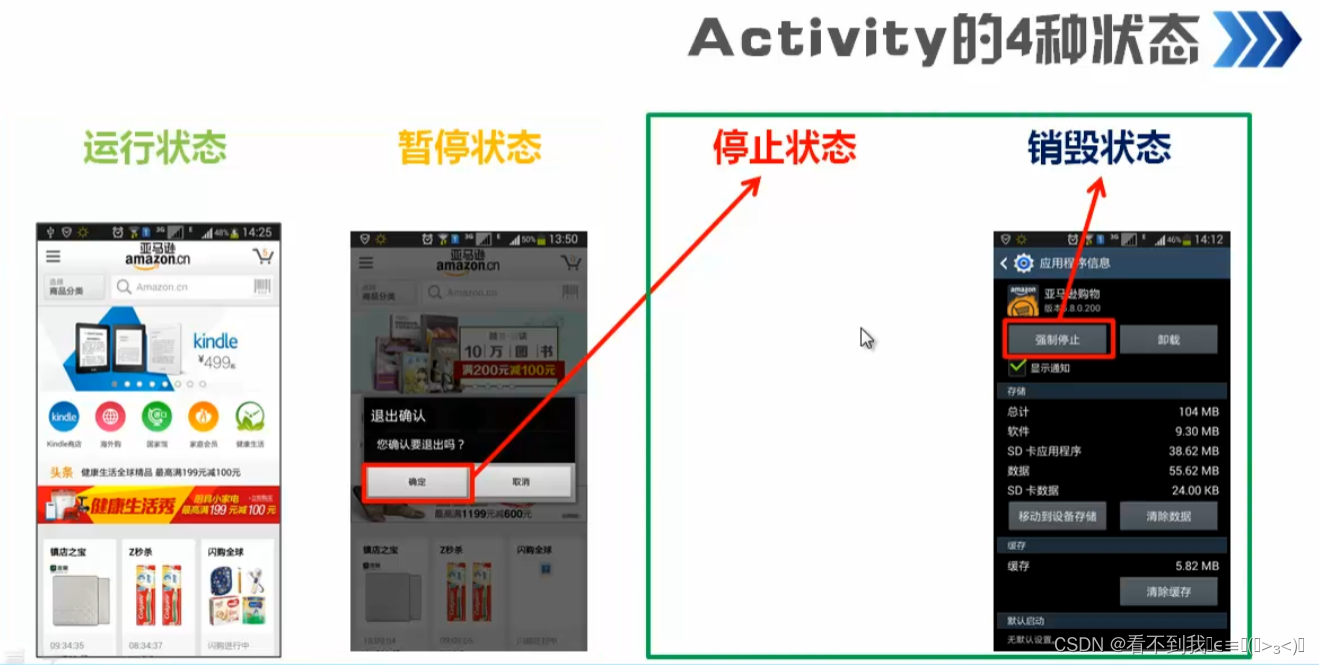
1.1 Activity的4种状态
- 运行状态
- 暂停状态
- 停止状态
- 销毁状态
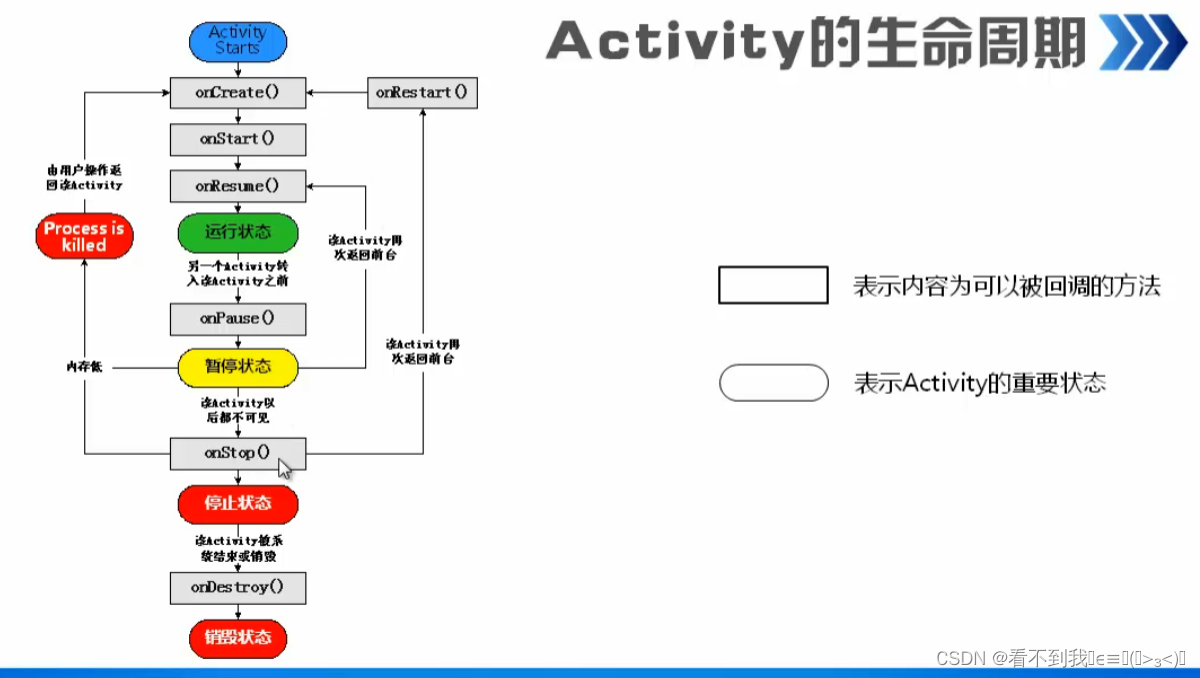
1.2 Activity的生命周期
第二节:创建、配置、启动和关闭Activity
2.1 创建和配置Activity
- 创建继承自Activity的Activity
- 重写需要的回调方法
- 设置要显示的视图
- 在xml中配置Activity
**注意:**使用Activity之前还要保证它已经在xml配置文件中配置过了,否则会报错
<?xml version="1.0" encoding="utf-8"?>
<manifest xmlns:android="http://schemas.android.com/apk/res/android"
    package="com.example.activitycreate">

    <application
        android:allowBackup="true"
        android:icon="@mipmap/ic_launcher"
        android:label="@string/app_name"
        android:roundIcon="@mipmap/ic_launcher_round"
        android:supportsRtl="true"
        android:theme="@style/Theme.FourthAndroid">
        <activity
            android:name=".MainActivity"
            android:exported="true">
            <intent-filter>
                <action android:name="android.intent.action.MAIN" />

                <category android:name="android.intent.category.LAUNCHER" />
            </intent-filter>
        </activity>

        <activity android:name=".DetailActivity"
            android:label="详细"></activity>
    </application>

</manifest>
package com.example.activitycreate;

import android.app.Activity;
import android.os.Bundle;

import androidx.annotation.Nullable;

public class DetailActivity extends Activity {
    @Override
    protected void onCreate(@Nullable Bundle savedInstanceState) {
        super.onCreate(savedInstanceState);
        setContentView(R.layout.activity_main);
    }
}
2.2 启动和关闭Activity
Intent
Activity通过Intent来表达自己的“意图”
启动Activity
activity_main.xml
<?xml version="1.0" encoding="utf-8"?>
<RelativeLayout xmlns:android="http://schemas.android.com/apk/res/android"
    xmlns:app="http://schemas.android.com/apk/res-auto"
    xmlns:tools="http://schemas.android.com/tools"
    android:layout_width="match_parent"
    android:layout_height="match_parent"
    android:padding="16dp"
    tools:context=".MainActivity">

    <Button
        android:id="@+id/button1"
        android:layout_width="wrap_content"
        android:layout_height="wrap_content"
        android:text="查看详细"
        />

</RelativeLayout>
MainActivity
package com.example.activitycreate;

import androidx.appcompat.app.AppCompatActivity;

import android.content.Intent;
import android.os.Bundle;
import android.view.View;

public class MainActivity extends AppCompatActivity {

    @Override
    protected void onCreate(Bundle savedInstanceState) {
        super.onCreate(savedInstanceState);
        setContentView(R.layout.activity_main);
        findViewById(R.id.button1).setOnClickListener(new View.OnClickListener() {
            @Override
            public void onClick(View view) {
                Intent intent=new Intent(MainActivity.this,DetailActivity.class);
                startActivity(intent);
            }
        });
    }
}
DetailActivity
package com.example.activitycreate;

import android.app.Activity;
import android.os.Bundle;

import androidx.annotation.Nullable;

public class DetailActivity extends Activity {
    @Override
    protected void onCreate(@Nullable Bundle savedInstanceState) {
        super.onCreate(savedInstanceState);
        setContentView(R.layout.activity_my);
    }
}
activity_my.xml
<?xml version="1.0" encoding="utf-8"?>
<RelativeLayout xmlns:android="http://schemas.android.com/apk/res/android"
    xmlns:app="http://schemas.android.com/apk/res-auto"
    xmlns:tools="http://schemas.android.com/tools"
    android:layout_width="match_parent"
    android:layout_height="match_parent"
    tools:context=".MyActivity">

    <Button
        android:layout_width="wrap_content"
        android:layout_height="wrap_content"
        android:text="关闭"
        />

</RelativeLayout>
关闭Activity
调用finish()方法
activity_my.xml
<?xml version="1.0" encoding="utf-8"?>
<RelativeLayout xmlns:android="http://schemas.android.com/apk/res/android"
    xmlns:app="http://schemas.android.com/apk/res-auto"
    xmlns:tools="http://schemas.android.com/tools"
    android:layout_width="match_parent"
    android:layout_height="match_parent"
    tools:context=".MyActivity">

    <Button
        android:id="@+id/close"
        android:layout_width="wrap_content"
        android:layout_height="wrap_content"
        android:text="关闭"
        />

</RelativeLayout>
DetailActivity
package com.example.activitycreate;

import android.app.Activity;
import android.os.Bundle;
import android.view.View;

import androidx.annotation.Nullable;

public class DetailActivity extends Activity {
    @Override
    protected void onCreate(@Nullable Bundle savedInstanceState) {
        super.onCreate(savedInstanceState);
        setContentView(R.layout.activity_my);
        findViewById(R.id.close).setOnClickListener(new View.OnClickListener() {
            @Override
            public void onClick(View view) {
                finish();
            }
        });
    }
}
刷新当前Activity
onCreate(null);
模拟喜马拉雅登录界面实现忘记密码页面跳转功能
activity_main.xml
<?xml version="1.0" encoding="utf-8"?>
<TableLayout xmlns:android="http://schemas.android.com/apk/res/android"
    xmlns:app="http://schemas.android.com/apk/res-auto"
    xmlns:tools="http://schemas.android.com/tools"
    android:layout_width="match_parent"
    android:layout_height="match_parent"
    android:background="@drawable/biaoge"
    android:stretchColumns="0,3"
    tools:context=".MainActivity">

    <!--第一行-->
    <TableRow
        android:layout_width="wrap_content"
        android:layout_height="wrap_content"
        android:paddingTop="200dp"
        >
        <TextView />
        <TextView
            android:layout_width="wrap_content"
            android:layout_height="wrap_content"
            android:textSize="18sp"
            android:text="账 号"
            android:layout_gravity="center"
            />
        <EditText
            android:layout_width="match_parent"
            android:layout_height="wrap_content"
            android:hint="邮箱或手机号"
            />
    </TableRow>

    <!--第二行-->
    <TableRow
        android:layout_width="wrap_content"
        android:layout_height="wrap_content"
        android:paddingTop="20dp"
        >
        <TextView />
        <TextView
            android:layout_width="wrap_content"
            android:layout_height="wrap_content"
            android:textSize="18sp"
            android:text="密 码:"
            android:gravity="center_horizontal"
            />
        <EditText
            android:layout_width="wrap_content"
            android:layout_height="wrap_content"
            android:hint="输入6-16位数字或字母"
            />
        <TextView />
    </TableRow>
    <!--第三行-->
    <TableRow
        android:layout_width="wrap_content"
        android:layout_height="wrap_content">
        <TextView />
        <Button
            android:layout_width="wrap_content"
            android:layout_height="wrap_content"
            android:text="注 册"
            />
        <Button
            android:layout_width="wrap_content"
            android:layout_height="wrap_content"
            android:background="#FF8247"
            android:text="登 录"/>
        <TextView />
    </TableRow>
    <!--第四行-->
    <TableRow
        android:layout_width="wrap_content"
        android:layout_height="wrap_content"
        android:paddingTop="20dp"
        >
        <TextView />
        <TextView />
        <TextView
            android:id="@+id/wang_mima"
            android:text="忘记密码?"
            android:textColor="#FF4500"
            android:gravity="right"
            />
        <TextView />
    </TableRow>


</TableLayout>
MainActivity
package com.example.ximalayalogin;

import androidx.appcompat.app.AppCompatActivity;

import android.content.Intent;
import android.os.Bundle;
import android.view.View;

public class MainActivity extends AppCompatActivity {

    @Override
    protected void onCreate(Bundle savedInstanceState) {
        super.onCreate(savedInstanceState);
        setContentView(R.layout.activity_main);
        findViewById(R.id.wang_mima).setOnClickListener(new View.OnClickListener() {
            @Override
            public void onClick(View view) {
                Intent intent=new Intent(MainActivity.this,passwordActivity.class);
                startActivity(intent);
            }
        });
    }
}
AndroidManifest.xml
<?xml version="1.0" encoding="utf-8"?>
<manifest xmlns:android="http://schemas.android.com/apk/res/android"
    package="com.example.ximalayalogin">

    <application
        android:allowBackup="true"
        android:icon="@mipmap/ic_launcher"
        android:label="@string/app_name"
        android:roundIcon="@mipmap/ic_launcher_round"
        android:supportsRtl="true"
        android:theme="@style/Theme.FourthAndroid">
        <activity
            android:name=".MainActivity"
            android:exported="true">
            <intent-filter>
                <action android:name="android.intent.action.MAIN" />

                <category android:name="android.intent.category.LAUNCHER" />
            </intent-filter>
        </activity>
        <activity android:name=".passwordActivity"></activity>
    </application>

</manifest>
activity_password.xml
<?xml version="1.0" encoding="utf-8"?>
<LinearLayout
    xmlns:android="http://schemas.android.com/apk/res/android"
    xmlns:tools="http://schemas.android.com/tools"
    android:layout_width="match_parent"
    android:layout_height="match_parent"
    android:orientation="vertical"
    android:background="@drawable/beijing"
    android:padding="5dp"
    tools:context=".passwordActivity">
    <ImageButton
        android:id="@+id/close"
        android:layout_width="15dp"
        android:layout_height="15dp"
        android:src="@drawable/guanbi"
        android:background="#0000"
        android:layout_marginTop="15dp"
        android:scaleType="fitXY"
        />
    <TextView
        android:layout_width="wrap_content"
        android:layout_height="wrap_content"
        android:layout_marginTop="40dp"
        android:layout_marginLeft="10dp"
        android:text="你的邮箱或手机号"/>
    <EditText
        android:layout_width="200dp"
        android:layout_height="wrap_content"
        android:hint="请输入邮箱或手机号"/>
    <Button
        android:layout_width="200dp"
        android:layout_height="50dp"
        android:background="#FF8247"
        android:text="提交"/>
</LinearLayout>
passwordActivity
package com.example.ximalayalogin;

import android.app.Activity;
import android.content.Intent;
import android.os.Bundle;
import android.view.View;

import androidx.annotation.Nullable;

public class passwordActivity extends Activity {
    @Override
    protected void onCreate(@Nullable Bundle savedInstanceState) {
        super.onCreate(savedInstanceState);
        setContentView(R.layout.activity_password);
        findViewById(R.id.close).setOnClickListener(new View.OnClickListener() {
            @Override
            public void onClick(View view) {
                finish();
            }
        });
    }
}
第三节:多个Activity的使用
3.1 使用Bundle在Activity之间交换数据
什么是Bundle?
Bundle是一个键值对的组合,我们可以把一些数据以键值对的形式保存到Bundle中,要读取的时候,根据前面的key找到对应的数据
模拟淘宝的填写并显示收货地址的功能
activity_main.xml
<?xml version="1.0" encoding="utf-8"?>
<RelativeLayout xmlns:android="http://schemas.android.com/apk/res/android"
    xmlns:app="http://schemas.android.com/apk/res-auto"
    xmlns:tools="http://schemas.android.com/tools"
    android:layout_width="match_parent"
    android:layout_height="match_parent"
    android:orientation="vertical"
    tools:context=".MainActivity">

    <LinearLayout
        android:layout_width="match_parent"
        android:layout_height="match_parent"
        android:orientation="vertical"
        >
        <ImageView
            android:layout_width="match_parent"
            android:layout_height="wrap_content"
            android:src="@drawable/top"
            android:adjustViewBounds="true"
            />

        <EditText
            android:id="@+id/address1"
            android:layout_width="match_parent"
            android:layout_height="wrap_content"
            android:hint="请输入所在地区"
            android:textSize="20sp"
            />
        <EditText
            android:id="@+id/address2"
            android:layout_width="match_parent"
            android:layout_height="wrap_content"
            android:hint="请输入街道"
            android:textSize="20sp"
            />
        <EditText
            android:id="@+id/address3"
            android:layout_width="match_parent"
            android:layout_height="wrap_content"
            android:hint="请输入详细地址"
            android:textSize="20sp"
            />
        <EditText
            android:id="@+id/address4"
            android:layout_width="match_parent"
            android:layout_height="wrap_content"
            android:hint="请输入收货人姓名"
            android:textSize="20sp"
            />
        <EditText
            android:id="@+id/address5"
            android:layout_width="match_parent"
            android:layout_height="wrap_content"
            android:hint="请输入收货人联系电话"
            android:textSize="20sp"
            />
        <EditText
            android:id="@+id/address6"
            android:layout_width="match_parent"
            android:layout_height="wrap_content"
            android:hint="请输入邮箱"
            android:textSize="20sp"
            />
    </LinearLayout>

    <Button
        android:id="@+id/submit"
        android:layout_width="wrap_content"
        android:layout_height="wrap_content"
        android:layout_alignParentBottom="true"
        android:layout_alignParentRight="true"
        android:layout_margin="16dp"
        android:text="提交"
        android:background="#ff5500"
        />

</RelativeLayout>
MainActivity
package com.example.taobaoaddress;

import androidx.appcompat.app.AppCompatActivity;

import android.content.Intent;
import android.os.Bundle;
import android.view.View;
import android.widget.EditText;
import android.widget.Toast;

public class MainActivity extends AppCompatActivity {

    @Override
    protected void onCreate(Bundle savedInstanceState) {
        super.onCreate(savedInstanceState);
        setContentView(R.layout.activity_main);

        findViewById(R.id.submit).setOnClickListener(new View.OnClickListener() {
            @Override
            public void onClick(View view) {
                String site1=((EditText)findViewById(R.id.address1)).getText().toString();
                String site2=((EditText)findViewById(R.id.address2)).getText().toString();
                String site3=((EditText)findViewById(R.id.address3)).getText().toString();
                String name=((EditText)findViewById(R.id.address4)).getText().toString();
                String phone=((EditText)findViewById(R.id.address5)).getText().toString();
                String email=((EditText)findViewById(R.id.address6)).getText().toString();
                if (!"".equals(site1)&&!"".equals(site2)&&!"".equals(site3)&&!"".equals(name)&&!"".equals(phone)&&!"".equals(email)){
                    Intent intent=new Intent(MainActivity.this,AddressActivity.class);
                    Bundle bundle=new Bundle();
                    bundle.putCharSequence("name",name);
                    bundle.putCharSequence("phone",phone);
                    bundle.putCharSequence("site1",site1);
                    bundle.putCharSequence("site2",site2);
                    bundle.putCharSequence("site3",site3);
                    intent.putExtras(bundle);
                    startActivity(intent);
                }else {
                    Toast.makeText(MainActivity.this, "请将收货地址填写完整", Toast.LENGTH_SHORT).show();
                }
            }
        });
    }
}
activity_address.xml
<?xml version="1.0" encoding="utf-8"?>
<RelativeLayout xmlns:android="http://schemas.android.com/apk/res/android"
    android:layout_width="match_parent"
    android:layout_height="match_parent">

    <ImageView
        android:id="@+id/top"
        android:layout_width="match_parent"
        android:layout_height="wrap_content"
        android:src="@drawable/top"
        android:adjustViewBounds="true"
        />

    <TextView
        android:id="@+id/name"
        android:layout_width="match_parent"
        android:layout_height="wrap_content"
        android:textSize="20sp"
        android:layout_below="@+id/top"
        />

    <TextView
        android:id="@+id/phone"
        android:layout_width="wrap_content"
        android:layout_height="wrap_content"
        android:textSize="20sp"
        android:layout_below="@+id/name"
        android:layout_alignParentRight="true"
        android:layout_marginRight="30dp"
        />


    <TextView
        android:id="@+id/site"
        android:layout_width="wrap_content"
        android:layout_height="wrap_content"
        android:textSize="20sp"
        android:layout_below="@+id/name"
        />

</RelativeLayout>
package com.example.taobaoaddress;

import android.app.Activity;
import android.content.Intent;
import android.os.Bundle;
import android.widget.TextView;

import androidx.annotation.Nullable;

public class AddressActivity extends Activity {
    @Override
    protected void onCreate(@Nullable Bundle savedInstanceState) {
        super.onCreate(savedInstanceState);
        setContentView(R.layout.activity_address);
        Intent intent=getIntent();
        Bundle bundle=intent.getExtras();
        String name=bundle.getString("name");
        String phone=bundle.getString("phone");
        String site=bundle.getString("site1")+bundle.getString("site2")+bundle.getString("site3");
        TextView tv_name=findViewById(R.id.name);
        tv_name.setText(name);
        TextView tv_phone=findViewById(R.id.phone);
        tv_phone.setText(phone);
        TextView tv_site=findViewById(R.id.site);
        tv_site.setText(site);
    }
}
3.2 调用另一个Activity并返回结果
使用startActivityResult()方法,而非startActivity()方法
基本格式
public void stratActivityForResult(Intent intent,int requestCode)
模拟喜马拉雅FM选择头像功能
activity_main.xml
<?xml version="1.0" encoding="utf-8"?>
<RelativeLayout xmlns:android="http://schemas.android.com/apk/res/android"
    xmlns:app="http://schemas.android.com/apk/res-auto"
    xmlns:tools="http://schemas.android.com/tools"
    android:layout_width="match_parent"
    android:layout_height="match_parent"
    android:background="@drawable/beijing"
    tools:context=".MainActivity">

    <ImageView
        android:id="@+id/touxiang"
        android:layout_width="wrap_content"
        android:layout_height="wrap_content"
        android:src="@drawable/touxiang"
        android:layout_marginTop="50dp"
        android:layout_marginLeft="190dp"
        />

    <Button
        android:id="@+id/btn"
        android:layout_width="wrap_content"
        android:layout_height="wrap_content"
        android:text="选择头像"
        android:layout_below="@+id/touxiang"
        android:layout_marginLeft="195dp"
        android:background="#cccccc"
        />


</RelativeLayout>
MainActivity
package com.example.ximalayafmtouxiang;

import androidx.appcompat.app.AppCompatActivity;

import android.app.Activity;
import android.content.Intent;
import android.os.Bundle;
import android.view.View;
import android.widget.ImageView;

public class MainActivity extends Activity {

    @Override
    protected void onActivityResult(int requestCode, int resultCode, Intent data) {
        super.onActivityResult(requestCode, resultCode, data);
        if (requestCode==0x11&&requestCode==0x11){
            Bundle bundle=data.getExtras();
            int imageId=bundle.getInt("imageId");
            ImageView imageView=findViewById(R.id.touxiang);
            imageView.setImageResource(imageId);
        }
    }

    @Override
    protected void onCreate(Bundle savedInstanceState) {
        super.onCreate(savedInstanceState);
        setContentView(R.layout.activity_main);
        findViewById(R.id.btn).setOnClickListener(new View.OnClickListener() {
            @Override
            public void onClick(View view) {
                Intent intent=new Intent(MainActivity.this,HeadActivity.class);
                startActivityForResult(intent,0x11);
            }
        });
    }
}
activity_head.xml
<?xml version="1.0" encoding="utf-8"?>
<RelativeLayout xmlns:android="http://schemas.android.com/apk/res/android"
    android:layout_width="match_parent"
    android:layout_height="match_parent"
    >

    <GridView
        android:id="@+id/gridView"
        android:layout_width="match_parent"
        android:layout_height="match_parent"
        android:layout_marginTop="10dp"
        android:horizontalSpacing="3dp"
        android:verticalSpacing="3dp"
        android:numColumns="4"
        />

</RelativeLayout>
HeadActivity
package com.example.ximalayafmtouxiang;

import android.app.Activity;
import android.content.Intent;
import android.os.Bundle;
import android.view.View;
import android.view.ViewGroup;
import android.widget.AdapterView;
import android.widget.BaseAdapter;
import android.widget.GridView;
import android.widget.ImageView;

import androidx.annotation.Nullable;

public class HeadActivity extends Activity {
    //定义并初始化保存头像id的数组
    public int[] imageId=new int[]{R.drawable.touxiang1,R.drawable.touxiang2,R.drawable.touxiang3,R.drawable.touxiang4,R.drawable.touxiang5};

    @Override
    protected void onCreate(@Nullable Bundle savedInstanceState) {
        super.onCreate(savedInstanceState);
        setContentView(R.layout.activity_head);
        GridView gridView=findViewById(R.id.gridView);//获取GridView组件
        BaseAdapter adapter=new BaseAdapter() {
            @Override
            public int getCount() {
                return imageId.length;
            }

            @Override
            //获得当前选项
            public Object getItem(int i) {
                return i;
            }

            @Override
            //获取当前id
            public long getItemId(int i) {
                return i;
            }

            @Override
            public View getView(int i, View view, ViewGroup viewGroup) {
                ImageView imageView;
                if (view==null){
                    imageView=new ImageView(HeadActivity.this);//实例化ImageView对象
                    /****设置图像的宽度和高度*****/
                    imageView.setAdjustViewBounds(true);
                    imageView.setMaxWidth(158);
                    imageView.setMaxHeight(150);
                    /*************************/
                    imageView.setPadding(5,5,5,5);//设置ImageView的内边距
                }else {
                    imageView=(ImageView) view;
                }
                imageView.setImageResource(imageId[i]);//为ImageView设置要显示的图片
                return imageView;//返回ImageView
            }
        };

        gridView.setAdapter(adapter);//将适配器与GridView关联
        gridView.setOnItemClickListener(new AdapterView.OnItemClickListener() {
            @Override
            public void onItemClick(AdapterView<?> adapterView, View view, int i, long l) {
                Intent intent=getIntent();//获取Intent对象
                Bundle bundle=new Bundle();//实例化要传递的数据包
                bundle.putInt("imageId",imageId[i]);//显示选中的图片
                intent.putExtras(bundle);//将数据包保存到intent中
                setResult(0x11,intent);//设置返回的结果码,并返回调用该Activity的Activity
                finish();//关闭当前Activity
            }
        });
    }
}
第四节:使用Fragment
4.1 Fragment
它与Activity相似,用来在一个Activity中描述一些行为或一部分用户界面,可以在多个Activity中重用Fragment,也可以使用多个Fragment在一个单独的Activity中建立多个UI面板
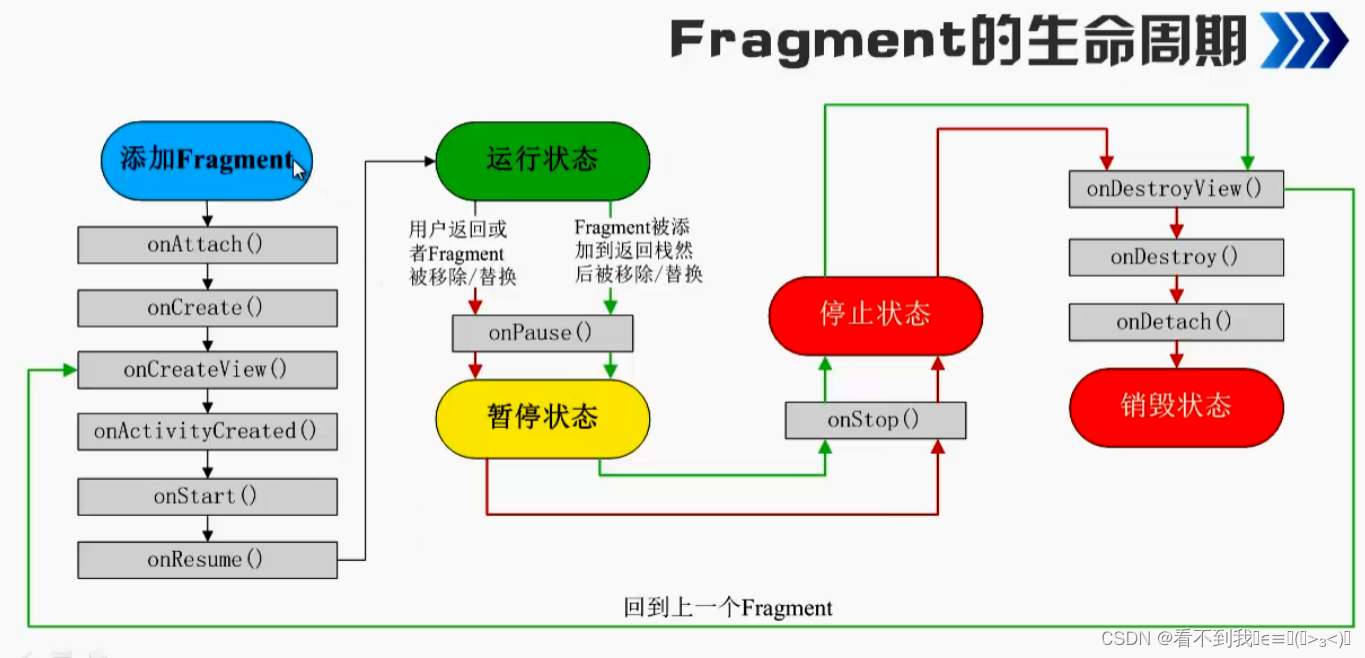
4.2 Fragment的生命周期

4.3 创建Fragment
- 需要继承
Fragment - 重写
onCreateView()方法
activity_main.xml
<?xml version="1.0" encoding="utf-8"?>
<RelativeLayout xmlns:android="http://schemas.android.com/apk/res/android"
    xmlns:app="http://schemas.android.com/apk/res-auto"
    xmlns:tools="http://schemas.android.com/tools"
    android:layout_width="match_parent"
    android:layout_height="match_parent"
    android:padding="16dp"
    tools:context=".MainActivity">

    <TextView
        android:layout_width="wrap_content"
        android:layout_height="wrap_content"
        android:text="Hello World!"
        app:layout_constraintBottom_toBottomOf="parent"
        app:layout_constraintLeft_toLeftOf="parent"
        app:layout_constraintRight_toRightOf="parent"
        app:layout_constraintTop_toTopOf="parent" />

</RelativeLayout>
fragment_list.xml
<?xml version="1.0" encoding="utf-8"?>
<LinearLayout xmlns:android="http://schemas.android.com/apk/res/android"
    android:layout_width="match_parent"
    android:layout_height="match_parent">

    <TextView
        android:layout_width="match_parent"
        android:layout_height="match_parent"
        android:text="Fragment内容"
        />

</LinearLayout>
ListFragment
package com.example.fragmentcreate;

import android.os.Bundle;
import android.view.LayoutInflater;
import android.view.View;
import android.view.ViewGroup;

import androidx.annotation.NonNull;
import androidx.annotation.Nullable;
import androidx.fragment.app.Fragment;

public class ListFragment extends Fragment {
    @Nullable
    @Override
    public View onCreateView(@NonNull LayoutInflater inflater, @Nullable ViewGroup container, @Nullable Bundle savedInstanceState) {
        View view=inflater.inflate(R.layout.fragment_list,container,false);
        return view;
    }
}
4.4 在Activity中添加Fragment
属性
android:name:指定要显示的fragment
直接在布局文件中添加Fragment
activity_main.xml
package com.example.fragment;

import android.os.Bundle;
import android.view.LayoutInflater;
import android.view.View;
import android.view.ViewGroup;

import androidx.annotation.NonNull;
import androidx.annotation.Nullable;
import androidx.fragment.app.Fragment;

public class DetailFragment extends Fragment {
    @Nullable
    @Override
    public View onCreateView(@NonNull LayoutInflater inflater, @Nullable ViewGroup container, @Nullable Bundle savedInstanceState) {
        return inflater.inflate(R.layout.fragment_detail,container,false);
    }
}
MainActivity
package com.example.fragment;

import androidx.appcompat.app.AppCompatActivity;

import android.os.Bundle;

public class MainActivity extends AppCompatActivity {

    @Override
    protected void onCreate(Bundle savedInstanceState) {
        super.onCreate(savedInstanceState);
        setContentView(R.layout.activity_main);
    }
}
fragment_list.xml
<?xml version="1.0" encoding="utf-8"?>
<LinearLayout xmlns:android="http://schemas.android.com/apk/res/android"
    android:layout_width="match_parent"
    android:layout_height="match_parent"
    android:padding="10dp">

    <TextView
        android:layout_width="wrap_content"
        android:layout_height="wrap_content"
        android:text="List Fragment"
        android:textSize="20sp"
        />

</LinearLayout>
ListFragment
package com.example.fragment;

import android.os.Bundle;
import android.view.LayoutInflater;
import android.view.View;
import android.view.ViewGroup;

import androidx.annotation.NonNull;
import androidx.annotation.Nullable;
import androidx.fragment.app.Fragment;

public class ListFragment extends Fragment {
    @Nullable
    @Override
    public View onCreateView(@NonNull LayoutInflater inflater, @Nullable ViewGroup container, @Nullable Bundle savedInstanceState) {
        return inflater.inflate(R.layout.fragment_list,container,false);

    }
}
fragment_detail.xml
<?xml version="1.0" encoding="utf-8"?>
<LinearLayout xmlns:android="http://schemas.android.com/apk/res/android"
    android:layout_width="match_parent"
    android:layout_height="match_parent"
    android:padding="10dp">

    <TextView
        android:layout_width="wrap_content"
        android:layout_height="wrap_content"
        android:text="Detail Fragment"
        android:textSize="20sp"
        />

</LinearLayout>
DetailFragment
package com.example.fragment;

import android.os.Bundle;
import android.view.LayoutInflater;
import android.view.View;
import android.view.ViewGroup;

import androidx.annotation.NonNull;
import androidx.annotation.Nullable;
import androidx.fragment.app.Fragment;

public class DetailFragment extends Fragment {
    @Nullable
    @Override
    public View onCreateView(@NonNull LayoutInflater inflater, @Nullable ViewGroup container, @Nullable Bundle savedInstanceState) {
        return inflater.inflate(R.layout.fragment_detail,container,false);
    }
}
4.5 当Activity运行时添加Fragment
activity_main.xml
<?xml version="1.0" encoding="utf-8"?>
<LinearLayout xmlns:android="http://schemas.android.com/apk/res/android"
    xmlns:app="http://schemas.android.com/apk/res-auto"
    xmlns:tools="http://schemas.android.com/tools"
    android:layout_width="match_parent"
    android:layout_height="match_parent"
    android:padding="16dp"
    android:orientation="horizontal"
    tools:context=".MainActivity">

    <TextView
        android:layout_width="wrap_content"
        android:layout_height="wrap_content"
        android:text="Activity"
        />

    <FrameLayout
        android:id="@+id/frameLayout"
        android:layout_width="match_parent"
        android:layout_height="wrap_content"
        />

</LinearLayout>
MainActivity
package com.example.fragment;

import androidx.appcompat.app.AppCompatActivity;
import androidx.fragment.app.FragmentTransaction;
import android.os.Bundle;

public class MainActivity extends AppCompatActivity {

    @Override
    protected void onCreate(Bundle savedInstanceState) {
        super.onCreate(savedInstanceState);
        setContentView(R.layout.activity_main);
        DetailFragment detailFragment=new DetailFragment();
        ListFragment listFragment=new ListFragment();
        FragmentTransaction fragmentTransaction= getSupportFragmentManager().beginTransaction();
        fragmentTransaction.add(R.id.frameLayout,detailFragment);
        fragmentTransaction.commit();
    }
}
fragment_detail.xml
<?xml version="1.0" encoding="utf-8"?>
<LinearLayout xmlns:android="http://schemas.android.com/apk/res/android"
    android:layout_width="match_parent"
    android:layout_height="match_parent"
    android:padding="10dp">

    <TextView
        android:layout_width="wrap_content"
        android:layout_height="wrap_content"
        android:text="Detail Fragment"
        android:textSize="20sp"
        />
</LinearLayout>
实现模拟微信界面中的Tab标签切换功能
activity_main.xml
<?xml version="1.0" encoding="utf-8"?>
<RelativeLayout xmlns:android="http://schemas.android.com/apk/res/android"
    xmlns:app="http://schemas.android.com/apk/res-auto"
    xmlns:tools="http://schemas.android.com/tools"
    android:layout_width="match_parent"
    android:layout_height="match_parent"
    tools:context=".MainActivity">

    <fragment
        android:id="@+id/fragment"
        android:layout_width="match_parent"
        android:layout_height="match_parent"
        android:name="com.example.wechattab.Wechat_Fragment"
        />

    <LinearLayout
        android:layout_width="match_parent"
        android:layout_height="50dp"
        android:orientation="horizontal"
        android:layout_alignParentBottom="true"
        android:background="#ffffff"
        >
        <ImageView
            android:id="@+id/image1"
            android:layout_width="0dp"
            android:layout_height="50dp"
            android:layout_weight="1"
            android:src="@drawable/bottom_1"/>
        <ImageView
            android:id="@+id/image2"
            android:layout_width="0dp"
            android:layout_height="50dp"
            android:layout_weight="1"
            android:src="@drawable/bottom_2"/>
        <ImageView
            android:id="@+id/image3"
            android:layout_width="0dp"
            android:layout_height="50dp"
            android:layout_weight="1"
            android:src="@drawable/bottom_3"/>
        <ImageView
            android:id="@+id/image4"
            android:layout_width="0dp"
            android:layout_height="50dp"
            android:layout_weight="1"
            android:src="@drawable/bottom_4"/>
    </LinearLayout>

</RelativeLayout>
MainActivity
package com.example.wechattab;

import androidx.appcompat.app.AppCompatActivity;
import androidx.fragment.app.Fragment;
import androidx.fragment.app.FragmentManager;
import androidx.fragment.app.FragmentTransaction;

import android.os.Bundle;
import android.view.View;
import android.view.WindowManager;
import android.widget.ImageView;

public class MainActivity extends AppCompatActivity {

    @Override
    protected void onCreate(Bundle savedInstanceState) {
        super.onCreate(savedInstanceState);
        setContentView(R.layout.activity_main);
        getWindow().setFlags(WindowManager.LayoutParams.FLAG_FULLSCREEN,WindowManager.LayoutParams.FLAG_FULLSCREEN);
        ImageView imageView1=findViewById(R.id.image1);
        ImageView imageView2=findViewById(R.id.image2);
        ImageView imageView3=findViewById(R.id.image3);
        ImageView imageView4=findViewById(R.id.image4);
        imageView1.setOnClickListener(listener);
        imageView2.setOnClickListener(listener);
        imageView3.setOnClickListener(listener);
        imageView4.setOnClickListener(listener);
    }

    View.OnClickListener listener=new View.OnClickListener() {
        @Override
        public void onClick(View view) {
            FragmentManager fragmentManager=getSupportFragmentManager();
            FragmentTransaction fragmentTransaction=fragmentManager.beginTransaction();
            Fragment fragment=null;
            switch (view.getId()){
                case R.id.image1:{
                    fragment=new Wechat_Fragment();
                    break;
                }
                case R.id.image2:{
                    fragment=new Message_Fragment();
                    break;
                }
                case R.id.image3:{
                    fragment=new Find_Fragment();
                    break;
                }
                case R.id.image4:{
                    fragment=new Me_Fragment();
                    break;
                }
                default:
                    break;
            }
            fragmentTransaction.replace(R.id.fragment,fragment);
            fragmentTransaction.commit();
        }
    };
}
find_fragment.xml
<?xml version="1.0" encoding="utf-8"?>
<RelativeLayout xmlns:android="http://schemas.android.com/apk/res/android"
    android:layout_width="match_parent"
    android:layout_height="match_parent">

    <ImageView
        android:layout_width="match_parent"
        android:layout_height="match_parent"
        android:src="@drawable/faxian"
        android:adjustViewBounds="true"
        android:scaleType="fitXY"
        />
</RelativeLayout>
Find_Fragment
package com.example.wechattab;

import android.os.Bundle;
import android.view.LayoutInflater;
import android.view.View;
import android.view.ViewGroup;

import androidx.annotation.NonNull;
import androidx.annotation.Nullable;
import androidx.fragment.app.Fragment;

public class Find_Fragment extends Fragment {
    @Nullable
    @Override
    public View onCreateView(@NonNull LayoutInflater inflater, @Nullable ViewGroup container, @Nullable Bundle savedInstanceState) {
        return inflater.inflate(R.layout.find_fragment,null);
    }
}
me_fragment.xml
<?xml version="1.0" encoding="utf-8"?>
<RelativeLayout xmlns:android="http://schemas.android.com/apk/res/android"
    android:layout_width="match_parent"
    android:layout_height="match_parent">

    <ImageView
        android:layout_width="match_parent"
        android:layout_height="match_parent"
        android:src="@drawable/wo"
        android:adjustViewBounds="true"
        android:scaleType="fitXY"
        />

</RelativeLayout>
Me_Fragment
package com.example.wechattab;

import android.os.Bundle;
import android.view.LayoutInflater;
import android.view.View;
import android.view.ViewGroup;

import androidx.annotation.NonNull;
import androidx.annotation.Nullable;
import androidx.fragment.app.Fragment;

public class Me_Fragment extends Fragment {
    @Nullable
    @Override
    public View onCreateView(@NonNull LayoutInflater inflater, @Nullable ViewGroup container, @Nullable Bundle savedInstanceState) {
        return inflater.inflate(R.layout.me_fragment,null);
    }
}
message_fragment.xml
<?xml version="1.0" encoding="utf-8"?>
<RelativeLayout xmlns:android="http://schemas.android.com/apk/res/android"
    android:layout_width="match_parent"
    android:layout_height="match_parent">

    <ImageView
        android:layout_width="match_parent"
        android:layout_height="match_parent"
        android:src="@drawable/tongxun"
        android:adjustViewBounds="true"
        android:scaleType="fitXY"
        />

</RelativeLayout>
Message_Fragment
package com.example.wechattab;

import android.os.Bundle;
import android.view.LayoutInflater;
import android.view.View;
import android.view.ViewGroup;

import androidx.annotation.NonNull;
import androidx.annotation.Nullable;
import androidx.fragment.app.Fragment;

public class Message_Fragment extends Fragment {
    @Nullable
    @Override
    public View onCreateView(@NonNull LayoutInflater inflater, @Nullable ViewGroup container, @Nullable Bundle savedInstanceState) {
        return inflater.inflate(R.layout.message_fragment,null);
    }
}
wechat_fragment.xml
<?xml version="1.0" encoding="utf-8"?>
<RelativeLayout xmlns:android="http://schemas.android.com/apk/res/android"
    android:layout_width="match_parent"
    android:layout_height="match_parent">

    <ImageView
        android:layout_width="match_parent"
        android:layout_height="match_parent"
        android:src="@drawable/weixin"
        android:adjustViewBounds="true"
        android:scaleType="fitXY"
        />

</RelativeLayout>
Wechat_Fragment
package com.example.wechattab;

import android.os.Bundle;
import android.view.LayoutInflater;
import android.view.View;
import android.view.ViewGroup;

import androidx.annotation.NonNull;
import androidx.annotation.Nullable;
import androidx.fragment.app.Fragment;

public class Wechat_Fragment extends Fragment {
    @Nullable
    @Override
    public View onCreateView(@NonNull LayoutInflater inflater, @Nullable ViewGroup container, @Nullable Bundle savedInstanceState) {
        return inflater.inflate(R.layout.wechat_fragment,null);
    }
}


 被折叠的 条评论
为什么被折叠?
被折叠的 条评论
为什么被折叠?
 到【灌水乐园】发言


