


在开发中我们有的时候会遇到这种需求:如给文字加阴影,一个字符串中部分显示的颜色不同等等来美化文字显示的效果,这个时候我们就会下面这些东西
加阴影两种方式
1.在Layet/XML文件中添加属性
android:shadowColor:阴影的颜色
android:shadowRadius:阴影的半径大小,半径越大文字越模糊
android:shadowDx:水平方向上的偏移量
android:shadowDy:垂直方向上的偏移量
2.在java文件中添加代码
TextView.setShadowLayer(float radius, float dx, float dy, int color)
参数1:阴影的半径大小,半径越大文字越模糊
参数2:水平方向上的偏移量
参数3:垂直方向上的偏移量
参数4:阴影的颜色
我们来写一个看看效果吧:
    <TextView
        android:layout_width="wrap_content"
        android:layout_height="wrap_content"
        android:textSize="22sp"
        android:text="Android CSDN"
        android:textColor="@android:color/white"
        android:shadowColor="@android:color/black"
        android:layout_centerInParent="true"
        android:shadowRadius="5"
        android:shadowDx="10"
        android:shadowDy="10" />
通过组合这4个属性可以做出更多你想要的效果。
TextView加常见样式
1 .添加下划线,删除线
textView1.getPaint().setFlags(Paint.UNDERLINE_TEXT_FLAG ); // 下划线
textView1.getPaint().setFlags(Paint.STRIKE_THRU_TEXT_FLAG); // 删除线
或者
String str = "下划线删除线";
SpannableString span = new SpannableString(str);
span.setSpan(new UnderlineSpan(), 0, 3, Spanned.SPAN_EXCLUSIVE_EXCLUSIVE); // 下划线
span.setSpan(new StrikethroughSpan(), 3, 6, Spanned.SPAN_EXCLUSIVE_EXCLUSIVE); // 删除线
textView1.setText(span);
2.添加超链接,电话,短信,邮件
String str = "百度电话短信邮件";
SpannableString spanStr =  new  SpannableString(str);
spanStr.setSpan(new URLSpan("http://www.baidu.com"), 0, 2, Spanned.SPAN_EXCLUSIVE_EXCLUSIVE); // 网站
spanStr.setSpan(new URLSpan("tel:15012341234"), 2, 4, Spanned.SPAN_EXCLUSIVE_EXCLUSIVE); // 电话
spanStr.setSpan(new URLSpan("sms:15012341234"), 4, 6, Spanned.SPAN_EXCLUSIVE_EXCLUSIVE); // 短信,或者smsto
spanStr.setSpan(new URLSpan("mailto:123456789@qq.com"), 6, 8, Spanned.SPAN_EXCLUSIVE_EXCLUSIVE); // 邮件
textView2.setText(spanStr);textView2.setMovementMethod(LinkMovementMethod.getInstance()); //添加setMovementMethod方法附加响应
3.背景高亮显示
String str = "背景高亮";
SpannableString sp = new SpannableString(str);
sp.setSpan(new BackgroundColorSpan(Color.BLUE), 0, str.length() ,Spannable.SPAN_EXCLUSIVE_EXCLUSIVE);
textView3.setText(sp);
4.文字高亮显示
String str= "文字高亮";
SpannableString sp = new SpannableString(str);
sp.setSpan( new ForegroundColorSpan(Color.RED), 0, str.length(),Spannable.SPAN_EXCLUSIVE_INCLUSIVE);
textView4.setText(sp)
5.添加字体样式正常,粗体,斜体,粗斜体
String str = "正常粗体斜体粗斜体";
SpannableString msp = new SpannableString(str);
msp.setSpan(new StyleSpan(android.graphics.Typeface.NORMAL), 0, 2, Spanned.SPAN_EXCLUSIVE_EXCLUSIVE);  //正常
msp.setSpan(new StyleSpan(android.graphics.Typeface.BOLD), 2, 4, Spanned.SPAN_EXCLUSIVE_EXCLUSIVE);  //粗体
msp.setSpan(new StyleSpan(android.graphics.Typeface.ITALIC), 4, 6, Spanned.SPAN_EXCLUSIVE_EXCLUSIVE);  //斜体
msp.setSpan(new StyleSpan(android.graphics.Typeface.BOLD_ITALIC), 6, 9, Spanned.SPAN_EXCLUSIVE_EXCLUSIVE);  //粗斜体
textView5.setText(msp);
6.添加上标,下标
String str = "X1X2";
SpannableString sp=new SpannableString(str);
sp.setSpan(new SuperscriptSpan(), 1, 2, Spanned.SPAN_EXCLUSIVE_EXCLUSIVE);   //上标
sp.setSpan(new SubscriptSpan(), 3, 4, Spanned.SPAN_EXCLUSIVE_EXCLUSIVE);     //下标
textView6.setText(sp);
7.设置字体大小
String str = "文字";
SpannableString sp=new SpannableString(str);
sp.setSpan(new ScaleXSpan(2.0f), 0, 2, Spanned.SPAN_EXCLUSIVE_EXCLUSIVE); //ScaleXSpan参数表示默认字体宽度的两倍,高度不变
textView7.setText(sp);
效果图如下:
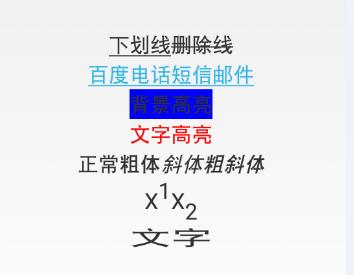
注意:SpannableString.setSpan() 的第2个和第3个参数:
1,.索引从0开始;
2.截取的字符串不包含后面的索引,如上面的例子添加上标中"X1X2"参数2传了1,参数3传了2,指的是将索引为1的字符串“1”作为上标
这是我的第一篇博客,如果你觉得还可以就赞一个或者留言一下吧,如果有什么错误或者要加的欢迎留言


 1220
1220

 被折叠的 条评论
为什么被折叠?
被折叠的 条评论
为什么被折叠?
 到【灌水乐园】发言


