


 本文介绍了API hook技术,通过示例展示了如何使用C++在Windows上实现API函数的hook,包括从DLL导出函数和钩住特定API以改变其行为。详细解释了经典5字节钩子技术的工作原理,并提供了源代码供读者实践。
什么是API hook?
API hook是一种技术,通过它我们可以测量和修改API调用的行为和流。许多反病毒解决方案也使用这种技术来检测代码是否为恶意代码。
示例1
在挂接windows API函数之前,我将考虑如何从DLL中导出函数。
例如,我们有DLL的这个逻辑(pet.cpp):
/*
pet.dll - DLL example for basic hooking
*/

#include <windows.h>
#pragma comment (lib, "user32.lib")

BOOL APIENTRY DllMain(HMODULE hModule,  DWORD  ul_reason_for_call, LPVOID lpReserved) {
  switch (ul_reason_for_call) {
    case DLL_PROCESS_ATTACH:
      break;
    case DLL_PROCESS_DETACH:
      break;
    case DLL_THREAD_ATTACH:
      break;
    case DLL_THREAD_DETACH:
      break;
  }
  return TRUE;
}

extern "C" {
  __declspec(dllexport) int _cdecl Cat(LPCTSTR say) {
    MessageBox(NULL, say, "=^..^=", MB_OK);
	  return 1;
	}
}

extern "C" {
  __declspec(dllexport) int _cdecl Mouse(LPCTSTR say) {
    MessageBox(NULL, say, "<:3()~~", MB_OK);
	  return 1;
	}
}

extern "C" {
  __declspec(dllexport) int _cdecl Frog(LPCTSTR say) {
    MessageBox(NULL, say, "8)~", MB_OK);
	  return 1;
	}
}

extern "C" {
  __declspec(dllexport) int _cdecl Bird(LPCTSTR say) {
    MessageBox(NULL, say, "<(-)", MB_OK);
	  return 1;
	}
}
正如你所看到的,这个DLL有最简单的导出函数:Cat, Mouse, Frog, Bird和一个参数。正如您所看到的,这个函数的逻辑是最简单的,只是带有标题的弹出消息。
让我们去编译它:
x86_64-w64-mingw32-gcc -shared -o pet.dll pet.cpp -fpermissive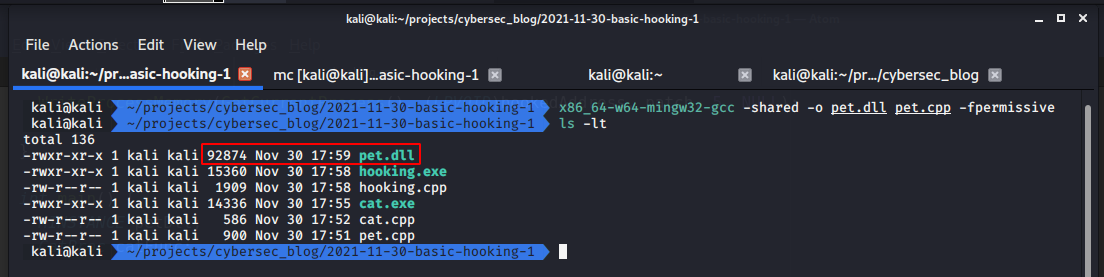
然后,创建一个简单的代码来验证这个DLL (cat.cpp):
#include <windows.h>

typedef int (__cdecl *CatProc)(LPCTSTR say);
typedef int (__cdecl *BirdProc)(LPCTSTR say);

int main(void) {
  HINSTANCE petDll;
  CatProc catFunc;
  BirdProc birdFunc;
  BOOL freeRes;

  petDll = LoadLibrary("pet.dll");

  if (petDll != NULL) {
    catFunc = (CatProc) GetProcAddress(petDll, "Cat");
    birdFunc = (BirdProc) GetProcAddress(petDll, "Bird");
    if ((catFunc != NULL) && (birdFunc != NULL)) {
      (catFunc) ("meow-meow");
      (catFunc) ("mmmmeow");
      (birdFunc) ("tweet-tweet");
    }
    freeRes = FreeLibrary(petDll);
  }

  return 0;
}
让我们去编译它:
x86_64-w64-mingw32-g++ -O2 cat.cpp -o cat.exe -mconsole -I/usr/share/mingw-w64/include/ -s -ffunction-sections -fdata-sections -Wno-write-strings -fno-exceptions -fmerge-all-constants -static-libstdc++ -static-libgcc -fpermissive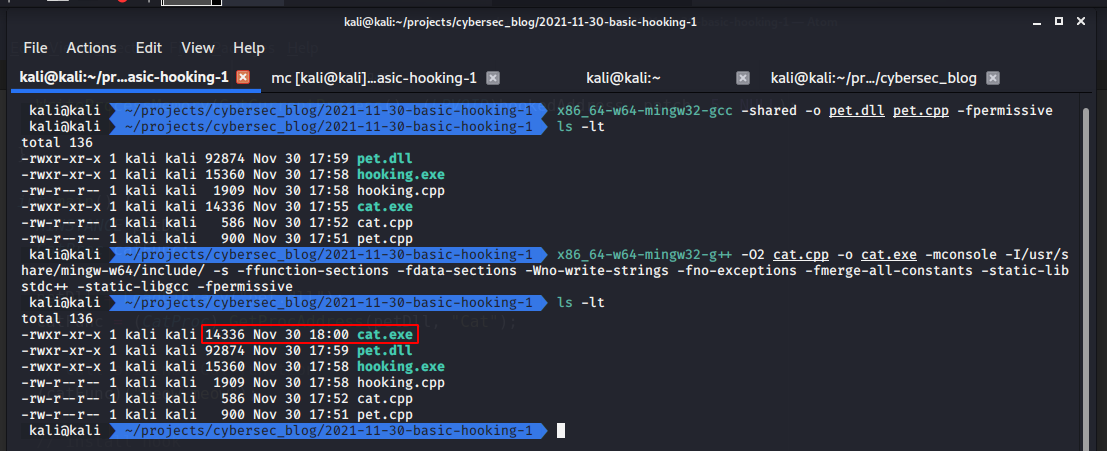
并在Windows 7 x64上运行:
。\ cat.exe
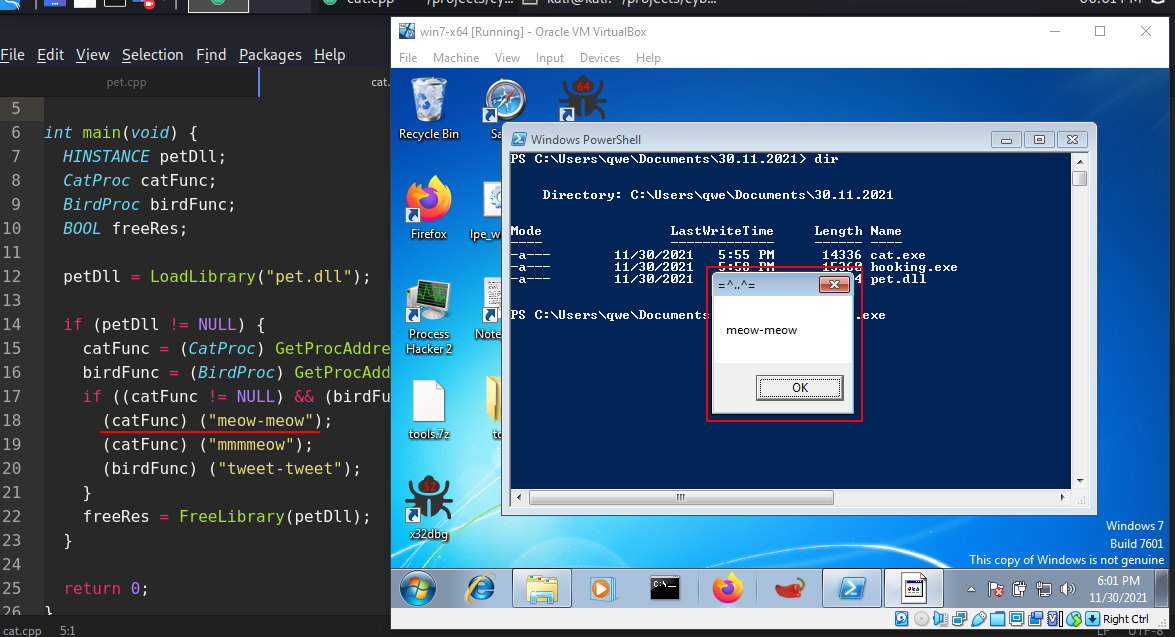

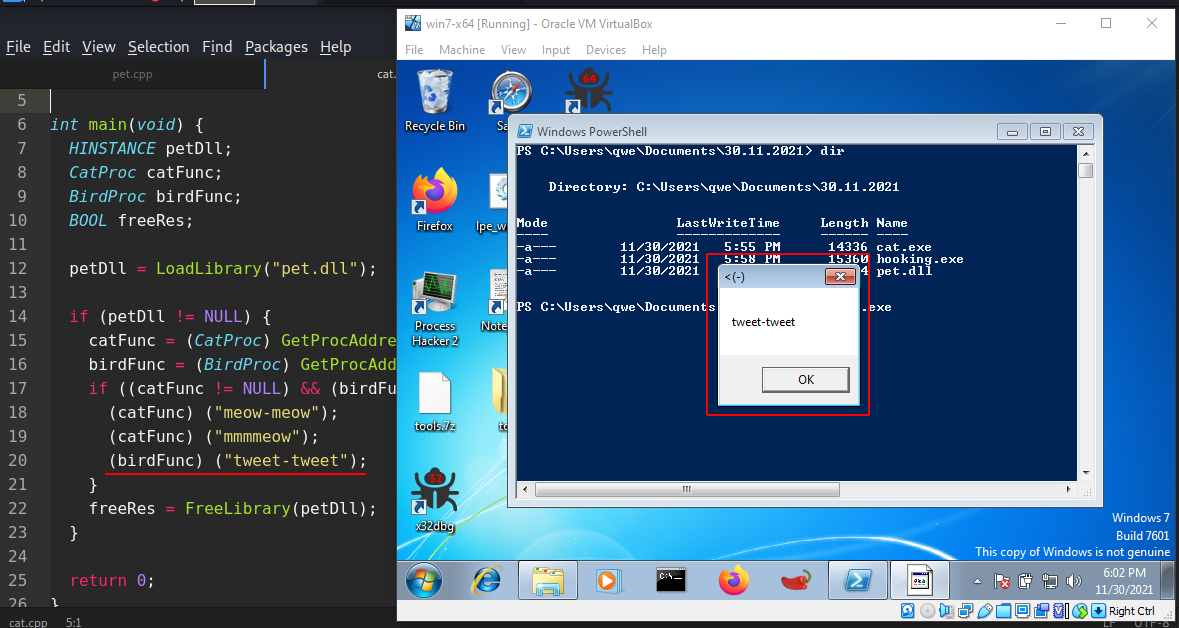
正如你所看到的,一切都如你所愿。
然后,例如Cat函数将在这个场景中被钩住,但它可以是任何。
该技术的工作流程如下:
首先,获取Cat函数的内存地址。
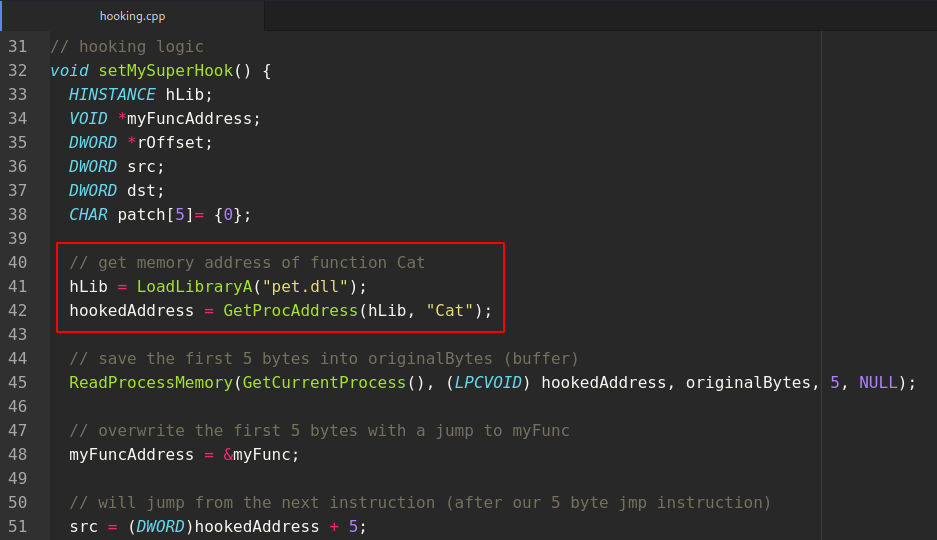
然后,保存Cat函数的前5个字节。我们将需要这些字节:
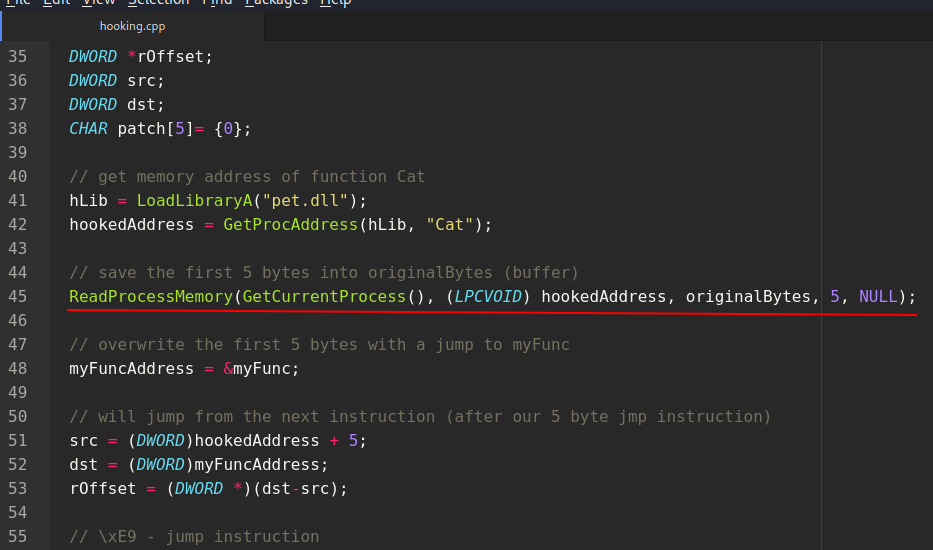
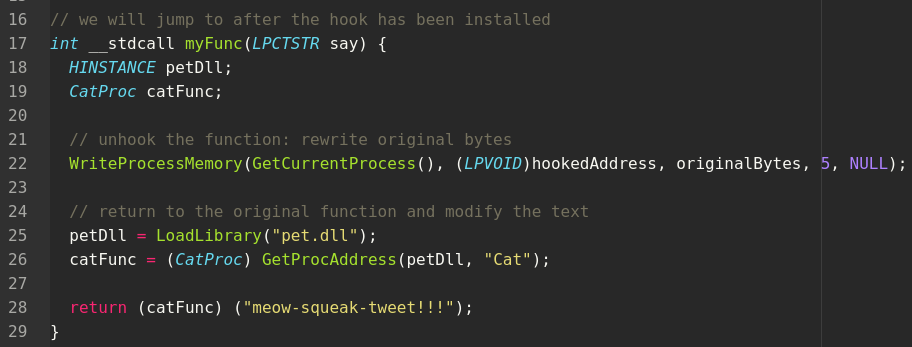
然后,创建一个myFunc函数,它将在原来的Cat被调用时执行:
覆盖5字节跳转到myFunc:
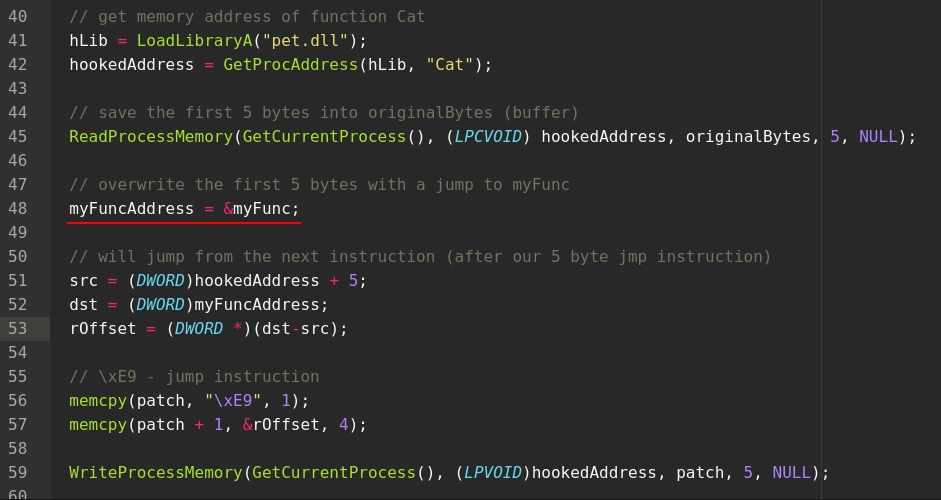
然后,创建一个“补丁(patch)”:
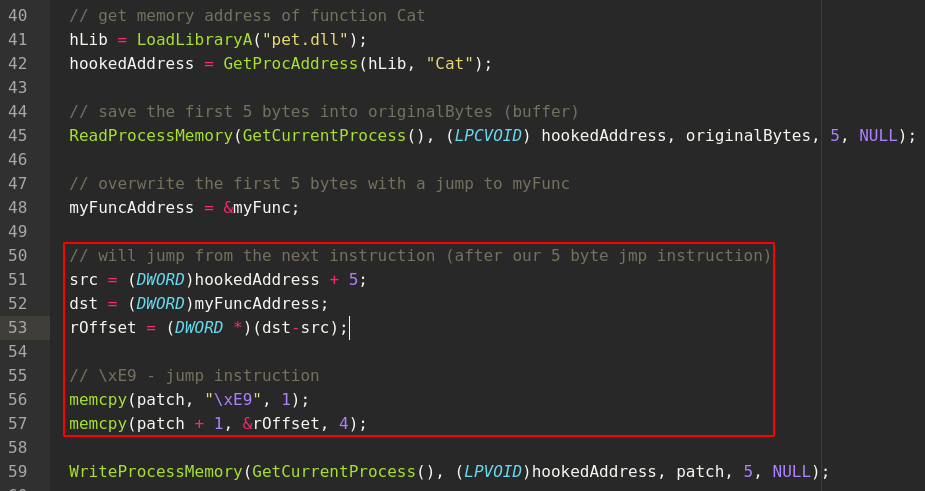
在下一步,修补我们的Cat函数(重定向到myFunc):
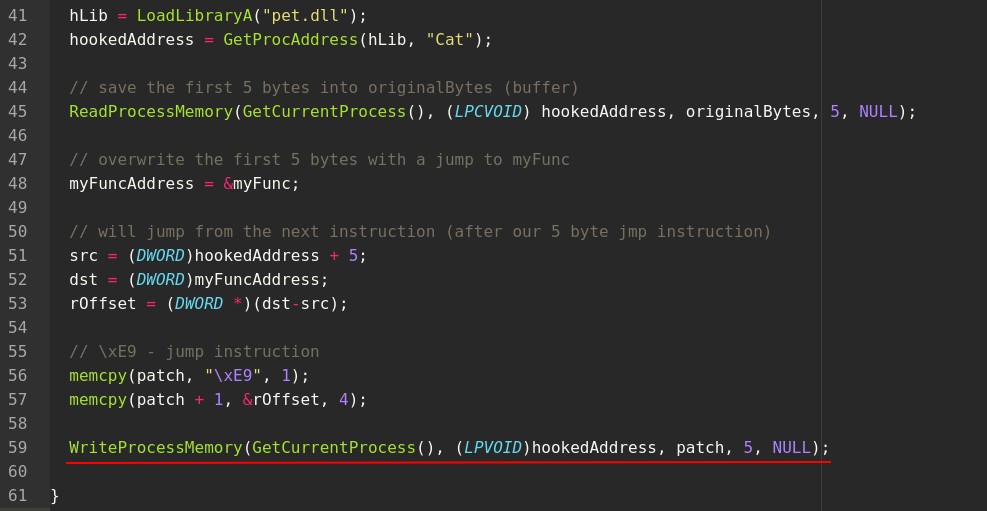
我们做了什么?这个技巧就是“经典的5字节钩子”技术。如果我们分解函数:
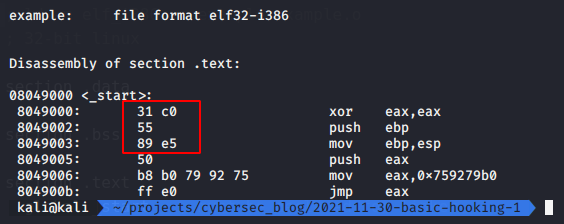
突出显示的5个字节是许多API函数中相当典型的序言。通过用jmp指令覆盖这前5个字节,我们将执行重定向到我们自己定义的函数。我们将保存原始字节,以便在以后想要将执行传递回钩住的函数时引用它们。
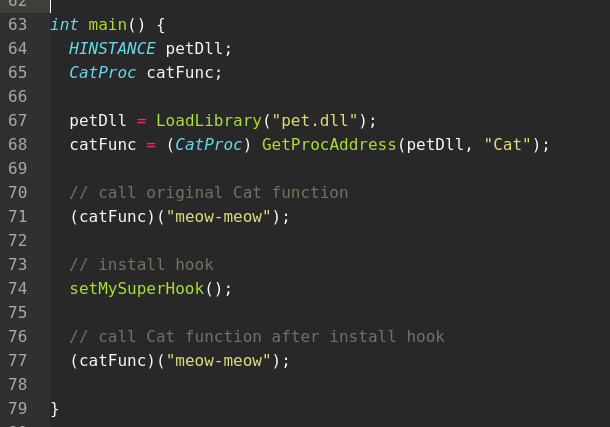
首先,我们调用原来的Cat函数,设置我们的钩子并再次调用Cat:
完整的源代码是:
/*
hooking.cpp
basic hooking example
author: @cocomelonc
https://cocomelonc.github.io/tutorial/2021/11/30/basic-hooking-1.html
*/
#include <windows.h>
typedef int (__cdecl *CatProc)(LPCTSTR say);
// buffer for saving original bytes
char originalBytes[5];
FARPROC hookedAddress;
// we will jump to after the hook has been installed
int __stdcall myFunc(LPCTSTR say) {
HINSTANCE petDll;
CatProc catFunc;
// unhook the function: rewrite original bytes
WriteProcessMemory(GetCurrentProcess(), (LPVOID)hookedAddress, originalBytes, 5, NULL);
// return to the original function and modify the text
petDll = LoadLibrary("pet.dll");
catFunc = (CatProc) GetProcAddress(petDll, "Cat");
return (catFunc) ("meow-squeak-tweet!!!");
}
// hooking logic
void setMySuperHook() {
HINSTANCE hLib;
VOID *myFuncAddress;
DWORD *rOffset;
DWORD src;
DWORD dst;
CHAR patch[5]= {0};
// get memory address of function Cat
hLib = LoadLibraryA("pet.dll");
hookedAddress = GetProcAddress(hLib, "Cat");
// save the first 5 bytes into originalBytes (buffer)
ReadProcessMemory(GetCurrentProcess(), (LPCVOID) hookedAddress, originalBytes, 5, NULL);
// overwrite the first 5 bytes with a jump to myFunc
myFuncAddress = &myFunc;
// will jump from the next instruction (after our 5 byte jmp instruction)
src = (DWORD)hookedAddress + 5;
dst = (DWORD)myFuncAddress;
rOffset = (DWORD *)(dst-src);
// \xE9 - jump instruction
memcpy(patch, "\xE9", 1);
memcpy(patch + 1, &rOffset, 4);
WriteProcessMemory(GetCurrentProcess(), (LPVOID)hookedAddress, patch, 5, NULL);
}
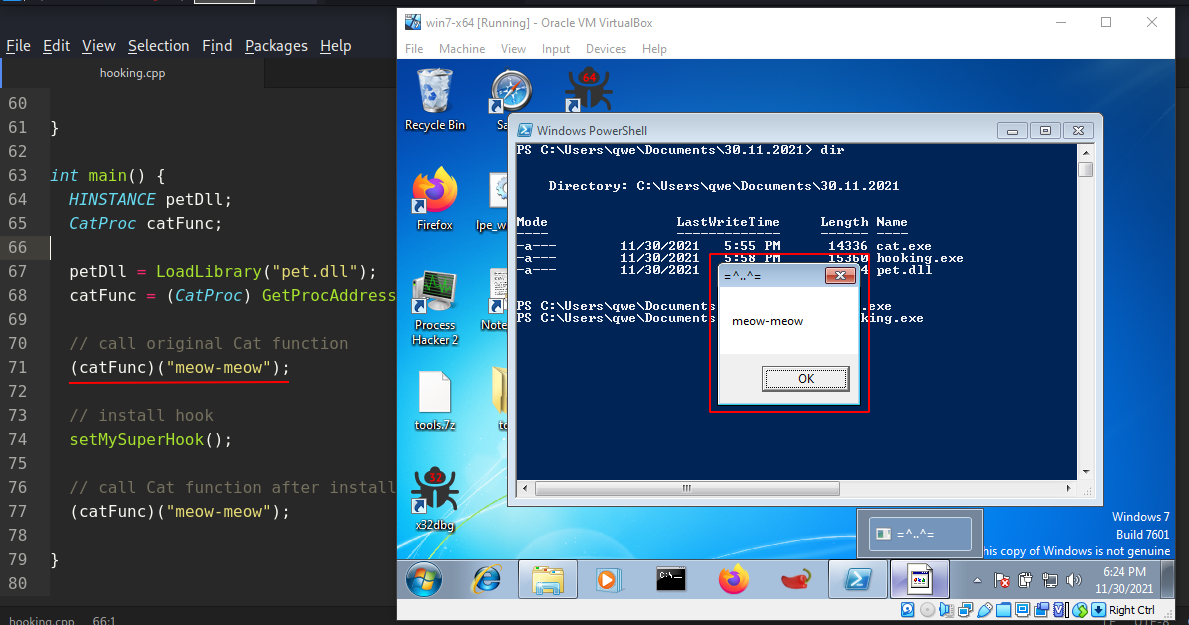
int main() {
HINSTANCE petDll;
CatProc catFunc;
petDll = LoadLibrary("pet.dll");
catFunc = (CatProc) GetProcAddress(petDll, "Cat");
// call original Cat function
(catFunc)("meow-meow");
// install hook
setMySuperHook();
// call Cat function after install hook
(catFunc)("meow-meow");
}
让我们去编译它:
x86_64-w64-mingw32-g++ -O2 hooking.cpp -o hooking.exe -mconsole -I/usr/share/mingw-w64/include/ -s -ffunction-sections -fdata-sections -Wno-write-strings -fno-exceptions -fmerge-all-constants -static-libstdc++ -static-libgcc -fpermissive
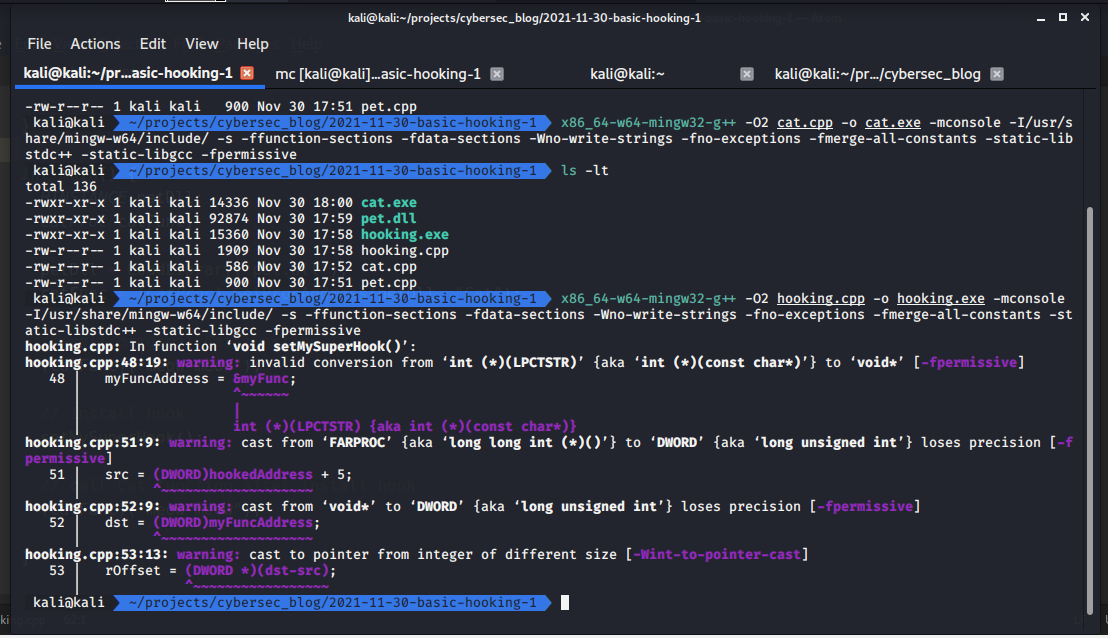
并看到它的行动(在Windows 7 x64的情况下):
hooking.exe
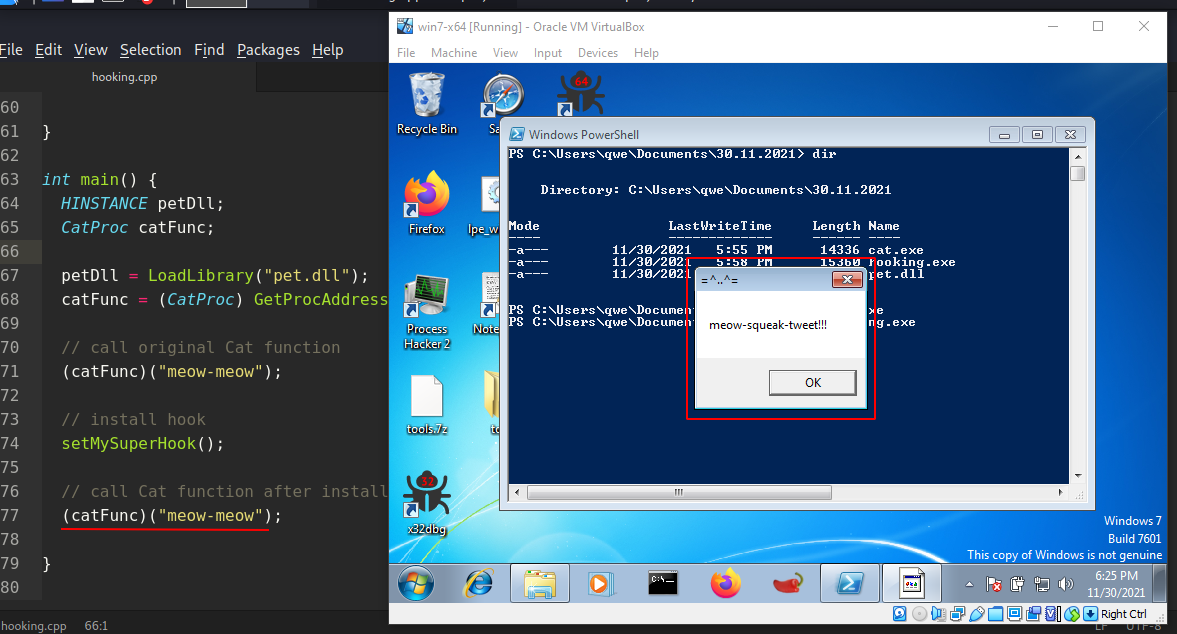
正如你所看到的,我们的钩子工作得很完美!!Cat会meow-squeak-tweet ! !而不是meow-meow !
例子2
类似地,你可以从kernel32.dll (hooking2.cpp)中钩子一个WinExec函数:
#include <windows.h>

// buffer for saving original bytes
char originalBytes[5];

FARPROC hookedAddress;

// we will jump to after the hook has been installed
int __stdcall myFunc(LPCSTR lpCmdLine, UINT uCmdShow) {

  // unhook the function: rewrite original bytes
  WriteProcessMemory(GetCurrentProcess(), (LPVOID)hookedAddress, originalBytes, 5, NULL);

  // return to the original function and modify the text
  return WinExec("calc", uCmdShow);
}

// hooking logic
void setMySuperHook() {
  HINSTANCE hLib;
  VOID *myFuncAddress;
  DWORD *rOffset;
  DWORD src;
  DWORD dst;
  CHAR patch[5]= {0};

  // get memory address of function MessageBoxA
  hLib = LoadLibraryA("kernel32.dll");
  hookedAddress = GetProcAddress(hLib, "WinExec");

  // save the first 5 bytes into originalBytes (buffer)
  ReadProcessMemory(GetCurrentProcess(), (LPCVOID) hookedAddress, originalBytes, 5, NULL);

  // overwrite the first 5 bytes with a jump to myFunc
  myFuncAddress = &myFunc;

  // will jump from the next instruction (after our 5 byte jmp instruction)
  src = (DWORD)hookedAddress + 5;
  dst = (DWORD)myFuncAddress;
  rOffset = (DWORD *)(dst-src);

  // \xE9 - jump instruction
  memcpy(patch, "\xE9", 1);
  memcpy(patch + 1, &rOffset, 4);

  WriteProcessMemory(GetCurrentProcess(), (LPVOID)hookedAddress, patch, 5, NULL);

}

int main() {

  // call original
  WinExec("notepad", SW_SHOWDEFAULT);

  // install hook
  setMySuperHook();

  // call after install hook
  WinExec("notepad", SW_SHOWDEFAULT);

}
让我们去编译:
x86_64-w64-mingw32-g++ -O2 hooking2.cpp -o hooking2.exe -mconsole -I/usr/share/mingw-w64/include/ -s -ffunction-sections -fdata-sections -Wno-write-strings -fno-exceptions -fmerge-all-constants -static-libstdc++ -static-libgcc -fpermissive
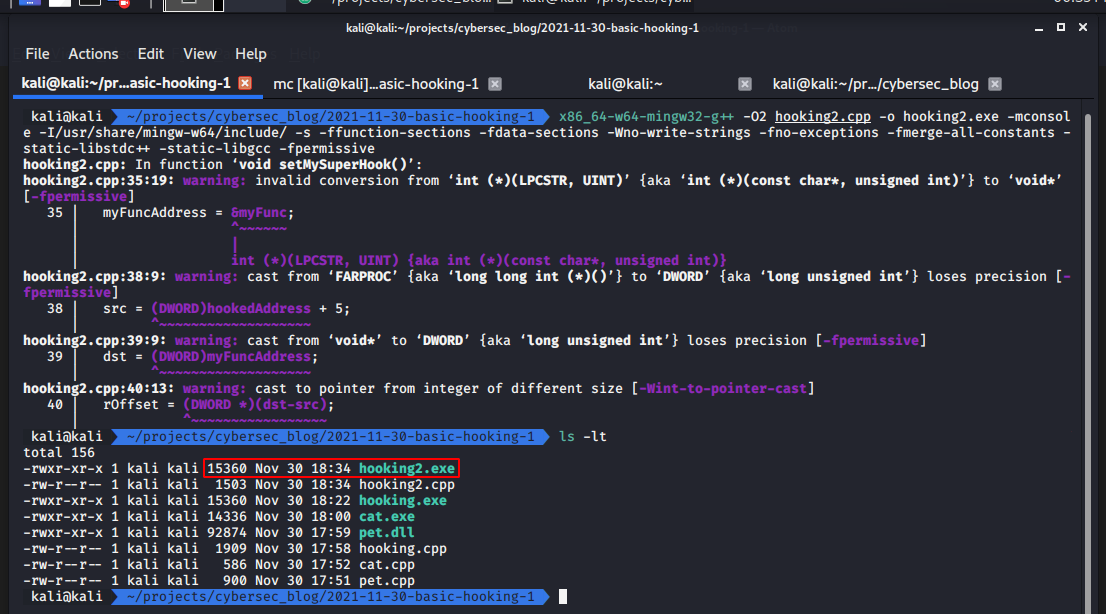
并且允运行hooking2.exe
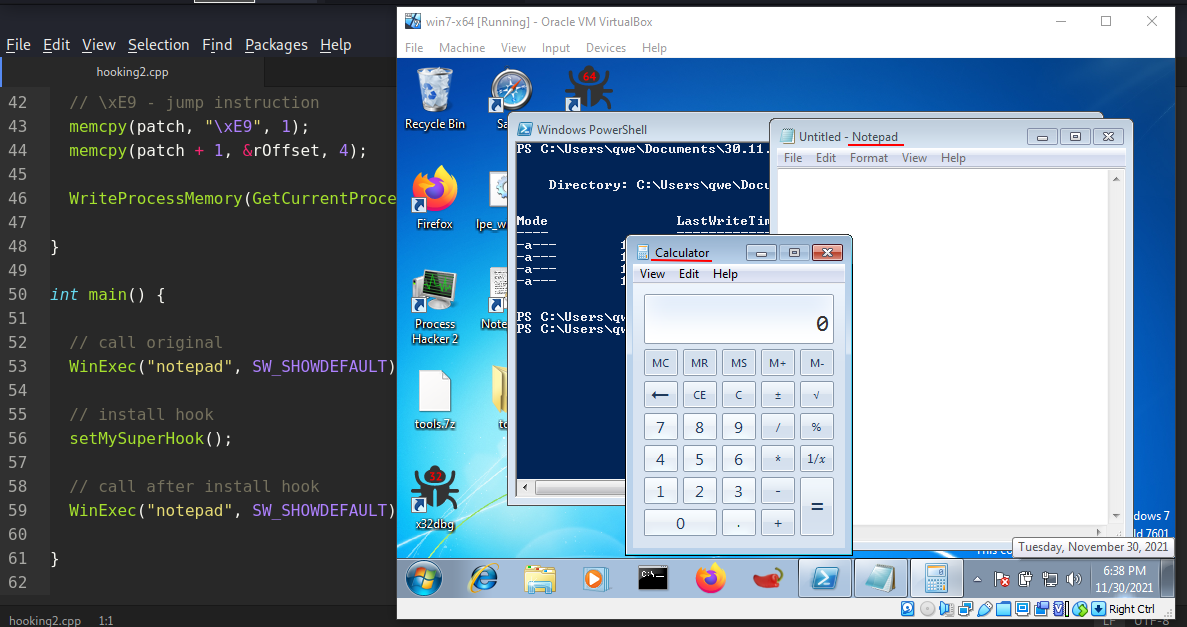
所以一切都如预期的那样。
githubGitHub - cocomelonc/2021-11-30-basic-hooking-1: Classic 5-byte hook example. C++


 被折叠的 条评论
为什么被折叠?
被折叠的 条评论
为什么被折叠?
 到【灌水乐园】发言


