


Spring Boot Web 生成并显示二维码
本 Spring Boot 教程将逐步向您展示如何实现 Spring Boot Web 应用程序,该应用程序从用户输入生成 QR 码并通过网页显示 QR 码。
目录
2.将 ZXing Core 和 ZXing Java SE Extensions 库添加到 Spring Boot 项目中
1.创建新的 Spring Boot Web 项目
打开 IntelliJ IDEA,选择菜单 File > New > Project。

在 New Project 对话框中,选择 Spring Initializr 并单击 Next 按钮。
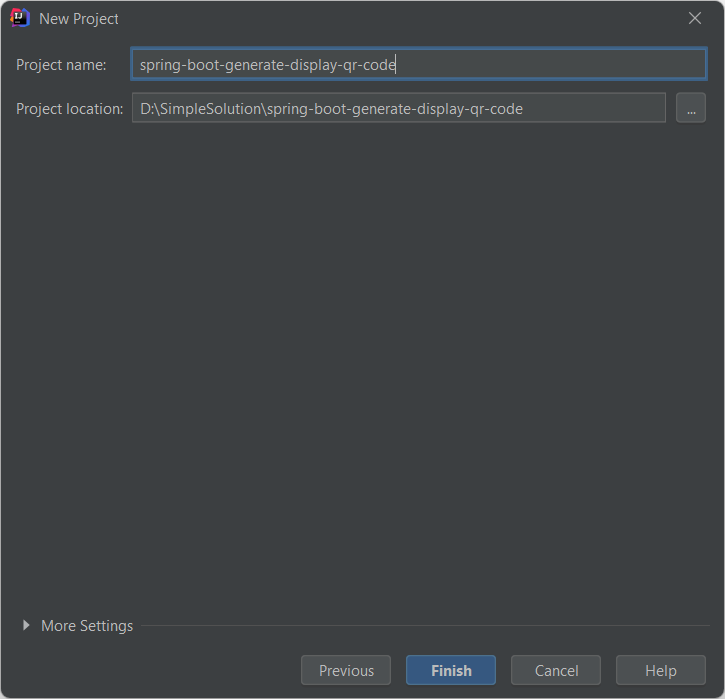
在 Spring initializr Project Settings 对话框中,输入新的项目信息,如下所示,然后单击 Next 按钮。
- group:dev.simplesolution
- artifact:spring-boot-generate-display-qr-code
- version:1.0.0
- Name:spring-boot-generate-display-qr-code
- description:Spring Boot Web 生成并显示二维码
- package:dev.simplesolution.generateqr

在 Dependencies 对话框中,选择下面的依赖项,然后单击 Next 按钮。
- Spring Web
- Thymeleaf
-

为您的项目选择位置,然后单击 Finish 按钮以创建新的 Spring Boot 项目。
您还可以使用位于start.spring.io的 Spring Initializr 在线工具创建新的 Spring Boot 项目,如下图所示。

2.将 ZXing Core 和 ZXing Java SE Extensions 库添加到 Spring Boot 项目中
为了生成二维码图像,我们使用 ZXing 库。要在 Maven 项目中使用 ZXing 库,请将以下依赖项添加到 pom.xml 文件中。
<dependency>
    <groupId>com.google.zxing</groupId>
    <artifactId>core</artifactId>
    <version>3.4.1</version>
</dependency>

<dependency>
    <groupId>com.google.zxing</groupId>
    <artifactId>javase</artifactId>
    <version>3.4.1</version>
</dependency>
完整的 pom.xml 如下所示。
<?xml version="1.0" encoding="UTF-8"?>
<project xmlns="http://maven.apache.org/POM/4.0.0" xmlns:xsi="http://www.w3.org/2001/XMLSchema-instance"
         xsi:schemaLocation="http://maven.apache.org/POM/4.0.0 https://maven.apache.org/xsd/maven-4.0.0.xsd">
    <modelVersion>4.0.0</modelVersion>
    <parent>
        <groupId>org.springframework.boot</groupId>
        <artifactId>spring-boot-starter-parent</artifactId>
        <version>2.6.1</version>
        <relativePath/> <!-- lookup parent from repository -->
    </parent>
    <groupId>dev.simplesolution</groupId>
    <artifactId>spring-boot-generate-display-qr-code</artifactId>
    <version>1.0.0</version>
    <name>spring-boot-generate-display-qr-code</name>
    <description>Spring Boot Web Generate and Display QR Code</description>
    <properties>
        <java.version>1.8</java.version>
    </properties>
    <dependencies>
        <dependency>
            <groupId>org.springframework.boot</groupId>
            <artifactId>spring-boot-starter-thymeleaf</artifactId>
        </dependency>
        <dependency>
            <groupId>org.springframework.boot</groupId>
            <artifactId>spring-boot-starter-web</artifactId>
        </dependency>

        <dependency>
            <groupId>com.google.zxing</groupId>
            <artifactId>core</artifactId>
            <version>3.4.1</version>
        </dependency>

        <dependency>
            <groupId>com.google.zxing</groupId>
            <artifactId>javase</artifactId>
            <version>3.4.1</version>
        </dependency>

        <dependency>
            <groupId>org.springframework.boot</groupId>
            <artifactId>spring-boot-starter-test</artifactId>
            <scope>test</scope>
        </dependency>
    </dependencies>

    <build>
        <plugins>
            <plugin>
                <groupId>org.springframework.boot</groupId>
                <artifactId>spring-boot-maven-plugin</artifactId>
            </plugin>
        </plugins>
    </build>
</project>
如果您使用的是 Gradle,请将以下依赖项添加到 build.gradle 文件中。
implementation group: 'com.google.zxing', name: 'core', version: '3.4.1'

implementation group: 'com.google.zxing', name: 'javase', version: '3.4.1'
3.编写二维码服务接口和类
在这一步,我们实现服务类来生成 QR 图像并将 QR 图像作为字节数组返回。
创建一个名为 dev.simplesolution.generateqr.service 的新包并添加新接口 QRCodeService,如下所示。
src/main/java/dev/simplesolution/generateqr/service/QRCodeService.java
package dev.simplesolution.generateqr.service;

public interface QRCodeService {

    byte[] generateQRCode(String qrContent, int width, int height);

}
创建一个名为 dev.simplesolution.generateqr.service.impl 的新包,并按照以下代码实现一个名为 QRCodeServiceImpl 的类。
src/main/java/dev/simplesolution/generateqr/service/impl/QRCodeServiceImpl.java
package dev.simplesolution.generateqr.service.impl;

import com.google.zxing.BarcodeFormat;
import com.google.zxing.WriterException;
import com.google.zxing.client.j2se.MatrixToImageWriter;
import com.google.zxing.common.BitMatrix;
import com.google.zxing.qrcode.QRCodeWriter;
import dev.simplesolution.generateqr.service.QRCodeService;
import org.slf4j.Logger;
import org.slf4j.LoggerFactory;
import org.springframework.stereotype.Service;

import java.io.ByteArrayOutputStream;
import java.io.IOException;

@Service
public class QRCodeServiceImpl implements QRCodeService {

    private Logger logger = LoggerFactory.getLogger(QRCodeServiceImpl.class);

    @Override
    public byte[] generateQRCode(String qrContent, int width, int height) {
        try {
            QRCodeWriter qrCodeWriter = new QRCodeWriter();
            BitMatrix bitMatrix = qrCodeWriter.encode(qrContent, BarcodeFormat.QR_CODE, width, height);
            ByteArrayOutputStream byteArrayOutputStream = new ByteArrayOutputStream();
            MatrixToImageWriter.writeToStream(bitMatrix, "PNG", byteArrayOutputStream);
            return byteArrayOutputStream.toByteArray();
        } catch (WriterException e) {
            logger.error(e.getMessage(), e);
        } catch (IOException e) {
            logger.error(e.getMessage(), e);
        }
        return null;
    }
}
4.编写控制器类和 HTML 视图
在这一步中,我们实现了一个新的 Controller 类,它公开了 3 个端点。
- 显示表单的索引端点允许用户输入内容来生成二维码。
- 显示 QR 码端点以显示 HTML 页面,其中包含表示生成的 QR 码图像的 img 标记。
- 生成二维码端点接收文本作为二维码内容并返回二维码图像。
添加一个名为 dev.simplesolution.generateqr.controller 的新 Java 包,并按照以下 Java 代码实现 QRCodeController 类。
src/main/java/dev/simplesolution/generateqr/controller/QRCodeController.java
package dev.simplesolution.generateqr.controller;

import dev.simplesolution.generateqr.service.QRCodeService;
import org.springframework.beans.factory.annotation.Autowired;
import org.springframework.stereotype.Controller;
import org.springframework.ui.Model;
import org.springframework.web.bind.annotation.GetMapping;
import org.springframework.web.bind.annotation.PostMapping;
import org.springframework.web.bind.annotation.RequestMapping;

import javax.servlet.http.HttpServletResponse;
import java.io.IOException;
import java.io.OutputStream;

@Controller
public class QRCodeController {

    @Autowired
    private QRCodeService qrCodeService;

    @RequestMapping("/")
    public String index() {
        return "index";
    }

    @PostMapping("/showQRCode")
    public String showQRCode(String qrContent, Model model) {
        model.addAttribute("qrCodeContent", "/generateQRCode?qrContent=" + qrContent);
        return "show-qr-code";
    }

    @GetMapping("/generateQRCode")
    public void generateQRCode(String qrContent, HttpServletResponse response) throws IOException {
        response.setContentType("image/png");
        byte[] qrCode = qrCodeService.generateQRCode(qrContent, 500, 500);
        OutputStream outputStream = response.getOutputStream();
        outputStream.write(qrCode);
    }
}
下一步我们将下面的 HTML 视图添加到资源/模板目录,如下所示。
- index.html 显示允许用户输入内容生成二维码的索引页面。
- show-qr-code.html 显示带有 img 标签的二维码。
src/main/resources/templates/index.html
<html xmlns:th="https://www.thymeleaf.org">
<head>
    <title>Spring Boot Web Generate QR Code</title>
    <link href="https://cdn.jsdelivr.net/npm/bootstrap@5.1.3/dist/css/bootstrap.min.css" rel="stylesheet">
</head>
<body>
<div class="container">
    <h1>Generate QR Code</h1>
    <form method="POST" enctype="multipart/form-data" action="/showQRCode">
        <div class="mb-3">
            <label for="qrContent" class="form-label">Enter your content to generate QR code</label>
            <input type="text" class="form-control form-control-lg" id="qrContent" name="qrContent" required>
        </div>
        <div class="mb-3">
            <button type="submit" class="btn btn-primary">Generate QR Code</button>
        </div>
    </form>
</div>
</body>
</html>
src/main/resources/templates/show-qr-code.html
<html xmlns:th="https://www.thymeleaf.org">
<head>
    <title>Spring Boot Web Generate QR Code</title>
    <link href="https://cdn.jsdelivr.net/npm/bootstrap@5.1.3/dist/css/bootstrap.min.css" rel="stylesheet">
</head>
<body>
<div class="container">
    <a href="/" class="btn btn-link">Back to home</a>
    <br />
    <img th:src="${qrCodeContent}" />
</div>
</body>
</html>
5.完成源代码并运行 Web 应用程序
最后我们得到了完整的应用程序,其源代码结构如下。

运行应用程序并在浏览器上打开http://localhost:8080/以访问如下网页。
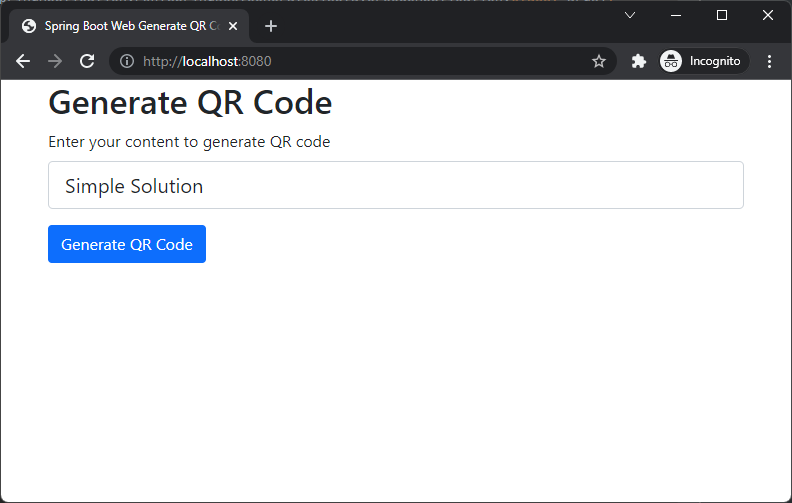
在文本字段中输入您要生成二维码的内容,然后点击生成二维码生成二维码图像,如下所示。

源代码下载地址:SpringBootWeb生成并显示二维码-Java文档类资源-CSDN下载
如果觉得文章不错,可以点赞,关注一下博主啦~ 感谢~


 949
949


 被折叠的 条评论
为什么被折叠?
被折叠的 条评论
为什么被折叠?
 到【灌水乐园】发言


