


spring cloud 1
1服务的注册与发现框架
eureka netflex
consul
nacos
dubbo
2微服务调用框架
ribbon
feign
3熔断器框架
hystrix
4网关
gateway
zuul
5配置中心
config
6服务总线
bus
1初识 Spring Cloud-面试
1.1微服务架构

①"微服务”一词源于 Martin Fowler的名为 Microservices的博文,可以在他的官方博客上找到http://martinfowler.com/articles/microservices.html
②微服务是系统架构上的一种设计风格,它的主旨是将一个原本独立的系统拆分成多个小型服务,这些小型服务都在各自独立的进程中运行,服务之间一般通过 HTTP 的 RESTfuL API 进行通信协作。
③微服务是系统架构上的一种设计风格,它的主旨是将一个原本独立的系统拆分成多个小型服务,这些小型服务都在各自独立的进程中运行,服务之间一般通过 HTTP 的 RESTfuL API 进行通信协作。
④由于有了轻量级的通信协作基础,所以这些微服务可以使用不同的语言来编写。
1.2走进 Spring Cloud
①Spring Cloud 是一系列框架的有序集合。
②Spring Cloud 并没有重复制造轮子,它只是将目前各家公司开发的比较成熟、经得起实际考验的服务框架组合起来。
③通过 Spring Boot 风格进行再封装屏蔽掉了复杂的配置和实现原理,最终给开发者留出了一套简单易懂、易部署和易维护的分布式系统开发工具包。
④它利用Spring Boot的开发便利性巧妙地简化了分布式系统基础设施的开发,如服务发现注册、配置中心、消息总线、负载均衡、 断路器、数据监控等,都可以用Spring Boot的开发风格做到一键启动和部署。
⑤Spring Cloud项目官方网址:https://spring.io/projects/spring-cloud
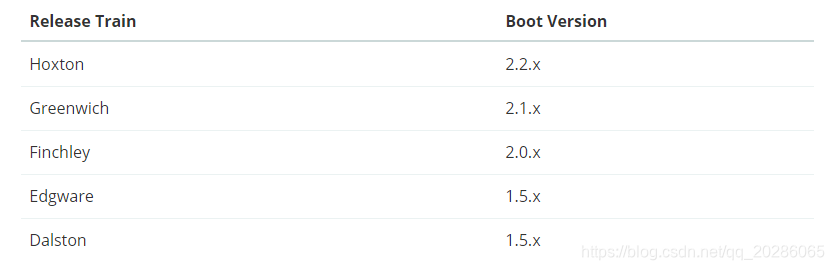
⑥Spring Cloud 版本命名方式采用了伦敦地铁站的名称,同时根据字母表的顺序来对应版本时间顺序,比如:最早的Release版本:Angel,第二个Release版本:Brixton,然后是Camden、Dalston、Edgware,Finchley,Greenwich,Hoxton。
目前最新的是Hoxton版本。
1.3Spring Cloud 与 Dubbo 对比
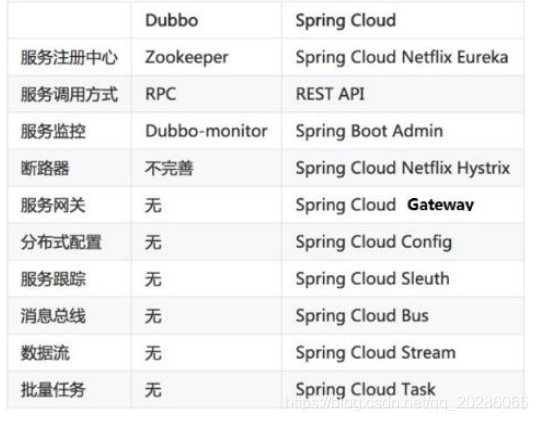
相同点:Spring Cloud 与 Dubbo 都是实现微服务有效的工具。
不同点:
1Dubbo 只是实现了服务治理,而 Spring Cloud 子项目分别覆盖了微服务架构下的众多部件。
2Dubbo 使用 RPC 通讯协议,Spring Cloud 使用 RESTful 完成通信,Dubbo 效率略高于 Spring Cloud。
小结
• 微服务就是将项目的各个模块拆分为可独立运行、部署、测试的架构设计风格。
• Spring 公司将其他公司中微服务架构常用的组件整合起来,并使用 SpringBoot 简化其开发、配置。称为 Spring Cloud
• Spring Cloud 与 Dubbo都是实现微服务有效的工具。Dubbo 性能更好,而 Spring Cloud 功能更全面。
2Spring Cloud 服务治理
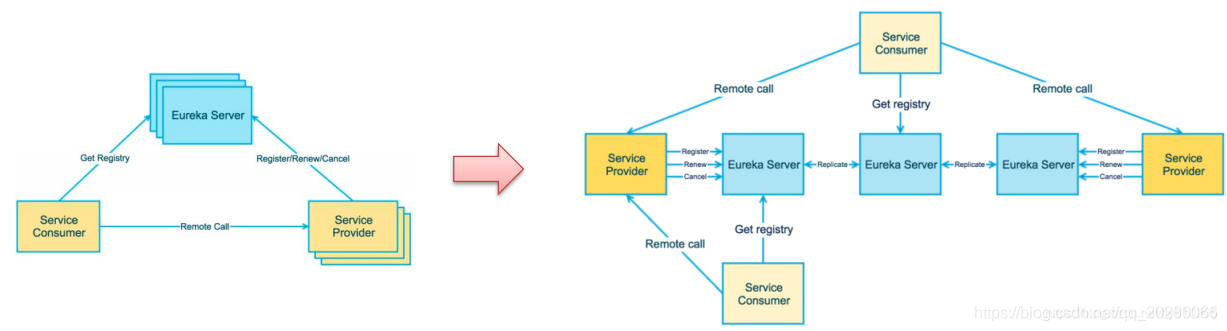
2.1Eureka
概念:
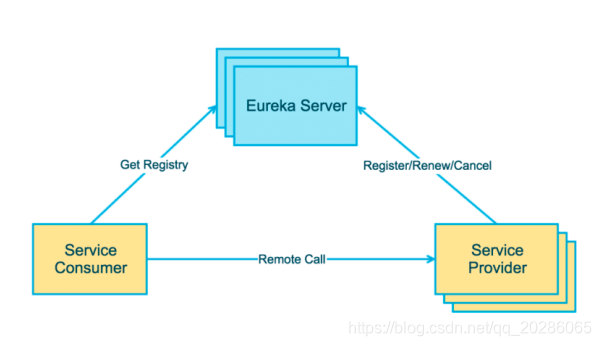
• Eureka 是 Netflix 公司开源的一个服务注册与发现的组件 。
• Eureka 和其他 Netflix 公司的服务组件(例如负载均衡、熔断器、网关等) 一起,被 Spring Cloud 社区整合为Spring-Cloud-Netflix 模块。
• Eureka 包含两个组件:Eureka Server (注册中心) 和 Eureka Client (服务提供者、服务消费者)。

操作:
一、搭建 Provider 和 Consumer 服务。
1父工程 spring-cloud-parent
pom.xml
<?xml version="1.0" encoding="UTF-8"?>
<project xmlns="http://maven.apache.org/POM/4.0.0"
         xmlns:xsi="http://www.w3.org/2001/XMLSchema-instance"
         xsi:schemaLocation="http://maven.apache.org/POM/4.0.0 http://maven.apache.org/xsd/maven-4.0.0.xsd">
    <modelVersion>4.0.0</modelVersion>

    <groupId>com.itheima</groupId>
    <artifactId>spring-cloud-parent</artifactId>
    <packaging>pom</packaging>
    <version>1.0-SNAPSHOT</version>
    <modules>
        <module>eureka-provider</module>
        <module>eureka-consumer</module>
    </modules>


    <!--spring boot 环境 -->
    <parent>
        <groupId>org.springframework.boot</groupId>
        <artifactId>spring-boot-starter-parent</artifactId>
        <version>2.1.0.RELEASE</version>
        <relativePath/>
    </parent>


    <properties>
        <project.build.sourceEncoding>UTF-8</project.build.sourceEncoding>
        <project.reporting.outputEncoding>UTF-8</project.reporting.outputEncoding>
        <java.version>1.8</java.version>
    </properties>

</project>
2生产者 eureka-provider
pom.xml
<?xml version="1.0" encoding="UTF-8"?>
<project xmlns="http://maven.apache.org/POM/4.0.0"
         xmlns:xsi="http://www.w3.org/2001/XMLSchema-instance"
         xsi:schemaLocation="http://maven.apache.org/POM/4.0.0 http://maven.apache.org/xsd/maven-4.0.0.xsd">
    <parent>
        <artifactId>spring-cloud-parent</artifactId>
        <groupId>com.itheima</groupId>
        <version>1.0-SNAPSHOT</version>
    </parent>
    <modelVersion>4.0.0</modelVersion>
    <artifactId>eureka-provider</artifactId>

    <dependencies>
        <!--spring boot web-->
        <dependency>
            <groupId>org.springframework.boot</groupId>
            <artifactId>spring-boot-starter-web</artifactId>
        </dependency>
    </dependencies>
</project>
ProviderApp
package com.itheima.provider;

import org.springframework.boot.SpringApplication;
import org.springframework.boot.autoconfigure.SpringBootApplication;

/**
 * creste by itheima.itcast
 */
@SpringBootApplication
public class ProviderApp {
    public static void main(String[] args) {
        SpringApplication.run(ProviderApp.class,args);
    }
}
Goods
package com.itheima.provider.domain;

/**
 * 商品实体类
 */
public class Goods {

    private int id;
    private String title;//商品标题
    private double price;//商品价格
    private int count;//商品库存

    public Goods() {
    }

    public Goods(int id, String title, double price, int count) {
        this.id = id;
        this.title = title;
        this.price = price;
        this.count = count;
    }

    public int getId() {
        return id;
    }

    public void setId(int id) {
        this.id = id;
    }

    public String getTitle() {
        return title;
    }

    public void setTitle(String title) {
        this.title = title;
    }

    public double getPrice() {
        return price;
    }

    public void setPrice(double price) {
        this.price = price;
    }

    public int getCount() {
        return count;
    }

    public void setCount(int count) {
        this.count = count;
    }
}
GoodsController
package com.itheima.provider.controller;

import com.itheima.provider.domain.Goods;
import com.itheima.provider.service.GoodsService;
import org.springframework.beans.factory.annotation.Autowired;
import org.springframework.web.bind.annotation.GetMapping;
import org.springframework.web.bind.annotation.PathVariable;
import org.springframework.web.bind.annotation.RequestMapping;
import org.springframework.web.bind.annotation.RestController;

/**
 * Goods Controller 服务提供方
 */

@RestController
@RequestMapping("/goods")
public class GoodsController {

    @Autowired
    private GoodsService goodsService;

    @GetMapping("/findOne/{id}")
    public Goods findOne(@PathVariable("id") int id){

        Goods goods = goodsService.findOne(id);

        return goods;
    }
}
GoodsService
package com.itheima.provider.service;

import com.itheima.provider.dao.GoodsDao;
import com.itheima.provider.domain.Goods;
import org.springframework.beans.factory.annotation.Autowired;
import org.springframework.stereotype.Service;

/**
 * Goods 业务层
 */
@Service
public class GoodsService {

    @Autowired
    private GoodsDao goodsDao;


    /**
     * 根据id查询
     * @param id
     * @return
     */
    public Goods findOne(int id){
        return goodsDao.findOne(id);
    }
}
GoodsDao
package com.itheima.provider.dao;

import com.itheima.provider.domain.Goods;
import org.springframework.stereotype.Repository;

import javax.validation.ReportAsSingleViolation;

/**
 * 商品Dao
 */

@Repository
public class GoodsDao {


    public Goods findOne(int id){
        return new Goods(1,"华为手机",3999,10000);
    }
}
application.yml
server:
  port: 8000
测试:
3消费者 eureka-consumer
pom.xml
<?xml version="1.0" encoding="UTF-8"?>
<project xmlns="http://maven.apache.org/POM/4.0.0"
         xmlns:xsi="http://www.w3.org/2001/XMLSchema-instance"
         xsi:schemaLocation="http://maven.apache.org/POM/4.0.0 http://maven.apache.org/xsd/maven-4.0.0.xsd">
    <parent>
        <artifactId>spring-cloud-parent</artifactId>
        <groupId>com.itheima</groupId>
        <version>1.0-SNAPSHOT</version>
    </parent>
    <modelVersion>4.0.0</modelVersion>

    <artifactId>eureka-consumer</artifactId>


    <dependencies>

        <!--spring boot web-->
        <dependency>
            <groupId>org.springframework.boot</groupId>
            <artifactId>spring-boot-starter-web</artifactId>
        </dependency>

    </dependencies>
</project>
Goods
package com.itheima.consumer.domain;

/**
 * 商品实体类
 */
public class Goods {

    private int id;
    private String title;//商品标题
    private double price;//商品价格
    private int count;//商品库存

    public Goods() {
    }

    public Goods(int id, String title, double price, int count) {
        this.id = id;
        this.title = title;
        this.price = price;
        this.count = count;
    }

    public int getId() {
        return id;
    }

    public void setId(int id) {
        this.id = id;
    }

    public String getTitle() {
        return title;
    }

    public void setTitle(String title) {
        this.title = title;
    }

    public double getPrice() {
        return price;
    }

    public void setPrice(double price) {
        this.price = price;
    }

    public int getCount() {
        return count;
    }

    public void setCount(int count) {
        this.count = count;
    }
}
OrderController
package com.itheima.consumer.controller;


import com.itheima.consumer.domain.Goods;
import org.springframework.beans.factory.annotation.Autowired;
import org.springframework.web.bind.annotation.GetMapping;
import org.springframework.web.bind.annotation.PathVariable;
import org.springframework.web.bind.annotation.RequestMapping;
import org.springframework.web.bind.annotation.RestController;


/**
 * 服务的调用方
 */

@RestController
@RequestMapping("/order")
public class OrderController {

    @GetMapping("/goods/{id}")
    public Goods findGoodsById(@PathVariable("id") int id){
        System.out.println("findGoodsById..."+id);


		//远程调用Goods服务中的findOne接口
        return null;
    }
}
application.yml
server:
  port: 9000
测试:
二、使用 RestTemplate 完成远程调用。
- Spring提供的一种简单便捷的模板类,用于在 java 代码里访问 restful 服务。
- 其功能与 HttpClient 类似,但是 RestTemplate 实现更优雅,使用更方便。
consumer工程中
RestTemplateConfig
package com.itheima.consumer.config;


import org.springframework.context.annotation.Bean;
import org.springframework.context.annotation.Configuration;
import org.springframework.web.client.RestTemplate;

@Configuration
public class RestTemplateConfig {


    @Bean
    public RestTemplate restTemplate(){
        return new RestTemplate();
    }
}
OrderController
package com.itheima.consumer.controller;


import com.itheima.consumer.domain.Goods;
import org.springframework.beans.factory.annotation.Autowired;
import org.springframework.web.bind.annotation.GetMapping;
import org.springframework.web.bind.annotation.PathVariable;
import org.springframework.web.bind.annotation.RequestMapping;
import org.springframework.web.bind.annotation.RestController;
import org.springframework.web.client.RestTemplate;

/**
 * 服务的调用方
 */

@RestController
@RequestMapping("/order")
public class OrderController {

    @Autowired
    private RestTemplate restTemplate;

    @GetMapping("/goods/{id}")
    public Goods findGoodsById(@PathVariable("id") int id){
        System.out.println("findGoodsById..."+id);


        /*
            //远程调用Goods服务中的findOne接口
            使用RestTemplate
            1. 定义Bean  restTemplate
            2. 注入Bean
            3. 调用方法
         */

        String url = "http://localhost:8000/goods/findOne/"+id;
        // 3. 调用方法
        Goods goods = restTemplate.getForObject(url, Goods.class);


        return goods;
    }
}
测试:
三、搭建 Eureka Server 服务。
① 创建 eureka-server 模块
② 引入 SpringCloud 和 euraka-server 相关依赖
③ 完成 Eureka Server 相关配置
④ 启动该模块
父工程 pom
<?xml version="1.0" encoding="UTF-8"?>
<project xmlns="http://maven.apache.org/POM/4.0.0"
         xmlns:xsi="http://www.w3.org/2001/XMLSchema-instance"
         xsi:schemaLocation="http://maven.apache.org/POM/4.0.0 http://maven.apache.org/xsd/maven-4.0.0.xsd">
    <modelVersion>4.0.0</modelVersion>

    <groupId>com.itheima</groupId>
    <artifactId>spring-cloud-parent</artifactId>
    <packaging>pom</packaging>
    <version>1.0-SNAPSHOT</version>
    <modules>
        <module>eureka-provider</module>
        <module>eureka-consumer</module>
        <module>eureka-server</module>
    </modules>


    <!--spring boot 环境 -->
    <parent>
        <groupId>org.springframework.boot</groupId>
        <artifactId>spring-boot-starter-parent</artifactId>
        <version>2.1.0.RELEASE</version>
        <relativePath/>
    </parent>


    <properties>
        <project.build.sourceEncoding>UTF-8</project.build.sourceEncoding>
        <project.reporting.outputEncoding>UTF-8</project.reporting.outputEncoding>
        <java.version>1.8</java.version>
        <!--spring cloud 版本-->
        <spring-cloud.version>Greenwich.RELEASE</spring-cloud.version>
    </properties>

    <!--引入Spring Cloud 依赖-->
    <dependencyManagement>
        <dependencies>
            <dependency>
                <groupId>org.springframework.cloud</groupId>
                <artifactId>spring-cloud-dependencies</artifactId>
                <version>${spring-cloud.version}</version>
                <type>pom</type>
                <scope>import</scope>
            </dependency>
        </dependencies>
    </dependencyManagement>

</project>
eureka-server工程
pom
<?xml version="1.0" encoding="UTF-8"?>
<project xmlns="http://maven.apache.org/POM/4.0.0"
         xmlns:xsi="http://www.w3.org/2001/XMLSchema-instance"
         xsi:schemaLocation="http://maven.apache.org/POM/4.0.0 http://maven.apache.org/xsd/maven-4.0.0.xsd">
    <parent>
        <artifactId>spring-cloud-parent</artifactId>
        <groupId>com.itheima</groupId>
        <version>1.0-SNAPSHOT</version>
    </parent>
    <modelVersion>4.0.0</modelVersion>

    <artifactId>eureka-server</artifactId>


    <dependencies>

        <dependency>
            <groupId>org.springframework.boot</groupId>
            <artifactId>spring-boot-starter-web</artifactId>
        </dependency>

        <!-- eureka-server -->
        <dependency>
            <groupId>org.springframework.cloud</groupId>
            <artifactId>spring-cloud-starter-netflix-eureka-server</artifactId>
        </dependency>
    </dependencies>


</project>
EurekaApp
package com.itheima.eureka;

import org.springframework.boot.SpringApplication;
import org.springframework.boot.autoconfigure.SpringBootApplication;
import org.springframework.cloud.netflix.eureka.server.EnableEurekaServer;

@SpringBootApplication
// 启用EurekaServer
@EnableEurekaServer
public class EurekaApp {

    public static void main(String[] args) {
        SpringApplication.run(EurekaApp.class,args);
    }
}
application.yml
server:
  port: 8761

# eureka 配置
# eureka 一共有4部分 配置
# 1. dashboard:eureka的web控制台配置
# 2. server:eureka的服务端配置
# 3. client:eureka的客户端配置
# 4. instance:eureka的实例配置


eureka:
  instance:
    hostname: localhost # 主机名
  client:
    service-url:
      defaultZone: http://${eureka.instance.hostname}:${server.port}/eureka # eureka服务端地址,将来客户端使用该地址和eureka进行通信

    register-with-eureka: false # 是否将自己的路径 注册到eureka上。eureka server 不需要的,eureka provider client 需要
    fetch-registry: false # 是否需要从eureka中抓取路径。eureka server 不需要的,eureka consumer client 需要
**测试: ** 访问 localhost:8761

四、改造 Provider 和 Consumer 称为 Eureka Client。
① 引 eureka-client 相关依赖
② 完成 eureka client 相关配置
③ 启动 测试
Provider工程
pom
<!-- eureka-client -->
<dependency>
    <groupId>org.springframework.cloud</groupId>
    <artifactId>spring-cloud-starter-netflix-eureka-client</artifactId>
</dependency>
ProviderApp
@EnableEurekaClient
application.yml
server:
  port: 8001


eureka:
  instance:
    hostname: localhost # 主机名
  client:
    service-url:
      defaultZone: http://localhost:8761/eureka # eureka服务端地址,将来客户端使用该地址和eureka进行通信
spring:
  application:
    name: eureka-provider # 设置当前应用的名称。将来会在eureka中Application显示。将来需要使用该名称来获取路径
Consumer
pom
<!-- eureka-client -->
<dependency>
    <groupId>org.springframework.cloud</groupId>
    <artifactId>spring-cloud-starter-netflix-eureka-client</artifactId>
</dependency>
ConsumerApp
package com.itheima.consumer;

import org.springframework.boot.SpringApplication;
import org.springframework.boot.autoconfigure.SpringBootApplication;
import org.springframework.cloud.client.discovery.EnableDiscoveryClient;
import org.springframework.cloud.netflix.eureka.EnableEurekaClient;

@EnableDiscoveryClient // 激活DiscoveryClient
@EnableEurekaClient
@SpringBootApplication
public class ConsumerApp {


    public static void main(String[] args) {
        SpringApplication.run(ConsumerApp.class,args);
    }
}
application.yml
server:
  port: 9000

eureka:
  instance:
    hostname: localhost # 主机名
  client:
    service-url:
      defaultZone: http://localhost:8761/eureka # eureka服务端地址,将来客户端使用该地址和eureka进行通信
spring:
  application:
    name: eureka-consumer # 设置当前应用的名称。将来会在eureka中Application显示。将来需要使用该名称来获取路径
五、Consumer 服务 通过从 Eureka Server 中抓取 Provider 地址,完成远程调用。
Consumer
OrderController
package com.itheima.consumer.controller;


import com.itheima.consumer.domain.Goods;
import org.springframework.beans.factory.annotation.Autowired;
import org.springframework.cloud.client.ServiceInstance;
import org.springframework.cloud.client.discovery.DiscoveryClient;
import org.springframework.web.bind.annotation.GetMapping;
import org.springframework.web.bind.annotation.PathVariable;
import org.springframework.web.bind.annotation.RequestMapping;
import org.springframework.web.bind.annotation.RestController;
import org.springframework.web.client.RestTemplate;

import java.util.List;

/**
 * 服务的调用方
 */

@RestController
@RequestMapping("/order")
public class OrderController {

    @Autowired
    private RestTemplate restTemplate;

    @Autowired
    private DiscoveryClient discoveryClient;

    @GetMapping("/goods/{id}")
    public Goods findGoodsById(@PathVariable("id") int id){
        System.out.println("findGoodsById..."+id);


        /*
            //远程调用Goods服务中的findOne接口
            使用RestTemplate
            1. 定义Bean  restTemplate
            2. 注入Bean
            3. 调用方法
         */

        /*
            动态从Eureka Server 中获取 provider 的 ip 和端口
             1. 注入 DiscoveryClient 对象.激活
             2. 调用方法


         */

        //演示discoveryClient 使用
        List<ServiceInstance> instances = discoveryClient.getInstances("EUREKA-PROVIDER");

        //判断集合是否有数据
        if(instances == null || instances.size() == 0){
            //集合没有数据
            return null;
        }

        ServiceInstance instance = instances.get(0);
        String host = instance.getHost();//获取ip
        int port = instance.getPort();//获取端口

        System.out.println(host);
        System.out.println(port);

        String url = "http://"+host+":"+port+"/goods/findOne/"+id;
        // 3. 调用方法
        Goods goods = restTemplate.getForObject(url, Goods.class);


        return goods;
    }
}
六、Euraka配置详解
Eureka包含四个部分的配置
- instance:当前Eureka Instance实例信息配置
- client:Eureka Client客户端特性配置
- server:Eureka Server注册中心特性配置
- dashboard:Eureka Server注册中心仪表盘配置
1、Eureka Instance实例信息配置
eureka:
    instance:
        hostname: localhost # 主机名
        prefer-ip-address: # 是否将自己的ip注册到eureka中,默认false 注册 主机名
        ip-address: # 设置当前实例ip
        instance-id: # 修改instance-id显示
        lease-renewal-interval-in-seconds: 30 # 每一次eureka client 向 eureka server发送心跳的时间间隔
        lease-expiration-duration-in-seconds: 90 # 如果90秒内eureka server没有收到eureka client的心跳包,则剔除该服务
Eureka Instance的配置信息全部保存在org.springframework.cloud.netflix.eureka.EurekaInstanceConfigBean配置类里,实际上它是com.netflix.appinfo.EurekaInstanceConfig的实现类,替代了netflix的com.netflix.appinfo.CloudInstanceConfig的默认实现。
Eureka Instance的配置信息全部以eureka.instance.xxx的格式配置。
配置列表
- appname = unknown
应用名,首先获取spring.application.name的值,如果取值为空,则取默认unknown。
- appGroupName = null
应用组名
- instanceEnabledOnit = false
实例注册到Eureka上是,是否立刻开启通讯。有时候应用在准备好服务之前需要一些预处理。
- nonSecurePort = 80
非安全的端口
- securePort = 443
安全端口
- nonSecurePortEnabled = true
是否开启非安全端口通讯
- securePortEnabled = false
是否开启安全端口通讯
- leaseRenewalIntervalInSeconds = 30
实例续约间隔时间
- leaseExpirationDurationInSeconds = 90
实例超时时间,表示最大leaseExpirationDurationInSeconds秒后没有续约,Server就认为他不可用了,随之就会将其剔除。
- virtualHostName = unknown
虚拟主机名,首先获取spring.application.name的值,如果取值为空,则取默认unknown。
- instanceId
注册到eureka上的唯一实例ID,不能与相同appname的其他实例重复。
- secureVirtualHostName = unknown
安全虚拟主机名,首先获取spring.application.name的值,如果取值为空,则取默认unknown。
- metadataMap = new HashMap();
实例元数据,可以供其他实例使用。比如spring-boot-admin在监控时,获取实例的上下文和端口。
- dataCenterInfo = new MyDataCenterInfo(DataCenterInfo.Name.MyOwn);
实例部署的数据中心。如AWS、MyOwn。
- ipAddress=null
实例的IP地址
- statusPageUrlPath = “/actuator/info”
实例状态页相对url
- statusPageUrl = null
实例状态页绝对URL
- homePageUrlPath = “/”
实例主页相对URL
- homePageUrl = null
实例主页绝对URL
- healthCheckUrlUrlPath = “/actuator/health”
实例健康检查相对URL
- healthCheckUrl = null
实例健康检查绝对URL
- secureHealthCheckUrl = null
实例安全的健康检查绝对URL
- namespace = “eureka”
配置属性的命名空间(Spring Cloud中被忽略)
- hostname = null
主机名,不配置的时候讲根据操作系统的主机名来获取
- preferIpAddress = false
是否优先使用IP地址作为主机名的标识
2、Eureka Client客户端特性配置
eureka:
    client:
        service-url:
       		 # eureka服务端地址,将来客户端使用该地址和eureka进行通信
        	defaultZone:
        register-with-eureka: # 是否将自己的路径 注册到eureka上。
        fetch-registry: # 是否需要从eureka中抓取数据。
Eureka Client客户端特性配置是对作为Eureka客户端的特性配置,包括Eureka注册中心,本身也是一个Eureka Client。
Eureka Client特性配置全部在org.springframework.cloud.netflix.eureka.EurekaClientConfigBean中,实际上它是com.netflix.discovery.EurekaClientConfig的实现类,替代了netxflix的默认实现。
Eureka Client客户端特性配置全部以eureka.client.xxx的格式配置。
配置列表
- enabled=true
是否启用Eureka client。
- registryFetchIntervalSeconds=30
定时从Eureka Server拉取服务注册信息的间隔时间
- instanceInfoReplicationIntervalSeconds=30
定时将实例信息(如果变化了)复制到Eureka Server的间隔时间。(InstanceInfoReplicator线程)
- initialInstanceInfoReplicationIntervalSeconds=40
首次将实例信息复制到Eureka Server的延迟时间。(InstanceInfoReplicator线程)
- eurekaServiceUrlPollIntervalSeconds=300
拉取Eureka Server地址的间隔时间(Eureka Server有可能增减)
- proxyPort=null
Eureka Server的代理端口
- proxyHost=null
Eureka Server的代理主机名
- proxyUserName=null
Eureka Server的代理用户名
- proxyPassword=null
Eureka Server的代理密码
- eurekaServerReadTimeoutSeconds=8
从Eureka Server读取信息的超时时间
- eurekaServerConnectTimeoutSeconds=5
连接Eureka Server的超时时间
- backupRegistryImpl=null
Eureka Client第一次启动时获取服务注册信息的调用的回溯实现。Eureka Client启动时首次会检查有没有BackupRegistry的实现类,如果有实现类,则优先从这个实现类里获取服务注册信息。
- eurekaServerTotalConnections=200
Eureka client连接Eureka Server的链接总数
- eurekaServerTotalConnectionsPerHost=50
Eureka client连接单台Eureka Server的链接总数
- eurekaServerURLContext=null
当Eureka server的列表在DNS中时,Eureka Server的上下文路径。如http://xxxx/eureka。
- eurekaServerPort=null
当Eureka server的列表在DNS中时,Eureka Server的端口。
- eurekaServerDNSName=null
当Eureka server的列表在DNS中时,且要通过DNSName获取Eureka Server列表时,DNS名字。
- region=“us-east-1”
实例所属区域。
- eurekaConnectionIdleTimeoutSeconds = 30
Eureka Client和Eureka Server之间的Http连接的空闲超时时间。
- heartbeatExecutorThreadPoolSize=2
心跳(续约)执行器线程池大小。
- heartbeatExecutorExponentialBackOffBound=10
心跳执行器在续约过程中超时后的再次执行续约的最大延迟倍数。默认最大延迟时间=10 * eureka.instance.leaseRenewalIntervalInSeconds
- cacheRefreshExecutorThreadPoolSize=2
cacheRefreshExecutord的线程池大小(获取注册信息)
- cacheRefreshExecutorExponentialBackOffBound=10
cacheRefreshExecutord的再次执行的最大延迟倍数。默认最大延迟时间=10 *eureka.client.registryFetchIntervalSeconds
- serviceUrl= new HashMap();serviceUrl.put(DEFAULT_ZONE, DEFAULT_URL);
Eureka Server的分区地址。默认添加了一个defualtZone。也就是最常用的配置eureka.client.service-url.defaultZone=xxx
- registerWithEureka=true
是否注册到Eureka Server。
- preferSameZoneEureka=true
是否使用相同Zone下的Eureka server。
- logDeltaDiff=false
是否记录Eureka Server和Eureka Client之间注册信息的差异
- disableDelta=false
是否开启增量同步注册信息。
- fetchRemoteRegionsRegistry=null
获取注册服务的远程地区,以逗号隔开。
- availabilityZones=new HashMap()
可用分区列表。用逗号隔开。
- filterOnlyUpInstances = true
是否只拉取UP状态的实例。
- fetchRegistry=true
是否拉取注册信息。
- shouldUnregisterOnShutdown = true
是否在停止服务的时候向Eureka Server发起Cancel指令。
- shouldEnforceRegistrationAtInit = false
是否在初始化过程中注册服务。
3、Eureka Server注册中心端配置
eureka:
    server: #是否开启自我保护机制,默认true
        enable-self-preservation: #清理间隔(单位毫秒,默认是60*1000)
        eviction-interval-timer-in-ms: 2月
	instance:
        lease-renewal-interval-in-seconds: 30 # 每一次eureka client 向 eureka server发送心跳的时间间隔
        lease-expiration-duration-in-seconds: 90 # 如果90秒内eureka server没有收到eureka client的心跳包,则剔除该服务
Eureka Server注册中心端的配置是对注册中心的特性配置。Eureka Server的配置全部在org.springframework.cloud.netflix.eureka.server.EurekaServerConfigBean里,实际上它是com.netflix.eureka.EurekaServerConfig的实现类,替代了netflix的默认实现。
Eureka Server的配置全部以eureka.server.xxx的格式进行配置。
配置列表
- enableSelfPreservation=true
是否开启自我保护
- renewalPercentThreshold = 0.85
自我保护续约百分比阀值因子。如果实际续约数小于续约数阀值,则开启自我保护
- renewalThresholdUpdateIntervalMs = 15 * 60 * 1000
续约数阀值更新频率。
- peerEurekaNodesUpdateIntervalMs = 10 * 60 * 1000
Eureka Server节点更新频率。
- enableReplicatedRequestCompression = false
是否启用复制请求压缩。
- waitTimeInMsWhenSyncEmpty=5 * 60 * 1000
当从其他节点同步实例信息为空时等待的时间。
- peerNodeConnectTimeoutMs=200
节点间连接的超时时间。
- peerNodeReadTimeoutMs=200
节点间读取信息的超时时间。
- peerNodeTotalConnections=1000
节点间连接总数。
- peerNodeTotalConnectionsPerHost = 500;
单个节点间连接总数。
- peerNodeConnectionIdleTimeoutSeconds = 30;
节点间连接空闲超时时间。
- retentionTimeInMSInDeltaQueue = 3 * MINUTES;
增量队列的缓存时间。
- deltaRetentionTimerIntervalInMs = 30 * 1000;
清理增量队列中过期的频率。
- evictionIntervalTimerInMs = 60 * 1000;
剔除任务频率。
- responseCacheAutoExpirationInSeconds = 180;
注册列表缓存超时时间(当注册列表没有变化时)
- responseCacheUpdateIntervalMs = 30 * 1000;
注册列表缓存更新频率。
- useReadOnlyResponseCache = true;
是否开启注册列表的二级缓存。
- disableDelta=false。
是否为client提供增量信息。
- maxThreadsForStatusReplication = 1;
状态同步的最大线程数。
- maxElementsInStatusReplicationPool = 10000;
状态同步队列的最大容量。
- syncWhenTimestampDiffers = true;
当时间差异时是否同步。
- registrySyncRetries = 0;
注册信息同步重试次数。
- registrySyncRetryWaitMs = 30 * 1000;
注册信息同步重试期间的时间间隔。
- maxElementsInPeerReplicationPool = 10000;
节点间同步事件的最大容量。
- minThreadsForPeerReplication = 5;
节点间同步的最小线程数。
- maxThreadsForPeerReplication = 20;
节点间同步的最大线程数。
- maxTimeForReplication = 30000;
节点间同步的最大时间,单位为毫秒。
- disableDeltaForRemoteRegions = false;
是否启用远程区域增量。
- remoteRegionConnectTimeoutMs = 1000;
远程区域连接超时时间。
- remoteRegionReadTimeoutMs = 1000;
远程区域读取超时时间。
- remoteRegionTotalConnections = 1000;
远程区域最大连接数
- remoteRegionTotalConnectionsPerHost = 500;
远程区域单机连接数
- remoteRegionConnectionIdleTimeoutSeconds = 30;
远程区域连接空闲超时时间。
- remoteRegionRegistryFetchInterval = 30;
远程区域注册信息拉取频率。
- remoteRegionFetchThreadPoolSize = 20;
远程区域注册信息线程数。
4、Eureka Server注册中心仪表盘配置
eureka:
    dashboard:
        enabled: true # 是否启用eureka web控制台
        path: / # 设置eureka web控制台默认访问路径
注册中心仪表盘的配置主要是控制注册中心的可视化展示。以eureka.dashboard.xxx的格式配置。
- path="/"
仪表盘访问路径
- enabled=true
是否启用仪表盘
改造 provider
server:
  port: 8001


eureka:
  instance:
    hostname: localhost # 主机名
    prefer-ip-address: true # 将当前实例的ip注册到eureka server 中。默认是false 注册主机名
    ip-address: 127.0.0.1 # 设置当前实例的ip
    instance-id: ${eureka.instance.ip-address}:${spring.application.name}:${server.port} # 设置web控制台显示的 实例id
    lease-renewal-interval-in-seconds: 3 # 每隔3 秒发一次心跳包
    lease-expiration-duration-in-seconds: 9 # 如果9秒没有发心跳包,服务器呀,你把我干掉吧~
  client:
    service-url:
      defaultZone: http://localhost:8761/eureka # eureka服务端地址,将来客户端使用该地址和eureka进行通信
spring:
  application:
    name: eureka-provider # 设置当前应用的名称。将来会在eureka中Application显示。将来需要使用该名称来获取路径
consumer
server:
  port: 9000


eureka:
  instance:
    hostname: localhost # 主机名
  client:
    service-url:
      defaultZone: http://localhost:8761/eureka # eureka服务端地址,将来客户端使用该地址和eureka进行通信
spring:
  application:
    name: eureka-consumer # 设置当前应用的名称。将来会在eureka中Application显示。将来需要使用该名称来获取路径
server
server:
  port: 8761

# eureka 配置
# eureka 一共有4部分 配置
# 1. dashboard:eureka的web控制台配置
# 2. server:eureka的服务端配置
# 3. client:eureka的客户端配置
# 4. instance:eureka的实例配置


eureka:
  instance:
    hostname: localhost # 主机名
  client:
    service-url:
      defaultZone: http://${eureka.instance.hostname}:${server.port}/eureka # eureka服务端地址,将来客户端使用该地址和eureka进行通信
    register-with-eureka: false # 是否将自己的路径 注册到eureka上。eureka server 不需要的,eureka provider client 需要
    fetch-registry: false # 是否需要从eureka中抓取路径。eureka server 不需要的,eureka consumer client 需要
  server:
    enable-self-preservation: false # 关闭自我保护机制
    eviction-interval-timer-in-ms: 3000 # 检查服务的时间间隔
七、高可用
-
准备两个Eureka Server
-
分别进行配置,相互注册
-
Eureka Client 分别注册到这两个 Eureka Server中
创建eureka-server1
server:
  port: 8761


eureka:
  instance:
    hostname: eureka-server1 # 主机名
  client:
    service-url:
      defaultZone: http://eureka-server2:8762/eureka
    register-with-eureka: true # 是否将自己的路径 注册到eureka上。eureka server 不需要的,eureka provider client 需要
    fetch-registry: true # 是否需要从eureka中抓取路径。eureka server 不需要的,eureka consumer client 需要


spring:
  application:
    name: eureka-server-ha
创建eureka-server2
server:
  port: 8762


eureka:
  instance:
    hostname: eureka-server2 # 主机名
  client:
    service-url:
      defaultZone: http://eureka-server1:8761/eureka

    register-with-eureka: true # 是否将自己的路径 注册到eureka上。eureka server 不需要的,eureka provider client 需要
    fetch-registry: true # 是否需要从eureka中抓取路径。eureka server 不需要的,eureka consumer client 需要
spring:
  application:
    name: eureka-server-ha
修改:C:\Windows\System32\drivers\etc\hosts
127.0.0.1 eureka-server1
127.0.0.1 eureka-server2

测试:
provider
server:
  port: 8001


eureka:
  instance:
    hostname: localhost # 主机名
    prefer-ip-address: true # 将当前实例的ip注册到eureka server 中。默认是false 注册主机名
    ip-address: 127.0.0.1 # 设置当前实例的ip
    instance-id: ${eureka.instance.ip-address}:${spring.application.name}:${server.port} # 设置web控制台显示的 实例id
    lease-renewal-interval-in-seconds: 3 # 每隔3 秒发一次心跳包
    lease-expiration-duration-in-seconds: 9 # 如果9秒没有发心跳包,服务器呀,你把我干掉吧~
  client:
    service-url:
      defaultZone: http://eureka-server1:8761/eureka,http://eureka-server2:8762/eureka # eureka服务端地址,将来客户端使用该地址和eureka进行通信
spring:
  application:
    name: eureka-provider # 设置当前应用的名称。将来会在eureka中Application显示。将来需要使用该名称来获取路径
consumer
server:
  port: 9000


eureka:
  instance:
    hostname: localhost # 主机名
  client:
    service-url:
      defaultZone:  http://eureka-server1:8761/eureka,http://eureka-server2:8762/eureka  # eureka服务端地址,将来客户端使用该地址和eureka进行通信
spring:
  application:
    name: eureka-consumer # 设置当前应用的名称。将来会在eureka中Application显示。将来需要使用该名称来获取路径
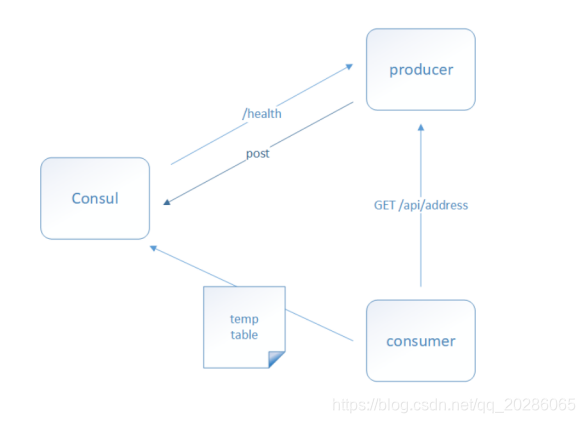
2.2Consul
2.2.1是什么:
- Consul 是由 HashiCorp 基于 Go 语言开发的,支持多数据中心,分布式高可用的服务发布和注册服务软件。
- 用于实现分布式系统的服务发现与配置。
- 使用起来也较 为简单。具有天然可移植性(支持Linux、windows和Mac OS X);安装包仅包含一个可执行文件,方便部署 。
- 官网地址: https://www.consul.io
2.2.2怎么用:
看资料中的代码即可
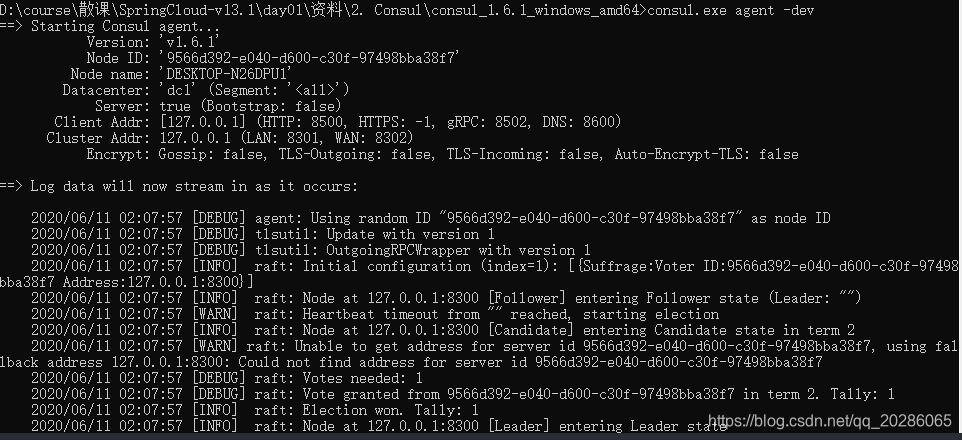
1准备 cmd输入:consul.exe agent -dev
2搭建 Provider 和 Consumer 服务。
3 使用 RestTemplate 完成远程调用。
4 将Provider服务注册到Consul中。
pom
<?xml version="1.0" encoding="UTF-8"?>
<project xmlns="http://maven.apache.org/POM/4.0.0"
         xmlns:xsi="http://www.w3.org/2001/XMLSchema-instance"
         xsi:schemaLocation="http://maven.apache.org/POM/4.0.0 http://maven.apache.org/xsd/maven-4.0.0.xsd">
    <parent>
        <artifactId>spring-cloud-parent</artifactId>
        <groupId>com.itheima</groupId>
        <version>1.0-SNAPSHOT</version>
    </parent>
    <modelVersion>4.0.0</modelVersion>

    <artifactId>consul-provider</artifactId>


    <dependencies>

        <!--consul 客户端-->
        <dependency>
            <groupId>org.springframework.cloud</groupId>
            <artifactId>spring-cloud-starter-consul-discovery</artifactId>
        </dependency>

        <dependency>
            <groupId>org.springframework.boot</groupId>
            <artifactId>spring-boot-starter-web</artifactId>
        </dependency>

        <dependency>
            <groupId>org.springframework.boot</groupId>
            <artifactId>spring-boot-starter-test</artifactId>
            <scope>test</scope>
        </dependency>

        <dependency>
            <groupId>org.springframework.boot</groupId>
            <artifactId>spring-boot-starter-actuator</artifactId>
        </dependency>

    </dependencies>
</project>
application.yml
server:
  port: 8000
spring:
  cloud:
    consul:
      host: localhost # consul 服务端的 ip
      port: 8500 # consul 服务端的端口 默认8500
      discovery:
        service-name: ${spring.application.name} # 当前应用注册到consul的名称
        prefer-ip-address: true # 注册ip
  application:
    name: consul-provider # 应用名称
5 Consumer 服务 通过从 Consul 中抓取 Provider 地址完成远程调用
pom
<?xml version="1.0" encoding="UTF-8"?>
<project xmlns="http://maven.apache.org/POM/4.0.0"
         xmlns:xsi="http://www.w3.org/2001/XMLSchema-instance"
         xsi:schemaLocation="http://maven.apache.org/POM/4.0.0 http://maven.apache.org/xsd/maven-4.0.0.xsd">
    <parent>
        <artifactId>spring-cloud-parent</artifactId>
        <groupId>com.itheima</groupId>
        <version>1.0-SNAPSHOT</version>
    </parent>
    <modelVersion>4.0.0</modelVersion>

    <artifactId>consul-consumer</artifactId>


    <dependencies>
        <!--consul 客户端-->
        <dependency>
            <groupId>org.springframework.cloud</groupId>
            <artifactId>spring-cloud-starter-consul-discovery</artifactId>
        </dependency>
        <dependency>
            <groupId>org.springframework.boot</groupId>
            <artifactId>spring-boot-starter-web</artifactId>
        </dependency>

        <dependency>
            <groupId>org.springframework.boot</groupId>
            <artifactId>spring-boot-starter-test</artifactId>
            <scope>test</scope>
        </dependency>

        <dependency>
            <groupId>org.springframework.boot</groupId>
            <artifactId>spring-boot-starter-actuator</artifactId>
        </dependency>

    </dependencies>

</project>
application.yml
server:
  port: 9000


spring:
  cloud:
    consul:
      host: localhost # consul 服务端的 ip
      port: 8500 # consul 服务端的端口 默认8500
      discovery:
        service-name: ${spring.application.name} # 当前应用注册到consul的名称
        prefer-ip-address: true # 注册ip

  application:
    name: consul-consumer # 应用名称
OrderController
package com.itheima.consul.controller;


import com.itheima.consul.domain.Goods;
import org.springframework.beans.factory.annotation.Autowired;
import org.springframework.cloud.client.ServiceInstance;
import org.springframework.cloud.client.discovery.DiscoveryClient;
import org.springframework.web.bind.annotation.GetMapping;
import org.springframework.web.bind.annotation.PathVariable;
import org.springframework.web.bind.annotation.RequestMapping;
import org.springframework.web.bind.annotation.RestController;
import org.springframework.web.client.RestTemplate;

import java.util.List;

/**
 * 服务的调用方
 */

@RestController
@RequestMapping("/order")
public class OrderController {

    @Autowired
    private RestTemplate restTemplate;

    @Autowired
    private DiscoveryClient discoveryClient;

    @GetMapping("/goods/{id}")
    public Goods findGoodsById(@PathVariable("id") int id){
        //演示discoveryClient 使用
        List<ServiceInstance> instances = discoveryClient.getInstances("consul-PROVIDER");

        //判断集合是否有数据
        if(instances == null || instances.size() == 0){
            //集合没有数据
            return null;
        }

        ServiceInstance instance = instances.get(0);
        String host = instance.getHost();//获取ip
        int port = instance.getPort();//获取端口

        System.out.println(host);
        System.out.println(port);

        String url = "http://"+host+":"+port+"/goods/findOne/"+id;
        // 3. 调用方法
        Goods goods = restTemplate.getForObject(url, Goods.class);

        return goods;
    }
}
2.3Nacos
2.3.1是什么:
- Nacos(Dynamic Naming and Configuration Service) 是阿里巴巴2018年7月开源的项目。
- 它专注于服务发现和配置管理领域 致力于帮助您发现、配置和管理微服务。Nacos 支持几乎所有主流类型的“服务”的发现、配置和管理。
- 一句话概括就是Nacos = Spring Cloud注册中心 + Spring Cloud配置中心。
- 官网:https://nacos.io/
- 下载地址: https://github.com/alibaba/nacos/releases
2.3.2怎么用
看资料中的代码即可
1环境准备。双击startup.cmd

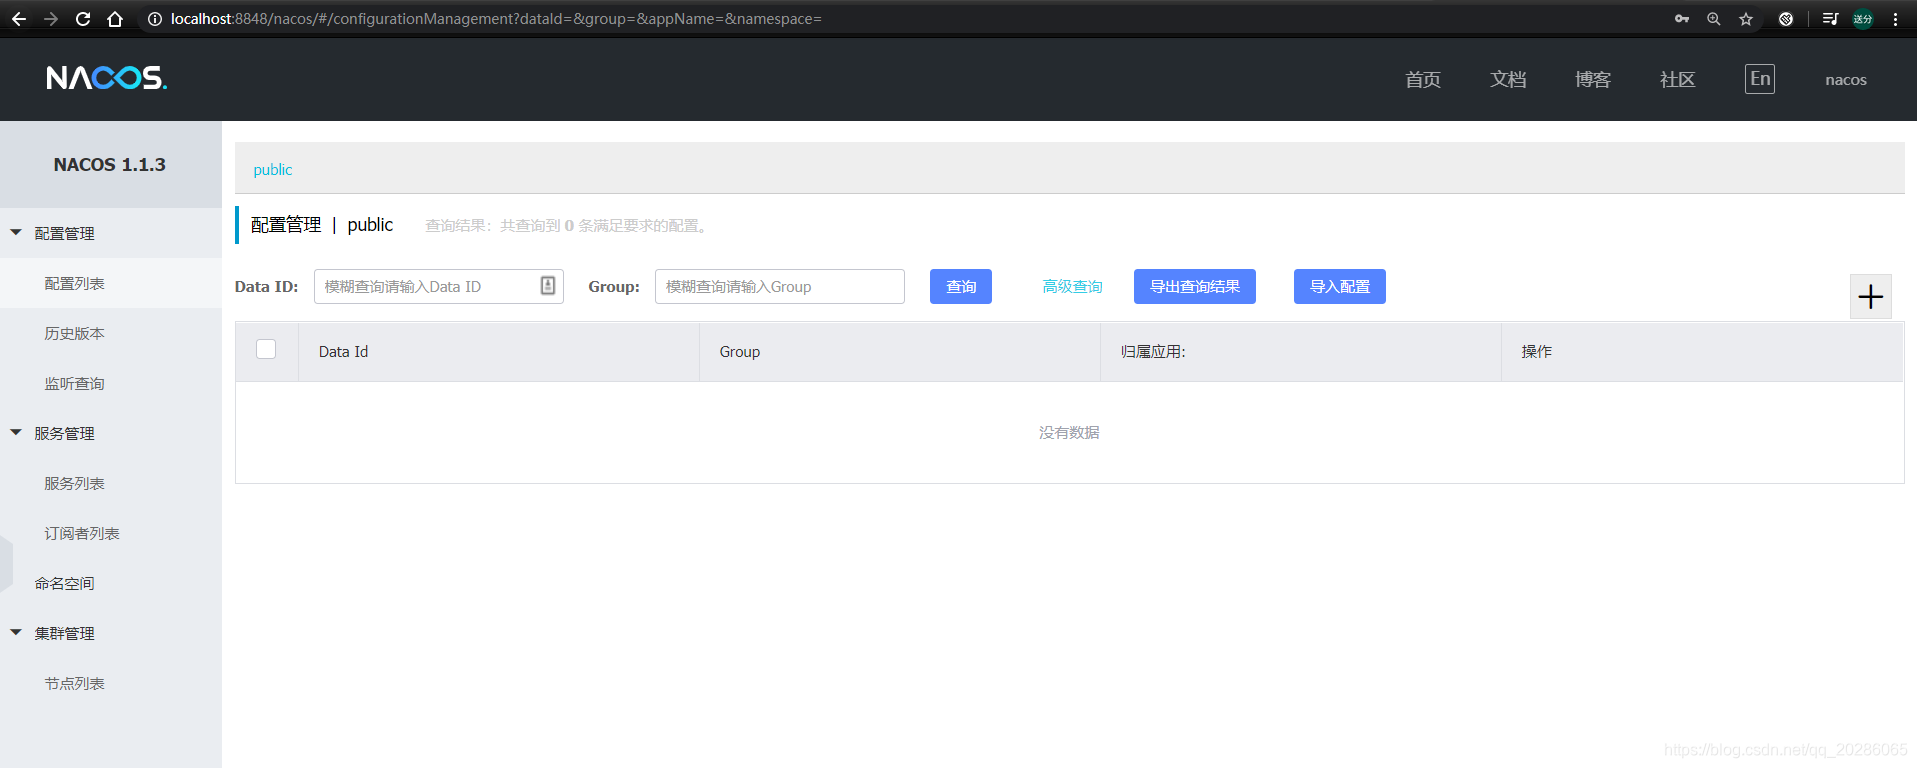
2访问控制台
http://localhost:8848/nacos/#/login 用户名 密码为nacos
3搭建 Provider 和 Consumer 服务。
4 使用 RestTemplate 完成远程调用。
5 将Provider服务注册到Consul中。
pom
<?xml version="1.0" encoding="UTF-8"?>
<project xmlns="http://maven.apache.org/POM/4.0.0"
         xmlns:xsi="http://www.w3.org/2001/XMLSchema-instance"
         xsi:schemaLocation="http://maven.apache.org/POM/4.0.0 http://maven.apache.org/xsd/maven-4.0.0.xsd">
    <parent>
        <artifactId>spring-cloud-parent</artifactId>
        <groupId>com.itheima</groupId>
        <version>1.0-SNAPSHOT</version>
    </parent>
    <modelVersion>4.0.0</modelVersion>

    <artifactId>nacos-provider</artifactId>


    <dependencies>

        <!--nacos-->
        <dependency>
            <groupId>org.springframework.cloud</groupId>
            <artifactId>spring-cloud-starter-alibaba-nacos-discovery</artifactId>
            <version>0.2.2.RELEASE</version>
        </dependency>
        <dependency>
            <groupId>com.alibaba.nacos</groupId>
            <artifactId>nacos-client</artifactId>
            <version>1.1.0</version>
        </dependency>


        <dependency>
            <groupId>org.springframework.boot</groupId>
            <artifactId>spring-boot-starter-web</artifactId>
        </dependency>

        <dependency>
            <groupId>org.springframework.boot</groupId>
            <artifactId>spring-boot-starter-test</artifactId>
            <scope>test</scope>
        </dependency>

        <dependency>
            <groupId>org.springframework.boot</groupId>
            <artifactId>spring-boot-starter-actuator</artifactId>
        </dependency>
    </dependencies>

</project>
application.yml
server:
  port: 8000

spring:
  cloud:
    nacos:
      discovery:
        server-addr:  127.0.0.1:8848 # 配置nacos 服务端地址
  application:
    name: nacos-provider # 服务名称
5 Consumer 服务 通过从 Consul 中抓取 Provider 地址完成远程调用
pom
<?xml version="1.0" encoding="UTF-8"?>
<project xmlns="http://maven.apache.org/POM/4.0.0"
         xmlns:xsi="http://www.w3.org/2001/XMLSchema-instance"
         xsi:schemaLocation="http://maven.apache.org/POM/4.0.0 http://maven.apache.org/xsd/maven-4.0.0.xsd">
    <parent>
        <artifactId>spring-cloud-parent</artifactId>
        <groupId>com.itheima</groupId>
        <version>1.0-SNAPSHOT</version>
    </parent>
    <modelVersion>4.0.0</modelVersion>

    <artifactId>nacos-consumer</artifactId>


    <dependencies>

        <!--nacos-->
        <dependency>
            <groupId>org.springframework.cloud</groupId>
            <artifactId>spring-cloud-starter-alibaba-nacos-discovery</artifactId>
            <version>0.2.2.RELEASE</version>
        </dependency>
        <dependency>
            <groupId>com.alibaba.nacos</groupId>
            <artifactId>nacos-client</artifactId>
            <version>1.1.0</version>
        </dependency>


        <dependency>
            <groupId>org.springframework.boot</groupId>
            <artifactId>spring-boot-starter-web</artifactId>
        </dependency>

        <dependency>
            <groupId>org.springframework.boot</groupId>
            <artifactId>spring-boot-starter-test</artifactId>
            <scope>test</scope>
        </dependency>

        <dependency>
            <groupId>org.springframework.boot</groupId>
            <artifactId>spring-boot-starter-actuator</artifactId>
        </dependency>
    </dependencies>
</project>
application.yml
server:
  port: 9000

spring:
  cloud:
    nacos:
      discovery:
        server-addr:  127.0.0.1:8848 # 配置nacos 服务端地址
  application:
    name: nacos-consumer # 服务名称
OrderController
package com.itheima.nacos.controller;


import com.itheima.nacos.domain.Goods;
import org.springframework.beans.factory.annotation.Autowired;
import org.springframework.cloud.client.ServiceInstance;
import org.springframework.cloud.client.discovery.DiscoveryClient;
import org.springframework.web.bind.annotation.GetMapping;
import org.springframework.web.bind.annotation.PathVariable;
import org.springframework.web.bind.annotation.RequestMapping;
import org.springframework.web.bind.annotation.RestController;
import org.springframework.web.client.RestTemplate;

import java.util.List;

/**
 * 服务的调用方
 */
@RestController
@RequestMapping("/order")
public class OrderController {

    @Autowired
    private RestTemplate restTemplate;

    @Autowired
    private DiscoveryClient discoveryClient;

    @GetMapping("/goods/{id}")
    public Goods findGoodsById(@PathVariable("id") int id){
        //演示discoveryClient 使用
        List<ServiceInstance> instances = discoveryClient.getInstances("nacos-provider");

        //判断集合是否有数据
        if(instances == null || instances.size() == 0){
            //集合没有数据
            return null;
        }

        ServiceInstance instance = instances.get(0);
        String host = instance.getHost();//获取ip
        int port = instance.getPort();//获取端口

        System.out.println(host);
        System.out.println(port);

        String url = "http://"+host+":"+port+"/goods/findOne/"+id;
        // 3. 调用方法
        Goods goods = restTemplate.getForObject(url, Goods.class);

        return goods;
    }
}
3Ribbon 客户端负载均衡
3.1是什么
Netflix公司推出的http和TCP的客户端负载均衡工具。
ribbon:
1简化远程调用代码
2内置很多负载均衡算法
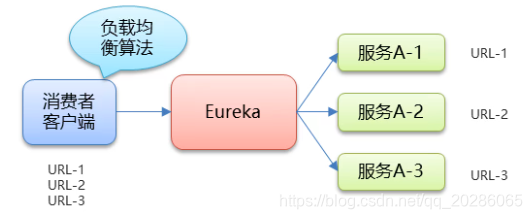
3.1.1服务端负载均衡
负载均衡算法在服务端
服务端维护服务列表
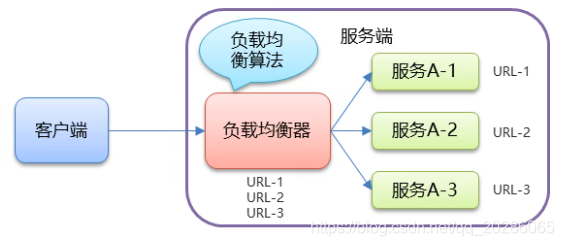
3.1.2客户端负载均衡
负载均衡算法在客户端
客户端维护服务列表
3.2简化restTemplate
1声明restTemplate时@LoadBalanced
2restTemplate请求远程服务时,ip端口替换为服务名
 @GetMapping("/goods2/{id}")
  public Goods findGoodsById2(@PathVariable("id") int id){
      System.out.println("findGoodsById..."+id);
      String url = "http://EUREKA-PROVIDER/goods/findOne/"+id;
      // 3. 调用方法
      Goods goods = restTemplate.getForObject(url, Goods.class);
      return goods;
  }
测试:
1将provider改造,显示本实例的端口号;
package com.itheima.provider.controller;

import com.itheima.provider.domain.Goods;
import com.itheima.provider.service.GoodsService;
import org.springframework.beans.factory.annotation.Autowired;
import org.springframework.beans.factory.annotation.Value;
import org.springframework.web.bind.annotation.GetMapping;
import org.springframework.web.bind.annotation.PathVariable;
import org.springframework.web.bind.annotation.RequestMapping;
import org.springframework.web.bind.annotation.RestController;

/**
 * Goods Controller 服务提供方
 */

@RestController
@RequestMapping("/goods")
public class GoodsController {

    @Autowired
    private GoodsService goodsService;
    @Value("${server.port}")
    int port;

    @GetMapping("/findOne/{id}")
    public Goods findOne(@PathVariable("id") int id){

        Goods goods = goodsService.findOne(id);
        goods.setTitle(goods.getTitle()+"|"+port);

        return goods;
    }
}
2启动2个provider
3多次访问consumer
3.3ribbon 负载均衡策略
| 内置负载均衡规则类 | 规则描述 |
|---|---|
| RoundRobinRule | 简单轮询服务列表来选择服务器。它是Ribbon默认的负载均衡规则。 |
| AvailabilityFilteringRule | 对以下两种服务器进行忽略:(1)在默认情况下,这台服务器如果3次连接失败,这台服务器就会被设置为“短路”状态。短路状态将持续30秒,如果再次连接失败,短路的持续时间就会几何级地增加。注意:可以通过修改配置loadbalancer..connectionFailureCountThreshold来修改连接失败多少次之后被设置为短路状态。默认是3次。(2)并发数过高的服务器。如果一个服务器的并发连接数过高,配置了AvailabilityFilteringRule规则的客户端也会将其忽略。并发连接数的上线,可以由客户端的..ActiveConnectionsLimit属性进行配置。 |
| WeightedResponseTimeRule | 为每一个服务器赋予一个权重值。服务器响应时间越长,这个服务器的权重就越小。这个规则会随机选择服务器,这个权重值会影响服务器的选择。 |
| ZoneAvoidanceRule | 以区域可用的服务器为基础进行服务器的选择。使用Zone对服务器进行分类,这个Zone可以理解为一个机房、一个机架等。 |
| BestAvailableRule | 忽略哪些短路的服务器,并选择并发数较低的服务器。 |
| RandomRule | 随机选择一个可用的服务器。 |
| Retry | 重试机制的选择逻辑 |
拓展资料:https://www.cnblogs.com/cxxjohnson/p/9027919.html
3.4设置ribbon 负载均衡策略
3.4.1代码
consumer工程
1MyRule 返回想要的规则即可
package com.itheima.consumer.config;

import com.netflix.loadbalancer.IRule;
import com.netflix.loadbalancer.RandomRule;
import org.springframework.context.annotation.Bean;
import org.springframework.context.annotation.Configuration;

/**
 * creste by itheima.itcast
 */
@Configuration
public class MyRule {
    @Bean
    public IRule rule(){
        return new RandomRule();
    }
}
2启动类
@RibbonClient(name ="eureka-provider",configuration = MyRule.class)
3.4.2配置
consumer工程
application.yml
eureka-provider: #远程服务名
  ribbon:
    NFLoadBalancerRuleClassName: com.netflix.loadbalancer.RandomRule #策略


 231
231


 被折叠的 条评论
为什么被折叠?
被折叠的 条评论
为什么被折叠?
 到【灌水乐园】发言


