


最近写一个项目要实现保存操作记录,就想到了AOP,先附上参考的地址
网上小实例:http://my.oschina.net/yangzg/blog/343945
建议先把小实例在电脑上跑通,然后看慕课的视频教学,效果不错。下面附上我学习的思路和代码吧
一、Spring jar包的导入
实现Spring编程,jar包少不了,主要用到了五个jar,其中有两个是测试用的
pom.xml依赖如下
  <dependencies>
  	<!-- https://mvnrepository.com/artifact/org.springframework/spring-context -->

	<dependency>
	    <groupId>org.springframework</groupId>
	    <artifactId>spring-context</artifactId>
	    <version>5.0.0.RELEASE</version>
	</dependency>
	<!-- https://mvnrepository.com/artifact/org.aspectj/aspectjweaver -->
	<dependency>
	    <groupId>org.aspectj</groupId>
	    <artifactId>aspectjweaver</artifactId>
	    <version>1.8.11</version>
	</dependency>
	<!-- https://mvnrepository.com/artifact/org.springframework/spring-aspects -->
	<dependency>
	    <groupId>org.springframework</groupId>
	    <artifactId>spring-aspects</artifactId>
	    <version>5.0.1.RELEASE</version>
	</dependency>
	<!-- https://mvnrepository.com/artifact/junit/junit -->
	<dependency>
	    <groupId>junit</groupId>
	    <artifactId>junit</artifactId>
	    <version>4.12</version>
	    <scope>test</scope>
	</dependency>
	<!-- https://mvnrepository.com/artifact/org.springframework/spring-test -->
	<dependency>
	    <groupId>org.springframework</groupId>
	    <artifactId>spring-test</artifactId>
	    <version>5.0.0.RELEASE</version>
	    <scope>test</scope>
	</dependency>

</dependencies>二、Spring 配置文件
<?xml version="1.0" encoding="UTF-8"?>
<beans xmlns="http://www.springframework.org/schema/beans"
       xmlns:xsi="http://www.w3.org/2001/XMLSchema-instance"
       xmlns:context="http://www.springframework.org/schema/context"
       xmlns:aop="http://www.springframework.org/schema/aop"
       xsi:schemaLocation="http://www.springframework.org/schema/beans
           http://www.springframework.org/schema/beans/spring-beans-2.5.xsd
           http://www.springframework.org/schema/context
           http://www.springframework.org/schema/context/spring-context-2.5.xsd
           http://www.springframework.org/schema/aop
           http://www.springframework.org/schema/aop/spring-aop-2.5.xsd">
    <context:annotation-config />
    <!-- 自动扫描的包路径 -->
    <context:component-scan base-package="com.aspect"/>
    <!-- 对aspectJ的支持配置 -->
    <aop:aspectj-autoproxy />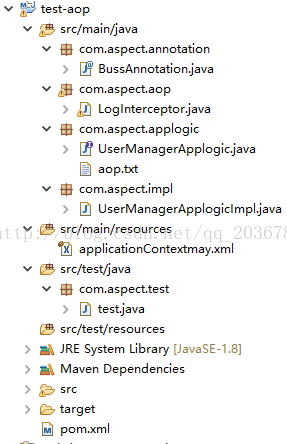
</beans>三、项目文件目录结构
放代码前先看看项目包目录结构
四、代码实现
写日志用到了注解实现,就是在要方法前加入该方法说明的注解就能自动读取注解内容,且不改变方法本身,没有侵入性
1、逻辑业务接口
package com.aspect.applogic;

/*
 * /  用户管理业务逻辑接口
 */

public interface UserManagerApplogic {
    public String addUser(String name);
    public void addOne(int type,int parentid);
} 2、用户管理业务逻辑实现类
package com.aspect.impl;

import org.springframework.stereotype.Component;

import com.aspect.applogic.UserManagerApplogic;
import com.aspect.annotation.BussAnnotation;
/*
 * 用户管理业务逻辑实现类
 */

@Component("userManager")
public class UserManagerApplogicImpl implements UserManagerApplogic {

    @BussAnnotation(moduleName="人员管理",option="添加用户")
    @Override
    public String addUser(String name) {
       System.out.println("add a User name is "+name);   this.addOne(1, 1);
        // 测试异常放回抛出
        // throw new RuntimeException("add failed!");
       return "add success!";
    }

    @BussAnnotation(moduleName="人员管理",option="添加新人")
    @Override
    public void addOne(int type, int parentid) {
        System.out.println("add a new one type : "+type+" \t perentid : "+parentid);
    }


}
3、业务注释类
package com.aspect.annotation;
import java.lang.annotation.Retention;
import java.lang.annotation.ElementType;
import java.lang.annotation.RetentionPolicy;
import java.lang.annotation.Target;
/*
 * 业务注释类
 */
// RUNTIME代表的是表示在源码、编译好的.class文件中保留信息,在执行的时候会把这一些信息加载到JVM中去的。
@Retention(RetentionPolicy.RUNTIME)
// @Target里面的ElementType是用来指定Annotation类型可以用在哪一些元素上的.METHOD(方法)
@Target ({ElementType.METHOD})
public @interface  BussAnnotation {
	//模块名
    String moduleName() default "";
    //操作内容
    String option() default "";
}
4、切面类
重点就是这个切面类
package com.aspect.aop;
import java.lang.reflect.Method;

import org.aspectj.lang.ProceedingJoinPoint;
import org.aspectj.lang.annotation.After;
import org.aspectj.lang.annotation.AfterReturning;
import org.aspectj.lang.annotation.AfterThrowing;
import org.aspectj.lang.annotation.Around;
import org.aspectj.lang.annotation.Aspect;
import org.aspectj.lang.annotation.Before;
import org.aspectj.lang.annotation.Pointcut;
import org.springframework.stereotype.Component;

import com.aspect.annotation.BussAnnotation;


//切面类  http://my.oschina.net/yangzg/blog/343945
/*
* 特别注意: Spring的配置文件中添加:
*
* <aop:aspectj-autoproxy />
* spring-mvc-dispatcher.xml中天机
* <!--通知spring使用cglib而不是jdk的来生成代理方法 AOP可以拦截到Controller-->
* <aop:aspectj-autoproxy proxy-target-class="true"/>
*
* <aop:config>节点中proxy-target-class="true"不为true时。
* 当登录的时候会报这个异常java.lang.NoSuchMethodException: $Proxy54.login(),
*/

// aspect注解不能被自动扫描。配合component使用
// 这个类为一个切面类且自己不会被代理
/*
 * aspectJ是编译期的AOP,检查代码并匹配连接点和切入点代价高,要选择好的切入点
 * execution get、set、call、handler等等选择
 * within withincode确定范围
 * this、target、@annotation 匹配上下文信息
 */
@Aspect
@Component
public class LogInterceptor {
	// 定义切入点  @Pointcut("execution(public * com.aspect..*.*(..))")  -- 表示对com.aspect 包下的所有方法都可添加切入点
	// 该注解下方法返回值为void
	@Pointcut("execution(public * addUser(..))")
 	public void aApplogic() {}

	//定义切入点  -- 拦截指定的方法  这里拦截 com.aspect.demo3.aop1.impl.UserManagerApplogicImpl 的addOne()方法
 	@Pointcut("execution(public * addOne(..))")
 	public void joinPointForAddOne(){}

//	/**
//	* 环绕通知 用于拦截指定内容,记录用户的操作
//	* 切入点可以通过 && 和 || 进行一个拼接的作用
//	*/
//	@Around(value = "aApplogic() && @annotation(annotation) &&args(object,..) ", argNames = "annotation,object")
//	public Object interceptorApplogic(ProceedingJoinPoint pj,
//		BussAnnotation annotation, Object object) throws Throwable {
//		System.out.println("moduleName:" + annotation.moduleName());
//		System.out.println("option:" + annotation.option());
//		pj.proceed();
//		// 打印方法名
//		System.out.println(pj.getSignature().getName());
//		// 打印参数
//		for(Object obj : pj.getArgs()){
//			System.out.println(obj.toString());
//		}
//		return object;
//	}
//
//
//	  /**
//	   * 环绕通知   拦截指定的切点,这里拦截joinPointForAddOne切入点所指定的addOne()方法
//	   *
//	   */
//	@Around("joinPointForAddOne()")
//	public Object interceptorAddOne(ProceedingJoinPoint joinPoint) throws Throwable {
//		System.out.println("Aop start");
//		String methodRemark = getMthodRemark(joinPoint);
//		Object result = null;
//	 	try {
//	 	// 记录操作日志...谁..在什么时间..做了什么事情..
//	 		result = joinPoint.proceed();
//	 	} catch (Exception e) {
//	 		// 异常处理记录日志..log.error(e);
//	 		throw e;
//	 	}
//	  	System.out.println(methodRemark);
//	 	System.out.println("Aop end");
//		return result;
//	  }
//
//
//	// 获取方法的中文备注____用于记录用户的操作日志描述
//	public static String getMthodRemark(ProceedingJoinPoint joinPoint)
//			throws Exception {
//	  	String targetName = joinPoint.getTarget().getClass().getName();
//	   	String methodName = joinPoint.getSignature().getName();
//	   	System. out.println("====调用" +methodName+"方法-开始!");
//	   	Object[] arguments = joinPoint.getArgs();   //获得参数列表
//	  	System.out.println("打印出方法调用时传入的参数,可以在这里通过添加参数的类型,进行一些简易逻辑处理和判断");
//	  	if(arguments.length<=0){
//	  		System.out.println("=== "+methodName+" 方法没有参数");
//	  	}else{
//	  		for(int i=0;i<arguments.length;i++){
//	  			System.out.println("==== 参数   "+(i+1)+" : "+arguments[i]);
//	  		}
//	  	}
//
//	  	@SuppressWarnings("rawtypes")
//	  	Class targetClass = Class.forName(targetName);
//	 	Method[] method = targetClass.getMethods();
//	  	String methode = "";
//	  	for (Method m : method) {
//	  		if (m.getName().equals(methodName)) {
//	  			@SuppressWarnings("rawtypes")
//				Class[] tmpCs = m.getParameterTypes();
//	           	if (tmpCs.length == arguments.length) {
//	              	BussAnnotation methodCache = m.getAnnotation(BussAnnotation.class);
//	              	methode = methodCache.moduleName();
//	              	break;
//	         	}
//	  		}
//	  	}
//		return methode;
//	}

 	/*
 	 * imooc 例子
 	 */

  	// 执行前
 	// 下面写法类型这个@Before("execution(public * add*(..))")
 	@Before("aApplogic()")
	public void Before(){
		System.out.println("Before.");
	}

 	// Advice可以获取参数
 	@Before("aApplogic()&&args(arg)")
	public void BeforeWithParame(String arg){
		System.out.println("BeforeWithParame." + arg);
	}

 	// Advice获取注解,先定义一个注解例如:bussAnnotation那个,然后再方法那加上注解
 	// 注意注解获取在参数获取之前
 	//@Before("aApplogic()&&@annotation(annotation)")
	// 简单写法
	// 上述方法的简单写法
	@Pointcut("execution(public * addUser(..))&&@annotation(annotation)")
	public void aApplogicAnno(BussAnnotation annotation) {}

	@Before("aApplogicAnno(annotation)")
 	public void BeforeWithAnnotation(BussAnnotation annotation){
		System.out.println("BeforeWithAnnotation." + annotation.moduleName());
	}


 	// 正常返回后获取返回值
 	// returning 获取方法的返回值,放回类型不确定定义该类型为object
 	@AfterReturning(pointcut="aApplogic()",returning="returnValue")
 	public void afterReturning(Object returnValue){
 		System.out.println("AfterReturning:" + returnValue);
 	}

 	// 异常返回后获取异常值	e 接收抛出的异常
 	@AfterThrowing(pointcut="aApplogic()",throwing="e")
 	public void afterThrowing(RuntimeException e){
 		// 调试打出堆栈信息
 		// e.printStackTrace();
 		System.out.println("afterThrowing :" + e.getMessage());
 	}

 	// 返回(无论返回正常还是异常)后释放资源:注意,after先执行,AfterReturning和AfterThrowing后执行
 	@After("aApplogic()")
 	public void after(){
 		System.out.println("After");
 	}

 	// 环绕通知
 	/*
 	 * 环绕通知通知方法的第一个参数必须是ProceedingJoinPoint类型
 	 * 在通知内部调用ProceedingJoinPoint的proceed()方法会导致执行真正的方法
 	 * 传入一个object[]对象,数组中的值将会作为参数传递个方法
 	 * proceed()方法执行时才执行真正的方法,把真正的返回值个object类型
 	 */
 	@Around("aApplogic()")
 	public Object around(ProceedingJoinPoint pjp) throws Throwable{
 		/* 执行顺序
 		 * 1、around 1
 		 * 2、before
 		 * 3、method
 		 * 4、around 2
 		 * 5、around : obj
 		 * 6、after
 		 * 7、afterReturning
 		 */
 		System.out.println("Around 1");
 		Object object = pjp.proceed();
 		System.out.println("Around 2");
 		System.out.println("Around :" + object);
 		return object;
	}
}
5、测试方法
package com.aspect.test;

import org.junit.Test;
import org.junit.runner.RunWith;
import org.springframework.test.context.ContextConfiguration;
import org.springframework.test.context.junit4.SpringJUnit4ClassRunner;
import org.springframework.beans.factory.annotation.Autowired;
import com.aspect.applogic.UserManagerApplogic;

// 使用所有注释前必须使用@RunWith(SpringJUnit4ClassRunner.class),让测试运行于Spring测试环境
@RunWith(SpringJUnit4ClassRunner.class)
@ContextConfiguration(locations="classpath:applicationContextmay.xml")
public class test{
	@Autowired
    private UserManagerApplogic userManager;

    @Test
    public void testAopAddUser(){
        userManager.addUser("马良");
    }

    @Test
    public void testAopAddOne(){
        userManager.addOne(1, 1);
    }
}
Around 1
Before.
BeforeWithAnnotation.人员管理
BeforeWithParame.马良
add a User name is 马良
add a new one type : 1 	 perentid : 1
Around 2
Around :add success!
After
AfterReturning:add success!
五、实际使用
ApplicationContext context = new ClassPathXmlApplicationContext("classpath:applicationContextmay.xml");
LoginMainFrm loginMainFrm = (LoginMainFrm) context.getBean("loginMainFrm");ApplicationContext 多个项目还不知道怎么实现日志记录管理~先写这么多吧


 9872
9872

 被折叠的 条评论
为什么被折叠?
被折叠的 条评论
为什么被折叠?
 到【灌水乐园】发言


