


一、Flowable 入门介绍
代码实现文章:SpringBoot整合Flowable最新教程(二)
官网地址:https://www.flowable.org/
Flowable6.3中文教程:中文教程地址
可以在官网下载对应的jar包在本地部署运行,官方提供了下面的五个应用程序:
Flowable Modeler:流程定义管理
Flowable Task:用户任务管理
Flowable IDM:用户组权限管理
Flowable REST API:流程引擎对外提供的API接口
Flowable Admin:后台管理
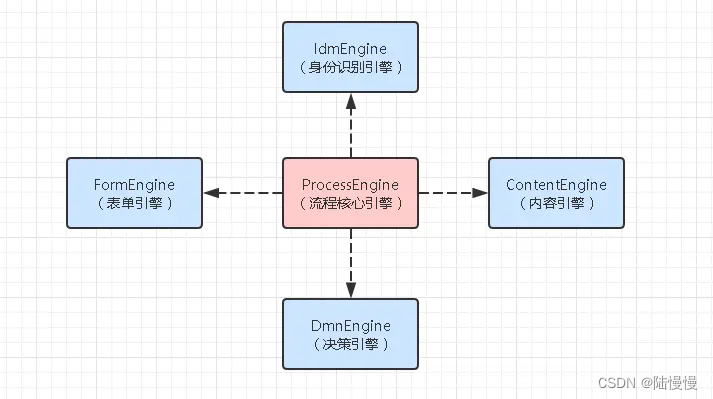
二、初识Flowable五大引擎
Flowable有五大引擎,每个之间都是相互独立互不影响。
ProcessEngine是里面最核心也是最重要的一个引擎,如果失去它那Flowable也就意义了。
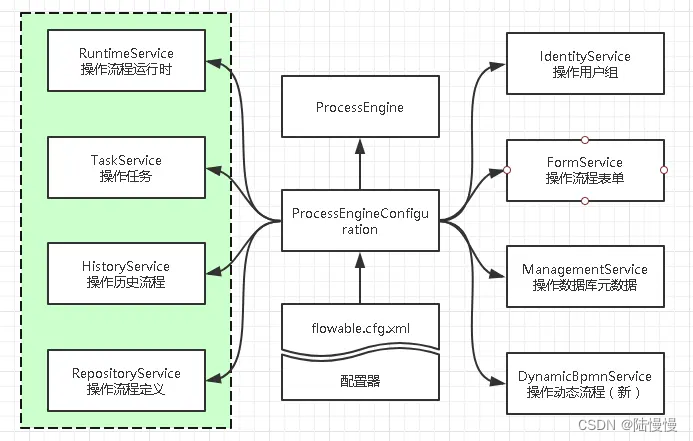
三、流程引擎使用架构
Flowable引擎在使用前需要先通过配置来初始化ProcessEngine。
初始化ProcessEngineConfiguration一般有两种方式:
1.通过Spinrg配置文件进行依赖注入,通过flowable.cfg.xml文件来初始化ProcessEngineConfiguration(这里的文件名必须为flowable.cfg.xml,否则Flowable识别不到)
2.通过编写程序的方式来构造ProcessEngineConfiguration对象
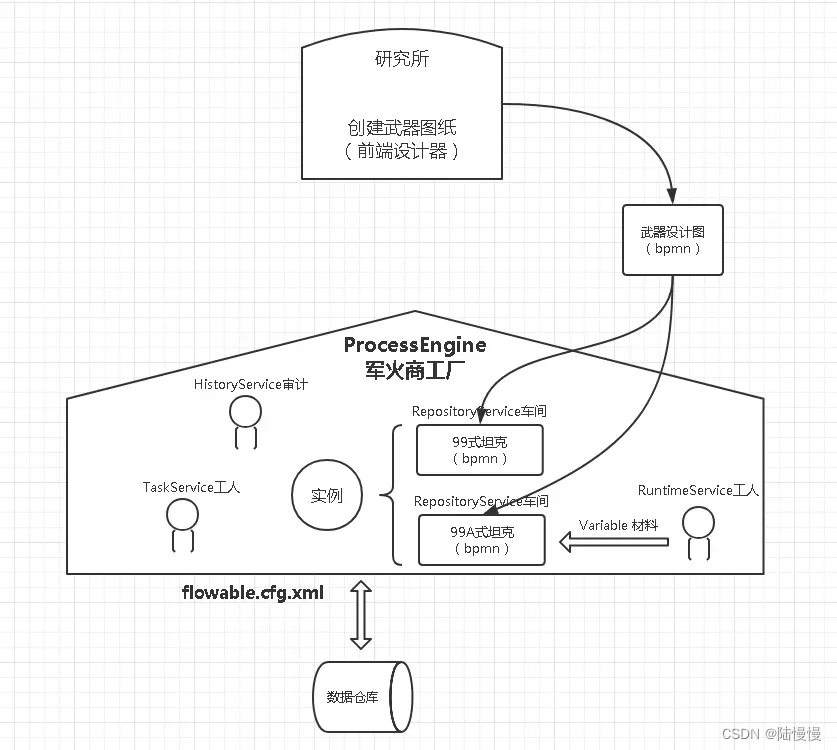
四、流程引擎初体验
1.简单了解Bpmn
1.1Task任务:
用户任务(userTask)
系统任务(serviceTask )
1.2Event事件:
定时器事件(timerEventDefinition)
1.3Gateway网关:
排他网关(exclusive gateway)
2.目标:实现以下简化版的请假流程

步骤1:定义相应的BPMN文件
步骤2:配置flowable.cfg.xml
步骤3:将流程定义添加到Repository仓储中
步骤4:Runtime开始一个流程实例
五、Flowable的用户权限体系
在接入Flowable的用户权限体系的时候,有四种方式:
1.使用Flowable提供的默认IdmEngine进行用户体系管理,该引擎包含了用户、组的概念。
2.集成LDAP,实现轻量级用户权限管理。通过IdentityService进行认证,用于由IdentityService处理所有认证业务的场景。
3.实现IdmIdentityService接口,自定义实现用户、组的查询
4.接入自定义的权限体系
用户id => 获取到租户id、角色id集、部门id集
4.1单用户(assignee=“用户id”)、多用户(candidateUsers=“用户id1,用户id2”)
4.2单角色、多角色(candidateGroups=“:角色id1,:角色id2”)
4.3单部门、多部门(candidateGroups=“部门id1:,部门id2:”)
4.4角色或部门(candidateGroups=“角色id1:, :部门id1”)
4.5角色且部门
六、数据库介绍
ACT_RE_ *:RE代表repository。具有此前缀的表包含静态信息,例如流程定义和流程资源(图像,规则等)。
ACT_RU_ *:RU代表runtime。这些是包含运行时的流程实例,用户任务,变量,作业等的运行时数据的运行时表。Flowable仅在流程实例执行期间存储运行时数据,并在流程实例结束时删除记录。这使运行时表保持小而快。
ACT_HI_ *:HI代表history。这些是包含历史数据的表,例如过去的流程实例,变量,任务等。
ACT_GE_ *:general数据,用于各种用例。
ACT_ID_*:Idm的用户、组
=====================================================
ACT_HI_ACTINST 流程实例的历史运行节点表
ACT_HI_TASKINST 流程实例的历史任务表
ACT_HI_VARINST 流程实例的历史运行节点的变量表
ACT_HI_PROCINST 流程历史部署记录
ACT_HI_IDENTITYLINK 对应ACT_RU_IDENTITYLINK的历史记录表
ACT_RE_DEPLOYMENT 流程部署
ACT_RE_PROCDEF 流程定义表
ACT_RU_EXECUTION 流程实例执行过程的所有节点记录
ACT_RU_IDENTITYLINK 流程实例运行过程中,各节点对应的用户
ACT_RU_TASK 流程实例运行时的任务表
ACT_RU_VARIABLE 流程实例运行时节点的变量表
ACT_GE_BYTEARRAY 资源文件表


 3069
3069


 被折叠的 条评论
为什么被折叠?
被折叠的 条评论
为什么被折叠?
 到【灌水乐园】发言


