


LVS + Keepalived
实例图
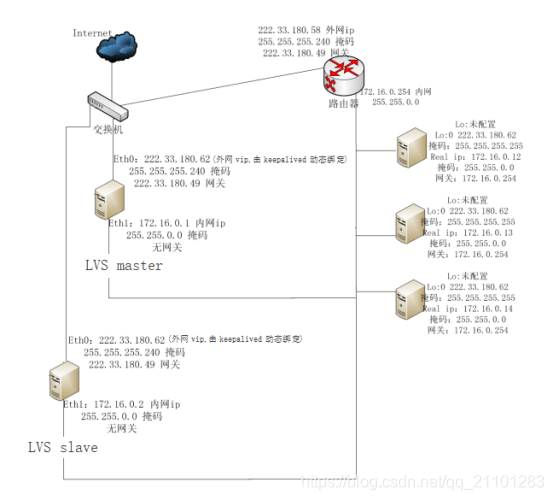
LVS DR
原理:
LVS绑定vip(virtual
ip)到一个网卡,当该vip收到IP包后,修改该IP包的目标mac为rip(real server
ip)的mac地址,real server收到该IP包后,为不丢弃该包,需要把vip绑定到real
server的lo:0接口,这样real server就认为该IP包是发送给自己的,就不会丢弃。
real server,需要进行如下设置(假设网卡为eth0):
-
配置网卡:
$ sudo ip address add 222.33.180.62/32 dev lo:0
-
配置/etc/sysctl.conf文件:
net.ipv4.ip_forward = 1
net.ipv4.conf.lo.rp_filter = 0
net.ipv4.conf.eth0.rp_filter = 0
net.ipv4.conf.all.rp_filter = 0
net.ipv4.conf.all.arp_filter = 1
net.ipv4.conf.all.arp_ignore = 1
net.ipv4.conf.all.arp_announce = 2
然后使其生效:
$ sudo sysctl -p
LVS master的配置:
-
配置 /etc/sysctl.conf 文件:
修改为 net.ipv4.ip_forward = 1 允许包转发 -
安装keepalived,并配置/etc/keepalived/keepalived.conf:
vrrp_instance VI_1 {#定义VRR组
state MASTER
interface eth0 #对外访问的网络接口
virtual_router_id 17 #虚拟路由标识,主从要一致
priority 100 #优先级,slave要低于这个值
advert_int 1 #广播周期秒数
authentication { #验证
auth_type PASS
auth_pass 1717
}
virtual_ipaddress {#虚拟VIP地址,外网访问进来的IP
222.33.180.62
}
}
virtual_server 222.33.180.62 80 {
delay_loop 6
lb_algo wrr
lb_kind DR
persistence_timeout 10
protocol TCP
real_server 172.16.0.12 80 {
weight 1
}
real_server 172.16.0.13 80 {
weight
}
}
LVS slave的配置:
与master相同,只修改state BACKUP 和 priority 90 即可。
ARP问题:
通常,DR模式需要在Real-server上配置VIP,原因在于,当LVS把client的包转发给Real-server时,因为包的目的IP地址是VIP,那么如果Real-server收到这个包后,发现包的目的IP不是自己的系统IP,那么就会认为这个包不是发给自己的,就会丢弃这个包,所以需要将这个IP地址绑到网卡上;当发送应答包给client时,Real-server就会把包的源和目的地址调换,直接回复给client。
关于ARP广播
绑定VIP的掩码是”255.255.255.255″,说明广播地址是其本身,那么他就不会将ARP发送到实际的自己该属于的广播域了,这样防止与LVS上VIP冲突,而导致IP冲突。
rp_filter - INTEGER
0 - No source validation. 不做源路由测试。
1 - Strict mode as defined in RFC3704 Strict Reverse Path
Each incoming packet is tested against the FIB and if the interface is not the
best reverse path the packet check Will Fail. By default failed packets are
discarded.
测试进来包的最佳返回路径是否经过这个包进来时的网卡,是,则测试通过,不是则测试失败,包被丢弃。
2 - Loose mode as defined in RFC3704 Loose Reverse Path Each incoming packet’s
source address is also tested against the FIB and if the source address is not
reachable via any interface the packet check will fail. Current recommended
practice in RFC3704 is to enable strict mode to prevent IP spoofing from DDos
attacks. If using asymmetric routing or other complicated routing, then loose
mode is recommended. The max value from conf/{all,interface}/rp_filter is used
when doing source validation on the {interface}. Default value is 0. Note that
some distributions enable it in startup scripts.
测试进来包的是否能返回。这个选项其实没啥用。
arp_filter - BOOLEAN
1 - Allows you to have multiple network interfaces on the same subnet, and have
the ARPs for each interface be answered based on whether or not the kernel would
route a packet from the ARP’d IP out that interface (therefore you must use
source based routing for this to work). In other words it allows control of
which cards (usually 1) will respond to an arp request.
IP包从哪个网卡出去,那么该网卡响应该主机所有IP的ARP请求。通常,同一网段的多网卡的IP包都从route表优先级最高(metric最小)的网卡接口出去,所以只有该网卡响应ARP请求。
0 - (default) The kernel can respond to arp requests with addresses from other
interfaces. This may seem wrong but it usually makes sense, because it increases
the chance of successful communication. IP addresses are owned by the complete
host on Linux, not by particular interfaces. Only for more complex setups like
load-balancing, does this behaviour cause problems. arp_filter for the interface
will be enabled if at least one of conf/{all,interface}/arp_filter is set to
TRUE, it will be disabled otherwise. 内核可以用其他网卡来回应arp请求.
这看起来是错的, 但是它增大了成功通讯的可能性. IP地址属于整个主机,
而不是特定的接口. 只是在一些复杂的情况, 比如负载均衡, 会出现错误.
arp_ignore – INTEGER
Define different modes for sending replies in response to
received ARP requests that resolve local target IP addresses:
0 – (default): reply for any local target IP address, configured
on any interface
1 – reply only if the target IP address is local address
configured on the incoming interface
2 – reply only if the target IP address is local address
configured on the incoming interface and both with the
sender’s IP address are part from same subnet on this interface
3 – do not reply for local addresses configured with scope host,
only resolutions for global and link addresses are replied
4-7 – reserved
8 – do not reply for all local addresses
The max value from conf/{all,interface}/arp_ignore is used
when ARP request is received on the {interface}
“0″,代表对于arp请求,任何配置在本地的目的ip地址都会回应,不管该arp请求的目的地址是不是接口的ip;如果有多个网卡,并且网卡的ip都是一个子网,那么从一个端口进来的arp请求,别的端口也会发送回应。
“1″,代表如果arp请求的目的地址,不是该arp请求包进入的接口的ip地址,那么不回应。
“2″,要求的更苛刻,除了”1″的条件外,还必须要求arp发送者的ip地址和arp请求进入的接口的ip地址是一个网段的。
(后面略)
arp_announce – INTEGER
Define different restriction levels for announcing the local
source IP address from IP packets in ARP requests sent on
interface:
0 – (default) Use any local address, configured on any interface
1 – Try to avoid local addresses that are not in the target’s
subnet for this interface. This mode is useful when target
hosts reachable via this interface require the source IP
address in ARP requests to be part of their logical network
configured on the receiving interface. When we generate the
request we will check all our subnets that include the
target IP and will preserve the source address if it is from
such subnet. If there is no such subnet we select source
address according to the rules for level 2.
2 – Always use the best local address for this target.
In this mode we ignore the source address in the IP packet
and try to select local address that we prefer for talks with
the target host. Such local address is selected by looking
for primary IP addresses on all our subnets on the outgoing
interface that include the target IP address. If no suitable
local address is found we select the first local address
we have on the outgoing interface or on all other interfaces,
with the hope we will receive reply for our request and
even sometimes no matter the source IP address we announce.
The max value from conf/{all,interface}/arp_announce is used.
Increasing the restriction level gives more chance for
receiving answer from the resolved target while decreasing
the level announces more valid sender’s information.
arp_announce 用来限制,是否使用发送的端口的ip地址来设置ARP的源地址:
-
“0″代表是用ip包的源地址来设置ARP请求的源地址。
-
“1″代表不使用ip包的源地址来设置ARP请求的源地址,如果ip包的源地址是和该端口的IP地址相同的子网,那么用ip包的源地址,来设置ARP请求的源地址,否则使用”2″的设置。
-
“2″代表不使用ip包的源地址来设置ARP请求的源地址,而由系统来选择最好的接口来发送。
当内网的机器要发送一个到外部的ip包,那么它就会请求路由器的mac地址,发送一个arp请求,这个arp请求里面包括了自己的ip地址和mac地址,而linux默认是使用ip包的源ip地址作为arp里面的源ip地址,而不是使用发送设备上面的
,这样在lvs这样的架构下,所有发送包都是同一个VIP地址,那么arp请求就会包括VIP地址和设备
mac,而路由器收到这个arp请求就会更新自己的arp缓存,这样就会造成ip欺骗了,VIP被抢夺,某些架构下就会有问题。本例中虽然没有大问题,但是会造成路由器不停更新VIP的mac。
假设服务器上ip地址如下所示:
System Interface MAC Address IP Address
HN eth0 00:0c:29:b3:a2:54 192.168.18.10
HN eth3 00:0c:29:b3:a2:68 192.168.18.11
HN eth4 00:0c:29:b3:a2:5e 192.168.18.12
client eth0 00:0c:29:d2:c7:aa 192.168.18.129
当我从192.168.18.129 ping 192.168.18.10时,tcpdump抓包发现:
00:0c:29:d2:c7:aa \ ff:ff:ff:ff:ff:ff, ARP, length 60: arp who-has
192.168.18.10 tell 192.168.18.129
00:0c:29:b3:a2:5e \ 00:0c:29:d2:c7:aa, ARP, length 60: arp reply 192.168.18.10
is-at 00:0c:29:b3:a2:5e
00:0c:29:b3:a2:54 \ 00:0c:29:d2:c7:aa, ARP, length 60: arp reply 192.168.18.10
is-at 00:0c:29:b3:a2:54
00:0c:29:b3:a2:68 \ 00:0c:29:d2:c7:aa, ARP, length 60: arp reply 192.168.18.10
is-at 00:0c:29:b3:a2:68
00:0c:29:d2:c7:aa \ 00:0c:29:b3:a2:5e, IPv4, length 98: 192.168.18.129
192.168.18.10: ICMP echo request, id 32313, seq 1, length 64
00:0c:29:b3:a2:54 \ 00:0c:29:d2:c7:aa, IPv4, length 98: 192.168.18.10
192.168.18.129: ICMP echo reply, id 32313, seq 1, length 64
00:0c:29:d2:c7:aa \ 00:0c:29:b3:a2:5e, IPv4, length 98: 192.168.18.129
192.168.18.10: ICMP echo request, id 32313, seq 2, length 64
00:0c:29:b3:a2:54 \ 00:0c:29:d2:c7:aa, IPv4, length 98: 192.168.18.10
192.168.18.129: ICMP echo reply, id 32313, seq 2, length 64
00:0c:29:b3:a2:54 \ 00:0c:29:d2:c7:aa, ARP, length 60: arp who-has
192.168.18.129 tell 192.168.18.10
00:0c:29:d2:c7:aa \ 00:0c:29:b3:a2:54, ARP, length 60: arp reply 192.168.18.129
is-at 00:0c:29:d2:c7:aa
三个端口都发送了arp的reply包,但是192.168.18.129使用的第一个回应的eth4的mac地址作为ping请求的端口,由于192.168.18.10是icmp包中的目的地址,那么ping的应答包,会从eth0端口发出。
如果Real-server有个多个网卡,每个网卡在不同的网段,那么可以过滤掉非本网卡ARP请求的回应;但是如果多个网卡的ip在一个网段,那么就不行了。
对于多个接口在相同网段可以设置下面的来防止:
-
sysctl -w net.ipv4.conf.all.arp_ignore=1
-
sysctl -w net.ipv4.conf.all.arp_announce=2
还是从192.168.18.129 ping 192.168.18.10时,tcpdump抓包发现:
00:0c:29:d2:c7:aa \ ff:ff:ff:ff:ff:ff, ARP, length 60: arp who-has
192.168.18.10 tell 192.168.18.129
00:0c:29:b3:a2:54 \ 00:0c:29:d2:c7:aa, ARP, length 60: arp reply 192.168.18.10
is-at 00:0c:29:b3:a2:54
00:0c:29:d2:c7:aa \ 00:0c:29:b3:a2:54, IPv4, length 98: 192.168.18.129
192.168.18.10: ICMP echo request, id 32066, seq 1, length 64
00:0c:29:b3:a2:54 \ 00:0c:29:d2:c7:aa, IPv4, length 98: 192.168.18.10
192.168.18.129: ICMP echo reply, id 32066, seq 1, length 64
00:0c:29:d2:c7:aa \ 00:0c:29:b3:a2:54, IPv4, length 98: 192.168.18.129
192.168.18.10: ICMP echo request, id 32066, seq 2, length 64
00:0c:29:b3:a2:54 \ 00:0c:29:d2:c7:aa, IPv4, length 98: 192.168.18.10
192.168.18.129: ICMP echo reply, id 32066, seq 2, length 64
00:0c:29:b3:a2:54 \ 00:0c:29:d2:c7:aa, ARP, length 60: arp who-has
192.168.18.129 tell 192.168.18.10
00:0c:29:d2:c7:aa \ 00:0c:29:b3:a2:54, ARP, length 60: arp reply 192.168.18.129
is-at 00:0c:29:d2:c7:aa
看到了么,现在只有eth0会回应arp请求了。
LVS NAT
可以不需要实例图中的路由器。
说明:
Virtual Server在VIP(222.33.180.62)上接受client请求,目标转到real server,real
server不能直接返回给client,因为假如直接返回的话,source
IP变为RIP而不是去建立连接时的VIP,就会形成半连接。所以real
server返回时需要经过virtual server做NAT,也就需要把默认路由设为virtual
server。但是virtual server有主从两台,real
server的默认路由不能设成两个呀,怎么办呢?办法是由keepalived在两台virtual
server内网卡eth1上动态绑定内部vip 172.168.0.252,跟动态绑定外网vip一样。
设置Real Server:
$ sudo route add default gw 172.16.0.252
LVS master的配置:
-
配置 /etc/sysctl.conf 文件:
修改为 net.ipv4.ip_forward = 1 允许包转发然后使其生效:
$ sudo sysctl -p
-
安装keepalived,并配置/etc/keepalived/keepalived.conf:
vrrp_instance VI_2 {#定义VRR组
state MASTER
interface eth1 #内网络接口,real server的gateway
virtual_router_id 172 #虚拟路由标识,主从要一致
priority 100 #优先级,slave要低于这个值
advert_int 1 #广播周期秒数
authentication { #验证
auth_type PASS
auth_pass 1717
}
virtual_ipaddress {#虚拟VIP地址,外网访问进来的IP
172.16.0.252
}
}
vrrp_instance VI_1 {#定义VRR组
state MASTER
interface eth0 #对外访问的网络接口
virtual_router_id 17 #虚拟路由标识,主从要一致
priority 100 #优先级,slave要低于这个值
advert_int 1 #广播周期秒数
authentication { #验证
auth_type PASS
auth_pass 1717
}
virtual_ipaddress {#虚拟VIP地址,外网访问进来的IP
222.33.180.62
}
}
virtual_server 222.33.180.62 80 {
delay_loop 6
lb_algo wrr
lb_kind NAT
persistence_timeout 10
protocol TCP
real_server 172.16.0.12 80 {
weight 1
}
real_server 172.16.0.13 80 {
weight
}
}
LVS slave的配置:
与master相同,只修改state BACKUP 和 priority 90 即可。
LVS TUN(IP over IP,原理同DR,IP替代DR 的MAC)
LVS master的配置:
-
配置 /etc/sysctl.conf 文件:
修改为 net.ipv4.ip_forward = 1 允许包转发
然后使其生效:
$ sudo sysctl -p -
安装keepalived,并配置/etc/keepalived/keepalived.conf:
vrrp_instance VI_1 {#定义VRR组
state MASTER
interface eth0 #对外访问的网络接口
virtual_router_id 17 #虚拟路由标识,主从要一致
priority 100 #优先级,slave要低于这个值
advert_int 1 #广播周期秒数
authentication { #验证
auth_type PASS
auth_pass 1717
}
virtual_ipaddress {#虚拟VIP地址,外网访问进来的IP
222.33.180.62
}
}
virtual_server 222.33.180.62 80 {
delay_loop 6
lb_algo wrr
lb_kind TUN
persistence_timeout 10
protocol TCP
real_server 172.16.0.12 80 {
weight 1
}
real_server 172.16.0.13 80 {
weight
}
}
LVS slave的配置:
与master相同,只修改state BACKUP 和 priority 90 即可。
设置Real Server:
$ sudo modprobe ipip #装载ipip(tunel)内核模块并创建tunl0接口
$ vim lvs_tun.sh
#!/bin/bash
#srcipt to start LVS TUN realserver
VIP=222.33.180.62
case “$1” in
start)
#start LVS-TUN real server on this machine
/sbin/ifconfig tunl0 down
/sbin/ifconfig tunl0 up
echo 1 \ /proc/sys/net/ipv4/conf/tunl0/arp_ignore
echo 2 \ /proc/sys/net/ipv4/conf/tunl0/arp_announce
echo 0 \ /proc/sys/net/ipv4/conf/tunl0/rp_filter
echo 1 \ /proc/sys/net/ipv4/conf/tunl0/forwarding
echo 1 \ /proc/sys/net/ipv4/conf/all/arp_ignore
echo 2 \ /proc/sys/net/ipv4/conf/all/arp_announce
/sbin/ifconfig tunl0 $VIP broadcast $VIP netmask 255.255.255.255 up
/sbin/route add -host $VIP dev tunl0
;;
stop)
#stop lvs-TUN real server loopback device
/sbin/ifconfig tunl0 down
echo 0 \ /proc/sys/net/ipv4/conf/tunl0/arp_ignore
echo 0 \ /proc/sys/net/ipv4/conf/tunl0/arp_announce
echo 1 \ /proc/sys/net/ipv4/conf/tunl0/rp_filter
echo 0 \ /proc/sys/net/ipv4/conf/all/arp_ignore
echo 0 \ /proc/sys/net/ipv4/conf/all/arp_announce
;;
status)
islothere=’/sbin/ifconfig tunl0 |grep $VIP’
isrothere=‘netstat -rn |grep “tunl0”|grep $VIP’
if [ ! “$islothere” -o ! “$isrothere” ];then
echo “LVS-TUN real server stopped”
else echo “LVS-TUN Running”
fi
;;
*)
echo “$0: Usage: $0 {start|stop|status}”
exit 1
;;
Esac
附ipvsadm命令:
#DR
$ sudo ipvsadm –C
$ sudo ipvsadm –A –t 222.33.180.62:80 –s wlc
$ sudo ipvsadm –a –t 222.33.180.62:80 –r 172.16.0.12 –g
$ sudo ipvsadm –a –t 222.33.180.62:80 –r 172.16.0.13 –g
#NAT
$ sudo ipvsadm –C
$ sudo ipvsadm –A –t 222.33.180.62:80 –s wlc
$ sudo ipvsadm –a –t 222.33.180.62:80 –r 172.16.0.12 –m
$ sudo ipvsadm –a –t 222.33.180.62:80 –r 172.16.0.13 –m
#TUN
$ sudo ipvsadm –C
$ sudo ipvsadm –A –t 222.33.180.62:80 –s wlc
$ sudo ipvsadm –a –t 222.33.180.62:80 –r 172.16.0.12 –i
$ sudo ipvsadm –a –t 222.33.180.62:80 –r 172.16.0.13 –i


 664
664


 被折叠的 条评论
为什么被折叠?
被折叠的 条评论
为什么被折叠?
 到【灌水乐园】发言


