


 本文详细介绍了线程的工作原理,包括进程与线程的概念,线程状态的切换,以及Java中四种常见的线程通信方式:volatile、wait/notify、Condition和BlockingQueue。通过实例代码展示了每种通信方式的用法,强调了在多线程环境下确保数据同步和正确通信的重要性。
一、线程之间如何工作
大家都知道计算机的核心是CPU,它承担着计算机所搜的计算任务, 而操作系统负责计算机任务的调度,资源管理与分配。
进程是一个具有独立功能的程序,是操作系统进行资源分配和调度的基本单位,是应用程序的载体,比如微信、IDEA等运行都属于进程的范畴。进程是任务调度的最小单位,每个进程都有属于自己的一块独立内存,各个进程之间是相互隔离的。线程则是程序执行中一个单一的的顺序控制流程,是程序执行的最小单元,是处理器调度的最小单元。一个进程可以有一个或多个线程,多个线程之间共享进程的内存空间。举个例子,微信能够保证用户刷视频的同时,及时接收好友信息,可以简单理解为微信(进程)拥有俩个执行中的线程。
二、线程状态如何切换
线程运行过程中会经历创立、运行、暂停、销毁等几个阶段
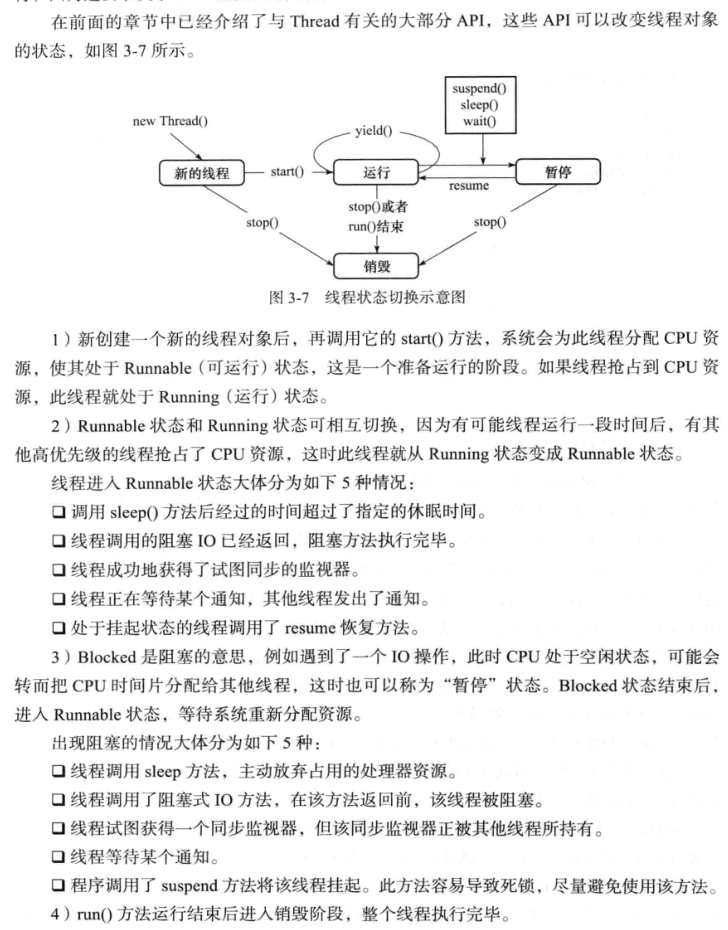
上图为大家展示了线程运行过程中的几种状态,其中wait()方法的作用是使得当前执行代码的线程进入等待(暂停),直到接到notify()方法通知或者被中断为止。需要注意的是,在上述俩个方法,只能在同步方法或者同步代码块中执行,即必须获得对象级别锁
每个锁对象都有两个队列,一个是就绪队列,一个是阻塞队列。就绪队列存储了将要获得锁的进程,阻塞队列存储了被阻塞的进程。一个线程被唤醒后,才会进入就绪队列,等待CPU的调度;反之,一个线程被wait后,就会进入阻塞队列,等待下一次被唤醒。
三、线程间通信
线程通信的有以下几种
1、共享变量
第一类:使用volatile关键字实现 示例代码如下:
public class RunThread extends Thread{

	private volatile boolean isRunning = true;
	private void setRunning(boolean isRunning){
		this.isRunning = isRunning;
	}

	public void run(){
		System.out.println("进入run方法..");
		int i = 0;
		while(isRunning == true){
			//..
		}
		System.out.println("线程停止");
	}

	public static void main(String[] args) throws InterruptedException {
		RunThread rt = new RunThread();
		rt.start();
		Thread.sleep(1000);
		rt.setRunning(false);
		System.out.println("isRunning的值已经被设置了false");
	}

}
不加volatile关键字,while循环不会停止。该关键字使得isRunning对其它进程可见,当其它进程对变量进行修改后,线程会强制执行把共性内存内的变量值重新读取一遍,加载到自身的工作内存中。
但是 volatile关键字不具有同步性,一般只用于多线程的变量读操作,并不能代替synchronize关键字的同步性
第二类:使用synchronized/wait/notify实现
对于生产者-消费者问题,有两个要点需要注意:
第一,在多个同类型线程(多个生产者线程或者消费者线程)的场景中,为防止wait的条件发生变化而导致线程异常终止,我们在阻塞线程被唤醒的同时还必须对wait的条件进行额外的检查,即 使用 while 循环代替 if条件;
第二,在多个同类型线程(多个生产者线程或者消费者线程)的场景中,为防止生产者(消费者)仅唤醒生产者(消费者),保证生产者和消费者互相唤醒,需要 使用 notifyAll 替代 notify。
示例代码如下:
public class Demo1 {

    private final List<Integer> list =new ArrayList<>();

    public static void main(String[] args) {
        Demo1 demo =new Demo1();
        new Thread(()->{
            for (int i=0;i<10;i++){
                synchronized (demo.list){
                   // if(demo.list.size()%2==1){
                    while(demo.list.size()%2==1){
                        try {
                            demo.list.wait();
                        } catch (InterruptedException e) {
                            e.printStackTrace();
                        }
                    }
                    demo.list.add(i);
                    System.out.print(Thread.currentThread().getName());
                    System.out.println(demo.list);
                    //demo.list.notify();
                    demo.list.notifyAll();
                }
            }

        }).start();

        new Thread(()->{
            for (int i=0;i<10;i++){
                synchronized (demo.list){
                    //if(demo.list.size()%2==0){
                    while(demo.list.size()%2==0){
                        try {
                            demo.list.wait();
                        } catch (InterruptedException e) {
                            e.printStackTrace();
                        }
                    }
                    demo.list.add(i);
                    System.out.print(Thread.currentThread().getName());
                    System.out.println(demo.list);
                    //demo.list.notify();
                    demo.list.notifyAll();
                }
            }
        }).start();
    }
}
输出结果如下:
Thread-0[0]
Thread-1[0, 0]
Thread-0[0, 0, 1]
Thread-1[0, 0, 1, 1]
Thread-0[0, 0, 1, 1, 2]
Thread-1[0, 0, 1, 1, 2, 2]
Thread-0[0, 0, 1, 1, 2, 2, 3]
Thread-1[0, 0, 1, 1, 2, 2, 3, 3]
Thread-0[0, 0, 1, 1, 2, 2, 3, 3, 4]
Thread-1[0, 0, 1, 1, 2, 2, 3, 3, 4, 4]
Thread-0[0, 0, 1, 1, 2, 2, 3, 3, 4, 4, 5]
Thread-1[0, 0, 1, 1, 2, 2, 3, 3, 4, 4, 5, 5]
Thread-0[0, 0, 1, 1, 2, 2, 3, 3, 4, 4, 5, 5, 6]
Thread-1[0, 0, 1, 1, 2, 2, 3, 3, 4, 4, 5, 5, 6, 6]
Thread-0[0, 0, 1, 1, 2, 2, 3, 3, 4, 4, 5, 5, 6, 6, 7]
Thread-1[0, 0, 1, 1, 2, 2, 3, 3, 4, 4, 5, 5, 6, 6, 7, 7]
Thread-0[0, 0, 1, 1, 2, 2, 3, 3, 4, 4, 5, 5, 6, 6, 7, 7, 8]
Thread-1[0, 0, 1, 1, 2, 2, 3, 3, 4, 4, 5, 5, 6, 6, 7, 7, 8, 8]
Thread-0[0, 0, 1, 1, 2, 2, 3, 3, 4, 4, 5, 5, 6, 6, 7, 7, 8, 8, 9]
Thread-1[0, 0, 1, 1, 2, 2, 3, 3, 4, 4, 5, 5, 6, 6, 7, 7, 8, 8, 9, 9]
此类通信方式属于等待/通知机制,不同于volatile关键字的实现机制。第一类实现方式是多个线程主动读取一个共享变量,在花费时间读取变量的基础上,加上while等条件判断语句,并不能保证读到的变量是预期结果。
如果有多个线程等待,则由线程规划器随机挑选出其中一个呈wait状态的线程,对其发出通知notify,并使它等待获取该对象的对象锁。需要说明的是,在执行notify()方法后,当前线程不会马上释放该对象锁,呈wait状态的线程也并不能马上获取该对象锁,到等到执行notify()方法的线程将程序执行完,也就是退出synchronized代码块后,当前线程才会释放锁,而呈wait状态所在的线程才可以获取该对象锁。
第三类:使用lock/Condition实现
相比使用Object的wait()/notify(),使用Condition的await()/signal()这种方式能够更加安全和高效地实现线程间协作。 Condition是个接口,基本的方法就是await()和signal()方法。Condition依赖于Lock接口,生成一个Condition的基本代码是lock.newCondition() 。
必须要注意的是,Condition 的 await()/signal() 使用都必须在lock保护之内,也就是说,必须在lock.lock()和lock.unlock之间才可以使用。
示例代码如下:
public class Task {
    private final Lock lock = new ReentrantLock();

    private final Condition addConditon = lock.newCondition();
    private final Condition subConditon = lock.newCondition();

    private volatile int num = 0;
    private List<String> list = new ArrayList<>();

    public void add() {
        for (int i = 0; i < 10; i++) {
            lock.lock();

            try {
                if (list.size() == 10) {
                    addConditon.await();
                }
                num++;
                Thread.sleep(100);
                list.add("add " + num);
                System.out.println("The list size is " + list.size());
                System.out.println("The add thread is " + Thread.currentThread().getName());
                System.out.println("-------------");
                subConditon.signal();

            } catch (Exception e) {
                e.printStackTrace();
            } finally {
                lock.unlock();
            }
        }
    }

    public void sub() {
        for (int i = 0; i < 10; i++) {
            lock.lock();

            try {

                if (list.size() == 0) {
                    subConditon.await();
                }
                num--;
                Thread.sleep(100);
                list.remove(0);
                System.out.println("The list size is " + list.size());
                System.out.println("The sub thread is " + Thread.currentThread().getName());
                System.out.println("-------------");
                addConditon.signal();

            } catch (Exception e) {
                e.printStackTrace();
            } finally {
                lock.unlock();
            }
        }
    }


    public static void main(String[] args) {
        Task task = new Task();
        new Thread(task::add).start();
        new Thread(task::sub).start();
    }
}
输出结果如下:
The list size is 1
The add thread is Thread-0
-------------
The list size is 2
The add thread is Thread-0
-------------
The list size is 3
The add thread is Thread-0
-------------
The list size is 4
The add thread is Thread-0
-------------
The list size is 5
The add thread is Thread-0
-------------
The list size is 6
The add thread is Thread-0
-------------
The list size is 5
The sub thread is Thread-1
-------------
The list size is 6
The add thread is Thread-0
-------------
The list size is 7
The add thread is Thread-0
-------------
The list size is 8
The add thread is Thread-0
-------------
The list size is 9
The add thread is Thread-0
-------------
The list size is 8
The sub thread is Thread-1
-------------
The list size is 7
The sub thread is Thread-1
-------------
The list size is 6
The sub thread is Thread-1
-------------
The list size is 5
The sub thread is Thread-1
-------------
The list size is 4
The sub thread is Thread-1
-------------
The list size is 3
The sub thread is Thread-1
-------------
The list size is 2
The sub thread is Thread-1
-------------
The list size is 1
The sub thread is Thread-1
-------------
The list size is 0
The sub thread is Thread-1
-------------
使用Condition往往比使用传统的通知等待机制(Object的wait()/notify())要更灵活、高效,也可以使用多个Condition实现通知部分线程
第四类:使用PipedInputStream/PipedOutputStream实现
PipedInputStream类与PipedOutputStream类用于在应用程序中创建管道通信。一个PipedInputStream实例对象必须和一个PipedOutputStream实例对象进行连接而产生一个通信管道。
PipedOutputStream可以向管道中写入数据,PipedIntputStream可以读取PipedOutputStream向管道中写入的数据,这两个类主要用来完成线程之间的通信。 PipedInputStream和PipedOutputStream的实现原理类似于”生产者-消费者”原理,PipedOutputStream是生产者,PipedInputStream是消费者。
public class Test {
    public static void main(String[] args) {
        try {
            PipedInputStream inputStream = new PipedInputStream();
            PipedOutputStream outputStream = new PipedOutputStream();

            // inputStream.connect(outputStream);   // 效果相同
            outputStream.connect(inputStream);

            ThreadRead threadRead = new ThreadRead( inputStream);
            threadRead.start();

            Thread.sleep(2000);

            ThreadWrite threadWrite = new ThreadWrite( outputStream);
            threadWrite.start();

        } catch (IOException e) {
            e.printStackTrace();
        } catch (InterruptedException e) {
            e.printStackTrace();
        }
    }
}

//读线程


class ThreadRead  extends Thread {

  private PipedInputStream input;

  public ThreadRead ( PipedInputStream input) {
      super();
      this.input = input;
  }

  public void readMethod(PipedInputStream input) {
      try {
          System.out.println("readMethod begin  :");
          byte[] byteArray = new byte[20];
          int readLength = input.read(byteArray);
          while (readLength != -1) {
              String newData = new String(byteArray, 0, readLength);
              System.out.print(newData);
              readLength = input.read(byteArray);
          }
          System.out.println();
          System.out.println("readMethod end  :");
          input.close();
      } catch (IOException e) {
          e.printStackTrace();
      }
  }

  @Override
  public void run() {
      this.readMethod(input);
  }
}

//写线程
class ThreadWrite extends Thread {

  private PipedOutputStream out;

  public ThreadWrite( PipedOutputStream out) {
      super();
      this.out = out;
  }

  public void writeMethod(PipedOutputStream out) {
      try {
          System.out.println("writeMethod begin :");
          for (int i = 0; i < 30; i++) {
              String outData = "" + (i + 1);
              out.write(outData.getBytes());
              System.out.print(outData);
          }
          System.out.println();
          System.out.println("writeMethod end :");
          out.close();
      } catch (IOException e) {
          e.printStackTrace();
      }
  }

  @Override
  public void run() {
      this.writeMethod(out);
  }
}
输出结果如下:
readMethod begin  :
writeMethod begin :
123456789101112131415161718192021222324252627282930
writeMethod end :
123456789101112131415161718192021222324252627282930
readMethod end  :
第五类:使用BlockingQueue实现
BlockingQueue定义的常用方法如下:
- add(Object):把Object加到BlockingQueue里,如果BlockingQueue可以容纳,则返回true,否则抛出异常。
- offer(Object):表示如果可能的话,将Object加到BlockingQueue里,即如果BlockingQueue可以容纳,则返回true,否则返回false。
- put(Object):把Object加到BlockingQueue里,如果BlockingQueue没有空间,则调用此方法的线程被阻断直到BlockingQueue里有空间再继续。
- poll(time):获取并删除BlockingQueue里排在首位的对象,若不能立即取出,则可以等time参数规定的时间,取不到时返回null。当不传入time值时,立刻返回。
- peek():立刻获取BlockingQueue里排在首位的对象,但不从队列里删除,如果队列为空,则返回null。
- take():获取并删除BlockingQueue里排在首位的对象,若BlockingQueue为空,阻断进入等待状态直到BlockingQueue有新的对象被加入为止。
BlockingQueue有四个具体的实现类:
- ArrayBlockingQueue:数组阻塞队列,规定大小,其构造函数必须带一个int参数来指明其大小。其所含的对象是以FIFO(先入先出)顺序排序的。
- LinkedBlockingQueue:链阻塞队列,大小不定,若其构造函数带一个规定大小的参数,生成的BlockingQueue有大小限制,若不带大小参数,所生成的BlockingQueue的大小由Integer.MAX_VALUE来决定。其所含的对象是以FIFO顺序排序的。
- PriorityBlockingQueue:类似于LinkedBlockingQueue,但其所含对象的排序不是FIFO,而是依据对象的自然排序顺序或者是构造函数所带的Comparator决定的顺序。
- SynchronousQueue:特殊的BlockingQueue,它的内部同时只能够容纳单个元素,对其的操作必须是放和取交替完成的。
- DelayQueue:延迟队列,注入其中的元素必须实现 java.util.concurrent.Delayed 接口
public class BlockingQueueDemo {

    public static void main(String[] args) {
        LinkedBlockingQueue<String> queue = new LinkedBlockingQueue<>();
        //读线程
        new Thread(() -> {
            int i =0;
            while (true) {
                try {
                    String item = queue.take();
                    System.out.print(Thread.currentThread().getName() + ": " + i + " ");
                    System.out.println(item);
                    i++;
                } catch (Exception e) {
                    e.printStackTrace();
                }
            }
        }).start();
        //写线程
        new Thread(() -> {
            for (int i = 0; i < 10; i++) {
                try {
                    String item = "go"+i;
                    System.out.print(Thread.currentThread().getName() + ": " + i + " ");
                    System.out.println(item);
                    queue.put(item);
                } catch (Exception e) {
                    e.printStackTrace();
                }
            }
        }).start();
    }
}
以上内容参考文章:
进程与线程 - 浅浅念 - 博客园
Java中的ThreadLocal详解 - 夏末秋涼 - 博客园
java线程间通讯的几种方式_顽石九变的博客-CSDN博客_java线程间的通信方式三种
Java多线程编程(三)线程间通信 - BigJunOba - 博客园
JAVA线程通信详解_抽离的心的博客-CSDN博客_java线程通信


 5万+
5万+

 被折叠的 条评论
为什么被折叠?
被折叠的 条评论
为什么被折叠?
 到【灌水乐园】发言


