


一、首先创建一个maven项目,名字为“sping-batch”,maven项目创建方法参考我的另一篇文章
地址:IDEA创建一个maven项目_人……杰的博客-CSDN博客_idea新建一个maven项目
二、将maven项目改造成一个Spring Batch项目
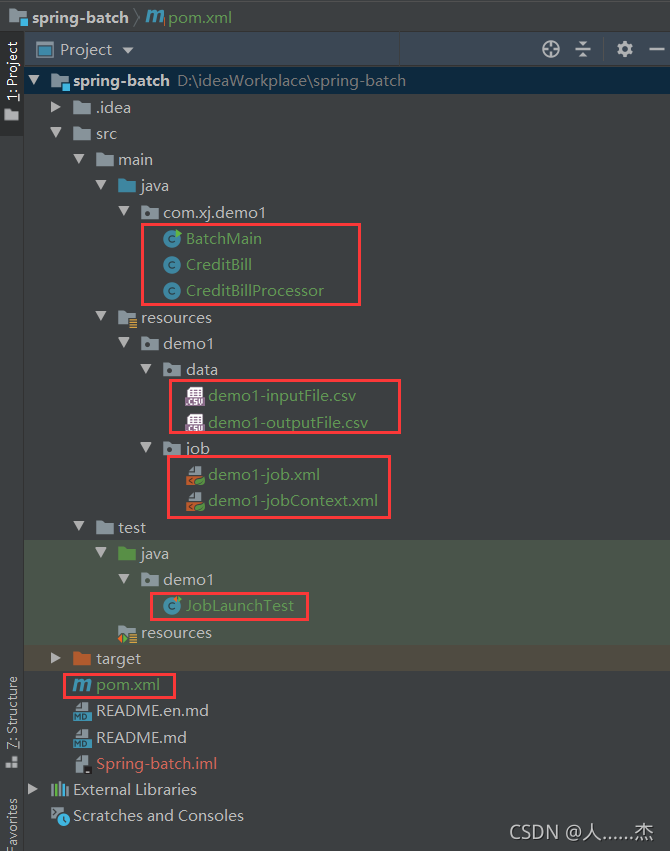
1.项目目录结构:
2.在pom.xml引入Spring Batch依赖的jar包
pom.xml:
    <!--配置参数-->
    <properties>
        <jdk.version>1.8</jdk.version>
        <spring.version>4.3.8.RELEASE</spring.version>
        <spring.batch.version>3.0.7.RELEASE</spring.batch.version>
        <mysql.driver.version>5.1.25</mysql.driver.version>
        <junit.version>4.11</junit.version>
    </properties>

    <!--依赖jar包-->
    <dependencies>
        <!-- Spring Core -->
        <dependency>
            <groupId>org.springframework</groupId>
            <artifactId>spring-core</artifactId>
            <version>${spring.version}</version>
        </dependency>

        <!-- Spring jdbc, for database -->
        <dependency>
            <groupId>org.springframework</groupId>
            <artifactId>spring-jdbc</artifactId>
            <version>${spring.version}</version>
        </dependency>

        <!-- Spring XML to/back object -->
        <dependency>
            <groupId>org.springframework</groupId>
            <artifactId>spring-oxm</artifactId>
            <version>${spring.version}</version>
        </dependency>

        <!-- MySQL database driver -->
        <dependency>
            <groupId>mysql</groupId>
            <artifactId>mysql-connector-java</artifactId>
            <version>${mysql.driver.version}</version>
        </dependency>

        <!-- Spring Batch dependencies -->
        <dependency>
            <groupId>org.springframework.batch</groupId>
            <artifactId>spring-batch-core</artifactId>
            <version>${spring.batch.version}</version>
        </dependency>

        <dependency>
            <groupId>org.springframework.batch</groupId>
            <artifactId>spring-batch-infrastructure</artifactId>
            <version>${spring.batch.version}</version>
        </dependency>

        <!-- Spring Batch unit test -->
        <dependency>
            <groupId>org.springframework.batch</groupId>
            <artifactId>spring-batch-test</artifactId>
            <version>${spring.batch.version}</version>
        </dependency>

        <!-- Junit -->
        <dependency>
            <groupId>junit</groupId>
            <artifactId>junit</artifactId>
            <version>${junit.version}</version>
            <scope>test</scope>
        </dependency>
    </dependencies>
3.配置作业仓库、作业调度器、事务管理器、读步骤、处理步骤、写步骤
demo1-jobContext.xml:
<?xml version="1.0" encoding="UTF-8"?>
<beans xmlns="http://www.springframework.org/schema/beans"
       xmlns:xsi="http://www.w3.org/2001/XMLSchema-instance"
       xsi:schemaLocation="http://www.springframework.org/schema/beans http://www.springframework.org/schema/beans/spring-beans.xsd">

    <!--定义作业仓库 Job执行期间的元数据存储在内存中-->
    <bean id="jobRepository" class="org.springframework.batch.core.repository.support.MapJobRepositoryFactoryBean">
    </bean>

    <!--定义作业调度器,用来启动job-->
    <bean id="jobLauncher" class="org.springframework.batch.core.launch.support.SimpleJobLauncher">
        <!--注入jobRepository-->
        <property name="jobRepository" ref="jobRepository"/>
    </bean>

    <!--定义事务管理器,用于Spring Batch框架中对数据操作提供事务能力-->
    <bean id="transactionManager" class="org.springframework.batch.support.transaction.ResourcelessTransactionManager"/>

    <!--读取信用卡账单文件,CSV 格式-->
    <!--使用FlatFileItemReader读文本文件-->
    <bean id="csvItemReader" class="org.springframework.batch.item.file.FlatFileItemReader" scope="step">
        <!--指定读取的资源文件-->
        <property name="resource" value="classpath:demo1/data/demo1-inputFile.csv"/>
        <!--通过lineMapper把文本中的一行转换为领域对象creditBill-->
        <property name="lineMapper">
            <bean class="org.springframework.batch.item.file.mapping.DefaultLineMapper">
                <!--lineTokenizer定义文本中每行的分隔符号-->
                <property name="lineTokenizer" ref="lineTokenizer"/>
                <!--fieldSetMapper定义了转换结果映射,即具体映射到哪个Java类对象-->
                <property name="fieldSetMapper">
                    <bean class="org.springframework.batch.item.file.mapping.BeanWrapperFieldSetMapper">
                        <property name="prototypeBeanName" value="creditBill"/>
                    </bean>
                </property>
            </bean>
        </property>
    </bean>

    <!--lineTokenizer-->
    <bean id="lineTokenizer" class="org.springframework.batch.item.file.transform.DelimitedLineTokenizer">
        <!--按","符号对行进行切割-->
        <property name="delimiter" value=","/>
        <!--属性名称列表,将切割后的行按顺序投入-->
        <property name="names">
            <list>
                <value>accountID</value>
                <value>name</value>
                <value>amount</value>
                <value>date</value>
                <value>address</value>
            </list>
        </property>
    </bean>

    <!--注入实体类-->
    <bean id="creditBill" class="com.xj.demo1.CreditBill" scope="prototype"></bean>

    <!--数据处理类-->
    <bean id="creditBillProcessor" class="com.xj.demo1.CreditBillProcessor" scope="step"></bean>

    <!--写信用卡账单文件,CSV格式-->
    <bean id="csvItemWriter" class="org.springframework.batch.item.file.FlatFileItemWriter" scope="step">
        <!--要写入的文件位置,因为[classpath:]不是一个具体的目录,这里应当用[file:](从项目根目录开始)指明输出位置-->
        <property name="resource" value="file:src/main/resources/demo1/data/demo1-outputFile.csv"/>
        <!--[lineAggregator成员]指明行聚合器,用来将对象输出到文件时构造文件中的每行的格式-->
        <property name="lineAggregator">
            <!--这里使用Spring Batch自带的DelimitedLineAggregator来作为行聚合器(可以拼接一个个属性形成行)-->
            <bean class="org.springframework.batch.item.file.transform.DelimitedLineAggregator">
                <!--使用","拼接-->
                <property name="delimiter" value=","/>
                <!--fieldExtractor成员用来将Java类的属性组成的数组拼接成行字符串-->
                <property name="fieldExtractor">
                    <bean class="org.springframework.batch.item.file.transform.BeanWrapperFieldExtractor">
                        <property name="names" value="accountID,name,amount,date,address">
                        </property>
                    </bean>
                </property>
            </bean>
        </property>
    </bean>
</beans>
4.配置作业和作业步
demo1-job.xml:
<?xml version="1.0" encoding="UTF-8"?>
<beans xmlns="http://www.springframework.org/schema/beans"
       xmlns:xsi="http://www.w3.org/2001/XMLSchema-instance" xmlns:batch="http://www.springframework.org/schema/batch"
       xsi:schemaLocation="http://www.springframework.org/schema/beans http://www.springframework.org/schema/beans/spring-beans.xsd http://www.springframework.org/schema/batch http://www.springframework.org/schema/batch/spring-batch.xsd">

    <!--导入文件-->
    <import resource="classpath:demo1/job/demo1-jobContext.xml"/>

    <!--定义名字为billJob的作业-->
    <batch:job id="billJob">
        <!--定义名字为billStep的作业步-->
        <batch:step id="billStep">
            <batch:tasklet transaction-manager="transactionManager">
                <!--定义读、处理、写操作,规定每处理两条数据,进行一次写入操作,这样可以提高写的效率-->
                <batch:chunk reader="csvItemReader" processor="creditBillProcessor" writer="csvItemWriter"   commit-interval="2">
                </batch:chunk>
            </batch:tasklet>
        </batch:step>
    </batch:job>
</beans>
5.编写实体对象类CreditBill、处理类CreditBillProcessor和启动方法BatchMain:
CreditBill.java:
package com.xj.demo1;


public class CreditBill {
    //银行卡账户ID
    private String accountID = "";
    //持卡人姓名
    private String name = "";
    //消费金额
    private double amount = 0;
    //消费日期
    private String date = "";
    //消费场所
    private String address = "";

    public String getAccountID() {
        return accountID;
    }

    public void setAccountID(String accountID) {
        this.accountID = accountID;
    }

    public String getName() {
        return name;
    }

    public void setName(String name) {
        this.name = name;
    }

    public double getAmount() {
        return amount;
    }

    public void setAmount(double amount) {
        this.amount = amount;
    }

    public String getDate() {
        return date;
    }

    public void setDate(String date) {
        this.date = date;
    }

    public String getAddress() {
        return address;
    }

    public void setAddress(String address) {
        this.address = address;
    }

    @Override
    public String toString() {
        return this.accountID + "," + this.name + "," + this.amount + "," + this.date + "," + this.address;
    }
}
CreditBillProcessor.java:
package com.xj.demo1;

import org.springframework.batch.item.ItemProcessor;


public class CreditBillProcessor implements ItemProcessor<CreditBill, CreditBill> {
    @Override
    public CreditBill process(CreditBill bill) throws Exception {

        System.out.println(bill.toString());
        //做一些简单的处理
        bill.setAccountID(bill.getAccountID() + "1");
        bill.setName(bill.getName() + "2");
        bill.setAmount(bill.getAmount() + 3);
        bill.setDate(bill.getDate() + "4");
        bill.setAddress(bill.getAddress() + 5);

        return bill;
    }
}
BatchMain.java:
package com.xj.demo1;

import org.springframework.batch.core.Job;
import org.springframework.batch.core.JobExecution;
import org.springframework.batch.core.JobParameters;
import org.springframework.batch.core.launch.JobLauncher;
import org.springframework.context.ApplicationContext;
import org.springframework.context.support.ClassPathXmlApplicationContext;


public class BatchMain {
    public static void main(String[] args) {

        ApplicationContext context = new ClassPathXmlApplicationContext("demo1/job/demo1-job.xml");
        //Spring Batch的作业启动器,
        JobLauncher launcher = (JobLauncher) context.getBean("jobLauncher");
        //在batch.xml中配置的一个作业
        Job job  = (Job)context.getBean("billJob");

        try{
            //开始执行这个作业,获得处理结果(要运行的job,job参数对象)
            JobExecution result = launcher.run(job, new JobParameters());
            System.out.println(result.toString());
        }catch (Exception e){
            e.printStackTrace();
        }
    }
}
6.编写测试类
JobLaunchTest.java:
package demo1;

import org.junit.After;
import org.junit.Before;
import org.junit.Test;
import org.junit.runner.RunWith;
import org.springframework.batch.core.Job;
import org.springframework.batch.core.JobExecution;
import org.springframework.batch.core.JobParameters;
import org.springframework.batch.core.launch.JobLauncher;
import org.springframework.beans.factory.annotation.Autowired;
import org.springframework.beans.factory.annotation.Qualifier;
import org.springframework.test.context.ContextConfiguration;
import org.springframework.test.context.junit4.SpringJUnit4ClassRunner;


@RunWith(SpringJUnit4ClassRunner.class)
@ContextConfiguration(locations = {"/demo1/job/demo1-job.xml"})
public class JobLaunchTest {

    @Autowired
    private JobLauncher jobLauncher;

    @Autowired
    @Qualifier("billJob")
    private Job job;

    @Before
    public void setUp() throws Exception{

    }

    @After
    public void tearDown() throws Exception{

    }

    @Test
    public void importProducts() throws Exception{
        JobExecution result = jobLauncher.run(job, new JobParameters());
        System.out.println(result.toString());
    }
}
7.配置读文件和写文件:
demo1-inputFile.csv
4101231234656,tom,100.00,2013-12-31 12:00:08,Lu lit
4101236543210,tom,120.00,2013-12-31 12:00:08,Lu Zui
demo1-outputFile.csv
是一个空文件,专门用来写入的数据。
三、进行运行测试
1.运行BatchMain:

运行结果:

2.运行测试文件JobLaunchTest:

运行结果:

代码地址:
SpringBatch: 学习《Spring Batch 批处理框架》过程中所做的代码备份。
心得:
整天看书看书,结果发现好多东西不去实践就无法真正的理解吃透,所以开始一边看书一边去实践,并做相应的笔记。这篇文章是基于一本书中的某一章来写的,结果书中代码有问题,调试了好久都无非解决,最后连续参考了好多博主的文章,才发现问题,并完成了这篇博文。整个历程耗时将近三天吧,不过是边工作边学习的三天。最后还是想吐槽一下那本书的作者,书中代码有遗漏的部分也没有发现,坑人不浅,缺乏严谨的态度……


 3404
3404


 被折叠的 条评论
为什么被折叠?
被折叠的 条评论
为什么被折叠?
 到【灌水乐园】发言


