


1.前言
拥抱开源,热爱开源,将我们认为不错的代码开源到gihtub,将我们的库发布到jcenter\mevan等。
2.准备工作
2.1 准备
- 申请仓库账号
- 注意model为android library项目
2.2 插件引入
在根目录的gradle文件下加入
classpath 'com.jfrog.bintray.gradle:gradle-bintray-plugin:1.2'
        classpath 'com.github.dcendents:android-maven-plugin:1.2'
个人认为这1个最好保持一直。
最后我们根目录下的gradle文件变成这个样子
// Top-level build file where you can add configuration options common to all sub-projects/modules.

buildscript {
    repositories {
        jcenter()
    }
    dependencies {
        classpath 'com.android.tools.build:gradle:1.3.0'
        classpath 'com.jfrog.bintray.gradle:gradle-bintray-plugin:1.2'
        classpath 'com.github.dcendents:android-maven-plugin:1.2'
        // NOTE: Do not place your application dependencies here; they belong
        // in the individual module build.gradle files
    }
}

allprojects {
    repositories {
        jcenter()
    }
}

task clean(type: Delete) {
    delete rootProject.buildDir
}
2.3 在根目录下创建一个bintray.gradle文件(必须这名字)
group = PROJ_GROUP
version = PROJ_VERSION
project.archivesBaseName = PROJ_ARTIFACTID

apply plugin: 'com.jfrog.bintray'
apply plugin: 'maven-publish'

task sourcesJar(type: Jar) {
    from android.sourceSets.main.java.srcDirs
    classifier = 'sources'
}

task javadoc(type: Javadoc) {
    source = android.sourceSets.main.java.srcDirs
    classpath += configurations.compile
    classpath += project.files(android.getBootClasspath().join(File.pathSeparator))
}

task javadocJar(type: Jar, dependsOn: javadoc) {
    classifier = 'javadoc'
    from javadoc.destinationDir
}

javadoc {
    options{
        encoding "UTF-8"
        charSet 'UTF-8'
        author true
        version true
        links "http://docs.oracle.com/javase/7/docs/api"
        title PROJ_ARTIFACTID
    }
}

artifacts {
    archives javadocJar
    archives sourcesJar
}

def pomConfig = {
    licenses {
        license {
            name "The Apache Software License, Version 2.0"
            url "http://www.apache.org/licenses/LICENSE-2.0.txt"
            distribution "repo"
        }
    }
    developers {
        developer {
            id DEVELOPER_ID
            name DEVELOPER_NAME
            email DEVELOPER_EMAIL
        }
    }
    //这里有引号,并且有个空格,否则生成不了依赖,主要是这里的dependencies并不是build.gradle里的dependencies,而gradle会把他当成自身的dependencies处理
    "dependencies " {
//        dependency{
//            groupId "com.alibaba"
//            artifactId "fastjson"
//            "version " "1.2.6"
//            //同dependencies
//        }
    }

}

publishing {
    publications {
        mavenJava(MavenPublication) {
            artifactId PROJ_ARTIFACTID

            pom{
                packaging 'aar'
            }
            pom.withXml {
                def root = asNode()
                root.appendNode('description', PROJ_DESCRIPTION)
                root.children().last() + pomConfig
            }
        }
    }
}

bintray {
    Properties properties = new Properties()
    properties.load(project.rootProject.file('local.properties').newDataInputStream())

    user = properties.getProperty('BINTRAY_USER');
    key = properties.getProperty('BINTRAY_KEY');


    configurations = ['archives']
    publications = ['mavenJava']
    publish = true

    pkg {
        repo = 'maven'
        name = PROJ_NAME
        desc = PROJ_DESCRIPTION
        websiteUrl = PROJ_WEBSITEURL
        issueTrackerUrl = PROJ_ISSUETRACKERURL
        vcsUrl = PROJ_VCSURL
        licenses = ['Apache-2.0']
        publicDownloadNumbers = true
    }
}
上述文件几乎不用修改,假如你将要上传的包 包含其他的三方库。在以下块中进行申明
"dependencies " {
//        dependency{
//            groupId "com.alibaba"
//            artifactId "fastjson"
//            "version " "1.2.6"
//            //同dependencies
//        }
    }
通俗易懂,一目了然,就不多做解释了,并且在根目录下的gradle.properties文件中加入
PROJ_GROUP=这里改成groupId,比如com.android.support
PROJ_VERSION=这里改成库版本,比如22.2.0
PROJ_NAME=这里改成库名字,比如appcompat
PROJ_WEBSITEURL=这里改成github地址,比如https://github.com/android/appcompat
PROJ_ISSUETRACKERURL=这里改成issue地址,比如https://github.com/android/appcompat/issues
PROJ_VCSURL=这里改成版本控制地主,比如https://github.com/android/appcompat.git
PROJ_DESCRIPTION=这里改成库的描述信息
PROJ_ARTIFACTID=这里改成库的标示,比如appcompat-v7

DEVELOPER_ID=这里改成开发者id,比如
DEVELOPER_NAME=这里改成开发者名字,比如android
DEVELOPER_EMAIL=这里改成开发者邮箱,比如someone@android.com
2.4 剩余配置
- 在Model对应的gralde文件中配置签名\引入bintray.gradle,最终代码如下,如看不懂配置相关,阅读这篇 或者自行阅读gradle for android
apply plugin: 'com.android.application'

android {
    compileSdkVersion 23
    buildToolsVersion "23.0.2"

    defaultConfig {
        minSdkVersion 19
        targetSdkVersion 23
        versionCode 1
        versionName "1.0"
    }
    buildTypes {
        release {
            minifyEnabled false
            proguardFiles getDefaultProguardFile('proguard-android.txt'), 'proguard-rules.pro'
        }
    }
}

dependencies {
    compile fileTree(dir: 'libs', include: ['*.jar'])
    //compile 'com.android.support:appcompat-v7:23.1.1'

}
apply from:'../bintray.gradle'
注意bintray.gradle 一定要放在文件最下面。
- 配置BINTRAY_KEY 和BINTRAY_USER 也就是一开始注册的那个
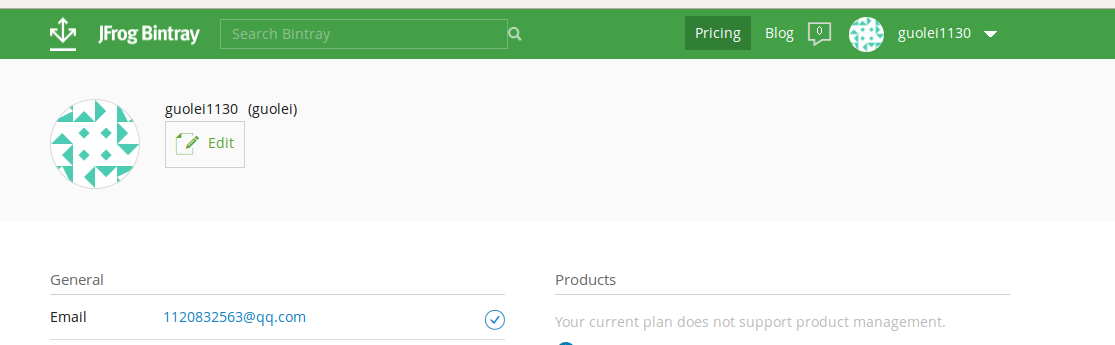
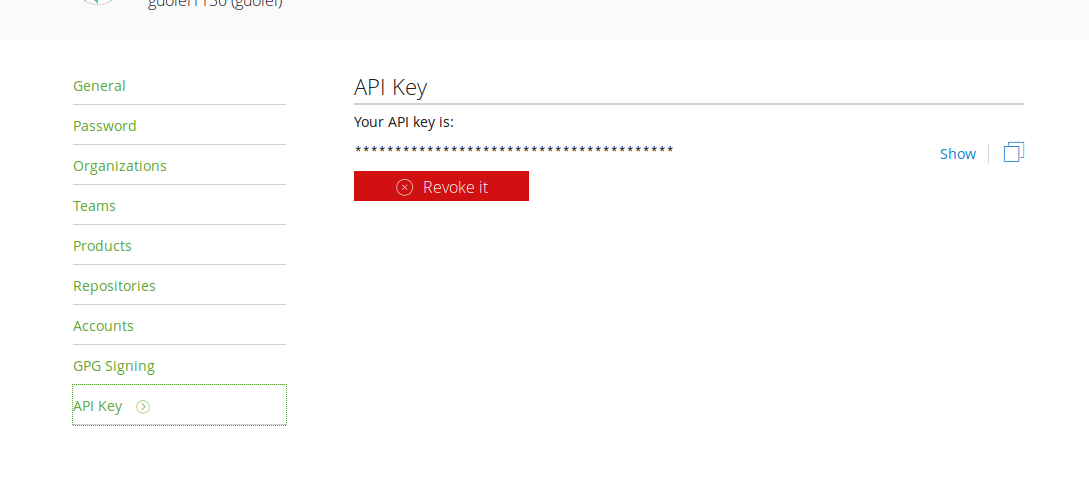
guolei1130 为我的用户名,查看key 点击edit,
点api key ,show 即可看到。
在根目录下的local.properties 配置。
BINTRAY_KEY=e21c3f96df17xxxxxxxx
BINTRAY_USER=guolei1130
这里对应的是bintray.gradle中的这一段代码,当然,你可以修改这段代码,将这2个属性写在任意位置
Properties properties = new Properties()
    properties.load(project.rootProject.file('local.properties').newDataInputStream())

    user = properties.getProperty('BINTRAY_USER');
    key = properties.getProperty('BINTRAY_KEY');
最后,sync now。
3.上传前准备
3.1 生成aar 包(上传)
build,生成对应的aar包。
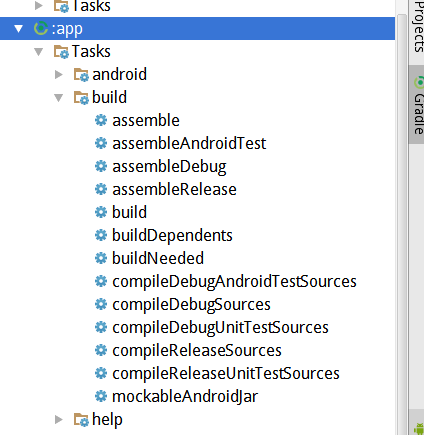
3.2 生成jardocjar sourcesjar
在model 对应的other task中,找到上面2个,点击生成 一般不慧出错
3.3 在publish中点击task生成pom文件
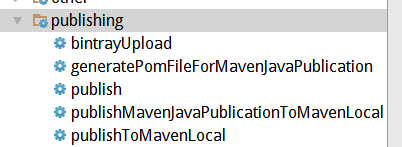
点击第二个即可
3.4 上传
点击上图中的第一个task,如果出错,根据错误排查即可,一般就是身份验证的相关问题。
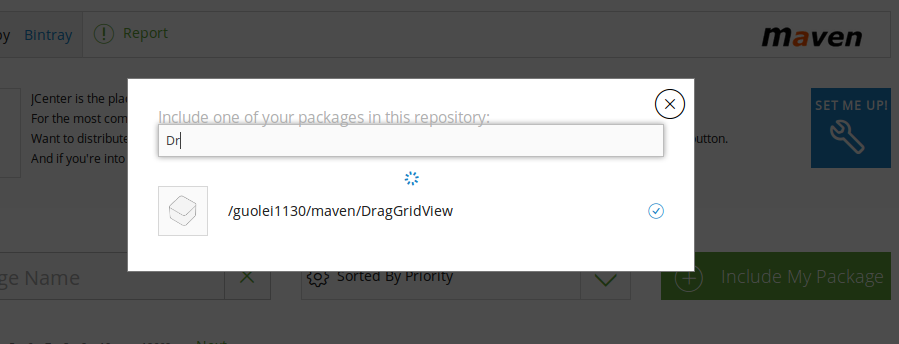
4. 导入的jcenter(需经过审核)

这个mevan仓库就是我刚才上传的,但是我们需要将他导入到jcenter 中,点击jcenter.点击有侧导入,筛选将要导入的库,等待管理员审核即可。
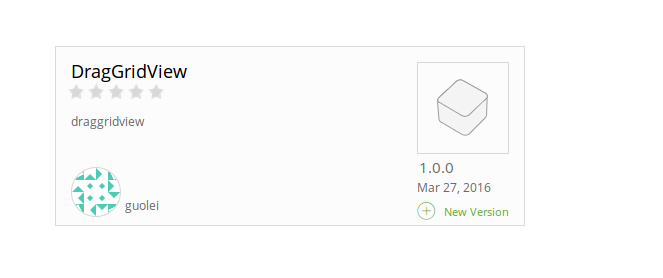
5. 最后来看下我的库
github地址,求个star
最后来张图证明我是刚刚上传的。
没错,就是这么so easy.


 680
680

 被折叠的 条评论
为什么被折叠?
被折叠的 条评论
为什么被折叠?
 到【灌水乐园】发言


