


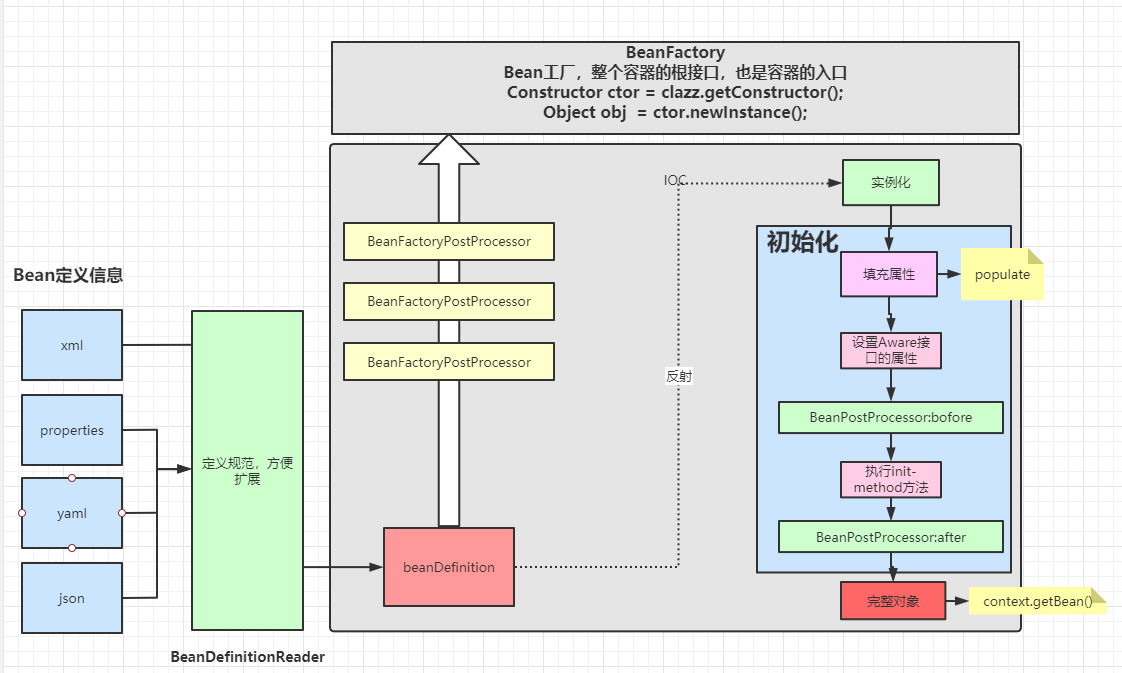
 本文深入剖析Spring源码,从创建ClassPathXmlApplicationContext开始,讲解refresh函数的10个核心步骤,包括bean定义信息的加载、bean工厂的准备、bean的实例化和初始化等关键流程,旨在帮助读者理解Spring框架的工作原理。
上一篇我们整体概述Spring的源码,这一篇我们来整体debug过一遍Spring的源码。
Spring源码前置知识
- Java基础,反射、代理等
- 熟练使用Spring
- 熟悉常见的设计模式,包括但不限于工厂、代理、适配、观察者模式、责任链等
- 熟悉常见的数据结构
- 懂多线程与JVM更好
如何读源码
- 优先把握整体脉络,不要太专注细节,先整体后部分
- 必看注释(类、接口、方法)
- 学会见名知意,源码的类、方法命名比较规范
- 大胆猜测,小心验证
- 必须画图,时序图、结构图、总结图
- 坚持!坚持!坚持!
搭建源码调试环境
估计搭建Spring源码的调试环境会难住部分人。这里我收集几个成功搭建的案例供大家参考。
整体debug
简单的demo
使用上一篇提供的简单例子进行调试。
// Bean类
public class Student {


    private int id;
    private String name;
    private static String gender = "男";
	//  省略getter/setter
}

// xml配置文件
<?xml version="1.0" encoding="UTF-8"?>
<beans xmlns="http://www.springframework.org/schema/beans"
       xmlns:xsi="http://www.w3.org/2001/XMLSchema-instance"
       xmlns:context="http://www.springframework.org/schema/context"
       xmlns:aop="http://www.springframework.org/schema/aop"
       xsi:schemaLocation="http://www.springframework.org/schema/beans http://www.springframework.org/schema/beans/spring-beans.xsd http://www.springframework.org/schema/context https://www.springframework.org/schema/context/spring-context.xsd http://www.springframework.org/schema/aop https://www.springframework.org/schema/aop/spring-aop.xsd">

    <bean class="com.mashibing.Student" id="student">
        <property name="id" value="1"></property>
        <property name="name" value="zhangsan"></property>
    </bean>
</beans>

// 启动类
public class MyTest {


    public static void main(String[] args) {


        ApplicationContext context = new ClassPathXmlApplicationContext("my-test.xml");
        Student student = context.getBean(Student.class);
        System.out.println("姓名 " + student.getName());
    }
}
spring启动入口
-
创建一个新的ClassPathXmlApplicationContext,从xml文件中加载给定的bean定义信息,并且刷新上下文。

执行的
ClassPathXmlApplicationContext构造函数,尤其注意注意里面的一个函数refresh(),这个函数是通过启动spring的所有核心流程的入口。
为什么说这个
refresh函数是spring启动的核心入口?-
refresh定义在AbstractApplicationContext类中 -
查看一下这个抽象类的子类,注意2个比较典型的
ClassPathXmlApplicationContext和AnnotationConfigApplicationContext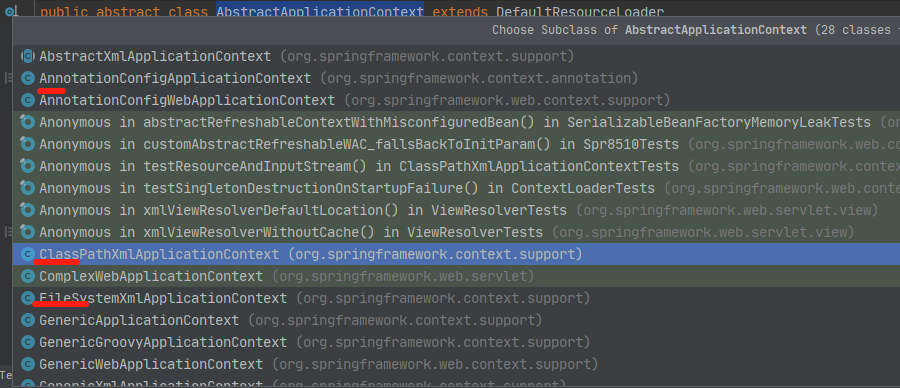
-
无论是通过xml配置文件启动启动,还是通过注解扫描启动,都会由这个抽象类的
refresh()方法进入spring的核心流程。
-
-
继续调试进入比较核心的入口方法
AbstractApplicationContext#refresh(),里面有10几个方法,夸张点说掌握了里面10个方法,大体就弄懂了spring的源码。每个方法大体作用,在下面的代码做了注释,可以参照看,我们在如何读源码也强调了一定要学会看注释。后续我们进入每个方法看一下大体作用。@Override public void refresh() throws BeansException, IllegalStateException { synchronized (this.startupShutdownMonitor) { // Prepare this context for refreshing. /** * 1 做容器刷新前的准备工作 */ prepareRefresh(); // Tell the subclass to refresh the internal bean factory. //2 创建容器对象:DefaultListableBeanFactory // 加载xml配置文件的属性值到当前工厂中,最重要的就是BeanDefinition ConfigurableListableBeanFactory beanFactory = obtainFreshBeanFactory(); // Prepare the bean factory for use in this context. //3 beanFactory的准备工作,对各种属性进行填充 prepareBeanFactory(beanFactory); try { // Allows post-processing of the bean factory in context subclasses. //4 子类覆盖方法做额外的处理,此处我们自己一般不做任何扩展工作,但是可以查看web中的代码,是有具体实现的 postProcessBeanFactory(beanFactory); // Invoke factory processors registered as beans in the context. // 5 调用各种beanFactory处理器 invokeBeanFactoryPostProcessors(beanFactory); // Register bean processors that intercept bean creation. // 6 注册bean处理器,这里只是注册功能,真正调用的是getBean方法 registerBeanPostProcessors(beanFactory); // Initialize message source for this context. // 7 为上下文初始化message源,即不同语言的消息体,国际化处理,在springmvc的时候通过国际化的代码重点讲 initMessageSource(); // Initialize event multicaster for this context. // 8 初始化事件监听多路广播器 initApplicationEventMulticaster(); // Initialize other special beans in specific context subclasses. // 9 留给子类来初始化其他的bean onRefresh(); // Check for listener beans and register them. // 10 在所有注册的bean中查找listener bean,注册到消息广播器中 registerListeners(); // Instantiate all remaining (non-lazy-init) singletons. // 11 初始化剩下的单实例(非懒加载的) finishBeanFactoryInitialization(beanFactory); // Last step: publish corresponding event. // 12 完成刷新过程,通知生命周期处理器lifecycleProcessor刷新过程,同时发出ContextRefreshEvent通知别人 finishRefresh(); } catch (BeansException ex) { if (logger.isWarnEnabled()) { logger.warn("Exception encountered during context initialization - " + "cancelling refresh attempt: " + ex); } // Destroy already created singletons to avoid dangling resources. // 为防止bean资源占用,在异常处理中,销毁已经在前面过程中生成的单件bean destroyBeans(); // Reset 'active' flag. // 重置active标志 cancelRefresh(ex); // Propagate exception to caller. throw ex; } finally { // Reset common introspection caches in Spring's core, since we // might not ever need metadata for singleton beans anymore... resetCommonCaches(); } } }
refresh函数详解
prepareRefresh()
做容器刷新前的准备工作
- 1、设置容器的启动时间
- 2、设置活跃状态为true
- 3、设置关闭状态为false
- 4、获取Environment对象,并加载当前系统的属性值到Environment对象中
- 5、准备监听器和事件的集合对象,默认为空的集合
第4,5点你会发现用到上一篇提到的2个重要的接口Environment和监听器ApplicationListener
protected void prepareRefresh() {


   // Switch to active.
   // 设置容器启动的时间
   this.startupDate = System.currentTimeMillis();
   // 容器的关闭标志位
   this.closed.set(false);
   // 容器的激活标志位
   this.active.set(true);

   // 留给子类覆盖,初始化属性资源
   initPropertySources();

   // 创建并获取环境对象,验证需要的属性文件是否都已经放入环境中
   getEnvironment().validateRequiredProperties();

   // Store pre-refresh ApplicationListeners...
   // 判断刷新前的应用程序监听器集合是否为空,如果为空,则将监听器添加到此集合中
   if (this.earlyApplicationListeners == null) {


      this.earlyApplicationListeners <
最低0.47元/天 解锁文章


 8363
8363

 被折叠的 条评论
为什么被折叠?
被折叠的 条评论
为什么被折叠?
 到【灌水乐园】发言


