


【Vue3实战】setup语法糖
前言
由于在前端代码的构建当中,我们对代码的简洁易用的需求与日俱增
Vue3推出的setup语法糖
大幅的提高了我们构建代码的效率
这篇博客会在TypeScript的基础上,为大家说明setup语法糖的使用
如果对TypeScript语法不太了解的童鞋,可以访问上面链接的博客来学习TypeScript语法
一、setup语法糖的优势
Vue 3 的 Composition API 和 setup 语法糖带来了一些优势
相较于 Vue 2 的选项 API,它提供了更灵活和可组合的方式来组织组件逻辑。
以下是一些使用 Vue 3 setup 语法糖的好处,并与 Vue 2 进行比较的例子:
1. 更清晰的逻辑组织
Vue 2(使用选项 API):
<script lang="ts">
export default {
  // 数据
  data() {
    return {
      count: 0,
    };
  },
  // 计算属性
  computed: {
    doubleCount() {
      return this.count * 2;
    },
  },
  // 方法
  methods: {
    increment() {
      this.count++;
    },
  },
};
</script>
Vue 3(使用 setup 的传统写法,不建议):
<script lang="ts">
import {computed, ref} from 'vue';

export default {
  setup() {
    // 响应式数据
    const count = ref(0);

    // 计算属性
    const doubleCount = computed(():number => count.value * 2);

    // 方法
    const increment = (): void => {
      count.value++;
    };

    // 返回组件需要的数据和方法
    return {
      count,
      doubleCount,
      increment,
    };
  },
};
</script>
// 相对于Vue2的写法,简化的并不明显
Vue 3(setup 语法糖写法,推荐!):
<script setup lang="ts">
//自动注入
import {computed, ref} from 'vue';

// 响应式数据
const count = ref(0);

// 计算属性
const doubleCount = computed((): number => count.value * 2);

// 方法
const increment = (): void => {
  count.value++;
};
</script>
//和Vue2以及setup传统写法相比,简化了50%的代码
<script setup> 是 Vue 3.0.0+ 中引入的新语法糖,它的目标是简化组件的写法,特别是对于那些相对简单的组件。
2. 更好的类型推断和IDE支持
由于 setup 使用了函数的返回值来定义组件的 API,IDE 能够更好地推断类型和提供代码补全,使开发过程更加流畅。
无需导入
不需要手动导入和声明 ref、reactive 等,它会自动处理。
自动注入组件的上下文
不需要手动使用 this 访问组件上下文,变量和方法都会被自动注入到当前作用域中。
更好的类型推断
TypeScript 用户会受益于更好的类型推断,因为 <script setup> 更符合标准的函数签名。
3. 更灵活的组合逻辑
Vue 3 的 Composition API 允许将相关的逻辑组合在一起,而不是按照选项 API 的生命周期来组织。
这使得代码更容易重用和维护。
下面是一个例子,展示了如何组合逻辑:
<template>
  <div>
    <p>Count: {{ count }}</p>
    <button @click="increment">Increment</button>
  </div>
</template>

<script setup lang="ts">
// 导入 ref 函数
import { ref } from 'vue';

// 定义组合逻辑 - 计数器
const useCounter = () => {
  // 响应式数据
  const count = ref(0);

  // 方法
  const increment = (): void => {
    count.value++;
  };

  // 返回组合逻辑的数据和方法
  return {
    count,
    increment,
  };
};

// 使用组合逻辑
const { count, increment } = useCounter();
</script>
4. 更好的响应式能力
Vue 3 的响应式系统经过改进,更加高效。setup 内部的响应式数据可以更细粒度地进行管理,提高性能。
在 <script setup> 中,响应式数据的管理更加简单和高效。
下面是一个使用 <script setup> 的例子,展示了更好的响应式能力:
<template>
  <div>
    <p>Count: {{ count }}</p>
    <button @click="increment">Increment</button>
  </div>
</template>

<script setup lang="ts">
// 导入 ref 函数
import { ref } from 'vue';

// 定义响应式数据
const count = ref(0);

// 定义方法
const increment = (): void => {
  count.value++;
};
</script>
二、Vue2和Vue3 setup语法糖的生命周期比较
1. 生命周期

基本上,Vue 的每个主要生命周期事件都被分成两个钩子,分别在该事件之前和之后调用。在你的 Vue 应用中,有四个主要事件(8个主要钩子)可以利用。
创建(Creation)
在组件创建时运行
挂载(Mounting)
当 DOM 被挂载时运行
更新(Updates)
当响应式数据被修改时运行。
销毁(Destruction)
在元素被销毁之前运行
这些生命周期事件和钩子在 Vue 组件的整个生命周期中发挥着重要作用,允许你在组件的不同阶段执行代码,以适应应用的需求。
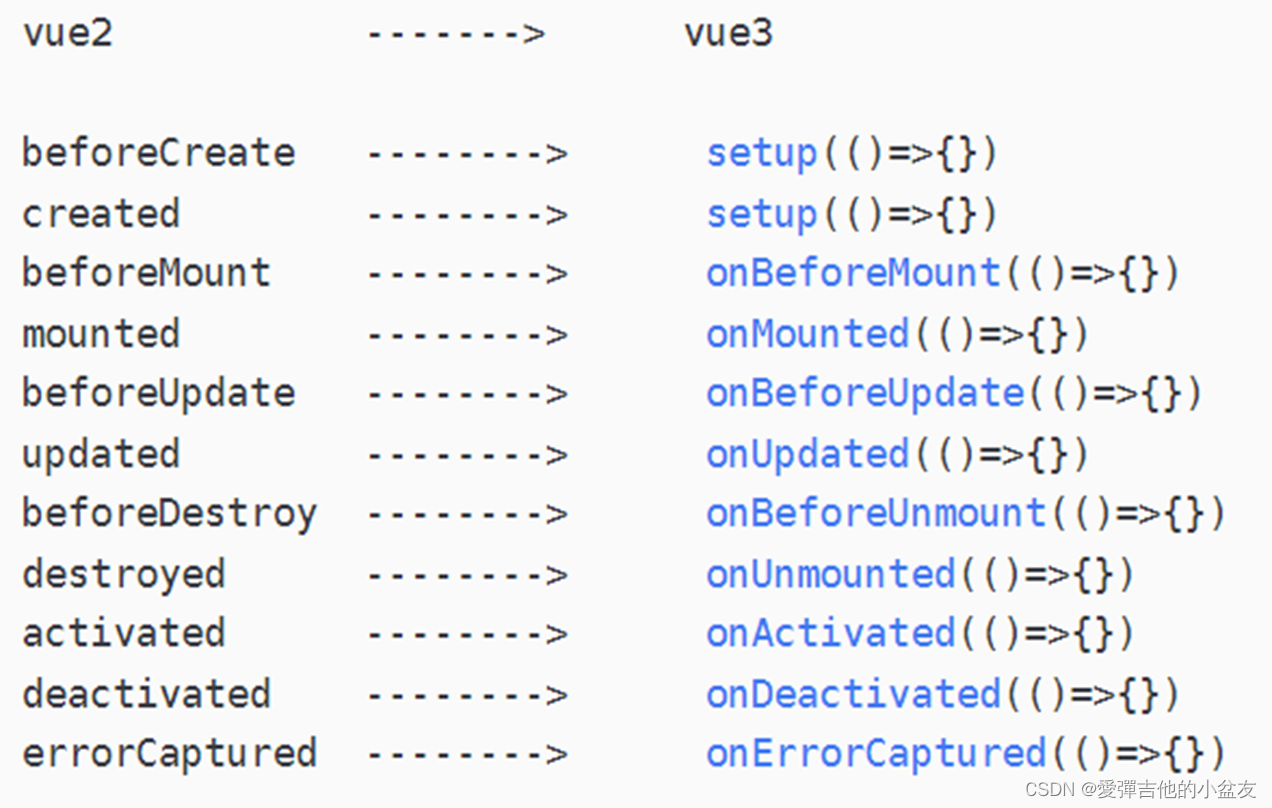
2. Vue2和Vue3中生命周期的对应关系
如下图所示:
3. setup的执行时机
在beforeCreate钩子之前执行
如下图所示:
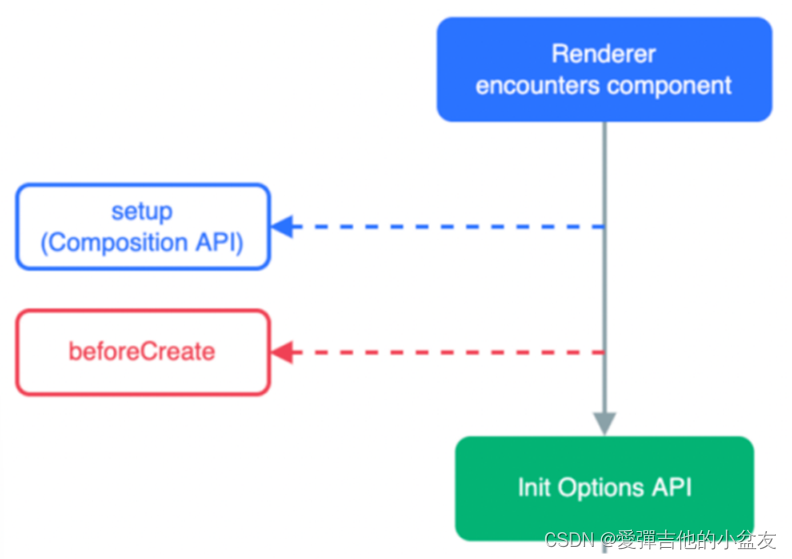
setup函数是处于生命周期函数 beforeCreate 和 Created 两个钩子函数之前的函数
执行 setup 时,组件实例尚未被创建(在 setup() 内部,this 不会是该活跃实例的引用,即不指向vue实例,Vue 为了避免我们错误的使用,直接将 setup函数中的this修改成了 undefined)
三、setup语法糖注意事项
尽量不要与Vue2.配置混用
- Vue2x配置 (data、methos、computed…) 中可以访问到setup中的属性、方法
- 但在setup中不能访问到Vue2.x配置(data、methos、computed…)
- 如果有重名,setup优先
setup函数中不能使用this
Vue为了避免我们错误的使用,直接将setup函数中的this修改为undefined
setup 接受两个参数
- props
- context(包含attrs(非props属性)、slots(插槽)、emit(事件派发))
代码示例如下:
<template>
  <div>
    <p>Message: {{ message }}</p>
    <button @click="handleClick">Click me</button>
  </div>
</template>

<script setup lang="ts">
// 导入 ref 函数
import { ref, defineProps, defineEmits, withDefaults } from 'vue';

// 定义 props 类型
interface MyProps {
  message: string;
}

// 定义组件逻辑
const setup = (props: MyProps, context: any) => {
  // 使用 defineProps 获取 props
  const { message } = defineProps(props);

  // 使用 ref 定义响应式数据
  const count = ref(0);

  // 使用 defineEmits 获取 emit
  const emit = defineEmits();

  // 定义方法
  const handleClick = () => {
    count.value++;
    // 使用 emit 触发自定义事件
    emit('click', count.value);
  };

  // 返回组件需要的数据和方法
  return {
    message,
    count,
    handleClick,
  };
};
</script>
在这个例子中,MyProps 接口定义了 message 属性的类型。通过 defineProps 函数,我们可以获取到正确类型的 props 对象。而通过 defineEmits 函数,我们可以获取到 emit 函数,用于在 setup 函数中派发自定义事件。
setup语法糖中和模板(Template)的双向绑定
从 setup()中返回的对象上的 property 返回并可以在模板中被访问时,它将自动展开为内部值
不需要在模板中追加 .value
代码如下图所示:
<template>
  <div>
    <p>Count: {{ count }}</p>
    <button @click="increment">Increment</button>
  </div>
</template>

<script setup lang="ts">
// 导入 ref 函数
import { ref } from 'vue';

// 在 setup 函数中定义响应式数据
const count = ref(0);

// 在 setup 函数中定义方法
const increment = () => {
  count.value++;
};
</script>
在这个例子中,count 是一个由 ref 创建的响应式数据,而 increment 是一个在 setup 函数中定义的方法。
它们会被自动展开为内部值,因此在模板中直接访问 count 和调用 increment 即可,无需再添加 .value。
这种简化的写法使得在模板中使用响应式数据更加直观和清晰。
setup函数只能是同步的不能是异步的
setup() 函数被设计为在组件实例被创建时同步执行的,它负责设置组件的初始状态和逻辑。
Vue 3 的组合式 API 使得在 setup() 函数中使用响应式数据、计算属性、生命周期钩子等变得更加方便和灵活。
如果您需要在组件加载后执行异步操作,您可以将异步逻辑放在 setup() 函数外部的普通函数中,并在 setup() 函数中调用该函数。
代码示例如下:
<template>
  <div>
    <p>{{ message }}</p>
  </div>
</template>

<script setup lang="ts">
// 导入 ref 函数
import { ref, onMounted } from 'vue';

// 在 setup 函数中定义响应式数据
const message = ref('');

// 错误示例:在 setup 函数中使用异步操作
// 以下代码将导致编译错误
const fetchData = async () => {
  const response = await fetch('https://example.com/data');
  message.value = await response.text();
};

// 正确示例:使用 onMounted 钩子来进行异步操作
// onMounted 钩子在组件挂载后执行,适合异步操作
onMounted(async () => {
  const response = await fetch('https://example.com/data');
  message.value = await response.text();
});
</script>
在错误的示例中,我们尝试在 setup 函数中使用异步函数 fetchData,这将导致编译错误。
相反,在正确的示例中,我们使用了 onMounted 钩子,该钩子在组件挂载后异步执行,因此适合包含异步操作
结语
TypeScipt语法帮助我们规范了代码和提高可读性,使之易于维护
setup语法糖帮助我们大大减少了代码量
两个语法的配合可以使我们代码的效率大幅提升,非常的推荐

和光同尘,与时舒卷;戢鳞潜翼,思属风云。


 584
584


 被折叠的 条评论
为什么被折叠?
被折叠的 条评论
为什么被折叠?
 到【灌水乐园】发言


