


1.Fragment的生命周期
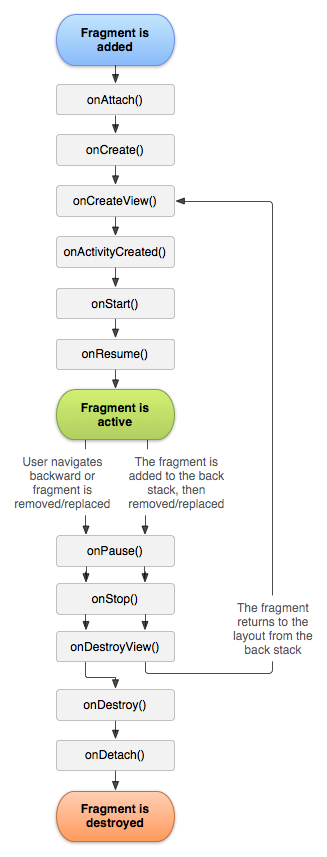
Fragment是依赖与Activity而存在的,因此Activity的生命周期会直接影响到Fragment的生命周期。看图可以得知, Fragment比Activity的生命周期多了五个回调方法,其中onAttach()、onActivityCreated()、onDestroyView()和onDetach()都是与父Activity相关连的,OnCreateView则是用来创建Fragment自己的视图。
一、onAttach(); 是Fragment和Activity连接的时候调用。
二、onActivityCreated();是Activity的视图创建完毕后调用,也就是 Activity的oncreate()方法发回时调用。
三、onDstroyView();与onCreateView()相对应,当视图被销毁时调用。
四、onDetach();与Attach();相对应,Fragment与Activity断开时调用。
Fragment的命运与它所属的Activity是息息相关的.因此Fragment状态转换与它相对应的Activity状态转换也是密切相关的。所以当Activity处在前台拥有焦点时,这些Fragment也是活动的。当Activity被暂停或停止,Fragment也同样会暂停和停止。但是不管什么触发了Fragment的状态转换,都应该确保无缝的用户体验,当Fragment被暂停或或停止时保存所有的UI状态和持久化所有的数据是非常重要的.
2.创建静态的Fragment
静态的Fragment使用非常简单,我们可以把它当成一个普通的View控件来使用。
一、创建一个类继承Fragment并重写onCreateView来创建它的视图。
在这里我们使用两个Fragment演示,这里注意Fragment的导入包要统一,如果你想兼容3.0以下的请同意使用v4下的否则直接使用app下的,尽量不要混搭。
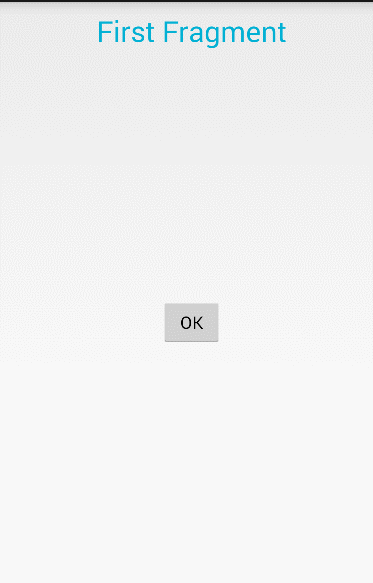
这个fragment我们不使用视图直接返回一个TextView;
public class FirstFragment extends Fragment {
  @Override
  public View onCreateView(LayoutInflater inflater, ViewGroup container, Bundle savedInstanceState) {
    TextView tv = new TextView(getActivity());
    tv.setText("First Fragment");
    tv.setTextSize(30);
    tv.setTextColor(Color.parseColor("#00b0d4"));
    tv.setGravity(Gravity.CENTER);
    return tv;
  }
}
我们是将布局插入Fragment,控件的点击事件也需要Fragment自己去完成。
public class SecondFragment extends Fragment {
  private View mView;
  private Button mButton;

  @Override
  public View onCreateView(LayoutInflater inflater, ViewGroup container, Bundle savedInstanceState) {
    mView = inflater.inflate(R.layout.fragment_content, container, false);
    mButton = (Button) mView.findViewById(R.id.fmt_btn_ok);
    mButton.setOnClickListener(new OnClickListener() {

      @Override
      public void onClick(View v) {
        Toast.makeText(getActivity(), "Second Fragment", Toast.LENGTH_SHORT).show();
      }
    });
    return mView;
  }
}
接下来在Activity的布局中引用它。
<LinearLayout xmlns:android="http://schemas.android.com/apk/res/android"
    xmlns:tools="http://schemas.android.com/tools"
    android:layout_width="match_parent"
    android:layout_height="match_parent"
    android:orientation="vertical" >

    <fragment
        android:id="@+id/first_fragment"
        android:name="com.example.stduyfragment.FirstFragment"
        android:layout_width="match_parent"
        android:layout_height="60dp" />

    <fragment
        android:id="@+id/second_fragment"
        android:name="com.example.stduyfragment.SecondFragment"
        android:layout_width="match_parent"
        android:layout_height="match_parent" />

</LinearLayout>
运行效果
3.动态的使用Fragment
如果想在运行时动态的切换Fragment或改变Fragment的布局,最好在布局文件中只定义父容器,通常我们使用FrameLayout。然后通过Fragment的事务来填充它。
接着上次的代码写。我们在中间布局使用FrameLayout,底部放置两个Button来切换Fragment;
<LinearLayout xmlns:android="http://schemas.android.com/apk/res/android"
    xmlns:tools="http://schemas.android.com/tools"
    android:layout_width="match_parent"
    android:layout_height="match_parent"
    android:orientation="vertical" >

    <fragment
        android:id="@+id/first_fragment"
        android:name="com.example.stduyfragment.FirstFragment"
        android:layout_width="match_parent"
        android:layout_height="60dp" />

    <FrameLayout
        android:id="@+id/fmt_layout"
        android:layout_width="match_parent"
        android:layout_height="0dp"
        android:layout_weight="1" />

    <LinearLayout
        android:layout_width="match_parent"
        android:layout_height="40dp"
        android:gravity="center_horizontal"
        android:orientation="horizontal" >

        <Button
            android:id="@+id/mian_btn_one"
            android:layout_width="wrap_content"
            android:layout_height="wrap_content"
            android:layout_marginBottom="5dp"
            android:background="#03a9f4" />

        <Button
            android:id="@+id/mian_btn_two"
            android:layout_width="wrap_content"
            android:layout_height="wrap_content"
            android:layout_marginBottom="5dp"
            android:layout_marginLeft="20dp"
            android:background="#009688" />
    </LinearLayout>

</LinearLayout>
然后在Activity进行管理Fragment
package com.example.stduyfragment;

import android.app.Activity;
import android.app.FragmentManager;
import android.app.FragmentTransaction;
import android.os.Bundle;
import android.view.View;
import android.view.View.OnClickListener;
import android.widget.Button;


public class MainActivity extends Activity implements OnClickListener {
  private Button mOne;
  private Button mTwo;

  private SecondFragment mSecondFmt;
  // 写法和FirstFragment一样,就不在贴代码了
  private ThirdFragment mThirdFmt;

  @Override
  protected void onCreate(Bundle savedInstanceState) {
    super.onCreate(savedInstanceState);
    setContentView(R.layout.activity_main);
    initView();

  }

  /**
   * 初始化View
   */
  private void initView() {
    mOne = (Button) findViewById(R.id.mian_btn_one);
    mTwo = (Button) findViewById(R.id.mian_btn_two);
    mOne.setOnClickListener(this);
    mTwo.setOnClickListener(this);
  }

  @Override
  public void onClick(View v) {
    // 启动Fragment的管理
    FragmentManager manager = getFragmentManager();
    // 开启事务
    FragmentTransaction transaction = manager.beginTransaction();
    switch (v.getId()) {
      case R.id.mian_btn_one:
        // 如果Second是空的那么我们实例化
        if (mSecondFmt == null) {
          mSecondFmt = new SecondFragment();
        }
        // 通过事务替换
        transaction.replace(R.id.fmt_layout, mSecondFmt);
        break;
      case R.id.mian_btn_two:
        if (mThirdFmt == null) {
          mThirdFmt = new ThirdFragment();
        }
        transaction.replace(R.id.fmt_layout, mThirdFmt);
        break;

      default:
        break;
    }
    // 提交
    transaction.commit();
  }
}
也很简单不是么,让我们来看看效果。
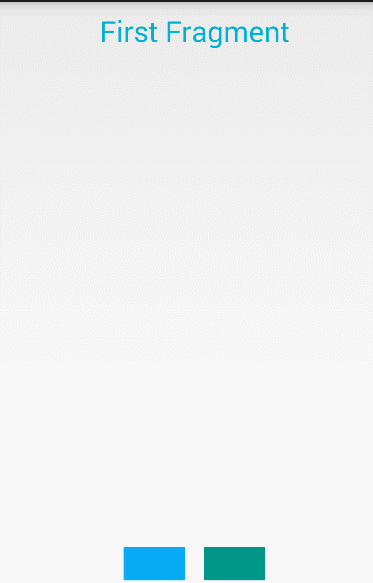
动态使用Fragment,无论是添加、删除还是替换。Fragmentde的Transaction是关键。常用的有。
Transaction.add();添加一个Fragment;
Transaction.remove();移除一个Fragment;
Transaction.replace();替换一个Fragment;
Transaction.show();显示一个隐藏的Fragment;
Transaction.hint();隐藏一个Fragment;
Transaction.detach();销毁Fragment视图;
Transaction.attach();重建Fragment视图;
Transaction.setCustomAnimations();切换动画.
最后如果我们想使用Back返回到上一个Fragment中,我们可以将事务添加到back栈中,使用Transaction.addToBackStack(“”);


 2万+
2万+

 被折叠的 条评论
为什么被折叠?
被折叠的 条评论
为什么被折叠?
 到【灌水乐园】发言


