


spring整合quartz
1.从官方网站下载内置表格
进入quartz的官网http://www.quartz-scheduler.org/,点击Downloads,
下载后在目录\docs\dbTables下有常用数据库创建quartz表的脚本,根据你所选用的数据库选择对应的表格,例如:“tables_mysql.sql”
官方表格关系图:


2.导入pom依赖
<?xml version="1.0" encoding="UTF-8"?>
<project xmlns="http://maven.apache.org/POM/4.0.0" xmlns:xsi="http://www.w3.org/2001/XMLSchema-instance"
         xsi:schemaLocation="http://maven.apache.org/POM/4.0.0 https://maven.apache.org/xsd/maven-4.0.0.xsd">
    <modelVersion>4.0.0</modelVersion>
    <parent>
        <groupId>org.springframework.boot</groupId>
        <artifactId>spring-boot-starter-parent</artifactId>
        <version>2.2.2.RELEASE</version>
        <relativePath/> <!-- lookup parent from repository -->
    </parent>
    <groupId>com.swx</groupId>
    <artifactId>quartz02</artifactId>
    <version>0.0.1-SNAPSHOT</version>
    <name>quartz02</name>
    <description>Demo project for Spring Boot</description>

    <properties>
        <java.version>1.8</java.version>
        <mysql.version>5.1.44</mysql.version>
    </properties>

    <dependencies>
        <dependency>
            <groupId>org.springframework.boot</groupId>
            <artifactId>spring-boot-starter-jdbc</artifactId>
        </dependency>
        <dependency>
            <groupId>org.springframework.boot</groupId>
            <artifactId>spring-boot-starter-quartz</artifactId>
        </dependency>
        <dependency>
            <groupId>org.springframework.boot</groupId>
            <artifactId>spring-boot-starter-thymeleaf</artifactId>
        </dependency>
        <dependency>
            <groupId>org.springframework.boot</groupId>
            <artifactId>spring-boot-starter-web</artifactId>
        </dependency>
        <dependency>
            <groupId>org.mybatis.spring.boot</groupId>
            <artifactId>mybatis-spring-boot-starter</artifactId>
            <version>2.1.1</version>
        </dependency>

        <dependency>
            <groupId>mysql</groupId>
            <artifactId>mysql-connector-java</artifactId>
            <version>${mysql.version}</version>
            <scope>runtime</scope>
        </dependency>
        <dependency>
            <groupId>org.projectlombok</groupId>
            <artifactId>lombok</artifactId>
            <optional>true</optional>
        </dependency>
        <dependency>
            <groupId>org.springframework.boot</groupId>
            <artifactId>spring-boot-starter-test</artifactId>
            <scope>test</scope>
            <exclusions>
                <exclusion>
                    <groupId>org.junit.vintage</groupId>
                    <artifactId>junit-vintage-engine</artifactId>
                </exclusion>
            </exclusions>
        </dependency>
        <!--切面-->
        <dependency>
            <groupId>org.springframework</groupId>
            <artifactId>spring-aspects</artifactId>
        </dependency>
        <!--quartz缺少的jobs-->
        <dependency>
            <groupId>org.quartz-scheduler</groupId>
            <artifactId>quartz-jobs</artifactId>
            <version>2.2.1</version>
        </dependency>
        <!--druid-->
        <dependency>
            <groupId>com.alibaba</groupId>
            <artifactId>druid-spring-boot-starter</artifactId>
            <version>1.1.10</version>
        </dependency>
    </dependencies>

    <build>
        <resources>
            <!--解决mybatis-generator-maven-plugin运行时没有将XxxMapper.xml文件放入target文件夹的问题-->
            <resource>
                <directory>src/main/java</directory>
                <includes>
                    <include>**/*.xml</include>
                </includes>
            </resource>
            <!--解决mybatis-generator-maven-plugin运行时没有将jdbc.properites文件放入target文件夹的问题-->
            <resource>
                <directory>src/main/resources</directory>
                <includes>
                    <include>jdbc.properties</include>
                    <include>*.xml</include>
                    <include>*.yml</include>
                </includes>
            </resource>
        </resources>
        <plugins>
            <!--逆向生成插件-->
            <plugin>
                <groupId>org.mybatis.generator</groupId>
                <artifactId>mybatis-generator-maven-plugin</artifactId>
                <version>1.3.2</version>
                <dependencies>
                    <!--使用Mybatis-generator插件不能使用太高版本的mysql驱动 -->
                    <dependency>
                        <groupId>mysql</groupId>
                        <artifactId>mysql-connector-java</artifactId>
                        <version>${mysql.version}</version>
                    </dependency>
                </dependencies>
                <configuration>
                    <overwrite>true</overwrite>
                </configuration>
            </plugin>
            <plugin>
                <groupId>org.springframework.boot</groupId>
                <artifactId>spring-boot-maven-plugin</artifactId>
            </plugin>
        </plugins>
    </build>

</project>
3. 换源 --在项目中添加quartz.properties文件(这样就不会加载自带的properties文件)
quartz.properties
#
#============================================================================
# Configure Main Scheduler Properties 调度器属性
#============================================================================
org.quartz.scheduler.instanceName: DefaultQuartzScheduler
org.quartz.scheduler.instanceId = AUTO
org.quartz.scheduler.rmi.export: false
org.quartz.scheduler.rmi.proxy: false
org.quartz.scheduler.wrapJobExecutionInUserTransaction: false
org.quartz.threadPool.class: org.quartz.simpl.SimpleThreadPool
org.quartz.threadPool.threadCount= 10
org.quartz.threadPool.threadPriority: 5
org.quartz.threadPool.threadsInheritContextClassLoaderOfInitializingThread: true
org.quartz.jobStore.misfireThreshold: 60000
#============================================================================
# Configure JobStore
#============================================================================
#存储方式使用JobStoreTX,也就是数据库
org.quartz.jobStore.class: org.quartz.impl.jdbcjobstore.JobStoreTX
org.quartz.jobStore.driverDelegateClass:org.quartz.impl.jdbcjobstore.StdJDBCDelegate
#使用自己的配置文件
org.quartz.jobStore.useProperties:true
#数据库中quartz表的表名前缀
org.quartz.jobStore.tablePrefix:qrtz_
org.quartz.jobStore.dataSource:qzDS
#是否使用集群(如果项目只部署到 一台服务器,就不用了)
org.quartz.jobStore.isClustered = true
#============================================================================
# Configure Datasources
#============================================================================
#配置数据库源(org.quartz.dataSource.qzDS.maxConnections: c3p0配置的是有s的,druid数据源没有s)
org.quartz.dataSource.qzDS.connectionProvider.class:com.swx.quartz02.utils.DruidConnectionProvider
org.quartz.dataSource.qzDS.driver: com.mysql.jdbc.Driver
org.quartz.dataSource.qzDS.URL: jdbc:mysql://localhost:3306/demo?useUnicode=true&characterEncoding=utf8
org.quartz.dataSource.qzDS.user: root
org.quartz.dataSource.qzDS.password: 123
org.quartz.dataSource.qzDS.maxConnection: 10
4.Druid连接池的Quartz扩展类
package com.swx.quartz02.utils;

import com.alibaba.druid.pool.DruidDataSource;
import org.quartz.SchedulerException;
import org.quartz.utils.ConnectionProvider;

import java.sql.Connection;
import java.sql.SQLException;

/*
#============================================================================
# JDBC
#============================================================================
org.quartz.jobStore.driverDelegateClass:org.quartz.impl.jdbcjobstore.StdJDBCDelegate
org.quartz.jobStore.useProperties:false
org.quartz.jobStore.dataSource:qzDS
#org.quartz.dataSource.qzDS.connectionProvider.class:org.quartz.utils.PoolingConnectionProvider
org.quartz.dataSource.qzDS.connectionProvider.class:com.zking.q03.quartz.DruidConnectionProvider
org.quartz.dataSource.qzDS.driver:com.mysql.jdbc.Driver
org.quartz.dataSource.qzDS.URL:jdbc:mysql://127.0.0.1:3306/test?useUnicode=true&characterEncoding=UTF-8
org.quartz.dataSource.qzDS.user:root
org.quartz.dataSource.qzDS.password:root
org.quartz.dataSource.qzDS.maxConnections:30
org.quartz.dataSource.qzDS.validationQuery: select 0
*/

/**
 * [Druid连接池的Quartz扩展类]
 *
 * @ProjectName: []
 * @Author: [xuguang]
 * @CreateDate: [2015/11/10 17:58]
 * @Update: [说明本次修改内容] BY[xuguang][2015/11/10]
 * @Version: [v1.0]
 */
public class DruidConnectionProvider implements ConnectionProvider {

     /*
     * ~~~~~~~~~~~~~~~~~~~~~~~~~~~~~~~~~~~~~~~~~~~~~~~~~~~~~~~~~~~~~~~~~~~~~~~~~
     *
     * 常量配置,与quartz.properties文件的key保持一致(去掉前缀),同时提供set方法,Quartz框架自动注入值。
     *
     * ~~~~~~~~~~~~~~~~~~~~~~~~~~~~~~~~~~~~~~~~~~~~~~~~~~~~~~~~~~~~~~~~~~~~~~~~~
     */

    //JDBC驱动
    public String driver;
    //JDBC连接串
    public String URL;
    //数据库用户名
    public String user;
    //数据库用户密码
    public String password;
    //数据库最大连接数
    public int maxConnection;
    //数据库SQL查询每次连接返回执行到连接池,以确保它仍然是有效的。
    public String validationQuery;

    private boolean validateOnCheckout;

    private int idleConnectionValidationSeconds;

    public String maxCachedStatementsPerConnection;

    private String discardIdleConnectionsSeconds;

    public static final int DEFAULT_DB_MAX_CONNECTIONS = 10;

    public static final int DEFAULT_DB_MAX_CACHED_STATEMENTS_PER_CONNECTION = 120;

    //Druid连接池
    private DruidDataSource datasource;

    /*
    * ~~~~~~~~~~~~~~~~~~~~~~~~~~~~~~~~~~~~~~~~~~~~~~~~~~~~~~~~~~~~~~~~~~~~~~~~~
    *
    * 接口实现
    *
    * ~~~~~~~~~~~~~~~~~~~~~~~~~~~~~~~~~~~~~~~~~~~~~~~~~~~~~~~~~~~~~~~~~~~~~~~~~
    */
    public Connection getConnection() throws SQLException {
        return datasource.getConnection();
    }

    public void shutdown() throws SQLException {
        datasource.close();
    }
    public void initialize() throws SQLException{
        if (this.URL == null) {
            throw new SQLException("DBPool could not be created: DB URL cannot be null");
        }

        if (this.driver == null) {
            throw new SQLException("DBPool driver could not be created: DB driver class name cannot be null!");
        }

        if (this.maxConnection < 0) {
            throw new SQLException("DBPool maxConnectins could not be created: Max connections must be greater than zero!");
        }

        datasource = new DruidDataSource();
        try{
            datasource.setDriverClassName(this.driver);
        } catch (Exception e) {
            try {
                throw new SchedulerException("Problem setting driver class name on datasource: " + e.getMessage(), e);
            } catch (SchedulerException e1) {
            }
        }

        datasource.setUrl(this.URL);
        datasource.setUsername(this.user);
        datasource.setPassword(this.password);
        datasource.setMaxActive(this.maxConnection);
        datasource.setMinIdle(1);
        datasource.setMaxWait(0);
        datasource.setMaxPoolPreparedStatementPerConnectionSize(this.DEFAULT_DB_MAX_CACHED_STATEMENTS_PER_CONNECTION);

        if (this.validationQuery != null) {
            datasource.setValidationQuery(this.validationQuery);
            if(!this.validateOnCheckout)
                datasource.setTestOnReturn(true);
            else
                datasource.setTestOnBorrow(true);
            datasource.setValidationQueryTimeout(this.idleConnectionValidationSeconds);
        }
    }

    /*
    * ~~~~~~~~~~~~~~~~~~~~~~~~~~~~~~~~~~~~~~~~~~~~~~~~~~~~~~~~~~~~~~~~~~~~~~~~~
    *
    * 提供get set方法
    *
    * ~~~~~~~~~~~~~~~~~~~~~~~~~~~~~~~~~~~~~~~~~~~~~~~~~~~~~~~~~~~~~~~~~~~~~~~~~
    */
    public String getDriver() {
        return driver;
    }

    public void setDriver(String driver) {
        this.driver = driver;
    }

    public String getURL() {
        return URL;
    }

    public void setURL(String URL) {
        this.URL = URL;
    }

    public String getUser() {
        return user;
    }

    public void setUser(String user) {
        this.user = user;
    }

    public String getPassword() {
        return password;
    }

    public void setPassword(String password) {
        this.password = password;
    }

    public int getMaxConnection() {
        return maxConnection;
    }

    public void setMaxConnection(int maxConnection) {
        this.maxConnection = maxConnection;
    }

    public String getValidationQuery() {
        return validationQuery;
    }

    public void setValidationQuery(String validationQuery) {
        this.validationQuery = validationQuery;
    }

    public boolean isValidateOnCheckout() {
        return validateOnCheckout;
    }

    public void setValidateOnCheckout(boolean validateOnCheckout) {
        this.validateOnCheckout = validateOnCheckout;
    }

    public int getIdleConnectionValidationSeconds() {
        return idleConnectionValidationSeconds;
    }

    public void setIdleConnectionValidationSeconds(int idleConnectionValidationSeconds) {
        this.idleConnectionValidationSeconds = idleConnectionValidationSeconds;
    }

    public DruidDataSource getDatasource() {
        return datasource;
    }

    public void setDatasource(DruidDataSource datasource) {
        this.datasource = datasource;
    }
}
5.自定义MyJobFactory,解决spring不能在quartz中注入bean的问题
package com.swx.quartz02.utils;

import lombok.extern.slf4j.Slf4j;
import org.quartz.spi.TriggerFiredBundle;
import org.springframework.beans.factory.annotation.Autowired;
import org.springframework.beans.factory.config.AutowireCapableBeanFactory;
import org.springframework.scheduling.quartz.AdaptableJobFactory;
import org.springframework.stereotype.Component;

@Component
@Slf4j
public class MyJobFactory extends AdaptableJobFactory {

    //这个对象Spring会帮我们自动注入进来
    @Autowired
    private AutowireCapableBeanFactory autowireCapableBeanFactory;

    //重写创建Job任务的实例方法
    @Override
    protected Object createJobInstance(TriggerFiredBundle bundle) throws Exception {
        Object jobInstance = super.createJobInstance(bundle);
        //通过以下方式,解决Job任务无法使用Spring中的Bean问题
        autowireCapableBeanFactory.autowireBean(jobInstance);
        return super.createJobInstance(bundle);
    }
}
6.创建调度器schedule,交给spring进行管理
package com.swx.quartz02.quartz;

import com.swx.quartz02.utils.MyJobFactory;
import org.quartz.Scheduler;
import org.springframework.beans.factory.annotation.Autowired;
import org.springframework.beans.factory.config.PropertiesFactoryBean;
import org.springframework.context.annotation.Bean;
import org.springframework.context.annotation.Configuration;
import org.springframework.core.io.ClassPathResource;
import org.springframework.scheduling.quartz.SchedulerFactoryBean;

import java.io.IOException;
import java.util.Properties;

@Configuration
public class QuartzConfiguration {

    @Autowired
    private MyJobFactory myJobFactory;

    //创建调度器工厂
    @Bean
        public SchedulerFactoryBean schedulerFactoryBean(){
            //1.创建SchedulerFactoryBean
            //2.加载自定义的quartz.properties配置文件
            //3.设置MyJobFactory

            SchedulerFactoryBean factoryBean=new SchedulerFactoryBean();
            try {
                factoryBean.setQuartzProperties(quartzProperties());
                factoryBean.setJobFactory(myJobFactory);
                return factoryBean;
            } catch (IOException e) {
                throw new RuntimeException(e);
            }
    }

    @Bean
    public Properties quartzProperties() throws IOException {
        PropertiesFactoryBean propertiesFactoryBean=new PropertiesFactoryBean();
        propertiesFactoryBean.setLocation(new ClassPathResource("/quartz.properties"));
        propertiesFactoryBean.afterPropertiesSet();
        return propertiesFactoryBean.getObject();
    }

    @Bean(name="scheduler")
    public Scheduler scheduler(){
        return schedulerFactoryBean().getScheduler();
    }
}
7.配置application.yml文件
server:
  port: 80
  servlet:
    context-path: /

spring:
  datasource:
    #1.JDBC
    type: com.alibaba.druid.pool.DruidDataSource
    driver-class-name: com.mysql.jdbc.Driver
    url: jdbc:mysql://localhost:3306/demo?useUnicode=true&characterEncoding=utf8
    username: root
    password: 123
    druid:
      #2.连接池配置
      #初始化连接池的连接数量 大小,最小,最大
      initial-size: 5
      min-idle: 5
      max-active: 20
      #配置获取连接等待超时的时间
      max-wait: 60000
      #配置间隔多久才进行一次检测,检测需要关闭的空闲连接,单位是毫秒
      time-between-eviction-runs-millis: 60000
      # 配置一个连接在池中最小生存的时间,单位是毫秒
      min-evictable-idle-time-millis: 30000
      validation-query: SELECT 1 FROM DUAL
      test-while-idle: true
      test-on-borrow: true
      test-on-return: false
      # 是否缓存preparedStatement,也就是PSCache  官方建议MySQL下建议关闭   个人建议如果想用SQL防火墙 建议打开
      pool-prepared-statements: true
      max-pool-prepared-statement-per-connection-size: 20
      # 配置监控统计拦截的filters,去掉后监控界面sql无法统计,'wall'用于防火墙
      filter:
        stat:
          merge-sql: true
          slow-sql-millis: 5000
      #3.基础监控配置
      web-stat-filter:
        enabled: true
        url-pattern: /*
        #设置不统计哪些URL
        exclusions: "*.js,*.gif,*.jpg,*.png,*.css,*.ico,/druid/*"
        session-stat-enable: true
        session-stat-max-count: 100
      stat-view-servlet:
        enabled: true
        url-pattern: /druid/*
        reset-enable: true
        #设置监控页面的登录名和密码
        login-username: admin
        login-password: admin
        allow: 127.0.0.1
        #deny: 192.168.1.100

#显示日志
logging:
  level:
    com.swx.quartz02.mapper: debug
8.启动类加上所需注解:
package com.swx.quartz02;

import org.mybatis.spring.annotation.MapperScan;
import org.springframework.boot.SpringApplication;
import org.springframework.boot.autoconfigure.SpringBootApplication;
import org.springframework.scheduling.annotation.EnableScheduling;
import org.springframework.transaction.annotation.EnableTransactionManagement;

@MapperScan("com.swx.quartz02.mapper")
@EnableTransactionManagement//事务管理器
@EnableScheduling//管理spring task
@SpringBootApplication
public class Quartz02Application {

    public static void main(String[] args) {
        SpringApplication.run(Quartz02Application.class, args);
    }

}
以上整合完毕!
使用spring+quartz
1.创建自定义表:
-- 注意:job_name存放的任务类的全路径,在quartz中通过jobName和jobGroup来确定trigger的唯一性,所以这两列为联合唯一索引
create table t_schedule_trigger
(
  id int primary key auto_increment,                                -- ID
  cron varchar(200) not null,                                       -- 时间表达式
  status char(1) not null,                                          -- 使用状态 0:禁用   1:启用
  job_name varchar(200) not null,                                   -- 任务名称
  job_group varchar(200) not null,                                  -- 任务分组
  unique index(job_name,job_group)
);

-- 额外添加到任务中的参数
create table t_schedule_trigger_param
(
  param_id int primary key auto_increment,                                -- ID
  name varchar(200) not null,                                             -- 参数名
  value varchar(512),                                                     -- 参数值

  schedule_trigger_id int not null,                                       -- 外键:引用t_schedule_trigger(id)
  foreign key(schedule_trigger_id) references t_schedule_trigger(id)
);
2. 导入逆向生成文件和数据库连接文件,并且逆向生成上面两个表
逆向生成结果:

分别添加方法:
ScheduleMapper
java:
    /**
     * 查询触发器中包含的所有任务
     * @return
     */
    List<Schedule> queryScheduleTriggerLst();
mapper:
  <select id="queryScheduleTriggerLst" resultType="com.swx.quartz02.model.Schedule">
    select <include refid="Base_Column_List"/>
    from t_schedule_trigger
  </select>
ScheduleParamMapper
java:
/**
     * 查询出当前任务类对应所需的参数
     * @param triggerId
     * @return
     */
    List<ScheduleParam> queryScheduleParamLst(Integer triggerId);

mapper:
<select id="queryScheduleParamLst" resultType="com.swx.quartz02.model.ScheduleParam">
    select <include refid="Base_Column_List"/>
    from t_schedule_trigger_param where schedule_trigger_id=#{triggerId}
  </select>
service层
package com.swx.quartz02.service;

import com.swx.quartz02.model.ScheduleParam;

import java.util.List;

/**
 * @author Songwanxi
 * @site www.lentter.club
 * @company
 * @create  2020-01-04 11:45
 */
public interface ScheduleTriggerParamService {
    public List<ScheduleParam> queryScheduleParamLst(Integer triggerId);
}
impl层
package com.swx.quartz02.service.impl;

import com.swx.quartz02.mapper.ScheduleParamMapper;
import com.swx.quartz02.model.ScheduleParam;
import com.swx.quartz02.service.ScheduleTriggerParamService;
import org.springframework.beans.factory.annotation.Autowired;
import org.springframework.stereotype.Service;

import java.util.List;

/**
 * @author Songwanxi
 * @site www.lentter.club
 * @company
 * @create  2020-01-04 11:53
 */
@Service
public class ScheduleTriggerParamServiceImpl implements ScheduleTriggerParamService {
    @Autowired
    private ScheduleParamMapper scheduleParamMapper;
    @Override
    public List<ScheduleParam> queryScheduleParamLst(Integer triggerId) {
        return scheduleParamMapper.queryScheduleParamLst(triggerId);
    }
}
3. spring自带定时任务作业类ScheduleTriggerServiceImpl
package com.swx.quartz02.service.impl;

import com.swx.quartz02.mapper.ScheduleMapper;
import com.swx.quartz02.mapper.ScheduleParamMapper;
import com.swx.quartz02.model.Schedule;
import com.swx.quartz02.model.ScheduleParam;
import org.quartz.*;
import org.springframework.beans.factory.annotation.Autowired;
import org.springframework.scheduling.annotation.Scheduled;
import org.springframework.stereotype.Service;

import java.util.List;

/**
 * @author Songwanxi
 * @site www.lentter.club
 * @company
 * @create  2020-01-04 11:55
 * 自带定时任务作业类
 */
@Service
public class ScheduleTriggerServiceImpl {
    @Autowired
    private ScheduleMapper scheduleMapper;
    @Autowired
    private ScheduleParamMapper scheduleParamMapper;
    @Autowired
    private Scheduler scheduler;


    @Scheduled(cron = "0/10 * * * * ?")
    public void refreshScheduler() throws  Exception{

        //获取数据库表中自定义表里的所有定时任务
        List<Schedule> schedules = scheduleMapper.queryScheduleTriggerLst();
        //对其进行判断,是否有定时任务
        if(null != schedules){
            //如果有 就进行循环
            for (Schedule schedule : schedules) {
                String cron = schedule.getCron();  //表达式
                String jobName = schedule.getJobName(); //任务名称
                String jobGroup = schedule.getJobGroup(); //任务分组
                String status = schedule.getStatus();  //任务状态

                //JobName+JobGroup=Primary Key
                //根据jobName和jobGroup生成TriggerKey
                TriggerKey triggerKey = TriggerKey.triggerKey(jobName,jobGroup);

                //根据triggerkey到scheduler调度器中获取触发器
                //从官方内置表中获取
                CronTrigger cronTrigger = (CronTrigger) scheduler.getTrigger(triggerKey);

                //判断官方内置表中有没有触发器
                if(null == cronTrigger){
                    //如果没有就判断其 启动状态
                    if(status.equals("0"))//如果没有启动就结束当前循环
                        continue;
                    //如果已经启动
                    System.out.println("创建调度器");
                    //创建任务详情
                    JobDetail jobDetail =
                            //获取表中对应作业类
                            JobBuilder.newJob((Class<? extends Job>) Class.forName(jobName))
                            .withIdentity(jobName,jobGroup)
                            .build();

                    //往job任务中传递参数
                    JobDataMap jobDataMap = jobDetail.getJobDataMap();
                    //根据id查询是否有参数
                    List<ScheduleParam> scheduleParams = scheduleParamMapper.queryScheduleParamLst(schedule.getId());
                    //将查询出来的参数存放进map里
                    for (ScheduleParam sp : scheduleParams) {
                        jobDataMap.put(sp.getName(),sp.getValue());
                    }

                    //创建表达式调度器 调用可以使用的表达式
                    CronScheduleBuilder cronScheduleBuilder = CronScheduleBuilder.cronSchedule(cron);

                    //创建Trigger 触发器
                    cronTrigger = TriggerBuilder.newTrigger()
                            .withIdentity(jobName,jobGroup)
                            .withSchedule(cronScheduleBuilder)
                            .build();
                    //将jobDetail和Trigger注入到scheduler调度器中

                    scheduler.scheduleJob(jobDetail,cronTrigger);

                }else{
                    //官方内置表里有值
                    if(status.equals("0")){
                        //如果为0 就删掉定时任务 然后结束
                        JobKey jobKey = JobKey.jobKey(jobName,jobGroup);
                        scheduler.deleteJob(jobKey);
                        continue;
                    }

                    //调度器中的表达式
                    String cronExpression = cronTrigger.getCronExpression();

                    if(!cron.equals(cronExpression)){//判断自定义表达式和数据库里官方表里的表达式是否一致
                        //不一致就证明表达式被更改 需要更新
                        //创建新表达式调度器
                        CronScheduleBuilder cronSchedule  = CronScheduleBuilder.cronSchedule(cron);

                        //重构 Trigger 触发器
                         cronTrigger = TriggerBuilder.newTrigger()
                                       .withIdentity(jobName,jobGroup)
                                        .withSchedule(cronSchedule)
                                         .build();
                         //刷新
                        scheduler.rescheduleJob(triggerKey,cronTrigger);

                    }

                }


            }
        }


    }


}
4.测试作业类
MyJob
package com.swx.quartz02.quartz;

import lombok.extern.slf4j.Slf4j;
import org.quartz.Job;
import org.quartz.JobExecutionContext;
import org.quartz.JobExecutionException;
import org.springframework.stereotype.Component;

import java.util.Date;

@Component
@Slf4j
public class MyJob implements Job {

    @Override
    public void execute(JobExecutionContext jobExecutionContext) throws JobExecutionException {
        System.out.println("MyJob是一个空的任务计划,时间:"+new Date().toLocaleString());
    }
}
MyJob1
package com.swx.quartz02.quartz;

import com.swx.quartz02.service.ScheduleTriggerParamService;
import lombok.extern.slf4j.Slf4j;
import org.quartz.*;
import org.springframework.beans.factory.annotation.Autowired;
import org.springframework.stereotype.Component;

import java.util.Date;

@Component
@Slf4j
public class MyJob1 implements Job {

    @Autowired
    private ScheduleTriggerParamService scheduleTriggerParamService;

    @Override
    public void execute(JobExecutionContext jobExecutionContext) throws JobExecutionException {
        JobDetail jobDetail =
                jobExecutionContext.getJobDetail();
        JobDataMap jobDataMap = jobDetail.getJobDataMap();
        System.out.println(new Date().toLocaleString()+"-->携带参数个数:"+jobDataMap.size());
    }
}
MyJob2
package com.swx.quartz02.quartz;

import lombok.extern.slf4j.Slf4j;
import org.quartz.*;
import org.springframework.stereotype.Component;

import java.util.Date;

@Component
@Slf4j
public class MyJob2 implements Job {
    @Override
    public void execute(JobExecutionContext jobExecutionContext) throws JobExecutionException {
        JobDetail jobDetail =
                jobExecutionContext.getJobDetail();
        JobDataMap jobDataMap = jobDetail.getJobDataMap();
        System.out.println(new Date().toLocaleString()+"-->MyJob2参数传递name="+jobDataMap.get("name")+",score="+
                jobDataMap.get("score"));
    }
}
读取数据库中表达式启动定时任务

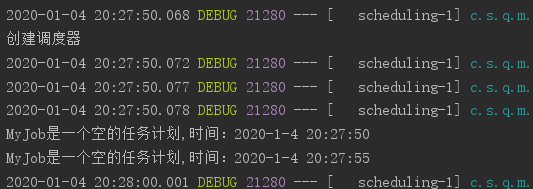
Spring自带定时任务每10s执行一次,查询自定义触发器表,获取到具体的作业类及任务表达式,quartz的任务为每5s执行一次,所以打印如上
更改定时任务状态
更改数据库调度器表t_schedule_trigger的state状态


spring自带的定时任务每10秒执行,quartz的任务没有执行
定时任务中携带参数


spring自带的定时任务每10s执行一次查询,查询t_schedule_trigger表,调度器是需要携带参数的,携带的参数在t_schedule_trigger_param表中,所以一开始调度器启动的时候需要查询t_schedule_trigger_param表数据,最终打印语句如上
更改定时任务规则

将其改为30s一次

打印具体参数


页面版定时任务curd
过程比较简单这里就直接上代码:
service层:
package com.swx.quartz02.service;

import com.swx.quartz02.model.Schedule;
import com.swx.quartz02.utils.PageBean;

import java.util.List;

/**
 * @author Songwanxi
 * @site www.lentter.club
 * @company
 * @create  2020-01-04 20:58
 */
public interface ScheduleService {
    int deleteByPrimaryKey(Integer id);

    int insert(Schedule record);

    int updateByPrimaryKeySelective(Schedule record);

    List<Schedule> qlScPager(String job_name, PageBean pageBean);
}
impl层:
package com.swx.quartz02.service.impl;

import com.swx.quartz02.mapper.ScheduleMapper;
import com.swx.quartz02.model.Schedule;
import com.swx.quartz02.service.ScheduleService;
import com.swx.quartz02.utils.PageBean;
import org.springframework.beans.factory.annotation.Autowired;
import org.springframework.stereotype.Service;

import java.util.List;

/**
 * @author Songwanxi
 * @site www.lentter.club
 * @company
 * @create  2020-01-04 21:09
 */
@Service
public class ScheduleServiceImpl implements ScheduleService {
    @Autowired
    private ScheduleMapper scheduleMapper;
    @Override
    public int deleteByPrimaryKey(Integer id) {
        return scheduleMapper.deleteByPrimaryKey(id);
    }

    @Override
    public int insert(Schedule record) {
        return scheduleMapper.insert(record);
    }

    @Override
    public int updateByPrimaryKeySelective(Schedule record) {
        return scheduleMapper.updateByPrimaryKeySelective(record);
    }

    @Override
    public List<Schedule> qlScPager(String job_name, PageBean pageBean) {
        return scheduleMapper.qlScPager(job_name);
    }
}
controller层:
package com.swx.quartz02.controller;

import com.swx.quartz02.model.Schedule;
import com.swx.quartz02.service.ScheduleService;
import com.swx.quartz02.utils.JSONResult;
import com.swx.quartz02.utils.PageBean;
import com.swx.quartz02.utils.StringUtils;
import org.springframework.beans.factory.annotation.Autowired;
import org.springframework.web.bind.annotation.CrossOrigin;
import org.springframework.web.bind.annotation.RequestMapping;
import org.springframework.web.bind.annotation.RestController;

import javax.servlet.http.HttpServletRequest;
import java.util.HashMap;
import java.util.List;
import java.util.Map;

/**
 * @author Songwanxi
 * @site www.lentter.club
 * @company
 * @create  2020-01-04 21:12
 */
@RestController
@CrossOrigin(origins = {"*","null"})//origins  : 允许可访问的域列表  maxAge:准备响应前的缓存持续的最大时间(以秒为单位)
public class ScheduleController {
    @Autowired
    private ScheduleService scheduleService;

    @RequestMapping("/list")
    public JSONResult list(HttpServletRequest request){
        //从前台传过来的分页数据
        PageBean pageBean = new PageBean();
        String page = request.getParameter("page");
        if(StringUtils.isNotBlank(page)){
            pageBean.setPage(Integer.valueOf(request.getParameter("page")));
        }
        //row
        //页大小
        String rows = request.getParameter("rows");
        if(StringUtils.isNotBlank(rows)){
            pageBean.setRows(rows);
        }
        String job_name = "%"+request.getParameter("job_name")+"%";
        List<Schedule> list = scheduleService.qlScPager(job_name, pageBean);
        List<Schedule> list1 = scheduleService.qlScPager(job_name, null);
        pageBean.setTotal(list1.size());
        Map data = new HashMap();
        data.put("data",list);
        data.put("pagebean",pageBean);
        return JSONResult.build(200,"ok",data);
    }

    @RequestMapping("/add")
        public JSONResult add(Schedule schedule){
            scheduleService.insert(schedule);
            return JSONResult.ok();
        }

    @RequestMapping("/del")
    public JSONResult del(Schedule schedule){
        scheduleService.deleteByPrimaryKey(schedule.getId());
        return JSONResult.ok();
    }

    @RequestMapping("/edit")
    public JSONResult edit(Schedule schedule){
        scheduleService.updateByPrimaryKeySelective(schedule);
        return JSONResult.ok();
    }
}
由于我是用vue进行展示的,所以要配置跨域:
spring的跨域比较简单,一个注解:
@CrossOrigin(origins = {"*","null"})//origins : 允许可访问的域列表 maxAge:准备响应前的缓存持续的最大时间(以秒为单位)
然后前端代码:
<template>
	<div>
		<el-form :inline="true" :model="formInline" class="user-search">
			<el-form-item label="搜索:">
				<el-input size="small" v-model="formInline.job_name" placeholder="输入文章标题"></el-input>
			</el-form-item>
			<el-form-item>
				<el-button size="small" type="primary" icon="el-icon-search" @click="search">搜索</el-button>
				<el-button size="small" type="primary" icon="el-icon-plus" @click="handleAdd()">添加</el-button>
			</el-form-item>
		</el-form>
		<!--列表-->
		<el-table size="small" :data="listData" style="width: 100%;">
			<el-table-column align="center" type="selection" min-width="1">
			</el-table-column>
			<el-table-column sortable prop="id" label="ID" min-width="1">
			</el-table-column>
			<el-table-column sortable prop="cron" label="表达式" min-width="2">
			</el-table-column>
			<el-table-column sortable prop="status" label="状态" min-width="2">
        <template slot-scope="scope">
            <el-switch
              v-model="scope.row.status"
              active-color="#13ce66"
              inactive-color="#ff4949"
              active-value="1"
              inactive-value="0"
              active-text="激活"
              inactive-text="关闭"
              @change="chag(scope.$index, scope.row)"
            >
            </el-switch>

        </template>
    </el-table-column>
      <el-table-column sortable prop="job_Name" label="类" min-width="2">
      </el-table-column>
      <el-table-column sortable prop="job_Group" label="分组" min-width="1">
      </el-table-column>
			<el-table-column align="center" label="操作" min-width="1">
				<template slot-scope="scope">
					<el-button size="mini" @click="doEdit(scope.$index, scope.row)">编辑</el-button>
					<el-button size="mini" type="danger" @click="deleteUser(scope.$index, scope.row)">删除</el-button>
				</template>
			</el-table-column>
		</el-table>
		<el-pagination style="margin-top: 20px;" @size-change="handleSizeChange" @current-change="handleCurrentChange"
		 :current-page="formInline.page" :page-sizes="[10, 20, 30, 50]" :page-size="100" layout="total, sizes, prev, pager, next, jumper"
		 :total="total">
		</el-pagination>
		<!-- 编辑界面 -->
		<el-dialog :title="title" :visible.sync="editFormVisible" width="30%" @before-close="closeDialog">
			<el-form label-width="120px" :model="editForm" :rules="rules" ref="editForm">
				<el-form-item label="表达式" prop="cron">
					<el-input size="small" v-model="editForm.cron" auto-complete="off" placeholder="请输入表达式"></el-input>
				</el-form-item>
				<el-form-item label="状态" prop="status">
        <el-input size="small" v-model="editForm.status" auto-complete="off" placeholder="请输入状态"></el-input>
      </el-form-item>
        <el-form-item label="类" prop="job_Name">
          <el-input size="small" v-model="editForm.job_Name" auto-complete="off" placeholder="请输入类"></el-input>
        </el-form-item>
        <el-form-item label="分组" prop="job_Group">
          <el-input size="small" v-model="editForm.job_Group" auto-complete="off" placeholder="请输入分组"></el-input>
        </el-form-item>
			</el-form>
			<div slot="footer" class="dialog-footer">
				<el-button size="small" @click="closeDialog">取消</el-button>
				<el-button size="small" type="primary" class="title" @click="submitForm('editForm')">保存</el-button>
			</div>
		</el-dialog>
	</div>

</template>

<script>
	export default {
		data() {
			return {
				listData: [],
				formInline: {
					page: 1,
					rows: 2,
					job_name: ''
				},
        status1:true,
        status2:false,
				total: 0,
				title: '', //编辑框标题
				editFormVisible: false, //控制编辑框是否弹出
				editForm: { //表单内容
					id: 0,
          cron: '',
          status: '',
          job_Name:'',
          job_Group:''
				},
				rules: { //表单验证内容
					title: [{
							required: true, //必填
							message: '请输入文章标题',
							trigger: 'blur'
						},
						{
							min: 3,
							max: 5,
							message: '长度在 3 到 5 个字符',
							trigger: 'blur'
						}
					],
					body: [{
						required: true,
						message: '请输入文章内容',
						trigger: 'blur'
					}]
				}
			};
		},
		methods: {
		  chag(index,row){
		    console.log(index,row);
		    this.editForm.id = row.id;
        this.editForm.status = row.status;
        this.editForm.job_Name = row.job_Name;
        this.editForm.job_Group = row.job_Group;
        this.editForm.cron = row.cron;
        let url = this.axios.urls.SYSTEM_QZ_EDIT;
        this.axios.post(url, this.editForm).then((response) => {
          console.log(response);
          this.closeDialog(); //关闭
          this.clearForm(); //清空
          this.search(); //刷新
        }).catch(function(error) {
          console.log(error);
        });
      },
			handleSizeChange(rows) { //页大小发生改变触发
				console.log(rows)
				this.formInline.page = 1;
				this.formInline.rows = rows;
				this.search();
			},
			handleCurrentChange(page) { //当前页码发生改变触发
				console.log(page)
				this.formInline.page = page;
				this.search();
			},
			doSearch(params) { //为了简便代码将方法封装 一处封装 多处调用
				//拿取表格数据
				let url = this.axios.urls.SYSTEM_QZ_SEL;
				this.axios.post(url, params).then((response) => {
					console.log(response);
					this.listData = response.data.data.data;
					this.total = response.data.data.pagebean.total;
				}).catch(function(error) {
					console.log(error);
				});
			},
			search() {
				this.doSearch(this.formInline)
			},
			closeDialog() { //表单取消方法
				this.editFormVisible = false;

			},
			submitForm(formName) { //表单提交方法 formName表单数据
				// console.log(this.editForm)
				this.$refs[formName].validate((valid) => { //补充表单验证提交 判断验证是否通过
					if (valid) {
						//console.log('submit !!');
						let url;
						if (this.editForm.id == 0) { //判断是增加还是修改
							url = this.axios.urls.SYSTEM_QZ_ADD;
						} else {
							url = this.axios.urls.SYSTEM_QZ_EDIT;
						}
						this.axios.post(url, this.editForm).then((response) => {
							console.log(response);
							this.closeDialog(); //关闭
							this.clearForm(); //清空
							this.search(); //刷新
						}).catch(function(error) {
							console.log(error);
						});


					} else {
						console.log('error submit!!');
						return false;
					}
				});
			},
			handleAdd() { //新增
				this.editFormVisible = true; //打开表单
				this.clearForm();
				this.title = '新增';
			},
			doEdit(index, row) { //修改 index选择的行  row行内数据
				this.editFormVisible = true; //打开表单
				this.clearForm(); //清空表单
				this.title = '修改';
        this.editForm.id = row.id;
        this.editForm.status = row.status;
        this.editForm.job_Name = row.job_Name;
        this.editForm.job_Group = row.job_Group;
        this.editForm.cron = row.cron;

			},
			deleteUser(index, row) { //删除
				let url = this.axios.urls.SYSTEM_ARTICLE_DEL;
				this.axios.post(url, {id:row.id}).then((response) => {
					//console.log(response);
					this.search(); //刷新
				}).catch(function(error) {
					console.log(error);
				});
		},
		clearForm() { //清空表单
      this.editForm.id = "";
      this.editForm.status = 0;
      this.editForm.job_Name = "";
      this.editForm.job_Group = "";
      this.editForm.cron = "";
		}
	},
	created() {
		this.doSearch();
	}
	}
</script>

<style>

</style>
页面展示:

打开第二个任务:


成功打开!其他增删改查就不一一演示了


 559
559


 被折叠的 条评论
为什么被折叠?
被折叠的 条评论
为什么被折叠?
 到【灌水乐园】发言


