application context not configured for this file 错误解决

application context not configured for this file 错误解决

spring配置文件中时常会出现这个提示,翻译过来大概意思就是没有配置该文件到项目中
在这里插入图片描述
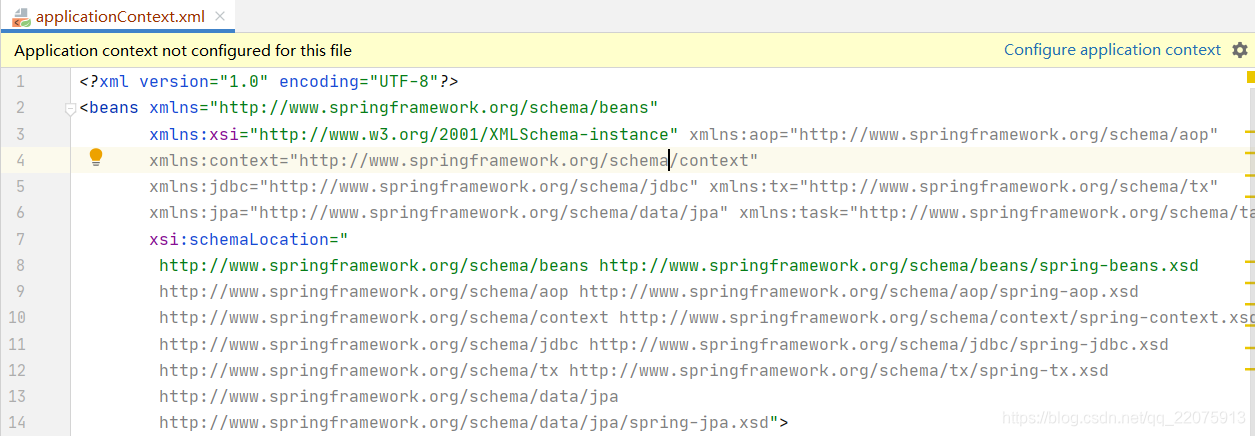
于是进入到File →Project Structure中查看
在这里插入图片描述
可以很明显的看到下面有个感叹号,大概意思是下面的文件没有匹配

知道原因就很好解决问题了,只需要加到项目中去就可以了

在这里插入图片描述
错误解决
在这里插入图片描述

  • 16
    点赞
  • 20
    收藏
    觉得还不错? 一键收藏
  • 0
    评论
[PHP] ;;;;;;;;;;;;;;;;;;; ; About php.ini ; ;;;;;;;;;;;;;;;;;;; ; PHP's initialization file, generally called php.ini, is responsible for ; configuring many of the aspects of PHP's behavior. ; PHP attempts to find and load this configuration from a number of locations. ; The following is a summary of its search order: ; 1. SAPI module specific location. ; 2. The PHPRC environment variable. (As of PHP 5.2.0) ; 3. A number of predefined registry keys on Windows (As of PHP 5.2.0) ; 4. Current working directory (except CLI) ; 5. The web server's directory (for SAPI modules), or directory of PHP ; (otherwise in Windows) ; 6. The directory from the --with-config-file-path compile time option, or the ; Windows directory (C:\windows or C:\winnt) ; See the PHP docs for more specific information. ; http://php.net/configuration.file ; The syntax of the file is extremely simple. Whitespace and lines ; beginning with a semicolon are silently ignored (as you probably guessed). ; Section headers (e.g. [Foo]) are also silently ignored, even though ; they might mean something in the future. ; Directives following the section heading [PATH=/www/mysite] only ; apply to PHP files in the /www/mysite directory. Directives ; following the section heading [HOST=www.example.com] only apply to ; PHP files served from www.example.com. Directives set in these ; special sections cannot be overridden by user-defined INI files or ; at runtime. Currently, [PATH=] and [HOST=] sections only work under ; CGI/FastCGI. ; http://php.net/ini.sections ; Directives are specified using the following syntax: ; directive = value ; Directive names are *case sensitive* - foo=bar is different from FOO=bar. ; Directives are variables used to configure PHP or PHP extensions. ; There is no name validation. If PHP can't find an expected ; directive because it is not set or is mistyped, a default value will be used. ; The value can be a string, a number, a PHP constant (e.g. E_ALL or M_PI), one ; of the INI constants (On, Off, True, False, Yes, No and None) or an expression ; (e.g. E_ALL & ~E_NOTICE), a quoted string ("bar"), or a reference to a ; previously set variable or directive (e.g. ${foo}) ; Expressions in the INI file are limited to bitwise operators and parentheses: ; | bitwise OR ; ^ bitwise XOR ; & bitwise AND ; ~ bitwise NOT ; ! boolean NOT ; Boolean flags can be turned on using the values 1, On, True or Yes. ; They can be turned off using the values 0, Off, False or No. ; An empty string can be denoted by simply not writing anything after the equal ; sign, or by using the None keyword: ; foo = ; sets foo to an empty string ; foo = None ; sets foo to an empty string ; foo = "None" ; sets foo to the string 'None' ; If you use constants in your value, and these constants belong to a ; dynamically loaded extension (either a PHP extension or a Zend extension), ; you may only use these constants *after* the line that loads the extension. ;;;;;;;;;;;;;;;;;;; ; About this file ; ;;;;;;;;;;;;;;;;;;; ; PHP comes packaged with two INI files. One that is recommended to be used ; in production environments and one that is recommended to be used in ; development environments. ; php.ini-production contains settings which hold security, performance and ; best practices at its core. But please be aware, these settings may break ; compatibility with older or less security conscience applications. We ; recommending using the production ini in production and testing environments. ; php.ini-development is very similar to its production variant, except it's ; much more verbose when it comes to errors. We recommending using the ; development version only in development environments as errors shown to ; application users can inadvertently leak otherwise secure information. ; This is php.ini-development INI file. ;;;;;;;;;;;;;;;;;;; ; Quick Reference ; ;;;;;;;;;;;;;;;;;;; ; The following are all the settings which are different in either the production ; or development versions of the INIs with respect to PHP's default behavior. ; Please see the actual settings later in the document for more details as to why ; we recommend these changes in PHP's behavior. ; display_errors ; Default Value: On ; Development Value: On ; Production Value: Off ; display_startup_errors ; Default Value: Off ; Development Value: On ; Production Value: Off ; error_reporting ; Default Value: E_ALL & ~E_NOTICE & ~E_STRICT & ~E_DEPRECATED ; Development Value: E_ALL ; Production Value: E_ALL & ~E_DEPRECATED & ~E_STRICT ; html_errors ; Default Value: On ; Development Value: On ; Production value: On ; log_errors ; Default Value: Off ; Development Value: On ; Production Value: On ; max_input_time ; Default Value: -1 (Unlimited) ; Development Value: 60 (60 seconds) ; Production Value: 60 (60 seconds) ; output_buffering ; Default Value: Off ; Development Value: 4096 ; Production Value: 4096 ; register_argc_argv ; Default Value: On ; Development Value: Off ; Production Value: Off ; request_order ; Default Value: None ; Development Value: "GP" ; Production Value: "GP" ; session.gc_divisor ; Default Value: 100 ; Development Value: 1000 ; Production Value: 1000 ; session.hash_bits_per_character ; Default Value: 4 ; Development Value: 5 ; Production Value: 5 ; short_open_tag ; Default Value: On ; Development Value: Off ; Production Value: Off ; track_errors ; Default Value: Off ; Development Value: On ; Production Value: Off ; url_rewriter.tags ; Default Value: "a=href,area=href,frame=src,form=,fieldset=" ; Development Value: "a=href,area=href,frame=src,input=src,form=fakeentry" ; Production Value: "a=href,area=href,frame=src,input=src,form=fakeentry" ; variables_order ; Default Value: "EGPCS" ; Development Value: "GPCS" ; Production Value: "GPCS" ;;;;;;;;;;;;;;;;;;;; ; php.ini Options ; ;;;;;;;;;;;;;;;;;;;; ; Name for user-defined php.ini (.htaccess) files. Default is ".user.ini" ;user_ini.filename = ".user.ini" ; To disable this feature set this option to empty value ;user_ini.filename = ; TTL for user-defined php.ini files (time-to-live) in seconds. Default is 300 seconds (5 minutes) ;user_ini.cache_ttl = 300 ;;;;;;;;;;;;;;;;;;;; ; Language Options ; ;;;;;;;;;;;;;;;;;;;; ; Enable the PHP scripting language engine under Apache. ; http://php.net/engine engine = On ; This directive determines whether or not PHP will recognize code between ; <? and ?> tags as PHP source which should be processed as such. It is ; generally recommended that <?php and ?> should be used and that this feature ; should be disabled, as enabling it may result in issues when generating XML ; documents, however this remains supported for backward compatibility reasons. ; Note that this directive does not control the <?= shorthand tag, which can be ; used regardless of this directive. ; Default Value: On ; Development Value: Off ; Production Value: Off ; http://php.net/short-open-tag short_open_tag = Off ; Allow ASP-style <% %> tags. ; http://php.net/asp-tags asp_tags = Off ; The number of significant digits displayed in floating point numbers. ; http://php.net/precision precision = 14 ; Output buffering is a mechanism for controlling how much output data ; (excluding headers and cookies) PHP should keep internally before pushing that ; data to the client. If your application's output exceeds this setting, PHP ; will send that data in chunks of roughly the size you specify. ; Turning on this setting and managing its maximum buffer size can yield some ; interesting side-effects depending on your application and web server. ; You may be able to send headers and cookies after you've already sent output ; through print or echo. You also may see performance benefits if your server is ; emitting less packets due to buffered output versus PHP streaming the output ; as it gets it. On production servers, 4096 bytes is a good setting for performance ; reasons. ; Note: Output buffering can also be controlled via Output Buffering Control ; functions. ; Possible Values: ; On = Enabled and buffer is unlimited. (Use with caution) ; Off = Disabled ; Integer = Enables the buffer and sets its maximum size in bytes. ; Note: This directive is hardcoded to Off for the CLI SAPI ; Default Value: Off ; Development Value: 4096 ; Production Value: 4096 ; http://php.net/output-buffering output_buffering = 4096 ; You can redirect all of the output of your scripts to a function. For ; example, if you set output_handler to "mb_output_handler", character ; encoding will be transparently converted to the specified encoding. ; Setting any output handler automatically turns on output buffering. ; Note: People who wrote portable scripts should not depend on this ini ; directive. Instead, explicitly set the output handler using ob_start(). ; Using this ini directive may cause problems unless you know what script ; is doing. ; Note: You cannot use both "mb_output_handler" with "ob_iconv_handler" ; and you cannot use both "ob_gzhandler" and "zlib.output_compression". ; Note: output_handler must be empty if this is set 'On' !!!! ; Instead you must use zlib.output_handler. ; http://php.net/output-handler ;output_handler = ; Transparent output compression using the zlib library ; Valid values for this option are 'off', 'on', or a specific buffer size ; to be used for compression (default is 4KB) ; Note: Resulting chunk size may vary due to nature of compression. PHP ; outputs chunks that are few hundreds bytes each as a result of ; compression. If you prefer a larger chunk size for better ; performance, enable output_buffering in addition. ; Note: You need to use zlib.output_handler instead of the standard ; output_handler, or otherwise the output will be corrupted. ; http://php.net/zlib.output-compression zlib.output_compression = Off ; http://php.net/zlib.output-compression-level ;zlib.output_compression_level = -1 ; You cannot specify additional output handlers if zlib.output_compression ; is activated here. This setting does the same as output_handler but in ; a different order. ; http://php.net/zlib.output-handler ;zlib.output_handler = ; Implicit flush tells PHP to tell the output layer to flush itself ; automatically after every output block. This is equivalent to calling the ; PHP function flush() after each and every call to print() or echo() and each ; and every HTML block. Turning this option on has serious performance ; implications and is generally recommended for debugging purposes only. ; http://php.net/implicit-flush ; Note: This directive is hardcoded to On for the CLI SAPI implicit_flush = Off ; The unserialize callback function will be called (with the undefined class' ; name as parameter), if the unserializer finds an undefined class ; which should be instantiated. A warning appears if the specified function is ; not defined, or if the function doesn't include/implement the missing class. ; So only set this entry, if you really want to implement such a ; callback-function. unserialize_callback_func = ; When floats & doubles are serialized store serialize_precision significant ; digits after the floating point. The default value ensures that when floats ; are decoded with unserialize, the data will remain the same. serialize_precision = 17 ; open_basedir, if set, limits all file operations to the defined directory ; and below. This directive makes most sense if used in a per-directory ; or per-virtualhost web server configuration file. This directive is ; *NOT* affected by whether Safe Mode is turned On or Off. ; http://php.net/open-basedir ;open_basedir = ; This directive allows you to disable certain functions for security reasons. ; It receives a comma-delimited list of function names. This directive is ; *NOT* affected by whether Safe Mode is turned On or Off. ; http://php.net/disable-functions disable_functions = ; This directive allows you to disable certain classes for security reasons. ; It receives a comma-delimited list of class names. This directive is ; *NOT* affected by whether Safe Mode is turned On or Off. ; http://php.net/disable-classes disable_classes = ; Colors for Syntax Highlighting mode. Anything that's acceptable in ; <span style="color: ???????"> would work. ; http://php.net/syntax-highlighting ;highlight.string = #DD0000 ;highlight.comment = #FF9900 ;highlight.keyword = #007700 ;highlight.default = #0000BB ;highlight.html = #000000 ; If enabled, the request will be allowed to complete even if the user aborts ; the request. Consider enabling it if executing long requests, which may end up ; being interrupted by the user or a browser timing out. PHP's default behavior ; is to disable this feature. ; http://php.net/ignore-user-abort ;ignore_user_abort = On ; Determines the size of the realpath cache to be used by PHP. This value should ; be increased on systems where PHP opens many files to reflect the quantity of ; the file operations performed. ; http://php.net/realpath-cache-size ;realpath_cache_size = 16k ; Duration of time, in seconds for which to cache realpath information for a given ; file or directory. For systems with rarely changing files, consider increasing this ; value. ; http://php.net/realpath-cache-ttl ;realpath_cache_ttl = 120 ; Enables or disables the circular reference collector. ; http://php.net/zend.enable-gc zend.enable_gc = On ; If enabled, scripts may be written in encodings that are incompatible with ; the scanner. CP936, Big5, CP949 and Shift_JIS are the examples of such ; encodings. To use this feature, mbstring extension must be enabled. ; Default: Off ;zend.multibyte = Off ; Allows to set the default encoding for the scripts. This value will be used ; unless "declare(encoding=...)" directive appears at the top of the script. ; Only affects if zend.multibyte is set. ; Default: "" ;zend.script_encoding = ;;;;;;;;;;;;;;;;; ; Miscellaneous ; ;;;;;;;;;;;;;;;;; ; Decides whether PHP may expose the fact that it is installed on the server ; (e.g. by adding its signature to the Web server header). It is no security ; threat in any way, but it makes it possible to determine whether you use PHP ; on your server or not. ; http://php.net/expose-php expose_php = On ;;;;;;;;;;;;;;;;;;; ; Resource Limits ; ;;;;;;;;;;;;;;;;;;; ; Maximum execution time of each script, in seconds ; http://php.net/max-execution-time ; Note: This directive is hardcoded to 0 for the CLI SAPI max_execution_time = 30 ; Maximum amount of time each script may spend parsing request data. It's a good ; idea to limit this time on productions servers in order to eliminate unexpectedly ; long running scripts. ; Note: This directive is hardcoded to -1 for the CLI SAPI ; Default Value: -1 (Unlimited) ; Development Value: 60 (60 seconds) ; Production Value: 60 (60 seconds) ; http://php.net/max-input-time max_input_time = 60 ; Maximum input variable nesting level ; http://php.net/max-input-nesting-level ;max_input_nesting_level = 64 ; How many GET/POST/COOKIE input variables may be accepted ; max_input_vars = 1000 ; Maximum amount of memory a script may consume (128MB) ; http://php.net/memory-limit memory_limit = 128M ;;;;;;;;;;;;;;;;;;;;;;;;;;;;;; ; Error handling and logging ; ;;;;;;;;;;;;;;;;;;;;;;;;;;;;;; ; This directive informs PHP of which errors, warnings and notices you would like ; it to take action for. The recommended way of setting values for this ; directive is through the use of the error level constants and bitwise ; operators. The error level constants are below here for convenience as well as ; some common settings and their meanings. ; By default, PHP is set to take action on all errors, notices and warnings EXCEPT ; those related to E_NOTICE and E_STRICT, which together cover best practices and ; recommended coding standards in PHP. For performance reasons, this is the ; recommend error reporting setting. Your production server shouldn't be wasting ; resources complaining about best practices and coding standards. That's what ; development servers and development settings are for. ; Note: The php.ini-development file has this setting as E_ALL. This ; means it pretty much reports everything which is exactly what you want during ; development and early testing. ; ; Error Level Constants: ; E_ALL - All errors and warnings (includes E_STRICT as of PHP 5.4.0) ; E_ERROR - fatal run-time errors ; E_RECOVERABLE_ERROR - almost fatal run-time errors ; E_WARNING - run-time warnings (non-fatal errors) ; E_PARSE - compile-time parse errors ; E_NOTICE - run-time notices (these are warnings which often result ; from a bug in your code, but it's possible that it was ; intentional (e.g., using an uninitialized variable and ; relying on the fact it's automatically initialized to an ; empty string) ; E_STRICT - run-time notices, enable to have PHP suggest changes ; to your code which will ensure the best interoperability ; and forward compatibility of your code ; E_CORE_ERROR - fatal errors that occur during PHP's initial startup ; E_CORE_WARNING - warnings (non-fatal errors) that occur during PHP's ; initial startup ; E_COMPILE_ERROR - fatal compile-time errors ; E_COMPILE_WARNING - compile-time warnings (non-fatal errors) ; E_USER_ERROR - user-generated error message ; E_USER_WARNING - user-generated warning message ; E_USER_NOTICE - user-generated notice message ; E_DEPRECATED - warn about code that will not work in future versions ; of PHP ; E_USER_DEPRECATED - user-generated deprecation warnings ; ; Common Values: ; E_ALL (Show all errors, warnings and notices including coding standards.) ; E_ALL & ~E_NOTICE (Show all errors, except for notices) ; E_ALL & ~E_NOTICE & ~E_STRICT (Show all errors, except for notices and coding standards warnings.) ; E_COMPILE_ERROR|E_RECOVERABLE_ERROR|E_ERROR|E_CORE_ERROR (Show only errors) ; Default Value: E_ALL & ~E_NOTICE & ~E_STRICT & ~E_DEPRECATED ; Development Value: E_ALL ; Production Value: E_ALL & ~E_DEPRECATED & ~E_STRICT ; http://php.net/error-reporting error_reporting = E_ALL ; This directive controls whether or not and where PHP will output errors, ; notices and warnings too. Error output is very useful during development, but ; it could be very dangerous in production environments. Depending on the code ; which is triggering the error, sensitive information could potentially leak ; out of your application such as database usernames and passwords or worse. ; It's recommended that errors be logged on production servers rather than ; having the errors sent to STDOUT. ; Possible Values: ; Off = Do not display any errors ; stderr = Display errors to STDERR (affects only CGI/CLI binaries!) ; On or stdout = Display errors to STDOUT ; Default Value: On ; Development Value: On ; Production Value: Off ; http://php.net/display-errors display_errors = On ; The display of errors which occur during PHP's startup sequence are handled ; separately from display_errors. PHP's default behavior is to suppress those ; errors from clients. Turning the display of startup errors on can be useful in ; debugging configuration problems. But, it's strongly recommended that you ; leave this setting off on production servers. ; Default Value: Off ; Development Value: On ; Production Value: Off ; http://php.net/display-startup-errors display_startup_errors = On ; Besides displaying errors, PHP can also log errors to locations such as a ; server-specific log, STDERR, or a location specified by the error_log ; directive found below. While errors should not be displayed on productions ; servers they should still be monitored and logging is a great way to do that. ; Default Value: Off ; Development Value: On ; Production Value: On ; http://php.net/log-errors log_errors = On ; Set maximum length of log_errors. In error_log information about the source is ; added. The default is 1024 and 0 allows to not apply any maximum length at all. ; http://php.net/log-errors-max-len log_errors_max_len = 1024 ; Do not log repeated messages. Repeated errors must occur in same file on same ; line unless ignore_repeated_source is set true. ; http://php.net/ignore-repeated-errors ignore_repeated_errors = Off ; Ignore source of message when ignoring repeated messages. When this setting ; is On you will not log errors with repeated messages from different files or ; source lines. ; http://php.net/ignore-repeated-source ignore_repeated_source = Off ; If this parameter is set to Off, then memory leaks will not be shown (on ; stdout or in the log). This has only effect in a debug compile, and if ; error reporting includes E_WARNING in the allowed list ; http://php.net/report-memleaks report_memleaks = On ; This setting is on by default. ;report_zend_debug = 0 ; Store the last error/warning message in $php_errormsg (boolean). Setting this value ; to On can assist in debugging and is appropriate for development servers. It should ; however be disabled on production servers. ; Default Value: Off ; Development Value: On ; Production Value: Off ; http://php.net/track-errors track_errors = On ; Turn off normal error reporting and emit XML-RPC error XML ; http://php.net/xmlrpc-errors ;xmlrpc_errors = 0 ; An XML-RPC faultCode ;xmlrpc_error_number = 0 ; When PHP displays or logs an error, it has the capability of formatting the ; error message as HTML for easier reading. This directive controls whether ; the error message is formatted as HTML or not. ; Note: This directive is hardcoded to Off for the CLI SAPI ; Default Value: On ; Development Value: On ; Production value: On ; http://php.net/html-errors html_errors = On ; If html_errors is set to On *and* docref_root is not empty, then PHP ; produces clickable error messages that direct to a page describing the error ; or function causing the error in detail. ; You can download a copy of the PHP manual from http://php.net/docs ; and change docref_root to the base URL of your local copy including the ; leading '/'. You must also specify the file extension being used including ; the dot. PHP's default behavior is to leave these settings empty, in which ; case no links to documentation are generated. ; Note: Never use this feature for production boxes. ; http://php.net/docref-root ; Examples ;docref_root = "/phpmanual/" ; http://php.net/docref-ext ;docref_ext = .html ; String to output before an error message. PHP's default behavior is to leave ; this setting blank. ; http://php.net/error-prepend-string ; Example: ;error_prepend_string = "<span style='color: #ff0000'>" ; String to output after an error message. PHP's default behavior is to leave ; this setting blank. ; http://php.net/error-append-string ; Example: ;error_append_string = "</span>" ; Log errors to specified file. PHP's default behavior is to leave this value ; empty. ; http://php.net/error-log ; Example: ;error_log = php_errors.log ; Log errors to syslog (Event Log on Windows). ;error_log = syslog ;windows.show_crt_warning ; Default value: 0 ; Development value: 0 ; Production value: 0 ;;;;;;;;;;;;;;;;; ; Data Handling ; ;;;;;;;;;;;;;;;;; ; The separator used in PHP generated URLs to separate arguments. ; PHP's default setting is "&". ; http://php.net/arg-separator.output ; Example: ;arg_separator.output = "&" ; List of separator(s) used by PHP to parse input URLs into variables. ; PHP's default setting is "&". ; NOTE: Every character in this directive is considered as separator! ; http://php.net/arg-separator.input ; Example: ;arg_separator.input = ";&" ; This directive determines which super global arrays are registered when PHP ; starts up. G,P,C,E & S are abbreviations for the following respective super ; globals: GET, POST, COOKIE, ENV and SERVER. There is a performance penalty ; paid for the registration of these arrays and because ENV is not as commonly ; used as the others, ENV is not recommended on productions servers. You ; can still get access to the environment variables through getenv() should you ; need to. ; Default Value: "EGPCS" ; Development Value: "GPCS" ; Production Value: "GPCS"; ; http://php.net/variables-order variables_order = "GPCS" ; This directive determines which super global data (G,P,C,E & S) should ; be registered into the super global array REQUEST. If so, it also determines ; the order in which that data is registered. The values for this directive are ; specified in the same manner as the variables_order directive, EXCEPT one. ; Leaving this value empty will cause PHP to use the value set in the ; variables_order directive. It does not mean it will leave the super globals ; array REQUEST empty. ; Default Value: None ; Development Value: "GP" ; Production Value: "GP" ; http://php.net/request-order request_order = "GP" ; This directive determines whether PHP registers $argv & $argc each time it ; runs. $argv contains an array of all the arguments passed to PHP when a script ; is invoked. $argc contains an integer representing the number of arguments ; that were passed when the script was invoked. These arrays are extremely ; useful when running scripts from the command line. When this directive is ; enabled, registering these variables consumes CPU cycles and memory each time ; a script is executed. For performance reasons, this feature should be disabled ; on production servers. ; Note: This directive is hardcoded to On for the CLI SAPI ; Default Value: On ; Development Value: Off ; Production Value: Off ; http://php.net/register-argc-argv register_argc_argv = Off ; When enabled, the ENV, REQUEST and SERVER variables are created when they're ; first used (Just In Time) instead of when the script starts. If these ; variables are not used within a script, having this directive on will result ; in a performance gain. The PHP directive register_argc_argv must be disabled ; for this directive to have any affect. ; http://php.net/auto-globals-jit auto_globals_jit = On ; Whether PHP will read the POST data. ; This option is enabled by default. ; Most likely, you won't want to disable this option globally. It causes $_POST ; and $_FILES to always be empty; the only way you will be able to read the ; POST data will be through the php://input stream wrapper. This can be useful ; to proxy requests or to process the POST data in a memory efficient fashion. ; http://php.net/enable-post-data-reading ;enable_post_data_reading = Off ; Maximum size of POST data that PHP will accept. ; Its value may be 0 to disable the limit. It is ignored if POST data reading ; is disabled through enable_post_data_reading. ; http://php.net/post-max-size post_max_size = 8M ; Automatically add files before PHP document. ; http://php.net/auto-prepend-file auto_prepend_file = ; Automatically add files after PHP document. ; http://php.net/auto-append-file auto_append_file = ; By default, PHP will output a character encoding using ; the Content-type: header. To disable sending of the charset, simply ; set it to be empty. ; ; PHP's built-in default is text/html ; http://php.net/default-mimetype default_mimetype = "text/html" ; PHP's default character set is set to empty. ; http://php.net/default-charset ;default_charset = "UTF-8" ; Always populate the $HTTP_RAW_POST_DATA variable. PHP's default behavior is ; to disable this feature. If post reading is disabled through ; enable_post_data_reading, $HTTP_RAW_POST_DATA is *NOT* populated. ; http://php.net/always-populate-raw-post-data ;always_populate_raw_post_data = On ;;;;;;;;;;;;;;;;;;;;;;;;; ; Paths and Directories ; ;;;;;;;;;;;;;;;;;;;;;;;;; ; UNIX: "/path1:/path2" ;include_path = ".:/php/includes" ; ; Windows: "\path1;\path2" ;include_path = ".;c:\php\includes" ; ; PHP's default setting for include_path is ".;/path/to/php/pear" ; http://php.net/include-path ; The root of the PHP pages, used only if nonempty. ; if PHP was not compiled with FORCE_REDIRECT, you SHOULD set doc_root ; if you are running php as a CGI under any web server (other than IIS) ; see documentation for security issues. The alternate is to use the ; cgi.force_redirect configuration below ; http://php.net/doc-root doc_root = ; The directory under which PHP opens the script using /~username used only ; if nonempty. ; http://php.net/user-dir user_dir = ; Directory in which the loadable extensions (modules) reside. ; http://php.net/extension-dir ; extension_dir = "./" ; On windows: ; extension_dir = "ext" ; Whether or not to enable the dl() function. The dl() function does NOT work ; properly in multithreaded servers, such as IIS or Zeus, and is automatically ; disabled on them. ; http://php.net/enable-dl enable_dl = Off ; cgi.force_redirect is necessary to provide security running PHP as a CGI under ; most web servers. Left undefined, PHP turns this on by default. You can ; turn it off here AT YOUR OWN RISK ; **You CAN safely turn this off for IIS, in fact, you MUST.** ; http://php.net/cgi.force-redirect ;cgi.force_redirect = 1 ; if cgi.nph is enabled it will force cgi to always sent Status: 200 with ; every request. PHP's default behavior is to disable this feature. ;cgi.nph = 1 ; if cgi.force_redirect is turned on, and you are not running under Apache or Netscape ; (iPlanet) web servers, you MAY need to set an environment variable name that PHP ; will look for to know it is OK to continue execution. Setting this variable MAY ; cause security issues, KNOW WHAT YOU ARE DOING FIRST. ; http://php.net/cgi.redirect-status-env ;cgi.redirect_status_env = ; cgi.fix_pathinfo provides *real* PATH_INFO/PATH_TRANSLATED support for CGI. PHP's ; previous behaviour was to set PATH_TRANSLATED to SCRIPT_FILENAME, and to not grok ; what PATH_INFO is. For more information on PATH_INFO, see the cgi specs. Setting ; this to 1 will cause PHP CGI to fix its paths to conform to the spec. A setting ; of zero causes PHP to behave as before. Default is 1. You should fix your scripts ; to use SCRIPT_FILENAME rather than PATH_TRANSLATED. ; http://php.net/cgi.fix-pathinfo ;cgi.fix_pathinfo=1 ; FastCGI under IIS (on WINNT based OS) supports the ability to impersonate ; security tokens of the calling client. This allows IIS to define the ; security context that the request runs under. mod_fastcgi under Apache ; does not currently support this feature (03/17/2002) ; Set to 1 if running under IIS. Default is zero. ; http://php.net/fastcgi.impersonate ;fastcgi.impersonate = 1 ; Disable logging through FastCGI connection. PHP's default behavior is to enable ; this feature. ;fastcgi.logging = 0 ; cgi.rfc2616_headers configuration option tells PHP what type of headers to ; use when sending HTTP response code. If it's set 0 PHP sends Status: header that ; is supported by Apache. When this option is set to 1 PHP will send ; RFC2616 compliant header. ; Default is zero. ; http://php.net/cgi.rfc2616-headers ;cgi.rfc2616_headers = 0 ;;;;;;;;;;;;;;;; ; File Uploads ; ;;;;;;;;;;;;;;;; ; Whether to allow HTTP file uploads. ; http://php.net/file-uploads file_uploads = On ; Temporary directory for HTTP uploaded files (will use system default if not ; specified). ; http://php.net/upload-tmp-dir ;upload_tmp_dir = ; Maximum allowed size for uploaded files. ; http://php.net/upload-max-filesize upload_max_filesize = 2M ; Maximum number of files that can be uploaded via a single request max_file_uploads = 20 ;;;;;;;;;;;;;;;;;; ; Fopen wrappers ; ;;;;;;;;;;;;;;;;;; ; Whether to allow the treatment of URLs (like http:// or ftp://) as files. ; http://php.net/allow-url-fopen allow_url_fopen = On ; Whether to allow include/require to open URLs (like http:// or ftp://) as files. ; http://php.net/allow-url-include allow_url_include = Off ; Define the anonymous ftp password (your email address). PHP's default setting ; for this is empty. ; http://php.net/from ;from="[email protected]" ; Define the User-Agent string. PHP's default setting for this is empty. ; http://php.net/user-agent ;user_agent="PHP" ; Default timeout for socket based streams (seconds) ; http://php.net/default-socket-timeout default_socket_timeout = 60 ; If your scripts have to deal with files from Macintosh systems, ; or you are running on a Mac and need to deal with files from ; unix or win32 systems, setting this flag will cause PHP to ; automatically detect the EOL character in those files so that ; fgets() and file() will work regardless of the source of the file. ; http://php.net/auto-detect-line-endings ;auto_detect_line_endings = Off ;;;;;;;;;;;;;;;;;;;;;; ; Dynamic Extensions ; ;;;;;;;;;;;;;;;;;;;;;; ; If you wish to have an extension loaded automatically, use the following ; syntax: ; ; extension=modulename.extension ; ; For example, on Windows: ; ; extension=msql.dll ; ; ... or under UNIX: ; ; extension=msql.so ; ; ... or with a path: ; ; extension=/path/to/extension/msql.so ; ; If you only provide the name of the extension, PHP will look for it in its ; default extension directory. ; ; Windows Extensions ; Note that ODBC support is built in, so no dll is needed for it. ; Note that many DLL files are located in the extensions/ (PHP 4) ext/ (PHP 5) ; extension folders as well as the separate PECL DLL download (PHP 5). ; Be sure to appropriately set the extension_dir directive. ; ;extension=php_bz2.dll ;extension=php_curl.dll ;extension=php_fileinfo.dll ;extension=php_gd2.dll ;extension=php_gettext.dll ;extension=php_gmp.dll ;extension=php_intl.dll ;extension=php_imap.dll ;extension=php_interbase.dll ;extension=php_ldap.dll ;extension=php_mbstring.dll ;extension=php_exif.dll ; Must be after mbstring as it depends on it ;extension=php_mysql.dll ;extension=php_mysqli.dll ;extension=php_oci8.dll ; Use with Oracle 10gR2 Instant Client ;extension=php_oci8_11g.dll ; Use with Oracle 11gR2 Instant Client ;extension=php_openssl.dll ;extension=php_pdo_firebird.dll ;extension=php_pdo_mysql.dll ;extension=php_pdo_oci.dll ;extension=php_pdo_odbc.dll ;extension=php_pdo_pgsql.dll ;extension=php_pdo_sqlite.dll ;extension=php_pgsql.dll ;extension=php_pspell.dll ;extension=php_shmop.dll ; The MIBS data available in the PHP distribution must be installed. ; See http://www.php.net/manual/en/snmp.installation.php ;extension=php_snmp.dll ;extension=php_soap.dll ;extension=php_sockets.dll ;extension=php_sqlite3.dll ;extension=php_sybase_ct.dll ;extension=php_tidy.dll ;extension=php_xmlrpc.dll ;extension=php_xsl.dll ;;;;;;;;;;;;;;;;;;; ; Module Settings ; ;;;;;;;;;;;;;;;;;;; [CLI Server] ; Whether the CLI web server uses ANSI color coding in its terminal output. cli_server.color = On [Date] ; Defines the default timezone used by the date functions ; http://php.net/date.timezone ;date.timezone = ; http://php.net/date.default-latitude ;date.default_latitude = 31.7667 ; http://php.net/date.default-longitude ;date.default_longitude = 35.2333 ; http://php.net/date.sunrise-zenith ;date.sunrise_zenith = 90.583333 ; http://php.net/date.sunset-zenith ;date.sunset_zenith = 90.583333 [filter] ; http://php.net/filter.default ;filter.default = unsafe_raw ; http://php.net/filter.default-flags ;filter.default_flags = [iconv] ;iconv.input_encoding = ISO-8859-1 ;iconv.internal_encoding = ISO-8859-1 ;iconv.output_encoding = ISO-8859-1 [intl] ;intl.default_locale = ; This directive allows you to produce PHP errors when some error ; happens within intl functions. The value is the level of the error produced. ; Default is 0, which does not produce any errors. ;intl.error_level = E_WARNING [sqlite] ; http://php.net/sqlite.assoc-case ;sqlite.assoc_case = 0 [sqlite3] ;sqlite3.extension_dir = [Pcre] ;PCRE library backtracking limit. ; http://php.net/pcre.backtrack-limit ;pcre.backtrack_limit=100000 ;PCRE library recursion limit. ;Please note that if you set this value to a high number you may consume all ;the available process stack and eventually crash PHP (due to reaching the ;stack size limit imposed by the Operating System). ; http://php.net/pcre.recursion-limit ;pcre.recursion_limit=100000 [Pdo] ; Whether to pool ODBC connections. Can be one of "strict", "relaxed" or "off" ; http://php.net/pdo-odbc.connection-pooling ;pdo_odbc.connection_pooling=strict ;pdo_odbc.db2_instance_name [Pdo_mysql] ; If mysqlnd is used: Number of cache slots for the internal result set cache ; http://php.net/pdo_mysql.cache_size pdo_mysql.cache_size = 2000 ; Default socket name for local MySQL connects. If empty, uses the built-in ; MySQL defaults. ; http://php.net/pdo_mysql.default-socket pdo_mysql.default_socket= [Phar] ; http://php.net/phar.readonly ;phar.readonly = On ; http://php.net/phar.require-hash ;phar.require_hash = On ;phar.cache_list = [mail function] ; For Win32 only. ; http://php.net/smtp SMTP = localhost ; http://php.net/smtp-port smtp_port = 25 ; For Win32 only. ; http://php.net/sendmail-from ;sendmail_from = [email protected] ; For Unix only. You may supply arguments as well (default: "sendmail -t -i"). ; http://php.net/sendmail-path ;sendmail_path = ; Force the addition of the specified parameters to be passed as extra parameters ; to the sendmail binary. These parameters will always replace the value of ; the 5th parameter to mail(), even in safe mode. ;mail.force_extra_parameters = ; Add X-PHP-Originating-Script: that will include uid of the script followed by the filename mail.add_x_header = On ; The path to a log file that will log all mail() calls. Log entries include ; the full path of the script, line number, To address and headers. ;mail.log = ; Log mail to syslog (Event Log on Windows). ;mail.log = syslog [SQL] ; http://php.net/sql.safe-mode sql.safe_mode = Off [ODBC] ; http://php.net/odbc.default-db ;odbc.default_db = Not yet implemented ; http://php.net/odbc.default-user ;odbc.default_user = Not yet implemented ; http://php.net/odbc.default-pw ;odbc.default_pw = Not yet implemented ; Controls the ODBC cursor model. ; Default: SQL_CURSOR_STATIC (default). ;odbc.default_cursortype ; Allow or prevent persistent links. ; http://php.net/odbc.allow-persistent odbc.allow_persistent = On ; Check that a connection is still valid before reuse. ; http://php.net/odbc.check-persistent odbc.check_persistent = On ; Maximum number of persistent links. -1 means no limit. ; http://php.net/odbc.max-persistent odbc.max_persistent = -1 ; Maximum number of links (persistent + non-persistent). -1 means no limit. ; http://php.net/odbc.max-links odbc.max_links = -1 ; Handling of LONG fields. Returns number of bytes to variables. 0 means ; passthru. ; http://php.net/odbc.defaultlrl odbc.defaultlrl = 4096 ; Handling of binary data. 0 means passthru, 1 return as is, 2 convert to char. ; See the documentation on odbc_binmode and odbc_longreadlen for an explanation ; of odbc.defaultlrl and odbc.defaultbinmode ; http://php.net/odbc.defaultbinmode odbc.defaultbinmode = 1 ;birdstep.max_links = -1 [Interbase] ; Allow or prevent persistent links. ibase.allow_persistent = 1 ; Maximum number of persistent links. -1 means no limit. ibase.max_persistent = -1 ; Maximum number of links (persistent + non-persistent). -1 means no limit. ibase.max_links = -1 ; Default database name for ibase_connect(). ;ibase.default_db = ; Default username for ibase_connect(). ;ibase.default_user = ; Default password for ibase_connect(). ;ibase.default_password = ; Default charset for ibase_connect(). ;ibase.default_charset = ; Default timestamp format. ibase.timestampformat = "%Y-%m-%d %H:%M:%S" ; Default date format. ibase.dateformat = "%Y-%m-%d" ; Default time format. ibase.timeformat = "%H:%M:%S" [MySQL] ; Allow accessing, from PHP's perspective, local files with LOAD DATA statements ; http://php.net/mysql.allow_local_infile mysql.allow_local_infile = On ; Allow or prevent persistent links. ; http://php.net/mysql.allow-persistent mysql.allow_persistent = On ; If mysqlnd is used: Number of cache slots for the internal result set cache ; http://php.net/mysql.cache_size mysql.cache_size = 2000 ; Maximum number of persistent links. -1 means no limit. ; http://php.net/mysql.max-persistent mysql.max_persistent = -1 ; Maximum number of links (persistent + non-persistent). -1 means no limit. ; http://php.net/mysql.max-links mysql.max_links = -1 ; Default port number for mysql_connect(). If unset, mysql_connect() will use ; the $MYSQL_TCP_PORT or the mysql-tcp entry in /etc/services or the ; compile-time value defined MYSQL_PORT (in that order). Win32 will only look ; at MYSQL_PORT. ; http://php.net/mysql.default-port mysql.default_port = ; Default socket name for local MySQL connects. If empty, uses the built-in ; MySQL defaults. ; http://php.net/mysql.default-socket mysql.default_socket = ; Default host for mysql_connect() (doesn't apply in safe mode). ; http://php.net/mysql.default-host mysql.default_host = ; Default user for mysql_connect() (doesn't apply in safe mode). ; http://php.net/mysql.default-user mysql.default_user = ; Default password for mysql_connect() (doesn't apply in safe mode). ; Note that this is generally a *bad* idea to store passwords in this file. ; *Any* user with PHP access can run 'echo get_cfg_var("mysql.default_password") ; and reveal this password! And of course, any users with read access to this ; file will be able to reveal the password as well. ; http://php.net/mysql.default-password mysql.default_password = ; Maximum time (in seconds) for connect timeout. -1 means no limit ; http://php.net/mysql.connect-timeout mysql.connect_timeout = 60 ; Trace mode. When trace_mode is active (=On), warnings for table/index scans and ; SQL-Errors will be displayed. ; http://php.net/mysql.trace-mode mysql.trace_mode = Off [MySQLi] ; Maximum number of persistent links. -1 means no limit. ; http://php.net/mysqli.max-persistent mysqli.max_persistent = -1 ; Allow accessing, from PHP's perspective, local files with LOAD DATA statements ; http://php.net/mysqli.allow_local_infile ;mysqli.allow_local_infile = On ; Allow or prevent persistent links. ; http://php.net/mysqli.allow-persistent mysqli.allow_persistent = On ; Maximum number of links. -1 means no limit. ; http://php.net/mysqli.max-links mysqli.max_links = -1 ; If mysqlnd is used: Number of cache slots for the internal result set cache ; http://php.net/mysqli.cache_size mysqli.cache_size = 2000 ; Default port number for mysqli_connect(). If unset, mysqli_connect() will use ; the $MYSQL_TCP_PORT or the mysql-tcp entry in /etc/services or the ; compile-time value defined MYSQL_PORT (in that order). Win32 will only look ; at MYSQL_PORT. ; http://php.net/mysqli.default-port mysqli.default_port = 3306 ; Default socket name for local MySQL connects. If empty, uses the built-in ; MySQL defaults. ; http://php.net/mysqli.default-socket mysqli.default_socket = ; Default host for mysql_connect() (doesn't apply in safe mode). ; http://php.net/mysqli.default-host mysqli.default_host = ; Default user for mysql_connect() (doesn't apply in safe mode). ; http://php.net/mysqli.default-user mysqli.default_user = ; Default password for mysqli_connect() (doesn't apply in safe mode). ; Note that this is generally a *bad* idea to store passwords in this file. ; *Any* user with PHP access can run 'echo get_cfg_var("mysqli.default_pw") ; and reveal this password! And of course, any users with read access to this ; file will be able to reveal the password as well. ; http://php.net/mysqli.default-pw mysqli.default_pw = ; Allow or prevent reconnect mysqli.reconnect = Off [mysqlnd] ; Enable / Disable collection of general statistics by mysqlnd which can be ; used to tune and monitor MySQL operations. ; http://php.net/mysqlnd.collect_statistics mysqlnd.collect_statistics = On ; Enable / Disable collection of memory usage statistics by mysqlnd which can be ; used to tune and monitor MySQL operations. ; http://php.net/mysqlnd.collect_memory_statistics mysqlnd.collect_memory_statistics = On ; Size of a pre-allocated buffer used when sending commands to MySQL in bytes. ; http://php.net/mysqlnd.net_cmd_buffer_size ;mysqlnd.net_cmd_buffer_size = 2048 ; Size of a pre-allocated buffer used for reading data sent by the server in ; bytes. ; http://php.net/mysqlnd.net_read_buffer_size ;mysqlnd.net_read_buffer_size = 32768 [OCI8] ; Connection: Enables privileged connections using external ; credentials (OCI_SYSOPER, OCI_SYSDBA) ; http://php.net/oci8.privileged-connect ;oci8.privileged_connect = Off ; Connection: The maximum number of persistent OCI8 connections per ; process. Using -1 means no limit. ; http://php.net/oci8.max-persistent ;oci8.max_persistent = -1 ; Connection: The maximum number of seconds a process is allowed to ; maintain an idle persistent connection. Using -1 means idle ; persistent connections will be maintained forever. ; http://php.net/oci8.persistent-timeout ;oci8.persistent_timeout = -1 ; Connection: The number of seconds that must pass before issuing a ; ping during oci_pconnect() to check the connection validity. When ; set to 0, each oci_pconnect() will cause a ping. Using -1 disables ; pings completely. ; http://php.net/oci8.ping-interval ;oci8.ping_interval = 60 ; Connection: Set this to a user chosen connection class to be used ; for all pooled server requests with Oracle 11g Database Resident ; Connection Pooling (DRCP). To use DRCP, this value should be set to ; the same string for all web servers running the same application, ; the database pool must be configured, and the connection string must ; specify to use a pooled server. ;oci8.connection_class = ; High Availability: Using On lets PHP receive Fast Application ; Notification (FAN) events generated when a database node fails. The ; database must also be configured to post FAN events. ;oci8.events = Off ; Tuning: This option enables statement caching, and specifies how ; many statements to cache. Using 0 disables statement caching. ; http://php.net/oci8.statement-cache-size ;oci8.statement_cache_size = 20 ; Tuning: Enables statement prefetching and sets the default number of ; rows that will be fetched automatically after statement execution. ; http://php.net/oci8.default-prefetch ;oci8.default_prefetch = 100 ; Compatibility. Using On means oci_close() will not close ; oci_connect() and oci_new_connect() connections. ; http://php.net/oci8.old-oci-close-semantics ;oci8.old_oci_close_semantics = Off [PostgreSQL] ; Allow or prevent persistent links. ; http://php.net/pgsql.allow-persistent pgsql.allow_persistent = On ; Detect broken persistent links always with pg_pconnect(). ; Auto reset feature requires a little overheads. ; http://php.net/pgsql.auto-reset-persistent pgsql.auto_reset_persistent = Off ; Maximum number of persistent links. -1 means no limit. ; http://php.net/pgsql.max-persistent pgsql.max_persistent = -1 ; Maximum number of links (persistent+non persistent). -1 means no limit. ; http://php.net/pgsql.max-links pgsql.max_links = -1 ; Ignore PostgreSQL backends Notice message or not. ; Notice message logging require a little overheads. ; http://php.net/pgsql.ignore-notice pgsql.ignore_notice = 0 ; Log PostgreSQL backends Notice message or not. ; Unless pgsql.ignore_notice=0, module cannot log notice message. ; http://php.net/pgsql.log-notice pgsql.log_notice = 0 [Sybase-CT] ; Allow or prevent persistent links. ; http://php.net/sybct.allow-persistent sybct.allow_persistent = On ; Maximum number of persistent links. -1 means no limit. ; http://php.net/sybct.max-persistent sybct.max_persistent = -1 ; Maximum number of links (persistent + non-persistent). -1 means no limit. ; http://php.net/sybct.max-links sybct.max_links = -1 ; Minimum server message severity to display. ; http://php.net/sybct.min-server-severity sybct.min_server_severity = 10 ; Minimum client message severity to display. ; http://php.net/sybct.min-client-severity sybct.min_client_severity = 10 ; Set per-context timeout ; http://php.net/sybct.timeout ;sybct.timeout= ;sybct.packet_size ; The maximum time in seconds to wait for a connection attempt to succeed before returning failure. ; Default: one minute ;sybct.login_timeout= ; The name of the host you claim to be connecting from, for display by sp_who. ; Default: none ;sybct.hostname= ; Allows you to define how often deadlocks are to be retried. -1 means "forever". ; Default: 0 ;sybct.deadlock_retry_count= [bcmath] ; Number of decimal digits for all bcmath functions. ; http://php.net/bcmath.scale bcmath.scale = 0 [browscap] ; http://php.net/browscap ;browscap = extra/browscap.ini [Session] ; Handler used to store/retrieve data. ; http://php.net/session.save-handler session.save_handler = files ; Argument passed to save_handler. In the case of files, this is the path ; where data files are stored. Note: Windows users have to change this ; variable in order to use PHP's session functions. ; ; The path can be defined as: ; ; session.save_path = "N;/path" ; ; where N is an integer. Instead of storing all the session files in ; /path, what this will do is use subdirectories N-levels deep, and ; store the session data in those directories. This is useful if you ; or your OS have problems with lots of files in one directory, and is ; a more efficient layout for servers that handle lots of sessions. ; ; NOTE 1: PHP will not create this directory structure automatically. ; You can use the script in the ext/session dir for that purpose. ; NOTE 2: See the section on garbage collection below if you choose to ; use subdirectories for session storage ; ; The file storage module creates files using mode 600 by default. ; You can change that by using ; ; session.save_path = "N;MODE;/path" ; ; where MODE is the octal representation of the mode. Note that this ; does not overwrite the process's umask. ; http://php.net/session.save-path ;session.save_path = "/tmp" ; Whether to use cookies. ; http://php.net/session.use-cookies session.use_cookies = 1 ; http://php.net/session.cookie-secure ;session.cookie_secure = ; This option forces PHP to fetch and use a cookie for storing and maintaining ; the session id. We encourage this operation as it's very helpful in combating ; session hijacking when not specifying and managing your own session id. It is ; not the end all be all of session hijacking defense, but it's a good start. ; http://php.net/session.use-only-cookies session.use_only_cookies = 1 ; Name of the session (used as cookie name). ; http://php.net/session.name session.name = PHPSESSID ; Initialize session on request startup. ; http://php.net/session.auto-start session.auto_start = 0 ; Lifetime in seconds of cookie or, if 0, until browser is restarted. ; http://php.net/session.cookie-lifetime session.cookie_lifetime = 0 ; The path for which the cookie is valid. ; http://php.net/session.cookie-path session.cookie_path = / ; The domain for which the cookie is valid. ; http://php.net/session.cookie-domain session.cookie_domain = ; Whether or not to add the httpOnly flag to the cookie, which makes it inaccessible to browser scripting languages such as JavaScript. ; http://php.net/session.cookie-httponly session.cookie_httponly = ; Handler used to serialize data. php is the standard serializer of PHP. ; http://php.net/session.serialize-handler session.serialize_handler = php ; Defines the probability that the 'garbage collection' process is started ; on every session initialization. The probability is calculated by using ; gc_probability/gc_divisor. Where session.gc_probability is the numerator ; and gc_divisor is the denominator in the equation. Setting this value to 1 ; when the session.gc_divisor value is 100 will give you approximately a 1% chance ; the gc will run on any give request. ; Default Value: 1 ; Development Value: 1 ; Production Value: 1 ; http://php.net/session.gc-probability session.gc_probability = 1 ; Defines the probability that the 'garbage collection' process is started on every ; session initialization. The probability is calculated by using the following equation: ; gc_probability/gc_divisor. Where session.gc_probability is the numerator and ; session.gc_divisor is the denominator in the equation. Setting this value to 1 ; when the session.gc_divisor value is 100 will give you approximately a 1% chance ; the gc will run on any give request. Increasing this value to 1000 will give you ; a 0.1% chance the gc will run on any give request. For high volume production servers, ; this is a more efficient approach. ; Default Value: 100 ; Development Value: 1000 ; Production Value: 1000 ; http://php.net/session.gc-divisor session.gc_divisor = 1000 ; After this number of seconds, stored data will be seen as 'garbage' and ; cleaned up by the garbage collection process. ; http://php.net/session.gc-maxlifetime session.gc_maxlifetime = 1440 ; NOTE: If you are using the subdirectory option for storing session files ; (see session.save_path above), then garbage collection does *not* ; happen automatically. You will need to do your own garbage ; collection through a shell script, cron entry, or some other method. ; For example, the following script would is the equivalent of ; setting session.gc_maxlifetime to 1440 (1440 seconds = 24 minutes): ; find /path/to/sessions -cmin +24 -type f | xargs rm ; Check HTTP Referer to invalidate externally stored URLs containing ids. ; HTTP_REFERER has to contain this substring for the session to be ; considered as valid. ; http://php.net/session.referer-check session.referer_check = ; How many bytes to read from the file. ; http://php.net/session.entropy-length ;session.entropy_length = 32 ; Specified here to create the session id. ; http://php.net/session.entropy-file ; Defaults to /dev/urandom ; On systems that don't have /dev/urandom but do have /dev/arandom, this will default to /dev/arandom ; If neither are found at compile time, the default is no entropy file. ; On windows, setting the entropy_length setting will activate the ; Windows random source (using the CryptoAPI) ;session.entropy_file = /dev/urandom ; Set to {nocache,private,public,} to determine HTTP caching aspects ; or leave this empty to avoid sending anti-caching headers. ; http://php.net/session.cache-limiter session.cache_limiter = nocache ; Document expires after n minutes. ; http://php.net/session.cache-expire session.cache_expire = 180 ; trans sid support is disabled by default. ; Use of trans sid may risk your users security. ; Use this option with caution. ; - User may send URL contains active session ID ; to other person via. email/irc/etc. ; - URL that contains active session ID may be stored ; in publicly accessible computer. ; - User may access your site with the same session ID ; always using URL stored in browser's history or bookmarks. ; http://php.net/session.use-trans-sid session.use_trans_sid = 0 ; Select a hash function for use in generating session ids. ; Possible Values ; 0 (MD5 128 bits) ; 1 (SHA-1 160 bits) ; This option may also be set to the name of any hash function supported by ; the hash extension. A list of available hashes is returned by the hash_algos() ; function. ; http://php.net/session.hash-function session.hash_function = 0 ; Define how many bits are stored in each character when converting ; the binary hash data to something readable. ; Possible values: ; 4 (4 bits: 0-9, a-f) ; 5 (5 bits: 0-9, a-v) ; 6 (6 bits: 0-9, a-z, A-Z, "-", ",") ; Default Value: 4 ; Development Value: 5 ; Production Value: 5 ; http://php.net/session.hash-bits-per-character session.hash_bits_per_character = 5 ; The URL rewriter will look for URLs in a defined set of HTML tags. ; form/fieldset are special; if you include them here, the rewriter will ; add a hidden <input> field with the info which is otherwise appended ; to URLs. If you want XHTML conformity, remove the form entry. ; Note that all valid entries require a "=", even if no value follows. ; Default Value: "a=href,area=href,frame=src,form=,fieldset=" ; Development Value: "a=href,area=href,frame=src,input=src,form=fakeentry" ; Production Value: "a=href,area=href,frame=src,input=src,form=fakeentry" ; http://php.net/url-rewriter.tags url_rewriter.tags = "a=href,area=href,frame=src,input=src,form=fakeentry" ; Enable upload progress tracking in $_SESSION ; Default Value: On ; Development Value: On ; Production Value: On ; http://php.net/session.upload-progress.enabled ;session.upload_progress.enabled = On ; Cleanup the progress information as soon as all POST data has been read ; (i.e. upload completed). ; Default Value: On ; Development Value: On ; Production Value: On ; http://php.net/session.upload-progress.cleanup ;session.upload_progress.cleanup = On ; A prefix used for the upload progress key in $_SESSION ; Default Value: "upload_progress_" ; Development Value: "upload_progress_" ; Production Value: "upload_progress_" ; http://php.net/session.upload-progress.prefix ;session.upload_progress.prefix = "upload_progress_" ; The index name (concatenated with the prefix) in $_SESSION ; containing the upload progress information ; Default Value: "PHP_SESSION_UPLOAD_PROGRESS" ; Development Value: "PHP_SESSION_UPLOAD_PROGRESS" ; Production Value: "PHP_SESSION_UPLOAD_PROGRESS" ; http://php.net/session.upload-progress.name ;session.upload_progress.name = "PHP_SESSION_UPLOAD_PROGRESS" ; How frequently the upload progress should be updated. ; Given either in percentages (per-file), or in bytes ; Default Value: "1%" ; Development Value: "1%" ; Production Value: "1%" ; http://php.net/session.upload-progress.freq ;session.upload_progress.freq = "1%" ; The minimum delay between updates, in seconds ; Default Value: 1 ; Development Value: 1 ; Production Value: 1 ; http://php.net/session.upload-progress.min-freq ;session.upload_progress.min_freq = "1" [MSSQL] ; Allow or prevent persistent links. mssql.allow_persistent = On ; Maximum number of persistent links. -1 means no limit. mssql.max_persistent = -1 ; Maximum number of links (persistent+non persistent). -1 means no limit. mssql.max_links = -1 ; Minimum error severity to display. mssql.min_error_severity = 10 ; Minimum message severity to display. mssql.min_message_severity = 10 ; Compatibility mode with old versions of PHP 3.0. mssql.compatability_mode = Off ; Connect timeout ;mssql.connect_timeout = 5 ; Query timeout ;mssql.timeout = 60 ; Valid range 0 - 2147483647. Default = 4096. ;mssql.textlimit = 4096 ; Valid range 0 - 2147483647. Default = 4096. ;mssql.textsize = 4096 ; Limits the number of records in each batch. 0 = all records in one batch. ;mssql.batchsize = 0 ; Specify how datetime and datetim4 columns are returned ; On => Returns data converted to SQL server settings ; Off => Returns values as YYYY-MM-DD hh:mm:ss ;mssql.datetimeconvert = On ; Use NT authentication when connecting to the server mssql.secure_connection = Off ; Specify max number of processes. -1 = library default ; msdlib defaults to 25 ; FreeTDS defaults to 4096 ;mssql.max_procs = -1 ; Specify client character set. ; If empty or not set the client charset from freetds.conf is used ; This is only used when compiled with FreeTDS ;mssql.charset = "ISO-8859-1" [Assertion] ; Assert(expr); active by default. ; http://php.net/assert.active ;assert.active = On ; Issue a PHP warning for each failed assertion. ; http://php.net/assert.warning ;assert.warning = On ; Don't bail out by default. ; http://php.net/assert.bail ;assert.bail = Off ; User-function to be called if an assertion fails. ; http://php.net/assert.callback ;assert.callback = 0 ; Eval the expression with current error_reporting(). Set to true if you want ; error_reporting(0) around the eval(). ; http://php.net/assert.quiet-eval ;assert.quiet_eval = 0 [COM] ; path to a file containing GUIDs, IIDs or filenames of files with TypeLibs ; http://php.net/com.typelib-file ;com.typelib_file = ; allow Distributed-COM calls ; http://php.net/com.allow-dcom ;com.allow_dcom = true ; autoregister constants of a components typlib on com_load() ; http://php.net/com.autoregister-typelib ;com.autoregister_typelib = true ; register constants casesensitive ; http://php.net/com.autoregister-casesensitive ;com.autoregister_casesensitive = false ; show warnings on duplicate constant registrations ; http://php.net/com.autoregister-verbose ;com.autoregister_verbose = true ; The default character set code-page to use when passing strings to and from COM objects. ; Default: system ANSI code page ;com.code_page= [mbstring] ; language for internal character representation. ; http://php.net/mbstring.language ;mbstring.language = Japanese ; internal/script encoding. ; Some encoding cannot work as internal encoding. ; (e.g. SJIS, BIG5, ISO-2022-*) ; http://php.net/mbstring.internal-encoding ;mbstring.internal_encoding = EUC-JP ; http input encoding. ; http://php.net/mbstring.http-input ;mbstring.http_input = auto ; http output encoding. mb_output_handler must be ; registered as output buffer to function ; http://php.net/mbstring.http-output ;mbstring.http_output = SJIS ; enable automatic encoding translation according to ; mbstring.internal_encoding setting. Input chars are ; converted to internal encoding by setting this to On. ; Note: Do _not_ use automatic encoding translation for ; portable libs/applications. ; http://php.net/mbstring.encoding-translation ;mbstring.encoding_translation = Off ; automatic encoding detection order. ; auto means ; http://php.net/mbstring.detect-order ;mbstring.detect_order = auto ; substitute_character used when character cannot be converted ; one from another ; http://php.net/mbstring.substitute-character ;mbstring.substitute_character = none; ; overload(replace) single byte functions by mbstring functions. ; mail(), ereg(), etc are overloaded by mb_send_mail(), mb_ereg(), ; etc. Possible values are 0,1,2,4 or combination of them. ; For example, 7 for overload everything. ; 0: No overload ; 1: Overload mail() function ; 2: Overload str*() functions ; 4: Overload ereg*() functions ; http://php.net/mbstring.func-overload ;mbstring.func_overload = 0 ; enable strict encoding detection. ;mbstring.strict_detection = Off ; This directive specifies the regex pattern of content types for which mb_output_handler() ; is activated. ; Default: mbstring.http_output_conv_mimetype=^(text/|application/xhtml\+xml) ;mbstring.http_output_conv_mimetype= [gd] ; Tell the jpeg decode to ignore warnings and try to create ; a gd image. The warning will then be displayed as notices ; disabled by default ; http://php.net/gd.jpeg-ignore-warning ;gd.jpeg_ignore_warning = 0 [exif] ; Exif UNICODE user comments are handled as UCS-2BE/UCS-2LE and JIS as JIS. ; With mbstring support this will automatically be converted into the encoding ; given by corresponding encode setting. When empty mbstring.internal_encoding ; is used. For the decode settings you can distinguish between motorola and ; intel byte order. A decode setting cannot be empty. ; http://php.net/exif.encode-unicode ;exif.encode_unicode = ISO-8859-15 ; http://php.net/exif.decode-unicode-motorola ;exif.decode_unicode_motorola = UCS-2BE ; http://php.net/exif.decode-unicode-intel ;exif.decode_unicode_intel = UCS-2LE ; http://php.net/exif.encode-jis ;exif.encode_jis = ; http://php.net/exif.decode-jis-motorola ;exif.decode_jis_motorola = JIS ; http://php.net/exif.decode-jis-intel ;exif.decode_jis_intel = JIS [Tidy] ; The path to a default tidy configuration file to use when using tidy ; http://php.net/tidy.default-config ;tidy.default_config = /usr/local/lib/php/default.tcfg ; Should tidy clean and repair output automatically? ; WARNING: Do not use this option if you are generating non-html content ; such as dynamic images ; http://php.net/tidy.clean-output tidy.clean_output = Off [soap] ; Enables or disables WSDL caching feature. ; http://php.net/soap.wsdl-cache-enabled soap.wsdl_cache_enabled=1 ; Sets the directory name where SOAP extension will put cache files. ; http://php.net/soap.wsdl-cache-dir soap.wsdl_cache_dir="/tmp" ; (time to live) Sets the number of second while cached file will be used ; instead of original one. ; http://php.net/soap.wsdl-cache-ttl soap.wsdl_cache_ttl=86400 ; Sets the size of the cache limit. (Max. number of WSDL files to cache) soap.wsdl_cache_limit = 5 [sysvshm] ; A default size of the shared memory segment ;sysvshm.init_mem = 10000 [ldap] ; Sets the maximum number of open links or -1 for unlimited. ldap.max_links = -1 [mcrypt] ; For more information about mcrypt settings see http://php.net/mcrypt-module-open ; Directory where to load mcrypt algorithms ; Default: Compiled in into libmcrypt (usually /usr/local/lib/libmcrypt) ;mcrypt.algorithms_dir= ; Directory where to load mcrypt modes ; Default: Compiled in into libmcrypt (usually /usr/local/lib/libmcrypt) ;mcrypt.modes_dir= [dba] ;dba.default_handler= [curl] ; A default value for the CURLOPT_CAINFO option. This is required to be an ; absolute path. ;curl.cainfo = ; Local Variables: ; tab-width: 4 ; End:
Table of Contents Preface 1 Chapter 1: Getting Started with Geronimo 7 Motivation behind the Geronimo project 7 Constituent projects 8 Apache Geronimo architecture 11 Downloading and running Apache Geronimo 12 Geronimo Administration Console 14 Information portlet 15 Java System Info portlet 15 Server Logs portlet 15 Web Server portlet 16 JMS Server portlet 16 Repository portlet 16 JMS Resources portlet 16 Database Pools portlet 16 Deploy New portlet 16 Plan Creator portlet 17 Plugins portlet 17 Applications portlets 17 Users and Groups portlet 17 DB Info portlet 18 DB Manager portlet 18 Building Geronimo 18 Contributing to Geronimo 20 Java EE 5 development tools 20 Java EE 5 samples 20 Summary 21 Chapter 2: Geronimo Architecture 23 Inversion of Control and dependency injection 24 GBeans 28 Configurations 30 This material is copyright and is licensed for the sole use by Jillian Fraser on 20th November 2009 111 Sutter Street, Suite 1800, San Francisco, , 94104 Download at WoweBook.Com Table of Contents [ ii ] Dependencies 31 High-level architecture 32 Class loader architecture 35 Modifying default class loading behavior 36 Important modules 37 Server directory structure 40 Deployment architecture 42 Deployer 42 Repository 43 Configuration builder 43 Module builder 44 Module builder extension 45 Naming builder 46 Hot deployment 46 Deployment watcher 47 Plugins 47 Plugin catalog and plugin repository 47 Custom server assemblies 48 Extensible Administration Console 48 Summary 48 Chapter 3: Database Connectivity 49 Database pool scopes 50 Creating a server-wide database pool 51 Using the Administration Console Wizard 51 Installing unlisted drivers 55 Using the Deploy New portlet 56 Using the command-line deployer 61 Using GShell 62 Creating an application-scoped database pool 62 Creating a client-scoped pool 64 Editing an existing pool 66 Importing a pool from another application server 67 Creating an XA pool 69 Using a database pool in an application 70 Accessing a server-scoped database pool 70 Accessing an application-scoped database pool from the same application 74 Accessing an application-scoped database pool from a different application 74 Summary 74 This material is copyright and is licensed for the sole use by Jillian Fraser on 20th November 2009 111 Sutter Street, Suite 1800, San Francisco, , 94104 Download at WoweBook.Com Table of Contents [ iii ] Chapter 4: JMS Connectivity 75 Message broker configuration 75 GBean configuration 76 Using the Administration Console 78 JMS resource scopes 78 Creating JMS resources 78 Creating Server-wide JMS resources 79 Using the Administration Console Wizard 79 Using the Deploy New portlet 86 Using the command-line deployer 86 Using GShell 86 Creating application-scoped JMS resources 86 Creating application client-scoped JMS resources 89 Using JMS resources in an application 90 Connecting to a different provider 94 Summary 94 Chapter 5: Java EE Application Deployment 95 Deployment of applications 96 Deployment descriptors 96 Deployment plans 97 The deploy tool 98 Deployment from the Administration Console 100 Deployment through GShell 100 Web modules 100 Servlet 100 Filter 101 Listener 102 Web deployment descriptor 105 Annotations 106 Resource annotation 106 EJB annotation 107 Web deployment plan 108 Tomcat specific configuration 110 Jetty specific configuration 111 Sample web application 112 EJB applications 112 Annotations 113 EJB deployment plan 116 Sample EJB application 118 Deploy the JMS resources 120 Deploy the EJB sample 120 Deploy the Web application 120 This material is copyright and is licensed for the sole use by Jillian Fraser on 20th November 2009 111 Sutter Street, Suite 1800, San Francisco, , 94104 Download at WoweBook.Com Table of Contents [ iv ] JPA Applications 120 Annotations 122 Container-managed persistence 122 CMP sample application 122 Bean-managed persistence 124 BMP sample application 125 Enterprise applications 127 Deployment plan 127 Application clients 129 Deployment plan 130 JavaMail 134 Web Services 135 EAR sample application 137 Deploying an EJB web service 140 Transactions 142 Container-managed transactions 142 Annotations 143 TransactionManagement 143 TransactionAttribute 144 Bean-managed transactions 144 Support in Geronimo 145 Setting transaction timeout 145 Transaction isolation levels 145 Transactions in web applications 146 Summary 148 Chapter 6: Security 149 Overview of security standards 149 Java Authentication and Authorization Service (JAAS) 150 Java Authorization Contract for Containers (JACC) 150 The Common Secure Interoperability Version 2 (CSIv2) protocol 150 Securing the server directory 150 Securing the Administration Console, JMX server, and deployer 151 Securing the embedded Derby database 152 Updating database pools 153 Cryptographic security 154 Keystores 154 Keystores portlet 155 Creating a new keystore 156 Viewing the contents of a keystore 156 Adding a private key 157 Adding a trusted certificate 158 Deleting a private key or trusted certificate 159 Changing a keystore password 159 This material is copyright and is licensed for the sole use by Jillian Fraser on 20th November 2009 111 Sutter Street, Suite 1800, San Francisco, , 94104 Download at WoweBook.Com Table of Contents [ v ] Unlocking keystore for availability 159 Unlocking a keystore for editing 160 Locking a keystore for editing or availability 160 View private key details 161 Changing a Private Key password 161 Generating CSR for a Private Key 161 Importing the CA Reply for a Private Key 162 Preparing a keystore for use with SSL 162 Certificate Authority portlet 164 Protecting passwords 164 HTTPS connectors 164 Tomcat HTTPS connectors 165 Jetty HTTPS connectors 166 JAAS login modules 166 Login modules for authentication 166 PropertiesFile login module 167 SQL login module 168 LDAP login module 169 CertificatePropertiesFile login module 171 Using custom login modules 172 Special purpose login modules 172 FileAudit login module 172 RepeatedFailureLockout login module 173 GeronimoPasswordCredential login module 173 NamedUsernamePasswordCredential login module 173 Security realms 174 Creating a security realm 174 Using the Security Realms portlet 174 Security realm deployment plan 179 Principal wrapping 180 Application security 180 Configuring web application security 180 Running the sample web application 185 Configuring EJB application security 185 Defining security roles in the deployment descriptor 185 Declaring method permissions in the deployment descriptor 186 Using annotations to define roles and permissions 188 Mapping principals to roles in the EJB deployment plan 189 Running the EJB sample application 190 Configuring entity bean security 191 Run-as and default subjects 192 Credential store 192 Configuring an application to use a credential store 193 Configuring run-as and default subjects 194 Running a sample EJB application with run-as 195 Configuring message-driven bean security 196 This material is copyright and is licensed for the sole use by Jillian Fraser on 20th November 2009 111 Sutter Street, Suite 1800, San Francisco, , 94104 Download at WoweBook.Com Table of Contents [ vi ] Configuring EAR application security 196 Application-scoped security realms 196 Single sign-on (SSO) 196 Replacing the default security realm 197 Summary 197 Chapter 7: CORBA 199 CORBA concepts 199 ORB 199 Naming service 199 Security services 200 Support in Geronimo 200 Exposing EJBs through CORBA 200 Creating a Target Security Service (TSS) 200 SSL 202 Authentication mechanism 203 Identity Tokens 204 Configuring EJB to use TSS 205 Sample application exposing EJBs through CORBA 205 Deploying and running the sample EJB application 209 Referencing EJBs through CORBA 209 Creating a Client Security Service (CSS) 209 SSL 211 Authentication mechanism 212 Identity tokens 213 Configuring the EJB reference to use CSS 214 Sample web application accessing CORBA EJBs 214 Sample CSS 215 Deploying and running the sample 217 Summary 217 Chapter 8: Naming and JNDI 219 Application local JNDI context 219 resource-ref 221 resource-env-ref 222 ejb-ref 222 ejb-local-ref 223 service-ref 224 message-destination-ref 225 persistence-context-ref 226 persistence-unit-ref 227 gbean-ref 228 This material is copyright and is licensed for the sole use by Jillian Fraser on 20th November 2009 111 Sutter Street, Suite 1800, San Francisco, , 94104 Download at WoweBook.Com Table of Contents [ vii ] Global JNDI 228 Summary 229 Chapter 9: Geronimo Plugins 231 Developing a plugin 231 Creating a plugin project 232 Installing a plugin 236 Available plugins 237 Pluggable Administration Console 237 Architecture 238 Developing an Administration Console extension 238 Plugins portlet 243 Custom server assemblies and server profiles 245 Summary 247 Chapter 10: Administration 249 Administration Console 249 Server portlets 251 Information portlet 251 Java System Info portlet 252 Server Logs portlet 252 Shutdown portlet 252 Web Server portlet 253 Thread Pools portlet 253 Apache HTTP portlet 253 JMS Server portlet 253 Monitoring portlet 253 Services portlets 253 Repository portlet 254 Database Pools portlet 254 JMS Resources portlet 255 Applications portlets 255 Deploy New portlet 255 System Modules portlet 256 Web App WARs portlet 256 EJB JARs portlet 256 Application EARs portlet 256 J2EE connectors portlet 257 App Clients portlet 257 Plan Creator portlet 257 Embedded DB portlets 258 DB Info portlet 258 DB Manager portlet 258 Debug Views portlets 260 JMX Viewer portlet 260 LDAP Viewer portlet 261 This material is copyright and is licensed for the sole use by Jillian Fraser on 20th November 2009 111 Sutter Street, Suite 1800, San Francisco, , 94104 Download at WoweBook.Com Table of Contents [ viii ] ClassLoader Viewer portlet 263 JNDI Viewer portlet 265 Dependency Viewer portlet 267 Web Server administration 268 HTTP connectors 269 HTTPS connectors 271 AJP connectors 273 Web Server Logs 274 JMS server administration 275 JMS listeners 275 Monitoring the server 276 Adding a Server 277 Adding a Graph 279 Creating a new view 280 GShell 282 Starting and exiting GShell 282 Getting help 283 Supported commands 283 Summary 287 Chapter 11: Geronimo Eclipse Plugin 289 Eclipse and the web tools framework 290 Download and installation 290 GEP download and installation 292 Developing an application in GEP 298 Deploying and running or debugging the application in Geronimo 305 Summary 306 Chapter 12: Clustering 307 WADI 308 Updating deployment descriptor and deployment plan 308 Load balancing with Apache web server 310 Installing the Apache web server 310 Web app in Geronimo served through Apache web server 310 Apache HTTP portlet 311 Accessing the sample app through Apache web server 315 Running multiple server instances from a single installation 315 Clustered Helloworld-cluster application 317 Updating workers.properties 317 Farming 320 Cluster member configuration 320 This material is copyright and is licensed for the sole use by Jillian Fraser on 20th November 2009 111 Sutter Street, Suite 1800, San Francisco, , 94104 Download at WoweBook.Com Table of Contents [ ix ] Farm deployment 321 Running a sample application with Farm deployment 322 Summary 323 Chapter 13: Logging 325 Configuring Apache Geronimo logging 326 Configuring application logging 327 Using log4j 327 Logging to the geronimo.log file and the command console 328 Logging to a separate log file 330 Logging using the ApplicationLog4jConfigurationGBean 332 Using the Java Logging API 333 Using the SLF4j logging adapter 333 Summary 334 Chapter 14: Geronimo Internals 335 Services provided by Geronimo 335 Kernel 335 ServerInfo 337 Configurations and deployment 338 ConfigurationManager 339 EditableConfigurationManager 340 LocalAttributeManager 341 ArtifactResolver 341 Developing a new GBean 342 GBean attributes 343 Magic attributes 344 GBean references 344 GBean operations 345 GBean constructor 345 GBean interface 346 GBeanLifecycle 346 Sample GBean MySampleGBean 347 Deploying the GBean 350 Testing the GBean with GBean web app sample 353 Summary 355 Appendix A: Deployment Plans 357 Environment 358 GBeans 362 Application Client 365 This material is copyright and is licensed for the sole use by Jillian Fraser on 20th November 2009 111 Sutter Street, Suite 1800, San Francisco, , 94104 Download at WoweBook.Com Table of Contents [ x ] Appendix B: Troubleshooting 367 Server startup errors 367 BindException 367 IllegalArgumentException due to a wrong instance name 368 InvalidConfigurationException 369 Deployment errors 369 MissingDependencyException 369 XmlException—Invalid deployment descriptor 370 DuplicateDeploymentException 371 Runtime errors 372 LoginException—No LoginModules configured 372 Index 373
Merge Professional is the visual file comparison (diff), merging and folder synchronization application from Araxis. Use it to compare and merge source code, web pages, XML and other text files with native application performance. Directly open and compare the text from Microsoft Office (Word and Excel), OpenDocument, PDF and RTF files. Compare images and binary files. Synchronize folders. Perform code reviews and audits. Work with folder hierarchies containing thousands of files. Merge integrates with many SCM (version control) systems and other applications. Benefits For legal and publishing professionals: instantly identify every change between different contract or manuscript drafts. Directly open and compare the text from Microsoft Office (Word and Excel), OpenDocument, PDF and RTF files. Copy text from other applications (such as Microsoft Word) and paste it directly into a text comparison window. For software engineers and web developers: compare, understand and combine different source file versions. Work quickly and accurately, whether you are comparing individual files or reconciling entire branches of source code. Use three-way comparison to integrate changes made by you, and those made by a colleague, with a common ancestor version. Synchronize a website with its staging area via ftp using the supplied ftp plugin. For release and quality control managers: compare different source code branches to give total confidence that you know and understand every change made to every file for a specific release. Compare product releases to be certain that only the expected files have been modified. Create an html or xml report of changes for audit purposes. For code reviewers and auditors: identify in context every change made between two or three source code hierarchies. Create a standalone html or xml report of your findings. Add bookmarks and comments to a file or folder comparison, then save it as a single-file archive for emailing to other team members for review. Other users: Whether you are working with multiple revisions of text files or need to keep multiple folder hierarchies in sync (for example, between a desktop and laptop machine), Merge could help save time and reduce errors by helping you to work quickly and accurately. File comparison and merging Merge enables you to compare and work with different revisions of text files, such as program source code, xml and html files. Merge can extract and compare the text from Microsoft Office, OpenDocument, PDF and RTF files. XML files can be shown with special formatting, helping you to see changes more clearly. It supports files with ascii, mbcs and Unicode character encodings. A colour-coded side-by-side comparison makes it easy to pinpoint at a glance similarities and differences between files. Linking lines are drawn between the documents showing clearly how they are related. Point-and-click merging lets you choose the parts of each file that you would like to add to a final merged version by simply clicking buttons. The in-place editor with unlimited undo enables complete control over the merged file as you create it. The file comparison display dynamically updates as the merge progresses. Merge shows detailed highlights of changes within lines. It can be configured to ignore differences in whitespace and line endings, as well as changes in lines matching specified regular expressions. The latter is useful for ignoring unimportant changes such as timestamps or expanded version control keywords. Binary and image file comparison Merge doesn’t just compare text files. Use image comparison to compare various types of image file and instantly see which pixels have been modified. Binary comparison enables you to identify differences in data files at a byte level. Three-way comparison and automatic merging Merge Professional adds advanced three-way visual file comparison and merging to the Standard Edition’s two-way visual file comparison and merging. This is particularly useful when more than one person is working on the same set of files. Automatic Merging enables swift reconciliation of even the largest files. Three-way file comparisons can be launched directly from a three-way folder comparison, allowing efficient integration of entire branches of source code. Integrated folder hierarchy comparison and synchronization Merge supports folder hierarchy comparison and synchronization, enabling you to compare and merge entire directory trees. This is ideal for detecting changes in different versions of source code or web pages. You can even use the efficient byte-by-byte comparison option to verify the contents of recordable cds or usb thumbsticks. The Professional Edition of Merge supports three-way folder comparison, enabling two revisions of a folder hierarchy to be merged with their common ancestor or some other folder hierarchy. This can be especially useful when used in conjunction with a source code control or software configuration management system. Direct access to FTP sites and configuration management systems An ftp plugin gives Merge file and folder comparisons direct access to files located on an ftp server. It is therefore possible to use a folder comparison to synchronize a local copy of a website’s content with the main site itself, provided the main site is running an ftp server. Merge plugins for Perforce, Subversion and Visual SourceSafe are also provided. These give Merge read-only access to files and folders located in Perforce depots, Subversion repositories and Visual SourceSafe databases. Therefore, for example, a Merge folder comparison can be used to compare a Perforce client workspace against the depot. Alternatively, different branches (or the same branch at different points in time) within a depot can be compared directly. A similar plugin for AllChange is available from Intasoft. Report generation File comparison reports (examples: two-way, three-way) can be created in html, html slideshow, xml or unix diff format. html reports are particularly useful for archiving and distribution. Folder comparison reports (examples: two-way, three-way) can be created in html or xml format. A folder comparison report can, optionally, include file comparison reports for some or all of the files involved in the folder comparison. Thus it is possible to generate a report that is a complete record of all the differences in all of the files involved in a folder comparison. This is especially useful in code review and code audit situations, particularly as reports can be generated directly for files and folders in configuration management systems for which there is a Merge plugin. Print support, Automation and other advanced features Other features include the ability to print a hard copy of file and folder comparisons, and to customize the behaviour and appearance of the application, including fonts, colours, whether the display is split horizontally or vertically, and more. A full Automation api and Command-Line Interface are included, allowing close integration with other applications (such as source code control and software configuration management systems) or your workflow. Comprehensive online documentation is supplied with the product and is also available from the Araxis website. Context-sensitive help is provided for every menu item, dialog and dialog control.
Version 1.7 ----------- - ADD: Delphi/CBuilder 10.2 Tokyo now supported. - ADD: Delphi/CBuilder 10.1 Berlin now supported. - ADD: Delphi/CBuilder 10 Seattle now supported. - ADD: Delphi/CBuilder XE8 now supported. - ADD: Delphi/CBuilder XE7 now supported. - ADD: Delphi/CBuilder XE6 now supported. - ADD: Delphi/CBuilder XE5 now supported. - ADD: Delphi/CBuilder XE4 now supported. - ADD: Delphi/CBuilder XE3 now supported. - ADD: Delphi/CBuilder XE2 now supported. - ADD: Delphi/CBuilder XE now supported. - ADD: Delphi/CBuilder 2010 now supported. - ADD: Delphi/CBuilder 2009 now supported. - ADD: New demo project FlexCADImport. - FIX: The height of the TFlexRegularPolygon object incorrectly changes with its rotation. - FIX: Added division by zero protect in method TFlexControl.MovePathSegment. - FIX: The background beyond docuemnt wasn't filled when TFlexPanel.DocClipping=True. - FIX: In "Windows ClearType" font rendering mode (OS Windows mode) the "garbage" pixels can appear from the right and from the bottom sides of the painted rectangle of the TFlexText object. - FIX: The result rectangle incorrectly calculated in the TFlexText.GetRefreshRect method. - FIX: Added FPaintCache.rcPaint cleanup in the TFlexPanel.WMPaint method. Now it is possible to define is the drawing take place via WMPaint or via the PaintTo direct call (if rcPaint contain non-empty rectangle then WMPaint in progress). - FIX: The TFlexPanel.FPaintCache field moved in the protected class section. Added rcPaint field in FPaintCache that represents drawing rectangle. - ADD: In the text prcise mode (TFlexText.Precise=True) takes into account the rotation angle (TFlexText.Angle). - FIX: Removed FG_NEWTEXTROTATE directive (the TFlexText Precise mode should be used instead). - FIX: The TFlexRegularPolygon object clones incorrectly drawed in case when TFlexRegularPolygon have alternative brush (gradient, texture). - ADD: Add TFlexPanel.InvalidateControl virtual method which calls from TFle
Keyboard shortcuts A quick reference guide to UltraEdit's default keyboard shortcuts Keymapping and custom hotkeys How to customize 键映射s and menu hotkeys Column Markers The benefit of a column maker is that it can help you to format your text/code, or in some cases to make it easier to read in complex nested logic. Quick Open UltraEdit and UEStudio provide multiple methods to quickly open files without using the standard Open File dialog. A favorite method among power users is the Quick Open in the File menu. The benefit of the quick open dialog is that it loads up very... Vertical & Horizontal Split Window This is a convenient feature when you're manually comparing files, when you want to copy/paste between multiple files, or when you simply want to divide up your edit space. Tabbed Child Windows Declutter your edit space by using the tabbed child windows feature Auto-Hide Child Windows When you're deep in your code, the most important thing is editing space. The all new auto-hide child windows give you The all new auto-hide child windows allow you to maximize your editing space by hiding the child windows against the edge of the editor. Customizing toolbars Did you know that you can not only change what is on UltraEdit's toolbars, you can also change the icon used, as well as create your own custom toolbars and tools? File tabs Understand how file tabs can be displayed, controlled and configured through the window docking system in UltraEdit/UEStudio. Create user/project tools Execute DOS or Windows commands in UltraEdit or UEStudio Temporary Files UltraEdit and UEStudio use temporary files... but what are temporary files? This power tip provides an explanation as well as some tips to get the most out of temp files. Backup and Restore Settings One of the staples of UltraEdit (and UEStudio) is its highly configurable interface and features. However, what happens when you're moving to a new system and you want to port your settings and customizations over along with UltraEdit? Add a webpage to your toolbar Use UltraEdit's powerful user tools to launch your favorite website from the click of a button on your toolbar Integrate Yahoo!, Google, Wikipedia and more with UltraEdit This tutorial will show you how to access the information you need in your browser by simply highlighting your text in the edit window and clicking your toolbar button How to install UE3 UE3 is the portable version of UltraEdit developed specifically for the U3 smart drive. You will need a U3-compatible USB drive for this power tip Scripting tutorial An introduction to UltraEdit's integrated scripting feature The List Lines Containing String option in Find The lists lines option can be a handy tool when searching because it presents all occurrences of the find string in a floating dialog box. You can use the dialog to navigate to each instance by double-clicking on one of the result lines... Scripting Access to the Clipboard How to access the Clipboard using the integrated scripting engine Scripting access to output window How to access the output window using the integrated scripting engine Writing a macro Steps to record and edit powerful macros to quickly and efficiently edit files Using "copied" and "selected" variables for dynamic macros Use copied and selected text in macros to dramatically increase the power and flexibility of UltraEdit macros Run a macro or script from the command line We are often asked if it is possible to run an UltraEdit macro or script on a file from the command line. The answer is yes - and it's not only possible, it's extremely simple! Using find/replace UltraEdit and UEStudio give you the ability to perform a find or replace through one or more files. Learn how to use UltraEdit/UEStudio's powerful find and replace. Multiline find and replace Search and replace text spanning several lines Incremental search Incremental search is an inline, progressive search that allows you to find matched text as you type, much like Firefox's search feature Regular expressions Regular Expressions are essentially patterns (rather than specific strings) that are used with Find/Replace operations. This guide can dramatically improve your speed and efficiency for Find/Replace Tagged expressions "Tagging" the find data allows UltraEdit/UEStudio to re-use the data similar to variable during a replace. For example, If ^(h*o^) ^(f*s^) matches "hello folks", ^2 ^1 would replace it with "folks hello". Perl compatible regular expressions An introduction to using Perl-style regular expressions for search/replace Perl regex tutorial: non-greedy regular expressions Have you ever built a complex Perl-style regular expression, only to find that it matches much more data than you anticipated? If you've ever found yourself pulling your hair out trying to build the perfect regular expression to match the least amoun... Remove blank lines A question we often see is "I have a lot of blank lines in my file and I don't want to go through and manually delete them. Is there an easier way to do this?" The answer is: yes! Configure FTP Set up and configure multiple FTP accounts TaskMatch Environments How to use TaskMatch Environments in UltraEdit and UEStudio Configure FTP backup Save a local copy of your files when you transfer them to FTP directories Encrypt and Decrypt Text Files Use UltraEdit to encrypt and decrypt your text files Link to remote directories Sync local directories with remote (FTP/SFTP) directories Compare Modified File Against Source File How to compare the modified file against the source file on disk. Column Based Find and Replace Need to restrict your search/replace to a specific column range? The column based search does just that... Compare Highlighted Text If you need to quickly compare of portions of text, rather than an entire file, then you need UltraEdit/UEStudio's selected text compare! The selected text compare allows you to select portions of text between 2 files and execute a compare on ONLY the se Using the SSH/telnet console A tutorial for UltraEdit/UEStudio's SSH/telent feature Adding a wordfile Adding a wordfile in UltraEdit v15.00 and greater Adding a wordfile (in v14.20 and earlier) Add a language definition to your wordfile for use with UltraEdit and UEStudio's powerful syntax highlighting Syntax highlighting and code folding Explanation of highlighting and folding definitions in the UltraEdit/UEStudio wordfile Create Your Own TaskMatch Environment How to create your own TaskMatch Environments Filtering the Explorer View How to filter the Explorer view in UltraEdit and UEStudio Group Files and Folders with Projects How to group your files and folders using Projects Adding or removing file extensions for syntax highlighting How to configure syntax highlighting to highlight different file types automatically Project Settings Advanced Project Features - Using the UltraEdit/UEStudio project settings dialog Scripting Techniques Scripting techniques for UltraEdit/UEStudio. Perl-style regular expressions for function strings Using Perl-Style regexes to identify functions in your syntax-highlighted files and populate the function list Autocorrect keywords in UltraEdit/UEStudio How to enable and disable autocorrect keywords with syntax highlighting Insert Menu Commands UltraEdit includes several special insert functions under the Insert menu. You can use these functions to insert a file into the active file, insert a string into the file at every specified increment, sample colors from anywhere on your screen, and more. Using Bookmarks UltraEdit and UEStudio provide a way for you to mark, access, and preview your favorite lines via bookmarks. We'll look at how to create, edit, and configure bookmarks in the bookmark viewer. Creating Search Favorites UltraEdit includes a Search and Replace Favorites feature that allows you to manage frequently used Find and Replace strings. Create, name, and edit your Search and Replace Favorites... Customizing The HTML Toolbar Commands The purpose of this power tip is to teach you how to customize the existing HTML tags and create your own HTML tags. Combine All Open Files into a Single Destination File Have you ever needed to combine multiple files into a single destination (output) file? You can use a combination of a script and tool to create a single file from multiple files. Sum Column/Selection in Column Mode This power tip demonstrates how to calculate the sum from a column of numeric data. Column mode How to use the features of UltraEdit's powerful column mode Advanced and column-based sort How to sort file data using the advanced sort options and the column sort options Working with CSV files Use UltraEdit's built-in handling for character-separated value files Word wrap and tab settings for different file types UltraEdit and UEStudio allow you to customize the word wrap and tab settings for any type of file. This power tip walks you through the steps to configure these customizations Versioned backup Set UltraEdit/UEStudio to automatically save versioned backups of your files Configure spell checker How to set the highly-configurable options for UltraEdit's integrated spell checker Special functions UltraEdit includes several special functions under the File menu. You can use these functions to insert a file into the current file, delete the active file, send the file through email, or insert a string into the file at every specified increment HTML preview Edit and preview your rendered HTML code in the edit window Custom templates Create templates for frequently used text. You can also assign hotkeys to your templates. Compare files/folders Integrated differences tool - comparing files and folders with UltraCompare Professional File change polling Monitor log files and more using UltraEdit's file change polling feature Vertically split the edit window Splitting the edit window in UltraEdit/UEStudio Large file text editor UltraEdit can be used to edit large text files. Learn how to configure UltraEdit to optimize editing large text files Multiple configuration environments of Ultraedit/UEstudio How to set up your separate environments for UltraEdit/UEStudio Java compiler Create a custom user tool to compile Java code, using the command line, from within UltraEdit Configure UltraEdit with javascript lint How to check your JavaScript source code for common mistakes without actually running the script or opening the web page Character properties at your fingertips Access the properties of a character with the click of a button Ctags Set up and configure Ctags for use in UltraEdit Visual SourceSafe integration Create a customized user tool to check out files from Visual SourceSafe Running WebFOCUS from UltraEdit Configure UltraEdit for use with WebFOCUS CSE HTML Validator CSE HTML Validator for Windows is the most powerful, easy to use, user configurable, and all-in-one HTML, XHTML, CSS, link, spelling, and accessibility checker available. This quick tutorial shows you how to use it and set it up in UltraEdit/UEStudio Working with Unicode in UltraEdit/UEStudio In this tutorial, we'll cover some of the basics of Unicode-encoded text and Unicode files, and how to view and manipulate it in UltraEdit. Search and delete lines found UEStudio and UltraEdit provide a way for you to search and delete found lines from your files. This short tutorial provides the steps for searching for and deleting lines by writing a simple script. Parsing XML files and editing XML files Parsing XML can be a time-consuming task, especially when large amounts of data are involved. As of v15.10, UltraEdit provides you with a the XML Window for the purpose of parsing your XML files. The XML window allows you to navigate through the XML... Using Bookmarks UltraEdit and UEStudio provide a way for you to mark, access, and preview your favorite lines via bookmarks. We'll look at how to create, edit, and configure bookmarks in the bookmark viewer. Using the CSS style builder UltraEdit and UEStudio both include a CSS style builder for you to easily configure and insert CSS styles into the active document. This power tip will show you how to use the style builder. SSH/Telnet Session Logging Log the input and output to/from the server in your SSH/Telnet sessions Edit, develop, debug, and run SAS programs This user-submitted power tip describes how to use UltraEdit as a SAS editor, as well as how to run and debug SAS programs from the editor itself Tabs to Spaces - Ignore tabs and spaces in string and comments Ever had to convert the tab characters to spaces, but wanted to leave the tabs in strings and comments untouched? In previous versions, the convert tabs to spaces feature didn't distinguish between tabs as whitespace/formatting vs. tabs in... Setting File Associations in UltraEdit/UEStudio A file association is used by Windows Explorer to determine which application will open the file when it is double-clicked (or opened) in Explorer. In the interest of speed, many UltraEdit/UEStudio users want to associate specific file types with... Windows Explorer Integration We know that many UltraEdit/UEStudio users don't operate solely from within the editor; rather, they are frequently working in Windows Explorer before going to the editor. As such, they want (and need) a quick and easy way to open files from within... Line Change Indicator Ever wanted to see what changes you've made since your last save, or have you ever wanted to know what lines you've changed during an edit session? As of UltraEdit v16.00, you can do just that with the line change indicator... Comment and Uncomment Selected Text How many times per day do you comment out a block of code? Do you ever get tired of manually typing your open and close comments? As of v16.00, simply highlight your code, click a button, and move on. It's that easy... Hide, Show, and Delete Found Lines in UltraEdit/UEStudio Over time, many of our users have asked for the ability to hide/show lines based on a Find string... you got it! As of v16.00, you can now hide/show and even delete text based on your search criteria. The following power tip will guide you through... Read Only Status Indicator Have you ever opened a file, tried incessantly to modify it, then realized it was read only? As of v16.00, UltraEdit includes an enhanced read only status indicator. For read only files, the file tab will display a lock icon. Additionally, you can... Regular Expression Builder Regular Expressions are essentially patterns, rather than literal strings, that are used to compare/match text in Find/Replace operations. As an example, the * character in a Perl regular expression matches the preceding character or expression zero or.. XML Manager: In-line editing of XML files The XML Manager allows you to navigate through complex XML data. But, what happens when you want to make a quick edit to your XML tags/data.... UltraEdit v16.00 extends the XML Manager with inline editing, giving you a faster and more elegant method... UltraEdit v16.00 Scripting Enhancements One of UltraEdit's trademark features is the ability to automate tasks through scripting. V16.00 extends the power of scripting further with includes, active document index, and more! Parse Source Code with the Function List The function list displays all the functions in the active file/project. Double clicking on a function name in the list repositions the file to the desired function. Also, as you navigate through a file, the function selected in the list changes to indica Brace Matching Brace matching is an often-used feature; it is indispensable for navigating through your code. Brace matching simply allows you to position your cursor next to an open (or close) brace and highlight the corresponding brace. Code Folding Code folding is indispensable for managing complex/nested code structures. Code folding allows you to collapse (hide) a section of code. The collapsible sections are based on the structure of the file/language Shared FTP accounts Do you use multiple IDM products - UltraEdit, UEStudio, or UltraCompare? Ever get sick of managing your FTP account information in each application? Now you can stop worrying about porting your FTP account settings! Simply configure it once and share you Auto-load macro with project Many UltraEdit/UEStudio users rely heavily on projects - and why not, projects are extremely helpful in managing related files and folder. Projects not only allow you to group/manage your files and folders, but projects also contain other items that... UEStudio 使用技巧 Using the classviewer A tour of UEStudio's classviewer which provides a parsed graphical representation of your project CVS/SVN Auto-Detect UEStudio can automatically detect and import your CVS/SVN account settings when you import a folder already under version control. IntelliTips UEStudio offers language intelligence in an exciting feature we call IntelliTips (like Intellisense). Imagine a function parameter list tooltip coupled with an intelligent auto complete tooltip for code elements of the current file Quickstart guide: Using UEStudio to develop Java applications A guide for using UEStudio to edit and develop Java applications Create a local PHP MySQL development environment How to set up a development environment for PHP/MySQL on your local machine. A development environment allows you to test your code as you develop your web application before publishing it to the web. Quickstart Guide: Using UEStudio with Borland C/C++ Compiler C/C++ developers can use UEStudio to set up and configure projects with the Borland C/C++ compiler Creating your first application Create, build, and run an application from within UEStudio Configuring VCS with UEStudio A guide for configuring version control support (VCS) in UEStudio 11 and later Configuring VCS with UEStudio (in v10.30 and earlier) A guide for configuring version control support (VCS) in UEStudio CVS Diff How to use the built-in CVS Diff commands with UEStudio and UltraCompare Add a file to version control system A trademark feature of UEStudio is it's powerful Version Control System. As you continue in your development, it is likely you will need to add files to the version control repository Compare files/folders A guide for comparing files or folders from UEStudio using the integrated diff tool Quickstart guide: Using the integrated debugger A guide for setting up integrated WinDbg debugging in UEStudio Quickstart guide: Using the integrated PHP debugger A guide for setting up the integrated PHP debugger in UEStudio Using the SSH/telnet console A guide for setting up SSH/telnet in UEStudio Keymapping and custom hotkeys A guide for customizing 键映射, menus and menu hotkeys in UEStudio Configuring SVN and CVS Accounts A cornerstone feature of UEStudio is the version control support. UEStudio supports CVS and SVN as well as multiple connection protocols. Before you can use version control, you must create an account. UEStudio has an auto-detect CVS/SVN feature, but... Group Files and Folders with Projects How to group your files and folders using Projects UltraEdit for Linux 使用技巧 FTP through Nautilus Did you know that you can access remote FTP files in UltraEdit for Linux with a variety of server connection protocols? Using Nautilus, the default file manager for the popular GNOME desktop, you can access files via FTP, SFTP, Windows shares, or even... Primary Select Using Linux's primary select feature in UltraEdit for Linux Custom terminal Set up a user tool to interact with the command line and specify a custom terminal for output Custom file browser UltraEdit for Linux allows you to right-click any file or folder in your Project (from the File View) and browse it on the file system. But did you know that you can configure which file browser is launched from UltraEdit? Scripting tutorial An introduction to the integrated scripting feature in UltraEdit for Linux Writing a macro Steps to record and edit powerful macros to quickly and efficiently edit files Vertical and horizontal split window editing This is a convenient feature when you're manually comparing files, when you want to copy/paste between multiple files, or when you simply want to divide up your edit space. Find and Replace A guide to the powerful features and options available under the "Search" menu. Find in Selected Text Find and Replace is a cornerstone feature for UltraEdit, so it is of course integral to UltraEdit for Linux. The Linux version offers the same features as in the Windows version, as well as additional features. One specific feature that was improved... Using bookmarks Provides a way for you to mark and quickly access lines of interest in your files via bookmarks. To add a bookmark, make sure the cursor is positioned on the line you'd like to bookmark. Press CTRL + F2.... Adding a wordfile Add a language definition to your wordfile for use with UltraEdit's powerful syntax highlighting Projects In UltraEdit for Linux, projects are a convenient, time-saving, feature that allow you to group and manage associated files. Additionally, Projects are integrated throughout the framework of UltraEdit making it easier to perform other actions on your... Search Favorites UltraEdit for Linux includes a Search and Replace Favorites feature that allows you to manage frequently used Find and Replace strings. Create, name, and edit your Search and Replace Favorites... Column mode How to use column and block selection mode in UltraEdit for Linux Templates How to create text editing templates in UltraEdit for Linux Keyboard shortcuts A quick reference guide to UltraEdit's (Linux) default keyboard shortcuts How to use the UltraEdit for Linux tar package This guide shows you how to download and use the tar.gz package of UltraEdit UltraEdit for Linux v1.20: Scripting enhancements One of UEx's trademark features is the ability to automate tasks through scripting; v1.2 extends the power of scripting further with includes. UltraEdit for Linux Command Line Support UltraEdit for Linux has many convenient command line options and flags for calling UEx from a console/terminal as part of a script, or simply for convenience. Advanced file sorting Sort files in UEx with a powerful array of options and settings, including optional sort keys UltraCompare 使用技巧 Compare text snippets A tutorial showing you how to compare text snippets without having to save your snippets into a file. Diff your snippets, merge your changes, save the result as a separate file, then clear out the snippets (and their temp files...) Increase your virtual memory Large file comparisons may require your system to use virtual memory. This tutorial shows you how to configure Windows to increase the amount of virtual memory on your system. Compare large files UltraCompare is a very robust file comparison tool which includes support for comparing large files even several GB large. This power tip shows you how to optimize UltraCompare for maximum performance when working with large files. Compare .zip, .rar., and .jar Archives Got Archives? UltraCompare's archive compare feature allows you to compare the contents of .zip files, .rar files, Java .jar files, and even password-protected .zip files. Use the archive compare and examine differences between archives or folders on th Version Control Comparison UltraCompare v6.40 includes major improvements to the command line support that allow greater flexibility when integrating with other applications. If you're using version control in a team development environment, then UltraCompare v6.40 is exactly... Visually inspect HTML code How to use UltraCompare Professional's integrated browser view to visually compare and inspect HTML code Compare directories using FTP/SFTP Configure FTP/SFTP accounts in UltraCompare Professional to backup or sync FTP directories and compare local and remote folders. Block and line mode merge Merge differences and save them between 2 or 3 files at the click of a button Sync files and folders with the Folder Synchronization feature Folder Synchronization is a powerful feature in UltraCompare which allows you to sync files between local, remote, network, and even FTP folders. Recursive compare Use recursive compare to evaluate subdirectories' content for differences Find and eliminate duplicate files Unnecessary and unwanted duplicate files can eat up valuable system disk space. This power tip will show you how to quickly and safely eliminate unwanted duplicate files from your system with the powerful Find Duplicates feature in UltraCompare Compare Word documents Compare multiple Microsoft Word documents - Identify and merge differences between Word documents. Command line tips Tips for running UltraCompare from a DOS command prompt Command line quick difference check Run a quick difference check between two files to quickly see if they're the same or different Ignore options Setting ignore options for file/folder comparisons in UltraCompare Ignore/compare column range Set parameters to ignore or compare up to 4 unique columns of data. Filtering files in folder mode Filtering files in UltraCompare while in folder mode Customizing the time/date format for folder comparison Many UltraCompare users in different regions of the world have different standard formats for dates and timestamps. UltraCompare provides the ability to customize the date and timestamp for your folder comparisons Editing files in UltraCompare How to use the integrated text editing capabilites within UltraCompare UltraCompare shell integration Tips for integrating UltraCompare into the right-click context menu in Windows Explorer Export/save text compare output How to export and save diff output from UltraCompare Web Compare If you work with web files, you are probably accustomed to downloading the file via FTP or viewing the source, saving the text, then doing a compare. We're sure you'll agree, this process is clunky and mechanical.... Manually Sync Your Compare Manually sync your compare lines UltraCompare Sessions If you're anything like us, you always have multiple applications running at once. Spawning multiple instances of any application makes it harder to work. So... UC gives you sessions to manage your compare operations! Customizing colors Tutorial on how to change the colors for folder/file compare in UltraCompare Reload previously active sessions When you're doing complex file and folder compare operations, it doesn't take long to open quite a few tabs. What happens when you close UC to move on to another task or to go home for the day- lose the session? Not with Reload active sessions... Session Manager If you've compared the same set of files/folders more than once... You need sessions. Sessions allow you to save compare options for a common set of files or folders which you can quickly recall anytime you open UltraCompare. Not only can you save... Workspace Manager The Workspace Manager is all about convenience, so the Explorer view allows you to drag/drop files and folders for quick and easy compare operations. Simply select the folder (or file) in the Explorer view and drag it to the compare frame. Bookmark Favorite Files/Folders in UltraCompare How to use Favorite in UltraCompare to bookmark your commonly used files/folders. FTP in Workspace Manager You can access your accounts through the Explorer tab of the Workspace Manager in UltraCompare Share FTP Accounts with UltraEdit/UEStudio Set up UltraEdit/UEStudio to share FTP accounts with UltraCompare FTP Folder Compare with CRC Have you wanted to do a quick folder compare - between a local directory and remote directory - without downloading the files first? No problem... As of v7.20, UltraCompare now supports an FTP CRC compare method. With the CRC compare feature... Mark and hide files and folders in folder compare Have you ever wanted to hide files/folders that aren't relevant for your immediate compare needs? We have... While UltraCompare offers many compare filters and ignore options, sometimes you just need more control... UltraSentry 使用技巧 Web browser cleanup Use UltraSentry to securely clean up history and temporary files associated with web browsers Application Cleaning Support Clean the sensitive data left behind after running your applications Delete browser cookies Protect your privacy and your security by securely deleting malicious or private cookies Download directory cleanup Securely delete your download history with UltraSentry Optimize your browser Using UltraSentry to improve speed, performance, and security of your browser Explorer/Microsoft office Integration Tips for integrating UltraSentry into the right-click context menu in Windows Explorer or MS Office Stealth mode Tutorial for running UltraSentry in the background or system tray Scheduling a task Tutorial for scheduling UltraSentry to automatically execute a specific cleaning task Run UltraSentry as a system service How to Schedule your profiles/cleaning operations and be sure that UltraSentry is running them whether you are logged in or not Using the Wizard UltraSentry's wizard makes secure/privacy cleaning operations quick and easy. This power tip shows you how to use the wizard. Total System Scrub Information on how to use UltraSentry's "Full System Scrub" profile to protect your privacy and secure your sensitive data Custom profiles This power tip describes how to set up your own custom profile so that you can securely clean only areas of the system that you wish to clean Securely delete email How to securely delete email on your system using UltraSentry Advanced features This power tip describes some of the advanced features and functionality of UltraSentry
I. Spring Boot Documentation 1. About the Documentation 2. Getting Help 3. First Steps 4. Working with Spring Boot 5. Learning about Spring Boot Features 6. Moving to Production 7. Advanced Topics II. Getting Started 8. Introducing Spring Boot 9. System Requirements 9.1. Servlet Containers 10. Installing Spring Boot 10.1. Installation Instructions for the Java Developer 10.1.1. Maven Installation 10.1.2. Gradle Installation 10.2. Installing the Spring Boot CLI 10.2.1. Manual Installation 10.2.2. Installation with SDKMAN! 10.2.3. OSX Homebrew Installation 10.2.4. MacPorts Installation 10.2.5. Command-line Completion 10.2.6. Quick-start Spring CLI Example 10.3. Upgrading from an Earlier Version of Spring Boot 11. Developing Your First Spring Boot Application 11.1. Creating the POM 11.2. Adding Classpath Dependencies 11.3. Writing the Code 11.3.1. The @RestController and @RequestMapping Annotations 11.3.2. The @EnableAutoConfiguration Annotation 11.3.3. The “main” Method 11.4. Running the Example 11.5. Creating an Executable Jar 12. What to Read Next III. Using Spring Boot 13. Build Systems 13.1. Dependency Management 13.2. Maven 13.2.1. Inheriting the Starter Parent 13.2.2. Using Spring Boot without the Parent POM 13.2.3. Using the Spring Boot Maven Plugin 13.3. Gradle 13.4. Ant 13.5. Starters 14. Structuring Your Code 14.1. Using the “default” Package 14.2. Locating the Main Application Class 15. Configuration Classes 15.1. Importing Additional Configuration Classes 15.2. Importing XML Configuration 16. Auto-configuration 16.1. Gradually Replacing Auto-configuration 16.2. Disabling Specific Auto-configuration Classes 17. Spring Beans and Dependency Injection 18. Using the @SpringBootApplication Annotation 19. Running Your Application 19.1. Running from an IDE 19.2. Running as a Packaged Application 19.3. Using the Maven Plugin 19.4. Using the Gradle Plugin 19.5. Hot Swapping 20. Developer Tools 20.1. Property Defaults 20.2. Automatic Restart 20.2.1. Logging changes in condition evaluation 20.2.2. Excluding Resources 20.2.3. Watching Additional Paths 20.2.4. Disabling Restart 20.2.5. Using a Trigger File 20.2.6. Customizing the Restart Classloader 20.2.7. Known Limitations 20.3. LiveReload 20.4. Global Settings 20.5. Remote Applications 20.5.1. Running the Remote Client Application 20.5.2. Remote Update 21. Packaging Your Application for Production 22. What to Read Next IV. Spring Boot features 23. SpringApplication 23.1. Startup Failure 23.2. Customizing the Banner 23.3. Customizing SpringApplication 23.4. Fluent Builder API 23.5. Application Events and Listeners 23.6. Web Environment 23.7. Accessing Application Arguments 23.8. Using the ApplicationRunner or CommandLineRunner 23.9. Application Exit 23.10. Admin Features 24. Externalized Configuration 24.1. Configuring Random Values 24.2. Accessing Command Line Properties 24.3. Application Property Files 24.4. Profile-specific Properties 24.5. Placeholders in Properties 24.6. Using YAML Instead of Properties 24.6.1. Loading YAML 24.6.2. Exposing YAML as Properties in the Spring Environment 24.6.3. Multi-profile YAML Documents 24.6.4. YAML Shortcomings 24.7. Type-safe Configuration Properties 24.7.1. Third-party Configuration 24.7.2. Relaxed Binding 24.7.3. Merging Complex Types 24.7.4. Properties Conversion Converting durations 24.7.5. @ConfigurationProperties Validation 24.7.6. @ConfigurationProperties vs. @Value 25. Profiles 25.1. Adding Active Profiles 25.2. Programmatically Setting Profiles 25.3. Profile-specific Configuration Files 26. Logging 26.1. Log Format 26.2. Console Output 26.2.1. Color-coded Output 26.3. File Output 26.4. Log Levels 26.5. Custom Log Configuration 26.6. Logback Extensions 26.6.1. Profile-specific Configuration 26.6.2. Environment Properties 27. Developing Web Applications 27.1. The “Spring Web MVC Framework” 27.1.1. Spring MVC Auto-configuration 27.1.2. HttpMessageConverters 27.1.3. Custom JSON Serializers and Deserializers 27.1.4. MessageCodesResolver 27.1.5. Static Content 27.1.6. Welcome Page 27.1.7. Custom Favicon 27.1.8. Path Matching and Content Negotiation 27.1.9. ConfigurableWebBindingInitializer 27.1.10. Template Engines 27.1.11. Error Handling Custom Error Pages Mapping Error Pages outside of Spring MVC 27.1.12. Spring HATEOAS 27.1.13. CORS Support 27.2. The “Spring WebFlux Framework” 27.2.1. Spring WebFlux Auto-configuration 27.2.2. HTTP Codecs with HttpMessageReaders and HttpMessageWriters 27.2.3. Static Content 27.2.4. Template Engines 27.2.5. Error Handling Custom Error Pages 27.2.6. Web Filters 27.3. JAX-RS and Jersey 27.4. Embedded Servlet Container Support 27.4.1. Servlets, Filters, and listeners Registering Servlets, Filters, and Listeners as Spring Beans 27.4.2. Servlet Context Initialization Scanning for Servlets, Filters, and listeners 27.4.3. The ServletWebServerApplicationContext 27.4.4. Customizing Embedded Servlet Containers Programmatic Customization Customizing ConfigurableServletWebServerFactory Directly 27.4.5. JSP Limitations 28. Security 28.1. MVC Security 28.2. WebFlux Security 28.3. OAuth2 28.3.1. Client 28.3.2. Server 28.4. Actuator Security 28.4.1. Cross Site Request Forgery Protection 29. Working with SQL Databases 29.1. Configure a DataSource 29.1.1. Embedded Database Support 29.1.2. Connection to a Production Database 29.1.3. Connection to a JNDI DataSource 29.2. Using JdbcTemplate 29.3. JPA and “Spring Data” 29.3.1. Entity Classes 29.3.2. Spring Data JPA Repositories 29.3.3. Creating and Dropping JPA Databases 29.3.4. Open EntityManager in View 29.4. Using H2’s Web Console 29.4.1. Changing the H2 Console’s Path 29.5. Using jOOQ 29.5.1. Code Generation 29.5.2. Using DSLContext 29.5.3. jOOQ SQL Dialect 29.5.4. Customizing jOOQ 30. Working with NoSQL Technologies 30.1. Redis 30.1.1. Connecting to Redis 30.2. MongoDB 30.2.1. Connecting to a MongoDB Database 30.2.2. MongoTemplate 30.2.3. Spring Data MongoDB Repositories 30.2.4. Embedded Mongo 30.3. Neo4j 30.3.1. Connecting to a Neo4j Database 30.3.2. Using the Embedded Mode 30.3.3. Neo4jSession 30.3.4. Spring Data Neo4j Repositories 30.3.5. Repository Example 30.4. Gemfire 30.5. Solr 30.5.1. Connecting to Solr 30.5.2. Spring Data Solr Repositories 30.6. Elasticsearch 30.6.1. Connecting to Elasticsearch by Using Jest 30.6.2. Connecting to Elasticsearch by Using Spring Data 30.6.3. Spring Data Elasticsearch Repositories 30.7. Cassandra 30.7.1. Connecting to Cassandra 30.7.2. Spring Data Cassandra Repositories 30.8. Couchbase 30.8.1. Connecting to Couchbase 30.8.2. Spring Data Couchbase Repositories 30.9. LDAP 30.9.1. Connecting to an LDAP Server 30.9.2. Spring Data LDAP Repositories 30.9.3. Embedded In-memory LDAP Server 30.10. InfluxDB 30.10.1. Connecting to InfluxDB 31. Caching 31.1. Supported Cache Providers 31.1.1. Generic 31.1.2. JCache (JSR-107) 31.1.3. EhCache 2.x 31.1.4. Hazelcast 31.1.5. Infinispan 31.1.6. Couchbase 31.1.7. Redis 31.1.8. Caffeine 31.1.9. Simple 31.1.10. None 32. Messaging 32.1. JMS 32.1.1. ActiveMQ Support 32.1.2. Artemis Support 32.1.3. Using a JNDI ConnectionFactory 32.1.4. Sending a Message 32.1.5. Receiving a Message 32.2. AMQP 32.2.1. RabbitMQ support 32.2.2. Sending a Message 32.2.3. Receiving a Message 32.3. Apache Kafka Support 32.3.1. Sending a Message 32.3.2. Receiving a Message 32.3.3. Additional Kafka Properties 33. Calling REST Services with RestTemplate 33.1. RestTemplate Customization 34. Calling REST Services with WebClient 34.1. WebClient Customization 35. Validation 36. Sending Email 37. Distributed Transactions with JTA 37.1. Using an Atomikos Transaction Manager 37.2. Using a Bitronix Transaction Manager 37.3. Using a Narayana Transaction Manager 37.4. Using a Java EE Managed Transaction Manager 37.5. Mixing XA and Non-XA JMS Connections 37.6. Supporting an Alternative Embedded Transaction Manager 38. Hazelcast 39. Quartz Scheduler 40. Spring Integration 41. Spring Session 42. Monitoring and Management over JMX 43. Testing 43.1. Test Scope Dependencies 43.2. Testing Spring Applications 43.3. Testing Spring Boot Applications 43.3.1. Detecting Web Application Type 43.3.2. Detecting Test Configuration 43.3.3. Excluding Test Configuration 43.3.4. Testing with a running server 43.3.5. Using JMX 43.3.6. Mocking and Spying Beans 43.3.7. Auto-configured Tests 43.3.8. Auto-configured JSON Tests 43.3.9. Auto-configured Spring MVC Tests 43.3.10. Auto-configured Spring WebFlux Tests 43.3.11. Auto-configured Data JPA Tests 43.3.12. Auto-configured JDBC Tests 43.3.13. Auto-configured jOOQ Tests 43.3.14. Auto-configured Data MongoDB Tests 43.3.15. Auto-configured Data Neo4j Tests 43.3.16. Auto-configured Data Redis Tests 43.3.17. Auto-configured Data LDAP Tests 43.3.18. Auto-configured REST Clients 43.3.19. Auto-configured Spring REST Docs Tests Auto-configured Spring REST Docs Tests with Mock MVC Auto-configured Spring REST Docs Tests with REST Assured 43.3.20. User Configuration and Slicing 43.3.21. Using Spock to Test Spring Boot Applications 43.4. Test Utilities 43.4.1. ConfigFileApplicationContextInitializer 43.4.2. TestPropertyValues 43.4.3. OutputCapture 43.4.4. TestRestTemplate 44. WebSockets 45. Web Services 46. Creating Your Own Auto-configuration 46.1. Understanding Auto-configured Beans 46.2. Locating Auto-configuration Candidates 46.3. Condition Annotations 46.3.1. Class Conditions 46.3.2. Bean Conditions 46.3.3. Property Conditions 46.3.4. Resource Conditions 46.3.5. Web Application Conditions 46.3.6. SpEL Expression Conditions 46.4. Testing your Auto-configuration 46.4.1. Simulating a Web Context 46.4.2. Overriding the Classpath 46.5. Creating Your Own Starter 46.5.1. Naming 46.5.2. autoconfigure Module 46.5.3. Starter Module 47. Kotlin support 47.1. Requirements 47.2. Null-safety 47.3. Kotlin API 47.3.1. runApplication 47.3.2. Extensions 47.4. Dependency management 47.5. @ConfigurationProperties 47.6. Testing 47.7. Resources 47.7.1. Further reading 47.7.2. Examples 48. What to Read Next V. Spring Boot Actuator: Production-ready features 49. Enabling Production-ready Features 50. Endpoints 50.1. Enabling Endpoints 50.2. Exposing Endpoints 50.3. Securing HTTP Endpoints 50.4. Configuring Endpoints 50.5. Hypermedia for Actuator Web Endpoints 50.6. Actuator Web Endpoint Paths 50.7. CORS Support 50.8. Implementing Custom Endpoints 50.8.1. Receiving Input Input type conversion 50.8.2. Custom Web Endpoints Web Endpoint Request Predicates Path HTTP method Consumes Produces Web Endpoint Response Status Web Endpoint Range Requests Web Endpoint Security 50.8.3. Servlet endpoints 50.8.4. Controller endpoints 50.9. Health Information 50.9.1. Auto-configured HealthIndicators 50.9.2. Writing Custom HealthIndicators 50.9.3. Reactive Health Indicators 50.9.4. Auto-configured ReactiveHealthIndicators 50.10. Application Information 50.10.1. Auto-configured InfoContributors 50.10.2. Custom Application Information 50.10.3. Git Commit Information 50.10.4. Build Information 50.10.5. Writing Custom InfoContributors 51. Monitoring and Management over HTTP 51.1. Customizing the Management Endpoint Paths 51.2. Customizing the Management Server Port 51.3. Configuring Management-specific SSL 51.4. Customizing the Management Server Address 51.5. Disabling HTTP Endpoints 52. Monitoring and Management over JMX 52.1. Customizing MBean Names 52.2. Disabling JMX Endpoints 52.3. Using Jolokia for JMX over HTTP 52.3.1. Customizing Jolokia 52.3.2. Disabling Jolokia 53. Loggers 53.1. Configure a Logger 54. Metrics 54.1. Getting started 54.2. Supported monitoring systems 54.2.1. Atlas 54.2.2. Datadog 54.2.3. Ganglia 54.2.4. Graphite 54.2.5. Influx 54.2.6. JMX 54.2.7. New Relic 54.2.8. Prometheus 54.2.9. SignalFx 54.2.10. Simple 54.2.11. StatsD 54.2.12. Wavefront 54.3. Supported Metrics 54.3.1. Spring MVC Metrics 54.3.2. Spring WebFlux Metrics 54.3.3. RestTemplate Metrics 54.3.4. Cache Metrics 54.3.5. DataSource Metrics 54.3.6. RabbitMQ Metrics 54.4. Registering custom metrics 54.5. Customizing individual metrics 54.5.1. Per-meter properties 54.6. Metrics endpoint 55. Auditing 56. HTTP Tracing 56.1. Custom HTTP tracing 57. Process Monitoring 57.1. Extending Configuration 57.2. Programmatically 58. Cloud Foundry Support 58.1. Disabling Extended Cloud Foundry Actuator Support 58.2. Cloud Foundry Self-signed Certificates 58.3. Custom context path 59. What to Read Next VI. Deploying Spring Boot Applications 60. Deploying to the Cloud 60.1. Cloud Foundry 60.1.1. Binding to Services 60.2. Heroku 60.3. OpenShift 60.4. Amazon Web Services (AWS) 60.4.1. AWS Elastic Beanstalk Using the Tomcat Platform Using the Java SE Platform 60.4.2. Summary 60.5. Boxfuse and Amazon Web Services 60.6. Google Cloud 61. Installing Spring Boot Applications 61.1. Supported Operating Systems 61.2. Unix/Linux Services 61.2.1. Installation as an init.d Service (System V) Securing an init.d Service 61.2.2. Installation as a systemd Service 61.2.3. Customizing the Startup Script Customizing the Start Script when It Is Written Customizing a Script When It Runs 61.3. Microsoft Windows Services 62. What to Read Next VII. Spring Boot CLI 63. Installing the CLI 64. Using the CLI 64.1. Running Applications with the CLI 64.1.1. Deduced “grab” Dependencies 64.1.2. Deduced “grab” Coordinates 64.1.3. Default Import Statements 64.1.4. Automatic Main Method 64.1.5. Custom Dependency Management 64.2. Applications with Multiple Source Files 64.3. Packaging Your Application 64.4. Initialize a New Project 64.5. Using the Embedded Shell 64.6. Adding Extensions to the CLI 65. Developing Applications with the Groovy Beans DSL 66. Configuring the CLI with settings.xml 67. What to Read Next VIII. Build tool plugins 68. Spring Boot Maven Plugin 68.1. Including the Plugin 68.2. Packaging Executable Jar and War Files 69. Spring Boot Gradle Plugin 70. Spring Boot AntLib Module 70.1. Spring Boot Ant Tasks 70.1.1. spring-boot:exejar 70.1.2. Examples 70.2. spring-boot:findmainclass 70.2.1. Examples 71. Supporting Other Build Systems 71.1. Repackaging Archives 71.2. Nested Libraries 71.3. Finding a Main Class 71.4. Example Repackage Implementation 72. What to Read Next IX. ‘How-to’ guides 73. Spring Boot Application 73.1. Create Your Own FailureAnalyzer 73.2. Troubleshoot Auto-configuration 73.3. Customize the Environment or ApplicationContext Before It Starts 73.4. Build an ApplicationContext Hierarchy (Adding a Parent or Root Context) 73.5. Create a Non-web Application 74. Properties and Configuration 74.1. Automatically Expand Properties at Build Time 74.1.1. Automatic Property Expansion Using Maven 74.1.2. Automatic Property Expansion Using Gradle 74.2. Externalize the Configuration of SpringApplication 74.3. Change the Location of External Properties of an Application 74.4. Use ‘Short’ Command Line Arguments 74.5. Use YAML for External Properties 74.6. Set the Active Spring Profiles 74.7. Change Configuration Depending on the Environment 74.8. Discover Built-in Options for External Properties 75. Embedded Web Servers 75.1. Use Another Web Server 75.2. Disabling the Web Server 75.3. Configure Jetty 75.4. Add a Servlet, Filter, or Listener to an Application 75.4.1. Add a Servlet, Filter, or Listener by Using a Spring Bean Disable Registration of a Servlet or Filter 75.4.2. Add Servlets, Filters, and Listeners by Using Classpath Scanning 75.5. Change the HTTP Port 75.6. Use a Random Unassigned HTTP Port 75.7. Discover the HTTP Port at Runtime 75.8. Configure SSL 75.9. Configure HTTP/2 75.9.1. HTTP/2 with Undertow 75.9.2. HTTP/2 with Jetty 75.9.3. HTTP/2 with Tomcat 75.10. Configure Access Logging 75.11. Running Behind a Front-end Proxy Server 75.11.1. Customize Tomcat’s Proxy Configuration 75.12. Configure Tomcat 75.13. Enable Multiple Connectors with Tomcat 75.14. Use Tomcat’s LegacyCookieProcessor 75.15. Configure Undertow 75.16. Enable Multiple Listeners with Undertow 75.17. Create WebSocket Endpoints Using @ServerEndpoint 75.18. Enable HTTP Response Compression 76. Spring MVC 76.1. Write a JSON REST Service 76.2. Write an XML REST Service 76.3. Customize the Jackson ObjectMapper 76.4. Customize the @ResponseBody Rendering 76.5. Handling Multipart File Uploads 76.6. Switch Off the Spring MVC DispatcherServlet 76.7. Switch off the Default MVC Configuration 76.8. Customize ViewResolvers 77. HTTP Clients 77.1. Configure RestTemplate to Use a Proxy 78. Logging 78.1. Configure Logback for Logging 78.1.1. Configure Logback for File-only Output 78.2. Configure Log4j for Logging 78.2.1. Use YAML or JSON to Configure Log4j 2 79. Data Access 79.1. Configure a Custom DataSource 79.2. Configure Two DataSources 79.3. Use Spring Data Repositories 79.4. Separate @Entity Definitions from Spring Configuration 79.5. Configure JPA Properties 79.6. Configure Hibernate Naming Strategy 79.7. Use a Custom EntityManagerFactory 79.8. Use Two EntityManagers 79.9. Use a Traditional persistence.xml File 79.10. Use Spring Data JPA and Mongo Repositories 79.11. Expose Spring Data Repositories as REST Endpoint 79.12. Configure a Component that is Used by JPA 79.13. Configure jOOQ with Two DataSources 80. Database Initialization 80.1. Initialize a Database Using JPA 80.2. Initialize a Database Using Hibernate 80.3. Initialize a Database 80.4. Initialize a Spring Batch Database 80.5. Use a Higher-level Database Migration Tool 80.5.1. Execute Flyway Database Migrations on Startup 80.5.2. Execute Liquibase Database Migrations on Startup 81. Messaging 81.1. Disable Transacted JMS Session 82. Batch Applications 82.1. Execute Spring Batch Jobs on Startup 83. Actuator 83.1. Change the HTTP Port or Address of the Actuator Endpoints 83.2. Customize the ‘whitelabel’ Error Page 84. Security 84.1. Switch off the Spring Boot Security Configuration 84.2. Change the UserDetailsService and Add User Accounts 84.3. Enable HTTPS When Running behind a Proxy Server 85. Hot Swapping 85.1. Reload Static Content 85.2. Reload Templates without Restarting the Container 85.2.1. Thymeleaf Templates 85.2.2. FreeMarker Templates 85.2.3. Groovy Templates 85.3. Fast Application Restarts 85.4. Reload Java Classes without Restarting the Container 86. Build 86.1. Generate Build Information 86.2. Generate Git Information 86.3. Customize Dependency Versions 86.4. Create an Executable JAR with Maven 86.5. Use a Spring Boot Application as a Dependency 86.6. Extract Specific Libraries When an Executable Jar Runs 86.7. Create a Non-executable JAR with Exclusions 86.8. Remote Debug a Spring Boot Application Started with Maven 86.9. Build an Executable Archive from Ant without Using spring-boot-antlib 87. Traditional Deployment 87.1. Create a Deployable War File 87.2. Convert an Existing Application to Spring Boot 87.3. Deploying a WAR to WebLogic 87.4. Use Jedis Instead of Lettuce X. Appendices A. Common application properties B. Configuration Metadata B.1. Metadata Format B.1.1. Group Attributes B.1.2. Property Attributes B.1.3. Hint Attributes B.1.4. Repeated Metadata Items B.2. Providing Manual Hints B.2.1. Value Hint B.2.2. Value Providers Any Class Reference Handle As Logger Name Spring Bean Reference Spring Profile Name B.3. Generating Your Own Metadata by Using the Annotation Processor B.3.1. Nested Properties B.3.2. Adding Additional Metadata C. Auto-configuration classes C.1. From the “spring-boot-autoconfigure” module C.2. From the “spring-boot-actuator-autoconfigure” module D. Test auto-configuration annotations E. The Executable Jar Format E.1. Nested JARs E.1.1. The Executable Jar File Structure E.1.2. The Executable War File Structure E.2. Spring Boot’s “JarFile” Class E.2.1. Compatibility with the Standard Java “JarFile” E.3. Launching Executable Jars E.3.1. Launcher Manifest E.3.2. Exploded Archives E.4. PropertiesLauncher Features E.5. Executable Jar Restrictions E.6. Alternative Single Jar Solutions F. Dependency versions

“相关推荐”对你有帮助么?

  • 非常没帮助
  • 没帮助
  • 一般
  • 有帮助
  • 非常有帮助
提交
评论
添加红包

请填写红包祝福语或标题

红包个数最小为10个

红包金额最低5元

当前余额3.43前往充值 >
需支付:10.00
成就一亿技术人!
领取后你会自动成为博主和红包主的粉丝 规则
hope_wisdom
发出的红包
实付
使用余额支付
点击重新获取
扫码支付
钱包余额 0

抵扣说明:

1.余额是钱包充值的虚拟货币,按照1:1的比例进行支付金额的抵扣。
2.余额无法直接购买下载,可以购买VIP、付费专栏及课程。

余额充值