


Excel单元格插入图片并实现单击放大或缩小功能
参考https://blog.csdn.net/MRZHUGH/article/details/108413504
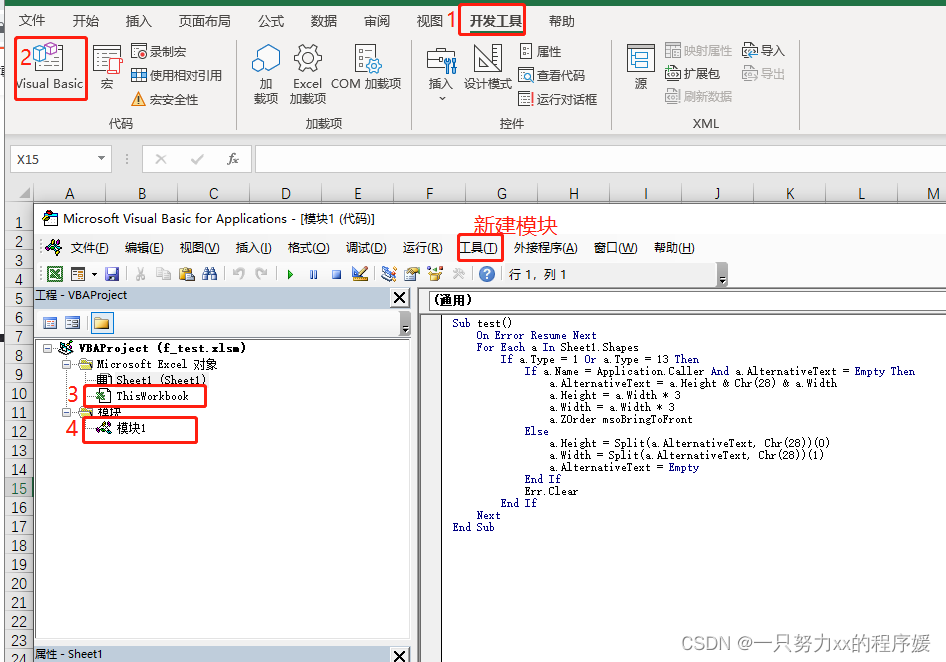
VBA代码
ThisWorkbook的代码
Private Sub Workbook_Open()
    Dim cName$
    On Error Resume Next
    For Each a In Sheet1.Shapes
        If a.Type = 1 Or a.Type = 13 Then
            a.OnAction = "test"
            cName = a.TopLeftCell.Address(0,0)
            Do
                a.Name = cName
                If Err = 0 Then Exit Do
                cName = cName & "_0"
                Err.Clear
            Loop
        End If
    Next
End Sub
新建模块的代码
Sub test()
    On Error Resume Next
    For Each a In Sheet1.Shapes
        If a.Type = 1 Or a.Type = 13 Then
            If a.Name = Application.Caller And a.AlternativeText = Empty Then
                a.AlternativeText = a.Height & Chr(28) & a.Width
                a.Height = a.Width * 3
                a.Width = a.Width * 3
                a.ZOrder msoBringToFront
            Else
                a.Height = Split(a.AlternativeText, Chr(28))(0)
                a.Width = Split(a.AlternativeText, Chr(28))(1)
                a.AlternativeText = Empty
            End If
            Err.Clear
        End If
    Next
End Sub
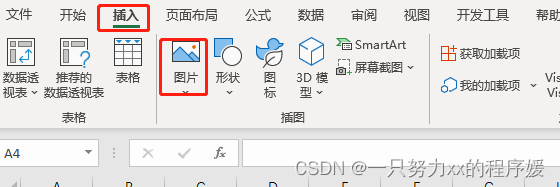
插入图片测试
保存为xlsm文件,保存后重新打开才能生效
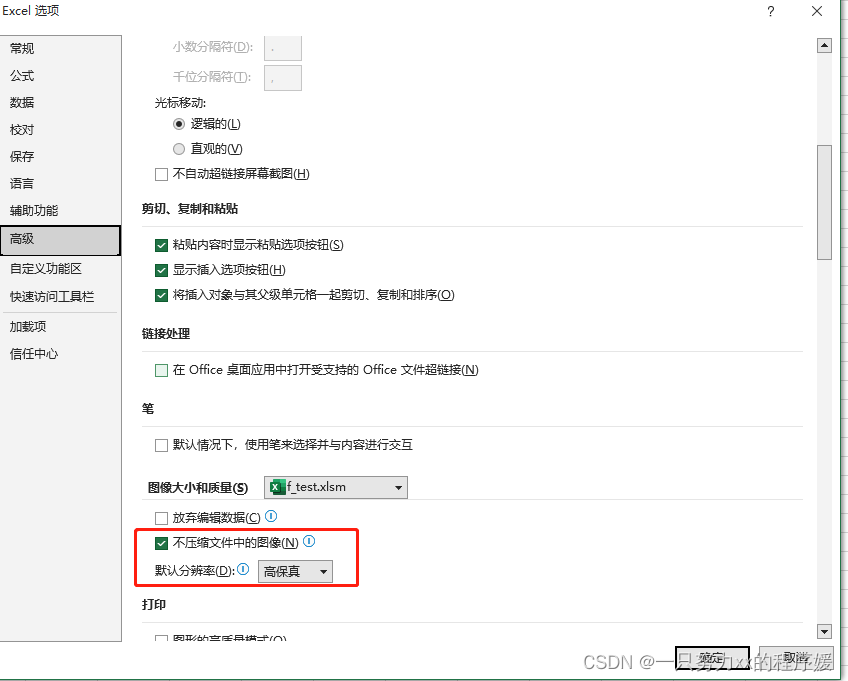
图片失真设置
excel文件–>选项–>高级–>选中“不压缩文件中的图像”,并设置分辨率为“高保真”
使用POI插入图片后仍然可以放大缩小
public static void insertExcelImage(String excelPath,String imagePath){
		InputStream in = null;
		FileOutputStream out = null;
		try{
			in = new FileInputStream(excelPath);
			XSSFWorkbook wb = new XSSFWorkbook(in);
			XSSFSheet sheet = wb.getSheetAt(0);
			XSSFRow row = sheet.getRow(3);//图片插入到第4行第4列的单元格
			if(row ==null){
				row = sheet.createRow(3);
			}
			Cell cell =	row.getCell(3);
			if(cell==null){
				cell = row.createCell(3);
			}
			sheet.setForceFormulaRecalculation(true);
			replaceImage(wb,sheet,cell,imagePath,3,3,200);
			out = new FileOutputStream(excelPath);
			// 将最新的 Excel 文件写入到文件输出流中,更新文件信息!
			wb.write(out);
			// 执行 flush 操作, 将缓存区内的信息更新到文件上
			out.flush();
			in.close();
		} catch (Exception e) {
			e.printStackTrace();
		} finally {
			if (in != null) {
				try {
					in.close();
				} catch (IOException e) {
					e.printStackTrace();
				}
			}
			if (out != null) {
				try {
					out.close();
				} catch (IOException e) {
					e.printStackTrace();
				}
			}
		}
	}
public static Workbook replaceImage(Workbook book, Sheet sheet, Cell cell, String jdImagePath, int jdcol, int jdrow, double width) throws Exception {
		InputStream jdis;
		byte[] jdbytes = null;
		try {
			jdis = new FileInputStream(jdImagePath);
			jdbytes = IOUtils.toByteArray(jdis);
		} catch (Exception e) {
			e.printStackTrace();
		}
		CreationHelper helper = book.getCreationHelper();
		Drawing drawing  = null;
		if (sheet instanceof XSSFSheet) {
			XSSFSheet xSSFSheet = (XSSFSheet)sheet;
			drawing = xSSFSheet.getDrawingPatriarch();
		} else if (sheet instanceof HSSFSheet) {
			HSSFSheet hSSFSheet = (HSSFSheet)sheet;
			drawing = hSSFSheet.getDrawingPatriarch();
		}
		if (drawing == null) {
			drawing = sheet.createDrawingPatriarch();
		}
		// 图片插入坐标
		if (-1 != jdcol && -1 != jdrow) {
			int jdpictureIdx = book.addPicture(jdbytes, Workbook.PICTURE_TYPE_JPEG);// 根据需要调整参数,如果是PNG,就改为 Workbook.PICTURE_TYPE_PNG
			ClientAnchor jdanchor = helper.createClientAnchor();
			jdanchor.setCol1(jdcol);
			jdanchor.setRow1(jdrow);
			// 获取原图片的宽度和高度,单位都是像素
			File image = new File(jdImagePath);
			BufferedImage sourceImg = ImageIO.read(image);
			double imageWidth = sourceImg.getWidth();
			double imageHeight = sourceImg.getHeight();
			// 获取单元格宽度和高度,单位都是像素
			double cellWidth = sheet.getColumnWidthInPixels(cell.getColumnIndex());
			double cellHeight = cell.getRow().getHeightInPoints() / 72 * 96;// getHeightInPoints()方法获取的是点(磅),就是excel设置的行高,1英寸有72磅,一般显示屏一英寸是96个像素
			// 插入图片,如果原图宽度大于最终要求的图片宽度,就按比例缩小,否则展示原图
			Picture pict = drawing.createPicture(jdanchor, jdpictureIdx);
			double newHeight = width * (imageHeight / imageWidth);
			if (imageWidth > width || width>cellWidth || newHeight>cellHeight) {
				double scaleX = width / cellWidth;// 最终图片大小与单元格宽度的比例
				double scaleY = 1;
				// 最终图片大小与单元格高度的比例
				// 说一下这个比例的计算方式吧:( imageHeight / imageWidth ) 是原图高于宽的比值,则 ( width * ( imageHeight / imageWidth ) ) 就是最终图片高的比值,
				// 那 ( width * ( imageHeight / imageWidth ) ) / cellHeight 就是所需比例了
				if (newHeight > cellHeight) {//true 图高=单元格高,图宽=cellHight*原图宽/原图高
					scaleX = cellHeight * (imageWidth / imageHeight) / cellWidth;
					scaleY = 1.0;
				} else {
					scaleY = (width * (imageHeight / imageWidth)) / cellHeight;
				}
				pict.resize(scaleX, scaleY);
			} else {
				pict.resize();
			}
		}
		return book;
	}


 1686
1686


 被折叠的 条评论
为什么被折叠?
被折叠的 条评论
为什么被折叠?
 到【灌水乐园】发言


