


1.下载客户端和服务端的安装包
下载服务端安装文件http://www.jb51.net/softs/55933.html
下载客户端安装文件http://www.jb51.net/softs/55934.html

2,在共享服务器端安装服务端
默认一直下一步,到下图所示
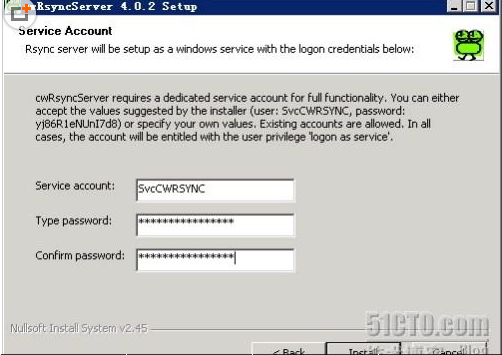
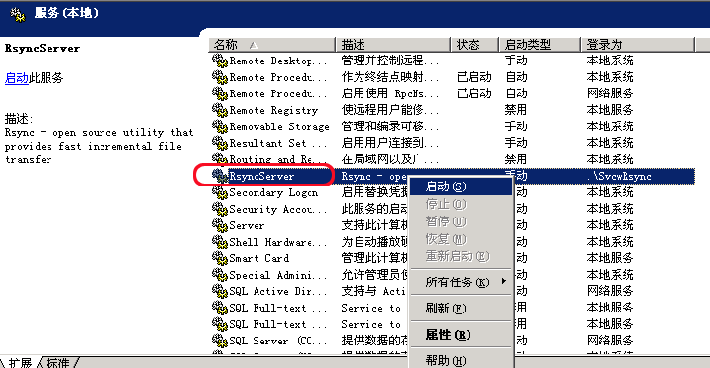
在此处更改rsync要创建的系统用户及用户名,其他采用默认选项安装。安装后,服务默认为手动启动模式,到“管理工具/服务管理”里,启动“RsyncServer”服务,并修改“RsyncServer”为自动启动模式。如下:
3.服务器端配置(windows系统)
编辑cwRsync安装目录下的rsyncd.conf文件,写入如下信息:
port = 22 # rsync服务的端口(873是默认端口,你可以更改,需要确保此端口可以被client端访问)
use chroot = false # 默认,不更改
strict modes = false # 默认,不更改
hosts allow = 192.168.1.110,192.168.1.105 # 允许连接服务器的客户端的IP地址列表(*表示不限制)
max connections = 10 # 最大连接数
log file = rsyncd.log # 日志文件
pid file = rsyncd.pid # 运行进程的ID写到哪里
uid=0 # 对某些场合,这个很重要,下面再解释
gid=0 # 对某些场合,这个很重要,下面再解释
auth users = zys # 允许连接服务器的用户名
secrets file = rsyncd.pas # 允许连接服务器的帐户文件,其格式在下面会详述
# Module definitions
# Remember cygwin naming conventions : c:\work becomes /cygwin/c/work
#
[test] # 一个模块的名字,可随意起,但最好有意义
path = /cygdrive/c/test # 同步的目录的路径,其中,c盘就是“/cygdrive/c”,所以该路径指的是c盘下的test目录
read only = false
transfer logging = yes # 传输时记录日志
[test2]
path = /cygdrive/E/Documents and Settings/another
read only = false
transfer logging = yes # 传输时记录日志
其中[test]和[test2]是设置的要同步的数据的模块,path是磁盘路径,/cygdrive/c/test对应到c:\test文件夹,由于cwRsync软件在windows下不能够直接挂盘符,采用 /cygdrive/这种模式。
需要注意的几点:
1)你设置的rsync服务器端口必须在防火墙里打开,否则客户端还是连接不上。
2)rsyncd.conf文件中的模块([test])上方是公用的参数,也就是所有模块都会共享的参数,如果在该模块内部又为该参数设置了不同的值,则会按模块内部的值来算。
3)rsyncd.pas文件的内容格式如下:
用户名:密码
例如:
zys:123456
4)一般来说,你要同步一个目录的话,就要在rsyncd.conf中添加一个“模块”,并为该模块设置路径等参数。
5)如果客户端连接rsync服务器时,提示chdir失败,并且你的登录用户名和密码之类的都设置对了,那么很可能你就需要添加上面的“uid=0”和“gid=0”了
6)如果出现rsync: failed to open lock file 错误,则在rsync.conf中填加一行:
lock file = rsyncd.lock
好了,服务器端的设置基本完成,然后启动rsync服务,就可以了。
下面我们来进行客户端的工作,以完成同步任务。
4.客户端安装(windows)
在cwRsync安装目录下的bin/目录下创建dnt_rsync.bat,编辑写入如下内容:
set CYGWIN=nontsec
rsync -ravztopg –progress –delete –password-
file=/cygdrive/c/rsycnd.pas rsync://zys@192.168.1.111:22/test /cygdrive/c/test
rsync-ravztopg –progress –delete –password-
file=/cygdrive/c/rsycnd.pas rsync://zys@192.168.1.111:22/test2 /cygdrive/c/test2
运行客户端的dnt_rsync.bat文件,就可以将服务器端的数据同步到客户端。
说明:
1) set CYGWIN=nontsec 这个参数十分重要,不然会引起文件权限问题
2) –delete 是否删除的选项,比如服务器端删除了一个文件,客户端如果也要删除,就要加上这个参数,小心使用
3) 192.168.1.100是rsync服务器IP,请视实际情况更改。
4) –password-file 参数指定了客户端登录服务器时,使用的帐户的密码文件,例如上面的“/cygdrive/c/rsycnd.pas” 表明是 c:\rsycnd.pas 文件,该文件内容就是登录rsync服务器的帐户的密码。
5) rsync://zys@192.168.1.111:22/test和rsync://zys@192.168.1.111:22/test2中的test和test2,指定的是rsync服务器配置文件中设置的模块名,必须一致。
6) 有多个目录要同步,就写多个rsync命令,双击此批处理文件时,会依次执行。
7) 上面例子中的第一个rsync命令的含义是:将远程的rsync服务器中,test模块所指定的目录,同步到本地的 c/test 目录。在客户端,如果路径中含有空格,则需要将路径用双引号括起来。
这样配置好之后,双击批处理文件,你的两个目录就开始同步啦,rsync会自动判断哪些文件修改了,哪些没有修改,只传输修改过的文件(并且还会增量传输),节省你的带宽,极其高效。
rsync功能非一般强大,关于rsync的更多配置选项,此处绝对不可能描述得完,请参考其手册。
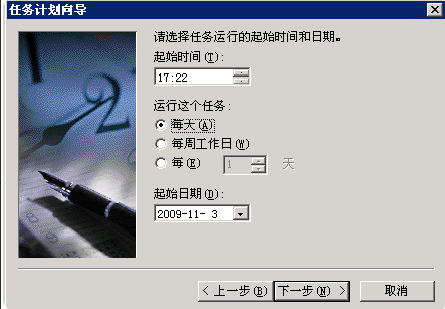
5.计划任务(windows)
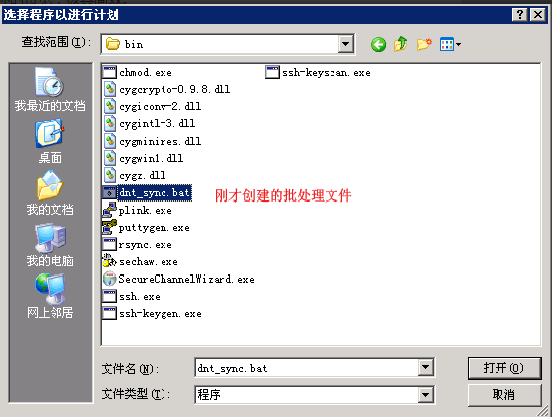
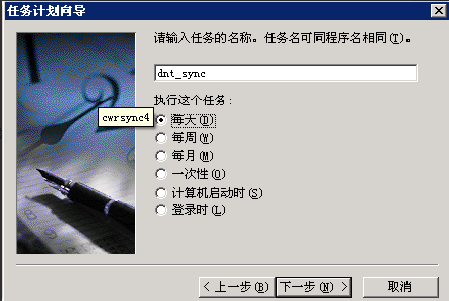
首先在客户端的机器上的: 控件面板->任务计划->点击“添加任务计划”, 在相应的弹出窗口中点击下一步,然后点击导航窗口中的“浏览”按钮,如下,并从中选择之前创建的批处理文件”dnt_sync.bat”:

1 Linux版安装配置
1.1 客户端安装及配置(linux)
1 下载地址:http://rsync.samba.org/ftp/rsync/rsync-3.0.7.tar.gz
2 下载安装包:wgethttp://rsync.samba.org/ftp/rsync/rsync-3.0.7.tar.gz
3 解压缩:tar–zxvf rsync-3.0.7.tar.gz
4 进入目录 cd rsync-3.0.7
5 安装rsync:
./configure –prefix=/usr/local/rsync
make
make install
执行同步命令:rsync -ravztopg –progress –delete –password-file=/usr/local/rsync/bin/rsycnd.pas rsync://zys@192.168.1.111:873/test2 /usr/local/rsync/test2
同步成功,不做过多解释了。
1.2 服务端安装(linux)
同客户端安装。
1.3 服务端配置(linux)
1.3.1 编辑配置文件rsyncd.conf
1) 新建配置文件
touch /etc/rsyncd.conf
2) 编辑内容
vim /etc/rsyncd.conf
usechroot = false
strict modes = false
port = 873
hosts allow = 192.168.4.148,60.18.147.50,222.33.192.62
log file = /home/rsync/rsyncd.log
pid file =/home/rsync/rsyncd.pid
uid = nobody
gid = nobody
# Module definitions
# Remember cygwin naming conventions : c:\work becomes /cygwin/c/work
#
[test2]
auth users = rsyimg
secrets file = /home/rsync/rsyncd.pas
path = /home/img
read only = false
transfer logging = yes
3) 保存退出
1.3.2 生成验证文件rsyncd.pas
1) 生成验证文件echo “rsync:rsync” > /home/rsync/rsyncd.pas (rsync:rsync为用户和密码,格式为user:passwd)
2) 修改文件属主chown root:root /home/rsync/rsyncd.pas
3) 修改文件权限chmod 600 /home/rsync/rsyncd.pas
1.3.3 启动rsync服务
/usr/local/rsync/bin/rsync –daemon
修改了rsyncd.conf文件,则要重新启动rsync服务。
Ps:
启动时报错:
/usr/local/rsync/bin/rsync: error while loading shared libraries: libiconv.so.2: cannot open shared object file: No such file or directory
解决方案
1、编辑/etc/ld.so.conf文件,添加一行:
/usr/local/lib
2、保存后运行ldconfig。
3、再启动运行rsyncd服务运行,问题得到解决。
(注:ld.so.conf和ldconfig用于维护系统动态链接库)
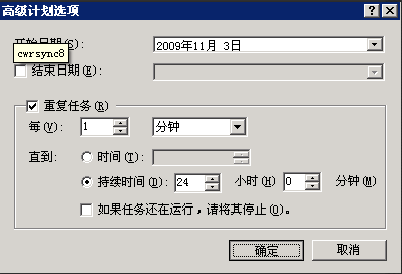
1.4 计划任务(linux)
*/5 * * * * /usr/local/rsync/rsync-ravztopg –progress –delete –chmod=Du=rwx,Dgo=rx,Fu=rw,Fog=rx–password-file=/usr/local/rsync/bin/rsycnd.pas rsync://zys@192.168.1.111:873/test2 /usr/local/rsync/test2
注:
1、每5分钟执行一次
2、–chmod=Du=rwx,Dgo=rx,Fu=rw,Fog=rx修改通过到客户端文件及文件夹的权限,D代表文件夹,F代表文件,u代表拥有者,g代表用户组,o代表其他用户,r、w、x分别为读、写、执行
3、 rsycnd.pas 文件,该文件内容就是登录rsync服务器的帐户的密码。
4、 rsync://zys@192.168.1.111:873/test2中的test2,指定的是rsync服务器配置文件中设置的模块名,必须一致。
2 参考
2.1 windows 2003 server 使用cwrsync同步文件夹的权限问题
http://hi.baidu.com/gaodi2002/blog/item/f6ad56eeac529bf7b2fb95e3.html
windows 2003 server 使用cwrsync同步文件夹的权限问题
windows 2003 server 使用cwrsync 3 同步文件夹后,权限和安全属性不能同步,直接导致无法使用,查阅资料后发现必须在运行命令前使用SET CYGWIN=nontsec参数
将以下内容保存成.bat批处理文件后即可运行。
@ECHO OFF
SET CYGWIN=nontsec
“c:\Program Files\cwRsync\bin\rsync” -avrr /cygdrive/c/srcdir/ /cygdrive/d/dstdir/
对于cwrsync 3.0.7以后及cwrsync 4.0以后的版本, 由于cygwin已经从1.5升级到1.7,而且cygwin1.7的mount点从注册表改成了/etc/fstab ,cwrsync 4.0.4版本使用CYGWIN=nontsec参数无效,仍然存在目录权限问题,解决方法如下,在rsync.exe的上一级目录新建一个etc目录, 然后在etc目录用写字板新建一个fstab文件,不带扩展名,文件内容为
#edit by gaodi
#none /cygdrivecygdriventfsoverride,binary,noacl 0 0
none /cygdrivecygdrivebinary,posix=0,user,noacl 0 0
C:/Program\040Files/cwrsync / ntfsoverride,binary,noacl 0 0
C:/Program\040Files/cwrsync/bin /usr/bin ntfsoverride,binary,noacl 0 0
#C:/Program\040Files/cwrsync/etc/terminfo /usr/share/terminfontfsoverride,binary,noacl 0 0
保存退出。
重新运行rsync.exe 执行同步后目录就不会出现”权限顺序不正确”的提示了。
(主要是第三行起作用,如果只加这一行一定要在最后加一个回车符)
附fstab文件的使用方法:
The Cygwin Mount Table
The /etc/fstab file is used to map Win32 drives and network shares into Cygwin’s internal POSIX directory tree. This is a similar concept to the typical UNIX fstab file. The mount points stored in /etc/fstab are globally set for all users. Sometimes there’s a requirement to have user specific mount points. The Cygwin DLL supports user specific fstab files. These are stored in the # #directory /etc/fstab.d and the name of the file is the Cygwin username of the user, as it’s stored in the /etc/passwd file. The content of the user specifc file is identical to the system-wide fstab file.
The file fstab contains descriptive information about the various file systems. fstab is only read by programs, and not written; it is the duty of the system administrator to properly create and maintain this file. Each filesystem is described on a separate line; fields on each line are separated by tabs or spaces. Lines starting with ‘#’ are comments.
The first field describes the block special device or remote filesystem to be mounted. On Cygwin, this is the native Windows path which the mount point links in. As path separator you MUST use a slash. Usage of a backslash might lead to unexpected results. UNC paths (using slashes, not backslashes) are allowed. If the path contains spaces these can be escaped as ‘\040’.
The second field describes the mount point for the filesystem. If the name of the mount point contains spaces these can be escaped as ‘\040’.
The third field describes the type of the filesystem. Cygwin supports any string here, since the file system type is usually not evaluated. The notable exception is the file system type cygdrive. This type is used to set the cygdrive prefix.
The fourth field describes the mount options associated with the filesystem. It is formatted as a comma separated list of options. It contains at least the type of mount (binary or text) plus any additional options appropriate to the filesystem type. Recognized options are binary, text, nouser, user, exec, notexec, cygexec, nosuid, posix=[0|1]. The meaning of the options is as follows.
acl – Cygwin uses the filesystem’s access control lists (ACLs) to
implement real POSIX permissions (default). This flag only
affects filesystems supporting ACLs (NTFS) and is ignored
otherwise.
auto – Ignored.
binary – Files default to binary mode (default).
cygexec – Treat all files below mount point as cygwinexecutables.
exec – Treat all files below mount point as executable.
noacl – Cygwin ignores filesystem ACLs and only fakes a subset of
permission bits based on the DOS readonly attribute. This
behaviour is the default on FAT and FAT32. The flag is
ignored on NFS filesystems.
nosuid – No suid files are allowed (currently unimplemented).
notexec – Treat all files below mount point as not executable.
nouser – Mount is a system-wide mount.
override – Force the override of an immutable mount point (currently “/”).
posix=0 – Switch off case sensitivity for paths under this mount point.
posix=1 – Switch on case sensitivity for paths under this mount point
(default).
text – Files default to CRLF text mode line endings.
user – Mount is a user mount.
While normally the execute permission bits are used to evaluate executability, this is not possible on filesystems which don’t support permissions at all (like FAT/FAT32), or if ACLs are ignored on filesystems supporting them (see the aforementioned acl mount option). In these cases, the following heuristic is used to evaluate if a file is executable: Files ending in certain extensions (.exe, .com, .bat, .btm, .cmd) are assumed to be executable. Files whose first two characters begin with ‘#!’ are also considered to be executable. The exec option is used to instruct Cygwin that the mounted file is “executable”. If the exec option is used with a directory then all files in the directory are executable. This option allows other files to be marked as executable and avoids the overhead of opening each file to check for a ‘#!’. The cygexec option is very similar to exec, but also prevents Cygwin from setting up commands and environment variables for a normal Windows program, adding another small performance gain. The opposite of these options is the notexec option, which means that no files should be marked as executable under that mount point.
A correct root directory is quite essential to the operation of Cygwin. A default root directory is evaluated at startup so afstab entry for the root directory is not necessary. If it’s wrong, nothing will work as expected. Therefore, the root directory evaluated by Cygwin itself is treated as an immutable mount point and can’t be overridden in /etc/fstab… unless you think you really know what you’re doing. In this case, use the override flag in the options field in the /etc/fstab file. Since this is a dangerous thing to do, do so at your own risk.
/usr/bin and /usr/lib are by default also automatic mount points generated by the Cygwin DLL similar to the way the root directory is evaluated. /usr/bin points to the directory the Cygwin DLL is installed in, /usr/lib is supposed to point to the /lib directory. This choice is safe and usually shouldn’t be changed. An fstab entry for them is not required.
nouser mount points are not overridable by a later call to mount. Mount points given in /etc/fstab are by default nouser mount points, unless you specify the option user. This allows the administrator to set certain paths so that they are not overridable by users. In contrast, all mount points in the user specific fstab file are user mount points.
The fifth and sixth field are ignored. They are so far only specified to keep a Linux-like fstab file layout.
Note that you don’t have to specify an fstab entry for the root dir, unless you want to have the root dir pointing to somewhere entirely different (hopefully you know what you’re doing), or if you want to mount the root dir with special options (for instance, as text mount).
Example entries:
Just a normal mount point:
c:/foo /bar fat32 binary 0 0
A mount point for a textmode mount with case sensitivity switched off:
C:/foo /bar/bazntfstext,posix=0 0 0
A mount point for a Windows directory with spaces in it:
C:/Documents\040and\040Settings /docs ext3 binary 0 0
A mount point for a remote directory without ACL support:
//server/share/subdir /srv/subdirsmbfsbinary,noacl 0 0
This is just a comment:
# This is just a comment
Set the cygdrive prefix to /mnt:
none /mntcygdrive binary 0 0
Whenever Cygwin generates a Win32 path from a POSIX one, it uses the longest matching prefix in the mount table. Thus, if C: is mounted as /c and also as /, then Cygwin would translate C:/foo/bar to /c/foo/bar. This translation is normally only used when trying to derive the POSIX equivalent current directory. Otherwise, the handling of MS-DOS filenames bypasses the mount table.
If you want to see the current set of mount points valid in your session, you can invoking the Cygwin tool mount without arguments:
Example 3.1. Displaying the current set of mount points
bash$ mount
f:/cygwin/bin on /usr/bin type system (binary,auto)
f:/cygwin/lib on /usr/lib type system (binary,auto)
f:/cygwin on / type system (binary,auto)
e:/src on /usr/src type system (binary)
c: on /cygdrive/c type user (binary,posix=0,user,noumount,auto)
e: on /cygdrive/e type user (binary,posix=0,user,noumount,auto)
You can also use the mount command to add new mount points, and the umount to delete them. However, since they are only noted in memory, these mount points will disappear as soon as your last Cygwin process ends. See the section called 搈ount?and the section called 搖mount?for more information.
Note
When you upgrade an existing older Cygwin installation to Cygwin 1.7, your old system mount points (stored in the HKEY_LOCAL_MACHINE branch of your registry) are read by a script and the /etc/fstab file is generated from these entries. Note that entries for /, /usr/bin, and /usr/lib are never generated.
The old user mount points in your HKEY_CURRENT_USER branch of the registry are not used to generate /etc/fstab. If you want to create a user specific /etc/fstab.d/${USER} file from your old entries, there’s a script available which does exactly that for you, bin/copy-user-registry-fstab. Just start the script and it will create your user specific fstab file. Stop all your Cygwin processes and restart them, and you can simply use your old user mount points as before.
服务端rsyncd.conf配置文件:
use chroot = false
strict modes = false
port = 873
hosts allow = IP地址,多个IP地址用逗号隔开
log file = /home/rsync/rsyncd.log
pid file =/home/rsync/rsyncd.pid
uid = root
gid = root
max connections = 512
# Module definitions
# Remember cygwin naming conventions : c:\work becomes /cygwin/c/work
#
[项目名称]
auth users = rsyncuser //同步时使用的用户名
secrets file = /home/rsync/rsyncd.pas //用户名密码校验文件
path = /home/data/cacheinfo/ //同步的目录
read only = false
transfer logging = yes


 310
310

 被折叠的 条评论
为什么被折叠?
被折叠的 条评论
为什么被折叠?
 到【灌水乐园】发言


