


1. 隐藏Nginx版本号
-
解压Nginx
[root@cs03 ~]# tar -zxvf nginx-1.19.1.tar.gz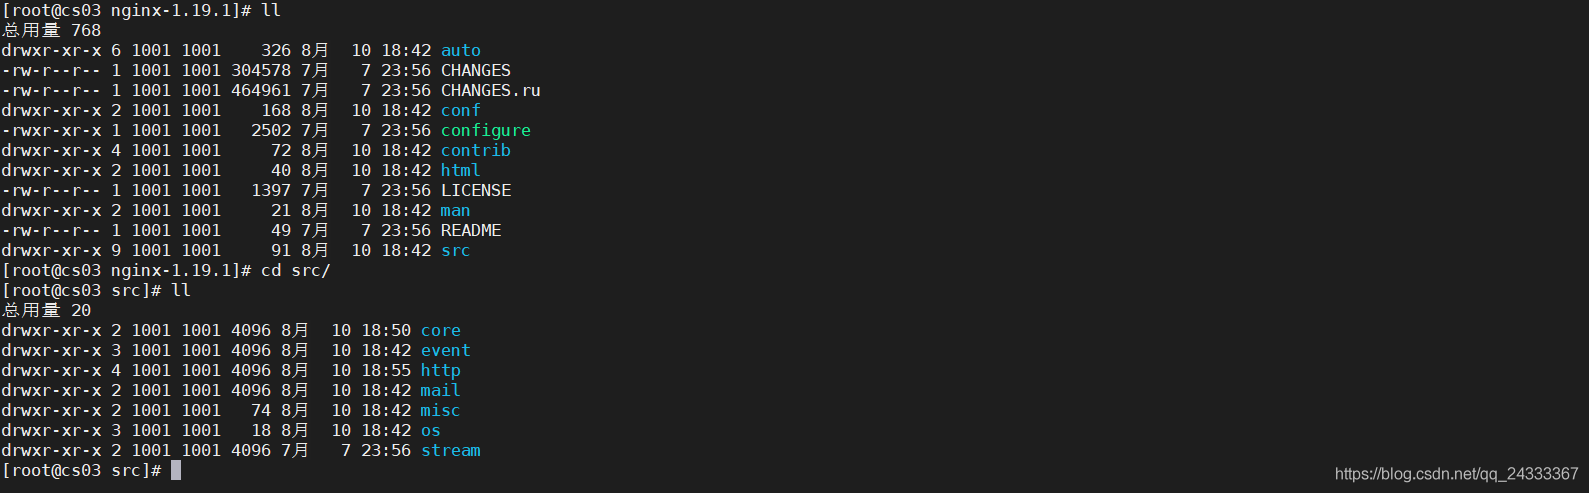
-
修改Nginx源码文件
2.1.修改Nginx,版本号vim core/nginx.h
改:[root@cs03 src]# vim core/nginx.h 13 #define NGINX_VERSION "1.19.1" 14 #define NGINX_VER "nginx/" NGINX_VERSION为:
13 #define NGINX_VERSION      "6.6.6"
14 #define NGINX_VER          "cory/" NGINX_VERSION
2.2 修改Http头信息中的 connection 字段,防止回显具体版本号
改vim http/ngx_http_header_filter_module.c
[root@cs03 src]# vim http/ngx_http_header_filter_module.c
49 static u_char ngx_http_server_string[] = "Server: nginx" CRLF;
为:
49 static u_char ngx_http_server_string[] = "Server: cory" CRLF;2.3:修改 ngx_http_special_response.c 文件定义了Nginx报404错误时,不回显 版本号。注:nginx 1.1 4.1 版本,不再需要修改。 nginx1.10 以下还需要修改一下内容:
vim http/ngx_http_special_response.c
改:[root@cs03 src]# vim http/ngx_http_special_response.c 36 "<hr><center>nginx</center>" CRLF为:
36 "<hr><center>cory</center>" CRLF -
编译安装启动nginx
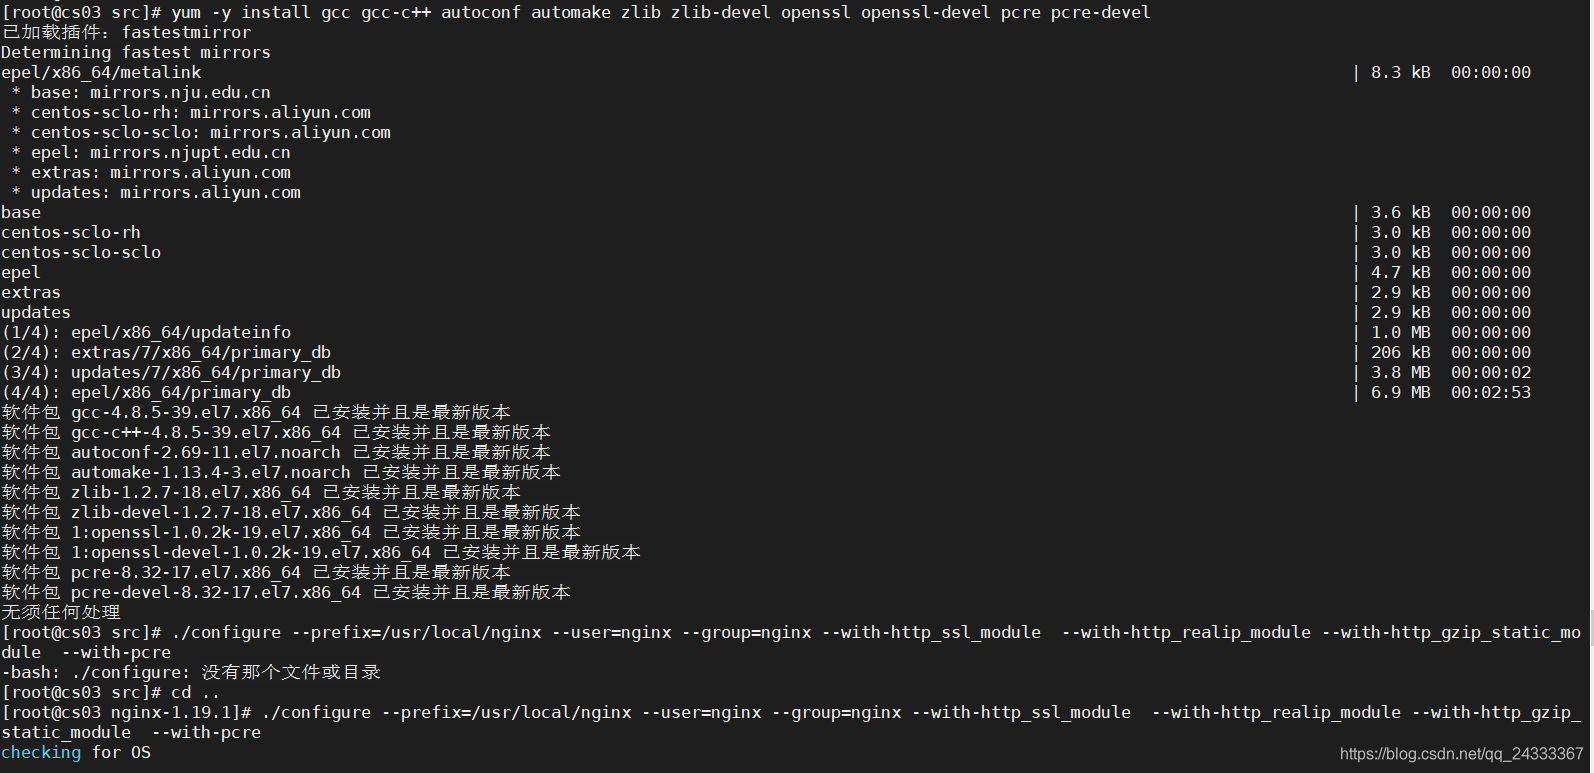
参数如下:
gcc: c语言编译器
gcc-c++: c++语言编译器
autoconf automake: 用于 configure 和 make 编译的工具
zlib : nginx提供gzip模块,需要zlib库支持 。
openssl: nginx提供ssl功能 。
pcre: 支持地址重写 rewrite 功能注:&&表示上一个命令执行成功后,再执行后面的命令。
参数说明:
–with-http_dav_module :
启用支持(增加PUT,DELETE,MKCOL:创建集合,COPY和MOVE方法)。默认关闭,需要编译开启
–with-http_stub_status_module:
启用支持(获取Nginx上次启动以来的工作状态)
–with-http_addition_module:
启用支持(作为一个输出过滤器,支持不完全缓冲,分部分相应请求)。
–with-http_sub_module:
启用支持(允许一些其他文本替换Nginx相应中的一些文本)。
–with-http_flv_module:
启用支持(提供支持flv视频文件支持)。
–with-http_mp4_module:
启用支持(提供支持mp4视频文件支持,提供伪流媒体服务端支持)。
–with-pcre:
#需要注意,这里指的是源码,用#./configure–help|greppcre查看帮助。
注意:必须创建一个 nginx 用户用于后期启动 nginx 进程使用,比你直接使用 root 用户启动 nginx 更安全[root@cs03 nginx-1.19.1]# useradd -s /sbin/nologin -M nginx [root@cs03 nginx-1.19.1]# /usr/local/nginx/sbin/nginx [root@cs03 nginx-1.19.1]# netstat -ntlp Active Internet connections (only servers) Proto Recv-Q Send-Q Local Address Foreign Address State PID/Program name tcp 0 0 127.0.0.1:25 0.0.0.0:* LISTEN 1545/master tcp 0 0 0.0.0.0:3306 0.0.0.0:* LISTEN 1440/mysqld tcp 0 0 0.0.0.0:6379 0.0.0.0:* LISTEN 2008/redis-server * tcp 0 0 0.0.0.0:80 0.0.0.0:* LISTEN 5379/nginx: master tcp 0 0 0.0.0.0:22 0.0.0.0:* LISTEN 1070/sshd tcp6 0 0 ::1:25 :::* LISTEN 1545/master tcp6 0 0 :::6379 :::* LISTEN 2008/redis-server * tcp6 0 0 :::22 :::* LISTEN 1070/sshd [root@cs03 nginx-1.19.1]# -
测试配置是否生效
[root@cs03 nginx-1.19.1]# curl -I http://127.0.0.1
HTTP/1.1 200 OK
Server: cory/6.6.6
Date: Mon, 10 Aug 2020 11:17:07 GMT
Content-Type: text/html
Content-Length: 612
Last-Modified: Mon, 10 Aug 2020 11:07:16 GMT
Connection: keep-alive
ETag: "5f312a64-264"
Accept-Ranges: bytes

[root@cs03 nginx-1.19.1]# curl -I http://127.0.0.1/1.html
HTTP/1.1 404 Not Found
Server: cory/6.6.6
Date: Mon, 10 Aug 2020 11:17:23 GMT
Content-Type: text/html
Content-Length: 151
Connection: keep-alive

[root@cs03 nginx-1.19.1]#
2. 修改Nginx运行用户-设置Nginx的cpu亲和力
-
修改Nginx启动用户,并重启nginx服务:
vim /usr/local/nginx/conf/
改:
2 #user nobody;
为:
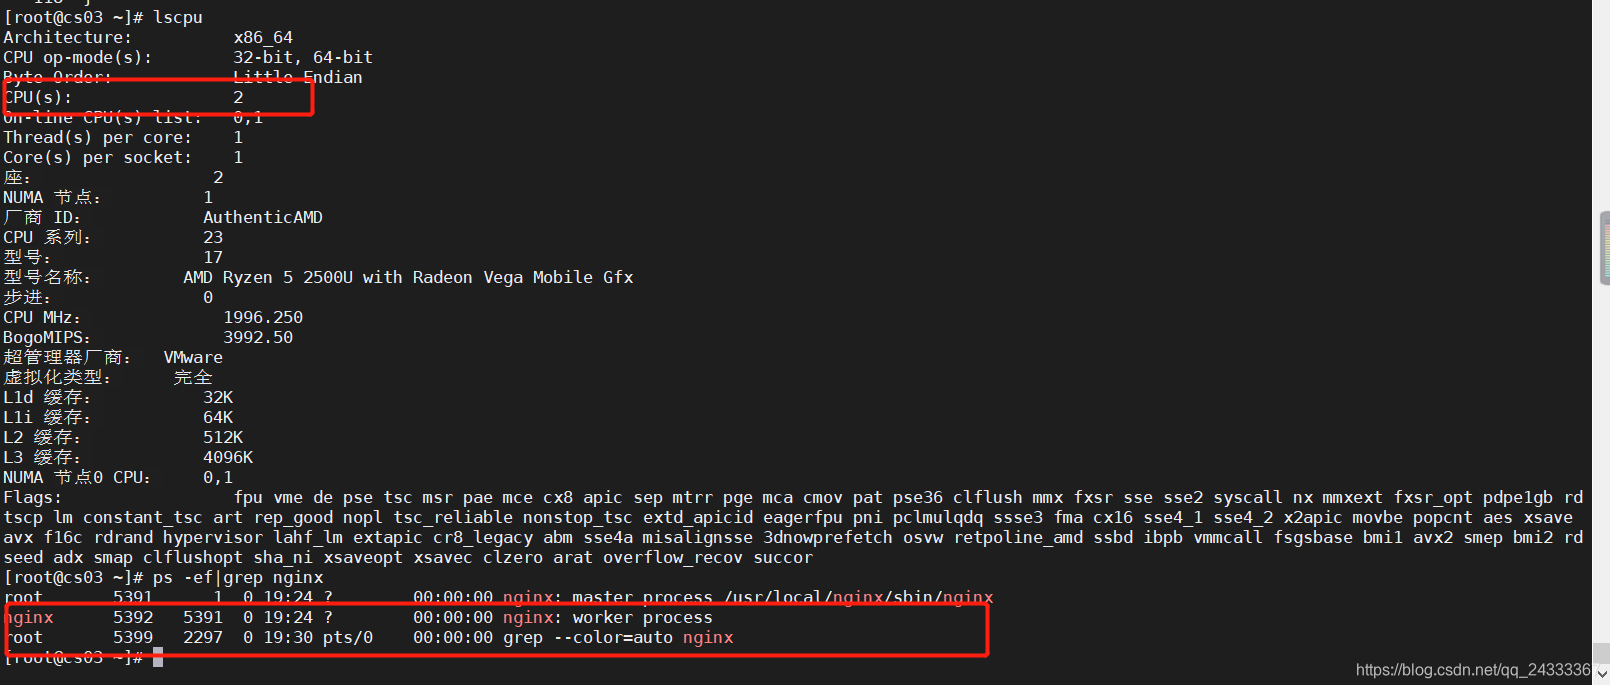
2 user nginx;[root@cs03 ~]# /usr/local/nginx/sbin/nginx -s stop [root@cs03 ~]# vim /usr/local/nginx/conf/ fastcgi.conf fastcgi_params.default mime.types nginx.conf.default uwsgi_params fastcgi.conf.default koi-utf mime.types.default scgi_params uwsgi_params.default fastcgi_params koi-win nginx.conf scgi_params.default win-utf [root@cs03 ~]# cp /usr/local/nginx/conf/nginx.conf /usr/local/nginx/conf/nginx.conf.bak [root@cs03 ~]# vim /usr/local/nginx/conf/nginx.conf [root@cs03 ~]# /usr/local/nginx/sbin/nginx [root@cs03 ~]# ps -ef|grep nginx root 5391 1 0 19:24 ? 00:00:00 nginx: master process /usr/local/nginx/sbin/nginx nginx 5392 5391 0 19:24 ? 00:00:00 nginx: worker process root 5394 2297 0 19:24 pts/0 00:00:00 grep --color=auto nginx [root@cs03 ~]#注:以 root 运行的进程是 nginx 主进程 master process 是管理
nginx 的 worker 进程的。这个是以 nginx 身份运行的 worker process 是 nginx 的 工作进程 work 进 程才是为用户提供服务的
-
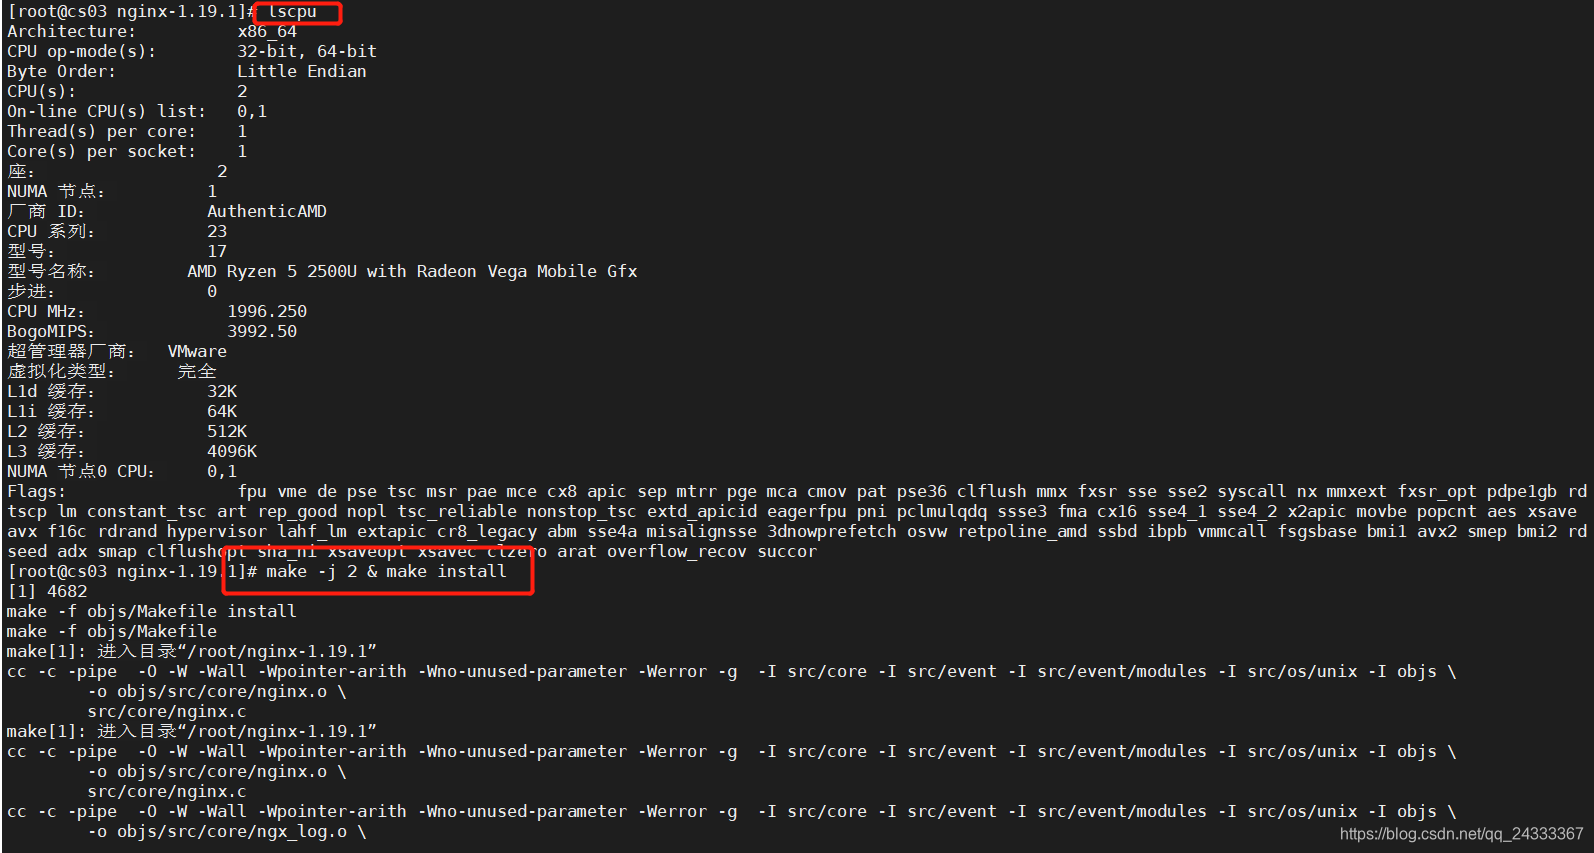
设置Nginx进程的个数,Nginx 运行的进程个数一般设置为CPU的核心数或者核心树的两倍
2.1 查看CPU,一个Nginx进程
2.2 修改nginx.conf,重启nginx,并查看nginx管理进程与work进程的父子关系改:3 worker_processes 1;
为:3 worker_processes 4;


-
cpu亲和力,就是把nginx每个进程绑定到Cpu上,从而减少cpu上下文的切换导致额外的开销
[root@cs03 ~]# vim /usr/local/nginx/conf/nginx.conf比如2c/2线程,配置如下:
3 worker_processes 4;
4 worker_cpu_affinity 0001 00108C/8线程,配置如下,以此类推
3 worker_processes 8;
4 worker_cpu_affinity 00000001 00000010 00000100 00001000 00010000 00100000 01000000 10000000; -
测试cpu亲和力:
没有配置cpu亲和力:
通过 pstree 可以看到 nginx master 进程和 worker 进程是父子关系
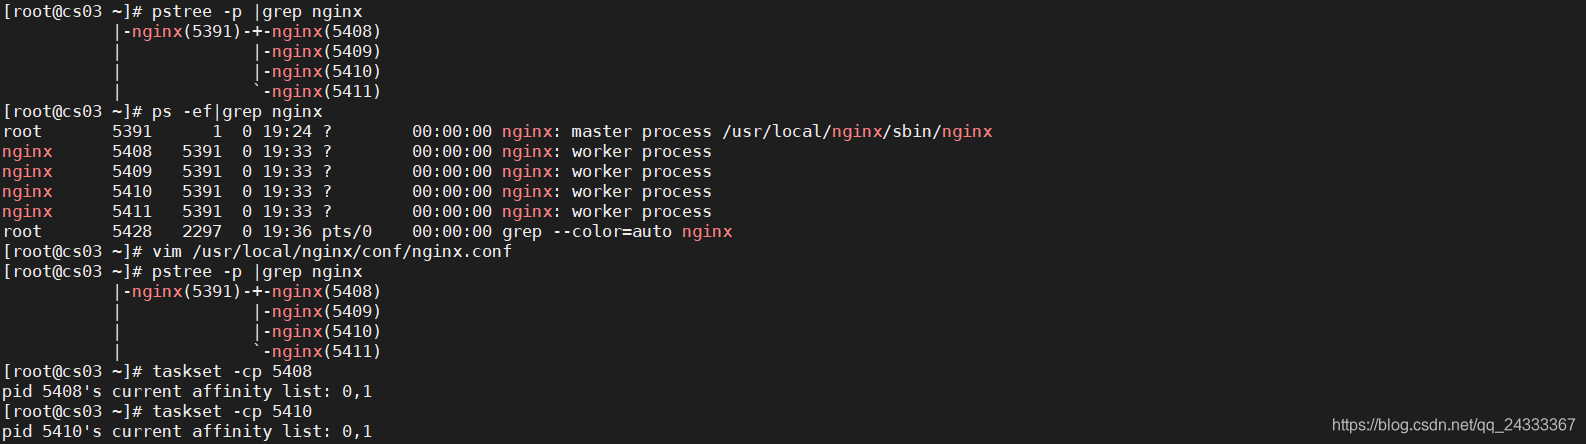
配置完cpu亲和力:

pid 5453’s current affinity list: 0
表示 nginx PID 5453,只能在第一个 cpu 运行pid 5454’s current affinity list: 1
表示 nginx PID 5454,只能在第二个 cpu 运行
3.设置Nginx每个进程最多可以打开的文件数以及事件的处理模
-
Nginx最多可以打开的文件个数:
[root@cs03 ~]# vim /usr/local/nginx/conf/nginx.conf
4 worker_cpu_affinity 0001 0010;
#在第四行下,添加以下内容
5 worker_rlimit_nofile 102400;这个指令是指当一个Nginx进程打开的最多文件描述符数目,理论值应该是最多打开文件数(ulimit -n)与nginx进程数相除,即(ulimit - n)/worker_processes,但是nginx分配请求并不是那么
均匀,所以最好与ulimit -n的值保持一致。2.Nginx事物处理模型:
添加 use epoll 这一行
[root@cs03 ~]# vim /usr/local/nginx/conf/nginx.conf
 13 events {
 14     use epoll;
 15     worker_connections  1024;
 16 }
 17
3.Nginx事物处理模型对比:
epoll 优势:
-
Epoll 没有最大并发连接的限制,上限是最大可以打开文件的数目,这个数字一般远大于 2048,
一般来说这个数目和系统内存关系很大,具体数目可以 cat /proc/sys/fs/file max 察看。[root@cs03 ~]# cat //proc/sys/fs/file-max 282538 [root@cs03 ~]# -
. 效率提升, Epoll 最大的优点就在于它只管你“活跃”的连接,而跟连接总数无关,因此在实际的网络环境中, Epoll
的效率就会远远高于 select 和 poll 。 -
Epoll 在这点上使用了“共享内存”, 更省内存,效率更高。
-
单个进程允许客户端最大并发连接
修改worker_connections 连接数量,
worker_connections:这个属性是指单个工作进程可以允许同时建立外部连接的数量。无论这个连接是外部主动建立的,还是内部建立的。 一个工作进程建立一个连接后,进程将打开一个文件副本。 所以这个数量还受限于操作系统ulimit -n 设定的值和 nginx 的 worker_connections 的值。一般情况下系统 ulimit -n 、 worker_rlimit_nofile ,worker_connections 三者的值是一样的。
nginx服务器实际最大并发值就是 worker_processes * worker_connections 的乘积[root@cs03 ~]# vim /usr/local/nginx/conf/nginx.conf 13 events { 14 use epoll; 15 worker_connections 1024; 16 } 13 events { 14 use epoll; 15 worker_connections 102400; 16 }Top - u Nginx查看Nginx的负载,每个进程使用的内存大小

4.ServerName和 Location匹配及高效传输模式
4.1 ServerName 匹配
- 精确匹配: www.aa.com
- 左侧通配符匹配: *.aa.com
- 右侧通配符匹配: www.*
- 正则表达式匹配: ~ ^.*.aa.com$
- default server
- 服务IP地址
对应需要修改的配置文件的位置是40行和46行
 37     server {
 38         listen       80;
 39         server_name  localhost;
 40
 41         #charset koi8-r;
 42
 43         #access_log  logs/host.access.log  main;
 44
 45         location / {
 46             root   html;
 47             index  index.html index.htm;
 48         }
4.2:修改Servername 测试,利用nginx命令检测文件是否正常,reload重新加载配置文件
[root@cs03 ~]# vim /usr/local/nginx/conf/nginx.conf

 37     server {
 38         listen       80;
 39         server_name  localhost;

 37     server {
 38         listen       80;
 39         server_name  cory.com;

[root@cs03 ~]# /usr/local/nginx/sbin/nginx -t
nginx: the configuration file /usr/local/nginx/conf/nginx.conf syntax is ok
nginx: configuration file /usr/local/nginx/conf/nginx.conf test is successful
[root@cs03 ~]# vim /usr/local/nginx/conf/nginx.conf
[root@cs03 ~]# /usr/local/nginx/sbin/nginx -s reload
4.3 location 匹配,如下:
- = 绝对匹配 。
- ^~ URL 前半部分匹配,不检查正则
- ~ 则匹配,区分大小写正则匹配,区分大小写
- ~* 正正则匹配,则匹配,不区分大小写不区分大小写
- \ 转义转义
- $ 以什么结尾以什么结尾
-
例如:
-
.php$ 表示 url 中以 .php 结尾的文件且区分大小写,都
按 { } 中的方法进行处理#location ~ \.php$ { # proxy_pass http://127.0.0.1; #}
4.4 开启高效传输模式
Include mime.types 媒体类型
default_type application/octetstream: 默认媒体类型 足够
sendfile on 开启高效文件传输模式,sendfile 指令指定 nginx 是否调用sendfile函数来输出文件,对于普通应用设为 on ,如果用来进行下载等应用磁盘 IO 重负载应用,可设置为 off,以平衡磁盘与网络 I/O 处理速度,降低系统的负载。注意:如果图片显示不正常把这个改成 off
tcp_nopush on 必须在 sendfile 开启模式才有效,防止网络阻塞,积极的减少网络报文段的数量
 19 http {
 20     include       mime.types;
 21     default_type  application/octet-stream;
 22
 23     #log_format  main  '$remote_addr - $remote_user [$time_local] "$request" '
 24     #                  '$status $body_bytes_sent "$http_referer" '
 25     #                  '"$http_user_agent" "$http_x_forwarded_for"';
 26
 27     #access_log  logs/access.log  main;
 28
 29     sendfile        on;
 30     tcp_nopush     on;
 31
4.5 连接超时时间,
 32     #keepalive_timeout  0;
 33     keepalive_timeout  65;
 34     tcp_nodelay on
 35     client_header_timeout 15
 36     client_body_timeout 15
 37     send_timeout 15
 38     #gzip  on;
主要目的是保护服务器资源,
CPU ,内存,控制连接数,因为建立连接也是需要消耗资源的 TCP 的
三次握手四次挥手等,我们一般断掉的是那些建立连接但是不做事儿,也就是我建立了链接开始,但是后续的握手过程没有 进行,那么我们的链接处于等待状态的,全部断掉!同时我们也希望php 建议短链接,消耗资源少 。
keepalived_timeout:
客户端连接保持会话超时时间,超过这个时间,服务器断开这个链接
tcp_nodelay:
也是防止网络阻塞,不过要包涵在 keepalived 参数才有效
client_header_timeout:
客户端请求头读取超时时间,如果超过设个时间没有发送任何数据, nginx将返回 request time out 的错误
client_body_timeout:
客户端求主体超时时间,超过这个时间没有发送任何数据,和上面一样的错误提示send_timeout响应客户端超时时间,这个超时时间仅限于两个活动之间的时间,如果超过这个时间,客户端没有任何活动, nginx 关闭连接
4.6 文件上传大小限制,0m代表不限制大小:
在http中添加 client_max_body_size 0m;
19 http {
20 include mime.types;
21 default_type application/octet-stream;
22 client_max_body_size 0m;
5.Fastcgi 调优 gzip 压缩网页调优 expires 缓存调优
5.1:Fasticgi相关概念:
- Fastcgi相关的个概念如下:
- Cache:写入缓存区
- Buffer:读取缓存区
- Fastcgi:是静态服务和动态服务的一个接口
- fastcgi_connect_timeout 300 :指定链接到后端 FastCGI 的超时时间。
- fastcgi_send_timeout 300: 向 FastCGI 传送请求的超时时间,这个值 是指已经完成两次握手后向
FastCGI 传送请求的超时时间。 - fastcgi_read_timeout 300: 指定接收 FastCGI 应答的超时时间,这个值是指已经完成两次握手后接收FastCGI 应答的超时时间。
- fastcgi_buffer_size 64k: 指定读取 FastCGI 应答第一部分需要用多大的缓冲区,这个值表示将使用 1 个 64KB 的缓冲区读取应答的第一部分(应答头),可以设置为 gastcgi_buffers 选项指定的缓
冲区大小。 - fastcgi_buffers 464 k :指定本地需要用多少和多大的缓冲区来缓冲 FastCGI 的应答请求,如果一个 php脚本所产生的页面大小为 256KB ,那么会分配 4 个 64KB 的缓冲区来缓存,如果页面大小大于 256KB ,那么大于 256KB的部分会缓存到 fastcgi_temp 指定的路径中,但是这并不是好方法,因为内存中的数据处理速度要快于磁盘。一般这个值应该为站点中php 脚本所产生的页面大小的中间值,如果站 点大部分脚本所产生的页面大小为 256KB ,那么可以把这个值设置为 “8 、 “4 等。
- fastcgi_busy_buffers_ size 128 k: 建议设置为 fastcgi_buffer 的两倍,繁忙时候的buffer 。
- fastcgi_temp_file_write_size 128 k :在写入fastcgi_temp_path 时将用多大的数据库,默认值是 fastcgi_buffers 的两倍,设置上述数值设置小时若负载上来时可能报 502Bad Gateway 。
- fastcgi_cache ngnix :表示开启 FastCGI 缓存并为其指定一个名称。开启缓存非常有用,可以有效降低 CPU的负载,并且防止 502 的错误 发 生,但是开启 缓存也可能会引起其他问题,要很据具体情况选择 。
- fastcgi_cache_valid 200 302 1h :用来指定应答代码的缓存时间,实例中的值表示将 2000 和 302应答缓存一小时,要和 fastcgi_cache 配合使用
- fastcgi_cache_valid 301 1d: 将 301 应答缓存一天
- fastcgi_cache_valid any 1m: 将其他应答缓存为 1 分钟 。
- fastcgi_cache_min_uses 1: 请求的数量
- fastcgi_cache_path 定义缓存的路径 。
5.2 修改Nginx.conf ,在http标签中添加一下内容:
[root@cs03 ~]# vim /usr/local/nginx/conf/nginx.conf
fastcgi_connect_timeout 300
fastcgi_send_timeout 300
fastcgi_read_timeout 300
fastcgi_buffer_size 64 k
fastcgi_buffers 4 64 k
fastcgi_busy_buffers_size 128 k
fastcgi_temp_file_write_size 128 k
#fastcgi_temp_path /data/ngx_fcgi_
fastcgi_cache_path data ngx_fcgi_cache levels 2 2 缓存路径, levels 目录层次级 。
keys_zone ngx_fcgi_cache 512 m # 定义了一个存 储区域名字,缓存大小 。
inactive=1d max_size=40g; # 不活动的数据在缓存中多长时间,目录总大小 。
5.3 在server location 标签添加如下:
location php php5
fastcgi_pass 127 0 0 1 9000
fastcgi_index index.php
include fastcgi.conf
fastcgi_cache ngx_fcgi_cache
fastcgi_cache_valid 200 302 1 h
fastcgi_cache_valid 301 1 d
fastcgi_cache_valid any 1 m
fastcgi_cache_min_uses 1
fastcgi_cache_use_stale error timeout invalid_header http_500
fastcgi_cache_key http ://://$host$request_uri
5.4 gzip 压缩网页调优 gzip 调优
使用gzip 压缩功能,可能为我们节约带宽,加快传输速度,有更好的体验,也为我们节约成本,所以说这是一个重点 。Nginx启用压缩功能需要你来 ngx_http_gzip_module 模块, apache 使用的是 mod_deflate一般我们需要压缩的内容有:文本,js html css ,对于图片,视频flash 什么的不压缩,同时也要注意,我们使用 gzip 的功能是需要消耗 CPU 的!
- gzip on: #开启压缩功能。
- gzip_min_length 1k;
#设置允许压缩的页面最小字节数,页面字节数从header头的Content-Length(内容长度)中获取,默认值是0,不管页面多大都进行压缩,建议设置成大于1K,如果小与1K可能会越压越大。 - gzip_buffers 4 32k;
#压缩缓冲区大小,表示申请4个单位为32K的内存作为压缩结果流缓存,默认值是申请与原始数据大小相同的内存空间来存储gzip压缩结果。 - gzip_http_version 1.1;
#压缩版本(默认1.1,前端为squid2.5时使用1.0)用于设置识别HTTP协议版本,默认是1.1,目前大部分浏览器已经支持GZIP解压,使用默认即可。 - gzip_comp_level 9;
#压缩比例,用来指定GZIP压缩比,1压缩比最小,处理速度最快,9压缩比最大,传输速度快,但是处理慢,也比较消耗CPU资源。 - gzip_types text/css text/xml application/javascript;
#用来指定压缩的类型,‘text/html’类型总是会被压缩。 - gzip_vary on; #vary
header支持,该选项可以让前端的缓存服务器缓存经过GZIP压缩的页面,例如用Squid缓存经过nginx压缩的数据。 - 日志切割优化目录文件访问控制-来源访问控制
- 禁止使用 IP 访问网站和优化 防盗链 错误页面的提示 开启认证功能
那么配置压缩的过程中,会有一下参数
改:41 #gzip on;
为:41 gzip on; #并在下一行添加如下。
gzip_min_length 1k;
gzip_buffers 4 32k;
gzip_http_version 1.1;
gzip_comp_level 9;
gzip_types text/css text/xml application/javascript;
gzip_vary on;
5.5 expires 缓存调优
缓存,主要针对于图片,css js 等元素更改机会比较少的情况下使用,特别是图片,占用带宽大,我们完全可以设置图片在浏览器本地缓存 365d css js html 可以缓存个 10 来天,这样用户第一次打开加载慢一点,第二次,就非常快了!缓存的时候,我们需要将需要缓存的拓展名列出来!
Expires缓存配置在 server 字段里面
location ~ .*\.(gif|jpg|jpeg|png|bmp|swf)$
{
    expires 365d;

}
location ~ .*\.(js|css)?$
{
  expires 30d;
}
同时也可以对目录及其进行判断:
location ~ ^/(images|javascript|js|css|flash|media|static)/
{
	   expires 360d;
}
location ~(robots.txt)
{
	expires 7d;
	break;
}
expire功能优点
- expires 可以降低网站购买的带宽,节约成本
- 同时提升用户访问体验减轻服务的压力
- 节约服务器成本,甚至可以节约人力成本,是 web 服务非常重要的功能
expire功能缺点:
- 被缓存的页面或数据更新了,用户看到的可能还是旧的内容,反而影响用户体验
解决办法:
第一个: 缩短缓存时间,例如: 1 天,不彻底,除非更新频率大于 1 天
第二个:对缓存的对象改名 。
a.图片,附件一般不会被用户修改,如果用户修改了,实际上也是更改文件名重新传了而已 。
b.网站升级对于 js css 元素,一般可以改名,把 css js ,推送到 CDN - 网站不希望被缓存的内容
1.广告图片
2.网站流量统计工具
3.更新频繁的文件 google 的 logo
6.日志切割优化 目录文件访问控制 来源访问控制
6.1日志切割优化:
[root@cs03 ~]# cd /usr/local/nginx/logs/
日志优化的目的,是为了一天日志一压缩,按天存放,超过
10 天的删除 。
[root@cs03 logs]# vim cut_nginx_log.sh

#!/bin/bash
date=$(date +%F -d -1day)
cd /usr/local/nginx/logs
if [ ! -d cut ] ; then
mkdir cut
fi
mv access.log cut/access_$(date +%F -d -1day).log
mv error.log cut/error_$(date +%F -d -1day).log
/usr/local/nginx/sbin/nginx -s reload
tar -jcvf cut/$date.tar.bz2 cut/*
rm -rf cut/access* && rm -rf cut/error*
cat >>/var/spool/cron/root<<eof
00 00 * * * /bin/sh /usr/local/nginx/logs/cut_nginx_log.sh >/dev/null 2>&1
eof
find -type f -mtime +10 | xargs rm -rf
~
健康检查的日志,不用输入到log 中,因为这些日志没有意义,我们分析的话只需要分析访问日志,看看一些页面链接,如 200 301 404 的状态吗,在 SEO 中很重要,而且我们统计 PV 是页面计算,这些都没有意义,反而消耗了磁盘 IO ,降低了服务器性能,我们可以屏蔽这些如图片 js css 这些不宜变化的内容 。
[root@xuegod63 ~]# vim /usr/local/nginx/conf/nginx.conf
location ~ .*\.(js|jpg|jpeg|JPG|JPEG|css|bmp|gif|GIF)$
 {
 access_log off;
 }
6.2 日志目录权限优化
[root@xuegod63 logs ]# chown R root.root /usr/local/nginx/logs/
[root@xuegod63 logs ]# chmod R 777 /usr/local/nginx/logs/
6.3: 目录文件访问控制
主要用在禁止目录下指定文件被访问,当然也可以禁止所有文件被访问!一般什么情况下用?比如是有存储共享,这些文件本来都只是一些下载资源文件,那么这些资源文件就不允许被执行,如 sh,py,pl,php
等等 。
例如:禁止访问images 下面的 php 程序文件
[root@xuegod63 ~]# vim /usr/local/nginx/conf/nginx.conf
在 location / { 下添加
location ~ ^/images/.*.(php|php5|.sh|.py|.pl)$ {
deny all;
}
[root@cs03 images]# /usr/local/nginx/sbin/nginx -s reload
[root@cs03 images]# curl -I http://127.0.0.1/images/index.php
HTTP/1.1 403 Forbidden
Server: cory/6.6.6
Date: Tue, 11 Aug 2020 09:10:36 GMT
Content-Type: text/html
Content-Length: 151
Connection: keep-alive

[root@cs03 images]# curl -I http://127.0.0.1/images/index.php
6.4多目录组合配置方法
location ~ ^/images/(attachment|avatar)/.*.(php|php5|.sh|.py|.py)$
{
deny all;
}
配置nginx 禁止访问 *.txt 文件
未配置规则访问如下:
[root@cs03 html]# echo "Test" > index.html
[root@cs03 html]# /usr/local/nginx/sbin/nginx -s reload
[root@cs03 html]# curl -I http://127.0.0.1
HTTP/1.1 200 OK
Server: cory/6.6.6
Date: Tue, 11 Aug 2020 09:31:23 GMT
Content-Type: text/html
Content-Length: 5
Last-Modified: Tue, 11 Aug 2020 09:31:08 GMT
Connection: keep-alive
ETag: "5f32655c-5"
Accept-Ranges: bytes

[root@cs03 html]#
配置规则,禁止访问:
    57          location ~* \.(txt|doc)$ {
    58               if ( -f $request_filename){
    59                   root /usr/local/nginx/html;
    60              break;
    61              }
    62              deny all;
    63           }
测试结果如下:
[root@cs03 html]# echo "Test" > 1.txt
[root@cs03 html]# /usr/local/nginx/sbin/nginx -s reload
[root@cs03 html]#  curl -I http://192.168.88.132/1.txt
HTTP/1.1 403 Forbidden
Server: cory/6.6.6
Date: Tue, 11 Aug 2020 09:55:29 GMT
Content-Type: text/html
Content-Length: 151
Connection: keep-alive

[root@cs03 html]#
当然,可以重定向到某一个URL
location ~* \.(txt|doc)$ {
       if ( -f $request_filename) {
           root /usr/local/nginx/html;
           rewrite ^/(.*)$ http://www.baidu.com last;
           break;
            }
6.5对目录进行限制的方法:
[root@cs03 html]# mkdir -p {cs01,cs02}
[root@cs03 html]# ll
总用量 8
-rw-r--r-- 1 root root   5 8月  11 17:55 1.txt
-rw-r--r-- 1 root root 494 8月  10 19:07 50x.html
drwxr-xr-x 2 root root   6 8月  11 18:01 cs01
drwxr-xr-x 2 root root   6 8月  11 18:01 cs02
drwxr-xr-x 2 root root  23 8月  11 17:10 images
-rw-r--r-- 1 root root   0 8月  11 17:31 index.html
[root@cs03 html]# echo "cs01" > cs01/index.html
[root@cs03 html]# echo "cs02" > cs02/index.html
[root@cs03 html]#
不配置权限进行目录访问:
[root@cs03 ~]# curl   http://192.168.88.132/cs02/
cs02
[root@cs03 ~]# curl   http://192.168.88.132/cs01/
cs01
[root@cs03 ~]#
配置权限,然后进行访问
[root@cs03 ~]# vim /usr/local/nginx/conf/nginx.conf
 52         location /cs01/ {
 53           return 404;
 54         }
 55         location /cs02/ {
 56            return 403;
 57         }
 58

上面是直接给了反馈的状态吗,也可以哦他能够过匹配deny all方式去做:
 55         location ~ ^/(cs02) {
 56            deny all;
 57         }
[root@cs03 ~]# curl http://192.168.88.132/cs02/
403 Forbidden
来源访问控制:
下面是针对整个网站的写法,对/限制就 OK
[root@cs03 ~]# vim /usr/local/nginx/conf/nginx.conf
 48         location / {
 49             root   html;
 50             index  index.html index.htm;
 51             allow 192.168.88.0/24;
 52             deny all;
 53         }
当然可以写IP ,可以写 IPduan ,但是注意次序,上下匹配 。同时,也可以通过if 语句控制,给以友好的错误提示 。
[root@xuegod63 ~]# vim /usr/local/nginx/conf/nginx.conf
location ~ ^/(cs02)/ {
if ( $remote_addr = 192.168.88.133 )
{
return 404;
}
使用client Ip: curl -v “http://192.168.88.132/cs02/index.html”

7.禁止使用 IP 访问网站和 301 优化 防盗链 错误页面的提示开启认证功能
禁止使用 IP 访问网站 和 301 优化有时候,我们发现访问网站的时候,使用IP 也是可以得,我们可以把这一层给屏蔽掉,让其直接反馈给 403, 也可以做跳转 。
跳转的做法:
 40     server {
 41         listen       80;
 42         server_name  cory.com;
 43         rewrite ^ http://www.baidu.com$request_uri?;
403反馈的做法:
 40     server {
 41         listen       80;
 42         server_name  cory.com;
 43         #rewrite ^ http://www.baidu.com$request_uri?;
 44         #charset koi8-r;
 45         return 403;
301跳转的做法,如我们域名一般在解析的过程中, a.com 一般会跳转到 www.a.com
server {
   listen 80;
   root /usr/share/nginx/html/;
   server_name www.a.com a.com;
    if ($host = 'a.com' ) {
         rewrite ^/(.*)$ http://www.a.com/$1 permanent;
     }
防盗链
防止别人直接从你网站引用图片等链接,消耗了你的资源和网络流量,那么我们的解决办法由几种:
1 :水印,品牌宣传,你的带宽,服务器足够
2 :防火墙,直接控制,前提是你知道 IP 来源
3 :防盗链策略
下面的方法是直接给予404 的错误提示
location ~\ (jpg|gif|png|swf|flv|wma|wmv|asf|mp3|mmf|zip|rar) ${
     valid_referers none blocked  *a.com a.com;
      if($invalid_referer){
         return 404;
      }
}
同时,我们也可以设置一个独有的,图片比较小的,来做
rewrite 跳转
location ~\ (jpg|gif|png|swf|flv|wma|wmv|asf|mp3|mmf|zip|rar) ${
     valid_referers none blocked  *a.com a.com;
      if($invalid_referer){
         rewrite ^/ http://www.a.com/img/nolink.png
      }
}
错误页面的提示,对于自定义的错误页面,我们只需要将。errorpage 写入到配置文件 。
error_page 404 /404.html;
开启认证功能,需要使用httpd-tools :

[root@cs03 ~]# htpasswd -cb /usr/local/nginx/conf/passwd aaa 123
Adding password for user aaa
[root@cs03 ~]# chmod 400 /usr/local/nginx/conf/passwd
[root@cs03 ~]# chown nginx /usr/local/nginx/conf/passwd
[root@cs03 ~]# /usr/local/nginx/sbin/nginx -s reload
再次访问Nginx时需要输入账号密码:

防止DDOS攻击:
通过使用limit_conn_zone 进行控制单个 IP 或者域名的访问次数
[root@cs03 conf]# vim nginx.conf
在http段中加:
limit_conn_zone $binary_remote_addr zone=addr:10m;
 19 http {
 20     include       mime.types;
 21     default_type  application/octet-stream;
 22     client_max_body_size 0m;
 26     limit_conn_zone $binary_remote_addr zone=addr:10m;
Server段中location 配置limit_conn addr 1
 40     server {
 41         listen       80;
 42         server_name  cory.com;
 43         #rewrite ^ http://www.baidu.com$request_uri?;
 44         #charset koi8-r;
 45         #return 403;
 46         #access_log  logs/host.access.log  main;
 47         location / {
 48             root   html;
 49             index  index.html index.htm;
 50             limit_conn addr 1;


location匹配命令:可参考https://www.jianshu.com/p/973ea153ccb9
~ #波浪线表示执行一个正则匹配,区分大小写
~* #表示执行一个正则匹配,不区分大小写
^~ #^~表示普通字符匹配,如果该选项匹配,只匹配该选项,不匹配别的选项,一般用来匹配目录
= #进行普通字符精确匹配
@ #"@" 定义一个命名的 location,使用在内部定向时,例如 error_page, try_files


 1406
1406


 被折叠的 条评论
为什么被折叠?
被折叠的 条评论
为什么被折叠?
 到【灌水乐园】发言


