1.安装
npm install handsontable @handsontable/vue
2.引入css,
方式1
在app.vue中引入
<style src="../node_modules/handsontable/dist/handsontable.full.css"></style>
方式2
在main.js中引入
import 'handsontable/dist/handsontable.full.css';
方式3
在vue组件中引入
<style> @import '~handsontable/dist/handsontable.full.css'; </style>
3.添加License key,去掉提示文字
<hot-table :settings="settings" licenseKey="non-commercial-and-evaluation" />
<script>
  import {HotTable} from '@handsontable/vue';
  import Handsontable from 'handsontable';

  export default {
    name: 'HelloWorld',
    data() {
      return {
        hotSettings: {
          data: Handsontable.helper.createSpreadsheetData(6, 10),
          colHeaders: true,
          colHeaders: true,
        }
      }
    },
   components: {
     HotTable
   }

  }
</script>
4.传递数据方式
方式1:
<hot-table :settings="hotSettings" />
setting:子组件接收数据属性

方式2:
<hot-table
      :settings="hotSettings"
      licenseKey="non-commercial-and-evaluation"
      :data="tableData"
      style="height:300px;overflow:auto;"
    >
    </hot-table>


<script>
  data() {
    return {
      hotSettings: {
        tableClassName: ['table01', 'htCenter'],
        stretchH: 'all',
        preventOverflow: 'vertical', //防止水平溢出表
           },
        data:''//你的对象数组或者二维数组,可以使用计算属性给其赋值等
         }
      },
</script>
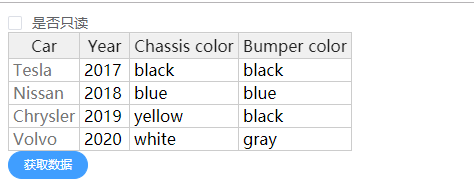
5.设置行.列表头显示
//默认行列头部
colHeaders: true,rowHeaders: true,

 //自定义行列头部
colHeaders: ['Car', 'Year', 'Chassis color', 'Bumper color'],

//对象数组头部设置
dataSchema: {//预定义对象属性
          car: null,
          year: null,
          chassisColor: null,
          bumperColor: null
        },
        colHeaders: ['Car', 'Year', 'Chassis color', 'Bumper color'],//也可以为汉字
        columns: [//对象属性与预定义属性对应
          { data: 'car', readOnly: true },
          { data: 'year', readOnly: true },
          { data: 'chassisColor', readOnly: true },
          { data: 'bumperColor', readOnly: true }
        ]
6.创建多种数据初始化列表 方法
createEmptySpreadsheetData(rows: number, columns: number): any[],
createObjectPropListener(defaultValue?: any, propertyToListen?: string): object,
createSpreadsheetData(rows?: number, columns?: number): any[],
createSpreadsheetObjectData(rows?: number, colCount?: number): any[],
使用
import Handsontable from 'handsontable';
data: Handsontable.helper.createEmptySpreadsheetData(10, 10),7.设置表格最大行数和列数
maxCols:10, maxRows:10,8.右键菜单
开启右键菜单
contextMenu:true,

自定义右键菜单
 contextMenu:['row_above', 'row_below', 'remove_row']
9.添加新的行(利用方法)
<el-button @click="addNewRow()">添加新的行</el-button>

//添加新的行
addNewRow() {
  const self = this;
  self.hotSettings.data = self.hotSettings.data.concat([[]]);
  self.$refs.hotTableComponent.hotInstance.loadData(self.hotSettings.data);
},
10.切换只读默认
全表只读模式
<el-checkbox v-model="checked" label="是否只读" @change="toggleReadOnly"></el-checkbox>
//只读模式
toggleReadOnly(val) {
  const self = this;
  self.hotSettings.readOnly = val;
}


列只读模式(对象数组)
columns: [
          { data: 'car', readOnly: true },
          { data: 'year', readOnly: true },
          { data: 'chassisColor', readOnly: true },
          { data: 'bumperColor', readOnly: true }
        ]

列只读模式(二维数组)
/...待续.../


单元格只读模式

<el-checkbox v-model="checked" label="是否只读" @change="toggleReadOnly"></el-checkbox>
<HotTable :language="language" :settings="hotSettings" licenseKey="non-commercial-and-evaluation" ref="hotTableComponent">
</HotTable>
调用
toggleReadOnly(val) {
  const self = this;
  // self.hotSettings.readOnly = val;
  let hot = self.$refs.hotTableComponent.hotInstance;
  hot.updateSettings({
    cells: function (row, col) {
      var cellProperties = {};
      if (hot.getData()[row][col] === 'Nissan') {
        cellProperties.readOnly = true;
      }
      return cellProperties;
    }
  })
},
部分列为只读模式
12.语言国际化
引入语言包
import 'handsontable/languages/zh-CN';
使用
<HotTable :language="language" :settings="hotSettings" licenseKey="non-commercial-and-evaluation"
ref="hotTableComponent">
</HotTable>
hotSettings: {
//创建空的数据excel
data: Handsontable.helper.createSpreadsheetData(10, 10),
colHeaders: true,
rowHeaders: true,
//header 内容过长提示
headerTooltips: true,
//添加 License key
licenseKey: 'non-commercial-and-evaluation',
//最大列
maxCols: 10,
//最大行
// maxRows: 10,
//只读模式
readOnly: false,
//启用公式库
formulas: true,
//右键菜单问题
contextMenu: ['row_above', 'row_below', 'remove_row']
},
//语言设置
language: 'zh-CN'
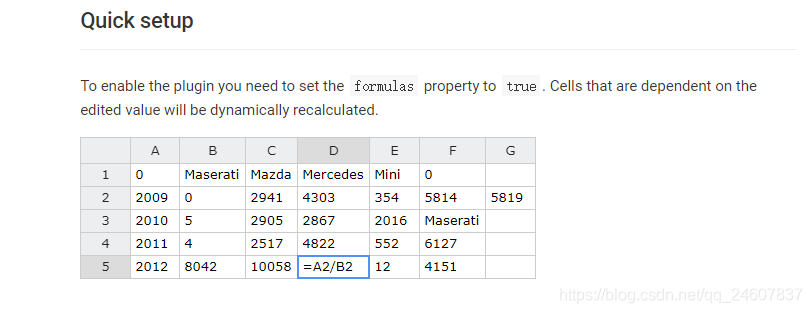
}13.公式的使用
//启用公式库
formulas: true,
/**
 支持的公式:
 任何数字,负数和正数,如浮点数或整数;
 算术运算,如:+,-,/,*,%,^,
 逻辑操作如:AND(),OR(),NOT(),XOR(),
 比较操作,如:=,>,>=,<,<=,<>;
 所有的JavaScript数学常量,如:PI(),E(),LN10(),LN2(),LOG10E(),LOG2E(),SQRT1_2(),SQRT2(),
错误处理:#DIV/0!,#ERROR!,#VALUE!,#REF!,#NAME?,#N/A,#NUM!,
字符串操作如:( &连接eq。=-(2&5)将返回-25);
公式中定义的所有excel 公式 ;
相对和绝对单元格引用,如:A1,$A1,A$1,$A$1,
内建变量,如:TRUE,FALSE,NULL,
自定义变量;
嵌套函数;
动态更新。
**/
公式使用图解
15。设置单元格背景色(通过backgroundclolor,在修改别的单元格的时候,颜色会被迁移和覆盖)
toggleReadOnly(val) {
  const self = this;
  // self.hotSettings.readOnly = val;
  let hot = self.$refs.hotTableComponent.hotInstance;
  hot.updateSettings({

    cells: function (row, col) {
      if (row==0){
        //设置单元格背景色
        let cell = hot.getCell(row, col);
        cell.style.background = "#00FF90";
      }
    }
  });
16.设置行高,列宽
rowHeights,colWidths

以像素为单位定义行高。接受数字,字符串(将转换为数字),数字数组
(如果要分别为每行定义行高)或函数(如果要
在每个渲染上动态设置行高)。(Number Array。<Number> String Array。<String>)
如果启用了插件ManualRowResize或AutoRowSize插件,这也是可
通过这两个插件中的任何一个设置的最小高度。
高度应等于或大于23px。如果高度小于23px,则表格呈现不正确。
默认值:undefined

// as a number, the same for all rows
rowHeights: 100,

// as a string, the same for all row
rowHeights: '100px',

// as an array, based on visual indexes. The rest of the rows have a default height
rowHeights: [100, 120, 90],

// as a function, based on visual indexes
rowHeights: function(index) {
  return index * 10;
},
17.设置文字居中
要使用预定义的水平和垂直对齐方式初始化Handsontable,请以网格columns或cell设置的形式提供className单元格详细信息(请参阅下面的代码示例)。
可用的classNames:
水平:htLeft,htCenter,htRight,htJustify,
垂直:htTop,htMiddle,htBottom。
可以使用afterSetCellMeta钩子回调来跟踪对齐更改
例子:
//整个表格文字设置
className: "htCenter",
单元格文字设置:
  cell: [
    {row: 0, col: 0, className: "htRight"},
    {row: 1, col: 1, className: "htLeft htMiddle"},
    {row: 3, col: 4, className: "htLeft htBottom"}
  ],
18.多表头格式
nestedHeaders: [
  ['A', {label: 'B', colspan: 8}, 'C'],
  ['D', {label: 'E', colspan: 4}, {label: 'F', colspan: 4}, 'G'],
  ['H', 'I', 'J', 'K', 'L', 'M', 'N', 'R', 'S', 'T']
],
19.修改文字改变文字所在单元格的样式
 //修改文字改变改单元格样式
        afterChange: function(changes, source) {
          if (source == 'edit') {
            console.log(changes);
            changes.forEach(([row, prop, oldValue, newValue]) => {
              //this 表示当前的handsontable对象
              let cell = this.getCell(row, prop);
              cell.style.background = 'lavender';
            });
          }
        }
20.监听单元格内容修改事件
mounted() {
  const self = this;
  self.customCellStyle();
  //监听改变单元格内容事件
  Handsontable.hooks.add("afterChange",function (result) {

  })
},
22.单元格渲染
数组

Handsontable.hooks.add("afterChange", function (changes, source) {
  if (source === 'edit') {
    changes.forEach(([row, prop, oldValue, newValue]) => {
      if (newValue !== oldValue && row > 0 && prop < 9) {
        //设置单元格背景色
        const className = this.getCellMeta(row, prop).className;
        //移除之前的表格样式
        if(className && className.lastIndexOf('selected-td') > 0){
          const index = className.indexOf('selected-td');
          this.setCellMeta(row, prop, 'className', className.substring(0, index) + className.substring(index+1, className.length));
        }else{
             //多个样式之间用空格隔开
        this.setCellMeta(row, prop, 'className', this.getCellMeta(row, prop).className + ' selected-td');
        //设置单元格公式
        }


      }
    })
  }
  //渲染表格
  this.render();
})

<style>
//selected-td 的父级必须为.handsontable
.handsontable .selected-td {
  background-color: red;
}
</style>


对象
//设置单元格背景色
Handsontable.hooks.add("afterChange", function (changes, source) {
  if (source === 'edit') {
    changes.forEach(([row, prop, oldValue, newValue]) => {
if(newValue!==oldValue){
          const obj = this.getCellMetaAtRow(row).find(
            v => v.row === row && v.prop === prop
          );
          const className = this.getCellMeta(row, obj.col).className;
          //移除之前的表格样式
          if (className && className.lastIndexOf('selected-td') > 0) {
            const index = className.indexOf('selected-td');
            this.setCellMeta(
              row,
              obj.col,
              'className',
              className.substring(0, index) +
                className.substring(index + 1, className.length)
            );
            //多个样式之间用空格隔开
            this.setCellMeta(
              row,
              obj.col,
              'className',
              this.getCellMeta(row, prop).className + ' selected-td'
            );
          } else {
            //多个样式之间用空格隔开
            this.setCellMeta(
              row,
              obj.col,
              'className',
              this.getCellMeta(row, prop).className + ' selected-td'
            );
          }
})
}
})


 468
468


 被折叠的 条评论
为什么被折叠?
被折叠的 条评论
为什么被折叠?
 到【灌水乐园】发言


