


环境:Windows11
目录:
1、下载OpenJDK12源码
下载地址:
https://hg.openjdk.org/jdk/jdk12
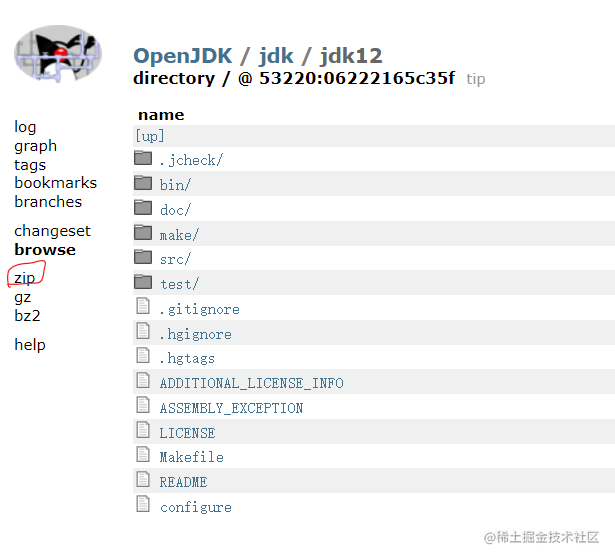
点击zip下载到本地。
解压到本地。
Tip:注意本地路径中最好不要包含中文或空格。
2、阅读一遍doc/building.html
如果只是想构建JDK,又没耐心看完那么多内容,只要看 TL;DR (Instructions for the Impatient) 部分的内容就可以了 😃
构建步骤主要为以下5步:
1、获取源码(http://hg.openjdk.java.net/jdk/jdk)
2、运行配置(bash configure)
3、运行make(make images)
4、验证是否构建成功(./build/*/images/jdk/bin/java -version)
5、运行基本测试(make run-test-tier1)
3、安装CYGWIN
CYGWIN是一个用于在windows上模拟UNIX或LINUX环境的软件,在其上可使用GNU工具集在Windows上进行嵌入式系统开发。
之所以要下载这个软件,是因为后面编译OpenJDK的时候,需要用GNU Make来执行Makefile文件。
下载地址:
Cygwin
安装教程:
Windows环境运行Linux命令——Cygwin安装_难拳的博客-CSDN博客
4、安装Visual Studio 2022(C++编译器)

官网下载地址:https://visualstudio.microsoft.com/zh-hans/vs/
5、配置依赖
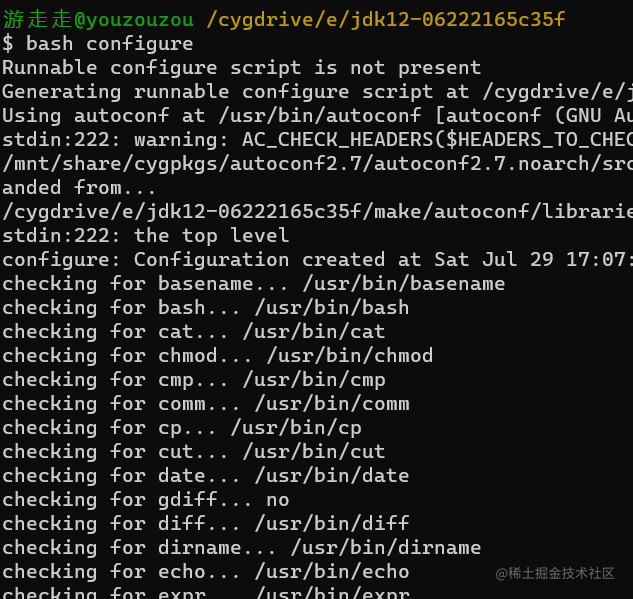
打开控制台,输入 bash ,进入Bourne Again Shell环境:

进入OpenJDK12源码解压后的路径,输入 bash configure:
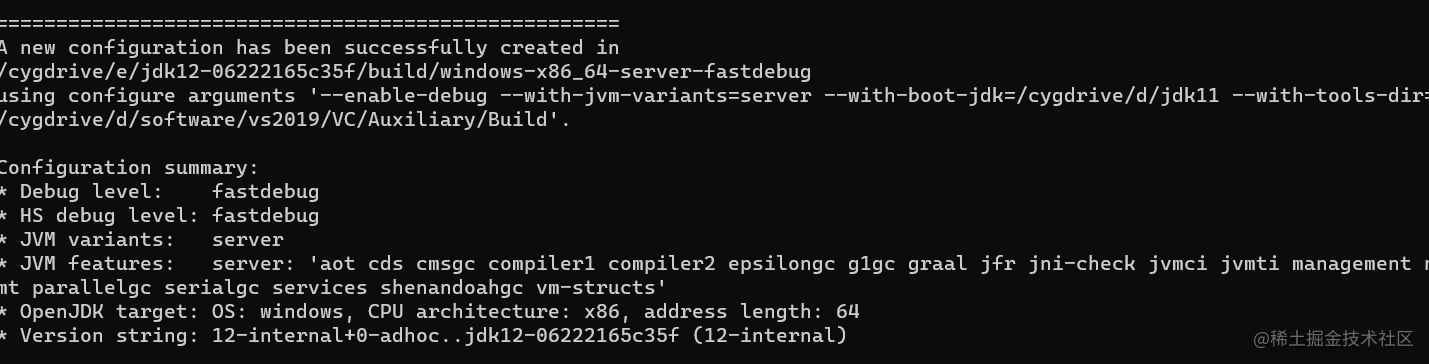
编译FastDebug版、仅含Server模式的HotSpot虚拟机:
bash configure --enable-debug --with-jvm-variants=server
Tip:如果之前执行过配置命令,需要先清除一下目录:make dist-clean
配置踩坑合集
报错1:

configure: Your path contains Windows tools (C:\Windows\system32) before your unix (cygwin or msys) tools. configure: This will not work. Please correct and make sure /usr/bin (or similar) is first in path. configure: error: Cannot continue configure exiting with result code 1
解决方案1:
用 bash --login -i 进入shell环境
报错2:
configure: Could not find a valid Boot JDK.
configure: error: Cannot continue
configure: This might be fixed by explicitly setting --with-boot-jdk
configure exiting with result code 1
解决方案2:
下载JDK11:https://www.oracle.com/java/technologies/downloads/#java11
安装完成后,执行:
bash configure --enable-debug --with-jvm-variants=server --with-boot-jdk=/cygdrive/d/jdk11
指定boot jdk路径:-with-boot-jdk=/cygdrive/d/jdk11
报错3:
configure: Cannot locate a valid Visual Studio installation, checking current environment
checking for Visual Studio variables... not found
configure: Cannot locate a valid Visual Studio or Windows SDK installation on disk,
configure: nor is this script run from a Visual Studio command prompt.
configure: Try setting --with-tools-dir to the VC/bin directory within the VS installation
configure: or run "bash.exe -l" from a VS command prompt and then run configure from there.
configure: error: Cannot continue
configure exiting with result code 1
解决方案3:
bash configure --enable-debug --with-jvm-variants=server --with-boot-jdk=/cygdrive/d/jdk11 --with-tools-dir=/cygdrive/d/software/vs2019/VC/Auxiliary/Build
指定:-with-tools-dir=/cygdrive/d/software/vs2019/VC/Auxiliary/Build
同时注释掉OpenJDK12源码中make/autoconf/toolchain_windows.m4文件中的这句:
#VS_ENV_CMD=""
以及make/autoconf/toolchain.m4中的:
#AC_MSG_ERROR([A $TOOLCHAIN_TYPE compiler is required. Try setting --with-tools-dir.])
报错4:
configure: Rewriting OBJDUMP to "/usr/bin/objdump"
configure: error: Target CPU mismatch. We are building for x86_64 but CL is for "□□"; expected "x64".
configure exiting with result code 1
解决方案4:
在make/autoconf/toolchain.m4中找到Target CPU mismatch对应的AC_MSG_ERROR,改成AC_MSG_NOTICE。
报错5:
configure: Rewriting CYGWIN_VC_INSTALL_DIR to "/cygdrive/d/software/vs2019/VC"
ls: cannot access '/cygdrive/d/software/vs2019/VC/Redist/MSVC/*/x64/Microsoft.VC141.CRT/vcruntime140.dll': No such file or directory
configure: Found vcruntime140.dll at /cygdrive/d/jdk11/bin/vcruntime140.dll using well-known location in Boot JDK
checking found vcruntime140.dll architecture... ok
checking for vcruntime140.dll... /cygdrive/d/jdk11/bin/vcruntime140.dll
configure: Rewriting CYGWIN_VC_INSTALL_DIR to "/cygdrive/d/software/vs2019/VC"
ls: cannot access '/cygdrive/d/software/vs2019/VC/Redist/MSVC/*/x64/Microsoft.VC141.CRT/msvcp140.dll': No such file or directory
configure: Found msvcp140.dll at /cygdrive/d/jdk11/bin/msvcp140.dll using well-known location in Boot JDK
checking found msvcp140.dll architecture... ok
checking for msvcp140.dll... /cygdrive/d/jdk11/bin/msvcp140.dll
checking for UCRT DLL dir... configure: Rewriting CYGWIN_WINDOWSSDKDIR to "/cygdrive/c/progra~2/wi3cf2~1/10"
no
configure: error: Could not find any dlls in /cygdrive/c/progra~2/wi3cf2~1/10/Redist/ucrt/DLLs/x64
configure exiting with result code 1
解决方案5:
toolchain_window.m4文件中的
UCRT_DLL_DIR="$CYGWIN_WINDOWSSDKDIR/Redist/ucrt/DLLs/$dll_subdir"
中间加上对应的版本号:
UCRT_DLL_DIR="$CYGWIN_WINDOWSSDKDIR/Redist/10.0.19041.0(版本号,在c/progra~2/wi3cf2~1/10/Redist下)/ucrt/DLLs/$dll_subdir"
再次执行:
bash configure --enable-debug --with-jvm-variants=server --with-boot-jdk=/cygdrive/d/jdk11 --with-tools-dir=/cygdrive/d/software/vs2019/VC/Auxiliary/Build
终于配置成功:
6、编译
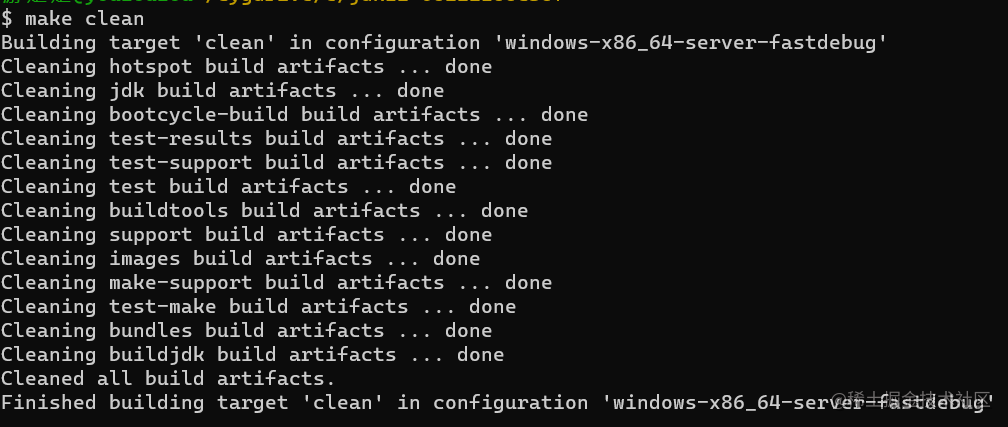
先执行make clean清除旧配置
执行make images编译:
编译踩坑合集
报错1:
解决1:
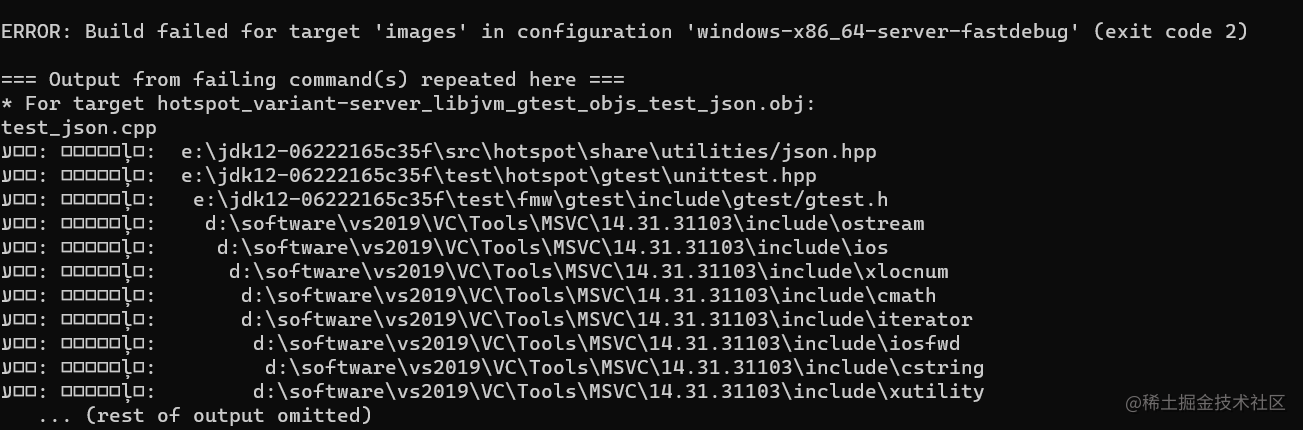
摸进e/jdk12-06222165c35f/build/windows-x86_64-server-fastdebug/make-support/failure-logs的错误日志里看看:
这个test_json.cpp文件里有语法错误,是文件编码的问题,把文件编码改为utf-8-bom格式。
再次执行make clean和make images:
报错2:

解决2:
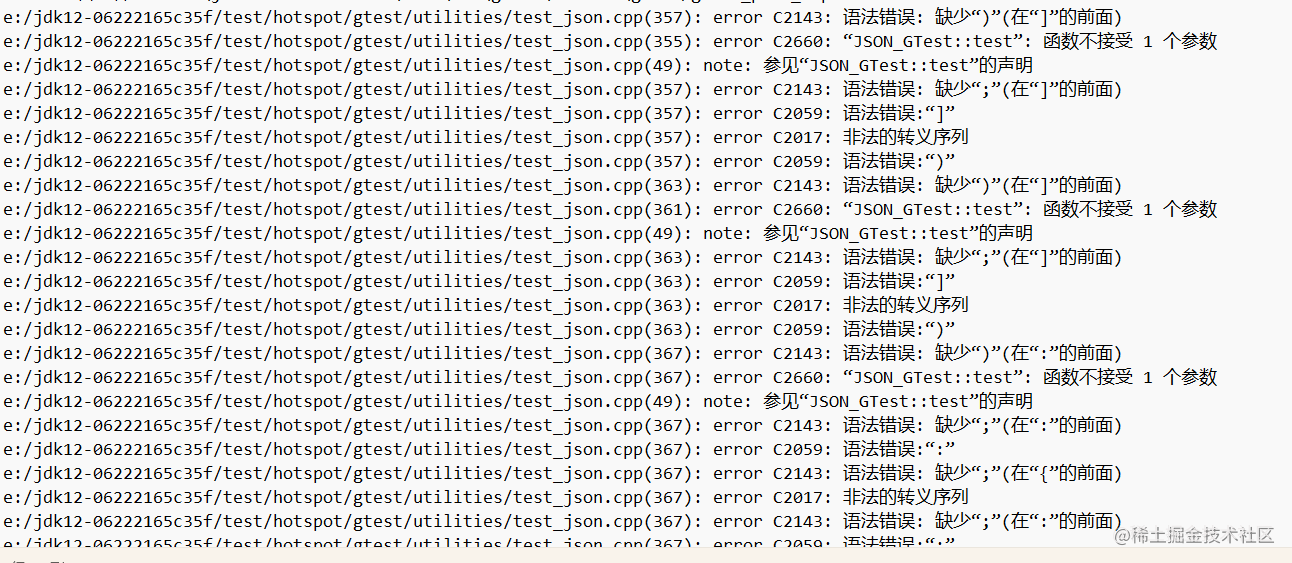
看到test_json.cpp的357和363等行里都有一个小雪人字符:
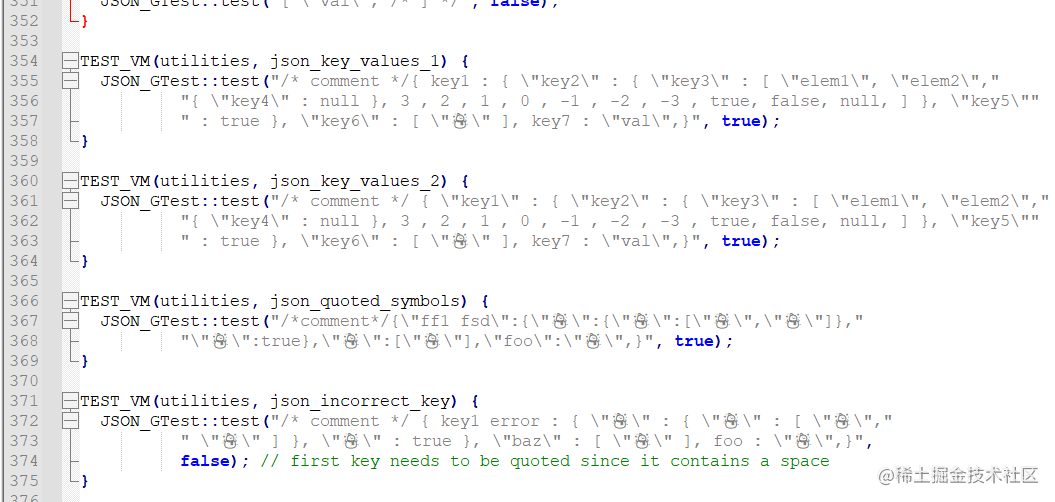
把所有雪人字符都替换成普通字母,再次执行make clean和make images:
报错3:

解决3:
找到methodMatcher.cpp,在240行后加上这三句:

    #pragma warning(disable: 4819)
    #pragma warning(disable: 4778)
    #pragma warning(disable: 4474)
报错4:
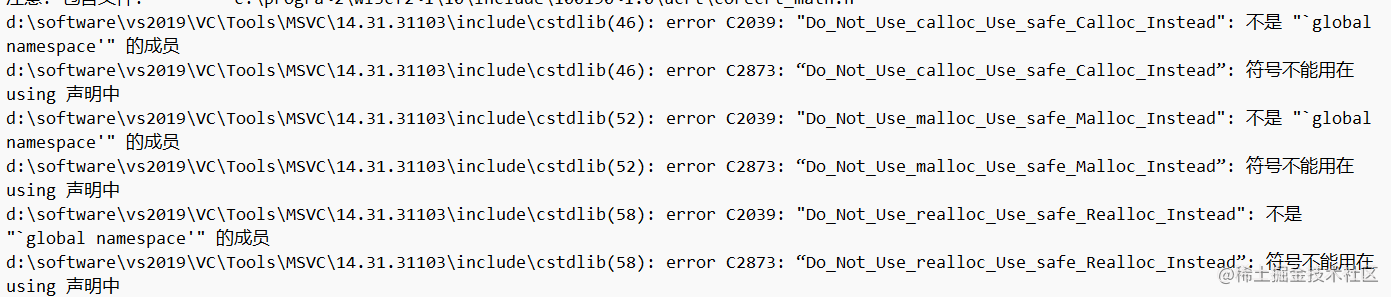
error C2039: "Do_Not_Use_calloc_Use_safe_Calloc_Instead": 不是 "`global namespace'" 的成员
error C2873: “Do_Not_Use_calloc_Use_safe_Calloc_Instead”: 符号不能用在 using 声明中
error C2039: "Do_Not_Use_malloc_Use_safe_Malloc_Instead": 不是 "`global namespace'" 的成员
error C2873: “Do_Not_Use_malloc_Use_safe_Malloc_Instead”: 符号不能用在 using 声明中
error C2039: "Do_Not_Use_realloc_Use_safe_Realloc_Instead": 不是 "`global namespace'" 的成员
error C2873: “Do_Not_Use_realloc_Use_safe_Realloc_Instead”: 符号不能用在 using 声明中
解决4:
找到src\java.desktop\windows\native\libawt\windows\alloc.h,将文件格式改为utf-8-bom。
并将87行开始的下面这三句注释掉:
#define malloc Do_Not_Use_malloc_Use_safe_Malloc_Instead
#define calloc Do_Not_Use_calloc_Use_safe_Calloc_Instead
#define realloc Do_Not_Use_realloc_Use_safe_Realloc_Instead
报错5:
Building target 'images' in configuration 'windows-x86_64-server-fastdebug'
Warning: No SCM configuration present and no .src-rev
make[3]: *** No rule to make target '/cygdrive/e/jdk12/build/windows-x86_64-server-fastdebug/buildtools/langtools_tools_classes/_the.BUILD_TOOLS_LANGTOOLS.vardeps', needed by '/cygdrive/e/jdk12/build/windows-x86_64-server-fastdebug/buildtools/langtools_tools_classes/_the.BUILD_TOOLS_LANGTOOLS_batch'.  Stop.
make[3]: *** Waiting for unfinished jobs....
make[3]: *** No rule to make target '/cygdrive/e/jdk12/build/windows-x86_64-server-fastdebug/make-support/vardeps/make/ReleaseFile.gmk/create-info-file.vardeps', needed by '/cygdrive/e/jdk12/build/windows-x86_64-server-fastdebug/jdk/release'.  Stop.
make[2]: *** [make/Main.gmk:369: release-file] Error 2
make[2]: *** Waiting for unfinished jobs....
make[2]: *** [make/Main.gmk:73: buildtools-langtools] Error 2
make[3]: *** No rule to make target '/cygdrive/e/jdk12/build/windows-x86_64-server-fastdebug/make-support/vardeps/make/ModuleWrapper.gmk/java.base/ORDERED_CFG_VARIANTS.vardeps', needed by '/cygdrive/e/jdk12/build/windows-x86_64-server-fastdebug/support/modules_libs/java.base/jvm.cfg'.  Stop.
make[3]: *** Waiting for unfinished jobs....
make[2]: *** [make/Main.gmk:162: java.base-copy] Error 2
解决5:
参见 windows 平台编译openjdk12 - 乐途 - 博客园
make -v,检查一下Cygwin里make的版本,我的版本不知道什么时候改成了4.4,在Cygwin里卸载掉就可以了。
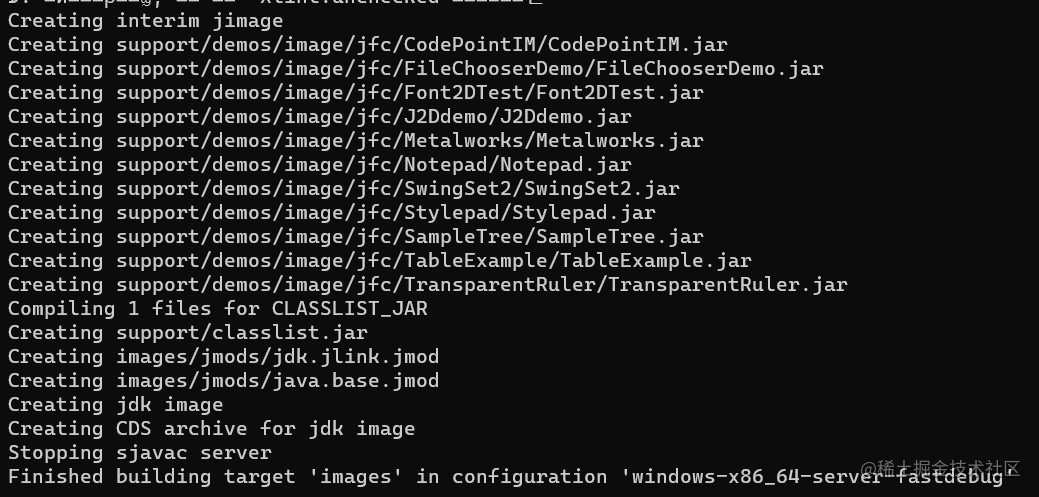
解决完所有报错后,执行 make images
编译成功:
7、安装IDE:CLion
1)CLion安装教程:
https://www.kdocs.cn/l/cvdh8F64PEfQ?openfrom=docs
2)打开OpenJDK项目:选择Open Project

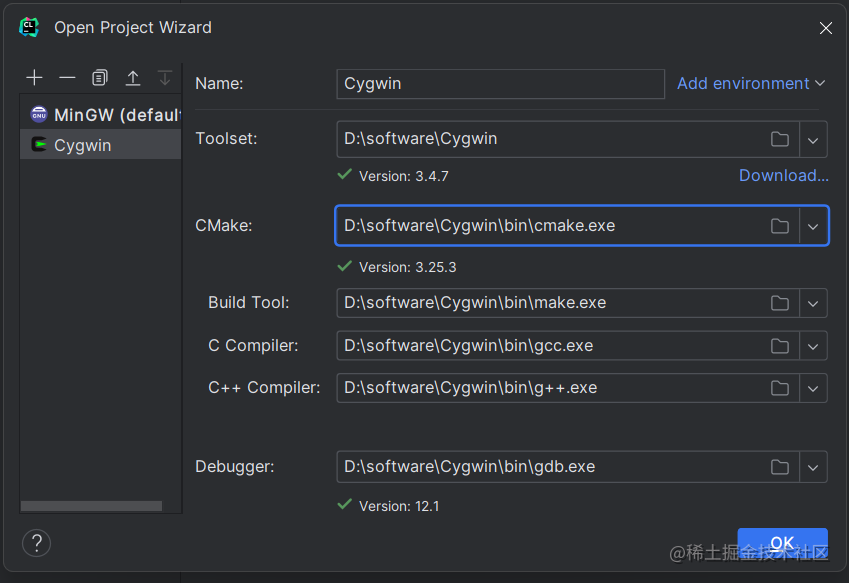
3)CLion配置Cygwin(Cygwin安装教程见上一章上机实验):
Setting>Toolchains
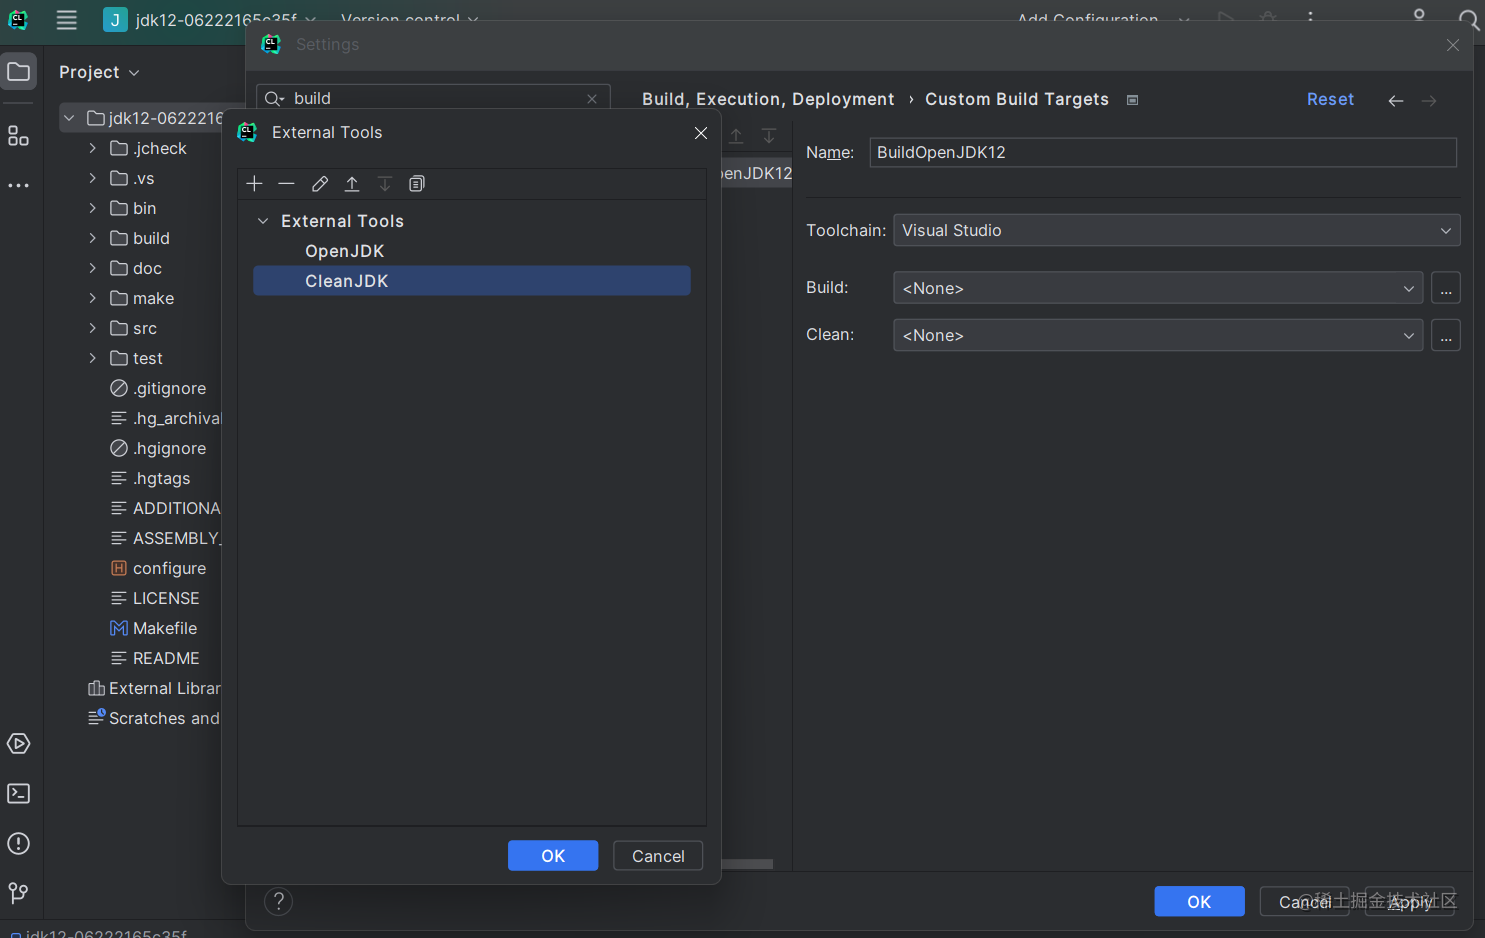
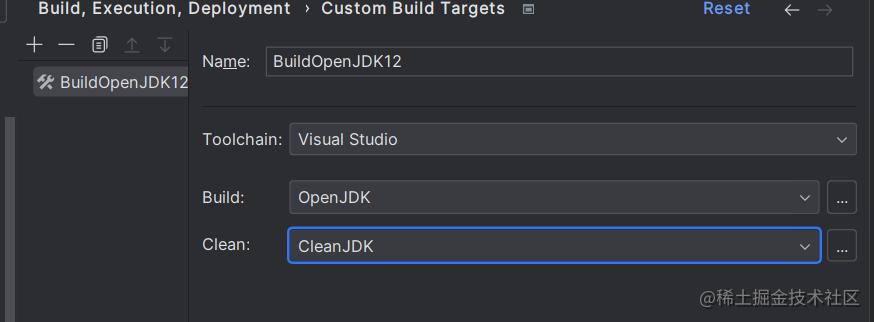
4)CLion配置编译参数:
Setting>Custom Build Targets
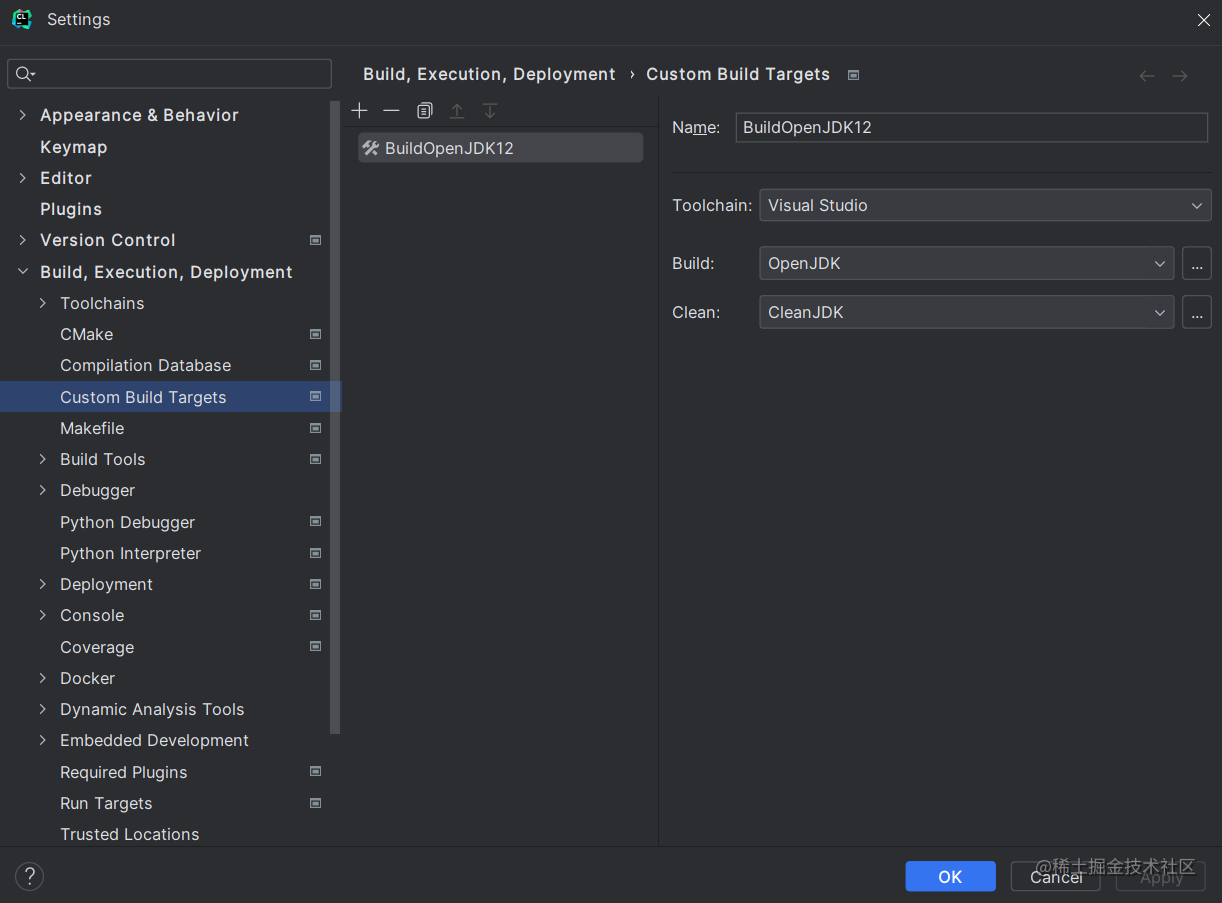
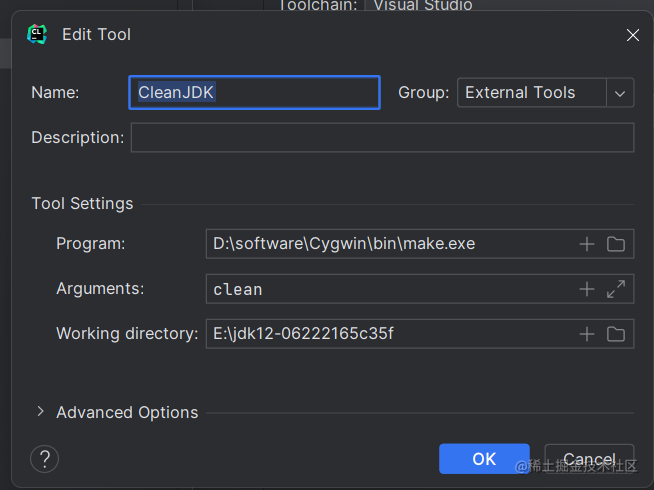
点击Build和Clean右侧的…配置对应的External Tools:
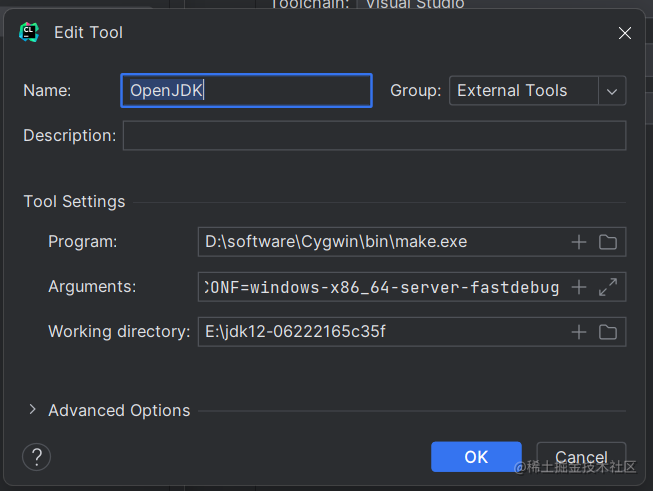
- CONF=windows-x86_64-server-fastdebug(在jdk编译后的build目录下)
AddConfiguration>Custom Build Application
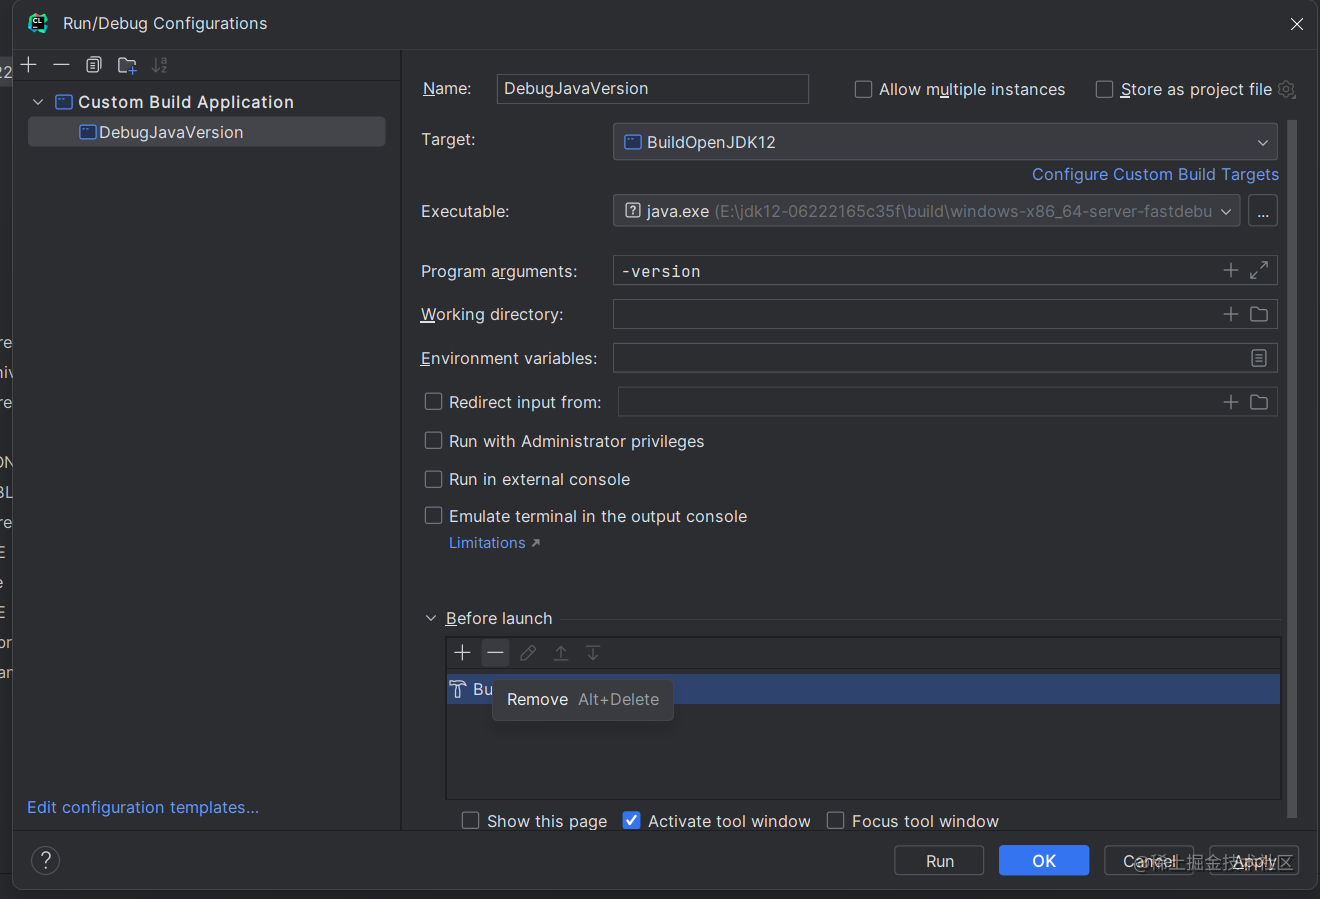
运行:
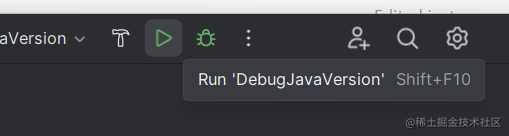
正确输出版本号,测试成功:


 621
621


 被折叠的 条评论
为什么被折叠?
被折叠的 条评论
为什么被折叠?
 到【灌水乐园】发言


