什么是Fragment?
Fragment是一种可以嵌入在activity当中的一个模块化和可重复利用的组件,它可以定义自己的布局和监听事件,以及通过使用它自己的生命周期回调方法来定义的它自己的行为。
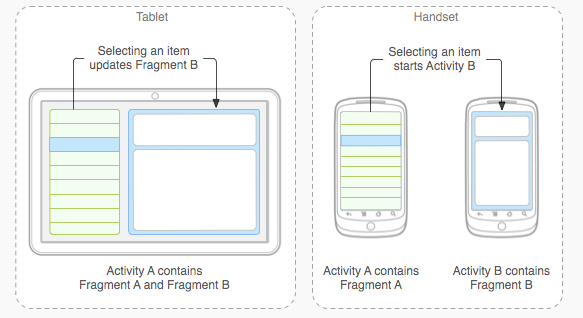
Fragment的设计理念:允许你把Activity中的布局文件分散到几个不同的Fragment中,通过管理Fragment来管理布局。这样,可以非常轻松的实现“phone”和“pad”两套版本的app开发:
每个Fragment拥有自己的生命周期,它们的生命周期会受宿主activity的生命周期的影响,下面列出了Fragment生命周期中各个时期的回调方法:
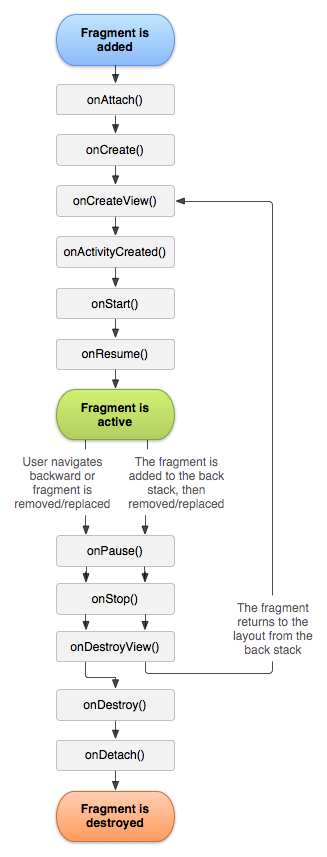
    public void onAttach(Activity activity)
    当Fragment被添加到Activity时候会回调这个方法,并且只调用一次

    public void onCreate(Bundle savedInstanceState)
    创建Fragment时会回调,只会调用一次

    public View onCreateView(LayoutInflater inflater, ViewGroup container,Bundle savedInstanceState)
    每次创建都会绘制Fragment的View组件时回调该方法

    public void onActivityCreated(Bundle savedInstanceState)
    当Fragment所在的Activty启动完成后调用

    public void onStart()
    启动Fragment

    public void onResume()
    恢复Fragment时会被回调,调用onStart()方法后面一定会调用onResume()方法

    public void onPause()
    暂停Fragment

    public void onStop()
    停止Fragment

    public void onDestroyView()
    销毁Fragment所包含的View组件时

    public void onDestroy()
    销毁Fragment时会被回调

    public void onDetach()
    Fragment从Activity中删除时会回调该方法,并且这个方法只会调用一次

    【注意】:

    1.Fragment第一次绘制的时候,系统会调用onCreateView(),为了绘制Fragment中定义的UI(UI定义在一个xml布局文件中),此方法必须返回一个View,如果不显示就返回null即可
    2.Fragment可以作为avtivity界面的一部分组成出现
    3.可以在一个activity中同时出现多个Fragment,并且一个Fragment也可以在多个activity中使用
    4.activity运行过程中,可以添加(add),移除(remove)或替换(replace)Fragment(前提是这些fragment都是动态加载的)
如何使用Fragment?
    Fragment可以通过“静态”和“动态”两种方式加载到Activity中。

    1.静态加载:
    像在布局文件添加一个控件一样,在xml里面声明一个Fragment标签,然后在Activity中引入即可。

    (1)创建Fragment中的布局文件:(本例中创建两个布局放到两个Fragment中)

    第一个布局文件:
<?xml version="1.0" encoding="utf-8"?>
<LinearLayout xmlns:android="http://schemas.android.com/apk/res/android"
    android:layout_width="match_parent"
    android:layout_height="match_parent"
    android:orientation="horizontal"
    android:background="@color/background_floating_material_dark"
    >

    <ImageButton
        android:id="@+id/imageButton"
        android:src="@mipmap/ic_launcher"
        android:layout_width="35dp"
        android:layout_height="35dp" />

    <TextView
        android:text="肥嘟嘟左卫门"
        android:textColor="#fff"
        android:layout_gravity="center"
        android:gravity="center"
        android:layout_width="match_parent"
        android:layout_height="wrap_content" />


</LinearLayout>
第二个布局文件:
<?xml version="1.0" encoding="utf-8"?>
<LinearLayout xmlns:android="http://schemas.android.com/apk/res/android"
    android:layout_width="match_parent"
    android:layout_height="match_parent"
    android:orientation="horizontal"
    >

    <TextView
        android:layout_gravity="center"
        android:gravity="center"
        android:text="这是一个静态的Fragment!"
        android:layout_width="match_parent"
        android:layout_height="wrap_content" />


</LinearLayout>
    (2)自定义一个类继承Fragment,并实现一些必要的方法:

    第一个Fragment的实现类(引入第一个布局文件):
package com.example.lowp.fragment_test.fragment;
import android.app.Fragment;
import android.os.Bundle;
import android.view.LayoutInflater;
import android.view.View;
import android.view.ViewGroup;
import android.widget.ImageButton;
import android.widget.Toast;
import com.example.lowp.fragment_test.R;
/**
* Created by Lowp on 2015/9/15.
*/
public class StaticFragment1 extends Fragment {
private ImageButton button;
@Override
public View onCreateView(LayoutInflater inflater, ViewGroup container, Bundle savedInstanceState) {
View view = inflater.inflate(R.layout.static_fragment1,container,false);
button = (ImageButton) view.findViewById(R.id.imageButton);
button.setOnClickListener(new View.OnClickListener() {
@Override
public void onClick(View v) {
Toast.makeText(getActivity(),"这是一个fragment布局!",Toast.LENGTH_SHORT).show();
}
});
return view;
}
}
第二个Fragment的实现类(引入第二个布局文件):
package com.example.lowp.fragment_test.fragment;
import android.os.Bundle;
import android.app.Fragment;
import android.view.LayoutInflater;
import android.view.View;
import android.view.ViewGroup;
import android.widget.ImageButton;
import com.example.lowp.fragment_test.R;
/**
* Created by Lowp on 2015/9/15.
*/
public class StaticFragment2 extends Fragment{
private ImageButton button;
@Override
public View onCreateView(LayoutInflater inflater, ViewGroup container, Bundle savedInstanceState) {
return inflater.inflate(R.layout.static_fragment2,container,false);
}
}
【注意】: inflater.inflate(R.layout.leftfragment, container, true)方法中的第一个参数R.layout.leftfragment是这个Fragment对应的布局文件ID, 第二个参数container是要插入的目标Activity, 第三个参数是决定这个Fragment是否依附于这个container


    (3)在主布局文件中添加fragment标签:
<LinearLayout xmlns:android="http://schemas.android.com/apk/res/android"
    xmlns:tools="http://schemas.android.com/tools"
    android:layout_width="match_parent"
    android:layout_height="match_parent"
    android:orientation="vertical"
    tools:context=".MainActivity">


    <fragment
        android:id="@+id/title"
        android:layout_width="match_parent"
        android:layout_height="35dp"
        android:name="com.example.lowp.fragment_test.fragment.StaticFragment1"
        >

    </fragment>


    <fragment
        android:id="@+id/content"
        android:layout_width="match_parent"
        android:layout_height="match_parent"
        android:name="com.example.lowp.fragment_test.fragment.StaticFragment2"
        >

    </fragment>

</LinearLayout>
    【注意】
    1.android:name 指定了一个实例化的Fragment

    2.因为fragment是可重用的,模块化的UI组件,每一个Fragment实例必须与父类FragmentActivity相关联。你可以通过在你Activity布局XML文件中定义每一个fragment来获得关联。FragmentActivity是在系统版本低于API level 11时由Support Library提供用来管理fragment的特殊activity。如果你支持的最低系统版本是API level 11或者更高,那你可以直接使用常规的Activity。

    运行效果:
    2,动态加载Fragment
    所谓动态加载,就是在Java代码中将已经定义好的Fragment添加到布局的视图控件中,使用动态加载的好处是,你可以Fragment进行添加、删除、替换、隐藏等操作,步骤如下:
    (1)首先,通过getFragmentManager()获得一个Fragment管理器对象
    FragmentManager manager = getFragmentManager();

    (2)通过fragment管理器对象开启一个事物,这个事物的API中就包含了对Fragment进行操作的各种方法
    FragmentTransaction transaction = manager.beginTransaction();

    (3)通过事物管理Fragment对象
    transaction.add(R.id.fragment_pool,new StaticFragment1());
    添加一个fragment到布局的视图控件(R.id.fragment_pool)中

    (4)让按下返回键回到fragment前一个状态
    transaction.addToBackStack(null);

    (5)将事物提交给宿主Activity
    transaction.commit();

    代码:
package com.example.lowp.fragment_test;
import android.app.Activity;
import android.app.FragmentManager;
import android.app.FragmentTransaction;
import android.content.Intent;
import android.os.Bundle;
import android.view.Window;
import android.widget.RadioGroup;
import com.example.lowp.fragment_test.fragment.StaticFragment1;
public class SecondActivity extends Activity {
private RadioGroup radioGroup;
@Override
protected void onCreate(Bundle savedInstanceState) {
super.onCreate(savedInstanceState);
setContentView(R.layout.second);
radioGroup = (RadioGroup) findViewById(R.id.radioGroup);
radioGroup.setOnCheckedChangeListener(new RadioGroup.OnCheckedChangeListener() {
@Override
public void onCheckedChanged(RadioGroup group, int checkedId) {
switch (checkedId){
case R.id.frist_button:
Intent intent = new Intent(SecondActivity.this,FristActivity.class);
startActivity(intent);
break;
case R.id.second_button:
FragmentManager manager = getFragmentManager();
FragmentTransaction transaction = manager.beginTransaction();
transaction.add(R.id.fragment_pool,new StaticFragment1());
transaction.remove()
transaction.addToBackStack(null);
transaction.commit();
break;
case R.id.thrid_button:
break;
case R.id.fourth_button:
break;
`
}
}
});
}
}
对应的布局:
<?xml version="1.0" encoding="utf-8"?>
<RelativeLayout xmlns:android="http://schemas.android.com/apk/res/android"
    android:layout_width="match_parent"
    android:layout_height="match_parent"
    android:orientation="vertical">

   <LinearLayout
       android:id="@+id/fragment_pool"
       android:layout_width="match_parent"
       android:layout_height="wrap_content"
       android:orientation="vertical">

   </LinearLayout>

    <RadioGroup
        android:layout_alignParentBottom="true"
        android:id="@+id/radioGroup"
        android:layout_width="match_parent"
        android:layout_height="wrap_content"
        android:orientation="horizontal">

        <RadioButton
            android:id="@+id/frist_button"
            android:drawableTop="@mipmap/ic_launcher"
            android:background="@drawable/radio_pressed"
            android:text="静态加载"
            android:button="@null"
            android:layout_weight="1"
            android:gravity="center_horizontal"
            android:layout_width="wrap_content"
            android:layout_height="match_parent" />

        <RadioButton
            android:id="@+id/second_button"
            android:drawableTop="@mipmap/ic_launcher"
            android:background="@drawable/radio_pressed"
            android:text="动态加载"
            android:button="@null"
            android:gravity="center_horizontal"
            android:layout_weight="1"
            android:layout_width="wrap_content"
            android:layout_height="match_parent" />

        <RadioButton
            android:id="@+id/thrid_button"
            android:drawableTop="@mipmap/ic_launcher"
            android:background="@drawable/radio_pressed"
            android:text=""
            android:button="@null"
            android:gravity="center_horizontal"
            android:layout_weight="1"
            android:layout_width="wrap_content"
            android:layout_height="match_parent" />

        <RadioButton
            android:id="@+id/fourth_button"
            android:drawableTop="@mipmap/ic_launcher"
            android:background="@drawable/radio_pressed"
            android:text=""
            android:button="@null"
            android:gravity="center_horizontal"
            android:layout_weight="1"
            android:layout_width="wrap_content"
            android:layout_height="match_parent" />
    </RadioGroup>


</RelativeLayout>
运行效果:
Fragment与Activity间的通信
    1.Activity向Fragment传送数据

     Activity向Fragment传送数据是通过Bundle对象来携带一个数据,然后通过Fragment对象的setArguments(Bundle b)来传递Bundle对象,再在对应的Fragment中通过getArguments()来获取传递过来的Bundle对象。

     新建一个Activity:
package com.example.lowp.fragment_test;
import android.app.Activity;
import android.app.FragmentManager;
import android.app.FragmentTransaction;
import android.os.Bundle;
import android.view.View;
import android.widget.Button;
import android.widget.EditText;
import android.widget.Toast;
import com.example.lowp.fragment_test.fragment.Fragment3;
public class ThridActivity extends Activity{
private EditText editText;
private Button button;
@Override
protected void onCreate(Bundle savedInstanceState) {
super.onCreate(savedInstanceState);
setContentView(R.layout.thrid);
editText = (EditText) findViewById(R.id.editText);
button = (Button) findViewById(R.id.send);
button.setOnClickListener(new View.OnClickListener() {
@Override
public void onClick(View v) {
String s = editText.getText().toString();
Fragment3 fragment3 = new Fragment3();
Bundle bundle = new Bundle();
bundle.putString("value",s);
fragment3.setArguments(bundle);
FragmentManager manager = getFragmentManager();
FragmentTransaction transaction = manager.beginTransaction();
transaction.add(R.id.thrid_layout,fragment3,"f2");
transaction.addToBackStack(null);
transaction.commit();
Toast.makeText(ThridActivity.this,"向Fragment发数据 : " + s,Toast.LENGTH_SHORT).show();
}
});
}
}
对应布局文件:
<?xml version="1.0" encoding="utf-8"?>
<LinearLayout xmlns:android="http://schemas.android.com/apk/res/android"
    android:layout_width="match_parent"
    android:layout_height="match_parent"
    android:orientation="vertical"
    >


    <EditText
        android:id="@+id/editText"
        android:paddingTop="40dp"
        android:layout_width="match_parent"
        android:layout_height="wrap_content" />


    <Button
        android:id="@+id/send"
        android:text="向Fragment发送消息"
        android:layout_width="match_parent"
        android:layout_height="wrap_content" />

    <LinearLayout
        android:id="@+id/thrid_layout"
        android:layout_width="match_parent"
        android:layout_height="wrap_content"
        android:orientation="vertical"
        >

    </LinearLayout>

</LinearLayout>
新建一个Fragment:
package com.example.lowp.fragment_test.fragment;
import android.app.Fragment;
import android.os.Bundle;
import android.view.LayoutInflater;
import android.view.View;
import android.view.ViewGroup;
import android.widget.TextView;
import android.widget.Toast;
import com.example.lowp.fragment_test.R;
/**
* Created by Lowp on 2015/9/15.
*/
public class Fragment3 extends Fragment{
private TextView textView;
@Override
public View onCreateView(LayoutInflater inflater, ViewGroup container, Bundle savedInstanceState) {
View view = inflater.inflate(R.layout.fragment3,container,false);
textView = (TextView) view.findViewById(R.id.f3_textView);
if(getArguments() != null){
String s = getArguments().getString("value");
textView.setText(s);
Toast.makeText(getActivity(), "数据 : " + s + " 已收到,谢谢!", Toast.LENGTH_SHORT).show();
}
return view;
}
}
其对应布局:
<?xml version="1.0" encoding="utf-8"?>
<LinearLayout xmlns:android="http://schemas.android.com/apk/res/android"
    android:layout_width="match_parent"
    android:layout_height="match_parent"
    android:orientation="vertical"
    >

    <TextView
        android:gravity="center"
        android:id="@+id/f3_textView"
        android:text=""
        android:layout_width="match_parent"
        android:layout_height="wrap_content" />


</LinearLayout>
运行效果:
    2.Fragment向Activity传递数据

    Fragment向Activity传递数据,通常都是通过自定义并实现一个接口来完成的。先在Fragment中定义一个接口,并在让Activity实现该接口,然后在Fragment的onAttach()回调方法中具体实现一个接口的对象。这样,fragment就可以调用接口中的方法实现与Activity的通信

    (1)在Fragment中自定义一个接口:
public interface MyListener{
        public void Thank(String s);
    }
(2)让Activity实现该接口,并实现抽象方法:
public class ThridActivity extends Activity implements Fragment3.MyListener{
......
@Override
    public void Thank(String s) {
        Toast.makeText(this,"Activity已接收到数据:" + s,Toast.LENGTH_SHORT).show();
    }
......
}
(3)onAttach()回调方法中具体实现一个接对象:
......
private MyListener listener;
......
@Override
public void onAttach(Activity activity) {
super.onAttach(activity);
try {
listener = (MyListener) activity;
}catch (ClassCastException e){
throw new ClassCastException(activity.toString()
+ " must implement OnHeadlineSelectedListener");
}
}
......
(4)调用listener中的Thank()方法,将数据传递给Activity:
@Override
public View onCreateView(LayoutInflater inflater, ViewGroup container, Bundle savedInstanceState) {
View view = inflater.inflate(R.layout.fragment3,container,false)
textView = (TextView) view.findViewById(R.id.f3_textView)
//判断数据是否为空
if(getArguments() != null){
//获取数据
String s = getArguments().getString("value")
textView.setText(s)
Toast.makeText(getActivity(), "Fragment已接收到数据 : " + s,Toast.LENGTH_SHORT).show()
Toast.makeText(getActivity(), "向Activity发送信息 :" + thank, Toast.LENGTH_SHORT).show()
//调用接口中的方法,把字符串传递给Activity
listener.Thank(thank)
}
//如果要显示一个视图,就必须返该视图
return view
}
运行效果:
Activity向Fragment发送”你好“,Fragment收到数据后提示已收到,为了表示友好,Fragment向Activity发送”Thank you !“,Activity收到数据后提示已收到!


 被折叠的 条评论
为什么被折叠?
被折叠的 条评论
为什么被折叠?
 到【灌水乐园】发言


