


来自:Spring 专栏
我们都知道,在使用new关键字实例化的Java Bean,它的生命周期非常简单,当Java Bean不需要使用时,则Java会自动进行垃圾回收,
所以它的生命周期会非常容易理解。
但Spring中Bean的生命周期,则较为复杂,它由Bean定义->Bean初始化->Bean应用->Bean销毁
Spring 针对不同Bean的作用域采用不同的管理方式
对采用singleton 作用域Bean,Spring可清楚的知道它的创建及初始化时间及销毁时间,
但是对于prototype作用域下的Bean,Spring框架则只负责创建,当创建完毕后,则将Bean实例交给客户端代码管理,
Spring将不对此类型的Bean进行生命周期管理
Spring Bean生命周期执行流程
Spring 容器在确保一个 Bean 能够使用之前,会进行很多工作。Spring 容器中 Bean 的生命周期流程如下图所示。
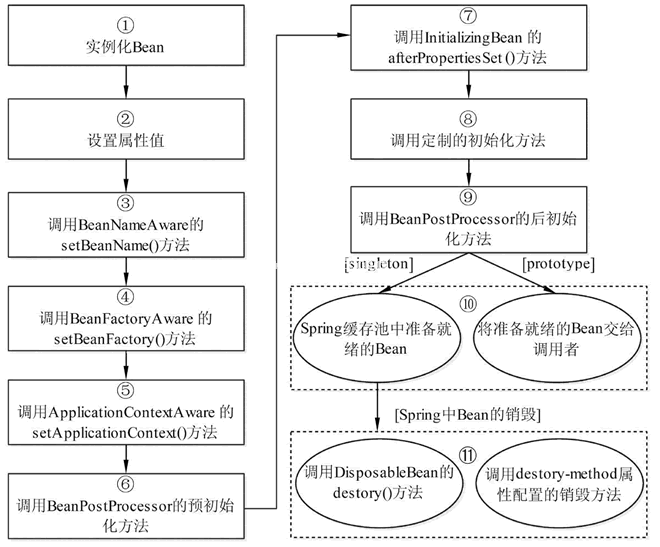
Bean 生命周期流程
- Spring 启动,查找并加载需要被Spring 管理的 Bean,并实例化 Bean。
- 利用依赖注入完成 Bean 中所有属性值的配置注入。
- 当Bean 实现了 BeanNameAware 接口,则 Spring 调用 Bean 的 setBeanName() 方法传入当前 Bean 的 id 值。
- 当Bean 实现了 BeanFactoryAware 接口,则 Spring 调用 setBeanFactory() 方法传入当前工厂实例的引用。
- 当Bean 实现了 ApplicationContextAware 接口,则 Spring 调用 setApplicationContext() 方法传入当前 ApplicationContext 实例的引用。
- 当Bean 实现了 BeanPostProcessor 接口,则 Spring 调用该接口的预初始化方法 postProcessBeforeInitialzation() 对 Bean 进行加工操作,此处非常重要,Spring 的 AOP 就是利用它实现的。
- 当Bean 实现了 InitializingBean 接口,则 Spring 将调用 afterPropertiesSet() 方法。
- 当在配置文件中通过 init-method 属性指定了初始化方法,则调用该初始化方法。
- 当BeanPostProcessor 和 Bean 关联,则 Spring 将调用该接口的初始化方法 postProcessAfterInitialization()。此时,Bean 已经可以被应用系统使用了。
- 当在 <bean> 中指定了该 Bean 的作用域为 singleton,则将该 Bean 放入 Spring IoC 的缓存池中,触发 Spring 对该 Bean 的生命周期管理;如果在 <bean> 中指定了该 Bean 的作用域为 prototype,则将该 Bean 交给调用者,调用者管理该 Bean 的生命周期,Spring 不再管理该 Bean。
- 当Bean 实现了 DisposableBean 接口,则 Spring 会调用 destory() 方法销毁 Bean;如果在配置文件中通过 destory-method 属性指定了 Bean 的销毁方法,则 Spring 将调用该方法对 Bean 进行销毁。
Spring 为 Bean 提供了细致全面的生命周期过程,实现特定的接口或设置 <bean> 的属性都可以对 Bean 的生命周期过程产生影响。建议不要过多的使用 Bean 实现接口,因为这样会导致代码的耦合性过高。
了解 Spring 生命周期的意义就在于,可以利用 Bean 在其存活期间的指定时刻完成一些相关操作。一般情况下,会在 Bean 被初始化后和被销毁前执行一些相关操作。
Spring 官方提供了 3 种方法实现初始化回调和销毁回调:
- 实现 InitializingBean 和 DisposableBean 接口;
- 在 XML 中配置 init-method 和 destory-method;
- 使用 @PostConstruct 和 @PreDestory 注解。
在一个 Bean 中有多种生命周期回调方法时,优先级为:注解 > 接口 > XML。
不建议使用接口和注解,这会让 pojo 类和 Spring 框架紧耦合。
初始化回调
1. 使用接口
org.springframework.beans.factory.InitializingBean 接口提供了以下方法:
- void afterPropertiesSet() throws Exception;
您可以实现以上接口,在 afterPropertiesSet 方法内指定 Bean 初始化后需要执行的操作。
     <bean id="..." class="..." />
       public class User implements InitializingBean {
        @Override
     public void afterPropertiesSet() throws Exception {
         System.out.println("调用接口:InitializingBean,方法:afterPropertiesSet,无参数");
       }
  }
2. 配置XML
可以通过 init-method 属性指定 Bean 初始化后执行的方法
 <bean id="..." class="..." init-method="init"/>
       public class User {
          public void init() {
             System.out.println("调用init-method指定的初始化方法:init" );
         }
     }
3. 使用注解
使用 @PostConstruct 注解标明该方法为 Bean 初始化后的方法。
      public class ExampleBean {
         @PostConstruct
        public void init() {
           System.out.println("@PostConstruct注解指定的初始化方法:init" );
        }
      }
销毁回调
1. 使用接口
org.springframework.beans.factory.DisposableBean 接口提供了以下方法:
- void destroy() throws Exception;
您可以实现以上接口,在 destroy 方法内指定 Bean 初始化后需要执行的操作。
      <bean id="..." class="..." />
       public class User implements InitializingBean {
         @Override
       public void afterPropertiesSet() throws Exception {
           System.out.println("调用接口:InitializingBean,方法:afterPropertiesSet,无参数");
        }
     }
2. 配置XML
可以通过 destroy-method 属性指定 Bean 销毁后执行的方法
     <bean id="..." class="..." destroy-method="destroy"/>
       public class User {
       public void destroy() {
          System.out.println("调用destroy-method指定的销毁方法:destroy" );
        }
     }
3. 使用注解
使用 @PreDestory 注解标明该方法为 Bean 销毁前执行的方法。
   public class ExampleBean {
       @PreDestory
    public void destroy() {
    System.out.println("@PreDestory注解指定的初始化方法:destroy" );
   }
}
例
下面使用 Eclipse IDE 演示如何通过配置 XML 的方式实现初始化回调和销毁回调,步骤如下:
- 创建 SpringDemo 项目,并在 src 目录下创建 com.java265包。
- 添加相应的 jar 包,可以参考《第一个Spring程序》一节。
- 在 com.java265 包下创建 HelloWorld 和 MainApp 类。
- 在 src 目录下创建 Spring 配置文件 Beans.xml。
- 运行 SpringDemo 项目
HelloWorld 类-----
package com.java265;
public class HelloWorld {
private String message;

public void setMessage(String message) {
this.message = message;
}
public void getMessage() {
System.out.println("message : " + message);
}
public void init() {
System.out.println("Bean正在进行初始化");
}
public void destroy() {
System.out.println("Bean将要被销毁");
}
}
MainApp 类代码如下,该类中我们使用 AbstractApplicationContext 类的 registerShutdownHook() 方法,来确保正常关机并调用相关的 destroy() 方法。
package com.java265;
import org.springframework.context.support.AbstractApplicationContext;
import org.springframework.context.support.ClassPathXmlApplicationContext;

public class MainApp {
public static void main(String[] args) {
AbstractApplicationContext context = new ClassPathXmlApplicationContext("Beans.xml");

HelloWorld obj = (HelloWorld) context.getBean("helloWorld");
obj.getMessage();
context.registerShutdownHook();
}
}
Beans.xml 配置文件代码如下。
<?xml version="1.0" encoding="UTF-8"?>
<beans xmlns="http://www.springframework.org/schema/beans"
xmlns:xsi="http://www.w3.org/2001/XMLSchema-instance"
xsi:schemaLocation="http://www.springframework.org/schema/beans
http://www.springframework.org/schema/beans/spring-beans-3.0.xsd">

<bean id="helloWorld" class="com.java265.HelloWorld"
init-method="init" destroy-method="destroy">
<property name="message" value="Hello World!" />
</bean>
</beans>
-----运行结果-----
Bean正在进行初始化
message : Hello World!
Bean将要被销毁
默认的初始化和销毁方法
如果多个 Bean 需要使用相同的初始化或者销毁方法,不用为每个 bean 声明初始化和销毁方法,可以使用 default-init-method 和 default-destroy-method 属性,如下:
<beans xmlns="http://www.springframework.org/schema/beans"
xmlns:xsi="http://www.w3.org/2001/XMLSchema-instance"
xsi:schemaLocation="http://www.springframework.org/schema/beans
http://www.springframework.org/schema/beans/spring-beans-3.0.xsd"
default-init-method="init"
default-destroy-method="destroy">

<bean id="..." class="...">
...
</bean>
</beans>


 6944
6944


 被折叠的 条评论
为什么被折叠?
被折叠的 条评论
为什么被折叠?
 到【灌水乐园】发言


